
Magnetic cupboard lock
For best results from the product, please read these instructions carefully and keep them for future reference.
LIST OF PARTS :
A- Screw mount catch
B- Adhesive mount catch (screws optional)
C- Lock
D- Lock/unlock button
E- Secure Tech™ locking indicator (Green: locked // Red: unlocked)
F- Magnetic key
G- Screws optional (4 per lock)
H- Installation template
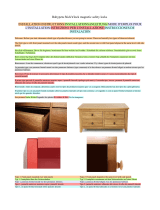
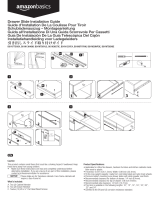
INSTALLATION :
The product may be installed on a drawer (see Image A) or on a cupboard door, at the top or side (see Image B).
1- Choose where you want to position the lock. Mark the position in pencil on the piece of furniture (Fig.1a and
Fig. 1b).
2- Check whether the adhesive mount catch can be used on your door/drawer (Fig. 2). If not, you will need to
use the screw mount.
3- Close the drawer or cupboard door and mark the position of the lock in pencil (Fig. 3a and Fig. 3b)
4- Remove the protection from the adhesive marked «1A» from the installation template (Fig. 4a). Open the door
or drawer and align the template with the mark made previously. Press firmly to stick (Fig 4b).
5- Fold the template along the dotted line towards the inside of the door/drawer. If you are using the adhesive
mount catch, make a pencil mark following the template (Fig. 5). If you are using the screw mount, make a hole
in the template at the 2 places indicated by the sign
so as to mark the 2 holes where the mount is to be
fixed onto your piece of furniture.
6- Remove the protection from the adhesive marked 1B (Fig 6). Close the door or drawer. The adhesive will stick
to the door or drawer.
7- Mark the position of the lock in pencil, following the outline of the template (Fig. 7). Remove the template.
Remove the lock adhesive protection and stick it to the place marked.
Note: it is advisable to fix the lock with screws if the lock does not adhere firmly to the door or drawer or if your
child persists in trying to open the cupboard or drawer.
8- To install the catch (Fig 8a and 8b):
Adhesive mount catch: remove the adhesive protection, hold the flat part of the catch outwards and stick it to
the place marked in pencil in step 5. Press firmly.
Screw mount catch: hold the flat part of the catch outwards and screw it to the 2 places marked in pencil (before
holes were made) in step 5.
USING :
Move the button so that the Securtech™ visual indicator turns green. The product is then in a locked position.
Close the cupboard door or drawer to engage the lock.
To open, place the magnetic key on the outside of the door or drawer at the spot where the product is positioned
(Fig 10). An audible click signals the unlocking of the cupboard door or drawer. Close the cupboard or drawer
again to engage the lock.
To deactivate the lock (during periods of non-use of the lock) without dismantling the product: move the button
so that the Securtech™ visual indicator turns red. The product is then in an unlocked position.
WARNING :
Safety devices are no substitute for proper adult supervision. Never leave your child unattended. Make sure
safety devices are properly installed.
Adhesive may damage the surface to which they are applied. Dorel declines any responsibility in case of da-
mage.
Bloque placard magnétique
Pour une bonne utilisation du produit, nous vous remercions de lire attentivement cette notice et de la conserver
afin de vous y référer ultérieurement en cas de besoin.
LISTE DES COMPOSANTS :
A- Crochet à vis
B- Crochet adhésif (vis optionnelles)
C- Verrou
D- Bouton de verrouillage / déverrouillage
E- Indicateur de verrouillage SecureTech™ (Vert : verrouillé // Rouge : déverrouillé)
F- Clé magnétique
G- Vis optionnelles (4 par verrou)
H- Gabarit d’installation
INSTALLATION :
Le dispositif peut s’installer sur un tiroir (cf image A) ou sur la porte d’un placard, sur le côté ou en haut (cf image
B).
1- Choisir l’emplacement souhaité du verrou. Indiquer par une marque au crayon sa position sur le meuble (Fig.1a
et Fig.1b).
2- Vérifier si le crochet adhésif peut être utilisé sur votre meuble (Fig.2). Si non, il faudra utiliser le crochet à vis.
3- Fermer le tiroir ou la porte du placard et marquer au crayon la position du verrou.(Fig. 3a et Fig.3b)
4- Retirer la protection de l’adhésif marqué « 1A » du gabarit d’installation (Fig.4a). Ouvrir la porte ou le tiroir et
aligner le gabarit sur la marque effectuée précédemment. Appuyer fermement pour coller (Fig 4b).
5- Plier le gabarit vers l’intérieur du meuble suivant la ligne pointillée. Si vous utilisez le crochet adhésif, faire une
marque au crayon en suivant le gabarit (Fig. 5). Si vous utilisez le crochet à vis, percer le gabarit aux 2 emplace-
ments indiqués par le signe
afin de marquer les 2 trous de fixation du crochet sur votre meuble.
6- Retirer la protection de l’adhésif marqué 1B (Fig.6). Fermer la porte ou le tiroir. L’adhésif se recolle sur la porte
ou le tiroir.
7- Marquer au crayon l’emplacement du verrou en suivant le contour du gabarit (Fig.7). Enlever le gabarit. Retirer
la protection de l’adhésif du verrou et le coller à l’emplacement défini.
Note : la fixation par vis du verrou est conseillée si le verrou ne tient pas fermement sur la porte ou le tiroir ou si
votre enfant persiste à essayer d’ouvrir le placard ou le tiroir.
8- Pour installer le crochet (Fig 8a et 8b) :
Crochet adhésif : retirer la protection de l’adhésif, positionner la partie plate du crochet vers l’extérieur et le coller
à l’emplacement effectué au crayon à l’étape 5. Presser fermement.
Crochet à vis : positionner la partie plate du crochet vers l’extérieur, le visser aux 2 emplacements (pré-trous)
effectués à l’étape 5.
UTILISATION :
Déplacer le bouton afin que l’indicateur visuel Securtech™ passe au vert. Le dispositif est alors en position de
verrouillage (Fig 9). Fermer la porte du placard ou le tiroir pour engager le verrou.
Pour ouvrir, placer la clé magnétique sur l’extérieur de la porte ou le tiroir à l’emplacement du dispositif (Fig 10).
Un clic audible assure le déverrouillage de la porte du placard ou du tiroir. Refermer le placard ou le tiroir pour
engager le verrou.
Pour désactiver le verrou (période de non-utilisation du verrou) sans démonter le dispositif : déplacer le bouton
afin que l’indicateur visuel Securtech™ passe au rouge. Le dispositif est alors en position de déverrouillage.
ATTENTION :
Les dispositifs de sécurité ne se substituent pas à la vigilance d’un adulte. Ne jamais laisser votre enfant sans
surveillance. Vérifier régulièrement la bonne installation du dispositif de sécurité. Les produits toxiques, les médi-
caments, les objets pointus ou tout autre objet dangereux doivent toujours être gardés hors de la portée des
enfants.
Certains adhésifs peuvent endommager le support sur lequel ils sont apposés. Dorel décline toute responsabi-
lité en cas de dommages.
Magnetschrankschloss
Zur Gewährleistung des richtigen Umgangs mit dem Produkt empfehlen wir Ihnen, diese Gebrauchsanleitung
sorgfältig zu lesen und für eine spätere Konsultation aufzuheben.
AUFLISTUNG DER EINZELTEILE :
A- Haken zur Schraubmontage
B- Haken zur Klebemontage (Schrauben als zusätzliche Option)
C- Schloss
D- Knopf zum Verriegeln / Entriegeln
E- SecureTech™-Verriegelungsanzeige (Grün: verriegelt // Rot: nicht verriegelt)
F- Magnetschlüssel
G- Zusätzliche Schrauben (4 pro Schloss)
H- Montageschablone
MONTAGE :
Der Schutz lässt sich in einer Schublade (siehe Bild A) oder seitlich bzw. im oberen Bereich einer Schranktür
befestigen (siehe Bild B).
1- Wählen Sie die gewünschte Position für das Schloss. Markieren Sie diese Position mit einem Bleistift auf dem
Möbelstück (Bild 1a und Bild 1b).
2- Prüfen Sie, ob sich der Haken zur Klebemontage auf Ihrem Möbelstück verwenden lässt (Bild 2). Wenn nicht,
verwenden Sie den Haken zur Schraubmontage.
3- Schließen Sie die Schublade oder die Schranktür und markieren Sie die Position des Schlosses mit einem
Bleistift (Bild 3a und 3b)
4- Entfernen Sie den Schutzfolie des Aufklebers mit der Markierung „1A“ der Montageschablone (Bild 4a). Öff-
nen Sie die Tür oder die Schublade und richten Sie die Schablone anhand der vorher angebrachten Markierung
aus. Zum Ankleben drücken Sie diese fest an (Bild 4b).
5- Knicken Sie die Schablone zum Inneren des Möbelstücks hin, entlang der gepunkteten Linie. Sollten Sie den
Haken zur Klebemontage nutzen, machen Sie mithilfe der Schablone eine entsprechende Markierung mit dem
Bleistift (Bild 5). Sollten Sie den Haken zur Schraubmontage verwenden, durchstechen Sie die Schablone an
den 2
gekennzeichneten Stellen, um die Befestigungsbohrungen für den Haken auf Ihrem Möbelstück zu
markieren.
6- Entfernen Sie die Schutzfolie des Aufklebers mit der Markierung 1B (Bild 6). Schließen Sie die Tür oder die
Schublade. Der Aufkleber lässt sich erneut auf der Tür oder Schublade aufkleben.
7- Zeichnen Sie die Umrisse der Schablone mit einem Bleistift nach und markieren Sie so die Position des
Schlosses (Bild 7). Entfernen Sie die Schablone. Entfernen Sie die Schutzfolie des Schlosses und kleben Sie es
an die gewünschte Stelle.
Hinweis: Die Befestigung des Schlosses mit Schrauben wird empfohlen, wenn es nicht richtig fest an der Tür sitzt
oder Ihr Kind weiterhin versucht, Türen und Schubladen zu öffnen.
8- Montage des Hakens (Bild 8a und 8b):
Haken zur Klebemontage: Entfernen Sie die Schutzfolie des Aufklebers, positionieren Sie den Haken mit der
flachen Seite nach außen und kleben Sie ihn an den mit Bleistift markierten Punkt (siehe Punkt 5). Drücken Sie
ihn fest an.
Haken zur Schraubmontage: Positionieren Sie den Haken mit der flachen Seite nach außen, schrauben Sie ihn an
den 2 (vorgebohrten) Stellen fest, die unter Schritt 5 markiert wurden.
GEBRAUCH :
Verstellen Sie den Knopf, damit die visuelle SecureTech™-Anzeige auf Grün steht. Der Schutz ist damit verriegelt
(Bild 9). Schließen Sie die Schranktür oder die Schublade, um die Verriegelung zu aktivieren.
Zum Öffnen platzieren Sie den Magnetschlüssel im Bereich des Schutzes an der Tür- oder Schubladenaußen-
seite (Bild 10). Ein gut hörbares Klicken bestätigt das Entriegeln der Schranktür oder der Schublade. Schließen
Sie erneut den Schrank oder die Schublade zum Aktivieren des Schlosses.
Deaktivieren des Schlosses (wenn dieses nicht genutzt wird) ohne Entfernen der Schutzeinrichtung: Knopf
verstellen, damit die visuelle SecureTech™-Anzeige auf Rot steht. Die Schutzeinrichtung ist damit entriegelt.
HINWEIS :
Die Sicherheitseinrichtung ersetzt nicht die Aufsicht durch einen Erwachsenen. Lassen Sie Ihr Kind nie unbeauf-
sichtigt. Überprüfen Sie regelmäßig die ordnungsgemäße Befestigung der Sicherheitseinrichtung. Giftige
Produkte, Medikamente oder spitze Gegenstände sowie sämtliche andere gefährliche Gegenstände sind stets
außerhalb der Reichweite von Kindern aufzubewahren.
Einige Klebematerialien können die Oberfläche beschädigen, auf der sie aufgebracht sind. Dorel übernimmt
keinerlei Haftung im Fall von Beschädigungen.
Bloccaporte magnetico
Per un buon utilizzo del prodotto, vi invitiamo a leggere attentamente queste istruzioni e a conservarle per un
riferimento futuro in caso di necessità.
LISTA DEI COMPONENTI :
A- Gancio a vite
B- Gancio adesivo (viti opzionali)
C- Blocco
D- Tasto di bloccaggio/sbloccaggio
E- Indicatore di bloccaggio SecureTech ™ (Verde: bloccato // Rosso: sbloccato)
F- Chiave magnetica
G- Viti opzionali (4 per blocco)
H- Sagoma per il montaggio
MONTAGGIO :
Il dispositivo può essere installato su un cassetto (vd. Fig. A) o sullo sportello di un armadio, di lato o in alto (vd.
Fig. B)
1- Scegliere la posizione preferita per il blocco. Indicare con un segno a matita la sua posizione sul mobile (Fig.
1a e 1b).
2- Verificare se il gancio adesivo può essere utilizzato sul vostro mobile (Fig. 2). Altrimenti sarà necessario uti-
lizzare il gancio a vite.
3- Chiudere il cassetto o lo sportello dell’armadio e segnare a matita la posizione del blocco. (Fig. 3a e 3b)
4- Togliere la protezione dell’adesivo contrassegnato come «1A» dalla sagoma per il montaggio (Fig. 4a). Aprire
la porta o il cassetto e posizionare la sagoma sul segno apposto precedentemente. Premere con forza per incol-
lare (Fig. 4b).
5- Ripiegare la sagoma verso l’interno del mobile seguendo la linea tratteggiata. Se utilizzate il gancio adesivo,
fate un segno a matita seguendo la sagoma (Fig. 5). Se utilizzate il gancio a vite, bucate la sagoma nei due punti
indicati con il simbolo
per contrassegnare i 2 fori di fissaggio del gancio al vostro mobile.
6- Togliere la protezione dell’adesivo contrassegnato 1B (Fig. 6). Chiudere lo sportello o il cassetto. L’adesivo
rimarrà incollato allo sportello o cassetto.
7- Segnare a matita la posizione del blocco seguendo il contorno della sagoma (Fig. 7). Togliere la sagoma.
Togliere la protezione dell’adesivo del blocco e installarlo nella posizione definitiva.
Nota: Il fissaggio con le viti è consigliato nel caso in cui l’adesivo non abbia abbastanza presa sullo sportello o sul
cassetto o se il vostro bambino continua a tentare di aprire lo sportello o il cassetto.
8- Per montare il gancio (Fig. 8a e 8b):
Gancio adesivo: rimuovere la protezione dell’adesivo, posizionare la parte piatta del gancio verso l’esterno e
incollarlo nella posizione segnata a matita al punto 5. Premere con forza.
Gancio a vite: posizionare la parte piatta del gancio verso l’esterno, avvitarlo nei 2 punti (pre-fori) contrassegnati
al punto 5.
USO :
Spostare il tasto in modo che l’indicatore visivo Securtech diventi verde. Il dispositivo è quindi in posizione di
bloccaggio (Fig. 9). Chiudere lo sportello dell’armadio o il cassetto per incastrare il blocco.
Per aprire, posizionare la chiave magnetica sull’esterno dello sportello o del cassetto nel punto dove si trova il
dispositivo (Fig. 10). Un clic udibile segnala lo sbloccaggio dello sportello dell’armadio o del cassetto. Richiudere
lo sportello o il cassetto per incastrare il blocco.
Per disattivare il blocco (periodo di non-utilizzo) senza smontare il dispositivo: spostare il tasto in modo che
l’indicatore visivo Securtech diventi rosso. Il dispositivo è quindi in posizione di sbloccaggio.
ATTENZIONE :
I dispositivi di sicurezza non sostituiscono la vigilanza di un adulto. Non lasciate mai il vostro bambino senza
sorveglianza.
Verificate regolarmente il corretto posizionamento del dispositivo di sicurezza. I prodotti tossici, i medicinali,
gli oggetti appuntiti e qualsiasi altro oggetto pericoloso devono sempre essere tenuti fuori dalla portata dei
bambini.
Alcuni adesivi possono danneggiare la superficie su cui sono attaccati. Dorel declina ogni responsabilità in caso
di danni.
La pagina si sta caricando...
-
 1
1
-
 2
2


in altre lingue
- English: Safety 1st Magnetic Lock User manual
- français: Safety 1st Magnetic Lock Manuel utilisateur
- español: Safety 1st Magnetic Lock Manual de usuario
- Deutsch: Safety 1st Magnetic Lock Benutzerhandbuch
- Nederlands: Safety 1st Magnetic Lock Handleiding
- português: Safety 1st Magnetic Lock Manual do usuário
Documenti correlati


Altri documenti
-
TNB MCAV1 Manuale del proprietario
-
 Babypeta Stick'n'lock Guida d'installazione
-
Fagor DHT356XP1 Manuale del proprietario
-
Smeg AF3-649 X Manuale del proprietario
-
 AmazonBasics B01N365TIC Manuale utente
-
Phoenix FS2230K Series Istruzioni per l'uso
-
-
Siemens LI46630SD/01 Manuale del proprietario
-
Siemens LI46730/02 Manuale del proprietario
-
Bosch DHI755F/03 Manuale del proprietario

