
ELECTRONICS FOR SPECIALISTS ELECTRONICS FOR SPECIALISTS ELECTRONICS FOR SPECIALISTS ELECTRONICS FOR SPECIALISTS ELECTRONICS FOR SPECIALISTS ELECTRONICS
MPR-1
Bestell-Nr. • Order No. 21.2010
MONACOR INTERNATIONAL GmbH & Co. KG • Zum Falsch 36 • 28307 Bremen • Germany
Copyright
©
by MONACOR INTERNATIONAL. All rights reserved.
A-0284.99.05.11.2016
3
2 1
1
3
2
GAIN
CLIP
PHANTOM
POWER
ON
MIN MAX
ON
OFF
INPUT OUTPUT
BALANCED BALANCED
12V
1 32 4 5 86 7 9
Préamplificateur micro 1 canal
Cette notice s’adresse aux utilisateurs sans connais-
sances techniques particulières. Veuillez lire la
notice avant le fonctionnement et conservez-la pour
pouvoir, si besoin, vous y reporter ultérieurement.
1 Possibilités d’utilisation
Avec le MPR-1, un microphone peut être relié à une en trée
ligne d’un appareil audio (table de mixage, enregis treur
etc.). Une alimentation fantôme (30 V ⎓) peut être com-
mutée pour un microphone à alimentation fantôme.
2 Conseils d’utilisation et de sécurité
Les appareils (préamplificateur et bloc secteur) répondent
à toutes les directives nécessaires de l’Union européenne
et portent donc le symbole
.
ATTENTION ! Le bloc secteur est alimenté par une ten-
sion dangereuse. Ne touchez jamais l’intérieur de l’appa-
reil, vous pourriez subir une décharge électrique.
•
Les appareils ne sont conçus que pour une utilisation
en intérieur. Protégez-les des projections d’eau et
éclaboussures, d’une humidité élevée de l’air et de
la chaleur (plage de température de fonctionnement
autorisée 0 – 40 °C).
•
Pour les nettoyer, utilisez uniquement un chiffon sec
et doux, en aucun cas de produits chimiques ou d’eau.
•
Nous déclinons toute responsabilité en cas de dom-
mages matériels ou corporels résultants si les appareils
sont utilisés dans un but autre que celui pour lequel ils
ont été conçus, s’ils ne sont pas correctement branchés,
utilisés ou s’ils ne sont pas réparés par une personne
habilitée ; en outre, la garantie deviendrait caduque.
Lorsque les appareils sont définitivement reti-
rés du service, vous devez les déposer dans une
usine de recyclage de proximité pour contri-
buer à leur élimination non polluante.
3 Fonctionnement
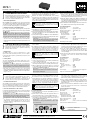
1) Reliez le microphone à la prise jack INPUT (5) ou à la
prise XLR INPUT (6).
2) Reliez la prise d’entrée ligne de l’appareil audio à la
prise jack OUTPUT (8) ou à la prise XLR OUTPUT (7).
3) Si un micro à une alimentation fantôme est relié à la
prise XLR (6), allumez l’alimentation fantôme avec la
touche PHANTOM POWER (2).
ATTENTION ! Pour un micro asymétrique, l’alimenta-
tion fantôme ne doit pas être allumée. Le micro peut
être endommagé.
4) Mettez la fiche basse tension du bloc secteur dans la
prise «12 V⎓» (9) et reliez le bloc secteur à une prise
secteur 230 V/ 50 Hz. L’amplificateur est en fonction, la
LED verte (1), témoin de fonctionnement, brille.
5) Avec le réglage GAIN (4), adaptez le volume du micro
à l’appareil audio relié. Si la LED rouge CLIP (3), témoin
d’écrêtage, brille, tournez le réglage GAIN en fonction
dans l’autre sens.
6) Après le fonctionnement, débranchez le bloc secteur
de la prise secteur pour éviter toute consommation
inutile de courant.
4 Caractéristiques techniques
Bande passante : . . . . . . . . .10 – 30 000 Hz
Entrée XLR : . . . . . . . . . . . . .3,5 mV/ 10 kΩ, sym.
Entrée jack 6,35 : . . . . . . . . .16 mV/ 10 kΩ, sym.
Tension de sortie : . . . . . . . .1 V
Amplification maximale
pour branchement sym. : . 50 dB
pour branchement asym. : 44 dB
Rapport signal sur bruit : . . .> 58 dB
Taux de distorsion : . . . . . . .< 0,1 %
Alimentation : . . . . . . . . . . .
par bloc secteur livré à 230 V/ 50 Hz
Tout droit de modification réservé.
1-Channel Microphone Preamplifier
These instructions are intended for users without
any specific technical knowledge. Please read the
instructions carefully prior to operation and keep
them for later reference.
1 Applications
The MPR-1 allows to connect a microphone to a line
input of an audio unit (mixer, recorder, etc.). For a phan-
tom-powered microphone, a phantom power (30 V ⎓) can
be switched on.
2 Safety Notes
The units (preamplifier and power supply unit) corre-
spond to all relevant directives of the EU and are there-
fore marked with
.
ATTENTION! The power supply unit uses dangerous
mains voltage. Leave servicing to skilled personnel only.
Inexpert handling of the unit may result in electric shock.
•
The units are suitable for indoor use only. Protect
them against dripping water and splash water, high air
humidity, and heat (admissible ambient temperature
range 0 – 40 °C).
•
For cleaning only use a dry, soft cloth; never use chem-
icals or water.
•
No guarantee claims for the units and no liability for
any resulting personal damage or material damage will
be accepted if the units are used for other purpos es
than originally intended, if they are not correctly con-
nected or operated, or not repaired in an expert way.
If the units are to be put out of operation
definitively, take them to a local recycling
plant for a disposal which is not harmful to the
environment.
3 Setting into Operation
1) Connect the microphone to the 6.3 mm jack INPUT (5)
or to the XLR jack INPUT (6).
2) Connect the line input jack of the audio unit to the
6.3 mm jack OUTPUT (8) or to the XLR jack OUTPUT (7).
3) When a phantom-powered microphone is connected
to the XLR jack (6), switch on the phantom power with
the button PHANTOM POWER (2).
CAUTION! In case of an unbalanced microphone, the
phantom power must not be switched on. The micro-
phone may be damaged.
4) Connect the low voltage plug of the power supply unit
to the jack “12 V⎓” (9) and the power supply unit to
a mains socket (230 V/ 50 Hz). The amplifier is in opera-
tion and the green power LED (1) lights up.
5) Use the control GAIN (4) to match the microphone
volume to the connected audio unit. If the red over-
load LED CLIP (3) lights up, turn back the control GAIN
correspondingly.
6) After operation disconnect the power supply unit from
the mains socket so that no current is unnecessarily
consumed.
4 Specifications
Frequency range: . . . . . . . . .10 – 30 000 Hz
Input XLR: . . . . . . . . . . . . . . .3.5 mV/ 10 kΩ, bal.
Input 6.3 mm jack: . . . . . . . . 16 mV/ 10 kΩ, bal.
Output voltage: . . . . . . . . . .1 V
Max. gain
for bal. connection: . . . . . .50 dB
for unbal. connection: . . .44 dB
S / N ratio: . . . . . . . . . . . . . . . .> 58 dB
THD: . . . . . . . . . . . . . . . . . . .< 0.1%
Power supply:
. . . . . . . . . . . .via supplied power supply unit
at 230 V/ 50 Hz
Subject to technical modification.
1-Kanal-Mikrofon-Vorverstärker
Diese Anleitung richtet sich an Benutzer ohne be-
sondere Fachkenntnisse. Bitte lesen Sie die Anlei-
tung vor dem Betrieb gründlich durch und heben
Sie sie für ein späteres Nachlesen auf.
1 Einsatzmöglichkeiten
Mit dem MPR-1 kann ein Mikrofon an einen Line-Eingang
eines Audiogerätes (Mischpult, Aufnahmegerät etc.) an-
geschlossen werden. Für ein phantomgespeistes Mikro-
fon ist eine Phantomspeisung (30 V ⎓) einschaltbar.
2 Hinweise für den sicheren Gebrauch
Die Geräte (Vorverstärker und Netzgerät) entsprechen
allen relevanten Richtlinien der EU und tragen deshalb
das
-Zeichen.
WARNUNG! Das Netzgerät wird mit lebensgefährlicher
Netzspannung versorgt. Nehmen Sie deshalb nie selbst
Eingriffe an diesem Gerät vor. Durch unsachgemäßes
Vorgehen besteht die Gefahr eines elektrischen Schlages.
•
Verwenden Sie die Geräte nur im Innenbereich. Schüt-
zen Sie sie vor Tropf- und Spritzwasser, hoher Luftfeuch-
tigkeit und Hitze (zulässiger Einsatztemperaturbereich
0 – 40 °C).
•
Verwenden Sie für die Reinigung nur ein trockenes,
weiches Tuch, niemals Chemikalien oder Wasser.
•
Werden die Geräte zweckentfremdet, nicht richtig
angeschlossen, falsch bedient oder nicht fachgerecht
repariert, kann keine Haftung für daraus resultierende
Sach- oder Personenschäden und keine Garantie für die
Geräte übernommen werden.
Sollen die Geräte endgültig aus dem Betrieb
genommen werden, übergeben Sie sie zur
umweltgerechten Entsorgung einem örtlichen
Recyclingbetrieb.
3 Inbetriebnahme
1) Das Mikrofon an die Klinkenbuchse INPUT (5) oder an
die XLR-Buchse INPUT (6) anschließen.
2) Die Line-Eingangsbuchse des Audiogerätes an die Klin-
kenbuchse OUTPUT (8) oder an die XLR-Buchse OUT-
PUT (7) anschließen.
3) Ist ein phantomgespeistes Mikrofon an der XLR-Buchse
(6) angeschlossen, die Phantomspeisung mit der Taste
PHANTOM POWER (2) einschalten.
VORSICHT! Bei einem asymmetrisch beschalteten Mi-
krofon darf die Phantomspeisung nicht eingeschaltet
sein. Das Mikrofon kann beschädigt werden.
4) Den Kleinspannungsstecker des Netzgerätes in die
Buchse „12 V⎓“ (9) stecken und das Netzgerät in eine
Steckdose (230 V/ 50 Hz). Der Verstärker ist in Betrieb
und die grüne Betriebsanzeige (1) leuchtet.
5) Mit dem Regler GAIN (4) die Mikrofonlautstärke an
das angeschlossene Audiogerät anpassen. Leuchtet die
rote Übersteuerungsanzeige CLIP (3) auf, den Regler
GAIN entsprechend zurückdrehen.
6) Nach dem Betrieb das Netzgerät aus der Steckdose zie-
hen, damit kein Strom unnötig verbraucht wird.
4 Technische Daten
Frequenzbereich: . . . . . . . . .10 – 30 000 Hz
Eingang XLR: . . . . . . . . . . . .3,5 mV/ 10 kΩ, sym.
Eingang 6,3-mm-Klinke: . . .16 mV/ 10 kΩ, sym.
Ausgangsspannung: . . . . . . . 1 V
max. Verstärkung
bei sym. Anschluss: . . . . . .50 dB
bei asym. Anschluss: . . . . .44 dB
Störabstand: . . . . . . . . . . . . .> 58 dB
Klirrfaktor: . . . . . . . . . . . . . .< 0,1 %
Stromversorgung: . . . . . . . . .über beiliegendes Netzgerät an
230 V/ 50 Hz
Änderungen vorbehalten.
DeutschEnglishFrançais
CARTONS ET EMBALLAGE
PAPIER À TRIER

ELECTRONICS FOR SPECIALISTS ELECTRONICS FOR SPECIALISTS ELECTRONICS FOR SPECIALISTS ELECTRONICS FOR SPECIALISTS ELECTRONICS FOR SPECIALISTS ELECTRONICS
MPR-1
Bestell-Nr. • Order No. 21.2010
MONACOR INTERNATIONAL GmbH & Co. KG • Zum Falsch 36 • 28307 Bremen • Germany
Copyright
©
by MONACOR INTERNATIONAL. All rights reserved.
A-0284.99.05.11.2016
3
2 1
1
3
2
GAIN
CLIP
PHANTOM
POWER
ON
MIN MAX
ON
OFF
INPUT OUTPUT
BALANCED BALANCED
12V
1 32 4 5 86 7 9
Jednokanałowy przedwzmacniacz
mikrofonowy
Niniejsza instrukcja przeznaczona jest dla użytkow-
ników nie posiadających doświadczenia oraz wie-
dzy technicznej. Przed rozpoczęciem użytkowania
prosimy o zapoznanie się z instrukcją i zachowanie
jej do wglądu.
1 Zastosowanie
MPR-1 wzmacnia sygnał mikrofonowy do poziomu
umożliwiającego podłączenie go do wejścia liniowego
urządzenia audio (mikser, wzmacniacz, urządzenie na-
grywające, itp.). Umożliwia także włączenie napięcia
zasila- jącego mikrofon – phantom (30 V ⎓).
2 Środki bezpieczeństwa
Urządzenia (przedwzmacniacz oraz zasilacz) spełniają
wszystkie wymogi norm UE i dlatego posiadają oznacze-
nie certyfikatem
.
UWAGA! Zasilacz jest zasilany niebezpiecznym dla życia
napięciem zmiennym. Aby uniknąć porażenia elektrycz-
nego nie wolno otwierać urządzenia. Jego naprawą
powinien zajmować się tylko przeszkolony personel.
•
Urządzenie jest przeznaczone tylko do użytku we-
wnątrz pomieszczeń. Należy chronić przed dostaniem
się jakiejkolwiek cieczy do środka urządzenia, dużą
wilgotnością oraz ciepłem (temperatura otoczenia po-
winna wynosić od 0 – 40 °C).
•
Do czyszczenia należy używać tylko suchej, miękkiej
ściereczki. Nie wolno używać wody ani żadnych środ-
ków chemicznych.
•
Nie ponosi się odpowiedzialności za wynikłe uszkodze-
nia sprzętu lub obrażenia użytkownika w przypadku,
gdy urządzenia są wykorzystywane w innych celach niż
to się przewiduje lub, jeśli są nieodpowiednio zainsta-
lowane, użytkowane lub naprawiane.
Po całkowitym zakończeniu eksploatacji urzą-
dzenie należy oddać do punktu utylizacji
odpadów.
3 Przygotowanie do pracy
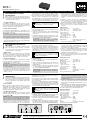
1) Podłączyć mikrofon do gniazda INPUT (5) typu duży
jack 6,3 mm lub do gniazda INPUT (6) typu XLR.
2) Podłączyć wejście liniowe urządzenia audio do gniaz-
da OUTPUT (8) typu duży jack 6,3 mm lub do gniazda
OUPUT (7) typu XLR.
3) Dla mikrofonów wymagających napięcia zasilania
(phantom): należy je podłączyć do gniazda XLR (6),
włączyć zasilanie przyciskiem PHANTOM POWER (2).
UWAGA! W przypadku używania mikrofonów nie-
zbalansowanych, należy wyłączyć napięcie zasilające
phantom. W przeciwnym razie można w ten sposób
uszkodzić mikrofon.
4) Podłączyć wtyk zasilacza do gniazda wzmacniacza
“12 V⎓” (9), a następnie zasilacz do sieci (230 V/ 50 Hz).
Zapali się zielony wskaźnik (1), wzmacniacz jest goto-
wy do pracy.
5) Za pomocą regulatora GAIN (4) ustawić odpowiednią gło-
śność. Jeżeli zapali się czerwony wskaźnik CLIP (3) świad-
czący o przesterowaniu, należy zmniejszyć głośność.
6) Po zakończeniu pracy, odłączyć zasilacz z sieci.
4 Dane techniczne
Pasmo przenoszenia: . . . . . .10 – 30 000 Hz
Czułość wejścia zbal.: . . . . . .3,5 mV/ 10 kΩ
Czułość wejścia zbal.: . . . . . .16 mV/ 10 kΩ
Napięcie wyjściowe: . . . . . . .1 V
Maks. wzmocnienie
przy połączeniu sym.: . . . .50 dB
przy połączeniu niesym: . .44 dB
Stosunek S / N: . . . . . . . . . . . .> 58 dB
THD: . . . . . . . . . . . . . . . . . . .< 0,1 %
Zasilanie: . . . . . . . . . . . . . . . .z zasilacza do 230 V/ 50 Hz
Z zastrzeżeniem do możliwych zmian.
Preamplificador de micrófono
de1canal
Estas instrucciones van dirigidas a usuarios sin nin-
gún conocimiento técnico específico. Lea atenta-
mente estas instrucciones antes de funcionamiento
y guárdelas para usos posteriores.
1 Aplicaciones
El MPR-1 permite conectar un micrófono a una entrada
de línea de una unidad de audio (mezclador, grabador,
etc.). Para un micrófono con alimentación phantom, una
alimentación phantom (30 V ⎓) puede ser conectado.
2 Notas de Seguridad
Los aparatos (preamplificador y alimentador) cumplen
con todas las directivas relevantes de la UE y por lo tanto
están marcados con el símbolo
.
¡ADVERTENCIA! El alimentador utiliza un voltaje peli-
groso. Deje el mantenimiento en manos del personal
cualificado. El manejo inexperto del aparato puede pro-
vocar una descarga.
•
Los aparatos están adecuados para utilizarse sólo en
interiores. Protéjalos de goteos y salpicaduras, elevada
humedad del aire y calor (temperatura ambiente ad-
misible: 0 – 40 °C).
•
Utilice sólo un paño suave y seco para la limpieza; no
utilice nunca ni agua ni productos químicos.
•
No podrá reclamarse garantía o responsabilidad algu-
na por cualquier daño personal o material resultante si
los aparatos se utilizan para otros fines diferentes a los
originalmente concebidos, si no se conectan o utilizan
adecuadamente, o si no se reparan por expertos.
Si va a poner los aparatos fuera de servicio de-
finitivamente, llévelos a la planta de reciclaje
más cercana para que su eliminación no perju-
dique el medioambiente.
3 Funcionamiento
1) Conecte el micrófono a la toma de 6,3 mm INPUT (5) o
a la toma XLR INPUT (6).
2) Conecte la toma de entrada de línea del aparato de
audio a la toma de 6,3 mm OUTPUT (8) o a la toma
XLR OUTPUT (7).
3) Si un micrófono con alimentación phantom se conecta
a la toma XLR (6), conecte la alimentación phantom
con el botón PHANTOM POWER (2).
¡PRECAUCIÓN! En caso de un micrófono asimétrico, la
potencia phantom no debe conectarse. El micrófono
puede dañarse.
4) Conecte la toma de bajo voltaje del alimentador a
la toma “12 V⎓” (9) y el alimentador a un enchufe
(230 V/ 50 Hz). El amplificador se enciende y el LED de
funcionamiento verde (1) se ilumina.
5) Utilice el control GAIN (4) para adaptar el volumen del
micrófono al aparato de audio conectado. Si el LED
de sobrecarga CLIP rojo (3) se ilumina, gire el control
GAIN atrás correspondientemente.
6) Después del funcionamiento desconecte el alimenta-
dor del enchufe de manera que no se consuma corrien-
te innecesariamente
4 Especificaciones
Rango frecuencia: . . . . . . . .10 – 30 000 Hz
Entrada XLR: . . . . . . . . . . . . .3,5 mV/ 10 kΩ, sim.
Entrada toma 6,3 mm: . . . . .16 mV/ 10 kΩ, sim.
Voltaje salida: . . . . . . . . . . . .1 V
Ganancia máx.
para conexión sim.: . . . . . .50 dB
para conexión asim.: . . . . .44 dB
Relación S / N: . . . . . . . . . . . . .> 58 dB
Tasa de distorsión: . . . . . . . .< 0,1 %
Alimentación: . . . . . . . . . . . .vía alimentador conectado
a
230 V/ 50 Hz
Sujeto a modificaciones técnicas.
Preamplificatore a 1 canale
permicrofono
Queste istruzioni sono rivolte all‘utente senza cono-
scenze tecniche specifiche. Vi preghiamo di leggerle
attentamente prima della messa in funzione e di
conservarle per un uso futuro.
1 Possibilità d’impiego
Con il MPR-1 è possibile collegare un microfono con l’in-
gresso Line di un apparecchio audio (mixer, registratore
ecc.). Per un microfono ad alimentazione phantom si può
attivare l’alimentazione phantom (30 V ⎓).
2 Avvertenze di sicurezza
Gli apparecchi (preamplificatore e alimentatore rete)
sono conformi a tutte le direttive rilevanti dell’UE e per-
tanto portano la sigla
.
ATTENZIONE! L’alimentatore rete funziona con tensione
di rete. Non intervenire mai al suo interno; la manipola-
zione scorretta può provocare delle scariche pericolose.
•
Far funzionare gli apparecchi solo all’interno di locali.
Proteggerli dall’acqua gocciolante e dagli spruzzi d’ac-
qua, da alta umidità dell’aria e dal calore (temperatura
d’impiego ammessa fra 0 e 40 °C).
•
Per la pulizia usare solo un panno morbido, asciutto;
non impiegare in nessun caso prodotti chimici o acqua.
•
Nel caso d’uso improprio, di collegamenti sbagliati, di
impiego scorretto o di riparazione non a regola d’arte
degli apparecchi, non si assume nessuna responsabilità
per eventuali danni consequenziali a persone o a cose
e non si assume nessuna garanzia per gli apparecchi.
Se si desidera eliminare gli apparecchi defini-
tivamente, consegnarli per lo smaltimento ad
un‘istituzione locale per il riciclaggio.
3 Messa in funzione
1) Collegare il microfono con la presa jack INPUT (5) o con
la presa XLR INPUT (6).
2) Collegare la presa d’ingresso Line dell’apparecchio
audio con la presa jack OUTPUT (8) o con la presa XLR
OUTPUT (7).
3) Se alla presa XLR (6) è collegato un microfono con ali-
mentazione phantom, attivare l’alimentazione phan-
tom con il tasto PHANTOM POWER (2).
ATTENZIONE! Nel caso di un microfono asimmetrico,
l’alimentazione phantom non deve essere attivata;
altrimenti il microfono può subire dei danni.
4) Inserire la spina per alimentazione DC dell’alimentato-
re nella presa “12 V⎓” (9) ed inserire l’alimentatore in
una presa di rete (230 V/ 50 Hz). L’amplificatore è ora in
funzione e la spia verde di funzionamento (1) rimane
accesa.
5) Adattare il volume del microfono all’apparecchio
audio collegato, servendosi del regolatore GAIN (4).
Se si accende la spia rossa di sovrapilotaggio CLIP (3),
abbassare il regolatore GAIN in corrispondenza.
6) Dopo il funzionamento staccare l’alimentatore dalla
presa di rete per non consumare inutilmente della
corrente.
4 Dati tecnici
Gamma di frequenze: . . . . .10 – 30 000 Hz
Ingresso XLR: . . . . . . . . . . . .3,5 mV/ 10 kΩ, simm.
Ingresso jack 6,3 mm: . . . . . .16 mV/ 10 kΩ, simm.
Tensione d’uscita: . . . . . . . . .1 V
Amplificazione max.
per collegamento bil.: . . . . 50 dB
per collegamento sbil.: . . .44 dB
Rapporto S / R: . . . . . . . . . . . .> 58 dB
Fattore di distorsione: . . . . .< 0,1 %
Alimentazione: . . . . . . . . . . .tramite alimentatore in dota-
zione a 230 V/ 50 Hz
Con riserva di modifiche tecniche.
ItalianoEspañolPolski
-
 1
1
-
 2
2


IMG STAGELINE MPR-1 Manuale utente
- Tipo
- Manuale utente
- Questo manuale è adatto anche per
in altre lingue
- English: IMG STAGELINE MPR-1 User manual
- français: IMG STAGELINE MPR-1 Manuel utilisateur
- Deutsch: IMG STAGELINE MPR-1 Benutzerhandbuch
- polski: IMG STAGELINE MPR-1 Instrukcja obsługi
Documenti correlati
-
IMG STAGELINE MMX-22 Manuale utente
-
IMG STAGELINE MMX-11USB Manuale utente
-
-
-
-
-
-
-
-