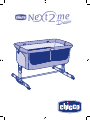
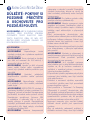
Chicco NeXt 2 me Guida utente
- Categoria
- Mobili per bambini
- Tipo
- Guida utente

composit chicco con trapping sul pallino rosso
logo chicco con trapping sul pallino rosso
logo chicco senza trapping sul pallino rosso
rosso:
pantone 186 C
blu:
pantone 2747 C

3

3
E3
E4
E5
A1
A2
A3
A4
A5
A8
A7 A6
D
A
G H
B4
B5 B2
B3
B1
1
B
E
CLICK
CLICK
C3
C2
C1
2 3
C
F

4
5
CLICK
5 64
7
8A
8
910
11
✓ ✓
12 13

4
5
2221
23
16
17
20
19
24 25
18
1
5
14 15

6
7
28
X
Y
26A 26B
27
41
41
21
21
21
21
11
49 64
49 64

6
7
I
Culla ChiCCo Next2me Dream
IMPORTANTE LEG
GERE ATTENTAMEN
TE E CONSERVARE
PER FUTURO RIFERI
MENTO.
ATTENZIONE: PER EVITARE RISCHI DI SOF-
FOCAMENTO, RIMUOVERE QUESTA COPER-
TURA PLASTICA PRIMA DELL’USO DEL PRO-
DOTTO. QUESTA COPERTURA PLASTICA
DOVREBBE ESSERE DISTRUTTA O TENUTA
LONTANA DALLA PORTATA DEI NEONATI E
BAMBINI.
AVVERTENZE
• Solo per uso domestico.
• ATTENZIONE: Non utilizzare questo pro-
dotto senza aver letto prima le istruzioni
d’uso.
• ATTENZIONE: L’uso del prodotto è consen-
tito ad un bambino di età compresa tra 0 -
5/6 mesi, sino ad un massimo di 9 kg di peso.
• ATTENZIONE: Quando il bambino è in
grado di stare seduto, in ginocchio o tirarsi
su, il prodotto non deve più essere utilizza-
to per questo bambino.
• ATTENZIONE: Il posizionamento di qual-
siasi prodotto aggiuntivo potrebbe causa-
re soocamento.
• ATTENZIONE: Non utilizzare il prodotto
se qualsiasi parte è rotta, strappata o man-
cante.
• ATTENZIONE: NON USARE il prodotto in
“Modalità culla” e/o “Modalità Co-Sleeping”
se qualsiasi componente è assente, dan-
neggiato o rotto. Contattare Artsana SPA
per parti di ricambio e istruzioni d’uso se ne-
cessarie. NON SOSTITUIRE parti mancanti,
danneggiate o rotte con componenti non
originali ed approvate da Artsana SPA.
• ATTENZIONE: Consultare il manuale d’i-
struzioni per la lista dei componenti. Pe-
riodicamente ispezionare il prodotto per
assicurarsi che non ci siano allentamenti,
danni o mancanza di componenti.
• ATTENZIONE: Utilizzare sempre tutte le par-
ti richieste per ogni congurazione d’uso.
• ATTENZIONE: Prestare attenzione al ri-
schio di bruciature da sigarette, amme
libere e altre fonti di forte calore come stu-
fe elettriche, stufe a gas, ecc. in vicinanza
della culla.
• Vericare prima dell’assemblaggio che il
prodotto e tutti i suoi componenti non
presentino eventuali danneggiamenti do-
vuti al trasporto, in tal caso il prodotto non
deve essere utilizzato e dovrà essere tenuto
lontano dalla portata dei bambini.
• Assicurarsi che gli utilizzatori del prodotto
siano a conoscenza dell’esatto funziona-
mento dello stesso.
• ATTENZIONE: Il prodotto è pronto all’uso
solo quando tutti i meccanismi di bloccag-
gio sono inseriti. Vericare con attenzione
che siano inseriti prima dell’uso.
• ATTENZIONE: Quando il bambino è incu-
stodito nel prodotto, in “Modalità culla”, as-
sicurarsi sempre che la sponda sia rialzata
e bloccata nella posizione di chiusura, alli-
neata con il perimetro superiore della culla.
• Quando il prodotto è in uso e soprattutto
in “Modalita culla” le rotelle devono essere
sempre bloccate.
• Tutte le operazioni di apertura e regolazio-
ne, ssaggio e posizionamento del prodot-
to devono essere eettuate esclusivamen-
te da un adulto.
• Prima dell’uso in “Modalità Co-Sleeping
(Fissaggio al letto)” vericare che il prodotto
sia correttamente ssato e posizionato.
Controllare la tenuta del sistema di ssaggio
prima di ogni utilizzo tirando il Co-Sleeping
in direzione opposta al letto adulti.
• Le cinghie di ssaggio sono incluse nella
confezione l’utente non deve utilizzare altri

8
9
sistemi di ssaggio.
• Per prevenire pericoli di soocamento da
intrappolamento della testa, la culla in
nella “Modalità Co-Sleeping (Fissaggio al
letto)” deve essere adeguatamente ssata
al letto del genitore, in accordo alle istru-
zioni d’uso, utilizzando le cinghie di col-
legamento.
• ATTENZIONE: Quando il prodotto è uti-
lizzato nella “Modalità Co-Sleeping (Fissag-
gio al letto)”, prima di adagiare il bambino,
assicurarsi che le cinghie di collegamento
siano agganciate e tese correttamente, il
prodotto deve essere attaccato al mate-
rasso dei genitori e non devono esser pre-
senti fessure tra la parte più bassa del Co-
sleeping e il materasso per adulti.
• Se vi sono aperture tra la parte più bassa
del Co-sleeping e il materasso per adulti,
NON usare il prodotto.
• Non colmare eventuali spazi o fessure tra
il materasso dei genitori e la culla con cu-
scini, coperte, lenzuola o qualsiasi mate-
riale che possa generare rischio di soo-
camento.
• PERICOLO! La sponda abbattibile deve
essere sempre rialzata e bloccata, quando
non attaccata al letto per adulti.
• ATTENZIONE: Per evitare il rischio di
strangolamento del bambino, i sistemi di
attacco al letto per adulto devono essere
sempre tenuti lontani e fuori dalla culla.
• ATTENZIONE: Per evitare il rischio di
strangolamento del bambino sulla parte
superiore del lato della culla a contatto con
il letto dei genitori, il bordo superiore della
sponda abbassata della culla non deve es-
sere più alta della supercie superiore del
materasso dei genitori.
• Il prodotto deve essere sempre collocato
su un piano orizzontale. Non lasciare mai il
prodotto su un piano inclinato con il bam-
bino all’interno.
• Non deve essere consentito ai bambini di
giocare senza supervisione in prossimità
del prodotto.
• Non utilizzare il prodotto senza il telaio.
• Tenere le cinghie di ssaggio lontane dalla
portata dei bambini.
• Usare solo il materasso fornito con il pro-
dotto o eventuali materassi di ricambio ap-
provati da Artsana.
• ATTENZIONE: Non usare più di un ma-
terasso nel prodotto. Utilizzare solo il ma-
terasso fornito con il prodotto.
• ATTENZIONE: Utilizzare solo il materasso
venduto con questa culla, non aggiungere
un secondo materasso, rischio di sooca-
mento.
• ATTENZIONE: E’ consentito inclinare la
culla, quando staccata dal letto, con uno
scarto massimo di 4 posizioni tra una gam-
ba e l’altra.
• I neonati possono soocare a causa di
biancheria e coperte morbide. Evitare di
posizionare cuscini oppure oggetti simili
sotto il neonato per maggiore comfort du-
rante il sonno.
• Utilizzare la culla in “Modalità Co-Sleeping
(Fissaggio al letto)” soltanto con letti dalle
dimensioni indicate nella gura di riferi-
mento a inizio manuale.
• Non lasciare all’interno del prodotto alcun
oggetto che possa ridurne la profondità.
• Non posizionare la culla in prossimità di
muri e ostacoli, per prevenire rischi di in-
trappolamento.
• Non lasciare all’interno del prodotto piccoli
oggetti, potrebbero essere ingoiati.
• Utilizzare soltanto ricambi approvati dal co-
struttore. Non applicare al prodotto acces-
sori, non forniti dal costruttore.
• Non eettuare regolazioni del prodotto
con il bambino all’interno.
• Non utilizzare la funzione basculante quan-
do il bambino nella culla non è sorvegliato.
Bloccare quindi la culla in posizione ssa
ogni qualvolta il bambino rimanga incu-
stodito.
• Quando utilizzata in “Modalità Co-sleeping”

8
9
(ssata al letto), non deve mai essere utiliz-
zata in posizione inclinata.
• Non spostare il prodotto con il bambino
all’interno.
• Non utilizzare il prodotto con più di un
bambino alla volta.
• ATTENZIONE: Non posizionare il prodot-
to vicino a un altro prodotto, che potrebbe
rappresentare un pericolo di soocamen-
to o strangolamento, ad es. corde, tende o
simili. Per evitare rischi di strangolamento,
non dare al bambino e non riporre vicino
al bambino oggetti muniti di corde.
• Una prolungata esposizione al sole po-
trebbe creare variazione ai toni di colore
del prodotto. Dopo una prolungata espo-
sizione del prodotto alle alte temperature
attendere qualche minuto prima di siste-
mare il bambino all’interno del prodotto.
• Tutti i raccordi di montaggio dovrebbero
essere sempre serrati correttamente, pre-
stare attenzione ad eventuali viti allentate,
perché un bambino potrebbe intrappolare
parti del corpo o vestiti (ad esempio strin-
ghe, collane, nastri di ciucci per neona-
ti, ecc.), costituendo quindi il rischio di
strangolamento.
• Quando non in uso, tenere il prodotto lon-
tano dalla portata dei bambini.
• ATTENZIONE: Durante l’utilizzo, assicura-
tevi che le lenzuola, coperte, ecc. non inva-
dano lo spazio della culla.
COMPONENTI
A. Supporto gambe con ruote
A1. Tasto regolazione altezza
A2. Pattino basculante
A3. Indicatore altezza
A4. Pulsante sblocco rotazione piedi
A5. Piedi snodabili
A6. Ruote con freno
A7. Pulsante disattivazione pattino
A8. Alloggi traverso
B. Struttura superiore
B1. Struttura ssa
B2. Struttura mobile
B3. Aggancio gambe
B4. Maniglia abbattimento spondina laterale
B5. Bottoni di ssaggio tessile
C. Struttura di supporto centrale
C1. Perno di aggancio
C2. Bottoni di ssaggio rivestimento tessile
C3. Fibbie grigie di ssaggio
D. Cinghie di ssaggio
D1. Fibbie rosse di ancoraggio
E. Rivestimento tessile
E1. Nastro con clip
E2. Tasca
E3. Zip svestizione tessile
E4. Finestre in rete
E5. Alette rigide per ssaggio tessile alla struttura superiore
F. Materasso sfoderabile
G. Traverso inferiore
H. Borsa
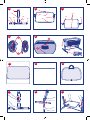
MONTAGGIO DELLA CULLA
1. Impugnare il supporto gambe “A” facendo scorrere verso l’al-
to il tubolare esterno no ad udire il CLICK di bloccaggio nella
prima posizione (g.1). Ripetere la medesima operazione con
l’altro supporto gambe.
2. Inserire il traverso inferiore “G” negli appositi alloggi presenti
all’interno dei supporti gambe “A” (g.2), no ad udire il click
di avvenuto ingaggio del pin metallico.
3. Agganciare la struttura superiore “B” alle due gambe come
illustrato in gura 3. Il CLICK del perno indica il corretto ag-
gancio della struttura.
ATTENZIONE: Rivolgere le bbie grigie dallo stesso lato dei
piedini snodabili (g.4).
4. Montare la struttura superiore “B” e il tessile “E” alle gambe
“A” facendo prima scorrere il tubolare della gamba all’interno
della tasca laterale del tessile (g.5). Eseguire l’operazione su
entrambi i lati.
ATTENZIONE: La struttura dovrà essere orientata in modo che
il lato con la maniglia ”B4” sia rivolto nella stessa direzione dei
piedini snodabili “A5”.
5. Fissare successivamente la struttura superiore alle gambe in-
serendo l’apposito supporto plastico come illustrato in gura
6. Spingere verso il basso no ad udire il CLICK di avvenuto
aggancio. Eseguire l’operazione su entrambi i lati.
6. Fissare il rivestimento tessile ”E” alla struttura centrale “C” ag-
ganciando i 2 nastri con clip “C2” posti nella parte inferiore del
rivestimento (g.7).
7. Agganciare i bottoni “C2” ai bottoni “B5” per procedere con il
ssaggio del tessile alla struttura superiore (Fig.8), e comple-
tare la chiusura delle zip E3 (g.8A). Ripetere quindi la stessa
operazione per il lato mancante.
8. Posizionare il materassino “F” sul fondo della culla (g.9).
9. Bloccare le 4 ruote “A6” della culla abbassando le leve che
azionano i freni (g.10).
A questo punto la culla è pronta per essere utilizzata.
ATTENZIONE: Vericare che tutti gli agganci siano corretta-
mente innestati e che le zip siano chiuse e bloccate no a ne
corsa.
ATTENZIONE: Non utilizzare la culla con i piedi snodabili par-
zialmente o totalmente ruotati o sbloccati (g. 11). La posizione
di utilizzo corretta è illustrata in gura 12. In caso di urto acci-
dentale contro i piedini snodabili, riportarli in posizione corretta
sollevando leggermente la culla.
ATTENZIONE: Qualora la culla fosse stata precedentemente
utilizzata in “modalità Co-Sleeping (Fissaggio al letto)”, accertar-
si di aver riposizionato la spondina laterale nella posizione di
chiusura, vericandone il corretto ingaggio.
REGOLAZIONE DELL’ ALTEZZA DELLA CULLA
E’ possibile regolare l’altezza della culla in dierenti posizioni.
Per regolare l’altezza tirare verso l’alto il pulsante di regolazione
“A1” e sollevare la culla no alla posizione desiderata (g.13). Ri-
petere l’operazione sul lato opposto.
E’ possibile inclinare leggermente la base della culla regolando
le 2 gambe a dierenti altezze (g.14).

10
11
ATTENZIONE: E’ consentito inclinare la culla con uno scarto
massimo di 4 posizioni tra una gamba e l’altra (esempio: gamba
destra in posizione 5 e gamba sinistra in posizione 1, vedi g.15).
ATTENZIONE: La testa del bambino deve sempre essere posi-
zionata sul lato maggiormente sollevato (g.16).
ATTENZIONE: Non è possibile selezionare delle altezze die-
renti sui due lati della culla, quando utilizzata in congurazione
basculante.
MODALITA’ CO-SLEEPING (FISSAGGIO AL LETTO)
E’ possibile agganciare la culla al letto dei genitori (modalità co-
sleeping).
ATTENZIONE – IMPORTANTE PER LA SICUREZZA DEL VO-
STRO BAMBINO: Questa modalità è consentita solo con le ti-
pologie di letto che permettono di rispettare tutte le condizioni
descritte in questo paragrafo.
In particolare la spondina della culla deve sempre essere acco-
stata al materasso dei genitori e il materasso dei genitori deve
essere allineato (o al massimo più alto) rispetto all’altezza della
spondina di contenimento della culla (g.17). Inoltre la culla
deve poter essere ancorata alla struttura del letto dei genitori
o al supporto del materasso (rete o doghe).
ATTENZIONE: Vericare che la struttura della culla in modalità
co-sleeping non sia in interferenza con il letto dei genitori.
ATTENZIONE: Durante l’utilizzo, assicuratevi che le lenzuola,
coperte, ecc. non invadano lo spazio della culla.
1. Abbassare la spondina laterale della culla “B2”, aerrando con
la mano l’apposita interfaccia “B4” e ruotandola verso l’alto per
sbloccare il meccanismo di abbattimento della spondina (g.18).
ATTENZIONE: Utilizzare la culla con il tubolare abbassato solo
in modalità co-sleeping.
2. Accostare la culla al letto dei genitori e vericare l’altezza del-
la culla rispetto al materasso dei genitori.
ATTENZIONE: L’altezza del materasso dei genitori deve sempre
essere maggiore o uguale a quella della spondina laterale di con-
tenimento della culla. Qualora non lo fosse, utilizzare il sistema di
regolazione per portarla in questa condizione su ambo i lati.
ATTENZIONE: In modalità co-sleeping le 2 gambe della culla
devono sempre essere regolate alla stessa altezza.
3. Per agganciare la culla al letto dei genitori (modalità co-sle-
eping) utilizzare la coppia di cinghie “D” fornite in dotazione.
Le cinghie si trovano nella tasca inferiore “E2” del rivestimento
tessile (g.19).
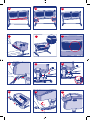
4. Agganciare le bbie grigie “C3” sotto al rivestimento tessile
su ambo i lati. Porre attenzione anché la bbia rossa “D1”
sia posizionata sopra il nastro della cinghia come illustrato
in gura 20.
5. Successivamente far passare dal basso verso l’alto la cinghia
attorno alla struttura del letto dei genitori (g.21) e aggan-
ciare la bbia rossa per formare un cappio (g.22). Ripetere
l’operazione anche sull’altro lato. Per un’installazione più
agevole, durante l’aggancio delle bbie, si suggerisce di te-
nere la culla leggermente distanziata dal letto dei genitori.
6. Accostare a questo punto completamente la culla al letto
dei genitori e stringere il cappio tirando le cinghie (g.23).
Eettuare l’operazione prima da un lato e poi dall’altro, aggiu-
stando le cinghie no a quando la culla sarà a contatto con il
materasso dei genitori.
ATTENZIONE: Prima di ogni utilizzo vericare sempre che tra il
materasso dei genitori e la spondina della culla non vi sia alcuno
spazio. Agire altrimenti sulle cinghie tirandole no a ripristinare
la condizione consentita. Vericare che la spondina sia sempre
libera di essere abbattuta e risollevata per tutta la sua corsa.
7. Riporre la porzione di cinghie in eccesso all’interno della ta-
sca posta sul fondo del rivestimento tessile.
8. Bloccare le ruote della culla.
Se durante le operazioni di ssaggio della culla al letto dei ge-
nitori non è possibile inlare i piedi della culla sotto al letto dei
genitori, è possibile ugualmente agganciare la culla seguendo le
operazioni descritte nei punti precedenti ruotando, in aggiunta, i
piedi snodabili durante l’accostamento della culla al letto.
Per ruotare i piedi tirare il pulsante di sblocco della rotazione
“A4” e ruotare con una mano i piedi “A5” della culla verso l’in-
terno (g.24).
9. Per richiudere la spondina laterale abbattibile è suciente
sollevarla aerrandola dalla parte di struttura mobile supe-
riore “B2” (g.25). Vericare sempre che sia correttamente
ingaggiata.
ATTENZIONE: Ogni qualvolta la spondina laterale viene ab-
bassata, vericare che la posizione relativa rispetto al materasso
dei genitori sia invariata rispetto a quanto illustrato nei paragra
precedenti.
ATTENZIONE: Non utilizzare mai la congurazione basculante
quando in “modalità Co-Sleeping (Fissaggio al letto)”.
ATTENZIONE: L’utilizzo del prodotto è consentito solo con let-
ti e/o materassi con i lati retti. E’ vietato l’utilizzo del prodotto
con letti e/o materassi rotondi, materassi ad acqua.
ATTENZIONE: Quando il prodotto è utilizzato in “Modalità Co-
Sleeping (Fissaggio al letto)”, deve essere sempre montato in
corrispondenza del lato lungo di accesso al letto. NON installare
il prodotto ai piedi o in testa ai letti.
CONSIGLI DI MANTENIMENTO
La culla e il materassino hanno un rivestimento in tessuto resi-
stente, completamente sfoderabile e lavabile.
Per eettuare la svestizione, eseguire la procedura spiegata nel
paragrafo “SFODERABILITA’”.
ATTENZIONE: Le operazioni di svestizione e vestizione potrebbe-
ro richiedere alcuni minuti e devono essere eseguite da un adulto.
Vericare regolarmente lo stato d’usura del prodotto e la pre-
senza di eventuali rotture. In caso di danneggiamenti non uti-
lizzarlo e tenerlo fuori dalla portata dei bambini.
Per il lavaggio dei tessuti seguire attentamente le istruzioni in-
dicate sull’etichetta.
Per la pulizia non utilizzare solventi, prodotti abrasivi o troppo
aggressivi.
Lavare a mano in acqua fredda
Non candeggiare
Non asciugare meccanicamente
Non stirare
Non lavare a secco
Dopo ogni lavaggio vericare la resistenza di tessuto e cuciture.
ATTENZIONE: Durante le operazione di svestizione e /o vesti-
zione, maneggiare con cura la parte tessile per evitare rotture o
danneggiamenti accidentali.
RIFACIMENTO DEL LETTO
E’ possibile sganciare la culla dal letto dei genitori per agevolare
il rifacimento quotidiano del letto. Per fare ciò è suciente sgan-
ciare le bbie grigie poste al di sotto del rivestimento tessile.
Nel riagganciare la culla al letto dei genitori, tirare nuovamente
le cinghie per garantire che la culla sia correttamente e salda-
mente agganciata al letto dei genitori. Porre attenzione an-
ché tutti i punti descritti in precedenza nel paragrafo “Modalità
co-sleeping (ssaggio al letto)” siano rispettati.
SFODERABILITA’
1. Rimuovere il materassino e sganciare i bottoni sulla parte
inferiore della struttura tessile, seguendo il procedimento
inverso rispetto al paragrafo “MONTAGGIO DELLA CULLA”.
30° C

10
11
2. Aprire le 3 zip “E3” poste sulla struttura superiore “B” e sgan-
ciare i 4 bottoni di ssaggio del tessile alla struttura superiore.
3. Premere i pulsanti posti sull’aggancio delle gambe e tirare
verso l’alto la struttura tubolare superiore, slando dalle gam-
be la struttura superiore (g.26A-B)
4. Slare inne il rivestimento tessile.
SMONTAGGIO DELLA CULLA
E’ possibile smontare completamente la culla per riporla nella
borsa fornita con il prodotto. Per terminare lo smontaggio della
culla dopo averla sfoderata, eliminare il traverso inferiore e la
struttura di supporto centrale, ripetendo le operazioni descritte
nel paragrafo “MONTAGGIO DELLA CULLA”.
CONFIGURAZIONE BASCULANTE
Per attivare la congurazione basculante, è necessario:
1. Estrarre i pattini “A2” posti nella parte inferiore delle gambe
della culla, posizionando il piede in prossimità della parte
centrale della sommità di ciascun pattino e, aerrando il bor-
do superiore della culla con la mano, tirare verso l’alto la culla
stessa, facendo da contrappeso con il piede per non farla sol-
levare da terra (g.27).
2. E’ necessario ripetere la stessa operazione per ciascuno dei
due lati.
3. Per disattivare la congurazione basculante, è suciente
premere, per ciascuno dei due lati, il pulsante “A7” posto al
centro del pattino e contemporaneamente accompagnare la
culla verso il basso, aerrandola dal bordo superiore, in modo
che il pattino torni in posizione di chiusura (g.28). Assicurarsi
sempre che il pattino sia completamente tornato in posizio-
ne di chiusura.
ATTENZIONE: Ricordarsi sempre di disattivare la congu-
razione basculante qualora si volesse utilizzare il prodotto in
“Modalità co-sleeping (ssaggio al letto)” o in caso di mancata
supervisione da parte dell’adulto.
ATTENZIONE: Non è possibile selezionare delle altezze die-
renti sui due lati della culla, quando utilizzata in congurazione
basculante.
GARANZIA
Il prodotto è garantito contro ogni difetto di conformità in nor-
mali condizioni di utilizzo secondo quanto previsto dalle istru-
zioni d’uso. La garanzia non sarà applicata, dunque, in caso di
danni derivanti da un uso improprio, usura o eventi accidentali.
Per la durata della garanzia sui difetti di conformità si rinvia alle
speciche previsioni delle normative nazionali applicabili nel
paese d’acquisto, dove previste.

12
13
ChiCCo
Next2me Dream Crib
IMPORTANT - READ
CAREFULLY AND
KEEP FOR FUTURE
REFERENCE.
WARNING: TO AVOID DANGER OF SUF-
FOCATION REMOVE THIS PLASTIC COVER
BEFORE USING THE PRODUCT. THIS COVER
SHOULD BE DESTROYED OR KEPT AWAY
FROM BABIES AND CHILDREN.
WARNINGS
• Only for domestic use.
• WARNING: Do not use this product with-
out reading the instructions for use rst.
• WARNING: When in its highest position
the product is intended for use by children
of 0 to 5/6 months (weighing up to 9 kg).
• WARNING: Stop using the product as
soon as the child can sit or kneel or pull
itself up.
• WARNING: Placing additional items in the
product may cause suocation.
• WARNING: Do not use the product if any
part is broken, torn or missing.
• WARNING: DO NOT USE the product in
“Crib Conguration” and/or “Bedside sleeper
Conguration” if any part is missing, dam-
aged or broken. Contact Artsana SpA for
spare parts and user instructions if needed.
DO NOT REPLACE missing, damaged or bro-
ken parts with non-OEM components or
components not approved by Artsana SpA.
• WARNING: Consult the user manual for
the list of components. Examine the prod-
uct regularly to make sure that there are no
loose, damaged or missing parts.
• WARNING: Always use all parts needed
for each conguration of use.
• WARNING: Be aware of the risk of burns
from cigarettes, naked ames and other
heat sources, like electric or gas heaters,
that are near the crib.
• Before assembly, check that the product
and all of its components have not been
damaged during transportation. Should
any part be damaged, keep out of reach of
children and do not use.
• Make sure that the adult using the product
knows exactly how it works.
• WARNING: The product is ready for use
only when all locking mechanisms are
engaged. Make sure they are securely en-
gaged before use.
• WARNING: When your child is unattended
and the product is in “Crib Conguration”, al-
ways make sure that the side is raised and
locked in the closed position and aligned
with the upper perimeter of the crib.
• When the product is being used, and above
all in “Crib Conguration”, the wheels must
always be locked.
• All operations for opening, adjusting, fas-
tening and installing the product must be
carried out by an adult.
• Before using in the “Bedside sleeper
Conguration” (fastened to bed), make
sure the product is fastened and installed
correctly. Check the fastening system hold
before each use by attempting to push the
crib away from the parents’ bed.
• The xing straps are included in the pack-
aging. Other fastening systems should not
be used.
• To prevent danger of choking due to the
child’s head being trapped, when the crib
is in the “Bedside sleeper Conguration”
(fastened to the bed) it should be prop-
erly fastened to the parents’ bed with the
xing straps as explained in the instruc-
tion booklet.
• WARNING: Before placing the child inside
the crib when the product is in the “Bed-
side sleeper Conguration” (fastened to the
bed), be sure that the xing straps are fas-
tened and tightened correctly. The prod-

12
13
uct must be attached to the parents’ bed
frame/support and there should be no
gaps between the lowest part of the Bed-
side sleeper crib and the parents’ mattress.
• If there are gaps between the lowest part
of the Bedside sleeper crib and the parents’
mattress, DO NOT use the product.
• Do not ll any spaces or gaps between the
parents’ mattress and the crib with pillows,
blankets, bedsheets or any other material
that may cause a choking hazard.
• DANGER! The Bedside sleeper, when not
attached to the adult’s bed, shall have all
its sides in place and/or in their highest
position.
• WARNING: To avoid hazards from the
child’s neck being caught on the top rail on
the side that is next to the adult bed, the
top rail must not be higher than the adult
bed mattress.
• WARNING: To avoid the risk of your child
being strangled the attachment system to
the adult’s bed shall always be kept away
from and out of the crib.
• The product must always be placed on a
horizontal surface. Never leave the product
on a sloping surface with your child inside.
• Unattended children must not be left to
play near the product.
• Do not use the product without the frame.
• Keep the xing straps out of reach of children.
• Only use the mattress provided with the
product or replacement mattresses ap-
proved by Artsana.
• WARNING: Do not use more than one
mattress in the product. Only use the mat-
tress that comes with the product.
• WARNING: Only use the mattress sold
with this crib, do not add a second mat-
tress on this one, suocation hazard.
• WARNING: When not attached to the bed,
the crib can be inclined by a maximum of
4 positions between one leg support and
the other.
• Infants can suocate on soft bedding.
Avoid placing pillows or similar items un-
der newborn babies for additional comfort
during sleep.
• Use the crib in the “Bedside sleeper Con-
guration” (fastened to the bed) only with
beds of the size indicated in the reference
gure at the beginning of the manual.
• Do not leave anything inside the product
that might reduce its depth.
• To prevent the child from being trapped, do
not place the crib close to walls or obstacles.
• Do not leave any small objects inside the
product that might be swallowed.
• Only use spare parts approved by the man-
ufacturer. Do not attach any accessories to
the product that have not been supplied
by the manufacturer.
• Do not make adjustments to the product
when the child is in it.
• Do not use the rocking function if the child
is unattended in the crib. Leave the crib in
the locked position whenever the child is
unattended.
• When in the “Bedside sleeper Congura-
tion” (fastened to the bed), the crib must
never be inclined.
• Do not move the product when the child
is inside.
• Do not use the product with more than
one child at a time.
• WARNING: Do not place the product
close to another product, which could
present a danger of suocation or strangu-
lation, e.g. strings, blind/curtain cords, etc
To avoid strangulation hazards, never give
children objects with strings attached, or
leave these objects within their reach.
• Prolonged exposure to direct sunlight may
cause the product’s colour to fade. After
prolonged exposure of the product to high
temperatures, wait a few minutes prior to
putting your child in it.
• All assembly couplings must be fastened
correctly. Be sure there are no loose screws,
as a child’s body or clothing (e.g., laces,

14
15
necklaces, cords from paciers) may get
trapped and cause a strangulation hazard.
• Keep the product out of reach of children
when it is not in use.
• WARNING: Be careful when the child is in
the crib, that objects or bedding items do
not fall into the crib.
COMPONENTS
A. Leg rest with wheels
A1. Height adjustment button
A2. Rocking slide
A3. Height indicator
A4. Foot rotation release button
A5. Articulated feet
A6. Wheels with brakes
A7. Slide deactivation button
A8. Cross slots
B. Upper structure
B1. Fixed structure
B2. Mobile structure
B3. Foot hook
B4. Side tilting handle
B5. Fabric attachment buttons
C. Central support structure
C1. Fastening pin
C2. Fabric lining attachment buttons
C3. Grey fastening buckles
D. Fastening straps
D1. Red fastening buckles
E. Fabric lining
E1. Strap with clip
E2. Pocket
E3. Fabric removal zipper
E4. Net windows
E5. Rigid tabs for fastening the fabric lining to the upper structure
F. Mattress with removable lining
G. Bottom bar
H. Bag
ASSEMBLY OF THE CRIB:
1. Hold foot support “A” and make the outer bar slide up until
you hear it CLICK into the rst position (g.1). Repeat this step
for the other foot support.
2. Insert the lower bar “G” in the relevant slots inside the foot
supports “A” (g.2) until you hear the metal pin lock into place.
3. Fasten the upper structure “B” to the two feet as shown in
gure 3. The CLICK of the pin means that the structure is cor-
rectly fastened.
WARNING: Make sure the grey buckles are facing the same
side as the articulated feet (g.4).
4. Mount the upper structure “B” and t the fabric “E” on the
feet “A” making the bar of the foot slide rst inside the lateral
pocket of the fabric (g.5). Repeat the step on both sides.
WARNING: The structure must be oriented so that the side
with the handle ”B4” is facing the same direction as the artic-
ulated feet “A5.”
5. Then fasten the upper structure to the feet by inserting the
relevant plastic support as shown in gure 6. Push down until
you hear it click into place. Repeat the step on both sides.
6. Fasten the fabric lining ”E” to the central structure “C” fastening
the 2 straps with clip “C2” on the lower part of the lining (g.7).
7. Fasten the buttons “C2” to the buttons “B5” to fasten the fab-
ric to the upper structure (g.8) and complete by closing the
zippers E3 (g.8A). Repeat the step for the missing side.
8. Position il mattress “F” on the bottom of the crib (g.9).
9. Block the 4 wheels “A6” of the crib by lowering the levers that
activate the brakes (g.10).
The crib is now ready to be used.
WARNING: Make sure that all the fasteners are engaged cor-
rectly and that the zippers are closed and locked at the end.
WARNING: Do not use the crib with the articulated feet par-
tially or completely turned or released (g. 11). The position of
correct use is illustrated in gure 12. In the case of accidental
knocking against the articulated feet, put them back in the cor-
rect position by lifting the crib slightly.
WARNING: If the crib has been used previously in “Bedside
sleeper conguration (fastened to the bed),” make sure that the
side is in locked position and check that it is engaged correctly.
ADJUSTING THE CRIB HEIGHT
The crib can be adjusted at dierent heights. To adjust the
height, the setting button “A1” up and lift the crib to the desired
position (g.13). Repeat the step on the opposite side.
The base of the crib can be slightly inclined by adjusting the 2
feet at dierent heights (g.14).
WARNING: The crib can be inclined by a maximum of 4 posi-
tions between one foot and the other (e.g., right foot in posi-
tion 5 and left foot in position 1, see g. 15).
WARNING: The child’s head must always be positioned near
the raised end (g.16).
WARNING: It is not possible to select dierent heights on the
two sides of the crib when in rocking conguration.
BEDSIDE SLEEPER CONFIGURATION (FASTENED TO THE BED)
It is possible to fasten the crib to the parents’ bed (Bedside
sleeper conguration).
CAUTION - IMPORTANT FOR YOUR CHILD’S SAFETY: This
conguration is allowed only with beds that allow complying
with all the conditions described in this paragraph.
In particular, the side of the crib must always be positioned
against the mattress of the parents’ bed and the parents’ mat-
tress must be aligned with (or at most higher than) the height
of the crib’s side (g.17). Moreover, the crib must be fastened to
the frame of the parents’ bed or to the mattress support (mesh
or slat sprung base).
WARNING: Check that the structure of the crib in Bedside
sleeper conguration does not interfere with the parents’ bed.
WARNING: Be careful when the child is into the bedside sleep-
er, that objects or bedding items do not fall into the crib.
1. Lower the side of the crib “B2” by gripping the relevant inter-
face “B4” and rotating it upward to release the side lowering
mechanism (g.18).
WARNING: Use the crib with the bar lowered only in Bedside
sleeper conguration.
2. Put the crib against the parents’ bed and check the height of
the crib compared to the parents’ mattress.
WARNING: The height of the parents’ mattress must be higher
than or the same as that of the side of the crib. If this is not the
case, use the adjustment system to achieve this condition on
both sides.
WARNING: In Bedside sleeper conguration, the 2 feet of the
crib must be set at the same height.
3. To fasten the crib to the parents’ bed (Bedside sleeper con-
guration), use the pair of supplied straps “D”. The straps are
found in the lower pocket “E2” of the fabric lining (g.19).
4. Fasten the grey buckles “C3” under the fabric lining on both
sides. Make sure the red buckle “D1” is positioned above the
strap as illustrated in gure 20.
5. Then run the strap around the structure of the parents’ bed
from the bottom up (g.21) and fasten the red buckle form-
ing a noose (g.22). Repeat this operation on the other side.

14
15
To make installation easy, when fastening the buckles, always
keep the crib slightly away from the parents’ bed.
6. At this point put the crib against the parents’ bed and tighten
the noose pulling the straps (g.23). Carry out this step rst
on one side and then on the other, adjusting the straps until
the crib is in contact with the parents’ mattress.
WARNING: Before use, always make sure that there is no space
between the parents’ mattress and crib’s side. Otherwise adjust
the straps pulling them until the required condition is restored.
Make sure that the side is always free to be lowered and raised
completely.
7. Fit the length of the straps in excess inside the pocket on the
bottom of the fabric lining.
8. Lock the crib’s wheels.
If when fastening the crib to the parents’ bed it is not possible to
t the crib’s feet under the parents’ bed, the bed can be fastened
anyway by the following the instructions above and rotating the
articulated feet when putting the crib against the bed.
To turn the feet, pull the rotation release button “A4” and turn
the feet “A5” of the crib inward by hand (g.24).
9. To close the side that can be lowered, just pull up by holding
it by the upper mobile structure “B2” (g.25). Always make
sure that it is engaged correctly.
WARNING: Whenever the side is lowered, make sure that the
position compared to the parents’ mattress has not changed
from that illustrated in the paragraphs above.
WARNING: Never use the rocking function when the crib is in
“Bedside sleeper conguration (fastened to the bed).”
WARNING: Use the product with beds and/or mattresses with
straight sides only. Do not use the product with round beds
and/or mattresses or water mattresses.
WARNING: When the product is used in “Bedside sleeper con-
guration (fastened to the bed),” it must always be mounted on
the long side of the bed. DO NOT install the product at the head
or feet of the bed.
CARE AND MAINTENANCE
The crib and mattress have a resistant fabric lining that can be
removed completely and washed.
To remove the fabric, follow the instructions in the paragraph
“HOW TO REMOVE THE FABRIC COVER.”
WARNING: Covering or removing the fabric may take a few
minutes and must be carried out by an adult.
Regularly inspect the toy for signs of wear and any damage.
In the case of damage do not use and keep out of reach of
children.
When washing the fabrics pay close attention to the instruc-
tions on the label.
Do not use solvents, abrasive or overly aggressive products.
Wash by hand in cold water
Do not bleach
Do not tumble dry
Do not iron
Do not dry clean
Check that the fabric and the stitching are in good condition
after each wash.
WARNING: When covering or removing the cover, take care
when handling the fabric parts so as to avoid accidental tears
or damage.
DOING THE BED
It is possible to unfasten the crib from the parents’ bed when
doing the bed. Just unfasten the grey buckles under the fabric
lining.
When fastening the crib again to the parents’ bed, pull the
straps again to make sure that the crib is correctly and securely
fastened to the parents’ bed. Make sure that all the steps illus-
trated above in “Bedside sleeper conguration (fastened to the
bed)” have been completed.
HOW TO REMOVE THE FABRIC COVER
1. Remove the mattress and unfasten the buttons in the lower
part of the fabric following the procedure illustrated in “AS-
SEMBLY OF THE CRIB” in opposite order.
2. Open the 3 zippers “E3” on the upper structure “B” and unfas-
ten the 4 buttons fastening the fabric to the upper structure.
3. Press the buttons on the fasteners of the feet, turn the upper
bar structure up and pull the upper structure out of the feet
(g.26A-B)
4. Then remove the fabric lining.
DISASSEMBLING THE CRIB:
The crib can be disassembled completely to put it away in the
supplied bag. In order to complete the disassembly of the crib
after removing the fabric, remove the lower bar and the central
support structure by repeating the steps illustrated in “ASSEM-
BLY OF THE CRIB.”
ROCKING CONFIGURATION
To use rocking conguration:
1. Pull out the slides “A2” on the lower part of the feet of the
crib positioning the foot near the centre of the top of each
slide and, holding the upper edge of the crib with your hand,
pull the crib up while holding the crib down with your foot
(g.27).
2. Repeat the same operation for both sides.
3. To deactivate rocking conguration, just press the button “A7”
at the centre of the slide on each side and then accompany
the crib down holding by the upper edge so that the slide
returns to closed position (g.28). Always make sure that the
slide has returned to closed position.
WARNING: Always remember to deactivate rocking congu-
ration when using the product in “Bedside sleeper(fastened to
the bed)” or when the child is unattended.
WARNING: It is not possible to select dierent heights on the
two sides of the crib when in rocking conguration.
WARRANTY
The product is guaranteed against any conformity defect in
normal conditions of use as provided for by the instructions for
use. The warranty shall not therefore apply in the case of dam-
ages caused by improper use, wear or accidental events. For
the duration of warranty on conformity defects please refer to
the specic provisions of national laws applicable in the coun-
try of purchase, where provided.
30° C

16
17
I
berCeau ChiCCo Next2me Dream
IMPORTANT - LIRE
ATTENTIVEMENT
LA NOTICE ET LA
CONSERVER POUR
CONSULTATION
ULTÉRIEURE.
AVERTISSEMENT: AFIN D’ÉVITER TOUT
RISQUE D’ÉTOUFFEMENT, ENLEVER LA
PROTECTION EN PLASTIQUE AVANT
D’UTILISER CE PRODUIT. LA PROTECTION EN
PLASTIQUE DOIT ÊTRE DÉTRUITE OU TENUE
HORS DE PORTÉE DES BÉBÉS ET DES ENFANTS.
AVERTISSEMENT
• Pour usage domestique seulement.
• AVERTISSEMENT : Ne pas utiliser ce
produit avant d’avoir lu les instructions
d’utilisation.
• AVERTISSEMENT : L’utilisation du produit
est autorisée avec un enfant d’un âge
compris entre 0 et 5/6 mois, jusqu’à un
poids maximum de 9 kg.
• AVERTISSEMENT : Ne plus utiliser le
produit dès lors que l’enfant peut s’asseoir,
s’agenouiller ou se lever seul.
• AVERTISSEMENT : Le fait de placer
d’autres articles dans le produit peut
provoquer des risques de suocation.
• AVERTISSEMENT : Ne pas utiliser le
produit si une quelconque partie est
cassée, déchirée ou manquante.
• AVERTISSEMENT : NE PAS utiliser le
berceau cododo si une pièce quelconque
est cassée, endommagée ou manquante.
Contacter ARTSANA SPA pour obtenir des
pièces de rechange et une documentation
avec des instructions si nécessaire. NE PAS
remplacer les pièces.
• AVERTISSEMENT : Consulter la notice
d’utilisation pour connaître la liste des
composants. Vérier régulièrement le produit,
notamment l’absence de desserrements, de
dommages ou de composants.
• AVERTISSEMENT : Toujours utiliser
toutes les parties requises pour chaque
conguration d’utilisation.
• AVERTISSEMENT : Attention au danger
de placer le berceau (lit bébé et lit bébé
suspendu) à proximité de ammes nues et
d’autres sources de forte chaleur, comme
les appareils de chauage électrique, les
appareils de chauage à gaz, etc.
• Vérier avant l’utilisation que le produit
et tous ses composants n’ont pas été
endommagés pendant le transport, auquel
cas ne pas utiliser le produit et le tenir hors
de portée des enfants.
• Vérier que les utilisateurs du produit
connaissent le fonctionnement exact de
ce dernier.
• AVERTISSEMENT : Le produit ne peut
être utilisé que lorsque les mécanismes
de blocage sont enclenchés. Vérier
attentivement leur enclenchement avant
d’utiliser le produit.
• AVERTISSEMENT : Quand l’enfant est
laissé sans surveillance à l’intérieur du
produit, en « Mode berceau », toujours
s’assurer que la paroi est relevée et bloquée
en position de fermeture, alignée sur le
bord supérieur du berceau.
• Quand le produit est utilisé, en particulier
en « Mode berceau », les roues doivent
toujours être bloquées.
• Toutes les opérations d’ouverture et de
réglage, de xation et de positionnement
du produit, doivent être eectuées
exclusivement par un adulte.
• Avant d’utiliser le produit en « Mode
Cododo (Fixation au lit) », vérier qu’il est
correctement xé et positionné. Vérier la
tenue du système de xation avant toute
utilisation en tirant le Cododo dans le sens
FR

16
17
opposé au lit des parents.
• Les sangles de xation sont incluses dans
l’emballage. L’utilisateur ne doit pas utiliser
d’autres systèmes de xation.
• AVERTISSEMENT : Pour éviter tout risque
d’étranglement de l’enfant, le système
de xation au lit de l’adulte doit toujours
être maintenu à l’écart et à l’extérieur du
berceau.
• AVERTISSEMENT : Lorsque le produit est
utilisé en « Mode Cododo (Fixation au lit)
», avant d’y installer l’enfant, s’assurer que
les sangles de xation sont enclenchées et
correctement tendues, le produit doit être
accroché au matelas du lit des parents et il
ne doit y avoir aucun espace entre la partie
la plus basse du Cododo et le matelas du
lit des parents.
• NE PAS utiliser le produit en présence d’un
espace entre la partie la plus basse du
Cododo et le matelas du lit des parents.
• Ne pas boucher les éventuels espaces
ou ssures entre le matelas du lit des
parents et le berceau avec des coussins,
des couvertures, des draps ou tout autre
matériau susceptible de causer un risque
d’étouement.
• DANGER ! Le cododo, lorsqu’il n’est pas
attaché au lit de l’adulte, doit être utilisé
avec tous ses côtés en place, et/ou en
position la plus haute.
• AVERTISSEMENT : Pour éviter tout risque
d’étranglement de l’enfant, le système de
xation au lit de l’adulte doit toujours être
maintenu à l’écart et à l’extérieur du berceau.
• AVERTISSEMENT : Pour éviter tout risque
d’étranglement de l’enfant causé par un
choc sur la trachée (gorge) au niveau du
côté supérieur adjacent au lit de l’adulte,
ce côté supérieur ne doit pas être plus
haut que le matelas du lit de l’adulte.
• Le produit doit toujours être placé sur un
plan horizontal. Ne jamais laisser le produit
sur un plan incliné avec l’enfant dedans.
• Il doit être interdit aux enfants de jouer
sans surveillance à proximité du produit.
• Ne pas utiliser le produit sans châssis.
• Tenir les sangles de xation loin de la
portée des enfants.
• AVERTISSEMENT : Utiliser exclusivement
le matelas fourni avec le produit ou
d’éventuels matelas de rechange
approuvés par Artsana.
• AVERTISSEMENT : Ceci est un matelas.
Ne pas ajouter de second matelas. Risques
de suocation.
• AVERTISSEMENT : Utiliser uniquement
le matelas vendu avec ce berceau. Ne pas
ajouter un second matelas sur celui-ci.
Risques de suocation.
• AVERTISSEMENT : L’inclinaison du
berceau, lorsqu’il n’est pas xé au lit, est
autorisée avec un écart maximum de 4
positions entre un pied et l’autre.
• Les nouveau-nés peuvent s’étouer en
raison du linge et des couvertures souples.
Éviter de placer des coussins ou des objets
similaires sous le nouveau-né pour un plus
grand confort durant le sommeil.
• Utiliser le berceau en « Mode Cododo
(Fixation au lit) » uniquement avec des lits
ayant les dimensions indiquées dans la
gure de référence au début de la notice.
• Ne laisser aucun objet dans le produit
pouvant réduire sa profondeur.
• Ne pas placer le berceau près de murs
ou d’obstacles, pour éviter tout risque de
coincement.
• Ne pas laisser à l’intérieur du produit de
petits objets susceptibles d’être avalés.
• Utiliser uniquement des pièces de
rechange approuvées par le fabricant. Ne
pas installer d’accessoires non fournis par
le fabricant du produit.
• Ne pas régler la hauteur du produit lorsque
l’enfant se trouve à l’intérieur.
• Ne pas utiliser la fonction bascule quand
l’enfant se trouve dans le berceau sans
surveillance. Bloquer ensuite le berceau
en position xe toutes les fois que l’enfant

18
19
reste sans surveillance.
• Lorsqu’il est utilisé en « Mode Cododo
(Fixation au lit) », le berceau ne doit jamais
être utilisé en position inclinée.
• Ne pas déplacer le produit lorsque l’enfant
est à l’intérieur.
• Ne pas utiliser le produit avec plus d’un
enfant à la fois.
• AVERTISSEMENT : Ne pas placer le
produit près d’un autre produit qui
pourrait présenter un risque de suocation
ou de strangulation, par exemple celles,
cordons de store/de rideau, etc. Pour
éviter tout risque d’étranglement, ne pas
donner à l’enfant ni poser près de l’enfant
d’objets munis de cordes.
• Une exposition prolongée du produit au
soleil pourrait entraîner une décoloration.
Après une exposition prolongée du produit
à de fortes températures, attendre quelques
minutes avant d’y installer l’enfant.
• Tous les raccords de montage doivent
toujours être correctement serrés, faire
attention aux vis desserrées car des parties
du corps ou des vêtements de l’enfant (par
exemple, sangles, colliers, rubans de sucettes
pour nouveau-nés, etc.) pourraient se coincer,
entraînant un risque de strangulation.
• Quand il n’est pas utilisé, tenir le produit
hors de portée des enfants.
• AVERTISSEMENT : Il convient que le
parent soit vigilant lorsque l’enfant est
placé dans le cododo, à ce que des objets
ou des éléments de literie ne tombent pas
dans le berceau.
COMPOSANTS
A. Support pieds avec roues
A1. Touches de réglage de la hauteur
A2. Patin basculant
A3. Indicateur de la hauteur
A4. Bouton de déblocage rotation pieds
A5. Pieds articulés
A6. Roues avec frein
A7. Bouton de désactivation patin
A8. Logements traverse
B. Structure supérieure
B1. Structure xe
B2. Structure mobile
B3. Enclenchement des pieds
B4. Poignée de rabattement de la paroi latérale
B5. Boutons de xation du revêtement en tissu
C. Structure de support centrale
C1. Cheville de xation
C2. Boutons de xation du revêtement en tissu
C3. Boucles des grilles de xation
D. Sangles de xation
D1. Boucles rouges d’ancrage
E. Revêtement textile
E1. Sangle avec clip
E2. Poche
E3. Zip de déhoussage revêtement en tissu
E4. Fenêtres en grillage
E5. Ailettes rigides pour la xation du revêtement en tissu à la
structure supérieure
F. Matelas déhoussable
G. Traverse inférieure
H. Sac
MONTAGE DU BERCEAU
1. Saisir le support de pieds «A» en faisant coulisser vers le haut
le tube extérieur jusqu’à entendre le déclic de blocage dans
la première position (g.1). Répéter cette opération pour
l’autre support de pieds.
2. Introduire la traverse inférieure « G » dans les logements
prévus à cet eet, situés à l’intérieur des supports de pieds
«A » (g.2), jusqu’à entendre le déclic d’enclenchement de la
broche métallique.
3. Enclencher la structure supérieure « B » aux deux pieds
comme illustré dans la gure 3. Le déclic de la cheville
indique l’enclenchement correct de la structure.
AVERTISSEMENT: Tourner les boucles grises du même côté
que les pieds articulés (g.4).
4. Monter la structure supérieure «B » et le revêtement en tissu
«E » aux pieds «A » en faisant d’abord coulisser le tube du
pied à l’intérieur de la poche latérale du revêtement en tissu
(g.5). Eectuer cette opération des deux côtés.
AVERTISSEMENT: La structure devra être orientée de manière
à ce que le côté avec la poignée « B4 » soit tourné dans la même
direction que les pieds articulés «A5 ».
5. Fixer ensuite la structure supérieure aux pieds en insérant le
support en plastique prévu à cet eet comme illustré dans
la gure 6. Pousser vers le bas jusqu’à percevoir le déclic
d’enclenchement. Eectuer cette opération des deux côtés.
6. Fixer le revêtement en tissu « E » à la structure centrale «C »
en accrochant les 2 sangles avec clip «C2 » situées dans la
partie inférieure du revêtement (g.7).
7. Accrocher les ailettes «E5 » aux boutons « B5 » pour xer
le revêtement en tissu à la structure supérieure (Fig.8), et
compléter la fermeture des zips E3 (g.8A). Répéter cette
opération de l’autre côté.
8. Positionner le matelas «F » sur le fond du berceau (g.9).
9. Bloquer les 4 roues «A6 » du berceau en abaissant les leviers
qui actionnent les freins (g.10).
Le berceau est alors prêt à être utilisé.
AVERTISSEMENT : Vérier que tous les crochets sont
correctement xés et que les zips sont fermées et bloquées
jusqu’en n de course.
AVERTISSEMENT: Ne pas utiliser le berceau avec les pieds
articulés en partie ou entièrement tournés ou débloqués (g.
11). La position d’utilisation correcte est illustrée dans la gure
12. En cas de choc accidentel contre les pieds articulés, les
remettre dans la position correcte en soulevant légèrement le
berceau.
AVERTISSEMENT : Dans le cas où le berceau aurait
précédemment été utilisé en «Mode Cododo(Fixation au lit)
», s’assurer que la paroi latérale a bien été remise en position de
fermeture en vériant son enclenchement.

18
19
RÉGLAGE DE LA HAUTEUR DU BERCEAU
La hauteur du berceau peut être réglée dans diérentes
positions. Pour régler la hauteur, tirer vers le haut le bouton de
réglage «A1 » et relever le berceau jusqu’à la position souhaitée
(g.13). Répéter cette opération du côté opposé.
Il est possible d’incliner légèrement la base du berceau en
réglant les 2 pieds à diérentes hauteurs (g.14).
AVERTISSEMENT: L’inclinaison du berceau est autorisée avec
un écart maximum de 4 positions entre un pied et l’autre (par
exemple : pied droit sur la position 5 et pied gauche sur la
position 1, voir g.15).
AVERTISSEMENT : La tête de l’enfant doit toujours être
positionnée du côté le plus haut (g.16).
AVERTISSEMENT : Il n’est pas possible de sélectionner des
hauteurs diérentes sur les deux côtés du berceau, quand
celui-ci est utilisé en conguration basculante.
MODE CODODO FIXATION AU LIT)
Il est possible d’accrocher le berceau au lit des parents (mode
Cododo).
AVERTISSEMENT – IMPORTANT POUR LA SÉCURITÉ DE
VOTRE ENFANT: Ce mode n’est autorisé qu’avec les types de
lit qui permettent de respecter toutes les conditions décrites
dans ce paragraphe.
En particulier, la paroi du berceau doit toujours être rapprochée
du matelas du lit des parents et celui-ci doit être aligné (ou à la
limite plus haut) sur la hauteur de la paroi du berceau (g.17). Par
ailleurs, le berceau doit pouvoir être xé à la structure du lit des
parents ou au support du matelas (sommier à grille ou à lattes).
AVERTISSEMENT: Vérier que la structure du berceau en mode
Cododo ne crée aucune interférence avec le lit des parents.
AVERTISSEMENT : Il convient que le parent soit vigilant
lorsque l’enfant est placé dans le cododo, à ceque des objets
ou des éléments de literie ne tombent pas dans le berceau.
1. Abaisser la paroi latérale du berceau «B2» en saisissant avec
la main l’interface «B4 » et en la tournant vers le haut pour
débloquer le mécanisme de rabattement de la paroi (g.18).
AVERTISSEMENT : Utiliser le berceau avec le tube abaissé
uniquement en mode Cododo.
2. Rapprocher le berceau du lit des parents et vérier la hauteur
du berceau par rapport au matelas du lit des parents.
AVERTISSEMENT: Le matelas du lit des parents doit toujours
être plus haut que la paroi latérale du berceau. Dans le cas
contraire, utiliser le système de réglage pour que la hauteur soit
correcte des deux côtés.
AVERTISSEMENT: En mode Cododo, les 2 pieds du berceau
doivent toujours être réglés à la même hauteur.
3. Pour accrocher le berceau au lit des parents (mode Cododo),
utiliser la paire de sangles « D » fournies avec le produit.
Les sangles se trouvent dans la poche inférieure « E2 » du
revêtement en tissu (g.19).
4. Accrocher les boucles grises «C3 » sous le revêtement en
tissu des deux côtés. Veiller à ce que la boucle rouge «D1 »
soit positionnée au-dessus de la sangle comme illustré dans
la gure 20.
5. Ensuite faire passer de bas en haut la sangle autour de la
structure du lit des parents (g.21) et accrocher la boucle
rouge de manière à former un nœud coulant (g.22). Répéter
l’opération de l’autre côté. Pour une installation plus aisée,
pendant l’enclenchement des boucles, il est suggéré de tenir
le berceau légèrement écarté du lit des parents.
6. Rapprocher ensuite complètement le berceau du lit des
parents et serrer le nœud coulant en tirant les sangles (g.23).
Eectuer cette opération d’abord d’un côté puis de l’autre, en
ajustant les sangles jusqu’à ce que le berceau soit au contact
du matelas du lit des parents.
AVERTISSEMENT: Avant toute utilisation, toujours vérier qu’il
n’y a pas d’espace entre le matelas du lit des parents et la paroi
du berceau. Agir autrement sur les sangles en les tirant jusqu’à
rétablir la condition autorisée. Vérier que la paroi est toujours
libre d’être rabattue et relevée sur toute sa course.
7. Ranger la partie des sangles en excès dans la poche située sur
le fond du revêtement en tissu.
8. Bloquer les roues du berceau.
Si, pendant les opérations de xation du berceau au lit des
parents, on ne parvient pas à enler les pieds du berceau
sous le lit des parents, il est également possible d’accrocher
le berceau en suivant les opérations décrites aux points
précédents mais en tournant en plus les pieds articulés
pendant le rapprochement du berceau du lit.
Pour tourner les pieds, tirer le bouton de déblocage de la
rotation «A4 » et tourner d’une main les pieds «A5 » du berceau
vers l’intérieur (g.24).
9. Pour refermer la paroi latérale rabattable, il sut de la
soulever en la saisissant par la partie de structure mobile
supérieure «B2 » (g.25). Toujours vérier qu’elle est introduite
correctement.
AVERTISSEMENT : Toutes les fois que la paroi latérale est
abaissée, vérier que la position correspondante par rapport
au matelas du lit des parents n’a pas changé par rapport à la
description fournie aux paragraphes précédents.
AVERTISSEMENT: Ne jamais utiliser la conguration basculante
quand le berceau est en «mode Cododo (Fixation au lit) ».
AVERTISSEMENT: L’utilisation du produit n’est admise qu’avec
des lits et/ou des matelas ayant des côtés droits. Il est interdit
d’utiliser le produit avec des lits et/ou des matelas ronds, des
matelas à eau.
AVERTISSEMENT : Quand le produit est utilisé en « mode
Cododo (Fixation au lit) », il doit toujours être monté au niveau
du côté long d’accès au lit. NE PAS installer le produit au pied
ou à la tête d’un lit.
CONSEILS D’ENTRETIEN
Le berceau et le matelas ont un revêtement en tissu
complètement amovible et lavable.
Pour le déhoussage, suivre la procédure décrite au paragraphe
«DÉHOUSSAGE ».
AVERTISSEMENT : Les opérations de déhoussage et/ou de
rehoussage pourraient prendre quelques minutes et doivent
être eectuées par un adulte.
Vérier régulièrement l’état d’usure du produit et la présence
d’éventuels défauts. En cas d’endommagements, ne pas
l’utiliser et le tenir hors de portée des enfants.
Pour le lavage des tissus, suivre attentivement les instructions
reportées sur l’étiquette.
Pour le nettoyage, ne pas utiliser de solvants ni de produits
abrasifs ou trop agressifs.
Laver à la main à l’eau froide
Ne pas blanchir
Ne pas sécher en machine
Ne pas repasser
Ne pas laver à sec
Après chaque lavage, vérier la résistance du tissu et des coutures.
AVERTISSEMENT : Pendant les opérations de déhoussage
et/ou de rehoussage, manipuler avec précaution la partie
en tissu pour éviter les déchirures ou les endommagements
accidentels.
RÉFECTION DU LIT
Il est possible de décrocher le berceau du lit des parents pour faciliter
30° C

20
21
la réfection quotidienne du lit. Pour ce faire, il sut de décrocher les
boucles grises situées en dessous du revêtement en tissu.
En raccrochant le berceau au lit des parents, tirer à nouveau
les sangles pour garantir que le berceau est correctement
et fermement xé au lit des parents. Faire attention à ce que
tous les points décrits précédemment au paragraphe «mode
Cododo (xation au lit) » soient respectés.
DÉHOUSSAGE
1. Enlever le matelas et décrocher les boutons sur la partie
inférieure de la structure en tissu, en suivant la procédure
inverse par rapport à celle du paragraphe «MONTAGE DU
BERCEAU ».
2. Ouvrir les 3 zips «E3 » situées sur la structure supérieure «B »
et décrocher les 4 boutons de xation du revêtement en tissu
à la structure supérieure.
3. Appuyer sur les boutons situés sur le dispositif
d’enclenchement des pieds et tirer la structure tubulaire
supérieure vers le haut en la dégageant des pieds (g.26A-B)
4. Ôter enn le revêtement en tissu.
DÉMONTAGE DU BERCEAU
Il est possible de démonter complètement le berceau pour
le ranger dans le sac fourni avec le produit. Pour achever
le démontage du berceau après l’avoir déhoussé, éliminer
la traverse inférieure et la structure de support centrale, en
répétant les opérations décrites au paragraphe «MONTAGE
DU BERCEAU ».
CONFIGURATION BASCULANTE
Pour activer la conguration basculante, il faut :
1. Enlever les patins «A2 » situés dans la partie inférieure des
pieds du berceau, positionner le pied à proximité de la partie
centrale du sommet de chaque patin et, en saisissant le bord
supérieur du berceau avec la main, tirer le berceau vers le
haut en contrebalançant avec le pied pour ne pas qu’il se
soulève du sol (g.27).
2. Répéter cette opération pour chacun des deux côtés.
3. Pour désactiver la conguration basculante, il sut
d’appuyer, pour chacun des deux côtés, sur le bouton «A7
» situé au centre du patin, tout en accompagnant le berceau
vers le bas, en le saisissant par le bord supérieur, de manière
à ce que le patin revienne en position de fermeture (g.28).
Toujours s’assurer que le patin est complètement tourné en
position de fermeture.
AVERTISSEMENT : Ne jamais oublier de désactiver la
conguration basculante si l’on veut utiliser le produit en
«mode Cododo (xation au lit) » ou en l’absence de surveillance
par un adulte.
AVERTISSEMENT : Il n’est pas possible de sélectionner des
hauteurs diérentes sur les deux côtés du berceau quand celui-
ci est utilisé en conguration basculante.
GARANTIE
Le produit est garanti contre les défauts de conformité dans des
conditions normales d’utilisation selon les indications prévues
par la notice d’emploi. La garantie ne sera donc pas appliquée
en cas de dommages dérivant d’un usage inapproprié, de
l’usure ou d’événements accidentels. En ce qui concerne la
durée de la garantie contre les défauts de conformité, consulter
les conditions prévues par les normes nationales applicables, le
cas échéant, dans le pays d’achat.
La pagina si sta caricando...
La pagina si sta caricando...
La pagina si sta caricando...
La pagina si sta caricando...
La pagina si sta caricando...
La pagina si sta caricando...
La pagina si sta caricando...
La pagina si sta caricando...
La pagina si sta caricando...
La pagina si sta caricando...
La pagina si sta caricando...
La pagina si sta caricando...
La pagina si sta caricando...
La pagina si sta caricando...
La pagina si sta caricando...
La pagina si sta caricando...
La pagina si sta caricando...
La pagina si sta caricando...
La pagina si sta caricando...
La pagina si sta caricando...
La pagina si sta caricando...
La pagina si sta caricando...
La pagina si sta caricando...
La pagina si sta caricando...
La pagina si sta caricando...
La pagina si sta caricando...
La pagina si sta caricando...
La pagina si sta caricando...
La pagina si sta caricando...
La pagina si sta caricando...
La pagina si sta caricando...
La pagina si sta caricando...
La pagina si sta caricando...
La pagina si sta caricando...
La pagina si sta caricando...
La pagina si sta caricando...
La pagina si sta caricando...
La pagina si sta caricando...
La pagina si sta caricando...
La pagina si sta caricando...
La pagina si sta caricando...
La pagina si sta caricando...
La pagina si sta caricando...
La pagina si sta caricando...
La pagina si sta caricando...
La pagina si sta caricando...
La pagina si sta caricando...
La pagina si sta caricando...
La pagina si sta caricando...
La pagina si sta caricando...
La pagina si sta caricando...
La pagina si sta caricando...
La pagina si sta caricando...
La pagina si sta caricando...
La pagina si sta caricando...
La pagina si sta caricando...
La pagina si sta caricando...
La pagina si sta caricando...
La pagina si sta caricando...
La pagina si sta caricando...
La pagina si sta caricando...
La pagina si sta caricando...
La pagina si sta caricando...
La pagina si sta caricando...
-
 1
1
-
 2
2
-
 3
3
-
 4
4
-
 5
5
-
 6
6
-
 7
7
-
 8
8
-
 9
9
-
 10
10
-
 11
11
-
 12
12
-
 13
13
-
 14
14
-
 15
15
-
 16
16
-
 17
17
-
 18
18
-
 19
19
-
 20
20
-
 21
21
-
 22
22
-
 23
23
-
 24
24
-
 25
25
-
 26
26
-
 27
27
-
 28
28
-
 29
29
-
 30
30
-
 31
31
-
 32
32
-
 33
33
-
 34
34
-
 35
35
-
 36
36
-
 37
37
-
 38
38
-
 39
39
-
 40
40
-
 41
41
-
 42
42
-
 43
43
-
 44
44
-
 45
45
-
 46
46
-
 47
47
-
 48
48
-
 49
49
-
 50
50
-
 51
51
-
 52
52
-
 53
53
-
 54
54
-
 55
55
-
 56
56
-
 57
57
-
 58
58
-
 59
59
-
 60
60
-
 61
61
-
 62
62
-
 63
63
-
 64
64
-
 65
65
-
 66
66
-
 67
67
-
 68
68
-
 69
69
-
 70
70
-
 71
71
-
 72
72
-
 73
73
-
 74
74
-
 75
75
-
 76
76
-
 77
77
-
 78
78
-
 79
79
-
 80
80
-
 81
81
-
 82
82
-
 83
83
-
 84
84


Chicco NeXt 2 me Guida utente
- Categoria
- Mobili per bambini
- Tipo
- Guida utente
in altre lingue
- français: Chicco NeXt 2 me Mode d'emploi
- español: Chicco NeXt 2 me Guía del usuario
- português: Chicco NeXt 2 me Guia de usuario
- Türkçe: Chicco NeXt 2 me Kullanici rehberi
Documenti correlati
Altri documenti
-
Joie ROOMIE GLIDE DLX S S GREY FLOWER Manuale utente
-
Joie roomie™ Manuale utente
-
Brevi Side bed crib Vicino Manuale del proprietario
-
-
Joie Roomie Glide Bedside Crib Manuale utente
-
Lionelo Theo Manuale utente
-
Lionelo LO-LEONIE Manuale utente
-
Lionelo Luna Manuale utente