Trendnet TV-IP315PI Guida utente
- Categoria
- Telecamere di sicurezza
- Tipo
- Guida utente


TRENDnet User’s Guide TV-IP315PI
© Copyright 2017 TRENDnet. All Rights Reserved. 2
Contents
...................................................................................................... 1
Product Overview ........................................................................... 4
Features ...................................................................................................................4
Hardware .................................................................................................................4
Performance ............................................................................................................4
Camera Management ..............................................................................................5
Package Contents ....................................................................................................5
Front View ...............................................................................................................6
Angle Adjustment ....................................................................................................6
Reset Button ............................................................................................................6
Warnings..................................................................................................................7
Cautions ...................................................................................................................7
Installation Procedure .......................... Error! Bookmark not defined.
Plan for installation location ........................................................... 8
Viewing angle ..........................................................................................................8
Weather Conditions.................................................................................................8
Hardware Installation ..................................................................... 9
Cabling .....................................................................................................................9
Waterproof cap .......................................................................................................9
Access your Camera with the Web Browser .................................... 9
System Management and Default Settings .............................................................9
Setup Your Camera with CD .......................................................... 10
Logging-in to the Camera for the First Time (Windows) ......... Error! Bookmark not
defined.
Logging-in to the Camera for the First Time (Windows) .......................................12
Logging-in to the Camera for the First Time (OS X) ...............................................14
Live View ................................................................................................................18
Playback .................................................................................................................19
Search for video recordings ..................................................................................................... 19
Time Line.................................................................................................................................. 19
Playback ................................................................................................................................... 20
Slice images from video playback ............................................................................................ 20
Download sections of video ..................................................................................................... 21
Download snapshots................................................................................................................ 21
Log .........................................................................................................................22
Search for logs ......................................................................................................................... 22
System Information ...............................................................................................23
System Configuration .................................................................... 24
Device Settings ......................................................................................................24
User Accounts ........................................................................................................25
Time Settings .........................................................................................................25
Daylight Savings .....................................................................................................26
Live View Settings ..................................................................................................26
Maintenance..........................................................................................................27
Network Settings .......................................................................... 28
TCP/IP ....................................................................................................................28
Port ........................................................................................................................29
DDNS ......................................................................................................................30
PPPoE .....................................................................................................................30
SNMP .....................................................................................................................31
802.1X ....................................................................................................................32
IP Address Filter .....................................................................................................33
Quality of Service (QoS) .........................................................................................33
UPnP ......................................................................................................................34

TRENDnet User’s Guide TV-IP315PI
© Copyright 2017 TRENDnet. All Rights Reserved. 3
Video Settings .............................................................................. 34
Video Format .........................................................................................................34
Display Settings .....................................................................................................35
On Screen Display Settings ....................................................................................38
Text Overlay ...........................................................................................................38
Privacy Mask ..........................................................................................................39
Video Recording ....................................................................................................39
Events .......................................................................................... 40
Motion Detection ..................................................................................................40
Video Tampering ...................................................................................................42
Notification ............................................................................................................44
Snapshot ................................................................................................................44
Email ......................................................................................................................45
Network Storage .......................................................................... 46
Network Storage ....................................................................................................46
Storage Management ............................................................................................48
FTP Server ..............................................................................................................49
Appendix ...................................................................................... 50
Direct video access - RTSP .....................................................................................50
Regulations .................................................................................. 50
Federal Communication Commission Interference Statement .................................50
RoHS .....................................................................................................................50
Europe – EU Declaration of Conformity ................................................................51
Limited Warranty ......................................................................... 52

TRENDnet User’s Guide TV-IP315PI
© Copyright 2017 TRENDnet. All Rights Reserved. 4
Product Overview
Features
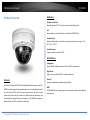
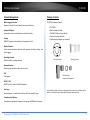
The Indoor / Outdoor 4 MP PoE Dome Day/Night Network Camera, model TV-
IP315PI, provides powerful 4-megapixel night vision in complete darkness for
up to 30 meters (100 ft.) Even in extreme environments, this ultra-compact
camera will function all year, thanks to an IP66 weather rated housing. Use
the included pro-grade software to manage up to 32 TRENDnet cameras or
download the free iOS® or Android™ mobile app.
Hardware
Compact Fixed Dome
Manually pan and tilt 75° to set the camera’s final viewing field
PoE
Save installation costs with Power over Ethernet (IEEE 802.3af)
Outdoor Ready
Outdoor IP66 weather rated and an operating temperature range of -30 –
60 °C (-22 – 140 °F)
Vandal Resistant
Impact protection rated with IK10
Performance
4 Megapixel
Record 2688 x 1520 pixel video at 20 fps in H.264+ compression
Night Vision
Night vision up to 30m (100ft.) in complete darkness
Smart IR
Dynamic IR adjustment optimizes night visibility
WDR
120 dB Wide Dynamic Range improves video quality in high contrast lighting
environments

TRENDnet User’s Guide TV-IP315PI
© Copyright 2017 TRENDnet. All Rights Reserved. 5
Camera Management
Multi-Language Interface
Support for English, French, Spanish, German, and Russian
Advanced Playback
Advanced in-camera archived video review functionality
Storage
SMB/CIFS support with notification if storage drive is full
Motion Detection
Create motion detection windows with separate sensitivity settings and
event triggers
Recording Schedule
Define a weekly recording schedule
Tamper Detection
Receive tamper detection video clips via email
IPv6
IPv6 support
ONVIF / PSIA
ONVIF Profile S, Profile G and PSIA compliant
Free Apps
See live video on a mobile device with free iOS
®
and Android™ apps
Complimentary Software
Complimentary pro-grade software to manage up to TRENDnet 32 cameras
Package Contents
TV-IP315PI package includes:
• TV-IP315PI
• Quick Installation Guide
• CD-ROM (Utility and User’s Guide)
• Camera mounting hardware
• (Optional power adapter not included)
If any package content is missing or damaged, please contact the retail store, online
retailer, or reseller/distributor from which the product was purchased.
Drilling Template
Mounting Screws
Network Cable
Waterproof Accessories

TRENDnet User’s Guide TV-IP315PI
© Copyright 2017 TRENDnet. All Rights Reserved. 6
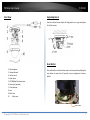
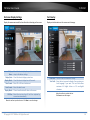
1. Mounting base
2. Horizontal stand
3. Vertical stand
4. Lower dome
5. 10/100Mbps PoE network port
6. Power port (optional)
7. Infra-red lamps
8. Lens
9. Black Liner
10. Safety rope
Front View
Angle Adjustment
Loosen the tilt lock screws, adjust the tilting position in a range, and tighten
the tilt lock screws.
Reset Button
Push and hold the reset button then power on the camera. Keep holding the
reset button for more than 10 seconds to reset configuration to factory
default.
Reset Button

TRENDnet User’s Guide TV-IP315PI
© Copyright 2017 TRENDnet. All Rights Reserved. 7
Warnings
Serious injury or death may be caused if any of these warnings are neglected.
Follow these safety guards to prevent serious injury or death.
• If using the power adapter, please choose the power adapter that
meets the safety extra low voltage (SELV) standard or IEC60950-1 and
Limited Power Source standard.
• If the product does not work properly, please contact your dealer or
the nearest service center. Never attempt to disassemble the camera
yourself. Disassembling the product will void the warranty and may
cause harm or injury.
• To reduce the risk of fire or electrical shock, do not expose this product
to rain or water.
• The installation should be done by a qualified service person and
should conform to all construction and electric regulations and other
local codes.
Cautions
Injury or equipment damage may be caused if any of these cautions are
neglected. Follow these precautions to prevent potential injury or material
damage.
• Make sure the power supply voltage is correct before using the Camera.
• Do not drop the camera or subject to physical shock.
• Do not touch sensor modules with fingers. If cleaning is necessary, use
a clean cloth with a bit of ethanol and wipe it gently. If the camera will
not be used for an extended period of time, put on the lens cap to
protect the sensor from dirt.
• Do not aim the camera lens at the strong light such as the Sun or an
incandescent lamp. Strong light can damage the camera sensor.
• The sensor may be burned out by a laser beam, so when any laser
equipment is being used, make sure that the surface of the sensor will
not be exposed to the laser beam.
• Do not place the camera in extremely hot, cold temperatures (the
operating temperature should be between -10°C to 60°C), dusty or
damp environment, and do not expose it to high electromagnetic
radiation.
• To avoid heat accumulation, good ventilation is required for a proper
operating environment.
• Keep out of water and any liquid.
• While shipping, the camera should be packed in its original packing.

TRENDnet User’s Guide TV-IP315PI
© Copyright 2017 TRENDnet. All Rights Reserved. 8
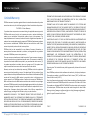
Plan for installation location
Viewing angle
The TV-IP315PI is a dome camera with a focused viewing angle (83 horizontal)
that provides non-distorted and detailed images. Choose the location where
has good angle to shoot the image you expect to see. The motion detection
area should also be considered when installing the camera.
Weather Conditions
The TV-IP315PI is a small dome camera, which fits most installations indoor
and outdoor. The camera can work under a wide range of weather conditions.
For severe weather conditions, a camera housing with temperature and
moisture control is recommended. Using the camera in milder weather
conditions will help extend the camera’s product life and preserve the quality
of the video image.
• Moisture: Avoid damp or moist environments whenever you can. The
TV-IP315PI is an IP66 grade water proof camera, and it will work in
moist environments. However, rain may affect the picture quality,
especially at night, water may reflect the light from the infra-red
illumination and degrade picture quality.
• Temperature: TV-IP315PI works within a specified temperature range.
Areas with severe temperatures should be avoided when installing the
camera. It’s recommended that you use an enclosure with a heater and
blower if you plan on using this camera outside of the specified
temperature range.
• Sunlight: Avoid direct sun light exposure. Direct sun light will damage
the image sensor. If sunlight is necessary for your viewing purposes,
provide protection for the image sensor.
• Lighting: Consider installing your camera faces the same direction of
the light sources. Shooting images with top-down position outdoor or
next to the existing light source are good choices. Avoid the light source
if it creates a shade that darkens the viewing area.

TRENDnet User’s Guide TV-IP315PI
© Copyright 2017 TRENDnet. All Rights Reserved. 9
Hardware Installation
Cabling
It’s recommended that the wiring the cable in your home or office by a
professional. If you already have the cable deployed, make sure the cable and
the connectors meet the category 5 Ethernet cable standards. At least 2 pairs
of twisted lines are required for power and data. Poor cable quality may cause
unexpected problems. Testing your cable or running a new cable is suggested
for new camera installation.
Waterproof cap
The TV-IP315PI itself is IP66 grade water and dust proof. There is a set of
network cable water proof caps that comes with the package as well. Run
your cable going through the accessories, and then crimp the cable with an
RJ45 module. Plug in the network cable and then tighten the waterproof cap
to prevent water running into camera through the cable.
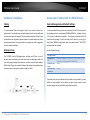
Access your Camera with the Web Browser
System Management and Default Settings
It is recommended that you install your camera with the CD that comes with
the package and use accompanying TRENDnetVIEW Pro software (version
2.4.3 or later) for Windows computers. The software is included on the CD
comes with the package. If you do not have the CD with you, you can go to
http://www.TRENDnet.com/support enter the model number “TV-IP315PI”
and download the software.
Camera Default Settings:
System Default
Management
IP
Dynamic assigned if there’s a DHCP server on the
network or self-assigned 192.168.10.30
Administrator
name
admin
Administrator
password
admin
If you want to access your camera directly instead of using software, you can
follow the steps specified in this chapter to login to your camera. A web
browser plug-in must be installed to watch video smoothly.

TRENDnet User’s Guide TV-IP315PI
© Copyright 2017 TRENDnet. All Rights Reserved. 10
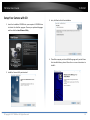
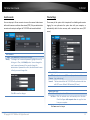
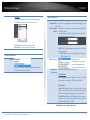
Setup Your Camera with CD
1. Insert the Installation CD-ROM into your computer’s CD-ROM drive
to initiate the Auto-Run program. Choose your preferred language
and then click the Install Camera Utility.
2. Install the Camera Utility as instructed
3. Last, click Next to finish the installation.
4. This will also require you to Install WinPcap program if you don’t have
this installed before, please follow the on screen Instructions to
Install It.

TRENDnet User’s Guide TV-IP315PI
© Copyright 2017 TRENDnet. All Rights Reserved. 11
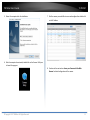
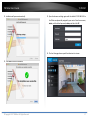
5. Restart the computer after the Installation.
6. After the computer has restarted, double click on the Camera Utility icon
to launch the program.
7. Find the camera you would like to access and configure then double click
on the IP address.
8. Continue to the next section Access your Camera with the Web
Browser for detail configurations of the camera.

TRENDnet User’s Guide TV-IP315PI
© Copyright 2017 TRENDnet. All Rights Reserved. 12
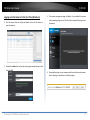
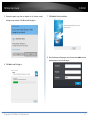
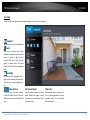
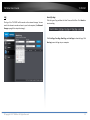
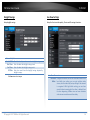
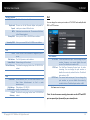
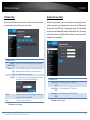
Logging-in to the Camera for the First Time (Windows)
1. Find the camera from the Utility and double click on the IP address to
open the browser.
2. Activate the admin User Account by entering your desired password, and
then click OK.
3. The camera management page will detect if you installed the camera
video streaming plug-in or not. Click the link to download the plug-in from
the camera.
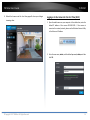
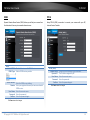
4. Download the plug-in to your computer and then and close your browser.
Launch the plug-in installation to install the plug-in.

TRENDnet User’s Guide TV-IP315PI
© Copyright 2017 TRENDnet. All Rights Reserved. 13
5. Permission request may show up depends on the Internet security
settings on your computer. Click Yes to install the plug- in.
6. Click Next to install the plug-in.
7. Click Finish to finish the installation.
8. Open the browser and login again, enter the user name admin and new
password again to start secured session.

TRENDnet User’s Guide TV-IP315PI
© Copyright 2017 TRENDnet. All Rights Reserved. 14
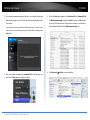
9. Refresh the browser and the Live View page will show up and begin
streaming video
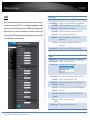
Logging-in to the Camera for the First Time (OS X)
1. Open the web browser on your computer. In the address bar, enter the
default IP address of the camera 192.168.10.30. If the camera is
connected to a router/network, please use the Windows Camera Utility
to find the exact IP address.
2. Enter the user name, admin, and the default password, admin, and then
click OK.

TRENDnet User’s Guide TV-IP315PI
© Copyright 2017 TRENDnet. All Rights Reserved. 15
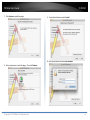
3. The camera management page will detect if you installed the camera
webcomponent plug-in or not. Click the link to download the plug-in from
the camera.
Note: Internet connection is required to download the plug-in. If you do not have
Internet access, you can find the plug-in on the CD comes with the package under
/Mac folder.
4. Quit your browser completely by command-Click on the browser icon
and then click Quit before installing the plug-in.
5. Go to the Finder and navigate to the Download folder. Command-Click
the WebComponents.pkg and then click Open. (If you are install the plug-
in from the CD when you don’t have internet connection, just browse to
/Mac folder and double click the WebComponents.pkg file.)
6. Click Open with Installer to start installation.

TRENDnet User’s Guide TV-IP315PI
© Copyright 2017 TRENDnet. All Rights Reserved. 16
7. Click Continue to install the plug-in.
8. Select a destination to install the plug-in. Then click Continue.
9. Use the default location and click Install.
10. Enter your password and click Install Software

TRENDnet User’s Guide TV-IP315PI
© Copyright 2017 TRENDnet. All Rights Reserved. 17
11. Installation will process automatically.
12. Click Close to exit the installation.
13. Open the browser and login again with the default IP 192.168.10.30 or
the IP that was dynamically assigned by your router. Enter the user name,
admin, and the default password, admin, and then click OK.
14. The Live View page shows up and the video starts to stream.

TRENDnet User’s Guide TV-IP315PI
© Copyright 2017 TRENDnet. All Rights Reserved. 18
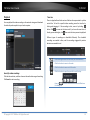
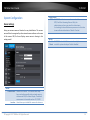
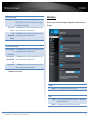
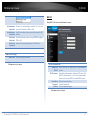
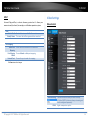
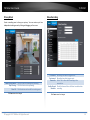
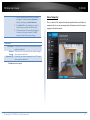
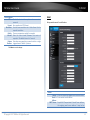
Live View
Snapshot
Click this icon to take a video snapshot.
After you log-in into the camera management page, you’ll see the Live View page.
Zoom
Click once to enable zoom. When
enabled, click and drag the area on the
picture to zoom in. Right click to
resume 100% zoom. Click the icon
again to disable zoom. The zoom
function works in full screen mode as
well.
Recording
Click once to start recording. Click it
again to stop recording. The status bar
will indicate if it is in recording state or
not.
Video Stream
TV-IP315PI has two video streams:
H.264 and MJPEG. Switch to view the
different video streams by clicking this
icon.
Full Screen Mode
Click the picture to view in full screen
mode. Double click again or press
escape key on your keyboard to exit
full screen mode.
Status Bar
The status bar shows the status you
are at, including enabled the zoom,
recording video, and successfully
taking a snapshot.

TRENDnet User’s Guide TV-IP315PI
© Copyright 2017 TRENDnet. All Rights Reserved. 19
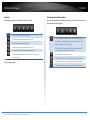
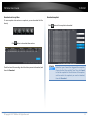
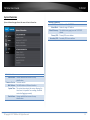
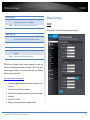
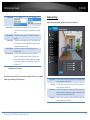
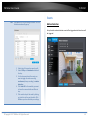
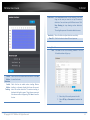
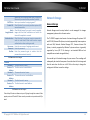
Playback
You can playback the video recording on the network storage and download
the video clip and snapshots to your local computer.
Search for video recordings
Click the date selection, and then choose a date as the date range of searching.
Click Search to start searching.
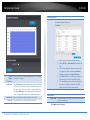
Time Line
There is a play back head in the center of the time line represented in a yellow
vertical line. To look for a specific video recording, move the time line by
clicking and dragging it. If the recording is short, zoom in by clicking
button. Click
to zoom out the time scale. If you know the exact time of
the day you are looking for, click
then enter the time you want to playback.
Different types of recordings are identified differently. The scheduled
recordings are marked in blue, and the recordings triggered by motion
detection are marked in red.
Click and drag the time line to move your time manually.
Click this button to zoom in the scale
Click this button to zoom out of the scale
Click this button to specify a specific time of the day.
then click to confirm selection and then click X to close
this dialog box.

TRENDnet User’s Guide TV-IP315PI
© Copyright 2017 TRENDnet. All Rights Reserved. 20
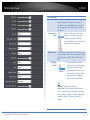
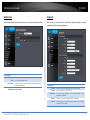
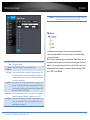
Playback
Use playback controls to play back the video recording.
Click this button to play the video.
Click this button to pause video playback.
Click this button to stop playback.
Click this button increase playback speed*.
Click this button decrease playback speed*.
Click to playback video frame by frame. Click again for
the next
fr
ame
�
* Note: There are 5 steps of playback speed you can choose from: 1/4, 1/2, 1, 2, and
4 times of original speed.
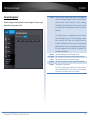
Slice images from video playback
You can take snapshots from playback video or make new video clips from
the video you are playing back.
Click this button to enable zoom. Then click and drag on
the video to define the area you want to zoom in. Click
again to get back to 100% zoom.
Double click to show video in full screen and press
ES
C
on keyboard to exit full screen mode.
Click this button to disable zoom.
Click this button to take a snapshot of current playback.
Click this button to start clipping a video from playback.
Click this button to stop clipping a video from playback.
La pagina si sta caricando...
La pagina si sta caricando...
La pagina si sta caricando...
La pagina si sta caricando...
La pagina si sta caricando...
La pagina si sta caricando...
La pagina si sta caricando...
La pagina si sta caricando...
La pagina si sta caricando...
La pagina si sta caricando...
La pagina si sta caricando...
La pagina si sta caricando...
La pagina si sta caricando...
La pagina si sta caricando...
La pagina si sta caricando...
La pagina si sta caricando...
La pagina si sta caricando...
La pagina si sta caricando...
La pagina si sta caricando...
La pagina si sta caricando...
La pagina si sta caricando...
La pagina si sta caricando...
La pagina si sta caricando...
La pagina si sta caricando...
La pagina si sta caricando...
La pagina si sta caricando...
La pagina si sta caricando...
La pagina si sta caricando...
La pagina si sta caricando...
La pagina si sta caricando...
La pagina si sta caricando...
La pagina si sta caricando...
La pagina si sta caricando...
-
 1
1
-
 2
2
-
 3
3
-
 4
4
-
 5
5
-
 6
6
-
 7
7
-
 8
8
-
 9
9
-
 10
10
-
 11
11
-
 12
12
-
 13
13
-
 14
14
-
 15
15
-
 16
16
-
 17
17
-
 18
18
-
 19
19
-
 20
20
-
 21
21
-
 22
22
-
 23
23
-
 24
24
-
 25
25
-
 26
26
-
 27
27
-
 28
28
-
 29
29
-
 30
30
-
 31
31
-
 32
32
-
 33
33
-
 34
34
-
 35
35
-
 36
36
-
 37
37
-
 38
38
-
 39
39
-
 40
40
-
 41
41
-
 42
42
-
 43
43
-
 44
44
-
 45
45
-
 46
46
-
 47
47
-
 48
48
-
 49
49
-
 50
50
-
 51
51
-
 52
52
-
 53
53


Trendnet TV-IP315PI Guida utente
- Categoria
- Telecamere di sicurezza
- Tipo
- Guida utente
in altre lingue
- English: Trendnet TV-IP315PI User guide
Documenti correlati
-
Trendnet TV-IP315PI Guida utente
-
Trendnet TV-IP1313PI Guida utente
-
Trendnet TV-IP410PI Guida utente
-
Trendnet RB-TV-DVR104K Guida utente
-
Trendnet TV-IP316PI Guida utente
-
Trendnet TV-IP314PI Guida utente
-
Trendnet TV-IP743SIC Guida utente
-
-
Trendnet TV-IP319PI Guida utente
-
Trendnet TV-IP317PI Guida utente