Aprimatic WI-MATIC ATC300E MET Fitting Instructions Manual
- Tipo
- Fitting Instructions Manual

WI-MATIC ATC300E MET.
ATTUATORE A CATENA
CHAIN OPERATOR
Istruzioni di montaggio
Fitting instructions
Tutti i dati sono stati redatti e controllati con la massima cura, ma non possiamo accettare
responsabilità per eventuali errori od omissioni.
Ci riserviamo di apportare quelle modifiche che sono connesse ai progressi tecnologici.
All the specifications have been written and verified with our best attention. We do not
undertake responsability for possible errors or omissions. We reserve the right to
introduce changes relative to technological progress.
IT
GB

2
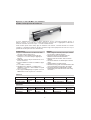
Operatore a catena Wi-Matic Sch. 43509/015
Wi-Matic Chain Operator Ref. 43509/015
Il motore dell’aprifinestra a catena ha ampie applicazioni: finestre saliscendi motorizzate, finestre a
battente, lucernari, ecc. In particolare, è adatto alle finestre montate in alto e raggiungibili con difficoltà. È
facilmente azionabile: la finestra si apre e si chiude automaticamente.
Chain window opener motor widely apply to motorized sash windows, casement windows and various
skylights. It is particularly suitable for windows mounted in high, where people hard to reach. It is easy to
operate the window open and close automatically.
Parametri
Parameters
Modello
43509/015
Velocità
10 mm/s
Temperatura
-20
~+60
Tensione nominale
100-240 V CA
50/60 Hz
Corsa
100-400 mm
Dimensioni
460X42X56
mm
Potenza nominale
28 W
Classe IP
IP42
Forza spinta/trazione
250 N/250 N
Model 43509/015 Speed 10 mm/s Temperature
-20
~+60
Rated voltage 100-240 V AC
50/60 Hz
Running trip 100-400 mm Size 460X42X56
mm
Rated power 28 W IP Class IP42 Push/Pull force 250 N/250 N
Caratteristiche
Ingresso di alimentazione 100-240 VCA, adatto
alle varie richieste di tutti i paesi.
Regolazione della distanza tramite apposita
manopola; la corsa massima può raggiungere
400 mm.
Applicabile a finestre di piccole dimensioni, fino a
finestre di 470 mm.
Catena realizzata in metallo inossidabile a doppio
strato.
Corsa stabile e uniforme.
Alloggiamento in alluminio con trattamento a
sabbiatura; coperchio e staffe realizzate in lega di
zinco pressofusa.
I due supporti ABS ignifughi e la guida scorrevole
POM rendono il motore più sicuro e silenzioso.
Features
Wide voltage100-240VAC power input, suitable
for all country’s different requests.
Adjust the journey by adjusting knob; the
Maximum stroke could reach 400mm.
Apply to small size window, down to 470mm
windows.
The chain materials use double layers stainless
metal.
Quality stable and smooth running.
Aluminum housing with sand blast treatment; the
cover and brackets are zinc alloy die castings.
Two Flame Resistance ABS holders and the
POM sliding guide make the motor more safety
and silent.

3
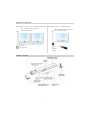
Applicazioni – Application
1) Interruttore manuale esterno - External manual switch
2) Ricevitore esterno - External receiver
Struttura – Structure
Ingresso di alimentazione 100-240 VCA
100-240 VAC Power input
Interruttore
Manual switch
Ingresso di alimentazione 100-240 VCA
1
00
-
2
4
0
VAC Power input
Ricevitore
Receiver

4
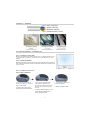
Installazione – Installation
Procedura di installazione – Installation step
Fase 1. Installazione della staffa
Misurare la larghezza del telaio della finestra e installare l’aprifinestra al
centro del telaio. Installare le due staffe in base alle dimensioni, come
indicato.
Step 1. Bracket Installation
Measure the width of the window frame and install the window opener in
the middle of the window frame. Install the two brackets according to the
size as shown.
Fase 2. Installazione del motore
Step 2. Motor installation
1. Con la catena del motore
rivolta verso il basso, inserire il
motore nella staffa.
1. Motor’s chain face down,
put the motor into the bracket
2. Il motore ruota di 90 gradi,
come indicato dalla freccia.
Posizionare la catena del motore
in modo che sia rivolta verso la
finestra.
2. Motor rotate 90 degree as the
arrow diagram. Make motor’s
chain face the window.
3. L’installazione del motore
è stata completata.
3. Motor installation finish.

5
Fase 3. Installazione del connettore finestra
Misurare la larghezza del saliscendi della finestra e installare il connettore
della finestra al centro del saliscendi. Fissare il connettore sulla finestra in
base alle dimensioni, come indicato.
Step 3. Window connector installation
Measure the width of the window sash and install the window connector in
the middle of window sash. Fix the connector on the window according to
the size shown.
Fase 4. Schema del connettore motore e motore
Inserire il perno di fissaggio nel foro che collega il motore e il
connettore e fissare la vite. Regolare la staffa accertandosi che
la catena sia perpendicolare al motore. L’installazione è
completata.
Step 4. Diagram of motor connector and motor
Put the fix pin into the hole connecting motor and the connector
and fix the screw. Adjust the bracket make sure the chain
perpendicular to motor. Installation finish.
Istruzioni di funzionamento
– Operation Instruction
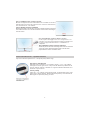
Impostare la distanza prima dell’uso - Set up the journey before using
Impostazione della distanza
Sulla manopola di regolazione sono riportati i numeri 1, 2, 3, 4, come indicato
nella figura a sinistra; ogni numero corrisponde alla distanza rispettivamente di
100 mm, 200 mm, 300 mm e 400 mm. Per regolare la distanza desiderata, fare
riferimento a questi numeri.
Journey setting
There are 1, 2, 3, 4 figures on the adjusting knob, as the left photo shown, each
figure means 100mm, 200mm, 300mm and 400mm journey. You could refer to
these figures to adjust the journey you want.

6
Ad esempio: se si desidera che il motore si estenda per 200 mm, procedere come segue.
Regolare la manopola sul numero 2.
Azionare il motore. Il motore aprirà la finestra di 200 mm e si arresterà automaticamente (se la distanza
non corrisponde perfettamente alla posizione indicata, è possibile regolare la manopola ancora un po’;
dopo tale regolazione, il motore non si aziona automaticamente; è necessario chiudere e riaprire la
finestra, quindi il motore si azionerà fino alla nuova posizione limite).
Attenzione: il motore in fase di chiusura si arresta in presenza di ostacoli.
For example: If you want the motor extend 200mm, you could operate as follow:
Adjust the knob to figure 2.
Operate the motor, the motor will open the window 200mm and stop automatically (if the journey is not
the perfect position, you could adjust the knob a little; the motor will not run automatically after your
adjusting, you have to shut the window and then open the window again, motor will run to the new limit
position).
Attention: The motor closing stop against obstacle.

7
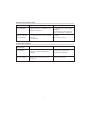
Risoluzione dei problemi comuni
Common fault settlement
Problema Motivo Risoluzione
Motore acceso, ma
non funzionante.
a. Motore sovraccarico.
b. Motore bloccato per installazione non
eseguita correttamente.
a. Cambiare il motore,
scegliendone uno con una coppia
maggiore.
b. Verificare che tutti i componenti
siano stati installati correttamente.
Arresto improvviso
del motore durante
il funzionamento.
a. Il motore ha incontrato un ostacolo, che
ne ha causato l’arresto come sistema di
protezione.
b. Spegnimento.
a. Spegnere e rimuovere gli
ostacoli.
b. Accendere il motore.
Faults
Phenomenon
Faults Reason
Elimination Methods
Power on, motor
isn’t working.
a.Motor is overload.
b.the motor is stuck by inappropriate
installation.
a.Change motor to bigger torque.
b.Check every components
installed in the right way.
Motor suddenly stop
when it’s woking.
a.Motor encounter obstacles, which will
make the motor stop to protect itself.
b.Power off.
a.Power off, remove the obstacles.
b.Power on the motor.

8
URMET SPA - VIA BOLOGNA, 188/C - 10154 TORINO
DIVISIONE APRIMATIC - VIA EMILIA, 147 – 40064
OZZANO DELL’EMILIA – BOLOGNA – ITALY
Tel. +39 051 6960711 – Fax +39 051 6960722
www.aprimatic.com
Prodotto in P.R.C.
Made in P.R.C.
-
 1
1
-
 2
2
-
 3
3
-
 4
4
-
 5
5
-
 6
6
-
 7
7
-
 8
8


Aprimatic WI-MATIC ATC300E MET Fitting Instructions Manual
- Tipo
- Fitting Instructions Manual
in altre lingue
- English: Aprimatic WI-MATIC ATC300E MET
Documenti correlati
Altri documenti
-
Daitsu APD-9CR Manuale utente
-
 nekos KIMO Manuale utente
-
CAME C100 Manuale del proprietario
-
Maserati Bora (Italian - English) Manuale del proprietario
-
Genius Zenith Istruzioni per l'uso
-
-
-
Ferrari 365 Manuale del proprietario
-
Husqvarna SM 610 Manuale del proprietario
