Aprimatic WI-MATIC ATC300E MET Fitting Instructions Manual
- Tipo
- Fitting Instructions Manual

DS43509-003
WI-MATIC ATC300E MET.
ATTUATORE A CATENA
CHAIN OPERATOR
KETTENSTELLANTRIEB
Istruzioni di montaggio
Fitting instructions
Montageanweisungen
Tutti i dati sono stati redatti e controllati con la massima cura, ma non possiamo accettare
responsabilità per eventuali errori ed omissioni.
Ci riserviamo di apportare quelle modifiche che sono connesse ai progressi tecnologici.
All the specifications have been written and verified with our best attention. We do not
undertake responsability for possible errors or omissions. We reserve the right to
introduce changes relative to technological progress.
Alle Daten wurden mit größter Sorgfalt erstellt und überprüft, aber wir übernehmen für
eventuelle Fehler oder Auslassungen keine Verantwortung.
Wir behalten uns das Recht vor Änderungen vorzunehmen, die mit den technologischen
Fortschritten verbunden sind.
IT
GB
DE

DS43509-003 2
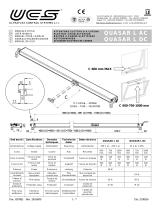
Operatore a catena Wi-Matic Sch. 43509/017
Wi-Matic Chain Operator Ref. 43509/017
Kettenstellantrieb Wi-Matic Ref. 43509/017
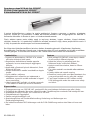
Il motore dell’aprifinestra a catena ha ampie applicazioni: finestre a sporgere, a vasistas, a battente,
lucernari, cupole ecc. In particolare, è adatto alle finestre montate in alto e raggiungibili con difficoltà. È
facilmente azionabile: la finestra si apre e si chiude automaticamente.
Chain window opener motor widely apply to top-hung windows, hopper windows, hinged windows,
skylights, domes etc. It is particularly suitable for windows mounted in high, where people hard to reach. It
is easy to operate the window open and close automatically.
Der Motor des Kettenfensteröffners hat einen breiten
Anwendungsbereich: Klappfenster, Kippfenster,
Ausstellfenster, Dachfenster, Kuppeln usw. Insbesondere ist er für hoch montierte und schwer erreichbare
Fenster geeignet. Er ist einfach zu bedienen: das Fenster öffnet und schließt sich automatisch.
Caratteristiche
Ingresso di alimentazione 100-240 VCA, adatto
alle varie richieste di tutti i paesi.
Regolazione della distanza tramite apposita
manopola; la corsa massima può raggiungere
400 mm.
Applicabile a finestre di piccole dimensioni, fino a
finestre di 470 mm.
Catena realizzata in metallo inossidabile a doppia
maglia.
Corsa stabile e uniforme.
Alloggiamento in alluminio con trattamento a
sabbiatura; coperchio e staffe realizzate in lega di
zinco pressofusa.
I due supporti ABS ignifughi e la guida scorrevole
POM rendono il motore più sicuro e silenzioso.
Features
Wide voltage100-240VAC power input, suitable
for all country’s different requests.
Adjust the journey by adjusting knob; the
Maximum stroke could reach 400mm.
Apply to small size window, down to 470mm
windows.
The chain materials use double roller stainless
metal.
Quality stable and smooth running.
Aluminum housing with sand blast treatment; the
cover and brackets are zinc alloy die castings.
Two Flame Resistance ABS holders and the
POM sliding guide make the motor more safety
and silent.
Eigenschaften
Eingangsspannung von 100-240 VAC, geeignet für die verschiedenen Anforderungen aller Länder.
Einstellung des Abstands über einen entsprechenden Einstellknopf; der maximale Hub beträgt 400 mm.
Anwendbar für kleine Fenster, für Fenster bis zu 470 mm.
Edelstahlkette mit Doppelglied.
Stabiler und gleichmäßiger Lauf.
Aluminiumgehäuse mit Sandstrahlbehandlung; Abdeckung und Halterungen aus
Zinkdruckgusslegierung.
Die beiden feuerfesten ABS-Halterungen und die POM-Gleitführung machen den Motor sicherer und
leiser.

DS43509-003 3
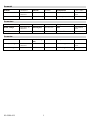
Parametri
Parameters
Parameter
Modello 43509/017 Velocità 10 mm/s Temperatura -20
℃
~+60
℃
Tensione nominale 100-240 V CA
50/60 Hz
Corsa 100-400 mm Dimensioni 460X42X56
mm
Potenza nominale 28 W Classe IP IP42 Forza spinta/trazione 250 N/250 N
Model 43509/017
Speed 10 mm/s Temperature -20
℃
~+60
℃
Rated voltage 100-240 V AC
50/60 Hz
Running trip 100-400 mm Size 460X42X56
mm
Rated power 28 W IP Class IP42 Push/Pull force 250 N/250 N
Modell 43509/017
Geschwindig
keit
10 mm/s Temperatur -20
℃
~+60
℃
Nennspannung 100-240 V AC
50/60 Hz
Lauf 100-400 mm Abmessungen 460X42X56
mm
Nennleistung 28 W IP-Klasse IP42 Schub-/Zugkraft 250 N/250 N

DS43509-003 4
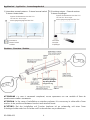
Applicazioni – Application -
Anwendungsbereich
1) Interruttore manuale esterno - External manual switch
Externer Handschalter
2) Ricevitore esterno - External receiver
Externer Empfänger
Struttura – Structure - Struktur
ATTENZIONE : In caso si serramenti complanari, occore spessorare con una rondella di 3mm da
posizionare tra staffa e serramento.
ATTENTION :
In the case of installation on window coplanar, it is necessary to shim with a 3mm
washer to be positioned between bracket and window frame.
ACHTUNG: Bei der Installation auf Fenster koplanar ist es notwendig, mit einer 3mm
Unterlegscheibe zwischen Scheibe und Fensterrahmen zu positionieren.
Ingresso di alimentazione 100-240 VCA
100-240 VAC Power input
Versorgungseingang 100
-240 VAC
Interruttore
Manual switch
Schalter
Ingresso di alimentazione 100-240 VCA
100-240 VAC Power input
Versorgungseingang 100
-240 VAC
Ricevitore
Receiver
Empfänger
Staffa per sporgere
Top
-
hung bracket
Hänghalterung
linke Klammer
rechte Klammer
Kettenstellantrieb
Kette
Einstellknopf
nuss
nuss
Innensechskantschraube

DS43509-003 5
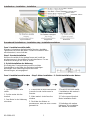
Installazione – Installation - Installation
Procedura di installazione – Installation step - Installationsverfahren
Fase 1. Installazione della staffa
Misurare la larghezza del telaio della finestra e installare
l’aprifinestra al centro del telaio. Fissare una staffa in base
alle dimensioni, come indicato.
Step 1. Bracket Installation
Measure the width of the window frame and install the
window opener in the middle of the window frame. Fix one
bracket according to the size as shown.
1. Schritt Installation der Halterung
Die Breite des Fensterrahmens messen und den
Fensteröffner in der Mitte des Rahmens befestigen.
Befestigen eine Halterung entsprechend den
Abmessungen, wie angegeben.
Fase 2. Installazione del motore - Step 2. Motor installation - 2. Schritt Installation des Motors
1. Inserire il motore nella
staffa.
1. Put the motor into the
bracket
1. Den Motor in der Halterung
einsetzen.
2. Posizionare la catena del motore
in modo che sia rivolta verso la
finestra.
2. Make motor’s chain face the
window
2. Die Kette des Motors so
positionieren, dass sie zum Fenster
gewandt ist.
3.Fissare la seconda staffa.
L’installazione del motore è
stata completata.
3. Fix the second bracket.
Motor installation finish.
3. Befestigen die andere
Halterung. Die Installation
des Motors ist beendet.
Sprossenfenster
Klappfenster Drehfenster
/ Blau – Neutral
/ Black - Geschlossen
/ Braun - Offen
/ Gün/Gelb - Masse

DS43509-003 6
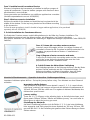
Fase 3. Installazione del connettore finestra
Misurare la larghezza del serramento e installare la staffa a sporgere al
centro del serramento. Fissare la staffa a sporgere sulla finestra in base
alle dimensioni, come indicato.
Stessa procedura per installazione con staffa per applicazione a vasistas
(fornibile separatamente con cod. 43509/050).
Step 3. Window connector installation
Measure the width of the window and install the top-hung bracket in the
middle of the window. Fix the top-hung bracket on the window according
to the shown size.
Follow the same procedure to install a bracket in hopper window applications (to be purchased
separately with ref. 43509/050).
3. Schritt Installation des Fensteranschlusses
Die Breite des Fensters messen und die Hänghalterung in der Mitte des Fensters installieren. Die
Hänghalterung entsprechend den Abmessungen, wie angegeben, am Fenster befestigen.
Das gleiche Verfahren zur Installation der Halterung für Kippfenster befolgen (separat mit Code 43509/050
lieferbar).
Fase 4. Schema del connettore motore e motore
Inserire il perno di fissaggio nel foro che collega il motore e il
connettore e fissare la vite. Regolare la staffa accertandosi che
la catena sia perpendicolare al motore. L’installazione è
completata.
Step 4. Diagram of motor connector and motor
Put the fix pin into the hole connecting motor and the connector
and fix the screw. Adjust the bracket make sure the chain
perpendicular to motor. Installation finish.
4. Schritt Schema der Motor-Motor Verbindung
Den Befestigungsbolzen in die Bohrung einführen, die den Motor
und den Stecker verbindet und die Schraube befestigen. Die
Halterung einstellen und dabei sicherstellen, dass die Kette
senkrecht zum Motor steht. Die Installation ist beendet.
Istruzioni di funzionamento
– Operation Instruction - Bedienungsanleitung
Impostare la distanza prima dell’uso - Set up the journey before using - Den Abstand vor dem Gebrauch
einstellen
Impostazione della distanza
Sulla manopola di regolazione sono riportati i numeri 1, 2, 3, 4, come indicato
nella figura a sinistra; ogni numero corrisponde alla distanza rispettivamente di
100 mm, 200 mm, 300 mm e 400 mm. Per regolare la distanza desiderata, fare
riferimento a questi numeri.
Journey setting
There are 1, 2, 3, 4 figures on the adjusting knob, as the left photo shown, each
figure means 100mm, 200mm, 300mm and 400mm journey. You could refer to
these figures to adjust the journey you want.
Einstellung des Abstands
Auf dem Einstellknopf befinden sich die Zahlen 1, 2, 3, 4, wie in der Abbildung
links angezeigt; jede Zahl entspricht einem Abstand von 100 mm, 200 mm, 300
mm und 400 mm. Für die Einstellung der gewünschten Distanz Bezug zu diesen
Zahlen nehmen.
Einstellknopf

DS43509-003 7
Ad esempio: se si desidera che il motore si estenda per 200 mm, procedere come segue.
Regolare la manopola sul numero 2.
Azionare il motore. Il motore aprirà la finestra di 200 mm e si arresterà automaticamente (se la distanza
non corrisponde perfettamente alla posizione indicata, è possibile regolare la manopola ancora un po’;
dopo tale regolazione, il motore non si aziona automaticamente; è necessario chiudere e riaprire la
finestra, quindi il motore si azionerà fino alla nuova posizione impostata).
Attenzione: il motore in fase di chiusura si arresta in presenza di ostacoli.
For example: If you want the motor extend 200mm, you could operate as follow:
Adjust the knob to figure 2.
Operate the motor, the motor will open the window 200mm and stop automatically (if the journey is not
the perfect position, you could adjust the knob a little; the motor will not run automatically after your
adjusting, you have to shut the window and then open the window again, motor will run to the new set
position).
Attention: The motor closing stop against obstacle.
Zum Beispiel: soll der Motor auf 200 mm erweitert werden, wie folgt vorgehen.
Den Knopf auf die Zahl 2 einstellen.
Den Motor starten. Der Motor öffnet das Fenster um 200 mm und stoppt automatisch (entspricht der
Abstand nicht genau der angegebenen Position, kann mit dem Knopf eine weitere Einstellung getätigt
werden; nach dieser Einstellung startet der Motor nicht automatisch; das Fenster muss geschlossen
und erneut geöffnet werden, danach wird der Motor auf die neu eingestellte Position bewegt).
Beim Schließen stoppt der Motor in Gegenwart von Hindernissen.

DS43509-003 8
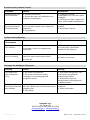
Risoluzione dei problemi comuni
Common fault settlement
Lösungen der häufigsten Störungen
Problema Motivo Risoluzione
Motore acceso, ma
non funzionante.
a. Motore sovraccarico.
b. Motore bloccato per installazione non
eseguita correttamente.
a. Cambiare il motore,
scegliendone uno con una coppia
maggiore.
b. Verificare che tutti i componenti
siano stati installati correttamente.
Arresto improvviso
del motore durante
il funzionamento.
a. Il motore ha incontrato un ostacolo, che
ne ha causato l’arresto come sistema di
protezione.
b. Spegnimento.
a. Spegnere e rimuovere gli
ostacoli.
b. Accendere il motore.
Faults
Phenomenon
Faults Reason
Elimination Methods
Power on, motor
isn’t working.
a.Motor is overload.
b.the motor is stuck by inappropriate
installation.
a.Change motor to bigger torque.
b.Check every components
installed in the right way.
Motor suddenly stop
when it’s woking.
a.Motor encounter obstacles, which will
make the motor stop to protect itself.
b.Power off.
a.Power off, remove the obstacles.
b.Power on the motor.
Störung Grund Lösung
Der Motor läuft,
aber funktioniert
nicht.
a. Der Motor ist überlastet.
b. Der Motor ist blockiert, da die
Installation nicht ordnungsgemäß
ausgeführt wurde.
a. Den Motor austauschen und
einen Motor mit größerem
Drehmoment wählen.
b. Überprüfen, dass alle
Komponenten ordnungsgemäß
installiert wurden.
Plötzlicher Stillstand
des Motors während
des Betriebs.
a. Der Motor hat ein Hindernis entdeckt,
das den Stillstand als Schutzmechanismus
ausgelöst hat.
b. Abschalten.
a. Abschalten und die Hindernisse
entfernen.
b. Motor einschalten.
Made in China - Hergestellt in China.
Aprimatic s.r.l.
Via Emilia 147
40064 Ozzano dell'Emilia (BO) Italy
www.aprimatic.it - info@aprimatic.it
Tel. 051 6960711 - Fax 051 6960722
-
 1
1
-
 2
2
-
 3
3
-
 4
4
-
 5
5
-
 6
6
-
 7
7
-
 8
8


Aprimatic WI-MATIC ATC300E MET Fitting Instructions Manual
- Tipo
- Fitting Instructions Manual
in altre lingue
- English: Aprimatic WI-MATIC ATC300E MET
- Deutsch: Aprimatic WI-MATIC ATC300E MET
Documenti correlati
Altri documenti
-
CAME C100 Manuale del proprietario
-
-
Comunello Smart Manuale utente
-
-
 UCS QUASAR L AC Manuale utente
-
Nice Automation Climber Manuale del proprietario
-
-
Genius Zenith Istruzioni per l'uso
-
Key Gates Viper LED Guida utente
-
Nice Spider 6060 Manuale utente
