
3-247-462-13(1)
Portable
MiniDisc Player
Operating Instructions
Mode d’emploi
Bedienungsanleitung
Manual de instrucciones
Gebruiksaanwijzing
Bruksanvisning
Istruzioni per l’uso
Manual de instruções
Käyttöohjeet
©2002 Sony Corporation
MZ-E310
“
WALKMAN” is a registered trademark of Sony Corporation to
represent Stereo products. is a trademark of
Sony Corporation.
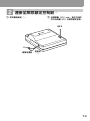
Portable MiniDisc Player MZ-E310

2-GB
model name1[MZ-E310] model name2[MZ------]
[3-247-462-11(1)]
masterpage:Left
filename[C:\WINNT\Profiles\Administrator\Desktop\02GB-MZE310CE7\020REG.fm]
To prevent fire or shock hazard, do
not expose the unit to rain or
moisture.
To prevent fire, do not cover the
ventilation of the apparatus with
newspapers, table-cloths, curtains, etc.
And don’t place lighted candles on the
apparatus.
To prevent fire or shock hazard, do not
place objects filled with liquids, such as
vases, on the apparatus.
Certain countries may regulate disposal of
the battery used to power this product.
Please consult with your local authority.
Caution
The use of optical instruments with this
product will increase eye hazard.
CAUTION — INVISIBLE LASER
RADIATION WHEN OPEN
DO NOT STARE INTO BEAM OR
VIEW DIRECTRY WITH OPTICAL
INSTRUMENTS
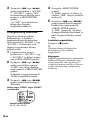
Information
The validity of the CE marking
is restricted to only those
countries where it is legally
enforced, mainly in the
countries EEA (European
Economic Area).
The C-Tick mark on the
Walkman is valid only for
the products marketed in
Australia.
Do not install the appliance in a
confined space, such as a bookcase or
built-in cabinet.
IN NO EVENT SHALL SELLER BE
LIABLE FOR ANY DIRECT,
INCIDENTAL OR
CONSEQUENTIAL DAMAGES OF
ANY NATURE, OR LOSSES OR
EXPENSES RESULTING FROM
ANY DEFECTIVE PRODUCT OR
THE USE OF ANY PRODUCT.
WARNING

model name1[MZ-E310] model name2[MZ------]
[3-247-462-11(1)]
masterpage:Right
filename[C:\WINNT\Profiles\Administrator\Desktop\02GB-
MZE310CE7\020REGTOC.fm]
3-GB
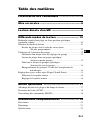
Table of contents
Looking at the controls .................................... 4
Getting started! ................................................ 6
Playing an MD right away! ................................8
Various ways of playback .............................. 10
Searching for a specific track or a position quickly (Quick Search) .... 10
Selecting the play mode ....................................................................... 10
Listening to tracks in a desired sequence (Program Play) ............. 12
Using the group function ...................................................................... 12
What is a disc with group settings? ............................................... 12
Listening to tracks in a specific group (Group Mode Playback) ... 13
Selecting and playing specific groups (Group Skip Function) ...... 13
Registering groups using your MiniDisc recorder ......................... 14
Adjusting treble or bass (Digital Sound Preset) ................................... 15
Selecting the sound quality ............................................................ 15
Adjusting the sound quality ........................................................... 15
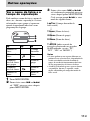
Other Operations ............................................ 17
Viewing the track name and playing time ........................................... 17
Protecting your hearing (AVLS) .......................................................... 18
Locking the controls (HOLD) .............................................................. 18
Additional information .................................... 19
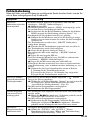
Precautions ........................................................................................... 19
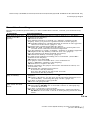
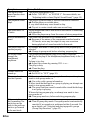
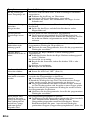
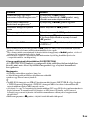
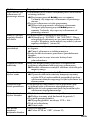
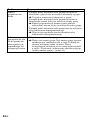
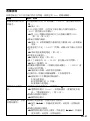
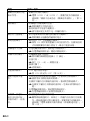
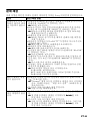
Troubleshooting ................................................................................... 21
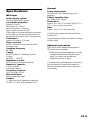
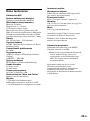
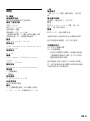
Specifications ....................................................................................... 23
GB

4-GB
model name1[MZ-E310] model name2[MZ------]
[3-247-462-11(1)]
masterpage:Left
filename[C:\WINNT\Profiles\Administrator\Desktop\02GB-MZE310CE7\030GET.fm]
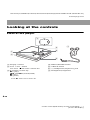
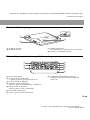
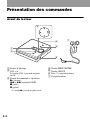
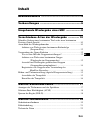
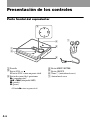
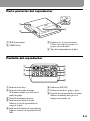
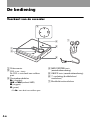
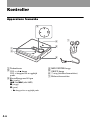
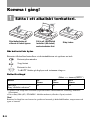
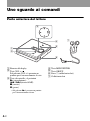
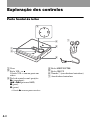
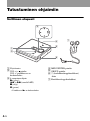
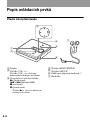
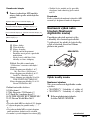
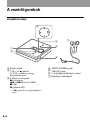
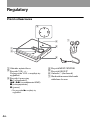
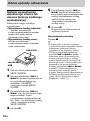
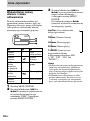
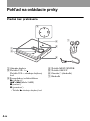
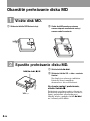
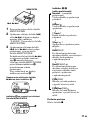
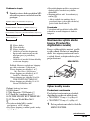
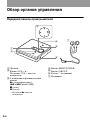
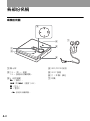
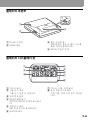
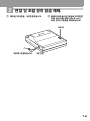
Looking at the controls
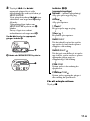
Front of the player
A Display window
B VOL + and – button
The VOL + button has a tactile dot.
C 4-position control key
N (play)
*
. and > (search/AMS)
x (stop)
X (pause)
∗ The N button has a tactile dot.
D
MENU/ENTER button
E GROUP button
F i (headphones/earphones) jack
G Headphones/earphones
3
5
4
6
7
1
2

model name1[MZ-E310] model name2[MZ------]
[3-247-462-11(1)]
masterpage:Right
filename[C:\WINNT\Profiles\Administrator\Desktop\02GB-MZE310CE7\030GET.fm]
5-GB
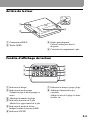
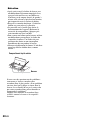
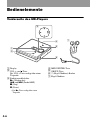
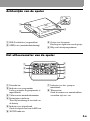
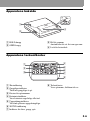
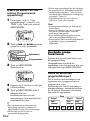
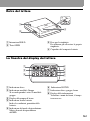
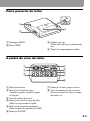
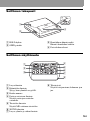
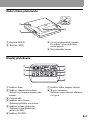
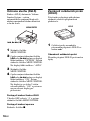
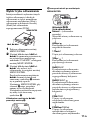
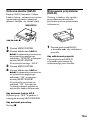
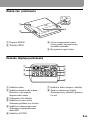
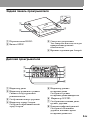
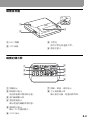
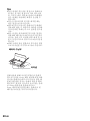
Back of the player
A HOLD switch
B OPEN button
C Hand strap hole
Use the hole to attach your own strap.
D Battery compartment lid
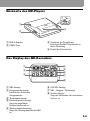
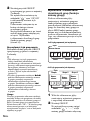
The display window of the player
A Disc indication
B Group mode indication
Lights up when group mode is on.
C Track number display
D Battery level indication
Shows approximate battery condition.
E Play mode indication
Shows play mode of the MD.
F SOUND indication
G Disc, group, track indication
H Character information display
Displays the track names, elapsed
time, etc.
1
2
4
3
1
2
3
4
5
6
7
8

6-GB
model name1[MZ-E310] model name2[MZ------]
[3-247-462-11(1)]
masterpage:Left
filename[C:\WINNT\Profiles\Administrator\Desktop\02GB-MZE310CE7\030GET.fm]
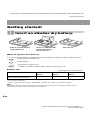
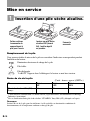
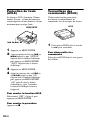
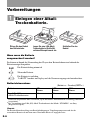
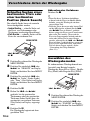
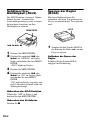
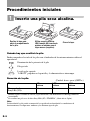
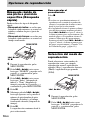
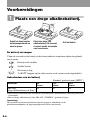
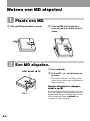
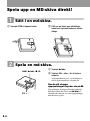
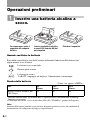
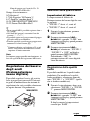
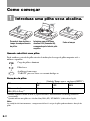
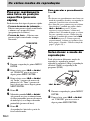
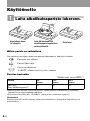
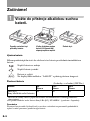
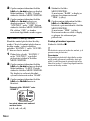
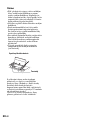
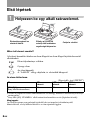
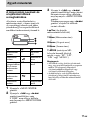
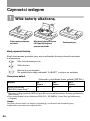
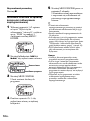
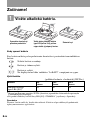
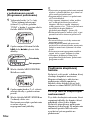
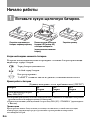
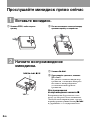
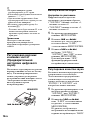
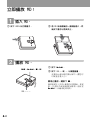
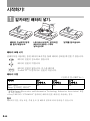
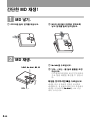
Getting started!
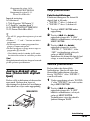
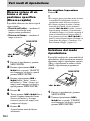
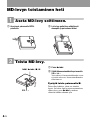
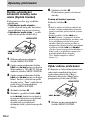
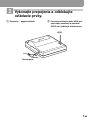
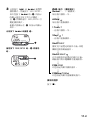
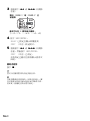
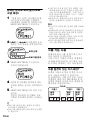
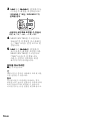
1
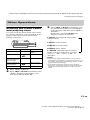
Insert an alkaline dry battery.
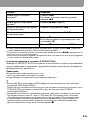
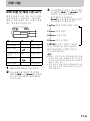
When to replace the battery
You can check the battery condition through the battery indicator while using the player.
Battery power decreasing
r
Weak battery
r
The battery has gone out.
“LoBATT” flashes in the display, and the power goes off.
e
E
Insert one LR6 (size AA)
alkaline dry battery
minus end first.
Slide to open the battery
compartment lid.
Close the lid.
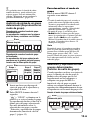
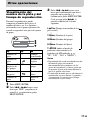
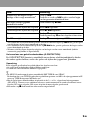
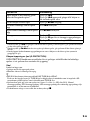
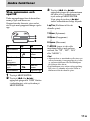
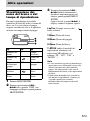
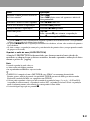
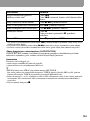
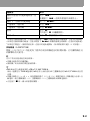
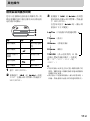
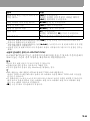
Battery life
(Unit:approx.hours)(JEITA
1)
)
1)
Measured in accordance with the JEITA (Japan Electronics and Information Technology Industries
Association) standard.
Battery SP
Stereo
LP2
Stereo
LP4
Stereo
LR6 (SG)
Sony alkaline dry battery
2)
2)
When using a Sony LR6 (SG) “STAMINA” alkaline dry battery (produced in Japan).
Note
The battery life may be shorter than that specified, depending on the operating conditions, the
temperature of the location, and varieties of batteries.
41 50 56

model name1[MZ-E310] model name2[MZ------]
[3-247-462-11(1)]
masterpage:Right
filename[C:\WINNT\Profiles\Administrator\Desktop\02GB-MZE310CE7\030GET.fm]
7-GB
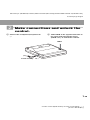
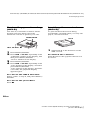
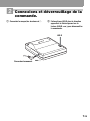
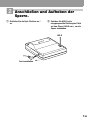
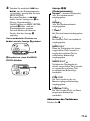
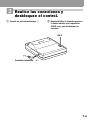
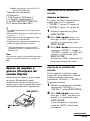
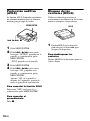
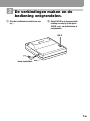
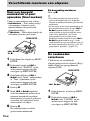
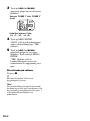
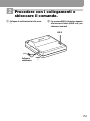
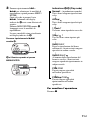
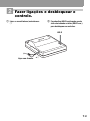
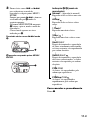
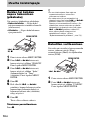
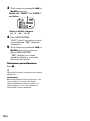
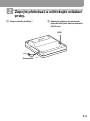
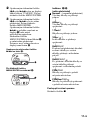
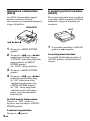
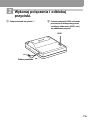
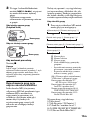
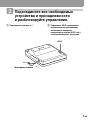
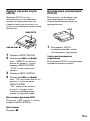
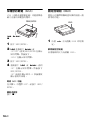
2
Make connections and unlock the
control.
1 Connect the headphones/earphones to
i.
2 Slide HOLD in the opposite direction of
the arrow indicated on the player
(HOLD .) to unlock the controls.
HOLD
to i
Connect firmly.

8-GB
model name1[MZ-E310] model name2[MZ------]
[3-247-462-11(1)]
masterpage:Left
filename[C:\WINNT\Profiles\Administrator\Desktop\02GB-MZE310CE7\030GET.fm]
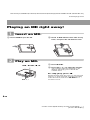
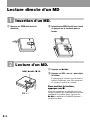
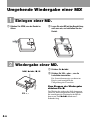
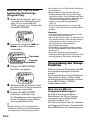
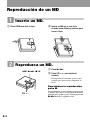
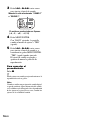
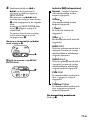
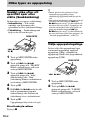
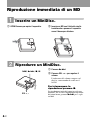
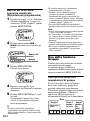
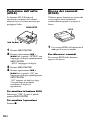
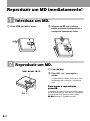
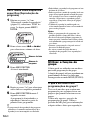
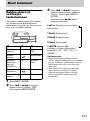
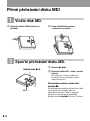
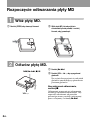
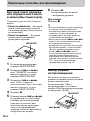
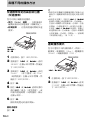
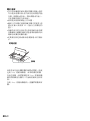
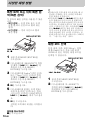
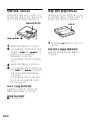
Playing an MD right away!
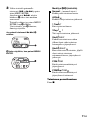
1
Insert an MD.
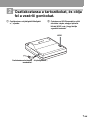
1 Press OPEN to open the lid. 2 Insert an MD with the label side facing
front, and press the lid down to close.
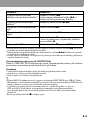
2
Play an MD.
1 Press N> .
2 Press VOL + or – to adjust the volume.
The volume indicator appears in the
display allowing you to check the
volume level.
To stop play, press x.
Playback starts from the point you last stopped
playing. To start playback from the beginning
of the first track, hold down
N> for 2
seconds or more.
VOL +, –
., N>, x, X

model name1[MZ-E310] model name2[MZ------]
[3-247-462-11(1)]
masterpage:Right
filename[C:\WINNT\Profiles\Administrator\Desktop\02GB-MZE310CE7\030GET.fm]
9-GB
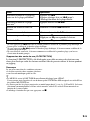
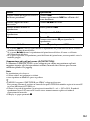
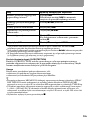
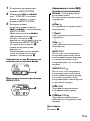
Suppressing the skip of the sound (G-PROTECTION)
The G-PROTECTION function was developed to provide a higher level of shock resistance
than that of existing players in order to allow the player to be used while jogging.
Note
The playback sound may skip if:
• the player receives stronger continuous shock.
• a dirty or scratched MiniDisc is played.
z
• The MZ-E310 supports the newly developed DSP TYPE-R for ATRAC. It thus allows you to enjoy
TYPE-R high-quality sound from MDs recorded in SP stereo on TYPE-R-equipped MD decks, etc.
• The player can play the track recorded by 2 × or 4 × long playing mode (LP2 or LP4). Normal stereo
playback, LP2 stereo playback, LP4 stereo playback or monaural playback is automatically selected
to match the audio source.
• The display will turn off shortly after you press
x.
To Operation
Find the beginning of the current
track or the previous track
1)
Press ..
Press . repeatedly until the beginning of the
desired track appears.
Find the beginning of the next track
2)
Press N> once.
Go backwards while playing Hold down ..
Go forward while playing Hold down
N>.
Pause Press X.
Press X again to resume play.
Remove the MD Press x, and then press OPEN.
3)
1)
If you press . twice continuously while playing the first track of the disc, the player goes to the
beginning of the last track on the disc.
2)
If you press N> during the last track of the disc, the player goes to the beginning of the first track
on the disc.
3)
If you open the lid, the playback will begin from the beginning of the first track (except when group
mode is on).

10-GB
model name1[MZ-E310] model name2[MZ------]
[3-247-462-11(1)]
masterpage:L0-Left
filename[C:\WINNT\Profiles\Administrator\Desktop\02GB-MZE310CE7\040OPE.fm]
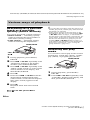
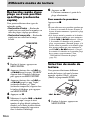
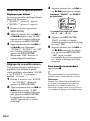
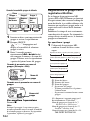
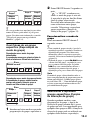
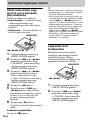
Various ways of playback
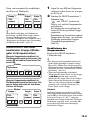
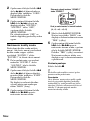
Searching for a specific
track or a position
quickly (Quick Search)
You can do two kinds of quick searches.
• Index search — Searching quickly
while monitoring the track number or
track name (factory setting).
• Time search — Searching quickly
while monitoring the elapsed time.
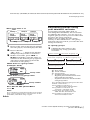
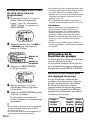
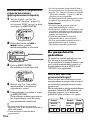
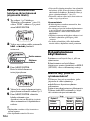
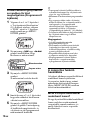
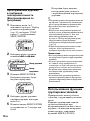
1 During playback, press MENU/
ENTER.
2 Press . or N> repeatedly until
“SEARCH” flashes in the display,
and then press MENU/ENTER.
3 Press . or N> repeatedly until
“Index”(index search) or “Time”(time
search) flashes in the display, and
then MENU/ENTER.
4 Press X.
5 Hold down . or N> until the
desired track number/track name
(index search) or the desired elapsed
time (time search) appears in the
display.
6 Press X.
Playback starts from the selected
track.
To cancel the procedure
Press x.
z
• If you do this procedure while the player is in
shuffle play mode, shuffle play starts from the
track that you selected.
• If the player reaches to the first track or the
last track on the disc as you are holding .
or N> button in step 5, it will return to
the last track or the first track, respectively. (In
group mode, if the player reaches to the first
track or the last track in a group as you are
holding . or N> button in step 5, it
will return to the last track or the first track in
that group, respectively.) (See “Using the
group function” (page 12).)
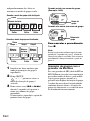
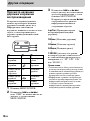
Selecting the play
mode
You can select various play modes such as
normal play, repeat play (1Rep.), shuffle
play (Shuff), or program play (PGM).
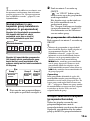
1 During playback, press MENU/
ENTER.
2 Press . or N> repeatedly until
“P-MODE” flashes in the display, and
then press MENU/ENTER.
MENU/ENTER
., N>,
X, x
MENU/ENTER
., N>

model name1[MZ-E310] model name2[MZ------]
[3-247-462-11(1)]
masterpage:Right
filename[C:\WINNT\Profiles\Administrator\Desktop\02GB-MZE310CE7\040OPE.fm]
11-GB
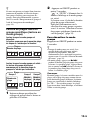
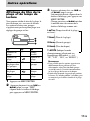
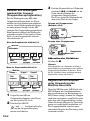
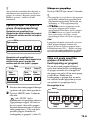
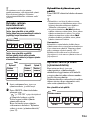
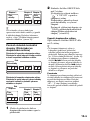
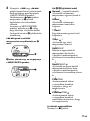
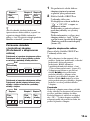
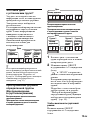
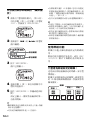
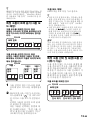
3 Press . or N> repeatedly to
select the play mode, and then press
MENU/ENTER.
Each time you press
N>, the
display item indicated by A changes
as follows:
Pressing MENU/ENTER while A is
flashing causes the play mode to
change.
The new mode then appears in the
display indicated by B.
Pressing N> repeatedly changes
A.
B lights up when you press MENU/
ENTER
.
Indication A/B (play mode)
Normal/—(normal play)
All the tracks are played once.
r
AllRep/
All the tracks are played repeatedly.
r
1 Track/1
A track is played once.
r
1Rep./ 1
A single track is played repeatedly.
r
Shuff/SHUF
After the currently selected track
finishes playing, the remaining
tracks are played in random order.
r
Shuf.R/SHUF
After the currently selected track
finishes playing, the remaining
tracks are played repeatedly in
random order.
r
PGM/PGM
The tracks are played in the order
that you specified.
r
PGMRep/PGM
The tracks are played repeatedly in
the order that you specified.
To cancel the procedure
Press x.

12-GB
model name1[MZ-E310] model name2[MZ------]
[3-247-462-11(1)]
masterpage:Left
filename[C:\WINNT\Profiles\Administrator\Desktop\02GB-MZE310CE7\040OPE.fm]
Listening to tracks in a
desired sequence (Program
Play)
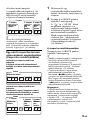
1 Do the steps 1 and 2 in “Selecting the
play mode” (page 10), select “PGM”
in step 3 and then press MENU/
ENTER.
2 Press . or N> repeatedly to
select the track number.
3 Press MENU/ENTER.
The track is entered.
4 Repeat steps 2 and 3 to select other
tracks in the desired sequence.
5 Press MENU/ENTER for 2 seconds
or more.
The settings are entered and playback
starts from the first programmed
track.
z
• The program play settings will remain in
memory even after playback finishes or is
stopped.
• You can set the program play up to 20 tracks.
• You can specify the play mode for a selected
group when group mode is on. To activate
group mode, see “Selecting and playing
specific groups (Group Skip Function)”
(page 13).
• The play mode can also be selected when the
player is paused or stopped.
Notes
• All program settings are lost when the lid is
opened.
• If no settings are made for 5 minutes while the
player is stopped, the settings made up to that
point are entered.
• During program setting, you cannot do group
mode’s on/off setting.
• If you turn on group mode during program
play, the program play is canceled.
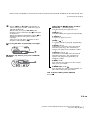
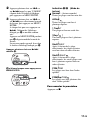
Using the group
function
The player can be used with a disc which
has group setting.
The group function is useful for playing a
great number of tracks, or tracks that have
been recorded in MDLP (LP2/LP4) mode.
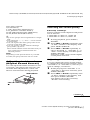
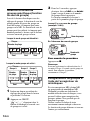
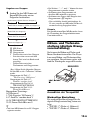
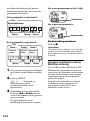
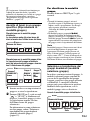
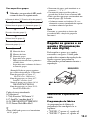
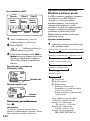
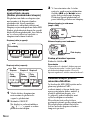
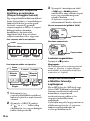
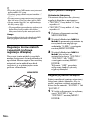
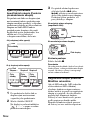
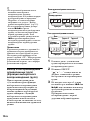
What is a disc with group
settings?
This is a disc with settings that organize
tracks into groups, and which allow those
groups to be selected.
The player does not support the recording
of group settings. Use your MD recorder
to record information, and then use the
player for playback.
Track number
Program number
123
7
85 6
4
Group 2
Group 1
Group 3
Track
number
Track
number
Track
number
Disc

model name1[MZ-E310] model name2[MZ------]
[3-247-462-11(1)]
masterpage:Right
filename[C:\WINNT\Profiles\Administrator\Desktop\02GB-MZE310CE7\040OPE.fm]
13-GB
z
If your recorder has a function for editing disc
names, you can use it to register groups. For
details, see “Registering groups using your
MiniDisc recorder” (page 14).
Listening to tracks in a
specific group (Group Mode
Playback)
Playback when group mode is off:
Playback starts with the first track in the
disc, and stops with the last track in the
disc.
Playback when group mode is on:
Playback of the selected group starts with
the first track in the group, and stops with
the last track in the group.
1 Insert a disc which has group settings
into the player, and then play the disc.
2 Press GROUP for 2 seconds or more.
“ ” and “GP ON” light up in the
display and group mode is turned on.
Playback stops at the end of the last
track in the selected group.
For details on selecting another
group, see “Selecting and playing
specific groups (Group Skip
Function)” (page 13).
To turn off group mode
Press GROUP for 2 seconds or more
again.
z
• When group mode is on, it is possible to do
repeat play, shuffle play, or program play. For
details on the respective operations, see
“Selecting the play mode” (page 10).
• In group mode, pressing N> during the
last track of the group moves playback to the
first track of the group. Pressing . twice
continuously while playing the first track of a
group moves playback to the last track of the
group.
Note
In group mode, the player treats all tracks
without group settings as belonging to the last
group on the disc. The last group is indicated in
the display as “GP --”. Within a group, the
tracks appear in their order on the disc, not their
order within the group.
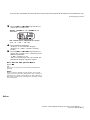
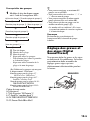
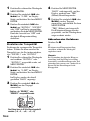
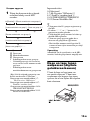
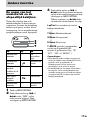
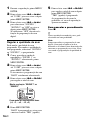
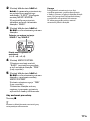
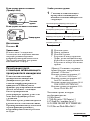
Selecting and playing specific
groups (Group Skip Function)
When playing a disc with group settings,
the group skip function allows you to
jump from the currently playing group to
any other group on the MD. The group
skip function can be used at any time
during playback, regardless of whether
the player is in group mode on or not.
123
7
85 6
4
Track number
Disc
123
1
21 2
Group 2
Group 1
Group 3
Track
number
Track
number
Track
number
Disc
123
7
85 6
4
Disc
When group mode is off:
Skip
Skip
Skip
Track number

14-GB
model name1[MZ-E310] model name2[MZ------]
[3-247-462-11(1)]
masterpage:Left
filename[C:\WINNT\Profiles\Administrator\Desktop\02GB-MZE310CE7\040OPE.fm]
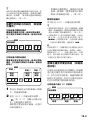
1 Insert a disc which has group settings
into the player, and then play the disc.
2 Press GROUP.
“ ” and “- - -” flash in the display
and groups skip mode is turned on.
3 Within 5 seconds, press . or
N> repeatedly until the name or
number of the desired group appears.
The player starts playing from the
first track in the group.
When there is a group name
(Example: AAA)
When there is no group name
To cancel the procedure
Press x.
Note
If no operation is performed within 5 seconds in
step 3, group skip mode is canceled. To do the
procedure, start from step 2 again.
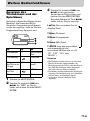
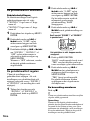
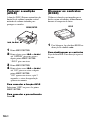
Registering groups using
your MiniDisc recorder
If your MD recorder (MD deck or
recording MD Walkman) has a function
for editing disc names, you can use it to
register groups even if your recorder does
not have the group function.
Make sure you enter the text string
exactly as described below. The group
function will not work if you enter the text
string incorrectly.
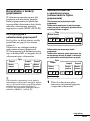
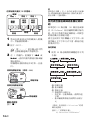
To specify groups
1 Change the disc name to the
following by using your MD
recorder:
A Disc name
B Track number
C Group name
// Separator between groups
– Hyphen placed between the first
track and the last track
; Separator between track number
and group name
(Ex.) Set the following groups for the disc
named “Collections”:
Group name for tracks 1-7:
My Favorites“2002winter”
Group name for tracks 8-17:
Jun&Tac“sunshine head”
Group name for tracks 18-24:
THE NIGHT BUTTERFLYS
Group name for tracks 25-32:
Dream World/Kiss Me!
123
1
21 2
Group 2
Group 1
Group 3
When group mode is on:
Track
number
Track
number
Track
number
Skip
Skip
Skip
Disc
Group name
Group number
0;[Disc name] // [First track of group 1 ]-
[Last track of group 1] ; [Name of group 1 ] //
A
BB
[Name of group 2] // ......
B
B
C
[First track of group 2] - [Last track of group 2 ] ;
C

model name1[MZ-E310] model name2[MZ------]
[3-247-462-11(1)]
masterpage:Right
filename[C:\WINNT\Profiles\Administrator\Desktop\02GB-MZE310CE7\040OPE.fm]
15-GB
Text string entered:
0;Collections//
1-7;My Favorites“2002winter”//
8-17;Jun&Tac“sunshine head”//
18-24;THE NIGHT BUTTERFLYS//
25-32;Dream World/Kiss Me!//
z
• Up to 99* groups can be registered on a single
MD.
• The characters “;”, “/”, and “–” can be used in
a group name.
• You can register the same group name twice
or more on the same MD.
• You can specify a group without entering a
group name (C) for it.
∗The actual number will be less than 99 if you
have entered more characters than are
allowed per disc.
Note
Depending on the specifications of your MD
recorder, the group function will not work.
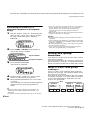
Adjusting treble or bass
(Digital Sound Preset)
You can adjust the treble and bass to suit
your taste. The player can store two sets
of treble-bass adjustments, which can
then be selected later during playback.
Selecting the sound quality
Factory settings
Factory settings of the digital sound preset
are as follows:
•“SOUND 1”: bass +1, treble ±0
•“SOUND 2”: bass +3, treble ±0
1 During playback, press MENU/
ENTER.
2 Press . or N> repeatedly until
“S–SEL” flashes in the display, and
press MENU/ENTER.
3 Press . or N> repeatedly to
select “SOUND 1”, “SOUND 2”, or
“OFF” in the display, and then press
MENU/ENTER.
Selecting “OFF” turns off the digital
sound preset function.
Adjusting the sound quality
You can change the preset sound quality.
To change the preset sound quality, select
“SOUND 1” or “SOUND 2”, the one you
want to change, in advance.
1 While playing and “SOUND 1” or
“SOUND 2” has been selected, press
MENU/ENTER.
2 Press . or N> repeatedly until
“S–SET” flashes in the display, and
then press MENU/ENTER.
The display shows the currently
“BASS” sound setting.
MENU/ENTER
., N>,
x
continued

16-GB
model name1[MZ-E310] model name2[MZ------]
[3-247-462-11(1)]
masterpage:Left
filename[C:\WINNT\Profiles\Administrator\Desktop\02GB-MZE310CE7\040OPE.fm]
3 Press . or N> repeatedly to
adjust the sound level.
4 Press MENU/ENTER.
“BASS” is set and the display
changes to “TRE” (treble) setting
mode.
5 Press . or N> repeatedly to
adjust the sound level, and then press
MENU/ENTER.
“TRE” (treble) is set.
The sound settings are saved and the
playback display appears again.
To cancel the procedure
Press x.
z
You can set a preset sound while playback is
paused.
Note
When using a digital sound preset, the sound
may break or become distorted if the volume is
turned up too high, depending on the settings or
the track. In this case, change the settings of the
sound quality.
Shows “SOUND 1” or “SOUND 2” is
selected
The sound can be adjusted in 8 steps.
(–4, –3, ...±0, ...+2, +3)

model name1[MZ-E310] model name2[MZ------]
[3-247-462-11(1)]
masterpage:L0-Right
filename[C:\WINNT\Profiles\Administrator\Desktop\02GB-MZE310CE7\040OPE.fm]
17-GB
Other Operations
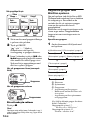
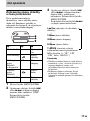
Viewing the track name
and playing time
You can check the track name, disc name,
etc. during playback. Group-related items
appear only when a track with group
settings is played.
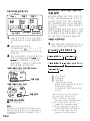
1 Press MENU/ENTER.
2 Press . or N> repeatedly until
“DISP” flashes in the display, and
then press MENU/ENTER.
3 Press . or N> repeatedly until
the information that you want flashes
in the display, and then press MENU/
ENTER.
Each time you press
N>, the
display changes as follows:
LapTim (The elapsed time of the
current track)
r
T.Name (Track name)
r
G.Name (Group name)
r
D.Name (Disc name)
r
T–MODE (indicates the recording
mode selected on the MD recorder
used; i.e., “SP”, “LP2”, “LP4”, or
“MONO”. )
Notes
• Items may appear differently or may not be
selectable, depending on the group mode’s on/
off status, the player’s operating status, or the
player and disc settings.
• The mode indication appears only during
playback. It appears for 2 seconds, and is then
replaced by the elapsed time of the current
track.
ABC
Track number — The elapsed
time
Track number Track name
The number of
total tracks in
the groups
GP Group name
The number of
total tracks
Disc name
Track number — Track mode

18-GB
model name1[MZ-E310] model name2[MZ------]
[3-247-462-11(1)]
masterpage:Left
filename[C:\WINNT\Profiles\Administrator\Desktop\02GB-MZE310CE7\040OPE.fm]
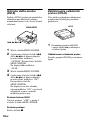
Protecting your hearing
(AVLS)
The AVLS (Automatic Volume Limiter
System) function keeps down the
maximum volume to protect your ears.
1 Press MENU/ENTER.
2 Press . or N> repeatedly until
“OPTION” flashes in the display, and
then press MENU/ENTER.
“AVLS” flashes in the display.
3 Press MENU/ENTER.
4 Press . or N> repeatedly until
“ON” flashes in the display, and then
press MENU/ENTER.
“ON” appears in the display, and after
2 seconds, the playback display
appears again.
To cancel the AVLS function
Select “OFF” in step 4, and press MENU/
ENTER.
To cancel the procedure
Press x.
Locking the controls
(HOLD)
To prevent the buttons from being
accidentally operated when you carry the
player, use this function.
1 Slide HOLD in the direction of the
. to lock.
To unlock the controls
Slide HOLD to the opposite direction of
the arrow.
MENU/ENTER
., N>, x
HOLD

model name1[MZ-E310] model name2[MZ------]
[3-247-462-11(1)]
masterpage:L0-Right
filename[C:\WINNT\Profiles\Administrator\Desktop\02GB-MZE310CE7\040OPE.fm]
19-GB
Additional information
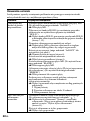
Precautions
On safety
• Do not carry or store the dry battery in the
same place with metallic objects such as
coins, key rings, or necklaces. This may cause
a short-circuit and the generation of heat.
• Incorrect battery usage may cause the battery
fluid to leak or battery to burst. To prevent
such accidents, make sure the battery is
installed with the + and – poles oriented
correctly.
• If a battery leak should develop, carefully and
thoroughly wipe away the battery fluid in the
battery compartment before inserting a new
battery.
• If you will not use the player for a long time,
be sure to remove the dry battery.
On Handling
• Do not drop or bump the player. This may
cause the player to malfunction.
• Do not pull headphones/earphones cords.
• Do not place the player in the following
places:
—An extremely hot place (over 60°C
(140°F))
—A place exposed to direct sunlight or near a
heater
—In a car with the windows rolled up
(especially in the summer)
—In a damp place such as a bathroom
—Near a source of electromagnetic fields
such as a magnet, speaker, or TV
—In a dusty place
On heat build-up
Heat may build up in the player if it is used for
an extended period of time. This, however, is
not a malfunction.
On mechanical noise
The player emits mechanical noise while
operating, which is caused by the power-saving
system of the player. This is not a malfunction.
On installation
Never use the player where it will be subjected
to extremes of light, temperature, moisture or
vibration.
On the MiniDisc cartridge
• Do not touch the internal disc directly. Forcing
the shutter open may damage the internal disc.
• When transporting a MiniDisc, keep it in its
case.
• Do not place the cartridge where it will be
subjected to light, temperature, moisture or
dust.
• Do not affix the label outside of the specified
area on the MD. Make sure the label is placed
within the recessed space on the disc.
On the headphones/earphones
Road safety
• Do not use headphones/earphones while
driving, cycling, or operating any motorized
vehicle. This may lead to a traffic accident and
is illegal in many areas. It can also be
potentially dangerous to play your player at
high volumes while walking, especially at
pedestrian crossings. You should exercise
extreme caution or discontinue using the
player in potentially hazardous situations.
• If you experience an allergic reaction to the
supplied headphones/earphones, stop using
them at once and consult a doctor or a Sony
service center.
Preventing hearing damage
Avoid using headphones/earphones at high
volumes. Hearing experts advise against
continuous, loud and extended play. If you
experience a ringing in your ears, reduce the
volume or discontinue use.
Caring for others
Keep the volume at a moderate level. This will
allow you to hear outside sounds and to be
considerate of the people around you.

20-GB
model name1[MZ-E310] model name2[MZ------]
[3-247-462-11(1)]
masterpage:Left
filename[C:\WINNT\Profiles\Administrator\Desktop\02GB-MZE310CE7\040OPE.fm]
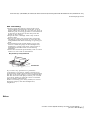
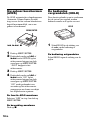
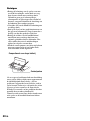
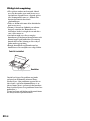
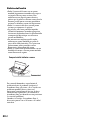
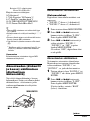
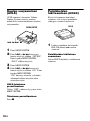
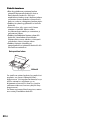
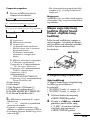
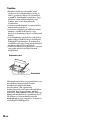
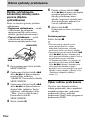
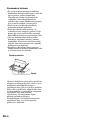
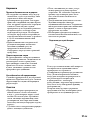
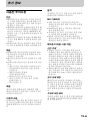
On cleaning
• After wiping the player casing with a soft
cloth slightly moistened with water, wipe it
again with a dry cloth. Do not use any type of
abrasive pad, scouring powder or solvent such
as alcohol or benzene as this may mar the
finish on the casing.
• Wipe the disc cartridge with a dry cloth to
remove dirt.
• Dust on the lens may prevent the unit from
operating properly. Be sure to close the disc
compartment lid after inserting or ejecting an
MD.
• To maintain good sound quality, use a soft
cloth to clean the plugs of the headphones/
earphones. A dirty plug may cause noise or
intermittent breaks in the sound during
playback.
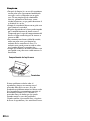
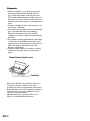
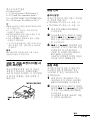
• Clean the terminals periodically with a cotton
swab or a soft cloth as illustrated.
If you have any questions or problems
concerning your player, please consult your
nearest Sony dealer. (If a trouble occurred when
the disc was in the player, we recommend that
the disc be left in the player when you consult
your Sony dealer so that the cause of trouble
may be better understood.)
When consulting your Sony dealer, be sure to
bring the player, and the headphones/
earphones.
Terminals
Dry battery compartment
La pagina si sta caricando...
La pagina si sta caricando...
La pagina si sta caricando...
La pagina si sta caricando...
La pagina si sta caricando...
La pagina si sta caricando...
La pagina si sta caricando...
La pagina si sta caricando...
La pagina si sta caricando...
La pagina si sta caricando...
La pagina si sta caricando...
La pagina si sta caricando...
La pagina si sta caricando...
La pagina si sta caricando...
La pagina si sta caricando...
La pagina si sta caricando...
La pagina si sta caricando...
La pagina si sta caricando...
La pagina si sta caricando...
La pagina si sta caricando...
La pagina si sta caricando...
La pagina si sta caricando...
La pagina si sta caricando...
La pagina si sta caricando...
La pagina si sta caricando...
La pagina si sta caricando...
La pagina si sta caricando...
La pagina si sta caricando...
La pagina si sta caricando...
La pagina si sta caricando...
La pagina si sta caricando...
La pagina si sta caricando...
La pagina si sta caricando...
La pagina si sta caricando...
La pagina si sta caricando...
La pagina si sta caricando...
La pagina si sta caricando...
La pagina si sta caricando...
La pagina si sta caricando...
La pagina si sta caricando...
La pagina si sta caricando...
La pagina si sta caricando...
La pagina si sta caricando...
La pagina si sta caricando...
La pagina si sta caricando...
La pagina si sta caricando...
La pagina si sta caricando...
La pagina si sta caricando...
La pagina si sta caricando...
La pagina si sta caricando...
La pagina si sta caricando...
La pagina si sta caricando...
La pagina si sta caricando...
La pagina si sta caricando...
La pagina si sta caricando...
La pagina si sta caricando...
La pagina si sta caricando...
La pagina si sta caricando...
La pagina si sta caricando...
La pagina si sta caricando...
La pagina si sta caricando...
La pagina si sta caricando...
La pagina si sta caricando...
La pagina si sta caricando...
La pagina si sta caricando...
La pagina si sta caricando...
La pagina si sta caricando...
La pagina si sta caricando...
La pagina si sta caricando...
La pagina si sta caricando...
La pagina si sta caricando...
La pagina si sta caricando...
La pagina si sta caricando...
La pagina si sta caricando...
La pagina si sta caricando...
La pagina si sta caricando...
La pagina si sta caricando...
La pagina si sta caricando...
La pagina si sta caricando...
La pagina si sta caricando...
La pagina si sta caricando...
La pagina si sta caricando...
La pagina si sta caricando...
La pagina si sta caricando...
La pagina si sta caricando...
La pagina si sta caricando...
La pagina si sta caricando...
La pagina si sta caricando...
La pagina si sta caricando...
La pagina si sta caricando...
La pagina si sta caricando...
La pagina si sta caricando...
La pagina si sta caricando...
La pagina si sta caricando...
La pagina si sta caricando...
La pagina si sta caricando...
La pagina si sta caricando...
La pagina si sta caricando...
La pagina si sta caricando...
La pagina si sta caricando...
La pagina si sta caricando...
La pagina si sta caricando...
La pagina si sta caricando...
La pagina si sta caricando...
La pagina si sta caricando...
La pagina si sta caricando...
La pagina si sta caricando...
La pagina si sta caricando...
La pagina si sta caricando...
La pagina si sta caricando...
La pagina si sta caricando...
La pagina si sta caricando...
La pagina si sta caricando...
La pagina si sta caricando...
La pagina si sta caricando...
La pagina si sta caricando...
La pagina si sta caricando...
La pagina si sta caricando...
La pagina si sta caricando...
La pagina si sta caricando...
La pagina si sta caricando...
La pagina si sta caricando...
La pagina si sta caricando...
La pagina si sta caricando...
La pagina si sta caricando...
La pagina si sta caricando...
La pagina si sta caricando...
La pagina si sta caricando...
La pagina si sta caricando...
La pagina si sta caricando...
La pagina si sta caricando...
La pagina si sta caricando...
La pagina si sta caricando...
La pagina si sta caricando...
La pagina si sta caricando...
La pagina si sta caricando...
La pagina si sta caricando...
La pagina si sta caricando...
La pagina si sta caricando...
La pagina si sta caricando...
La pagina si sta caricando...
La pagina si sta caricando...
La pagina si sta caricando...
La pagina si sta caricando...
La pagina si sta caricando...
La pagina si sta caricando...
La pagina si sta caricando...
La pagina si sta caricando...
La pagina si sta caricando...
La pagina si sta caricando...
La pagina si sta caricando...
La pagina si sta caricando...
La pagina si sta caricando...
La pagina si sta caricando...
La pagina si sta caricando...
La pagina si sta caricando...
La pagina si sta caricando...
La pagina si sta caricando...
La pagina si sta caricando...
La pagina si sta caricando...
La pagina si sta caricando...
La pagina si sta caricando...
La pagina si sta caricando...
La pagina si sta caricando...
La pagina si sta caricando...
La pagina si sta caricando...
La pagina si sta caricando...
La pagina si sta caricando...
La pagina si sta caricando...
La pagina si sta caricando...
La pagina si sta caricando...
La pagina si sta caricando...
La pagina si sta caricando...
La pagina si sta caricando...
La pagina si sta caricando...
La pagina si sta caricando...
La pagina si sta caricando...
La pagina si sta caricando...
La pagina si sta caricando...
La pagina si sta caricando...
La pagina si sta caricando...
La pagina si sta caricando...
La pagina si sta caricando...
La pagina si sta caricando...
La pagina si sta caricando...
La pagina si sta caricando...
La pagina si sta caricando...
La pagina si sta caricando...
La pagina si sta caricando...
La pagina si sta caricando...
La pagina si sta caricando...
La pagina si sta caricando...
La pagina si sta caricando...
La pagina si sta caricando...
La pagina si sta caricando...
La pagina si sta caricando...
La pagina si sta caricando...
La pagina si sta caricando...
La pagina si sta caricando...
La pagina si sta caricando...
La pagina si sta caricando...
La pagina si sta caricando...
La pagina si sta caricando...
La pagina si sta caricando...
La pagina si sta caricando...
La pagina si sta caricando...
La pagina si sta caricando...
La pagina si sta caricando...
La pagina si sta caricando...
La pagina si sta caricando...
La pagina si sta caricando...
La pagina si sta caricando...
La pagina si sta caricando...
La pagina si sta caricando...
La pagina si sta caricando...
La pagina si sta caricando...
La pagina si sta caricando...
La pagina si sta caricando...
La pagina si sta caricando...
La pagina si sta caricando...
La pagina si sta caricando...
La pagina si sta caricando...
La pagina si sta caricando...
La pagina si sta caricando...
La pagina si sta caricando...
La pagina si sta caricando...
La pagina si sta caricando...
La pagina si sta caricando...
La pagina si sta caricando...
La pagina si sta caricando...
La pagina si sta caricando...
La pagina si sta caricando...
La pagina si sta caricando...
La pagina si sta caricando...
La pagina si sta caricando...
La pagina si sta caricando...
La pagina si sta caricando...
La pagina si sta caricando...
La pagina si sta caricando...
La pagina si sta caricando...
La pagina si sta caricando...
La pagina si sta caricando...
La pagina si sta caricando...
La pagina si sta caricando...
La pagina si sta caricando...
La pagina si sta caricando...
La pagina si sta caricando...
La pagina si sta caricando...
La pagina si sta caricando...
La pagina si sta caricando...
La pagina si sta caricando...
La pagina si sta caricando...
La pagina si sta caricando...
La pagina si sta caricando...
La pagina si sta caricando...
La pagina si sta caricando...
La pagina si sta caricando...
La pagina si sta caricando...
La pagina si sta caricando...
La pagina si sta caricando...
La pagina si sta caricando...
La pagina si sta caricando...
La pagina si sta caricando...
La pagina si sta caricando...
La pagina si sta caricando...
La pagina si sta caricando...
La pagina si sta caricando...
La pagina si sta caricando...
La pagina si sta caricando...
La pagina si sta caricando...
La pagina si sta caricando...
La pagina si sta caricando...
La pagina si sta caricando...
La pagina si sta caricando...
La pagina si sta caricando...
La pagina si sta caricando...
La pagina si sta caricando...
La pagina si sta caricando...
La pagina si sta caricando...
La pagina si sta caricando...
La pagina si sta caricando...
La pagina si sta caricando...
La pagina si sta caricando...
La pagina si sta caricando...
La pagina si sta caricando...
La pagina si sta caricando...
La pagina si sta caricando...
La pagina si sta caricando...
La pagina si sta caricando...
La pagina si sta caricando...
La pagina si sta caricando...
La pagina si sta caricando...
La pagina si sta caricando...
La pagina si sta caricando...
La pagina si sta caricando...
La pagina si sta caricando...
La pagina si sta caricando...
La pagina si sta caricando...
La pagina si sta caricando...
La pagina si sta caricando...
La pagina si sta caricando...
La pagina si sta caricando...
La pagina si sta caricando...
La pagina si sta caricando...
La pagina si sta caricando...
La pagina si sta caricando...
La pagina si sta caricando...
La pagina si sta caricando...
La pagina si sta caricando...
La pagina si sta caricando...
La pagina si sta caricando...
La pagina si sta caricando...
La pagina si sta caricando...
La pagina si sta caricando...
La pagina si sta caricando...
La pagina si sta caricando...
La pagina si sta caricando...
La pagina si sta caricando...
La pagina si sta caricando...
La pagina si sta caricando...
La pagina si sta caricando...
La pagina si sta caricando...
La pagina si sta caricando...
La pagina si sta caricando...
La pagina si sta caricando...
La pagina si sta caricando...
La pagina si sta caricando...
La pagina si sta caricando...
La pagina si sta caricando...
La pagina si sta caricando...
La pagina si sta caricando...
La pagina si sta caricando...
La pagina si sta caricando...
La pagina si sta caricando...
La pagina si sta caricando...
La pagina si sta caricando...
La pagina si sta caricando...
La pagina si sta caricando...
La pagina si sta caricando...
La pagina si sta caricando...
La pagina si sta caricando...
La pagina si sta caricando...
La pagina si sta caricando...
La pagina si sta caricando...
-
 1
1
-
 2
2
-
 3
3
-
 4
4
-
 5
5
-
 6
6
-
 7
7
-
 8
8
-
 9
9
-
 10
10
-
 11
11
-
 12
12
-
 13
13
-
 14
14
-
 15
15
-
 16
16
-
 17
17
-
 18
18
-
 19
19
-
 20
20
-
 21
21
-
 22
22
-
 23
23
-
 24
24
-
 25
25
-
 26
26
-
 27
27
-
 28
28
-
 29
29
-
 30
30
-
 31
31
-
 32
32
-
 33
33
-
 34
34
-
 35
35
-
 36
36
-
 37
37
-
 38
38
-
 39
39
-
 40
40
-
 41
41
-
 42
42
-
 43
43
-
 44
44
-
 45
45
-
 46
46
-
 47
47
-
 48
48
-
 49
49
-
 50
50
-
 51
51
-
 52
52
-
 53
53
-
 54
54
-
 55
55
-
 56
56
-
 57
57
-
 58
58
-
 59
59
-
 60
60
-
 61
61
-
 62
62
-
 63
63
-
 64
64
-
 65
65
-
 66
66
-
 67
67
-
 68
68
-
 69
69
-
 70
70
-
 71
71
-
 72
72
-
 73
73
-
 74
74
-
 75
75
-
 76
76
-
 77
77
-
 78
78
-
 79
79
-
 80
80
-
 81
81
-
 82
82
-
 83
83
-
 84
84
-
 85
85
-
 86
86
-
 87
87
-
 88
88
-
 89
89
-
 90
90
-
 91
91
-
 92
92
-
 93
93
-
 94
94
-
 95
95
-
 96
96
-
 97
97
-
 98
98
-
 99
99
-
 100
100
-
 101
101
-
 102
102
-
 103
103
-
 104
104
-
 105
105
-
 106
106
-
 107
107
-
 108
108
-
 109
109
-
 110
110
-
 111
111
-
 112
112
-
 113
113
-
 114
114
-
 115
115
-
 116
116
-
 117
117
-
 118
118
-
 119
119
-
 120
120
-
 121
121
-
 122
122
-
 123
123
-
 124
124
-
 125
125
-
 126
126
-
 127
127
-
 128
128
-
 129
129
-
 130
130
-
 131
131
-
 132
132
-
 133
133
-
 134
134
-
 135
135
-
 136
136
-
 137
137
-
 138
138
-
 139
139
-
 140
140
-
 141
141
-
 142
142
-
 143
143
-
 144
144
-
 145
145
-
 146
146
-
 147
147
-
 148
148
-
 149
149
-
 150
150
-
 151
151
-
 152
152
-
 153
153
-
 154
154
-
 155
155
-
 156
156
-
 157
157
-
 158
158
-
 159
159
-
 160
160
-
 161
161
-
 162
162
-
 163
163
-
 164
164
-
 165
165
-
 166
166
-
 167
167
-
 168
168
-
 169
169
-
 170
170
-
 171
171
-
 172
172
-
 173
173
-
 174
174
-
 175
175
-
 176
176
-
 177
177
-
 178
178
-
 179
179
-
 180
180
-
 181
181
-
 182
182
-
 183
183
-
 184
184
-
 185
185
-
 186
186
-
 187
187
-
 188
188
-
 189
189
-
 190
190
-
 191
191
-
 192
192
-
 193
193
-
 194
194
-
 195
195
-
 196
196
-
 197
197
-
 198
198
-
 199
199
-
 200
200
-
 201
201
-
 202
202
-
 203
203
-
 204
204
-
 205
205
-
 206
206
-
 207
207
-
 208
208
-
 209
209
-
 210
210
-
 211
211
-
 212
212
-
 213
213
-
 214
214
-
 215
215
-
 216
216
-
 217
217
-
 218
218
-
 219
219
-
 220
220
-
 221
221
-
 222
222
-
 223
223
-
 224
224
-
 225
225
-
 226
226
-
 227
227
-
 228
228
-
 229
229
-
 230
230
-
 231
231
-
 232
232
-
 233
233
-
 234
234
-
 235
235
-
 236
236
-
 237
237
-
 238
238
-
 239
239
-
 240
240
-
 241
241
-
 242
242
-
 243
243
-
 244
244
-
 245
245
-
 246
246
-
 247
247
-
 248
248
-
 249
249
-
 250
250
-
 251
251
-
 252
252
-
 253
253
-
 254
254
-
 255
255
-
 256
256
-
 257
257
-
 258
258
-
 259
259
-
 260
260
-
 261
261
-
 262
262
-
 263
263
-
 264
264
-
 265
265
-
 266
266
-
 267
267
-
 268
268
-
 269
269
-
 270
270
-
 271
271
-
 272
272
-
 273
273
-
 274
274
-
 275
275
-
 276
276
-
 277
277
-
 278
278
-
 279
279
-
 280
280
-
 281
281
-
 282
282
-
 283
283
-
 284
284
-
 285
285
-
 286
286
-
 287
287
-
 288
288
-
 289
289
-
 290
290
-
 291
291
-
 292
292
-
 293
293
-
 294
294
-
 295
295
-
 296
296
-
 297
297
-
 298
298
-
 299
299
-
 300
300
-
 301
301
-
 302
302
-
 303
303
-
 304
304
-
 305
305
-
 306
306
-
 307
307
-
 308
308
-
 309
309
-
 310
310
-
 311
311
-
 312
312
-
 313
313
-
 314
314
-
 315
315
-
 316
316
-
 317
317
-
 318
318
-
 319
319
-
 320
320
-
 321
321
-
 322
322
-
 323
323
-
 324
324
-
 325
325
-
 326
326
-
 327
327
-
 328
328
-
 329
329
-
 330
330
-
 331
331
-
 332
332
-
 333
333
-
 334
334
-
 335
335
-
 336
336
-
 337
337
-
 338
338
-
 339
339
-
 340
340
-
 341
341
-
 342
342
-
 343
343
-
 344
344
-
 345
345
-
 346
346
-
 347
347
-
 348
348
-
 349
349
-
 350
350
-
 351
351
-
 352
352
-
 353
353
-
 354
354
-
 355
355
-
 356
356
-
 357
357
-
 358
358
-
 359
359
-
 360
360
-
 361
361
-
 362
362
-
 363
363
-
 364
364


in altre lingue
- English: Sony MZ E310 User manual
- français: Sony MZ E310 Manuel utilisateur
- español: Sony MZ E310 Manual de usuario
- Deutsch: Sony MZ E310 Benutzerhandbuch
- русский: Sony MZ E310 Руководство пользователя
- Nederlands: Sony MZ E310 Handleiding
- português: Sony MZ E310 Manual do usuário
- slovenčina: Sony MZ E310 Používateľská príručka
- čeština: Sony MZ E310 Uživatelský manuál
- polski: Sony MZ E310 Instrukcja obsługi
- svenska: Sony MZ E310 Användarmanual
- suomi: Sony MZ E310 Ohjekirja
Documenti correlati
-
Sony D-EJ020 Manuale del proprietario
-
Sony D-EJ100 Manuale del proprietario
-
Sony D-EJ001 Manuale del proprietario
-
Sony d ej021 Manuale del proprietario
-
Sony MZ-E501 Manuale del proprietario
-
Sony MZ-N10 Istruzioni per l'uso
-
Sony MZ-N710 Istruzioni per l'uso
-
-
Sony MZ-NH900 Istruzioni per l'uso
-
Sony MZ-NH600 Istruzioni per l'uso