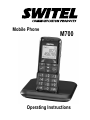
SWITEL M700 Manuale del proprietario
- Categoria
- Dispositivi di rete cellulare
- Tipo
- Manuale del proprietario

Mobile Phone
Operating Instructions
M700

2
2
Operating Instructions 3. . . . . . . . . . . .
Declaration of Conformity 101. . . . . . . .
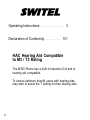
HAC Hearing Aid Compatible
to M3 / T3 Rating
The M700 Phone has a built in Induction Coil and is
hearing aid compatible.
To ensure optimum benefit, users with hearing aids
may wish to select the T setting on their hearing aids.

1
Contents
3
1 Safety Information 4. . . . . . . . . . . . . .
2 Preparing the Telephone 8. . . . . . . . .
3 Key Functions − Overview 16. . . . . . . .
4 Preliminary Information 20. . . . . . . . . .
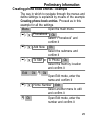
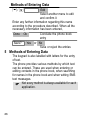
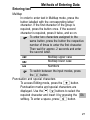
5 Methods of Entering Data 26. . . . . . . . .
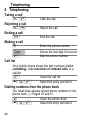
6 Telephoning 28. . . . . . . . . . . . . . . . . .
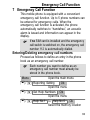
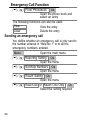
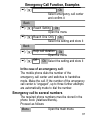
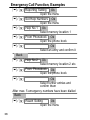
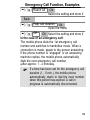
7 Emergency Call Function 33. . . . . . . . .
8 Emergency Call Function, Examples 36.
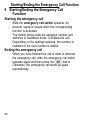
9 Starting/Ending the
Emergency Call Function 40. . . . . . .
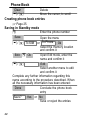
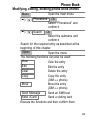
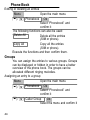
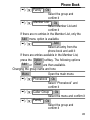
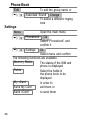
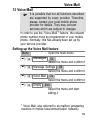
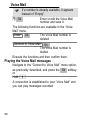
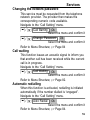
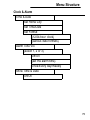
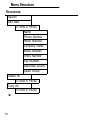
10 Phone Book 41. . . . . . . . . . . . . . . . . .
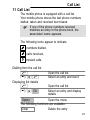
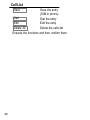
11 Call List 47. . . . . . . . . . . . . . . . . . . . .
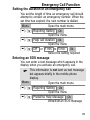
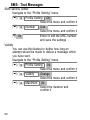
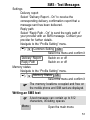
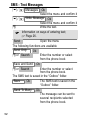
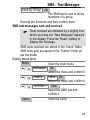
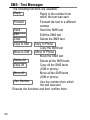
12 SMS − Text Messages 49. . . . . . . . . . .
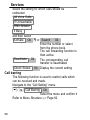
13 Voice Mail 55. . . . . . . . . . . . . . . . . . .
14 Services 57. . . . . . . . . . . . . . . . . . . . .
15 Settings 62. . . . . . . . . . . . . . . . . . . . .
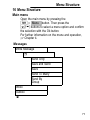
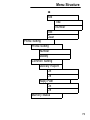
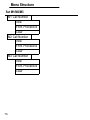
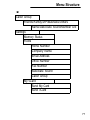
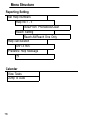
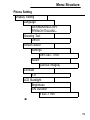
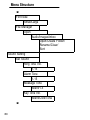
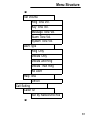
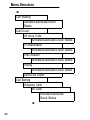
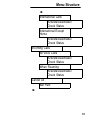
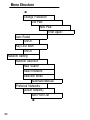
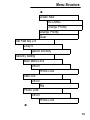
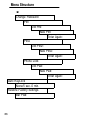
16 Menu Structure 71. . . . . . . . . . . . . . . .
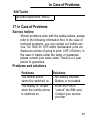
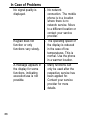
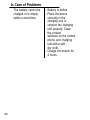
17 In Case of Problems 87. . . . . . . . . . . .
18 Technical Facts 91. . . . . . . . . . . . . . . .
19 SAR Information 95. . . . . . . . . . . . . . .
20 Maintenance / Guarantee 96. . . . . . . . .
21 Index 98. . . . . . . . . . . . . . . . . . . . . . .

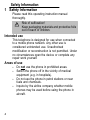
Safety Information
4
1 Safety Information
Please read this operating instruction manual
thoroughly.
Risk of suffocation!
Keep packaging materials and protective foils
out of reach of children.
Intended use
This telephone is designed for use when connected
to a mobile phone network. Any other use is
considered unintended use. Unauthorised
modification or reconstruction is not permitted. Under
no circumstances open the device or complete any
repair work yourself.
Areas of use
Do not use the phone in prohibited areas.
Switch the phone off in the vicinity of medical
equipment (e.g. in hospitals).
Do not use the phone in petrol stations or near
fuels and chemicals.
Inquire by the airline company whether mobile
phones may be used before using the phone in
aircraft.

Safety Information
5
General information
Prevent exposure to smoke, dust, vibration,
chemicals, moisture, heat and direct sunlight. The
phone is not waterproof; therefore, keep it dry.
Only use original accessories and batteries.
Never attempt to connect other products.
If you want to connect the phone to another
device, read the manual supplied with that device
with regard to any detailed safety information.
Never attempt to connect incompatible products.
Repairs to this device may only be completed by
qualified service personnel.
All mobile communication equipment is subject to
interference which may impair its performance.
Keep the phone and accessories out of the reach
of children.
The SIM card can be removed. Caution! Small
children can swallow them.
The ringing tone is issued via the loudspeaker.
Take an incoming call first and then hold the
phone to your ear.
This prevents any possible hearing damage.
Only use the phone while driving or riding a
transport vehicle in road traffic when using the
approved hands−free equipment and
appropriately positioned holders. Ensure that no
safety−related functions are interfered with when

Safety Information
6
operating the phone. It is essential to observe the
applicable laws and national regulations.
Always maintain a distance of at least 15 cm to
implanted heart pacemakers to prevent any
possible interference. If you have had a
pacemaker implanted, do not carry the phone in a
breast pocket when switched on. Always hold the
phone to the ear furthest away from the
pacemaker during calls.
Switch the phone off immediately if you notice or
suspect any adverse effects.
This phone is hearing aid compatible. If you wear
a hearing aid, however, please contact your
doctor or the hearing aid manufacturer to inquire
about any possible impairments through mobile
communication equipment.
Do not rely on the mobile phone as a safeguard
for emergencies. For a variety of technical
reasons, it is not possible to guarantee a reliable
connection under all circumstances.
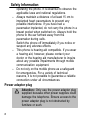
Power adapter plug
Attention: Only use the power adapter plug
supplied because other power supplies could
damage the telephone. Ensure access to the
power adapter plug is not obstructed by
furniture or such.

Safety Information
7
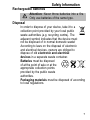
Rechargeable batteries
Attention: Never throw batteries into a fire.
Only use batteries of the same type.
Disposal
In order to dispose of your device, take it to a
collection point provided by your local public
waste authorities (e.g. recycling centre). The
adjacent symbol indicates that the device must
not be disposed of in normal domestic waste!
According to laws on the disposal of electronic
and electrical devices, owners are obliged to
dispose of old electronic and electrical
devices in a separate waste container.
Batteries must be disposed
of at the point of sale or at the
appropriate collection points
provided by the public waste
authorities.
Packaging materials must be disposed of according
to local regulations.

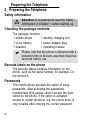
2
Preparing the Telephone
8
2 Preparing the Telephone
Safety information
Attention: It is essential to read the Safety
Information in Chapter 1 before starting up.
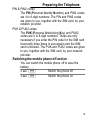
Checking the package contents
The package contains:
1 mobile phone 1 desktop charging unit
1 Li−ion battery 1 power adapter plug
1 headset 1 operating manual
Please note that the phone is delivered with a
protection film on the lens area that should be
removed before use.
Barcode labels on the phone
The barcode labels contains information on the
phone, such as the serial number, for example. Do
not remove it.
Passwords
This mobile phone provides the option of using
passwords. After activating the passwords,
unauthorised third−parties cannot access the data
stored on the phone. If the option is activated,
access to certain functions, e.g. the phone book, is
only possible after entering the correct password.

3
4
Preparing the Telephone
9
PIN & PIN2 codes
The PIN (Personal Identity Number) and PIN2 codes
are 4 to 8−digit numbers. The PIN and PIN2 codes
are given to you, together with the SIM card, by your
network provider.
PUK & PUK2 codes
The PUK (Personal Unblocking Key) and PUK2
codes are 4 to 8−digit numbers. These are only
necessary if you enter the PIN code for the SIM card
incorrectly three times in succession and the SIM
card is blocked. The PUK and PUK2 codes are given
to you, together with the SIM card, by your network
provider.
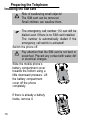
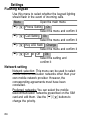
Switching the mobile phone off and on
You can switch the mobile phone off to save the
battery.
3 sec. Switch the phone off
3 sec. Switch the phone on

Preparing the Telephone
10
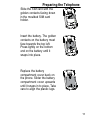
Installing the SIM card
Risk of swallowing small objects!
The SIM card can be removed.
Small children can swallow them.
The emergency call number 112 can still be
dialled even if there is no SIM card installed.
The number is automatically dialled if the
emergency call switch is activated!
Switch the phone off.
Pay attention that the SIM card is not bent or
scratched. Prevent any contact with water, dirt
or electrical charges.
Slide the mobile phone’s
battery compartment cover
towards the bottom using a
little downward pressure. Lift
the battery compartment
cover off the phone
completely.
If there is already a battery
inside, remove it.
1
2
1
2

Preparing the Telephone
11
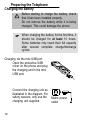
Slide the SIM card with the
golden contacts facing down
in the moulded SIM card
holder.
Insert the battery. The golden
contacts on the battery must
face towards the top left.
Press lightly on the bottom
end on the battery until it
snaps into place.
Replace the battery
compartment cover back on
the phone. Slider the battery
compartment cover upwards
until it snaps in to place. Take
care to align the plastic lugs.
1
2
1
2

5
Preparing the Telephone
12
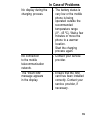
Charging the battery
Before starting to charge the battery, check
that it has been installed properly.
Do not remove the battery while it is being
charged. This could damage the phone.
When charging the battery for the first time, it
should be charged for at least 10 hours.
Some batteries only reach their full capacity
after several complete charge/discharge
cycles.
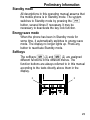
Charging via the mini USB port
Open the protective USB
cover on the phone and plug
the charging unit in the mini
USB port.
Connect the charging unit as
illustrated in the diagram. For
safety reasons, only use the
charging unit supplied.
Mains power
outlet

6
7
Preparing the Telephone
13
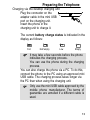
Charging via the desktop charging unit
Plug the connector on the
adapter cable in the mini USB
port on the charging unit.
Insert the phone in the
charging unit to charge it.
The current battery charge status is indicated in the
display as follows:
Full Half empty Low Empty
It may take a few seconds before the phone
indicates the charging process.
You can use the phone during the charging
process.
You can also charge the phone via a PC. To do this,
connect the phone to the PC using an approved mini
USB cable. The charging process takes longer via
the PC than when using the charging unit.
Only use the mini USB cable approved by the
mobile phone manufacturer. The terms of
guarantee are annulled if a different cable is
used.

Preparing the Telephone
14
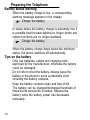
Battery status warning
When the battery charge is low, a corresponding
warning message appears in the display.
Charge the battery.
In cases where the battery charge is extremely low, it
is possible that the back−lighting no longer works and
certain functions are no longer available.
Charge the battery.
When the battery charge drops below the minimum
status, the phone switches off automatically.
Tips on the battery
Only use batteries, cables and charging units
approved by the manufacturer, otherwise the battery
could be damaged.
Do not short circuit the battery. Always leave the
battery in the phone to avoid accidentally short
circuiting the battery contacts.
Keep the battery contacts clean and free of dirt.
The battery can be charged/discharged hundreds of
times but its service life is limited. Replace the
battery when the battery power has decreased
noticeably.

Preparing the Telephone
15
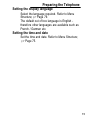
Setting the display language
Select the language required. Refer to Menu
Structure; Page 79.
The default out of box language is English −
therefore other languages are available such as
French / German etc.
Setting the time and date
Set the time and date. Refer to Menu Structure;
Page 75.

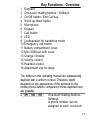
Key Functions − Overview
16
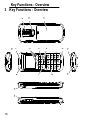
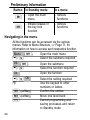
3 Key Functions − Overview
1
3
4
5
6
7
8
9
10
11
1213
14 15
16
2

Key Functions − Overview
17
1 Earpiece
2 One−touch dialling buttons / Softkeys
3 On/Off button / End Call key
4 Scroll up/down button
5 Microphone
6 Keypad
7 Call button
8 LED
9 Loudspeaker for handsfree mode
10 Emergency call switch
11 Battery compartment cover
12 Mini USB port with cover
13 Charge contacts
14 Volume control
15 Headset socket
16 Attachment eye for strap
The buttons in this operating manual are subsequently
depicted with a uniform contour. Therefore, slight
deviations in the appearance of the symbols on the
mobile phone buttons compared to those depicted here
are possible.
2 One−touch dialling buttons /
Softkeys
A phone number can be
assigned to each one−touch

Key Functions − Overview
18
dialling button and then dialled
directly by pressing and
holding the respective button.
are also softkeys
Page 23.
3 On/Off button/End Call key
Switch the mobile phone on
and off.
Cancel the current process.
End or reject a call.
4 Scroll up/down buttons
Navigate in the menus
Open the menu
Open the phone book
7 Call button Take a call or dial a number.
Open the call list.
8 LED Indicates the phone operating
status.
9 Loudspeaker You can hear the caller’s
voice from here when the
phone is in Handsfree mode.
The outgoing alert message is
played back loud via this
loudspeaker.
12 Mini USB port with cover
Connect a USB plug.

Key Functions − Overview
19
13 Charging contacts The phone is charged via
these contacts when in the
charging unit.
14 Volume control
Regulates the volume of the
caller.
15 Headset socket
Connect a headset.
The earpiece, loudspeaker
and microphone are
deactivated. You can only
hear and speak via the
headset.
Only use the headset supplied with this
phone. There is no guarantee that headsets
from other manufacturers will work properly.
Damage to the headset or mobile phone
cannot be ruled out.
16 Attachment eye Attach a wrist strap (not
contained in the material
supplied).

Preliminary Information
20
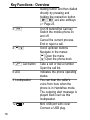
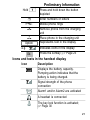
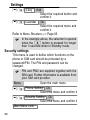
Buttons with special functions
Mode Hold Hold
Standby Activate/
Deactivate the
No Alert" call
setting
Activate the key
lock
Incoming call Activate the No
Alert" call setting
for this call only
Hold
A connection is established to your mailbox and you
can play messages recorded; Page 55.
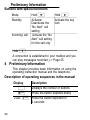
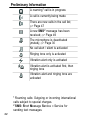
4 Preliminary Information
This chapter provides basic information on using the
operating instruction manual and the telephone.
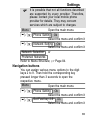
Description of operating sequences in the manual
Display Description
Displays the contour of buttons
Press the button depicted briefly
2 sec. Press the button depicted for
2 seconds
La pagina si sta caricando...
La pagina si sta caricando...
La pagina si sta caricando...
La pagina si sta caricando...
La pagina si sta caricando...
La pagina si sta caricando...
La pagina si sta caricando...
La pagina si sta caricando...
La pagina si sta caricando...
La pagina si sta caricando...
La pagina si sta caricando...
La pagina si sta caricando...
La pagina si sta caricando...
La pagina si sta caricando...
La pagina si sta caricando...
La pagina si sta caricando...
La pagina si sta caricando...
La pagina si sta caricando...
La pagina si sta caricando...
La pagina si sta caricando...
La pagina si sta caricando...
La pagina si sta caricando...
La pagina si sta caricando...
La pagina si sta caricando...
La pagina si sta caricando...
La pagina si sta caricando...
La pagina si sta caricando...
La pagina si sta caricando...
La pagina si sta caricando...
La pagina si sta caricando...
La pagina si sta caricando...
La pagina si sta caricando...
La pagina si sta caricando...
La pagina si sta caricando...
La pagina si sta caricando...
La pagina si sta caricando...
La pagina si sta caricando...
La pagina si sta caricando...
La pagina si sta caricando...
La pagina si sta caricando...
La pagina si sta caricando...
La pagina si sta caricando...
La pagina si sta caricando...
La pagina si sta caricando...
La pagina si sta caricando...
La pagina si sta caricando...
La pagina si sta caricando...
La pagina si sta caricando...
La pagina si sta caricando...
La pagina si sta caricando...
La pagina si sta caricando...
La pagina si sta caricando...
La pagina si sta caricando...
La pagina si sta caricando...
La pagina si sta caricando...
La pagina si sta caricando...
La pagina si sta caricando...
La pagina si sta caricando...
La pagina si sta caricando...
La pagina si sta caricando...
La pagina si sta caricando...
La pagina si sta caricando...
La pagina si sta caricando...
La pagina si sta caricando...
La pagina si sta caricando...
La pagina si sta caricando...
La pagina si sta caricando...
La pagina si sta caricando...
La pagina si sta caricando...
La pagina si sta caricando...
La pagina si sta caricando...
La pagina si sta caricando...
La pagina si sta caricando...
La pagina si sta caricando...
La pagina si sta caricando...
La pagina si sta caricando...
La pagina si sta caricando...
La pagina si sta caricando...
La pagina si sta caricando...
La pagina si sta caricando...
La pagina si sta caricando...
La pagina si sta caricando...
-
 1
1
-
 2
2
-
 3
3
-
 4
4
-
 5
5
-
 6
6
-
 7
7
-
 8
8
-
 9
9
-
 10
10
-
 11
11
-
 12
12
-
 13
13
-
 14
14
-
 15
15
-
 16
16
-
 17
17
-
 18
18
-
 19
19
-
 20
20
-
 21
21
-
 22
22
-
 23
23
-
 24
24
-
 25
25
-
 26
26
-
 27
27
-
 28
28
-
 29
29
-
 30
30
-
 31
31
-
 32
32
-
 33
33
-
 34
34
-
 35
35
-
 36
36
-
 37
37
-
 38
38
-
 39
39
-
 40
40
-
 41
41
-
 42
42
-
 43
43
-
 44
44
-
 45
45
-
 46
46
-
 47
47
-
 48
48
-
 49
49
-
 50
50
-
 51
51
-
 52
52
-
 53
53
-
 54
54
-
 55
55
-
 56
56
-
 57
57
-
 58
58
-
 59
59
-
 60
60
-
 61
61
-
 62
62
-
 63
63
-
 64
64
-
 65
65
-
 66
66
-
 67
67
-
 68
68
-
 69
69
-
 70
70
-
 71
71
-
 72
72
-
 73
73
-
 74
74
-
 75
75
-
 76
76
-
 77
77
-
 78
78
-
 79
79
-
 80
80
-
 81
81
-
 82
82
-
 83
83
-
 84
84
-
 85
85
-
 86
86
-
 87
87
-
 88
88
-
 89
89
-
 90
90
-
 91
91
-
 92
92
-
 93
93
-
 94
94
-
 95
95
-
 96
96
-
 97
97
-
 98
98
-
 99
99
-
 100
100
-
 101
101
-
 102
102


SWITEL M700 Manuale del proprietario
- Categoria
- Dispositivi di rete cellulare
- Tipo
- Manuale del proprietario
in altre lingue
- English: SWITEL M700 Owner's manual
Altri documenti
-
Telefunken TM 100 Manuale utente
-
Olympia Luna Manuale del proprietario
-
Olympia Style View Manuale del proprietario
-
Olympia ROCK Manuale del proprietario
-
BenQ A31A Manuale utente
-
Proximus Forum Free 575 Manuale utente
-
-
-
-