Princess AEROFRYER 182080 Manuale del proprietario
- Tipo
- Manuale del proprietario

Steam Aerofryer
01.182080.01.001
RU Руководство по эксплуатации
EN Instruction manual
NL Gebruiksaanwijzing
FR Mode d’emploi
DE Bedienungsanleitung
ES Manual de usuario
PT Manual de utilizador
IT Manuale utente
SV Bruksanvisning
CS Návod na použití
PL Instrukcja obsługi
SK Návod na použitie
FI Ohjekirja
DK Brugervejledning
NO Bruksanvisningen

4
15
16
1
3
2
6
7
8
1011
12 22 2313 241918
9
14
17
20 21
5
25
26
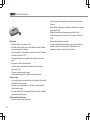
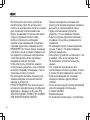
PARTS DESCRIPTION / ONDERDELENBESCHRIJVING / DESCRIPTION DES PIÈCES /
TEILEBESCHREIBUNG / DESCRIPCIÓN DE LAS PIEZAS / DESCRIÇÃO DOS
COMPONENTES / DESCRIZIONE DELLE PARTI / BESKRIVNING AV DELAR /
OPIS CZĘŚCI / POPIS SOUČÁSTÍ / POPIS SÚČASTÍ / ОПИСАНИЕ ЗАПЧАСТИ /
OSIEN KUVAUKSET / BESKRIVELSE AF BESTANDDELE / BESKRIVELSE AV DELER

Instruction manual
3
SAFETY
• By ignoring the safety instructions the
manufacturer cannot be held responsible for
the damage.
• If the supply cord is damaged, it must be
replaced by the manufacturer, its service
agent or similarly qualified persons in order
to avoid a hazard.
• Never move the appliance by pulling the
cord and make sure the cord cannot
become entangled.
• The appliance must be placed on a stable,
level surface.
• The user must not leave the device
unattended while it is connected to the
supply.
• This appliance is not intended for use by
persons (including children) with reduced
physical, sensory or mental capabilities, or
lack of experience and knowledge, unless
they have been given supervision or
instruction concerning use of the appliance
by a person responsible for their safety.
• Close supervision is necessary when any
appliance is used by or near children.
• WARNING: Spilled food can cause serious
burns. Keep appliance and cord away from
children. Never drape cord over edge of
counter, never use outlet below counter, and
never use with an extension cord.
• The use of accessory attachments not
recommended by the appliance
manufacturer may cause injuries.
• Do not use outdoors.
• Do not place on or near a hot gas or electric
burner, or in a heated oven.
• Do not clean with metal scouring pads.
Pieces can break off the pad and touch
electrical parts, creating a risk of electric
shock.
• Use extreme caution when removing tray or
disposing of hot grease
• Extreme caution must be used when moving
an appliance containing hot oil or other hot
liquids.
• CAUTION: To protect against damage or
electric shock, do not cook in the base unit.
Always use the provided baking pan to cook.
• To disconnect, press the power button, let
the item run the cool down program and
remove the plug.
EN

Instruction manual
4
• Do not use baking pan or aero plate if dented or
worn.
• WARNING: Never deep-fry in the Aerofryer,
regardless of whether the lid is on or off. THIS
IS DANGEROUS, AND CAN CAUSE A FIRE
AND SERIOUS DAMAGE.
• Before placing baking pan or aero plate into the
base, ensure both are dry by wiping with a soft
cloth.
• Always ensure the appliance is properly
assembled before use.
• Care should be taken when lifting the baking
pan from the base, it’s recommended to use
gloves.
• When removable baking pan is empty do not
heat it for more than 10 minutes, this may
damage the cooking surface.
• To avoid possible damage from steam, place
the unit away from walls and cabinets during
use.
• Never lift the unit by the lid side tabs.
• This appliance is intended to be used in
household and similar applications such as:
• Staff kitchen areas in shops, offices and other
working environments.
• By clients in hotels, motels and other residential
type environments.
• Bed and breakfast type environments.
• Farm houses.
• Children shall not play with the appliance.
• This appliance shall not be used by children.
Keep the appliance and its cord out of reach of
children.
• To protect yourself against an electric shock, do
not immerse the cord, plug or appliance in the
water or any other liquid.
• Do not heat the food for too long.
• The heating element surface is subject to
residual heat after use.
• The connector must be removed before the
appliance will be cleaned, please make sure the
inlet is completely dry before the unit will be
used again.
• Surface is liable to get hot during use.
• WARNING: If the surface is cracked, switch off
the appliance to avoid the possibility of an
electric shock.
• The temperature of accessible surfaces may be
high when the appliance is operating.

Instruction manual
5
• The appliance is not intended to be operated
by means of an external timer or a separate
remote-control system.
• The appliance is to be connected to a
socket-outlet having an earthed contact (for
class I appliances).
• In order to prevent disruptions of the airflow
do not put anything on top of the appliance
and make sure there is always 10
centimeter of free space around the
appliance.
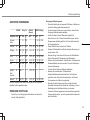
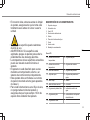
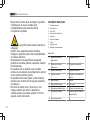
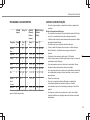
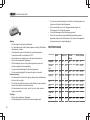
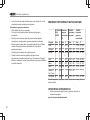
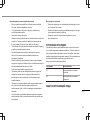
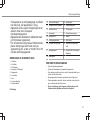
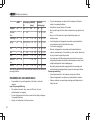
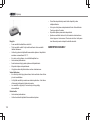
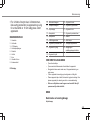
PARTS DESCRIPTION
1. Water tank
2. Air inlet
3. LCD display
4. Air outlet openings
5. Baking pan
6. Aero plate
7. Basket
8. Basket handle
9. Condensation tray
LCD display
10 Timer control buttons 19 Bread program
11 Temperature control buttons 20 Vegetables program
12 Power button 21 Fish program
13 Steam shot 22 Pasta / Rice / Grain program
14 Steam mode 23 Manual
15 Air fry mode 24 Active light
16 Fries program 25 Add water indicator
17 Chicken program 26 Cleaning/descaling button/
indicator
18 Meat program
BEFORE THE FIRST USE
• Remove all packaging material.
• Remove any stickers or labels from the appliance.
• Thoroughly clean the parts with hot water, some washing-up
liquid and a non-abrasive sponge.
• Wipe the inside and outside of the appliance with a moist cloth.
• Place the appliance on a stable, horizontal and level surface, do
not place the appliance on non-heat-resistant surfaces.
• This is an air fryer that works on hot air. Do not fill the pan
with oil or frying fat.
EN

Instruction manual
6
OPERATION
Touch button description
Power button
• Press the power button to activate the device when it is in standby
mode.
Steam shot button
• Press the steam shot button to add steam to the device. One shot of
steam will be produced.
Program buttons
• By tapping one of the preprogrammed buttons (fries, chicken, meat,
bread, vegetables, pasta/rice/grain, fish) the device will automatically
be set to the right time and temperature.
• You can also manually set a cooking time and temperature by tapping
the manual button.
• See chapter ‘Aerofryer programs’ for more information.
Timer control buttons
• Tap the plus button to increase or the minus button to decrease the
cooking time in 1 minute sequence. The maximum time setting is 90
minutes.
• Press and hold the plus or minus button to increase/decrease the
cooking time continuously.
Temperature control buttons
• Tap the plus button to increase the temperature by 5°C. The maximum
temperature setting is 200°C.
• Tap the minus button to decrease the temperature by 5°C.
• Press and hold the plus or minus button to increase/decrease the
temperature continuously.
Use
• Put the mains plug in an earthed wall socket.
• Press the power button to activate the display.
• When the product is not in use for 20 seconds, the device will return to
standby mode.
• Carefully pull the pan out of the air fryer.
• Put the ingredients in the basket.
• Slide the pan back into the air fryer.
• Do not touch the pan during and some time after use, as it gets very
hot. Only hold the pan by the handle.
• Some ingredients require shaking halfway through the preparation
time. To shake the ingredients, pull the pan out of the appliance by the
handle and shake it. Then slide the pan back into the air fryer. Do not
press the basket release button during shaking
• When you pull out the pan during the frying process, the device will
shut off automatically. When you reinsert the device, the program will
resume.
Aero plate
• The aero plate is designed so you can use it for both large and small
portion.
• If you have a large portion of food, fold in the legs of the plate.
• For small portions of food, unfold the legs of plate.

Instruction manual
7
Steam mode
• Turn the stopper to open the water tank.
• Fill the water tank with water. Make sure to properly secure the
stopper. Place the water tank back into the device.
• Select the steam function by using the manual program. The
temperature will be set automatically to 100°C.
• When the products is in steam mode, you cannot adjust the
temperature.
• Place your ingredients into the baking pan.
• Set the amount of time you want to steam your ingredients by
using the time control buttons.
• Press the power button to start the program.
• You can use the steam mode to steam various types of food.
Water injection
• When during steaming the water tank runs empty, this indicator
light will start to flash and an alarm will go off.
• You can refill the water tank and put it back into place. The light
will stop flashing and the alarm will stop.
• If the water tank is short of water for more than 2 minutes, the
device will automatically stop working.
Air fry mode
• Place ingredients into the baking pan.
• Select the Air fry mode by using the manual function.
• Press the manual button to manually set the desired temperature
and time by using the control buttons.
• You can also set on of the preprogrammed modes. See
‘Aerofryer programs’ to select the right program.
• Press the power button to activate the program.
• When you hear the timer beep, the set preparation time has
elapsed. The device will shut off after 20 seconds. Pull the pan
out of the appliance and place it on a heat-resistant surface.
EN

Instruction manual
8
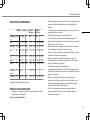
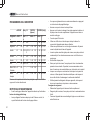
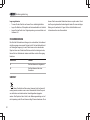
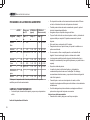
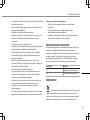
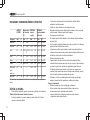
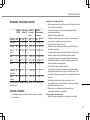
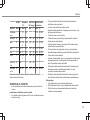
AEROFRYER PROGRAMS
STEAM Airfry 1/2 RANGE
(Steam)
RANGE (Airfry)
Program Time °C Time °C Time °C Time °C
Fries - - 20 200 1 - 90 80 - 200
Vegetables 20 100 2 180 1 - 60 100 1 - 90 80 - 200
Chicken 20 100 10/35 200/16
0
1 - 60 100 1 - 90 80 - 200
Fish 8 100 4 200 1 - 60 100 1 - 90 80 - 200
Meat 5 100 10 200 1 - 60 100 1 - 90 80 - 200
Bread 3 100 40/45 180 1 - 60 100 1 - 90 40 - 200
Pasta /
Rice / Grain
25 100 - - 1 - 60 100
Manual 20 100 20 180 1 - 60 100 1 - 90 80 - 200
The time or temperature of the preset function can only be changed for the
selected function.
CLEANING AND MAINTENANCE
• Before cleaning, unplug the appliance and wait for the appliance to
cool down.
cleaning/descaling button
• When the device has been operating for over 20 hours in total, the
cleaning fumction indication light will light up.
• You can also start this mode manually by pressing the cleaning/
descaling button.
• Make sure the water tank is filled with water.
• Tap the one-button wash button and the water pump will fully open.
The device now starts the cleaning function.
• The working time of this mode is 25 minutes.
• Use a soft damp cloth to wipe clean the base and lid of the unit after
every use.
• Use a small brush or cotton swab if necessary. Never pour any liquid
into the base of the unit.
• Wash the removable parts (baking pan, aero plate and condensation
tray) in warm soapy water with a soft cloth or sponge.
• Dry each piece thoroughly.
• Note that the baking pan, aero plate and condensation tray are
dishwasher safe. However, we recommend to wash them by hand as
this will be beneficial for the lifetime of the product.
• When cleaning or cooking with the cooking pot or basket, never use
metal utensils or scouring pads in order to avoid damage to the non-
stick coating.
• Never use harsh chemical detergents, scouring pads or powders on
any of the parts or accessories.
Storing Instructions
• Unplug allow unit to cool completely.
• Store the baking pan, aero plate and condensation tray inside the unit.
• Store the unit in its original box or covered in a cool, dry place.

Instruction manual
9
TROUBLE SHOOTING
The unit is equipped with safety features that will shut the unit down if
an abnormal condition is encountered during cooking. An error signal
will be displayed on the control panel. Depending on the error,
audible beeping may be heard. Once the problem has been identified
and corrected, plug in the unit and resume cooking.
Error code Problem
E1 The running state sensor is
disconnected.
E2 The running state sensor is short
circuited.
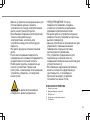
ENVIRONMENT
This appliance should not be put into the domestic garbage at
the end of its durability, but must be offered at a central point for the
recycling of electric and electronic domestic appliances. This symbol
on the appliance, instruction manual and packaging puts your
attention to this important issue. The materials used in this appliance
can be recycled. By recycling of used domestic appliances you
contribute an important push to the protection of our environment.
Ask your local authorities for information regarding the point of
recollection.
EN

Gebruiksaanwijzing
10
VEILIGHEID
• Als u de veiligheidsinstructies negeert, kan de
fabrikant niet verantwoordelijk worden
gehouden voor de mogelijke schade.
• Als het netsnoer beschadigd is, moet het
worden vervangen door de fabrikant, de
onderhoudsmonteur van de fabrikant of door
personen met een soortgelijke kwalificatie om
gevaar te voorkomen.
• Verplaats het apparaat nooit door aan het snoer
te trekken en zorg dat het snoer niet in de war
kan raken.
• Het apparaat moet op een stabiele, vlakke
ondergrond worden geplaatst.
• De gebruiker mag het apparaat niet onbeheerd
achterlaten wanneer de stekker zich in het
stopcontact bevindt.
• Dit apparaat is niet bedoeld voor gebruik door
personen (inclusief kinderen) met verminderde
lichamelijke, zintuiglijke of verstandelijke
vermogens of personen met een gebrek aan
ervaring en kennis, tenzij iemand die
verantwoordelijk is voor hun veiligheid toezicht
op hen houdt of hen heeft uitgelegd hoe het
apparaat dient te worden gebruikt.
• Houd voldoende toezicht wanneer een apparaat
wordt gebruikt door of in de buurt van kinderen.
• WAARSCHUWING: Gemorst voedsel kan
ernstige brandwonden veroorzaken. Houd het
apparaat en snoer uit de buurt van kinderen.
Laat het snoer nooit over de rand van het
werkblad hangen, gebruik nooit een stopcontact
onder het werkblad en gebruik het apparaat
nooit in combinatie met een verlengsnoer.
• Het gebruik van accessoires die niet worden
aanbevolen door de fabrikant van het apparaat,
kan letsel veroorzaken.
• Gebruik het apparaat niet buitenshuis.
• Plaats het apparaat niet op of in de buurt van
een ingeschakeld gasfornuis of elektrisch
fornuis, of in een verwarmde oven.
• Reinig het apparaat niet met metalen
schuursponsjes. Er kunnen stukjes afbreken
van het sponsje en in contact komen met
elektrische onderdelen, waardoor het risico op
een elektrische schok ontstaat.
• Ga uiterst voorzichtig te werk wanneer u de bak
verwijdert of heet vet wegdoet.
• Ga uiterst voorzichtig te werk wanneer u een
apparaat verplaatst dat hete olie of andere hete
vloeistoffen bevat.

Gebruiksaanwijzing
11
• LET OP: Om schade of een elektrische
schok te voorkomen, mag u geen voedsel
bereiden in de basiseenheid. Gebruik altijd
de meegeleverde bakpan voor de bereiding.
• Als u het apparaat wilt loskoppelen, drukt u
op de aan/uit-toets, voert u het
afkoelprogramma uit en verwijdert u de
stekker.
• Gebruik de bakpan of aero-plaat niet als
deze ingedeukt of versleten is.
• WAARSCHUWING: Frituur nooit voedsel in
de Aerofryer, met of zonder deksel. DIT IS
GEVAARLIJK EN KAN BRAND OF
ERNSTIGE SCHADE VEROORZAKEN.
• Voordat u de bakpan of aero-plaat in de
basis plaatst, moet u zorgen dat beide droog
zijn door ze af te vegen met een zachte
doek.
• Zorg altijd dat het apparaat correct in elkaar
is gezet voordat u het gebruikt.
• Wees voorzichtig wanneer u de bakpan uit
de basis tilt. Het wordt aanbevolen om
handschoenen te gebruiken.
• Wanneer de uitneembare bakpan leeg is,
mag u deze niet langer dan 10 minuten
opwarmen, anders raakt het
bereidingsoppervlak mogelijk beschadigd.
• Om mogelijke schade door stoom te
voorkomen, plaatst u het apparaat tijdens
gebruik niet in de buurt van muren en
kasten.
• Til het apparaat nooit op aan de uitstekende
delen van het deksel.
• Dit apparaat is bedoeld voor huishoudelijk
en soortgelijk gebruik, zoals:
• Personeelskeukens in winkels, kantoren en
andere werkomgevingen.
• Door gasten in hotels, motels en andere
residentiële omgevingen.
• Bed&Breakfast-type omgevingen.
• Boerderijen.
• Kinderen mogen niet met het apparaat
spelen.
• Dit apparaat mag niet worden gebruikt door
kinderen. Houd het apparaat en het
netsnoer buiten bereik van kinderen.
• Dompel het snoer, de stekker of het
apparaat niet onder in water of andere
vloeistoffen om elektrische schokken te
voorkomen.
• Verhit het voedsel niet te lang.
• Het oppervlak van het verwarmingselement
is na gebruik onderhevig aan restwarmte.
NL

Gebruiksaanwijzing
12
• De connector dient te worden verwijderd
alvorens het apparaat te reinigen. Wees er
zeker van dat de inlaat volledig droog is
alvorens het apparaat weer in gebruik te
nemen.
• Het oppervlak wordt heet tijdens
gebruik.
• WAARSCHUWING: Indien het oppervlak is
gebarsten, schakel dan het apparaat uit om
elektrische schokken te voorkomen.
• De temperatuur van de toegankelijke
oppervlakken kan hoog zijn wanneer het
apparaat in gebruik is.
• Het apparaat is niet bedoeld om bediend te
worden met behulp van een externe timer of
een afzonderlijk afstandbedieningssysteem.
• Het apparaat moet worden aangesloten op een
geaard stopcontact (voor klasse I-apparaten).
• Plaats niets boven op het apparaat en zorg
ervoor dat er altijd 10cm vrije ruimte rondom
het apparaat is om verstoring van de
luchtstroom te voorkomen.
ONDERDELENBESCHRIJVING
1. Waterreservoir
2. Luchtinlaat
3. Lcd-display
4. Luchtuitlaatopeningen
5. Bakpan
6. Aero-plaat
7. Mandje
8. Handgreep van mandje
9. Condensbak
Lcd-display
10 Toetsen voor timerregeling 19 Programma voor brood
11 Toetsen voor
temperatuurregeling
20 Programma voor groenten
12 Aan/uit-toets 21 Programma voor vis
13 Stoomstoot 22 Programma voor pasta/rijst/
granen
14 Stoommodus 23 Handmatig
15 Aerofry-modus 24 Activiteitslampje
16 Programma voor friet 25 Indicator voor water toevoegen
17 Programma voor kip 26 Indicator voor reinigen/
ontkalken
18 Programma voor vlees

Gebruiksaanwijzing
13
VOOR HET EERSTE GEBRUIK
• Verwijder alle verpakkingsmateriaal.
• Verwijder eventuele stickers of etiketten van het apparaat.
• Reinig de onderdelen grondig met heet water, een beetje
afwasmiddel en een niet-schurende spons.
• Reinig de binnenkant en de buitenkant van het apparaat met een
vochtige doek.
• Plaats het apparaat op een stabiele, horizontale en vlakke
ondergrond. Plaats het apparaat niet op een niet-hittebestendige
ondergrond.
• Dit is een heteluchtfriteuse die werkt op hete lucht. Vul de
pan niet met olie of frituurvet.
BEDIENING
Beschrijving van druktoetsen
Aan/uit-toets
• Druk op de aan/uit-toets om het apparaat in te schakelen
wanneer het in de stand-bymodus staat.
Stoomstoottoets
• Druk op de stoomstoottoets om stoom toe te voegen aan het
apparaat. Er wordt dan een stoomstoot vrijgegeven.
Programmatoetsen
• Als u op een van de voorgeprogrammeerde toetsen drukt (friet,
kip, vlees, brood, groenten, pasta/rijst/granen, vis), wordt het
apparaat automatisch ingesteld op de juiste tijd en temperatuur.
• U kunt ook handmatig een bereidingstijd en -temperatuur
instellen door op de handmatige toets te drukken.
• Zie het hoofdstuk 'Aerofryer-programma's' voor meer informatie.
Toetsen voor timerregeling
• Tik op de plus- of mintoets om de bereidingstijd in stappen van 1
minuut te verhogen of verlagen. De maximale tijdinstelling is 90
minuten.
• Houd de plus- of mintoets ingedrukt om de bereidingstijd
doorlopend te verhogen/verlagen.
Bedieningstoetsen voor de temperatuur
• Tik op de plustoets om de temperatuur in stappen van 5°C te
verhogen. De maximale temperatuurinstelling is 200°C.
• Tik op de mintoets om de temperatuur in stappen van 5°C te
verlagen.
• Houd de plus- of mintoets ingedrukt om de temperatuur
doorlopend te verhogen/verlagen.
Gebruik
• Plaats de netstekker in een geaard stopcontact.
• Druk op de aan/uit-toets om het display in te schakelen.
• Wanneer het apparaat 20 seconden niet wordt gebruikt, schakelt
het terug naar de stand-bymodus.
• Trek de pan voorzichtig uit de heteluchtfriteuse.
• Doe de ingrediënten in de mand.
• Schuif de pan terug in de heteluchtfriteuse.
• Raak de pan tijdens en enige tijd na gebruik niet aan. De pan
wordt zeer heet. Houd de pan uitsluitend bij de handgreep vast.
NL

Gebruiksaanwijzing
14
• Sommige ingrediënten moeten halverwege de bereidingstijd worden
geschud. Trek de pan met de handgreep uit het apparaat en schud de
pan om de ingrediënten te schudden. Schuif de pan vervolgens terug
in de heteluchtfriteuse. Druk tijdens het schudden niet op de
mandontgrendelingsknop.
• Als u de pan tijdens het frituren verwijdert, schakelt het apparaat
automatisch uit. Als u het apparaat terugplaatst, zal het programma
hervatten.
Aero-plaat
• De aero-plaat is zodanig ontworpen dat deze kan worden gebruikt
voor zowel grote als kleine porties.
• Als u een grote voedselportie heeft, klapt u de pootjes van de plaat in.
• Voor kleine voedselporties klapt u de pootjes van de plaat uit.
Stoommodus
• Draai aan de stop om het waterreservoir te openen.
• Vul het waterreservoir met water. Controleer of de stop stevig vastzit.
Plaats het waterreservoir terug in het apparaat.
• Selecteer de stoomfunctie door het handmatige programma te
gebruiken. De temperatuur wordt automatisch ingesteld op 100°C.
• In de stoommodus is het niet mogelijk om de temperatuur aan te
passen.
• Plaats de ingrediënten in de bakpan.
• Stel de gewenste tijd voor het stomen van de ingrediënten in met
behulp van de toetsen voor timerregeling.
• Druk op de aan/uit-toets om het programma te starten.
• U kunt de stoommodus gebruiken om diverse soorten voedsel te
bereiden.
Waterinjectie
• Wanneer het waterreservoir tijdens het stomen leeg raakt, gaat dit
lampje knipperen en klinkt er een alarm.
• U kunt het waterreservoir dan bijvullen en terugplaatsen. Het lampje
gaat uit en het alarm stopt.
• Als er meer dan 2 minuten geen water in het waterreservoir zit, wordt
het apparaat automatisch uitgeschakeld.
Aerofry-modus
• Plaats de ingrediënten in de bakpan.
• Selecteer de aerofry-modus door het handmatige programma te
gebruiken.
• Druk op de toets voor het handmatige programma om de gewenste
temperatuur en tijd handmatig in te stellen met de regeltoetsen.
• U kunt ook een van de voorgeprogrammeerde modi instellen. Zie
'Aerofryer-programma's' om het juiste programma te selecteren.
• Druk op de aan/uit-toets om het programma in te schakelen.
• Als de timer een piep laat horen, is de ingestelde bereidingstijd
verstreken. Het apparaat schakelt na 20 seconden uit. Trek de pan uit
het apparaat en plaats de pan op een hittebestendige ondergrond.

Gebruiksaanwijzing
15
AEROFRYER-PROGRAMMA'S
STOMEN Aerofry 1/2 BEREIK
(Stomen)
BEREIK
(Aerofry)
Programm
a
Tijd °C Tijd °C Tijd °C Tijd °C
Friet - - 20 200 1 - 90 80 - 200
Groenten 20 100 2 180 1 - 60 100 1 - 90 80 - 200
Kip 20 100 10/3
5
200/1
60
1 - 60 100 1 - 90 80 - 200
Vis 8 100 4 200 1 - 60 100 1 - 90 80 - 200
Vlees 5 100 10 200 1 - 60 100 1 - 90 80 - 200
Brood 3 100 40/4
5
180 1 - 60 100 1 - 90 40 - 200
Pasta/rijst/
granen
25 100 - - 1 - 60 100
Handmatig 20 100 20 180 1 - 60 100 1 - 90 80 - 200
De tijd of temperatuur van de snelkeuzefunctie kan alleen worden
gewijzigd voor de geselecteerde functie.
REINIGING EN ONDERHOUD
• Verwijder voor reiniging de stekker uit het stopcontact en wacht
tot het apparaat is afgekoeld.
toets voor reinigen/ontkalken
• Wanneer het apparaat in totaal meer dan 20 uur ingeschakeld is
geweest, gaat het indicatielampje voor de reinigingsfunctie
branden.
• U kunt deze modus ook handmatig starten door op de toets voor
reinigen/ontkalken te drukken.
• Zorg dat het waterreservoir is gevuld met water.
• Tik op de wastoets, waarna de waterpomp volledig wordt
geopend. De reinigingsfunctie van het apparaat wordt nu gestart.
• Deze modus duurt 25 minuten.
• Gebruik een zachte, vochtige doek om de basis en het deksel
van het apparaat na elk gebruik schoon te vegen.
• Gebruik zo nodig een kwastje of wattenstaafje. Giet nooit enige
vloeistof in de basis van het apparaat.
• Was de verwijderbare onderdelen (bakpan, aero-plaat en
condensbak) met een zachte doek of spons in warm zeepsop.
• Droog elk onderdeel zorgvuldig af.
• De bakpan, aero-plaat en condensbak zijn
vaatwasmachinebestendig. Het wordt echter aanbevolen deze
onderdelen met de hand af te wassen om de levensduur van het
product te verlengen.
• Wanneer u het apparaat reinigt of voedsel bereidt in de
binnenpan of het mandje, mag u nooit metalen bestek of een
metalen schuursponsje gebruiken, omdat hierdoor mogelijk
schade ontstaat aan de antiaanbaklaag.
• Gebruik nooit agressieve chemische reinigingsmiddelen,
schuursponsjes of -poeders om een van de onderdelen of
accessoires te reinigen.
NL

Gebruiksaanwijzing
16
Opberginstructies
• Haal de stekker uit het stopcontact en laat het apparaat volledig
afkoelen.
• Berg de bakpan, aero-plaat en condensbak op in het apparaat.
• Bewaar het apparaat in de originele verpakking of afgedekt op een
koele, droge plaats.
PROBLEMEN OPLOSSEN
Het apparaat is voorzien van veiligheidsfuncties waardoor het wordt
uitgeschakeld als er tijdens het gebruik een ongebruikelijke toestand wordt
gedetecteerd. Er verschijnt een foutmelding op het bedieningspaneel.
Afhankelijk van de fout klinkt er mogelijk ook een piepsignaal. Nadat u het
probleem hebt vastgesteld en verholpen, steekt u de stekker weer in het
stopcontact en hervat u de bereiding.
Foutcode Probleem
E1 De verbinding met de sensor voor
de huidige status is verbroken.
E2 Er is kortsluiting ontstaan in de
sensor voor de huidige status.
MILIEU
Dit apparaat mag aan het einde van de levensduur niet bij het
normale huisafval worden gedeponeerd, maar moet bij een speciaal
inzamelpunt voor hergebruik van elektrische en elektronische apparaten
worden aangeboden. Het symbool op het apparaat, in de
gebruiksaanwijzing en op de verpakking attendeert u hierop. De in het
apparaat gebruikte materialen kunnen worden gerecycled. Met het
recyclen van gebruikte huishoudelijke apparaten levert u een belangrijke
bijdrage aan de bescherming van ons milieu. Informeer bij uw lokale
overheid naar het inzamelpunt.

Manuel d'instructions
17
SÉCURITÉ
• Si vous ignorez les consignes de sécurité, le
fabricant ne peut être tenu pour responsable
des dommages.
• Si le cordon d'alimentation est endommagé,
il doit être remplacé par le fabricant, son
réparateur ou des personnes qualifiées afin
d'éviter tout risque.
• Ne déplacez jamais l'appareil en tirant sur le
cordon et veillez à ce que celui-ci ne
s'enroule pas.
• L'appareil doit être posé sur une surface
stable et nivelée.
• Ne laissez jamais le dispositif sans
surveillance s'il est connecté à l'alimentation.
• Cet appareil n'est pas destiné à être utilisé
par des personnes (enfants inclus) ayant
des capacités physiques, sensorielles ou
mentales réduites ou un manque
d'expérience et de connaissances, à moins
qu'elles ne bénéficient d'une supervision ou
d'instructions concernant l'utilisation de
l'appareil émanant d'une personne
responsable de leur sécurité.
• Une surveillance étroite est nécessaire
lorsqu'un appareil est utilisé par des enfants
ou à proximité d'enfants.
• AVERTISSEMENT: Les aliments renversés
peuvent causer de graves brûlures. Gardez
l'appareil et le cordon d'alimentation hors de
portée des enfants. Ne faites jamais passer
le cordon par-dessus le bord du plan de
travail, n'utilisez jamais de prise de courant
sous le plan de travail et n'utilisez jamais de
rallonge.
• L'utilisation d'accessoires non recommandés
par le fabricant peut provoquer un accident.
• Ne l'utilisez pas à l'extérieur.
• Ne placez pas l'appareil sur ou près d'un
brûleur à gaz ou électrique chaud, ou dans
un four chauffé.
• N’utilisez pas de tampons à récurer
métalliques pour le nettoyer. Des morceaux
peuvent se détacher du tampon et toucher
des parties électriques, créant un risque de
choc électrique.
• Soyez très prudent lorsque vous retirez le
plateau ou que vous jetez de la graisse
chaude
• La plus grande prudence s'impose lorsque
l'on déplace un appareil contenant de l'huile
chaude ou d'autres liquides chauds.
FR

Manuel d'instructions
18
• ATTENTION: Pour vous protéger contre les
dommages ou les chocs électriques, ne
cuisinez pas dans l'unité de base. Utilisez
toujours le plat de cuisson fourni pour cuisiner.
• Pour le déconnecter, appuyez sur le bouton
d'alimentation, laissez l'appareil exécuter le
programme de refroidissement et retirez la
prise.
• N'utilisez pas de plat ou de plaque de cuisson si
elle est bosselée ou usée.
• AVERTISSEMENT: Ne faites jamais frire dans
l'Aerofryer, que le couvercle soit ouvert ou
fermé. CECI EST DANGEREUX, ET PEUT
PROVOQUER UN INCENDIE ET DES
DÉGÂTS IMPORTANTS.
• Avant de placer un plat de cuisson ou une
plaque dans le socle, assurez-vous qu'elle est
bien sèche en l'essuyant avec un chiffon doux.
• Assurez-vous toujours que l'appareil est
correctement assemblé avant de l'utiliser.
• Attention lorsque vous soulevez le plat de
cuisson de sa base, il est recommandé d'utiliser
des gants.
• Lorsque le plat de cuisson amovible est vide, ne
le faites pas chauffer pendant plus de 10
minutes, car cela pourrait endommager la
surface de cuisson.
• Pour éviter tout dommage éventuel dû à la
vapeur, éloignez l'appareil des murs et des
armoires pendant l'utilisation.
• Ne soulevez jamais l'appareil par les languettes
latérales du couvercle.
• Cet appareil est destiné à une utilisation
domestique et aux applications similaires,
notamment:
• Coin cuisine des commerces, bureaux et autres
environnements de travail.
• Hôtels, motels et autres environnements de
type résidentiel.
• Environnements de type chambre d’hôtes.
• Fermes.
• Les enfants ne doivent pas jouer avec
l'appareil.
• Cet appareil ne doit pas être utilisé par les
enfants. Maintenez l'appareil et son cordon
d'alimentation hors de portée des enfants.
• Afin de vous éviter un choc électrique,
n'immergez pas le cordon, la prise ou l'appareil
dans de l'eau ou autre liquide .
• Ne chauffez pas les aliments trop longtemps.
• La surface de l'élément chauffant est sujette à
une chaleur résiduelle après usage.

Manuel d'instructions
19
• L’adaptateur doit être retiré avant de
nettoyer l’appareil, veillez à ce que l'orifice
d'entrée soit totalement sec avant de
réutiliser l'appareil.
• La surface est susceptible de
devenir chaude pendant l'utilisation.
• AVERTISSEMENT: Si la surface est
fissurée, arrêtez l'appareil pour éviter tout
risque de choc électrique.
• La température des surfaces accessibles
peut devenir élevée quand l'appareil est en
fonction.
• L'appareil n'est pas destiné à fonctionner
avec un dispositif de programmation externe
ou un système de télécommande
indépendant.
• Branchez l'appareil sur une prise électrique
munie d'une connexion à la terre (pour les
appareils de catégorie I).
• Pour éviter les perturbations du flux d'air, ne
placez rien sur l'appareil et assurez-vous de
préserver systématiquement un
dégagement de 10 cm autour de l'appareil.
DESCRIPTION DES PIÈCES
1. Réservoir d'eau
2. Entrée d'air
3. Affichage LCD
4. Ouvertures d'évacuation d'air
5. Plat de cuisson
6. Aero plaque
7. Panier
8. Poignée du panier
9. Collecteur de condensation
Affichage LCD
10 Boutons de minuterie 19 Programme Pain
11 Boutons de contrôle de la
température
20 Programme Légumes
12 Bouton d'alimentation 21 Programme Poisson
13 Déclenchement de vapeur 22 Programme Pâtes / Riz /
Céréales
14 Mode vapeur. 23 Mode d'emploi
15 Mode Air fry 24 Voyant de marche
16 Programme frites 25 Témoin d'ajout d'eau
17 Programme Volaille 26 Bouton/indicateur de
nettoyage/détartrage
18 Programme Viande
FR

Manuel d'instructions
20
AVANT LA PREMIÈRE UTILISATION
• Retirez tout l'emballage.
• Retirez tout autocollant ou étiquette de l'appareil.
• Nettoyez soigneusement les pièces à l'eau chaude avec un peu de
liquide vaisselle et une éponge non abrasive.
• Nettoyez l'intérieur et l'extérieur de l'appareil avec un chiffon humide.
• Placez l'appareil sur une surface stable, horizontale et de niveau et
évitez les surfaces non thermorésistantes.
• Cette friteuse à air chaud fonctionne à l'air chaud. Ne remplissez
pas la cuve avec de l'huile ou de la graisse de friture.
UTILISATION
Description des boutons tactiles
Bouton marche/arrêt
• Appuyez sur le bouton d'alimentation pour activer l'appareil lorsqu'il
est en mode veille.
Bouton de déclenchement de la vapeur
• Appuyez sur le bouton de déclenchement de la vapeur pour ajouter de
la vapeur. Un jet de vapeur sera ainsi généré.
Boutons de programme
• En appuyant sur l'un des boutons préprogrammés (frites, poulet,
viande, pain, légumes, pâtes/riz/grains, poisson), l'appareil sera
automatiquement réglé sur la bonne heure et la bonne température.
• Vous pouvez également régler manuellement un temps et une
température de cuisson en appuyant sur le bouton manuel.
• Voir chapitre «Programmes de l'Aerofryer» pour en savoir plus.
Boutons de minuterie
• Touchez le bouton plus pour augmenter le temps de cuisson en
séquences d'1 minute. La durée maximale est fixée à 90 minutes.
• Maintenez la touche plus ou moins enfoncée pour augmenter ou
réduire le temps de cuisson en continu.
Boutons de contrôle de la température
• Appuyez sur le bouton plus pour augmenter la température de 5°C. La
température maximale est de 200°C.
• Touchez le bouton moins pour diminuer la température de 5°C.
• Maintenez la touche plus ou moins enfoncée pour augmenter/diminuer
la température en continu.
Utilisation
• Branchez la fiche secteur dans une prise murale mise à la terre.
• Appuyez sur le bouton d'alimentation pour activer l'écran.
• Lorsque le produit n'est pas utilisé pendant 20 secondes, l'appareil
revient en mode veille.
• Retirez prudemment la cuve de la friteuse à air chaud.
• Placez les ingrédients dans le panier.
• Glissez à nouveau la cuve dans la friteuse à air chaud.
• Ne touchez pas la cuve durant l'usage et ensuite pendant un certain
temps. Elle devient très chaude. Tenez la cuve uniquement par la
poignée.
• Certains ingrédients ont besoin d'être secoués à mi-temps de la
préparation Pour secouer les ingrédients, sortez la cuve de l'appareil
par la poignée et secouez-la. Puis glissez à nouveau la cuve dans la
friteuse à air chaud. N'appuyez pas sur le bouton de libération de
panier durant la secousse.
La pagina sta caricando ...
La pagina sta caricando ...
La pagina sta caricando ...
La pagina sta caricando ...
La pagina sta caricando ...
La pagina sta caricando ...
La pagina sta caricando ...
La pagina sta caricando ...
La pagina sta caricando ...
La pagina sta caricando ...
La pagina sta caricando ...
La pagina sta caricando ...
La pagina sta caricando ...
La pagina sta caricando ...
La pagina sta caricando ...
La pagina sta caricando ...
La pagina sta caricando ...
La pagina sta caricando ...
La pagina sta caricando ...
La pagina sta caricando ...
La pagina sta caricando ...
La pagina sta caricando ...
La pagina sta caricando ...
La pagina sta caricando ...
La pagina sta caricando ...
La pagina sta caricando ...
La pagina sta caricando ...
La pagina sta caricando ...
La pagina sta caricando ...
La pagina sta caricando ...
La pagina sta caricando ...
La pagina sta caricando ...
La pagina sta caricando ...
La pagina sta caricando ...
La pagina sta caricando ...
La pagina sta caricando ...
La pagina sta caricando ...
La pagina sta caricando ...
La pagina sta caricando ...
La pagina sta caricando ...
La pagina sta caricando ...
La pagina sta caricando ...
La pagina sta caricando ...
La pagina sta caricando ...
La pagina sta caricando ...
La pagina sta caricando ...
La pagina sta caricando ...
La pagina sta caricando ...
La pagina sta caricando ...
La pagina sta caricando ...
La pagina sta caricando ...
La pagina sta caricando ...
La pagina sta caricando ...
La pagina sta caricando ...
La pagina sta caricando ...
La pagina sta caricando ...
La pagina sta caricando ...
La pagina sta caricando ...
La pagina sta caricando ...
La pagina sta caricando ...
La pagina sta caricando ...
La pagina sta caricando ...
La pagina sta caricando ...
La pagina sta caricando ...
La pagina sta caricando ...
La pagina sta caricando ...
La pagina sta caricando ...
La pagina sta caricando ...
La pagina sta caricando ...
La pagina sta caricando ...
La pagina sta caricando ...
La pagina sta caricando ...
La pagina sta caricando ...
La pagina sta caricando ...
La pagina sta caricando ...
La pagina sta caricando ...
La pagina sta caricando ...
La pagina sta caricando ...
La pagina sta caricando ...
La pagina sta caricando ...
La pagina sta caricando ...
La pagina sta caricando ...
La pagina sta caricando ...
La pagina sta caricando ...
La pagina sta caricando ...
La pagina sta caricando ...
La pagina sta caricando ...
La pagina sta caricando ...
La pagina sta caricando ...
La pagina sta caricando ...
-
 1
1
-
 2
2
-
 3
3
-
 4
4
-
 5
5
-
 6
6
-
 7
7
-
 8
8
-
 9
9
-
 10
10
-
 11
11
-
 12
12
-
 13
13
-
 14
14
-
 15
15
-
 16
16
-
 17
17
-
 18
18
-
 19
19
-
 20
20
-
 21
21
-
 22
22
-
 23
23
-
 24
24
-
 25
25
-
 26
26
-
 27
27
-
 28
28
-
 29
29
-
 30
30
-
 31
31
-
 32
32
-
 33
33
-
 34
34
-
 35
35
-
 36
36
-
 37
37
-
 38
38
-
 39
39
-
 40
40
-
 41
41
-
 42
42
-
 43
43
-
 44
44
-
 45
45
-
 46
46
-
 47
47
-
 48
48
-
 49
49
-
 50
50
-
 51
51
-
 52
52
-
 53
53
-
 54
54
-
 55
55
-
 56
56
-
 57
57
-
 58
58
-
 59
59
-
 60
60
-
 61
61
-
 62
62
-
 63
63
-
 64
64
-
 65
65
-
 66
66
-
 67
67
-
 68
68
-
 69
69
-
 70
70
-
 71
71
-
 72
72
-
 73
73
-
 74
74
-
 75
75
-
 76
76
-
 77
77
-
 78
78
-
 79
79
-
 80
80
-
 81
81
-
 82
82
-
 83
83
-
 84
84
-
 85
85
-
 86
86
-
 87
87
-
 88
88
-
 89
89
-
 90
90
-
 91
91
-
 92
92
-
 93
93
-
 94
94
-
 95
95
-
 96
96
-
 97
97
-
 98
98
-
 99
99
-
 100
100
-
 101
101
-
 102
102
-
 103
103
-
 104
104
-
 105
105
-
 106
106
-
 107
107
-
 108
108
-
 109
109
-
 110
110


Princess AEROFRYER 182080 Manuale del proprietario
- Tipo
- Manuale del proprietario
in altre lingue
- français: Princess AEROFRYER 182080 Le manuel du propriétaire
- Deutsch: Princess AEROFRYER 182080 Bedienungsanleitung
- Nederlands: Princess AEROFRYER 182080 de handleiding
- português: Princess AEROFRYER 182080 Manual do proprietário
- slovenčina: Princess AEROFRYER 182080 Návod na obsluhu
- dansk: Princess AEROFRYER 182080 Brugervejledning
- svenska: Princess AEROFRYER 182080 Bruksanvisning
Documenti correlati
-
Princess 01.183318.01.750 Manuale utente
-
-
-
-
-
-
-
-
Princess 182020 Manuale utente
-
Altri documenti
-
Tristar FR-9025 Manuale utente
-
-
Eden ED-7005 Manuale utente
-
Tristar FR-6999 Manuale utente
-
Eden ED-7012 Manuale utente
-
Tristar FR-6990 Crispy Fryer Manuale utente
-
Tristar FR-6990 Deep Fryer Manuale utente
-
Nova 02.180138.01.001 Manuale utente
-
-
ECG MH 178 vario Manuale utente