Princess 01.182085.01.001 Manuale utente
- Tipo
- Manuale utente

!"#$%&'
!" ()!)*!+
# ,!)!'!'
$ ()!
%& ()!&)
'& (!!!
$( ,#-'
)$ ./-)+01
% #%"2'
$* ./-) +0!
3454673685345334
$&+,-+'"!"."

5
9
7 8
6
4
12
3
ĘŚČ !
"Č!

Instruction manual
3
SAFETY
• By ignoring the safety instructions, the
manufacturer cannot be held responsible for
any damage.
• If the supply cord is damaged, it must be
replaced by the manufacturer, its service
agent or similarly qualified persons in order
to avoid a hazard.
• Never move the appliance by pulling the
cord and make sure the cord cannot
become entangled.
• The appliance must be placed on a stable,
level surface.
• The user must not leave the device
unattended while it is connected to the
supply.
• This appliance is not intended for use by
persons (including children) with reduced
physical, sensory or mental capabilities, or
lack of experience and knowledge, unless
they have been given supervision or
instruction concerning use of the appliance
by a person responsible for their safety.
• Close supervision is necessary when any
appliance is used by or near children.
• WARNING: Spilled food can cause serious
burns. Keep appliance and cord away from
children. Never drape cord over edge of
counter, never use outlet below counter, and
never use with an extension cord.
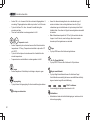
• The use of accessory attachments not
recommended by the appliance
manufacturer may cause injuries.
• Do not use outdoors.
• Do not place on or near a hot gas or electric
burner, or in a heated oven.
• Do not clean with metal scouring pads.
Pieces can break off the pad and touch
electrical parts, creating a risk of electric
shock.
• Use extreme caution when removing tray or
disposing of hot grease.
• Extreme caution must be used when moving
an appliance containing hot oil or other hot
liquids.
• CAUTION: To protect against damage or
electric shock, do not cook in the base unit.
Always use the provided baking pan to cook.
• Always ensure the appliance is properly
assembled before use.
EN

Instruction manual
4
• Care should be taken when removing the
baking trays, it’s recommended to use oven
mittens.
• To avoid possible damage from steam, place
the unit away from walls and cabinets during
use.
• This appliance is intended to be used in
household and similar applications such as:
• Staff kitchen areas in shops, offices and other
working environments.
• By clients in hotels, motels and other residential
type environments.
• Bed and breakfast type environments.
• Farm houses.
• Children shall not play with the appliance.
• This appliance shall not be used by children.
Keep the appliance and its cord out of reach of
children.
• To protect yourself against an electric shock, do
not immerse the cord, plug or appliance in the
water or any other liquid.
• Do not heat the food for too long.
• The connector must be removed before the
appliance will be cleaned, please make sure the
inlet is completely dry before the unit will be
used again.
• Surface is liable to get hot during use.
• WARNING: If the surface is cracked, switch off
the appliance to avoid the possibility of an
electric shock.
• The temperature of accessible surfaces may be
high when the appliance is operating.
• The appliance is not intended to be operated by
means of an external timer or a separate
remote-control system.
• The appliance is to be connected to a socket-
outlet having an earthed contact (for class I
appliances).
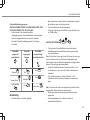
• In order to prevent disruptions of the airflow do
not put anything on top of the appliance and
make sure there is always 10 centimetres of
free space around the appliance.
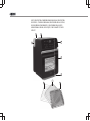
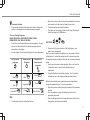
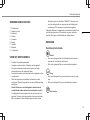
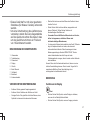
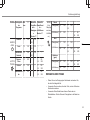
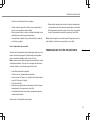
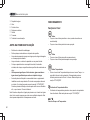
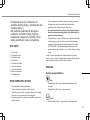
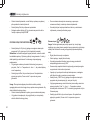
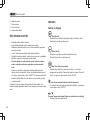
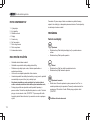
PARTS DESCRIPTION
1. Heat outlet
2. Tank cover
3. Water tank
4. Display
5. Oven door

Instruction manual
5
6. Baking net
7. Grill tray
8. Baking tray
9. Condensation tray
BEFORE THE FIRST USE
• Remove all packaging material.
• Remove any stickers or labels from the appliance.
• Thoroughly clean the parts with hot water, some washing-up
liquid and a non-abrasive sponge.
• Wipe the inside and outside of the appliance with a moist cloth.
• Place the appliance on a stable, horizontal and level surface, do
not place the appliance on non-heat-resistant surfaces.
•Use only fresh, cold tap water, softened water or carbonated
mineral water for filling the water tank,
• Before the first time use it is recommended to let it the appliance
operate in steam mode for 15 minutes without any food inside.
See instructions in this manual under the section “USE”. When in
use for the first time, the pump may produce a loud vibration
sound, this is normal and the sound will fade.
Note: When the device is turned on for the first time, a slight odour
will occur. This is normal, ensure adequate ventilation. This odour is
only temporary and will disappear soon.
OPERATION
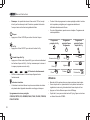
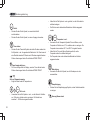
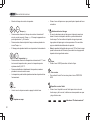
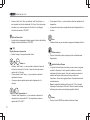
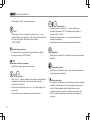
Functions on the Display
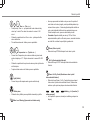
Start
• Press the Start icon to activate the display when it is in standby
mode.
• Press the Start icon to start an operation.
Return
• Press the Return icon to return to the last step.
• Press the Return icon to stop an operation.
Start Timer
• Press the Start Timer icon, then use the Time + and – icons to
set the desired starting time. The timer can be set to start
between 30 mins to 6 hours. More instructions under the section
“USE”.
Active Timer indicator
• The timer indicator will flash in the display when the timer has
been activated. More instructions under the section “USE”.
/
Time and Temperature display
EN

Instruction manual
6
• Displays the cooking time or temperature.
Time + and -
• Use the Time + and - icons to increase or decrease the cooking time
in 1-minute increments. The cooking time can be set between 1 – 90
minutes.
• Press and hold the Time + or - icons for rapid increase/decrease of the
time.
• The time can be also be adjusted while the appliance is in operation.
Temperature + and -
• Use the Temperature plus and minus icons to increase or decrease
the temperature by 5°C increments. The temperature can be set
between 80°C - 200°C.
• Press and hold the plus or minus icons for rapid increase/decrease of
the temperature.
• The temperature can be also be adjusted while the appliance is in
operation.
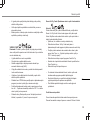
Light
• Use the light icon to turn the oven lamp on or off.
Steam Cleaning
• Press the steam cleaning icon to automatically clean the appliance.
Water Level Warning
• The Water Level Warning icon will illuminate and an alarm bel will be
heard for 3 minutes when the tank is empty and the steam function is
selected. Please re-fill the water tank when this happens then press
start to continue the operation. If no water is added, the operation will
automatically end.
•Note: The water tank capacity is 1150mL, filled with water it can run
more than 60 minutes, however the length of time the water lasts may
vary depending on the ingredients being used.
Steam
• Press the STEAM icon to activate the Steam function.
Air Fry
• Press the AIR FRY icon to activate the Air frying function.
Steam/ Air Fry Combi
• Press the Steam/ Air Fry Combi icon to activate the Steam and Air Fry
function simultaneously, the Air Fryer will begin with steaming then
switch to air frying.
“In Operation” indicators
• Runs consecutively in the display when the appliance is in operation.

Instruction manual
7
Limescale Indicator
• The limescale indicator will illuminate when there is a limescale
build up in the appliance and a steam cleaning in required.
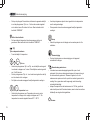
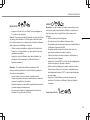
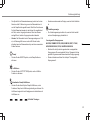
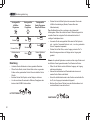
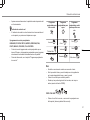
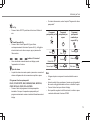
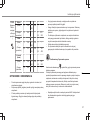
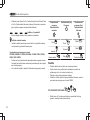
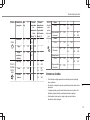
9 Pre-set Cooking Programs
BAKE, FRIES, RICE, VEGETABLES, BREAD, STEAK,
DRUMSTICKS, FISH, WHOLE CHICKEN.
• Touch the icon of the desired pre-set cooking program. The pre-
set time and temperature for the selected program will show
alternatively in the display.
• See the chapter ‘Pre-Set cooking Programs’ for more information.
Air Fry pre-set
programs
Steam pre-set
Programs
Steam/ Air fry
Combi pre-set
programs
Bake Rice
Bread
Fries Vegetables Steak
Drumsticks Fish Whole Chicken
Use
• Put the mains plug in an earthed wall socket.
• Open the oven door, place the tray with ingredients to be cooked
onto desired rack in the oven and close the oven door.
• Touch the start icon to activate the display.
• From here you can choose for either for Air Frying, Steaming or
for both by using the COMBI feature.
AIR FRYING
• Press the Air Fry icon or use one of the Air-frying pre - sets
(bake, fries or drumsticks).
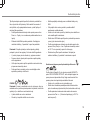
Tip: If you need to preheat the appliance, you can preheat it without
putting food in it. Just set the cooking time for 3 minutes longer than
the expected cooking and add the food after the 3-minute pre-heating
phase.
• Use the pre-set values or adjust using the Time + and - and the
Temperature + and - icons to set the desired time and
temperature.
• Press the Start button to start the operation. The ‘’In operation’’
indicators will run in the display and the operation will start.
Note: For best results, some ingredients require turning halfway
through the preparation time. To turn the ingredients -
• Open the oven door halfway through the operation, the operation
will stop.
• Use oven mittens to remove the baking tray and turn the
ingredients as needed.
• Place the baking tray back into the appliance and close the door,
the operation will resume automatically.
EN

Instruction manual
8
• Do not touch the inside the appliance during and sometime after use
as it gets very hot.
STEAMING
Note: When steaming, please ensure that the steam outlet located on the
inside left of the baking area is not blocked with anything and that water
tank is has adequate water in it.
• Remove the water tank from the appliance.
• Open the cover and fill the water tank with water.
• Do not overfill the tank and pay attention to the MAX water level
indicator.
• Always fill with pure water as this helps to delay a limescale build-up.
• Make sure to properly secure the tank cover then attach the water tank
back onto the appliance.
• Press the STEAM icon or use one of the Steaming pre-sets (Rice,
Vegetables, or Fish)
• Use with the pre-set value for the time or adjust the time using the
Time + and – icons. The temperature will be automatically set to
100°C and cannot be adjusted in Steam mode.
• Press the Start icon to start the operation. The ‘’ In operation’’
indicators will run in the display and the operation will start.
Steam/Air Fry Combi
Use the Steam/Air Fry function if you want to STEAM then AIR FRY your
food consecutively. The food will first be steamed then Air fried. You must
first set the steaming time, then set the air frying time and temperature.
• Make sure that there is adequate water in the water tank.
• Press the Steam/Air fry Combi icon or one of the combi pre-sets
(Bread, Meat or Whole Chicken)
• Use the default settings or Set the steaming time by using the Time +
and - icons. (The default steam temperature is 100°C and cannot be
adjusted).
• Press the Start icon to switch to Combi Air Fry programming.
• Set the air frying time and temperature using the Time and
Temperature + and - icons.
• Press the Start icon to start the operation.
• When the Air frying, Steaming or Combi operation is complete the
appliance will beep 5 times.
• Open the oven door and carefully remove the baking tray with
ingredients from the appliance using oven mittens.
• Unplug the appliance and allow it to cool down completely before
cleaning.
Using the Start Timer
You can use the start timer to set a time for an operation to begin. The
timer can be set to start within 30 minutes to 6 hours.
Note: Please evaluate how long the food can be kept at room
temperature. To prevent food spoilage and not affect the taste, it is
advised that the time should not exceed 2 hours.
• Press Start to activate the display.
• Press the Start Timer icon.

Instruction manual
9
• Use the Time + and – icons to set the desired starting time
(30mins to 6 hours).
• Press the Start icon.
• Choose the desired cooking program, make any desired
adjustments to the cooking time and temperature then press the
Start.
• The display will show the countdown and the operation will begin
when the countdown is over.
To cancel the Start Timer-
• Unplug the appliance to cancel a timer setting or when the
display is showing the timer settings and the in-operation
indicator is active, press the return icon, then press the start timer
icon then press the start icon.
Note: When the product is not in use for 20 seconds, the appliance
will return to standby mode. Activate it again by pressing the Start
icon.
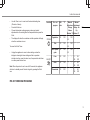
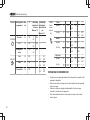
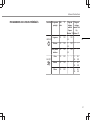
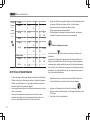
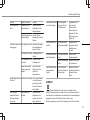
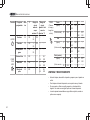
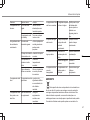
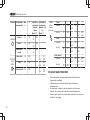
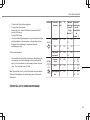
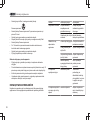
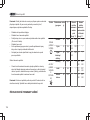
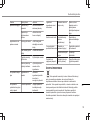
PRE-SET COOKING PROGRAMS
Function Pre - set
program
Min
utes
°C Manual
Adjustmen
t Range
-Steam
Minutes °C
Manual
Adjustment
Range - Air
Fry
Minutes °C
STEAM
Vegetables 22 100 1 -
90
100 - -
Fish 10 100 1 -
90
100 - -
Rice /pasta/
grain
25 100 1 -
90
100 - -
AIR-FRY
Fries 20 200 - - 1 -
90
80 -
200
Cake 45 160 - - 1 -
90
80 -
200
Drumsticks 20 200 - - 1 -
90
80 -
200
EN

Instruction manual
10
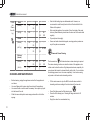
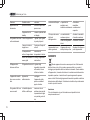
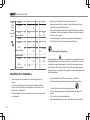
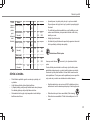
COMBI
(1st
Steam
then Air
fry)
Meat
(Steam) 5 100 1 -
90
100 - -
(Air fry) 10 200 - - 1 -
90
80 –
200
Bread
(Steam)
ↆ
(Air Fry)
3 100 1 -
90
100 - -
40 40 1 –
90
100 1 –
90
40 -200
Chicken
(whole)
(Steam)
ↆ
(Air Fry
20 100 1 –
90
100 1 -
90
80 -
200
10 200 - - - -
CLEANING AND MAINTENANCE
• Before cleaning, unplug the appliance and wait for the appliance to
cool down.
• Use a soft damp cloth to wipe clean the exterior of the appliance.
• Use a small brush or cotton swab if necessary. Never pour any liquid
into the base of the unit.
• Wash the removable parts in warm soapy water with a soft cloth or
sponge.
• Note that the baking trays are dishwasher safe. However, we
recommend to wash them by hand as this will be beneficial for the
lifetime of the product.
• After using the appliance for a period of time, the inside of the water
tank may breed bacteria, please clean the inner wall of the water tank
regularly.
• Dry each piece thoroughly.
• Never use harsh chemical detergents, scouring pads or powders on
any of the parts or accessories.
Limescale Steam Cleaning
The limescale icon will illuminate when a steam cleaning is required.
The steam cleaning function can clean the interior of the appliance to a
certain extent under the action of high temperature steam, especially for
some places that cannot be cleaned directly with a cloth. You must allow
the cleaning process to run its course completely. It can be done using
only water or with water and a descaling solution.
• Fill the water reservoir up to the MAX level with water and add a
descaling solution according to the instructions of the descaler.
• Press Start then press the Self-cleaning icon.
• Press the Self-cleaning icon. Cleaning will begin and last for 20
minutes.
• Empty the water from condensation tray.

Instruction manual
11
• Refill the water tank will pure water then press Start.
• Press the self -cleaning icon.
• After 15 minutes, the limescale cleaning will be completed and
the limescale indicator light will turn off.
• Empty the water from the condensation tray.
• Dry the appliance with a kitchen towel.
Storing Instructions
• Unplug the appliance and allow unit to cool completely.
• Always empty the water tank before storing the appliance, the
water can go bad before the next use.
• Store the baking trays inside the unit.
• Store the unit in its original box or covered in a cool, dry place.
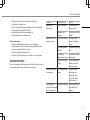
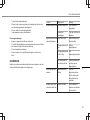
TROUBLESHOOTING
The unit is equipped with safety features that will shut the unit down if
an abnormal condition is encountered during cooking.
Problem Possible reason Solution
Appliance not
functioning
Plug not inserted Insert the plug into
the wall socket
Appliance is in
standby
Press any icon on the
display
Ingredients are not
properly cooked
The food is too thick Cut large of food
pieces into smaller
pieces
The cooking time is
too short
Lengthen the cooking
time
The cooking
temperature is too low
Increase the cooking
temperature
Some foods require
turning
Turn the ingredients
halfway during the
cooking process
Smoke is rising from
the appliance
The ingredients are
greasy
Grease from the
ingredients has
seeped into the
cavity, this will not
affect the result
The appliance is
giving off black smoke
and a strong smell
Appliance malfunction Unplug the appliance
and contact your
supplier
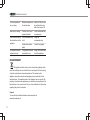
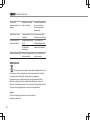
EN

Instruction manual
12
The fried ingredients
are not crispy
Brittleness depends on
the oil and water
Make sure the fries are
dry and brush the tray
with a few drops of oil
Water tank is leaking The tank cover is not
properly installed
Check and reinstall the
cover properly
There is water flowing
from the bottom of the
appliance
The condensation tray
is full
Empty the
condensation tray
Internal connections
defect
Contact the supplier
The appliance has an
unpleasant smell
The appliance was not
cleaned after use
Empty all the water and
clean the appliance
ENVIRONMENT
This appliance should not be put into the domestic garbage at the
end of its durability, but must be offered at a central point for the recycling
of electric and electronic domestic appliances. This symbol on the
appliance, instruction manual and packaging puts your attention to this
important issue. The materials used in this appliance can be recycled. By
recycling of used domestic appliances you contribute an important push to
the protection of our environment. Ask your local authorities for information
regarding the point of recollection.
Support
You can find all available information and spare parts at
www.princesshome.eu!

Gebruiksaanwijzing
13
VEILIGHEID
• Als de veiligheidsvoorschriften worden
genegeerd, kan de fabrikant niet
aansprakelijk worden gesteld voor eventuele
schade.
• Als het netsnoer is beschadigd, moet het om
gevaarlijke situaties te voorkomen worden
vervangen door de fabrikant, diens
servicevertegenwoordiger of een persoon
met vergelijkbare kwalificaties.
• Verplaats het apparaat nooit door aan het
snoer te trekken en zorg dat het snoer niet
in de war kan raken.
• Het apparaat moet op een stabiele, vlakke
ondergrond worden geplaatst.
• De gebruiker mag het apparaat niet
onbeheerd achterlaten wanneer de stekker
zich in het stopcontact bevindt.
• Dit apparaat is niet bedoeld voor gebruik
door personen ( waaronder kinderen) met
verminderde lichamelijke, zintuiglijke of
geestelijke vermogens, of gebrek aan
ervaring en kennis, tenzij zij onder toezicht
staan of instructies hebben gekregen
betreffende het gebruik van het apparaat
van een persoon die verantwoordelijk is voor
hun veiligheid.
• Nauwlettend toezicht is noodzakelijk
wanneer een apparaat door of in de
nabijheid van kinderen wordt gebruikt.
• WAARSCHUWING: Gemorste ingrediënten
kunnen ernstige brandwonden veroorzaken.
Houd het apparaat en het snoer uit de buurt
van kinderen. Leg het snoer nooit over de
rand van het aanrecht, gebruik nooit een
stopcontact onder het aanrecht, en gebruik
het nooit met een verlengsnoer.
• Het gebruik van niet door de fabrikant van
het apparaat aanbevolen accessoires kan
verwondingen veroorzaken.
• Niet buitenshuis gebruiken.
• Niet plaatsen op of in de buurt van een hete
gas- of elektrische brander, of in een
verwarmde oven.
• Niet schoonmaken met metalen
schuursponsjes. Stukjes kunnen van de
sponsjes afbreken en in aanraking komen
met elektrische onderdelen, waardoor er
gevaar voor elektrische schokken ontstaat.
• Wees uiterst voorzichtig bij het verwijderen
van de plaat of het weggooien van heet vet.
• Uiterste voorzichtigheid is geboden bij het
verplaatsen van een apparaat dat hete olie
of andere hete vloeistoffen bevat.
NL

Gebruiksaanwijzing
14
• LET OP: Ter bescherming tegen beschadiging
of elektrische schokken, mag u niet rechtstreeks
in het apparaat bakken. Gebruik altijd de
bijgeleverde bakpan om in te bakken.
• Zorg er altijd voor dat het apparaat op de juiste
manier in elkaar gezet is, voordat u het gebruikt.
• Voorzichtigheid is geboden bij het uitnemen van
de bakplaten, het is aan te bevelen ovenwanten
te gebruiken.
• Om mogelijke schade door stoom te
voorkomen, moet u het apparaat tijdens gebruik
op afstand van muren en kasten plaatsen.
• Dit apparaat is bedoeld voor huishoudelijk en
soortgelijk gebruik, zoals:
• Personeelskeukens in winkels, kantoren en
andere werkomgevingen.
• Door gasten in hotels, motels en andere
residentiële omgevingen.
• Bed&Breakfast-type omgevingen.
• Boerderijen.
• Kinderen mogen niet met het apparaat spelen.
• Dit apparaat mag niet worden gebruikt door
kinderen. Houd het apparaat en het netsnoer
buiten bereik van kinderen.
• Dompel het snoer, de stekker of het apparaat
niet onder in water of andere vloeistoffen om
elektrische schokken te voorkomen.
• Verhit het voedsel niet te lang.
• De connector dient te worden verwijderd
alvorens het apparaat te reinigen. Wees er
zeker van dat de inlaat volledig droog is
alvorens het apparaat weer in gebruik te
nemen.
• Het oppervlak wordt heet tijdens
gebruik.
• WAARSCHUWING: Indien het oppervlak is
gebarsten, schakel dan het apparaat uit om
elektrische schokken te voorkomen.
• De temperatuur van de toegankelijke
oppervlakken kan hoog zijn wanneer het
apparaat in gebruik is.
• Het apparaat is niet bedoeld om bediend te
worden met behulp van een externe timer of
een afzonderlijk afstandbedieningssysteem.
• Het apparaat moet worden aangesloten op een
geaard stopcontact (voor klasse I-apparaten).
• Voor een vrije luchtstroom zorg je dat er niets
boven op het apparaat staat en dat er een
ruimte van 10 centimeter rondom het apparaat
vrij blijft.

Gebruiksaanwijzing
15
ONDERDELENBESCHRIJVING
1. Warmteafvoer
2. Deksel voor tank
3. Watertank
4. Scherm
5. Ovendeur
6. Baknet
7. Grilplaat
8. Bakplaat
9. Condensbak
VOOR HET EERSTE GEBRUIK
• Verwijder alle verpakkingsmateriaal.
• Verwijder eventuele stickers of etiketten van het apparaat.
• Reinig de onderdelen grondig met heet water, een beetje
afwasmiddel en een niet-schurende spons.
• Reinig de binnenkant en de buitenkant van het apparaat met een
vochtige doek.
• Plaats het apparaat op een stabiele, horizontale en vlakke
ondergrond. Plaats het apparaat niet op een niet-hittebestendige
ondergrond.
•Gebruik alleen vers, koud leidingwater, onthard water of
koolstofhoudend mineraalwater om de watertank te vullen,
• Voorafgaand aan het eerste gebruik is het aan te bevelen het
apparaat 15 minuten in de stoommodus te laten werken zonder
dat er etenswaren in zitten. Raadpleeg de instructies in deze
handleiding onder het hoofdstuk "GEBRUIK". Wanneer u hem
voor het eerst gebruikt, kan de pomp een hard trillend geluid
voortbrengen. Dit is normaal en het geluid zal wegebben.
Opmerking: Wanneer u het apparaat voor het eerst inschakelt, kunt
een lichte geur opmerken. Dit is normaal, zorg voor voldoende
ventilatie. Deze geur is slechts tijdelijk en verdwijnt al snel.
BEDIENING
Functies op het scherm
Starten
• Druk op het pictogram Start om het beeldscherm te activeren
wanneer het in de stand-by modus staat.
• Druk op het pictogram Start om een handeling te beginnen.
Terug
• Druk op het pictogram Terug om terug te keren naar de vorige
stap.
• Druk op het pictogram Terug om een handeling te stoppen.
Timer starten
NL

Gebruiksaanwijzing
16
• Druk op de pictogram Timer starten, stel daarna de gewenste starttijd
in met de pictogrammen Tijd + en –. De timer kan worden ingesteld
om te starten tussen 30 minuten tot 6 uren. Meer instructies in het
hoofdstuk "GEBRUIK".
Active timer-indicator
• De timer-indicator knippert op het scherm wanneer de timer is
geactiveerd. Meer instructies in het hoofdstuk "GEBRUIK".
/
Tijd- en temperatuurscherm
• Toont de baktijd of -temperatuur.
Tijd + en -
• Gebruik de pictogrammen Tijd + en Tijd - om de baktijd te verlengen of
te verkorten in stappen van 1 minuut. De baktijd kan worden ingesteld
van 1 tot 90 minuten.
• Druk de pictogrammen Tijd + of - in en houd deze ingedrukt om de tijd
snel te verkorten of te verlengen.
• De tijd kan ook worden aangepast terwijl het apparaat in werking is.
Temperatuur + en -
• Gebruik de pictogrammen voor Temperatuur plus en min om de
temperatuur te verhogen of te verlagen in stappen van 5°C. De
temperatuur kan worden ingesteld tussen 80°C - 200°C.
• Houd de pictogrammen plus of minus ingedrukt om de temperatuur
snel te verhogen/verlagen.
• De temperatuur kan ook worden aangepast terwijl het apparaat in
werking is.
Lamp
• Gebruik de pictogram van het lampje om de ovenlamp aan of uit te
schakelen.
Stoomreiniging
• Druk op het pictogram voor stoomreiniging om het apparaat
automatisch te reinigen.
Waarschuwing waterniveau
• Het waterniveau-waarschuwingspictogram licht op en u hoort
gedurende 3 minuten een alarmsignaal wanneer het reservoir leeg is
en de stoomfunctie gekozen is. Wanneer dit gebeurt, vult u het
waterreservoir opnieuw en drukt u op start om verder te gaan met de
werking. Als er geen water wordt toegevoegd, wordt de werking
automatisch beëindigd.
•Let op: De capaciteit van het waterreservoir is 1150 ml, gevuld met
water kan hij meer dan 60 minuten draaien, maar de duur kan variëren
afhankelijk van de gebruikte ingrediënten.
Stomen

Gebruiksaanwijzing
17
• Druk op de STOOM-pictogram om de stoomfunctie te activeren.
Air Fry
• Druk op de AIR FRY-pictogram om de functie voor
heteluchtfrituren te activeren.
Combinatie Stoom/Heteluchtbakken
• Druk op de combinatiepictogram Stoom/heteluchtbakken om de
functies Stomen en Heteluchtbakken gelijktijdig te activeren. De
Heteluchtoven begint met stomen en schakelt daarna over op
heteluchtbakken
“In bedrijf”-indicatoren
• Loopt continu over het scherm wanneer het apparaat in werking
is.
Kalkindicator
• De kalkindicator gaat branden wanneer er zich kalk in het
apparaat heeft opgehoopt en een stoomreiniging nodig is.
9 vooraf ingestelde bereidingsprogramma's
BAKKEN, PATAT, RIJST, GROENTEN, BROOD, BIEFSTUK,
DRUMSTICKS, VIS, HELE KIP.
• Druk op het pictogram van het gewenste voorgeprogrammeerde
bereidingsprogramma. De vooraf ingestelde tijd en temperatuur
voor het gekozen programma worden afwisselend op het display
aangegeven.
• Raadpleeg het hoofdstuk "Vooringestelde
bereidingsprogramma's" voor meer informatie.
Vooringestelde
programma's voor
de heteluchtoven
Vooringestelde
programma's voor
Stomen
Vooringestelde
programma's voor
de combi stomen/
heteluchtbakken
Bakken Rijst
Brood
Friet Groente Biefstuk
Drumsticks Vis Hele kip
Gebruik
• Steek de stekker in een geaard stopcontact.
• Open de ovendeur, plaats de schaal met de te bereiden
ingrediënten op het gewenste rek in de oven en sluit de
ovendeur.
• Raak het startpictogram aan om het scherm te activeren.
• Van hieruit kunt u kiezen voor ofwel voor het heteluchtbakken,
ofwel voor het stomen, ofwel voor beide door de COMBI functie
te gebruiken.
NL

Gebruiksaanwijzing
18
HETELUCHTBAKKEN
• Druk op het pictogram heteluchtbakken of gebruik een van de
voorinstellingen voor heteluchtbakken (bakken, frites of drumsticks).
Tip: Als u het apparaat moet voorverwarmen, kunt u het voorverwarmen
zonder er etenswaren in te doen. Stel de bereidingstijd in op 3 minuten
langer dan de verwachte bereidingstijd en voeg de gerechten toe na de
voorverwarmingsfase van 3 minuten.
• Gebruik de vooringestelde waarden of pas aan met de Tijd- + en -
Temperatuur + en - pictogrammen voor het instellen van de gewenste
tijd en temperatuur.
• Druk op de start-knop om het programma te starten. De lampjes ''In
bedrijf'' lopen op het display en de bediening begint.
Let op: Voor het beste resultaat moeten sommige ingrediënten
halverwege de bereidingstijd omgedraaid worden. Om de ingrediënten om
te draaien -
• Open de ovendeur halverwege de bereiding, de bereiding zal stoppen.
• Gebruik ovenwanten om de bakplaat te verwijderen en de
ingrediënten om te draaien als dat nodig is.
• Plaats de bakplaat terug in het apparaat en sluit de deur, de bereiding
wordt automatisch hervat.
• Raak de binnenkant van het apparaat niet aan tijdens en enige tijd na
het gebruik, want het wordt erg heet.
STOMEN
Let op: Wanneer u stoomt, moet u ervoor zorgen dat de stoomuitlaat links
binnenin het bakgedeelte niet met iets geblokkeerd is en dat er voldoende
water in het waterreservoir zit.
• Verwijder het waterreservoir uit het apparaat.
• Open het deksel en vul het waterreservoir met water.
• Vul de tank niet te vol en let op de MAX waterpeilindicator.
• Vul altijd met zuiver water, want dat vertraagt de vorming van
kalkaanslag.
• Zorg ervoor dat u het deksel van het waterreservoir goed vastzet en
bevestig het waterreservoir vervolgens weer op het apparaat.
• Druk op het stoompictogram of gebruik één van de
voorgeprogrammeerde stoominstellingen (Rijst, Groenten, of Vis)
• Gebruik met de vooringestelde waarden of pas aan met de Tijd- + en
– pictogrammen. De temperatuur wordt automatisch ingesteld op
100°C en kan in de Stoomfunctie niet worden aangepast.
• Druk op het pictogram Start om de werking te beginnen. De lampjes
''In bedrijf'' lopen op het display en de werking begint.
Combinatie Stoom/Heteluchtbakken
Gebruik de functie stoom/Heteluchtbakken als u uw voedsel
achtereenvolgens wilt STOMEN en daarna HETELUCHTBAKKEN. De
etenswaren worden eerst gestoomd en dan heteluchtgebakken. U moet
eerst de stoomtijd instellen, en dan de tijd en temperatuur voor het
heteluchtbakken.
• Zorg ervoor dat er voldoende water in het waterreservoir zit.
• Druk op het pictogram voor de combi stomen/heteluchtoven of op één
van de combi-voorinstellingen (Brood, Vlees of Hele kip)

Gebruiksaanwijzing
19
• Gebruik de standaardinstellingen of stel de stoomtijd in met de
pictogrammen Tijd + en -. (De standaard stoomtemperatuur is
100°C en kan niet worden aangepast).
• Druk op het pictogram Start om naar de programmering van de
Combi Air Fry over te schakelen.
• Stel de tijd en temperatuur voor heteluchtbakken in met de Tijd
en Temperatuur + en - pictogrammen.
• Druk op het pictogram Start om de werking te beginnen.
• Als het heteluchtbakken, het stomen of de combi-functie klaar is,
geeft het apparaat 5 pieptonen.
• Open de ovendeur en neem de bakplaat met ingrediënten
voorzichtig uit het apparaat met ovenwanten.
• Haal de stekker van het apparaat uit het stopcontact en laat het
apparaat volledig afkoelen voordat u het reinigt.
Gebruik van de Start Timer
U kunt de starttimer gebruiken om een tijd in te stellen waarop een
bewerking moet starten. De timer kan worden ingesteld om te starten
binnen 30 minuten tot 6 uren.
Let op: Beoordeel hoe lang het voedsel op kamertemperatuur
bewaard kan worden. Om voedselbederf te voorkomen en de smaak
niet aan te tasten, wordt geadviseerd de tijd niet langer dan 2 uur in
te stellen.
• Druk op start om het scherm te activeren.
• Druk op het pictogram Start Timer
• Gebruik maken van de Tijd + en – pictogrammen om de
gewenste starttijd (30 min. tot 6 uur) in te stellen.
• Druk op het pictogram Start.
• Kies het gewenste bereidingsprogramma, stel eventueel de
bereidingstijd en -temperatuur in en druk dan op de Start-toets.
• Op het display verschijnt het aftellen en het programma begint
wanneer het aftellen voorbij is.
Om de Start Timer te annuleren -
• Haal de stekker uit het stopcontact om een timerinstelling te
annuleren, of wanneer het display de timerinstellingen weergeeft
en de bedrijfsindicator actief is, druk op het pictogram Terug,
druk dan op het pictogram Start timer en vervolgens op het
pictogram Start.
Let op: Wanneer het produkt 20 seconden niet gebruikt wordt, zal
het apparaat terugkeren in de standby-stand. Activeer het opnieuw
door op het Start pictogram te drukken.
VOORAF INGESTELDE
BEREIDINGSPROGRAMMA'S
NL

Gebruiksaanwijzing
20
Functie Vooringesteld
programma
Minu
ten
°C Handmatig
instelbereik
- Stomen
Minuten °C
Handmatig
instelbereik -
heteluchtfritu
ren
Minuten °C
STOMEN
Groente 22 100 1 -
90
100 - -
Vis 10 100 1 -
90
100 - -
Rijst/pasta/
tarwe
25 100 1 -
90
100 - -
AIR-FRY
Friet 20 200 - - 1 -
90
80 -
200
Cake 45 160 - - 1 -
90
80 -
200
Drumsticks 20 200 - - 1 -
90
80 -
200
COMBI
(Eerst
stoom
dan Air-
fry)
Vlees
(Stoom) 5 100 1 -
90
100 - -
(Air fry) 10 200 - - 1 -
90
80 –
200
Brood
(Stoom)
ↆ
(Air Fry)
3 100 1 -
90
100 - -
40 40 1 –
90
100 1 –
90
40 -200
Kip (heel)
(Stoom)
ↆ
(Air Fry
20 100 1 –
90
100 1 -
90
80 -
200
10 200 - - - -
REINIGING EN ONDERHOUD
• Verwijder voor reiniging de stekker uit het stopcontact en wacht tot het
apparaat is afgekoeld.
• Gebruik een zachte vochtige doek om de buitenkant van het apparaat
schoon te vegen.
• Gebruik zo nodig een kwastje of wattenstaafje. Giet nooit enige
vloeistof in de basis van het apparaat.
• Was de afneembare delen in warm water met zeep en een zachte
doek of spons.
La pagina si sta caricando...
La pagina si sta caricando...
La pagina si sta caricando...
La pagina si sta caricando...
La pagina si sta caricando...
La pagina si sta caricando...
La pagina si sta caricando...
La pagina si sta caricando...
La pagina si sta caricando...
La pagina si sta caricando...
La pagina si sta caricando...
La pagina si sta caricando...
La pagina si sta caricando...
La pagina si sta caricando...
La pagina si sta caricando...
La pagina si sta caricando...
La pagina si sta caricando...
La pagina si sta caricando...
La pagina si sta caricando...
La pagina si sta caricando...
La pagina si sta caricando...
La pagina si sta caricando...
La pagina si sta caricando...
La pagina si sta caricando...
La pagina si sta caricando...
La pagina si sta caricando...
La pagina si sta caricando...
La pagina si sta caricando...
La pagina si sta caricando...
La pagina si sta caricando...
La pagina si sta caricando...
La pagina si sta caricando...
La pagina si sta caricando...
La pagina si sta caricando...
La pagina si sta caricando...
La pagina si sta caricando...
La pagina si sta caricando...
La pagina si sta caricando...
La pagina si sta caricando...
La pagina si sta caricando...
La pagina si sta caricando...
La pagina si sta caricando...
La pagina si sta caricando...
La pagina si sta caricando...
La pagina si sta caricando...
La pagina si sta caricando...
La pagina si sta caricando...
La pagina si sta caricando...
La pagina si sta caricando...
La pagina si sta caricando...
La pagina si sta caricando...
La pagina si sta caricando...
La pagina si sta caricando...
La pagina si sta caricando...
La pagina si sta caricando...
La pagina si sta caricando...
La pagina si sta caricando...
La pagina si sta caricando...
La pagina si sta caricando...
La pagina si sta caricando...
La pagina si sta caricando...
La pagina si sta caricando...
La pagina si sta caricando...
La pagina si sta caricando...
La pagina si sta caricando...
La pagina si sta caricando...
La pagina si sta caricando...
La pagina si sta caricando...
La pagina si sta caricando...
La pagina si sta caricando...
La pagina si sta caricando...
La pagina si sta caricando...
La pagina si sta caricando...
La pagina si sta caricando...
La pagina si sta caricando...
La pagina si sta caricando...
La pagina si sta caricando...
La pagina si sta caricando...
La pagina si sta caricando...
La pagina si sta caricando...
La pagina si sta caricando...
La pagina si sta caricando...
La pagina si sta caricando...
La pagina si sta caricando...
La pagina si sta caricando...
La pagina si sta caricando...
La pagina si sta caricando...
La pagina si sta caricando...
La pagina si sta caricando...
La pagina si sta caricando...
La pagina si sta caricando...
La pagina si sta caricando...
La pagina si sta caricando...
La pagina si sta caricando...
La pagina si sta caricando...
La pagina si sta caricando...
La pagina si sta caricando...
La pagina si sta caricando...
La pagina si sta caricando...
La pagina si sta caricando...
La pagina si sta caricando...
La pagina si sta caricando...
-
 1
1
-
 2
2
-
 3
3
-
 4
4
-
 5
5
-
 6
6
-
 7
7
-
 8
8
-
 9
9
-
 10
10
-
 11
11
-
 12
12
-
 13
13
-
 14
14
-
 15
15
-
 16
16
-
 17
17
-
 18
18
-
 19
19
-
 20
20
-
 21
21
-
 22
22
-
 23
23
-
 24
24
-
 25
25
-
 26
26
-
 27
27
-
 28
28
-
 29
29
-
 30
30
-
 31
31
-
 32
32
-
 33
33
-
 34
34
-
 35
35
-
 36
36
-
 37
37
-
 38
38
-
 39
39
-
 40
40
-
 41
41
-
 42
42
-
 43
43
-
 44
44
-
 45
45
-
 46
46
-
 47
47
-
 48
48
-
 49
49
-
 50
50
-
 51
51
-
 52
52
-
 53
53
-
 54
54
-
 55
55
-
 56
56
-
 57
57
-
 58
58
-
 59
59
-
 60
60
-
 61
61
-
 62
62
-
 63
63
-
 64
64
-
 65
65
-
 66
66
-
 67
67
-
 68
68
-
 69
69
-
 70
70
-
 71
71
-
 72
72
-
 73
73
-
 74
74
-
 75
75
-
 76
76
-
 77
77
-
 78
78
-
 79
79
-
 80
80
-
 81
81
-
 82
82
-
 83
83
-
 84
84
-
 85
85
-
 86
86
-
 87
87
-
 88
88
-
 89
89
-
 90
90
-
 91
91
-
 92
92
-
 93
93
-
 94
94
-
 95
95
-
 96
96
-
 97
97
-
 98
98
-
 99
99
-
 100
100
-
 101
101
-
 102
102
-
 103
103
-
 104
104
-
 105
105
-
 106
106
-
 107
107
-
 108
108
-
 109
109
-
 110
110
-
 111
111
-
 112
112
-
 113
113
-
 114
114
-
 115
115
-
 116
116
-
 117
117
-
 118
118
-
 119
119
-
 120
120
-
 121
121
-
 122
122


Princess 01.182085.01.001 Manuale utente
- Tipo
- Manuale utente
in altre lingue
- français: Princess 01.182085.01.001 Manuel utilisateur
- español: Princess 01.182085.01.001 Manual de usuario
- Deutsch: Princess 01.182085.01.001 Benutzerhandbuch
- Nederlands: Princess 01.182085.01.001 Handleiding
- português: Princess 01.182085.01.001 Manual do usuário
- slovenčina: Princess 01.182085.01.001 Používateľská príručka
- polski: Princess 01.182085.01.001 Instrukcja obsługi