HP Business Inkjet 1200 Printer series Manuale utente
- Categoria
- Stampanti laser / LED
- Tipo
- Manuale utente

Getting Started Guide
Leitfaden zur Inbetriebnahme
Guide de mise en marche
Beknopte handleiding
Guida introduttiva
Cover.fm Page 1 Thursday, May 20, 2004 5:19 PM
𫨰ûàdG AóH π«dO

1
Copyright Information
© 2004 Copyright Hewlett-Packard Development Company, L.P.
Edition 1, 9/2004
Reproduction, adaptation or translation without prior written
permission is prohibited, except as allowed under the
copyright laws.
The information contained herein is subject to change
without notice.
The only warranties for HP products and services are set forth in
the express warranty statements accompanying such products
and services. Nothing herein should be construed as constituting
an additional warranty. HP shall not be liable for technical or
editorial errors or omissions contained herein.
Trademark credits
Microsoft® and Windows® are U.S. registered trademarks of
Microsoft Corporation. All other products mentioned herein may
be trademarks of their respective companies.
Informations sur le copyright
© 2004 Copyright Hewlett-Packard Development Company, L.P.
Édition 1, 9/2004
Toute reproduction, adaptation ou traduction sans autorisation
écrite préalable est formellement interdite, sauf si cette opération
est effectuée dans le cadre prévu par la loi sur les droits d’auteur.
Les informations contenues dans ce document peuvent faire
l’objet de modifications sans préavis.
Les seules garanties relatives aux produits et services HP sont
exposées dans les déclarations de garantie expresse qui
accompagnent lesdits produits et services. Aucun élément du
présent document ne doit être considéré comme constituant une
garantie supplémentaire. HP ne pourra être tenue responsable
des erreurs techniques ou rédactionnelles ou des omissions
figurant dans le présent document.
Marques
Microsoft® et Windows® sont des marques déposées de
Microsoft Corporation aux États-Unis. Tous les autres produits
mentionnés dans le présent document sont des marques de leurs
sociétés respectives.
Safety Information
Always follow basic safety precautions when using this product to
reduce risk of injury from fire or electric shock.
1 Read and understand all instructions in the documentation that
comes with the printer.
2 Use only a grounded electrical outlet when connecting this
product to a power source. If you do not know whether the
outlet is grounded, check with a qualified electrician.
3 Observe all warnings and instructions marked on the product.
4 Unplug this product from wall outlets before cleaning.
5 Do not install or use this product near water, or when
you are wet.
6 Install the product securely on a stable surface.
7 Install the product in a protected location where no one can
step on or trip over the line cord, and the line cord cannot be
damaged.
8 If the product does not operate normally, see “Maintaining and
troubleshooting” in the onscreen user’s guide on the Starter
CD for your operating system.
9 There are no user-serviceable parts inside. Refer servicing to
qualified service personnel.
Informationen zur Sicherheit
Beachten Sie beim Einsatz dieses Produkts immer die folgenden
Sicherheitshinweise, um die Verletzungsgefahr und das Risiko
eines elektrischen Schlags zu verringern.
1 Die Anweisungen in der mit dem Druckergelieferten
Dokumentation müssen von Ihnen gelesen und verstanden
worden sein.
2 Verwenden Sie ausschließlich eine geerdete Steckdose für
den Anschluss dieses Produktes an die Stromversorgung.
Wenn Sie sich nicht sicher sind, ob die Steckdose
geerdet ist, so lassen Sie dies durch einen qualifizierten
Elektriker überprüfen.
3 Alle am Produkt angebrachten Warnungen und Anweisungen
sind zu befolgen.
4 Ziehen Sie vor dem Reinigen des Produkts den Netzstecker
aus der Steckdose.
5 Dieses Produkt darf nicht in der Nähe von Wasser betrieben
bzw. von einer durchnässten Person aufgestellt oder
bedient werden.
6 Sorgen Sie für sicheren Stand des Produkts auf einer stabilen
Auflagefläche.
7 Wählen Sie für das Produkt einen geschützten Standort,
an dem keine Personen auf das Netzkabel treten oder darüber
stolpern können. Das Netzkabel darf nicht beschädigt werden.
8 Wenn die Seite nicht korrekt kopiert wird, lesen Sie den
Abschnitt zur Fehlerbehebung im Online-Benutzerhandbuch
der entsprechenden Starter-CD für Ihr Betriebssystem.
9 Im Inneren des Geräts befinden sich keine Teile, die vom
Endnutzer gewartet werden können. Beauftragen Sie mit
Wartung und Instandsetzung qualifiziertes
Kundendienstpersonal.
HPCrickMLK_GSG_UGFDIA.book Page 1 Wednesday, May 19, 2004 4:26 PM

2
Consignes de sécurité
Respectez toujours les précautions de sécurité élémentaires
quand vous utilisez ce produit, afin de réduire les risques de
blessures dues au feu ou à un choc électrique.
1 Veuillez lire attentivement toutes les instructions contenues
dans la documentation livrée avec l’imprimante.
2 Utilisez toujours une prise de courant mise à la terre lors du
branchement de ce produit à une source d’alimentation. Si
vous ne savez pas si une prise de courant est mise à la terre,
consultez un électricien qualifié.
3 Suivez tous les avertissements et toutes les instructions
indiqués sur le produit.
4 Débranchez cet appareil des prises murales avant de procéder
à un nettoyage.
5 N’installez jamais cet appareil près d’une source d’eau, ni si
vous êtes mouillé.
6 Installez l’appareil en toute sécurité sur une surface stable.
7 Installez l’appareil dans un lieu protégé où personne ne risque
de marcher sur le cordon ou de trébucher sur celui-ci, et où le
cordon ne risque pas d’être endommagé.
8 Si le produit ne fonctionne pas correctement, reportez-vous à
la section « Entretien et dépannage » du guide de l’utilisateur
en ligne disponible sur le CD de démarrage relatif à votre
système d’exploitation.
9 L’appareil ne contient aucune pièce dont l’entretien doit
être réalisé par l’utilisateur. Confiez-en l’entretien à du
personnel qualifié.
Veiligheidsinformatie
Neem bij het gebruik van dit product altijd de elementaire
voorzorgsmaatregelen in acht om de kans op letsel ten gevolge
van brand of elektrische schokken te beperken.
1 Zorg dat u alle instructies in de documentatie die wordt
geleverd bij de printer, hebt gelezen en begrepen.
2 Sluit dit product uitsluitend aan op een geaard stopcontact.
Als u niet zeker weet of een stopcontact geaard is, kunt u
advies inwinnen bij een erkende elektricien.
3 Neem alle op dit product vermelde waarschuwingen en
instructies in acht.
4 Haal het netsnoer uit het stopcontact voordat u dit product
reinigt.
5 Plaats of gebruik dit product niet in de buurt van water of
wanneer u nat bent.
6 Zorg dat het product stevig op een stabiel oppervlak staat.
7 Zet het product op een veilige plaats waar niemand op het
netsnoer kan trappen of erover kan struikelen en het
netsnoer niet wordt beschadigd.
8 Als het product niet goed werkt, raadpleegt u ‘Onderhoud en
probleemoplossing’ in de gebruikershandleiding op de
Starter-cd voor uw besturingssysteem.
9 Dit product bevat geen onderdelen die door de gebruiker
kunnen worden onderhouden. Laat
onderhoudswerkzaamheden over aan erkende
onderhoudsmonteurs.
Informazioni sulla sicurezza
Durante l’utilizzo di questo prodotto, attenersi sempre alle
precauzioni di sicurezza di base al fine di ridurre il rischio di
lesioni alle persone derivanti da incendi o scariche elettriche.
1 Si consiglia di leggere e apprendere tutte le istruzioni
contenute nei documenti forniti insieme alla stampante.
2 Per collegare il prodotto a una presa di corrente,
utilizzare esclusivamente una presa elettrica collegata
a massa. In caso di dubbio, contattare un elettricista
qualificato per verificare che la presa elettrica sia
collegata a massa.
3 Attenersi a tutte le avvertenze e le istruzioni indicate
sul prodotto.
4 Prima di effettuare la pulizia, scollegare il prodotto dalle
prese a parete.
5 Non installare o utilizzare il prodotto nelle vicinanze di acqua o
se non si è perfettamente asciutti.
6 Posizionare il prodotto su una superficie stabile.
7 Posizionare il prodotto in un luogo riparato, dove non si
possa inciampare sul cavo di alimentazione, che non deve
essere danneggiato.
8 Se il prodotto non funziona normalmente, consultare la
sezione “Manutenzione e risoluzione dei problemi”
della Guida in linea disponibile sul CD di avviamento.
9 Il prodotto non include parti riparabili dall’utente. Per le
riparazioni rivolgersi esclusivamente al personale qualificato.
HPCrickMLK_GSG_UGFDIA.book Page 2 Wednesday, May 19, 2004 4:26 PM

English
Français
Italiano
Deutsch
Nederlands
3
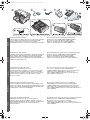
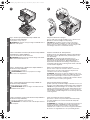
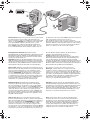
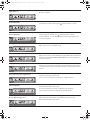
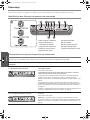
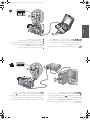
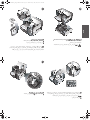
Check the package contents.
1) Printer, 2) power adapter, 3) power cord, 4) four ink cartridges
(cyan, magenta, yellow, black), 5) four printheads (CMYB),
6) Starter CD (software and onscreen user’s guide),
7) printed documentation (setup poster and getting started guide),
8) auto-duplex unit (for automatic two-sided printing;
HP Business Inkjet 1200d/1200dn/1200dtn/1200dtwn),
9) rear-access panel (HP Business Inkjet 1200),
10) tray 2 (HP Business Inkjet 1200dtn/1200dtwn),
11) cross cable (HP Business Inkjet 1200dtwn only).
Überprüfen des Paketinhalts.
1) Drucker, 2) Netzadapter, 3) Netzkabel, 4) vier Tintenpatronen
(cCan, Magenta, Gelb, Schwarz), 5) vier Druckköpfe (CMYB),
6) Starter-CD (Software und Onscreen-Benutzerhandbuch),
7) gedruckte Dokumentation (Faltblatt mit Installationshinweisen,
Leitfaden zur Inbetriebnahme),
8) Auto-Duplex-Einheit (für automatischen beidseitigen Druck;
HP Business Inkjet 1200d/1200dn/1200dtn/1200dtwn),
9) Hintere Abdeckung (HP Business Inkjet 1200),
10) Fach 2 (HP Business Inkjet 1200dtn/1200dtwn),
11) Crossover-Kabel (nur HP Business Inkjet 1200dtwn).
Vérification du contenu du carton.
1) Imprimante, 2) Adaptateur de courant,
3) Cordon d’alimentation, 4) Quatre cartouches d’encre (cyan,
magenta, jaune, noire), 5) Quatre têtes d’impression (CMJN),
6) CD de démarrage (logiciels et guide de l’utilisateur en ligne),
7) Documentation imprimée (poster d’installation et guide
de mise en marche).
8) Unité auto-duplex (pour l’impression automatique en
recto verso) ; HP Business Inkjet 1200d/1200dn/
1200dtn/1200dtwn), 9) Panneau d’accès arrière (imprimante
HP Business Inkjet 1200), 10) Bac 2 (HP Business
Inkjet 1200dtn/1200dtwn), 11) Câble croisé (HP Business
Inkjet 1200dtwn uniquement).
De inhoud van de verpakking controleren.
1) Printer, 2) adapter, 3) netsnoer, 4) vier inktcartridges (cyaan,
magenta, geel, zwart), 5) vier printkoppen (CMYB), 6) Starter-cd
(software en gebruikershandleiding), 7) gedrukte documentatie
(installatieposter en beknopte handleiding),
8) automatische duplex-eenheid (voor automatische
dubbelzijdig printen; HP Business Inkjet 1200d/1200dn/
1200dtn/1200dtwn), 9) Toegangspaneel aan de achterkant
(HP Business Inkjet 1200 printer), 10) lade 2 (HP Business
Inkjet 1200dtn/1200dtwn), 11) cross-kabel (alleen HP Business
Inkjet 1200dtwn).
Verificare il contenuto dell’imballo.
1) Stampante, 2) adattatore, 3) cavo di alimentazione,
4) quattro cartucce di stampa (CMYB), 5) quattro testine di
stampa (CMYB), 6) CD di avviamento (software e Guida in linea),
7) documentazione stampata (poster di configurazione e
Guida introduttiva),
8) unità duplex automatico (per la stampa fronte/retro automatica;
HP Business Inkjet 1200d/1200dn/1200dtn/1200dtwn),
9) Pannello di accesso posteriore (stampante
HP Business Inkjet 1200), 10) vassoio 2 (HP Business
Inkjet 1200dtn/1200dtwn), 11) cavo incrociato (solo HP Business
Inkjet 1200dtwn).
11
10
8
7
5
4
321
6
9
HPCrickMLK_GSG_UGFDIA.book Page 3 Wednesday, May 19, 2004 4:26 PM

4
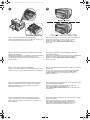
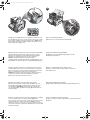
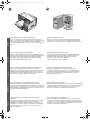
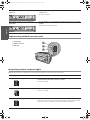
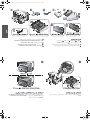
Step 1: Remove the packing tape and materials.
Remove all packing tape from the printer. Open the top cover and
remove the tape from the inside of the printer.
Step 2: Install the rear-access panel or the auto-duplex unit.
On the back of the printer, insert the rear-access panel
(HP Business Inkjet 1200) or the auto-duplex unit
(HP Business Inkjet 1200d/1200dn/1200dtn/1200dtwn)
until it clicks.
Schritt 1: Entfernen der Verpackungsklebestreifen und des
Verpackungsmaterials.
Entfernen Sie möglicherweise vorhandenes Verpackungsmaterial
aus dem Drucker. Öffnen Sie die Tintenpatronen- und
Druckkopfabdeckung und entfernen Sie die Klebestreifen im
Druckergehäuse.
Schritt 2: Bringen Sie die hintere Abdeckung oder die
Auto-Duplex-Einheit an.
Setzen Sie an der Rückseite des Druckers die hintere Abdeckung
(HP Business Inkjet 1200) oder die Auto-Duplex-Einheit
(HP Business Inkjet 1200d/1200dn/1200dtn/1200dtwn) ein,
bis diese einrastet.
Étape 1 : Retrait des matériaux d’emballage.
Retirez tous les rubans adhésifs de l’imprimante Ouvrez le capot
supérieur et retirez le ruban adhésif de l’intérieur de l’imprimante.
Étape 2 : Installation du panneau d’accès arrière ou de l’unité
auto-duplex.
Insérez le panneau d’accès arrière (HP Business Inkjet 1200)
ou l’unité auto-duplex (HP Business Inkjet 1200d/1200dn/
1200dtn/1200dtwn) à l’arrière de l’imprimante jusqu’à ce
qu’il/elle s’enclenche.
Stap 1: Het verpakkingsmateriaal en de tape verwijderen.
Verwijder de plakstroken van de verpakking van de printer.
Open de bovenklep en verwijder de plakstroken aan de
binnenkant van de printer.
Stap 2: Installeer het toegangspaneel aan de achterkant of de
automatische duplex-eenheid.
Klik het toegangspaneel (HP Business Inkjet 1200) of de
automatische duplex-eenheid (HP Business
Inkjet 1200d/1200dn/1200dtn/1200dtwn) vast op de achterkant
van de printer.
Punto 1: Rimuovere il nastro e il materiale di imballo.
Togliere completamente il nastro di imballo dalla stampante.
Aprire il coperchio superiore e rimuovere il nastro dall’interno
della stampante.
Punto 2: Installare il pannello di accesso posteriore o l’unità
duplex automatico.
Inserire il pannello di accesso posteriore (HP Business
Inkjet 1200) o l’unità duplex automatico (HP Business
Inkjet 1200d/1200dn/1200dtn/1200dtwn) sul retro della
stampante e premere finché non scatta in posizione.
1 2
HPCrickMLK_GSG_UGFDIA.book Page 4 Wednesday, May 19, 2004 4:26 PM

English
Français
Italiano
Deutsch
Nederlands
5
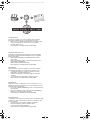
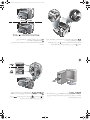
Step 3: Install tray 2 (HP Business Inkjet 1200dtn and
HP Business Inkjet 1200dtwn).
Set the printer on top of tray 2.
WARNING! Be careful to keep your fingers and hands clear of
the bottom of the printer.
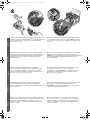
Step 4: Install the ink cartridges.
1) Press and release the ink cartridge cover to open the cover.
2) Remove each ink cartridge from its package.
CAUTION: HP recognizes customer’s choice, but cannot
guarantee the quality or reliability of non-HP ink cartridges.
Printer services or repairs required as a result of using non-HP
ink cartridges will not be covered under warranty.
Schritt 3: Installieren von Fach 2 (HP Business Inkjet 1200dtn
und HP Business Inkjet 1200dtwn).
Setzen Sie den Drucker auf das Fach 2 auf.
WARNUNG! Klemmen Sie sich nicht Ihre Finger oder Hände
an der Unterseite des Druckers ein.
Schritt 4: Installieren der Tintenpatronen.
1) Öffnen Sie die obere Abdeckung, indem Sie darauf drücken
und wieder loslassen. 2) Nehmen Sie jede Tintenpatrone aus
ihrer Verpackung.
ACHTUNG: HP erkennt zwar die Tintenpatronen von
Drittanbietern, kann die Qualität bzw. Zuverlässigkeit dieser
Patronen jedoch nicht garantieren. Druckerdienste bzw. –
Reparaturen, die durch die Verwendung von Tintenpatronen
erforderlich sind, die nicht von HP hergestellt wurden, sind nicht
von der Garantie abgedeckt.
Étape 3 : Installez le bac 2 (HP Business Inkjet 1200dtn et
HP Business Inkjet 1200dtwn).
Posez l’imprimante sur le bac 2.
AVERTISSEMENT ! Veillez à ne pas placer vos doigts
ou vos mains sous l’imprimante.
Étape 4 : Installation des cartouches d’encre.
1) Pour ouvrir le capot des cartouches d’encre, exercez une
légère pression sur celui-ci, puis relâchez-le. 2) Sortez les
cartouches d’encre de leurs emballages.
ATTENTION : HP respecte le choix des utilisateurs, mais n’est
pas en mesure de garantir la qualité ou la fiabilité des cartouches
d’encre d’une autre marque. Les interventions ou réparations
de l’imprimante consécutives à l’utilisation de cartouches d’encre
non HP ne sont pas couvertes par la garantie.
Stap 3: Lade 2 plaatsen (HP Business Inkjet 1200dtn en
HP Business Inkjet 1200dtwn).
Plaats de printer boven op lade 2.
WAARSCHUWING! Plaats uw vingers en handen niet aan
de onderkant van de printer.
Stap 4: De inktcartridges installeren.
1) Druk op de klep van de inktcartridge en laat deze weer los om
de klep te openen. 2)Verwijder de inktcartridges uit de verpakking.
LET OP: Er mogen inktcartridges van een ander merk worden
gebruikt, maar HP kan de kwaliteit of betrouwbaarheid van deze
inktcartridges niet garanderen. Reparatie of service als gevolg
van het gebruik van inktcartridges die niet van HP zijn, vallen niet
onder de garantie.
Punto 3: Installare il vassoio 2 (HP Business Inkjet 1200dtn e
HP Business Inkjet 1200dtwn).
Posizionare la stampante sopra il vassoio 2.
AVVERTENZA: non avvicinare mani e dita alla parte inferiore
della stampante.
Punto 4: Installare le cartucce di stampa.
1) Premere e rilasciare il coperchio della cartuccia di stampa
per aprirlo. 2) Rimuovere ciascuna cartuccia di stampa dal
proprio imballo.
ATTENZIONE: pur rispettando le scelte dei propri clienti, HP non
garantisce la qualità o l’affidabilità di cartucce di stampa non
originali HP. Gli interventi di assistenza o riparazione della
stampante che si rendono necessari in conseguenza dell’utilizzo
di cartucce non originali HP non sono coperti dalla garanzia.
3 4
2
1
HPCrickMLK_GSG_UGFDIA.book Page 5 Wednesday, May 19, 2004 4:26 PM

6
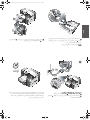
3) Align each cartridge with its color-coded slot, and then insert
the cartridge into the slot. To ensure proper contact, press down
firmly on the cartridges until they snap into place. Note: All four
ink cartridges must be correctly installed for the printer to work.
4) Close the ink cartridge cover.
Step 5: Install the printheads.
1) Open the top cover. 2) Lift the printhead latch.
3) Richten Sie die einzelnen Patronen am entsprechend farblich
gekennzeichneten Schacht aus, und setzen Sie sie in den
Schacht ein. Drücken Sie zur Gewährleistung des richtigen
Kontakts fest gegen die Patronen, bis diese einrasten.
Hinweis: Alle vier Tintenpatronen müssen für die
ordnungsgemäße Funktion des Druckers richtig installiert sein.
4) Schließen Sie die Tintenpatronen- und Druckkopfabdeckung.
Schritt 5: Installieren der Druckköpfe.
1) Öffnen Sie die obere Abdeckung. 2) Heben Sie die
Druckkopfverriegelung an.
3) Alignez chaque cartouche sur l’emplacement de la couleur
correspondante, puis insérez la cartouche dans son logement.
Pour assurer un bon contact, appuyez fermement la cartouche
dans son emplacement, jusqu’à son enclenchement.
Remarque : les quatre cartouches d’encre doivent être mises
en place correctement pour que l’imprimante fonctionne.
4) Fermez le capot des cartouches d’encre.
Étape 5 : Installation des têtes d’impression.
1) Ouvrez le capot supérieur. 2) Soulevez le loquet des
têtes d’impression.
3) Plaats de cartridge ter hoogte van de sleuf met de
bijbehorende kleurcode en bevestig de cartridge in de sleuf.
Bevestig de inktcartridges goed door deze stevig in de sleuf
vast te klikken. Opmerking: de printer werkt alleen als alle
vier de inktcartridges goed zijn bevestigd. 4) Sluit de klep van
de inktcartridge.
Stap 5: De printkoppen installeren.
1) Open de bovenklep. 2) Til de printkopvergrendeling omhoog.
3) Allineare ciascuna cartuccia al relativo alloggiamento codificato
in colore, quindi inserire la cartuccia nell’alloggiamento.
Per assicurare un corretto contatto, premere con decisione sulle
cartucce finché non scattano in posizione. Nota: perché la
stampante funzioni, è necessario che tutte e quattro le cartucce
siano state installate correttamente. 4) Chiudere il coperchio delle
cartucce di stampa.
Punto 5: Installare le testine di stampa.
1) Aprire il coperchio superiore. 2) Sollevare il fermo della testina
di stampa.
4
3
5
2
1
Guide.fm Page 6 Wednesday, May 19, 2004 8:41 PM

English
Français
Italiano
Deutsch
Nederlands
7
3) Remove each printhead from its package, and then remove the
protective tape from each printhead. 4) Insert each printhead into
its color-coded slot. Press down firmly on each printhead to
ensure proper contact.
5) Pull the printhead latch all the way forward and press down
to ensure that the latch is properly engaged. Note: You might
have to apply some pressure to engage the latch. 6) Close the
top cover.
3) Nehmen Sie jeden Druckkopf aus seiner Verpackung und
entfernen Sie das Klebeband. 4) Setzen Sie den Druckkopf in
den farblich markierten Schacht ein. Drücken Sie die einzelnen
Druckköpfe fest herunter, um den ordnungsgemäßen Sitz
zu gewährleisten.
5) Ziehen Sie die Druckkopfverriegelung ganz nach vorne und
drücken Sie die Verriegelung vollständig nach unten ein.
Hinweis: Sie müssen möglicherweise ein wenig Kraft aufwenden,
um die Verriegelung zu schließen. 6) Schließen Sie die
obere Abdeckung.
3) Sortez chaque tête d’impression de son emballage,
puis retirez le ruban adhésif de protection de chacune d’elles.
4) Insérez chaque tête d’impression dans le logement de la
couleur correspondante. Appuyez fermement sur chaque tête
d’impression pour assurer un bon contact.
5) Tirez le loquet des têtes d’impression à fond vers l’avant
et appuyez vers le bas pour vous assurer qu’il est
correctement engagé. Remarque : il est parfois nécessaire
d’appliquer une certaine pression pour engager le loquet.
6) Fermez le capot supérieur.
3) Haal de printkoppen uit de verpakking en verwijder de
beschermtape van de printkoppen. 4) Plaats elke printkop
in de sleuf met de kleurcode van de printkop. Druk elke printkop
goed op zijn plaats.
5) Trek de printkopvergrendeling helemaal naar voren en druk
deze omlaag, zodat de grendel goed wordt vastgezet.
Opmerking: mogelijk moet u druk uitoefenen om de grendel
vast te zetten. 6) Sluit de bovenste klep.
3) Rimuovere ciascuna testina di stampa dall’imballo e quindi il
nastro protettivo da ciascuna testina. 4) Inserire ciascuna testina
di stampa nel relativo alloggiamento codificato in colore.
Premere con decisione sulla testina di stampa per assicurare
il corretto contatto.
5) Tirare completamente il fermo della testina di stampa e
premere verso il basso per assicurarsi che sia correttamente
agganciato. Nota: per agganciare il fermo, potrebbe essere
necessario applicare una leggera pressione. 6) Chiudere il
coperchio superiore.
4
3
5
6
HPCrickMLK_GSG_UGFDIA.book Page 7 Wednesday, May 19, 2004 4:26 PM

8
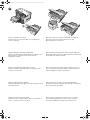
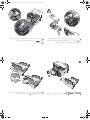
Step 6: Load paper in the trays.
1) Pull the tray out of the printer. 2) If you are loading tray 1,
raise the output tray.
3) For paper between 11 inches and 14 inches (356 mm and
279 mm) long, move the latch on the tray to the right;
4) then lower the front of the tray.
Schritt 6: Einlegen von Papier in die Fächer.
1) Ziehen Sie das Fach aus dem Drucker heraus. 2) Wenn Sie
Papier in Fach 1 einlegen möchten, müssen Sie das
Ausgabefach anheben.
3) Verschieben Sie bei 356 mm bis 279 mm langem Papier die
Arretierung am Fach nach rechts, 4) schwenken Sie anschließend
das Vorderteil des Fachs nach unten.
Étape 6 : Chargement de papier dans les bacs.
1) Retirez le bac de l’imprimante. 2) Si vous chargez le bac 1,
soulevez le bac de sortie.
3) Pour charger du papier d’une longueur comprise entre 11 et
14 pouces (279 mm et 356 mm), déplacez la butée du bac vers
la droite ; 4) Abaissez ensuite l’avant du bac.
Stap 6: Papier plaatsen in de laden.
1) Trek de lade uit de printer. 2) Voor het vullen van lade 1 tilt u de
uitvoerlade omhoog.
3) Voor papier met een lengte tussen de 356 and 279 mm
verplaatst u de grendel op de lade naar rechts. 4) Laat vervolgens
de voorkant van de lade zakken.
Punto 6: Caricare la carta nei vassoi.
1) Estrarre il vassoio dalla stampante. 2) Se si sta caricando il
vassoio 1, sollevare il vassoio di raccolta.
3) Per caricare carta di formato compreso tra 11 e 14 pollici
(279 e 356 mm) di lunghezza, spostare il fermo del vassoio
verso destra. 4) Abbassare la parte anteriore del vassoio.
6
2
1
4
3
HPCrickMLK_GSG_UGFDIA.book Page 8 Wednesday, May 19, 2004 4:26 PM

English
Français
Italiano
Deutsch
Nederlands
9
5) Slide the guides in the tray to adjust them for the size that
you are loading. 6) Insert up to 150 sheets of paper into tray 1
or 250 sheets of paper into tray 2, print-side down along the
right of the tray. Note: Tray 2 can be loaded only with plain paper.
7) Lower the output tray (if you loaded tray 1). 8) Gently reinsert
the tray. 9) Pull out the extension on the output tray.
5) Verschieben Sie die Papierführungen im Fach, um Sie an die
von Ihnen eingelegte Papiergröße anzupassen. 6) Legen Sie
maximal 150 Blatt Papier in Fach 1 oder 250 Blatt Papier in
Fach 2 mit der zu bedruckenden Seite nach unten ein.
Hinweis: In Fach 2 darf nur Normalpapier eingelegt werden.
7) Schwenken Sie das Ausgabefach nach unten (wenn Sie
das Fach 1 befüllt haben). 8) Setzen Sie das Fach vorsichtig
wieder ein. 9) Ziehen Sie die Verlängerung des
Ausgabefachs heraus.
5) Faites glisser les guides du bac pour les régler en fonction
de la taille du papier. 6) Introduisez jusqu’à 150 feuilles de
papier dans le bac 1 ou 250 feuilles dans le bac 2, face à
imprimer orientée vers le bas le long du côté droit du bac.
Remarque : utilisez uniquement du papier ordinaire pour
charger le bac 2.
7) Abaissez le bac de sortie (si vous avez chargé le bac 1).
8) Replacez délicatement le bac. 9) Tirez les extensions du
bac de sortie.
5) Stel de geleiders in de lade af op het papierformaat dat u in de
lade plaatst. 6) Plaats maximaal 150 vellen papier in lade 1 of
250 vellen in lade 2, met de afdrukzijde naar beneden geplaatst
langs de rechterkant van de lade. Opmerking: in lade 2 kan
uitsluitend normaal papier worden geladen.
7) Laat de uitvoerlade zakken (als u papier hebt geplaatst in
lade 1). 8) Plaats de lade voorzichtig terug. 9) Trek het
verlengstuk op de uitvoerlade uit.
5) Fare scorrere le guide nel vassoio per regolarle in base al
formato che si sta caricando. 6) Inserire fino a 150 fogli nel
vassoio 1 o 250 fogli nel vassoio 2, con il lato di stampa rivolto
verso il basso e allineato a destra del vassoio. Nota: nel vassoio 2
è possibile caricare soltanto carta comune.
7) Abbassare il vassoio di raccolta (se è stato caricato il
vassoio 1). 8) Reinserire il vassoio con delicatezza. 9) Estrarre la
prolunga del vassoio di raccolta carta.
5
6
8
7
9
HPCrickMLK_GSG_UGFDIA.book Page 9 Wednesday, May 19, 2004 4:26 PM

10
Step 7: Connect the power cord and turn on the printer.
1) Connect the power adapter into the printer. 2) Connect the
power cord to the power adapter. 3) Connect the other end of
the power cord to an alternating current (AC) power outlet.
4) Press the (power button) to turn on the printer.
To ensure the best possible print quality, the printer aligns the
printheads. At the beginning of the alignment process, the Power
light blinks and the printer prints a status page. At the end of
the process, the printer prints two auto-alignment pages.
Printhead alignment takes approximately 7 minutes.
Schritt 7: Anschließen des Netzkabels und Einschalten
des Druckers.
1) Schließen Sie den Netzadapter an den Drucker an.
2) Schließen Sie das Netzkabel an den Netzadapter an.
3) Schließen Sie das andere Ende des Netzkabels an eine
Steckdose für Wechselspannung an. 4) Drücken Sie
(Netztaste), um den Drucker einzuschalten.
Um eine optimale Druckqualität zu gewährleisten, werden
die Druckköpfe vom Drucker ausgerichtet. Zu Beginn des
Ausrichtungsvorgangs blinkt die Power-LED und der Drucker
druckt eine Statusseite. Am Ende des Vorgangs druckt
der Drucker zwei Seiten mit automatischer Ausrichtung.
Die Ausrichtung des Druckkopfs dauert ca. 7 Minuten.
Étape 7 : Branchez le cordon d’alimentation et mettez
l’imprimante sous tension.
1) Connectez l’adaptateur de courant dans l’imprimante.
2) Branchez le cordon d’alimentation sur l’adaptateur de courant.
3) Branchez l’autre extrémité du cordon d’alimentation sur une
prise secteur. 4) Appuyez sur le (bouton d’alimentation) pour
mettre l’imprimante sous tension.
Pour offrir une qualité d’impression optimale, l’imprimante aligne
les têtes d’impression. Au début de la procédure d’alignement, le
voyant d’alimentation clignote et l’imprimante imprime une page
d’état. Une fois la procédure terminée, elle imprime deux pages
d’alignement automatique. L’alignement des têtes d’impression
dure environ 7 minutes.
Stap 7: Het netsnoer aansluiten en de printer aanzetten.
1) Sluit de adapter aan op de printer. 2) Sluit het netsnoer aan op
de adapter. 3) Sluit het andere uiteinde van het netsnoer aan op
een stopcontact (AC). 4) Druk op de (Aan/uit-knop) om de
printer aan te zetten.
Om de best mogelijke afdrukkwaliteit te garanderen lijnt de printer
de printkoppen uit. Aan het begin van het uitlijningsproces
knippert het Aan/uit-lampje en drukt de printer een statuspagina
af. Aan het einde van het proces drukt de printer twee
automatische testpagina’s af. Uitlijning van printkoppen duurt
ongeveer zeven minuten.
Punto 7: Collegare il cavo di alimentazione e accendere
la stampante.
1) Collegare l’adattatore alla stampante. 2) Collegare il cavo di
alimentazione all’adattatore. 3) Collegare l’altra estremità del cavo
di alimentazione a una presa CA. 4) Premere il (pulsante di
accensione) per accendere la stampante.
Per assicurare la migliore qualità di stampa, la stampante esegue
l’allineamento delle testine. All’inizio di tale procedura, la spia
di accensione lampeggia e viene stampata una pagina di stato.
Al termine della procedura, vengono stampate due pagine di
allineamento automatico. L’allineamento delle testine di stampa
richiede circa 7 minuti.
7
4
3
2
1
HPCrickMLK_GSG_UGFDIA.book Page 10 Wednesday, May 19, 2004 4:26 PM

English
Français
Italiano
Deutsch
Nederlands
11
Note: If other printer lights are lit during the printhead alignment
process, see “Interpreting control panel lights” on page 17. If the
alignment page does not print, follow these steps. 1) Check that
the power cord is connected firmly. 2) Check that the printheads
and ink cartridges are properly installed.
3) Make sure the rear-access panel or the auto-duplex unit is
installed. 4) Turn off the printer, and then turn it on again. If the
alignment page still do not print, see “Troubleshooting” on
page 17.
Hinweis: Wenn andere Kontrollleuchten des Druckers während
der Druckkopfausrichtung leuchten, finden Sie weitere
Informationen unter “Bedeutung der LEDs auf dem Bedienfeld”
auf Seite 24. Wenn die Ausrichtungsseite nicht gedruckt wird,
führen Sie folgende Schritte aus. 1) Vergewissern Sie sich,
dass das Netzkabel richtig angeschlossen ist.
2) Vergewissern Sie sich, dass die Druckköpfe und die
Tintenpatronen richtig installiert sind.
3) Achten Sie darauf, dass die hintere Abdeckung oder die
Auto-Duplex-Einheit eingesetzt ist. 4) Schalten Sie den Drucker
aus und dann wieder ein. Wenn die Ausrichtungsseite immer
noch nicht gedruckt wird, lesen Sie den Abschnitt
“Fehlerbehebung” auf Seite 24.
Remarque: si d’autres voyants de l’imprimante sont allumés lors
de la procédure d’alignement des têtes d’impression,
reportez-vous à la section “Interprétation des voyants du panneau
de commande”, page 31. Si la page d’alignement ne s’imprime
pas, procédez comme suit. 1) Vérifiez que le cordon
d’alimentation est bien branché. 2) Vérifiez que les têtes
d’impression et les cartouches d’encre sont installées
correctement.
3) Assurez-vous que le panneau d’accès arrière ou l’unité
auto-duplex est installé. 4) Mettez l’imprimante hors tension, puis
à nouveau sous tension. Si la page d’alignement ne s’imprime
toujours pas, reportez-vous à la section “Dépannage”, page 31.
Opmerking: zie “De betekenis van de lampjes van het
bedieningspaneel” op pagina 39 als andere printerlampjes
branden tijdens het uitlijningsproces van de printkoppen. Als geen
testpagina wordt afgedrukt, volgt u onderstaande stappen.
1) Controleer of het netsnoer goed is aangesloten. 2) Controleer
of de printkoppen en de inktcartridges goed zijn geplaatst.
3) Controleer of het toegangspaneel aan de achterkant of de
automatische duplex-eenheid is geïnstalleerd. 4) Zet de printer uit
en weer aan. Zie “Problemen oplossen” op pagina 39 als de
testpagina nog steeds niet wordt afgedrukt.
Nota: se durante l’allineamento delle testine di stampa restano
accese altre spie della stampante, consultare la sezione
“Significato delle spie del pannello di controllo" a pagina 46.
Se la pagina di allineamento non viene stampata, attenersi alla
seguente procedura. 1) Verificare che il cavo di alimentazione sia
correttamente collegato. 2) Verificare che le testine e le cartucce
di stampa siano correttamente installate.
3) Assicurarsi di avere installato il pannello di accesso posteriore
o l’unità duplex automatico. 4) Spegnere e riaccendere la
stampante. Se il problema persiste, consultare la sezione
“Risoluzione dei problemi" a pagina 46.
HPCrickMLK_GSG_UGFDIA.book Page 11 Wednesday, May 19, 2004 4:26 PM

12
Step 8: Connect the printer.
See the following instructions for your connection type
(USB, parallel, wireless network, or wired network).
For more information about installing software, see the
onscreen user’s guide on the Starter CD.
USB or parallel connection: 1) Insert the Starter CD into the
CD drive. 2) Follow the onscreen instructions for your connection
and connect the USB ( ) or parallel ( ) (sold separately)
when prompted. Note: Connect only a parallel cable or
a USB cable — not both.
Schritt 8: Anschließen des Druckers.
Folgen Sie den Anweisungen für Ihren Anschlusstyp (USB,
parallel, kabelloses Netzwerk oder kabelgebundenes Netzwerk).
Weitere Informationen zum Installieren der Software finden Sie im
Online-Benutzerhandbuch auf der Starter-CD.
USB- oder Parallelanschluss: 1) Legen Sie die Starter-CD in
das CD-Laufwerk ein. 2) Folgen Sie den Anweisungen auf dem
Bildschirm für Ihren Anschuss, und schließen Sie das Kabel
für den USB- ( ) bzw. Parallelanschluss an ( )
(separat erhältlich), wenn Sie dazu aufgefordert werden.
Hinweis: Schließen Sie nur ein Parallelkabel oder ein
USB-Kabel an.
Étape 8 : Connexion de l’imprimante.
Consultez les instructions correspondant à votre type de
connexion (USB, parallèle, réseau sans fil ou câblé). Pour plus
d’informations sur l’installation de logiciels, reportez-vous au
guide de l’utilisateur en ligne disponible sur le CD de démarrage.
Connexion USB ou parallèle : 1) Introduisez le CD de
démarrage dans le lecteur de CD-ROM. 2) Suivez les instructions
relatives à votre connexion et branchez le câble USB ( ) ou
parallèle ( ) (vendu séparément) lorsque vous y êtes invité.
Remarque : branchez le câble parallèle ou le câble USB (jamais
les deux en même temps).
Stap 8: De printer aansluiten.
Zie de volgende aanwijzingen voor uw verbindingstype
(USB, parallel, draadloos netwerk of bekabeld netwerk).
Zie de gebruikershandleiding op de Starter-cd voor meer
informatie over het installeren van de software.
USB-verbinding of parallelle verbinding: 1) Plaats de
Starter-cd in het cd-rom-station. 2) Volg de aanwijzingen op het
scherm voor uw verbinding en sluit de (niet meegeleverde)
USB-kabel ( ) of parallelle kabel ( ) aan wanneer dat
wordt gevraagd. Opmerking: sluit óf een parallelle óf een
USB-kabel aan — nooit beide.
Punto 8: Collegare la stampante.
Vedere le istruzioni di seguito per il tipo di collegamento
(USB, parallelo, rete con o senza fili). Per ulteriori informazioni
sull’installazione del software, consultare la Guida in linea sul CD
di avviamento.
Collegamento parallelo o USB: 1) Inserire il CD di avviamento
nella relativa unità. 2) Attenersi alle istruzioni visualizzate
sullo schermo ed effettuare il collegamento del cavo USB ( )
o parallelo ( ) (venduto separatamente) quando richiesto.
Nota: collegare solo un cavo parallelo o un cavo USB,
non entrambi.
8
HPCrickMLK_GSG_UGFDIA.book Page 12 Wednesday, May 19, 2004 4:26 PM

English
Français
Italiano
Deutsch
Nederlands
13
Wireless connection: 1) Obtain the following information:
the network name (SSID), communication mode (infrastructure or
ad hoc), and the type of security the network uses (such as WPA,
WEP, or none). For information about configuring these settings,
see “Setting up the printer for wireless communication” on
page 21.
CAUTION: It is recommended that the printer and
the computers that use the printer be on the same subnet.
2) Remove the protective cover from the network port.
3) Temporarily connect the cross cable to the printer’s network
port and the computer. 4) Install the printer software for your
communication mode. (See “Installing printer software and
sharing the printer (Windows)” on page 22 and “Installing printer
software and sharing the printer (Mac OS)” on page 22.)
5) When prompted, disconnect the cross cable.
Drahtlose Verbindung: 1) Zeigen Sie folgende Informationen an:
den Netzwerknamen (SSID), Kommunikationsmodus
(Infrastruktur oder Adhoc) sowie den vom Netzwerk verwendeten
Sicherheitstyp (beispielsweise WPA, WEP oder keinen).
Weitere Informationen zum Konfigurieren dieser Einstellungen
finden Sie unter “Einrichten des Druckers für drahtlose
Kommunikation” auf Seite 28.
ACHTUNG: Es wird empfohlen, dass der Drucker und die
Computer, die diesen Drucker vewenden, demselben Subnetz
angehören.
2) Entfernen Sie die Schutzabdeckung vom Netzwerkanschluss.
3) Schließen Sie das Crossover-Kabel vorübergehend an den
Netzwerkanschluss des Druckers und den Computer an.
4) Installieren Sie die Druckersoftware für Ihren
Kommunikationsmodus. (Siehe “Installieren der Druckersoftware
und gemeinsame Nutzung des Druckers (Windows)” auf Seite 29
und “Installieren der Druckersoftware und gemeinsame Nutzung
des Druckers (Mac OS)” auf Seite 29.)
5) Trennen Sie das Crossover-Kabel vom Gerät, wenn Sie dazu
aufgefordert werden.
Connexion sans fil : 1) Procurez-vous les informations suivantes
: nom réseau (SSID), mode de communication (infrastructure ou
ad hoc) et type de sécurité utilisé par le réseau (tel que WPA,
WEP ou aucune). Pour plus d’informations sur la configuration de
ces paramètres, reportez-vous à la section “Configuration de la
fonction de communication sans fil de l’imprimante”, page 35.
ATTENTION : l’imprimante et les périphériques qui l’utilisent
doivent, de préférence, se trouver sur le même sous-réseau.
2) Retirez le capot de protection du port réseau.
3) Connectez temporairement le port réseau de l’imprimante et
l’ordinateur à l’aide du câble croisé. 4) Installez le logiciel
d’imprimante adapté à votre mode de communication.
Reportez-vous aux sections “Installation du logiciel d’imprimante
et partage de l’imprimante (Windows)”, page 36 et “Installation du
logiciel d’imprimante et partage de l’imprimante (Mac OS)”,
page 37.) 5) Lorsque vous y êtes invité, débranchez le
câble croisé.
Draadloze verbinding: 1) Haal de volgende informatie op: de
netwerknaam (SSID), de communicatiemodus (infrastructuur of
ad hoc) en het beveiligingstype dat in het netwerk wordt gebruikt
(zoals WPA, WEP of geen). Zie “De printer instellen op draadloze
communicatie” op pagina 43 voor informatie over de configuratie
van deze instellingen.
LET OP: Het wordt aanbevolen dat de printer en de computers
die de printer gebruiken, zich in hetzelfde subnet bevinden.
2) Verwijder de beschermkap van de netwerkpoort. 3) Sluit de
cross-kabel tijdelijk aan op de netwerkpoort en de computer
van de printer. 4) Installeer de printersoftware voor uw
communicatiemodus. (Zie “Printersoftware installeren en de
printer delen (Windows)” op pagina 44 en “Printersoftware
installeren en de printer delen (Mac OS)” op pagina 44.) 5) Koppel
de cross-kabel los als dat wordt gevraagd.
Collegamento senza fili: 1) Ottenere le seguenti informazioni:
il nome della rete (SSID), la modalità di comunicazione
(infrastruttura oppure ad hoc) e il tipo di sicurezza utilizzato dalla
rete (ad esempio WPA, WEP o nessuna). Per informazioni sulla
configurazione di queste impostazioni, consultare la sezione
“Impostazione della stampante per la comunicazione senza fili" a
pagina 50.
ATTENZIONE: si consiglia di avere la stampante e il computer
che la utilizza nella stessa sottorete.
2) Rimuovere il coperchio di protezione dalla porta di rete.
3) Collegare temporaneamente il cavo incrociato alla porta di
rete della stampante e al computer. 4) Installare il software della
stampante relativo alla propria modalità di comunicazione.
Consultare la sezione “Installazione del software della stampante
e condivisione della stampante (Windows)" a pagina 51 e
“Installazione del software della stampante e condivisione della
stampante (Mac OS)" a pagina 51. 5) Quando richiesto,
scollegare il cavo incrociato.
4
3
2
HPCrickMLK_GSG_UGFDIA.book Page 13 Wednesday, May 19, 2004 4:26 PM

14
Wired network: 1) Remove the protective cover from the network
port. 2) Connect the network cable (sold separately) to the
printer’s network port and to an available port on the network hub,
switch, or router. CAUTION: Do not plug the network cable into
a port labeled WAN or Uplink in the hub, switch, or router.
Do not plug the cross cable (provided with the HP Business
Inkjet 1200dtwn printer) into the network hub, switch, or router.
It is recommended that the printer and the computers that use
the printer be on the same subnet. Note: Repeat step 2 if the Link
light on the network connector does not turn on.
See “Troubleshooting” on page 17 for more information.
3) Using the information on the configuration pages (such as the
printer’s IP address), install the printer software on each computer
that will use the printer. For more information about sharing the
printer on a network, see the onscreen user’s guide.
Kabelgebundenes Netzwerk: 1) Entfernen Sie die
Schutzabdeckung vom Netzwerkanschluss. 2) Schließen Sie das
Netzwerkkabel (separat erhältlich) an den Netzwerkanschluss
des Druckers und an einen freien Anschluss des Hubs, Switch
oder Routers des Netzwerks an.
ACHTUNG: Stecken Sie das Netzwerkkabel nicht in einen mit
WAN oder Uplink gekennzeichneten Anschluss im Hub, Switch
oder Router. Stecken Sie das Crossover-Kabel (im Lieferumfang
des HP Business Inkjet 1200dtwn-Druckers enthalten) in den
Hub, Switch bzw. Router des Netzwerks. Es wird empfohlen,
dass der Drucker und die Computer, die diesen Drucker
vewenden, demselben Subnetz angehören.
Hinweis: Wiederholen Sie Schritt 2, wenn die
Verbindungsanzeige des Netzwerkanschlusses nicht leuchtet.
Weitere Informationen finden Sie unter “Fehlerbehebung” auf
Seite 24. 3) Installieren Sie die Druckersoftware auf jedem
Computer, der den Drucker verwendet, anhand der Informationen
auf den Konfigurationsseiten (beispielsweise die IP-Adresse des
Druckers). Weitere Informationen zum Freigeben des Druckers im
Netzwerk finden Sie im Online-Benutzerhandbuch.
Réseau câblé : 1)Retirez le capot de protection du port réseau.
2) Connectez une extrémité du câble réseau (vendu séparément)
au port réseau de l’imprimante et l’autre extrémité à un port
disponible sur le concentrateur de réseau, le commutateur ou
le routeur. ATTENTION : Ne branchez pas le câble réseau
sur un port désigné par WAN ou Uplink sur le concentrateur,
le commutateur ou le routeur. Ne connectez pas le câble croisé
(fourni avec l’imprimante HP Business Inkjet 1200dtwn) dans le
concentrateur de réseau, le commutateur ou le routeur.
L’imprimante et les périphériques qui l’utilisent doivent,
de préférence, se trouver sur le même sous-réseau.
Remarque : répétez l’étape 2 si le voyant de liaison du
connecteur réseau ne s’allume pas. Pour plus d’informations,
reportez-vous à la section “Dépannage”, page 31. 3) À l’aide des
informations renseignées sur les pages de configuration (telles
que l’adresse IP de l’imprimante), installez le logiciel d’imprimante
sur chaque ordinateur qui utilisera ce périphérique. Pour plus
d’informations sur le partage de l’imprimante en réseau,
reportez-vous au guide de l’utilisateur en ligne.
Bekabeld netwerk: 1)Verwijder de beschermklep van de
netwerkpoort. 2) Sluit de (niet meegeleverde) netwerkkabel
aan op de netwerkpoort van de printer en op een beschikbare
poort op de netwerkhub, -switch of -router. LET OP: Sluit de
netwerkkabel niet aan op een poort met de naam WAN of Uplink
op de hub, switch of router.. Sluit de cross-kabel (die wordt
meegeleverd met de printer HP Business Inkjet 1200dtwn) niet
aan op de netwerkhub, -switch of router. Het wordt aanbevolen
dat de printer en de computers die de printer gebruiken, zich in
hetzelfde subnet bevinden.
Opmerking: herhaal stap 2 als het verbindingslampje van de
netwerkaansluiting niet gaat branden. Zie “Problemen oplossen”
op pagina 39 voor meer informatie. 3) Installeer de printersoftware
op elke computer die de printer gebruikt met behulp van de
informatie op de configuratiepagina’s (zoals het IP-adres van de
printer). Zie de elektronische gebruikershandleiding voor meer
informatie over het delen van de printer in een netwerk.
Rete con fili 1) Rimuovere il coperchio di protezione dalla
porta di rete. 2) Collegare il cavo di rete (veduto separatamente)
alla porta di rete della stampante e a una porta del commutatore,
del router o dell’hub della rete. ATTENZIONE: non collegare il
cavo di rete a una porta contrassegnata da WAN o Uplink
nell’hub, nel commutatore o nel router. Non collegare il cavo
incrociato (fornito con la stampante HP Business Inkjet 1200dtwn)
nel commutatore, nel router o nell’hub di rete. Si consiglia di avere
la stampante e il computer che la utilizza nella stessa sottorete.
Nota: ripetere il punto due se la spia del collegamento del
connettore di rete non si accende. Per ulteriori informazioni,
consultare la sezione “Risoluzione dei problemi" a pagina 46.
3) Utilizzando le informazioni delle pagine di configurazione
(come ad esempio l’indirizzo IP della stampante), installare il
software della stampante nei computer che utilizzeranno la
stampante. Per ulteriori informazioni sulla condivisione della
stampante in una rete, consultare la Guida in linea.
3
2
1
2
HPCrickMLK_GSG_UGFDIA.book Page 14 Wednesday, May 19, 2004 4:26 PM

English
Français
Italiano
Deutsch
Nederlands
15
Step 9: Test the printer software installation.
After you complete the software installation and connect the
printer to the computer, print a document from an application that
you use frequently to ensure that the software is installed
correctly. If the document does not print, see “Troubleshooting” on
page 17.
Step 10: Register the printer.
Register the printer to receive important support and technical
information. If you did not register your printer while installing
the software, you can register later at http://www.register.hp.com.
Schritt 9: Testen der Softwareinstallation.
Nachdem Sie die Installation der Software ausgeführt und den
Drucker an den Computer angeschlossen haben, drucken Sie ein
Dokument aus einer Anwendung, die Sie häufig verwenden.
Wenn das Dokument nicht gedruckt wird, beachten Sie den
Abschnitt “Fehlerbehebung” auf Seite 24.
Schritt 10: Registrieren des Druckers.
Registrieren Sie den Drucker, damit Sie Kundenunterstützung
und wichtige technische Informationen erhalten. Wenn Sie
den Drucker nicht während der Installation der Software
registrieren, können Sie dies später unter
http://www.register.hp.com nachholen.
Étape 9 : Testez l’installation du logiciel de l’imprimante.
Après avoir terminé l’installation du logiciel et connecté
l’imprimante à l’ordinateur, imprimez un document à partir d’une
application que vous utilisez régulièrement pour vous assurer
que le logiciel est bien installé. Si le document ne s’imprime pas,
reportez-vous à la section “Dépannage”, page 31.
Étape 10 : Enregistrement de l’imprimante.
Enregistrez l’imprimante afin d’obtenir de l’aide et des
informations techniques importantes. Si vous décidez de
ne pas enregistrer votre imprimante au cours de l’installation
du logiciel, vous pourrez le faire ultérieurement à l’adresse
http://www.register.hp.com.
Stap 9: De installatie van de printersoftware testen.
Nadat u de software hebt geïnstalleerd en de printer hebt
aangesloten op de computer, drukt u een document af vanuit een
toepassing die u vaak gebruikt om te controleren of de software
juist is geïnstalleerd. Zie “Problemen oplossen” op pagina 39 als
het document niet wordt afgedrukt.
Stap 10: De printer registreren.
Registreer de printer om gebruik te kunnen maken van belangrijke
ondersteuning en technische informatie. Als u de printer niet hebt
geregistreerd tijdens de installatie van de software, kunt u de
printer later registreren op http://www.register.hp.com.
Punto 9: Verificare l’installazione del software della
stampante.
Al termine dell’installazione del software e dopo avere collegato
la stampante al computer, stampare un documento da
un’applicazione utilizzata frequentemente per assicurarsi che
l’installazione sia stata eseguita correttamente. Se il documento
non viene stampato, consultare la sezione “Risoluzione dei
problemi" a pagina 46
Punto 10: Registrare la stampante.
Per ricevere importanti informazioni tecniche e sull’assistenza,
è necessario effettuare la registrazione della stampante. Se tale
operazione non è stata eseguita al momento dell’installazione del
software, sarà possibile registrare la stampante successivamente
all’indirizzo http://www.register.hp.com.
10
9
HPCrickMLK_GSG_UGFDIA.book Page 15 Wednesday, May 19, 2004 4:26 PM

16
Congratulations!
Your printer is ready to use. For information about using the
printer and troubleshooting, see the following resources:
• Onscreen user’s guide and Readme file on the Starter CD.
• HP Instant Support (see the onscreen user’s guide)
• Product support site at
http://www.hp.com/support/businessinkjet1200
Herzlichen Glückwunsch!
Ihr Drucker ist betriebsbereit. Informationen zur Verwendung
des Druckers und zur Fehlerbehebung können Sie folgenden
Quellen entnehmen:
• Online-Benutzerhandbuch und Readme-Datei auf der
Starter-CD.
• HP Instant Support (weitere Informationen finden Sie im
Online-Benutzerhandbuch)
• Website der Produktunterstützung
http://www.hp.com/support/businessinkjet1200
Félicitations !
Votre imprimante est prête à l’emploi. Pour toute information
concernant l’imprimante et son dépannage, reportez-vous:
• au guide de l’utilisateur en ligne et au fichier Lisezmoi
disponibles sur le CD de démarrage ;
• à HP Instant Support (consultez le guide de l’utilisateur
en ligne) ;
• au site d’assistance du produit à l’adresse suivante
http://www.hp.com/support/businessinkjet1200
Gefeliciteerd.
De printer is klaar voor gebruik. Voor meer informatie over het
gebruik van de printer en het oplossen van problemen kunt u de
volgende bronnen raadplegen:
• De on line gebruikershandleiding en het Leesmij-bestand op
de Starter-cd.
• HP Instant Support (zie de on line gebruikershandleiding)
• Website voor productondersteuning op
http://www.hp.com/support/businessinkjet1200
Congratulazioni!
La stampante è pronta per l’uso. Per informazioni sull’utilizzo della
stampante e sulla risoluzione dei problemi, fare riferimento alle
risorse seguenti:
• Guida in linea e file Readme nel CD di avviamento.
• HP Instant Support (vedere la Guida in linea)
• Sito assistenza prodotti all’indirizzo
http://www.hp.com/support/businessinkjet1200
HPCrickMLK_GSG_UGFDIA.book Page 16 Wednesday, May 19, 2004 4:26 PM

17
English
Troubleshooting
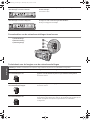
This section provides troubleshooting suggestions for some of the most common issues associated with hardware and software installation.
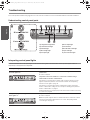
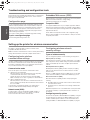
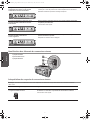
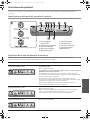
Understanding control panel parts
Interpreting control panel lights
For more information about control panel lights, see the onscreen user’s guide on the Starter CD or visit the product support website at
http://www.hp.com/support/businessinkjet1200.
1 2 3 4 5 6 7
9
10
8
1) Configuration Page button
2) Power button and light
3) Printhead light
4) Ink Cartridge light
5) Door Open light
6) Out of Paper light
7) Cancel button
8) Resume button and light
9) Paper Jam light
10) Color indicator lights
Control panel light pattern Explanation and recommended action
Configuration page button is off.
The Power light is on.
The printer is turned on and idle. It is connected using a USB or
parallel cable.
No action is required.
The printer is turned on and idle. It is connected to a network using a
network cable or wireless communication.
If the printer is connected using a network cable, check the network connector
lights to verify that the printer is connected to the network. See “Interpreting
network connector lights” on page 19.
If the printer is connected using wireless communication, make sure that the
wireless communication settings are set correctly. See “Setting up the printer for
wireless communication” on page 21.
Verify that the printer is set up properly on the network. See “Problems connecting
to a network” on page 20.
Configuration page button is green.
Power light is on.
The printer is connected to a wired network. It is turned on and idle.
No action is required.
Note: If the printer supports wireless communication but is connected to a wired
network, the Configuration page button is not on. See “Interpreting network
connector lights” on page 19.
HPCrickMLK_GSG_UGFDIA.book Page 17 Wednesday, May 19, 2004 4:26 PM

18
Configuration page button is blue.
Power light is on.
The printer is connected to a wireless network. It is turned on and idle.
No action is required.
Power light is on. Out of Paper light blinks.
Resume light blinks.
The printer is out of paper.
Load paper in the printer, and then press (Resume button) to continue.
Power light is on. Paper Jam light blinks.
Resume light blinks.
Paper is jammed in the printer.
Clear the paper jam, and then press (Resume button) to continue.
For more information, see the “Maintaining and troubleshooting” chapter in the
onscreen user’s guide.”
Power light is on. Door Open light is on. A cover is not closed completely.
Make sure all covers are completely closed.
Power light is on. Door Open light blinks. The rear-access panel or the auto-duplex unit is not inserted completely.
Make sure the rear-access panel (HP Business Inkjet 1200) or the auto-duplex unit
(HP Business Inkjet 1200d/1200dn/1200dtn/1200dtwn) is inserted completely in
the back of the printer.
Power light is on. Printhead light is on. The printhead latch is not secured properly.
Open the top cover and press down firmly on the printhead latch to ensure that it is
secured properly. Also, make sure the protective tape on each printhead has been
removed.
The Power light, the Ink Cartridge light, and one or
more of the color indicator lights are on.
One or more of the ink cartridges is missing.
Install the ink cartridges and try to print.
If the error persists, replace the ink cartridge or cartridges indicated.
Power light is on. Printhead light and appropriate color
indicator light blink.
One or more of the printheads needs attention.
Reinstall the printheads and try to print.
Try cleaning the printhead contacts. See Maintaining the printheads.
If the error persists, replace the printhead or printheads indicated.
The Power light, the Printhead light, and one or more of
the color indicator lights are on.
One or more of the printheads is missing.
Make sure that the protective tape on the printhead has been removed.
Reinstall the printheads and try to print.
HPCrickMLK_GSG_UGFDIA.book Page 18 Wednesday, May 19, 2004 4:26 PM

19
English
Understanding network connector parts
Interpreting network connector lights
Note: The printer’s wireless communication is turned off when the printer is connected using a network cable.
Power light is on. One or more color indicator
lights is on.
One or more ink cartridges is low on ink and will need to be
replaced soon.
No action is required.
Power light is on. One or more color indicator
lights blinks.
An ink cartridge is out of ink and must be replaced before you can continue
printing.
Replace the ink cartridge indicated.
1) Activity light
2) Network connector
3) Link light
1
2
3
Network light pattern Explanation and recommended action
Link light is on. Activity light is off. The printer is connected to the network but is not receiving or transmitting data
over the network. The printer is turned on and idle.
No action is required.
Link light is on. Activity light blinks. The printer is receiving or transmitting data over the network.
No action is required.
Link light is off. Activity light is off. The printer is turned off or is not connected to the network.
If the printer is turned off, turn on the printer. If the printer is turned on and a network
cable is connected, see “Problems connecting to a network” on page 20.
HPCrickMLK_GSG_UGFDIA.book Page 19 Wednesday, May 19, 2004 4:26 PM
La pagina si sta caricando...
La pagina si sta caricando...
La pagina si sta caricando...
La pagina si sta caricando...
La pagina si sta caricando...
La pagina si sta caricando...
La pagina si sta caricando...
La pagina si sta caricando...
La pagina si sta caricando...
La pagina si sta caricando...
La pagina si sta caricando...
La pagina si sta caricando...
La pagina si sta caricando...
La pagina si sta caricando...
La pagina si sta caricando...
La pagina si sta caricando...
La pagina si sta caricando...
La pagina si sta caricando...
La pagina si sta caricando...
La pagina si sta caricando...
La pagina si sta caricando...
La pagina si sta caricando...
La pagina si sta caricando...
La pagina si sta caricando...
La pagina si sta caricando...
La pagina si sta caricando...
La pagina si sta caricando...
La pagina si sta caricando...
La pagina si sta caricando...
La pagina si sta caricando...
La pagina si sta caricando...
La pagina si sta caricando...
La pagina si sta caricando...
La pagina si sta caricando...
La pagina si sta caricando...
La pagina si sta caricando...
La pagina si sta caricando...
La pagina si sta caricando...
La pagina si sta caricando...
La pagina si sta caricando...
La pagina si sta caricando...
La pagina si sta caricando...
La pagina si sta caricando...
La pagina si sta caricando...
La pagina si sta caricando...
La pagina si sta caricando...
La pagina si sta caricando...
La pagina si sta caricando...
La pagina si sta caricando...
La pagina si sta caricando...
La pagina si sta caricando...
La pagina si sta caricando...
La pagina si sta caricando...
La pagina si sta caricando...
La pagina si sta caricando...
La pagina si sta caricando...
-
 1
1
-
 2
2
-
 3
3
-
 4
4
-
 5
5
-
 6
6
-
 7
7
-
 8
8
-
 9
9
-
 10
10
-
 11
11
-
 12
12
-
 13
13
-
 14
14
-
 15
15
-
 16
16
-
 17
17
-
 18
18
-
 19
19
-
 20
20
-
 21
21
-
 22
22
-
 23
23
-
 24
24
-
 25
25
-
 26
26
-
 27
27
-
 28
28
-
 29
29
-
 30
30
-
 31
31
-
 32
32
-
 33
33
-
 34
34
-
 35
35
-
 36
36
-
 37
37
-
 38
38
-
 39
39
-
 40
40
-
 41
41
-
 42
42
-
 43
43
-
 44
44
-
 45
45
-
 46
46
-
 47
47
-
 48
48
-
 49
49
-
 50
50
-
 51
51
-
 52
52
-
 53
53
-
 54
54
-
 55
55
-
 56
56
-
 57
57
-
 58
58
-
 59
59
-
 60
60
-
 61
61
-
 62
62
-
 63
63
-
 64
64
-
 65
65
-
 66
66
-
 67
67
-
 68
68
-
 69
69
-
 70
70
-
 71
71
-
 72
72
-
 73
73
-
 74
74
-
 75
75
-
 76
76


HP Business Inkjet 1200 Printer series Manuale utente
- Categoria
- Stampanti laser / LED
- Tipo
- Manuale utente
in altre lingue
Documenti correlati
-
HP BUSINESS INKJET 1000 PRINTER Manuale utente
-
HP Business Inkjet 1100 Printer series Manuale utente
-
HP Color LaserJet 3500 Printer series Manuale del proprietario
-
HP Business Inkjet 2800 Manuale utente
-
HP Deskjet 6840 Printer series Guida utente
-
-
-
HP Deskjet D1400 Printer series Guida di riferimento
-
HP Smart Tank 514 Wireless All-in-One Guida Rapida
-
HP Smart Tank Plus 559 Wireless All-in-One Guida Rapida