Jamara 153059 Manuale utente
- Categoria
- Caricabatterie per auto
- Tipo
- Manuale utente

IT - Dichiarazione di conformità
Con la presente JAMARA e.K. dichiara che il prodotto „Caricatore X-Peak 80 BAL V2, No.
153059“ è conforme alla Direttiva 2014/30/UE, 2014/35/UE e 2011/65/UE.
Il testo integrale della dichiarazione di conformità UE è disponibile al seguente indirizzo
Internet: www.jamara-shop.com/Conformity
GB - Certicate of Conformity
Hereby JAMARA e.K. declares that the product „Charger X-Peak 80 BAL V2, No. 153059“
complies with Directive 2014/30/EU, 2014/35/EU and 2011/65/EU.
The full text of the EU Declaration of Conformity is available at the following Internet
address: www.jamara-shop.com/Conformity
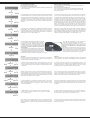
Caricatore | Charger
X-Peak 80 BAL V2
No. 153059
IT - Istruzioni per l’uso
GB - Instruction
IT - Informazioni generali
JAMARA e.K. non e´responsabile per danni, sostenute al prodotto stesso o attraverso questo, do-
vuti ad una gestione non corretta del articolo. Solo il cliente si assume la piena responsabilità per
la manutenzione e l´utilizzo corretto dello stesso; questo include il montaggio, la ricarica, l´utilizzo,
no alla scelta della aerea di applicazione. Si prega di notare e rispettare le istruzioni d´uso, questi
contengono informazioni e avvertimenti molto importanti.
GB - General information
JAMARA e.K. is not liable for any damage caused to the product itself or through this, provided this
is due to improper operation or handling errors. The Customer alone bears the full responsibility for
the proper use and handling, including without limitation, the assembly, the charging process, the
use and choice of the operation area. Please refer to the operating and user instructions, it contains
important information and warnings.
IT - Prima di avviare il modello, leggere attentamente tutte le istruzioni per l’uso.
Attenzione! Leggere completamente le avvertenze / istruzioni di sicurezza,
questi sono per la vostra sicurezza può prevenire incidenti / infortuni.
GB - Read the complete instructions and security instructions carefully before using the
model.
Caution! Please fully and carefully read warnings/ safety instructions. These
are for our own security and can avoid accidents/injuries.
21/22
IT - Dati tecnici:
Input AC 100 - 240 V; 50 Hz; 0,84 - 0,35 A; 84 W
DC 11 - 18,0 V; 5 - 7,2 - 4,55 A; 80 W
Output LiIon/LiPo/LiFePo: 1 - 6
NiCd/NiMH: 1 - 15
Pb 2V ~ 20 V
Corrente di carica max. 80 W, 0,1 ~ 6,0 A
Corrente di scarica max. 10 W, 0,1 ~ 2,0 A
Corrente bilanciatore 300 mAh/Celle
Dimensioni 136 x 113 x 63 mm
Peso 639 g
GB - Technical data:
Input AC 100 - 240 V; 50 Hz; 0,84 - 0,35 A; 84 W
DC 11 - 18,0 V; 5 - 7,2 - 4,55 A; 80 W
Output LiIon/LiPo/LiFePo: 1 - 6
NiCd/NiMH: 1 - 15
Pb 2V ~ 20 V
Charging current max. 80 W, 0,1 ~ 6,0 A
Discharge current max. 10 W, 0,1 ~ 2,0 A
Balance current 300 mAh/cell
Dimensions 136 x 113 x 63 mm
Weight 639 g
IT - Highlights:
• Adattatore Dual Power AC/DC 230V e 11 - 18V
• Balancer al Litio incorporato
• Equilibratore individuale per la scarica della batteria
• Modus di programmazione per vari tipi di pacco batterie
• Massima sicurezza
• Funzionalità Overload
• Controllo Input
• Limite di capacità
• Limite di tempo del processo
• Monitoraggio della ricarica
• Supporta Litio, NiMh, NiCD e PB
• 5 posizioni di memoria
• Ventilatore attivo
GB - Highlights:
• Dual Power Built-in AC Adapter 230V and 11 - 18V
• Internal independent lithium battery balancer
• Individually balanced battery discharge
• Fast and storage model for various type of battery
• Maximum safety
• Automatic charging current limit
• Input power monitoring
• Capacity limit
• Proscessing time limit
• Load capacity display
• Supports Lithium, NiMh, NiCd and Lead battery packs
• 5 memory locations
• Active fan
IT - Contenuto del kit:
• Caricatore
• Cavo di carica: BEC, Tamiya, Spina per alta tensione LiPo, Pinze al coccodrillo, Scheda
bilanciatore, Cavo di alimentazione per alimentazione 12 V, Cavi di alimentazione
• Istruzioni
GB - Box content:
• Charger
• Charging lead: BEC, Tamiya, LiPo high-current plug, Crocodile clips,
Balancer board 12 V for power supply, Supply cable, Power cable
• Instructions

2
IT - Particolarità
Indipendente bilanciatore al litio all’interno
L’caricatore ha un bilanciatore integrato per max. 6 Litio - celle. Il processo di carica diventa in
questo modo molto più sicuro e confortevole. Non è necessario collegare un bilanciatore sepa-
rato durante il processo di carica.
Scarico di batteria singolarmente equilibrata
Durante il processo di scarico il caricatore controlla ogni cella singolarmente. Errori sono visualizzati
sul display e il processo termina automaticamente se la tensione di una cella non è regolare.
Vari tipi di batterie al litio
Con questo caricatore possano essere caricato varie batterie al litio. Per esempio: batterie agli ioni
di litio, LiPo e le nuove celle LiFe.
Memoria rapida
Tutti i dati possono essere memorizzati e visualizzati. Il comportamento delle celle po’ in questo
modo essere monitorato su più cicli di carica / scarica e analizzato.
Massima sicurezza
Delta-Peak-Sensibilità: Il caricabatterie controlla la tensione della batteria durante la carica. Appena
raggiunto o superato la tensione di carica della batteria, il dispositivo si spegne automaticamente.
Protezione automatica contro le sovratensioni
È possibile impostare il limite superiore della corrente di carica durante la ricarica del tuo NiCd o
NiMH. Questo è utile per batterie NiMH con bassa capacità in modalità di caricamento automatico
Limite di capacità
Per sicurezza è monitorata la capacità di carica. Inoltre è costantemente monitorato anche il tempo
di ricarica. Se la capacità di carica supera il valore massimo, il processo sarà terminato automati-
camente.
Monitoraggio della temperatura con spegnimento programmabile*
Al caricatore po’ essere collegato un sensore di temperatura. Il quale po’ controllare la temperatura
della batteria no a 80°C.
* Questa funzione è solo ottenibile con il collegamento di un sensore di temperatura (No. 153057).
Quest’articolo non è incluso nel kit di consegna.
Limite di tempo delle operazioni
Per evitare errori, è anche possibile impostare manualmente il tempo di caricamento.
Eingangsstrom Überwachung
Damit es nicht zu einer Tiefentladung der Autobatterie kommt wird die Eingangsspannung des La-
degeräts ständig überwacht. Wenn der Grenzwert unterschritten wird, beendet das Ladegerät den
Prozess automatisch.
Memorizzazione dei dati
Il caricabatterie è dotato di una capacità di memoria no a 5 batterie. In ogni memoria, è possibile
memorizzare i dati di una confezione di batterie. Questo consente un rapido accesso alle batterie
principali ed elimina in gran parte la necessità di una riprogrammazione.
Funzionamento a cicli di carica / scarica
Le celle delle batterie possano anche usufruire di un programma per la rigenerazione delle celle
stesse. Per i dettagli esatti si prega di consultare i dati tecnici.
GB - Special features
Internal independent lithium battery balancer
The Charger has an integrated balancer connection for the included Balander board (up to 6-cell
lithium). It isn‘t necessary to connect an external balancer for balance charging.
Balancing individual cells battery charging/discharging
During the process of discharging, the charger can monitor and balance each cell of the battery in-
dividually. Error message will be indicated and the process will be ended automatically if the voltage
of any single one cell is abnormal.
Adaptable to various type of lithium battery
Charger is adaptable to various types of Lithium batteries, such as Li-ion, LiPo and LiFe series of
batteries.
Fast and storage mode of lithium battery
Purposes to charge dierent battery types, „fast“ charge reduce the duration of charging, whereas
„store“ state can control the nal voltage of your battery, so as to store fo a long time and protect
useful time of the battery.
Maximum safety
Delta-peak sensitivity: the automatic charge termination program based on the principle of the Delta-
peak voltage detection. When the battery‘s voltage exceeds the threshold, the process will be ter-
minated automatically.
Automatic charging current limit
You can set up the upper limit of the charging current when charging your NiCd or NiMh battery. It is
useful for the NiMh battery of low impendance and capacity in the „Auto“ charging mode.
Capacity limit
The charging capacity is always calculated as the charging current multiplied by time. If the charging
capacity exceeds the limit, the process will be terminated automatically when you set the maximum
value.
Temperatur monitoring with programmable cut-o *
The battery‘s internal chemical reaction will cause the temperature of the battery to rise. If the tem-
perature limit is reached, the process will be terminated.
* This function is available by connecting optional temperatur probe (Ord. No. 153057), which is not
included in our package.
Processing time limit
You can also limit the maximum process time to avoid any possible defect.
Input power monitoring
To portect the car battery used as DC input power from being damaged, its voltage keeps being
monitored. If it drops below the lower limit, the process will be ended automatically.
Data store/load
The maximum ve batteries‘ data can be stored for users‘ convenience. You can keep the data
pertaining to program setting of the battery of continuous charging or discharging. Users can call out
these data at any time without any special program setting.
Cyclic charging / discharging
1 to 5 cyclic and continuous process of charge>discharge or discharge>charge is operable for bat-
tery refreshing and Balancing to simulate the battery‘s activity.

3
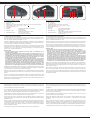
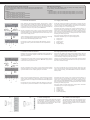
IT - Connessioni e Modi di controllo
1 Ingresso 230 V
2 Ingresso 11 - 18 V
3 Collegamento per il sensore di temperatura (Sensore non è incluso nel kit di consegna)
4 Porta di ricarica - rosso = più (+) | nero = meno (-)
5 Attacchi di bilanciatore (1 - 6)
6 LED Display
7 Tipo Batt = Utilizzato per selezionare i tipi di batteria
Ferma la carica
8 Status - / + = Cambio di modalità
Diminuzione o aumento di un valore.
9 Pulsante Start / Enter = Avvia il processo di carica
Per confermare le voci di menu
GB - Connections and Controls
1 230 V AC Input
2 11 - 18 V DC Input
3 Temperature sensor socket (sensor not included)
4 Output charge lead - red = plus (+) | black = minus (-)
5 Balancer lead sockets (1 - 6)
6 LED screen
7 Batt. Type = Scroll through the Main Menu
Stop any charge processes
8 Status - / + = After values
See the status of individual cells in balance charge mode
9 Start / Enter button = Resume or start charge processes.
Conrm an action.
3457
6 8 9
1 2
IT - Messa in servizio del caricabatterie
Lo X-Peak 80 BAL V2 in alternativa può essere utilizzato con due fonti di tensione dierenti. È pos-
sibile usare l‘energia del cavo di alimentazione di una normale presa CA o di una batteria a 12 V o
anche di un potente alimentatore stabilizzato.(11 - 18V)
Collegare uno degli ingressi alla rete di Vostra scelta. Quando è collegato a una fonte di alimentazio-
ne a 12 V, accertarsi di rispettare la corretta polarità. Collegare il morsetto rosso al polo positivo (+) e
il nero al polo negativo (-) alimentazione a batteria o alimentazione.
Durante l´accensione viene segnalato „Charge Discharge“. In quell´istante il processore controlla
la caricabatteria e la fonte di alimentazione. Se trova un errore, per esempio la tensione d’ingresso
è inferiore a 11 V o 15 V, lo segnala con un messaggio sul display e con un segnale acustico. Se
questo è il caso, controllare l‘alimentazione.
Note importanti!
• Mai usare entrambe le fonti energetiche allo stesso tempo, il caricabatterie così va
inevitabilmente danneggiato.
• Assicurarsi di utilizzare il programma di carica corretto (Litio, NiMh, Piombo ecc.) per la
rispettiva batteria! Il tentativo di caricare una batteria con un programma di carica non
compatibile può causare gravi danni alla batteria e al caricatore. C'è il rischio di incendio o
di esplosione! Se non si è sicuri del programma di ricarica da utilizzare per la propria
batteria, contattare il produttore della batteria o il nostro servizio clienti.
• Il caricabatterie è in grado di caricare in modo sbilanciato le batterie al litio multicella
in condizioni controllate, quando viene selezionato il programma di carica appropriato. La
ricarica non bilanciata delle batterie al litio multicella è a rischio e pericolo dell'utente.
Sconsigliamo fortemente di farlo e raccomandiamo che le batterie al litio a più celle siano
sempre caricate in modo bilanciato. Una carica sbilanciata può portare a una deriva della
tensione delle celle che può causare un invecchiamento più rapido della batteria e, nel
peggiore dei casi, può danneggiarla gravemente. C'è il rischio di incendio o di esplosione!
Il collegamento con la batteria da caricare o scaricare è compiuto da prese di 4mm di 2 colori diversi.
Collegate la batteria con queste prese. Il (+) della batteria deve essere collegato con la presa rossa
e il (–) con la presa nera. Usate solo cavi di ricarica di alta qualità.
Durante la carica o la scarica di una batteria al litio, è necessario utilizzare per ragioni di sicurezza
la funzione di bilanciamento del caricatore. Solo in questo modo, le celle al litio sono perfettamente
protette.
Per fare ciò, oltre alle due porte principali dovete collegare anche il sistema di bilanciamento della
batteria con il caricabatterie. Se il bilanciatore non è usato, la modalità di carica o scarica viene
eettuata senza controllo della tensione delle singole celle. Inoltre, le tensioni delle singole celle non
possono essere visualizzati sul display.
GB - Using your charger for the rst time
The X-Peak 80 BAL V2 is tted with 2 power inputs which gives you the choice of powering the unit
from the household mains supply (220 V AC) or via 12 V DC. The 12 V DC can be either a vehicle
battery or a stabilised transformer (11 - 18V).
Connect the charger to an input of your choice, if using 12 V pay particular attention to the polarity.
The red crocodile clip must be connected to the plus pole (+) and the black clip to the minus pole (-).
After connection the charger will display „Charge Discharge“ whilst a self test is conducted. If an
error is encountered, for example if the input voltage is outside the allowed range of 11-15 V, a mes-
sage will be displayed and the buzzer will sound. Disconnect the power supply and rectify the fault.
Important notes!
• Never connect both power inputs simultaneously as this will destroy the charger!
• Make sure to use the correct charging programme (Lithium, NiMh, Lead etc.) for the
respective battery! Attempting to charge a battery with a non-compatible charging
programme can cause serious damage to the battery and charger. There is a risk of re
or explosion! If you are not sure which charging programme to use for your battery, please
contact the manufacturer of the battery or contact our customer service.
• The charger is capable of unbalanced charging of multi-cell lithium batteries under
controlled conditions when the appropriate charging programme is selected. Unbalanced
charging of multi-cell lithium batteries is at your own risk. We strongly advise against this
and recommend that multi-cell lithium batteries are always charged balanced. Unbalanced
charging can lead to cell voltage drift which can cause the battery to age more quickly and
in the worst case can severely damage the battery. There is a risk of re or explosion!
Battery packs to be charged or discharged are attached to the charger via 2 colour coded banana
sockets using a good quality charging cable. Make sure that the plus (+) pole of the battery is con-
nected to the red socket on the charger and that the minus (-) pole of the battery is connected to the
black socket of the charger.
When charging or discharging Lithium packs, always use the balancer function of the charger. This
will not only provide protection for your cells, but also ensure maximum eciency and long life.
To do so, you must connect both the charging cable and the balancer plug/socket. Not doing this
will result in the individual cells not being protected and you will not be able to monitor the individual
cell voltage in the display.
IT - Struttura del menu del caricabatterie
Dopo aver collegato il caricabatterie a una presa di corrente, le ultime impostazioni sono attive. Se la
stessa batteria deve nuovamente essere, caricata o scaricata, nessuna modica deve essere fatta.
L’ultima modalità di carica usata viene visualizzato
Per una modica delle impostazioni si deve inizialmente indicare che tipo di batterie s’intende ca-
ricare o scaricare. Per questo premere ripetutamente il pulsante ‘Batt.Typ/Stop’ no a quando il
display mostra il tipo di batteria desiderata. I tipi di batteria sono disposti uno dietro l'altro.
Il tipo di batteria va confermata, premendo il tasto ‚Start / Enter. Se lei lo desidera, ogni conferma di
qualsiasi pulsante po’ essere accompagnata da un breve segnale acustico.
Quando il tasto „Start / Enter“ viene premuto, inizia a lampeggiare il parametro regolabile, per es-
empio, la corrente di carica. Premendo il tasto ’Status - / + ’- pulsante questo valore può essere
modicato a piacere.
Quando una batteria è collegata, l‘operazione programmata po’ essere iniziata premendo per un
tempo prolungato il pulsante ’Start/Enter’. Quando il tutto è completato correttamente e la batteria
non mostra alcun tipo di difetto, il processo inizia. In caso contrario accompagnato da un segnale
acustico, sarà segnalato l´errore. Durante la modalità di carica o di scarica i dati più importanti
vengono visualizzate sul display.
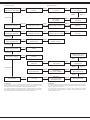
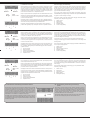
Il graco seguente rappresenta la struttura completa del menu dello X-Peak 80 BAL V2:
GB - Menu Structures
Having connected the charger to a power supply, the last settings used will be displayed. If you are
going to charge/discharge the same pack, no settings need to be changed. The last used mode will
be displayed.
If a dierent pack is to be charged/discharged the setting must be changed, starting with the battery
type. To do this, press the ‘Batt.Typ/Stop’ button until the correct battery type ashes in the display.
This menu option is an endless loop.
The displayed battery type is conrmed by pressing the ‚Start/Enter‘ button. If you wish, each key
press is conrmed by a brief acoustic signal.
Pressing the ’Start/Enter’ button allows the user to access the various parameters which can be
changed, for example the charging current. The ’Status - / + ’ buttons are used to change
the values.
Once a battery pack has been connected, the selected operation can be started by pressing the
’Start/Enter’ button for 3 seconds. Providing that the battery is not damaged and correctly connec-
ted, the selected operation will begin. If a problem is encountered, a warning bleep will sound and
a warning message displayed. When operationing the charger will display the relevant information.
The following program ow chart shows the complete menu structure of the X-Peak 80 BAL V2:

4
IT - Struttura del menu GB - Menu Structures
Programma batteria al litio
Program select - Lithium battery
Programma batteria al NiMh
Program select - NiMH battery
Programma batteria al NiCd
Program select - NiCd battery
Programma batteria al piombo
Program select - Pb battery
Programma di memoria
Program select - Save Data
Scegliere programma memorizzata
Program select - Load Data
Utente del programma denito
User Set Program
Salva impostazioni
Save Data
Carico programma memorizzato
Load Data
Carica Lixx
Lixx charge
Carica NiMh - Auto./Manuale
NiMH charge - Auto. / Man.
Carica NiCd - Auto./Manuale
NiCd charge - Auto. / Man.
Timer di sicurezza
Safety Timer
Pausa carico/scarico
CHg>Dchg Waste Time
Tipo Lixx
Lixx V. Type
Carica piombo
Pb battery charge
Lixx - carica equilibrata
Lixx - Balance
NiMh - scarica - Auto./Manuale
NiMH - discharge - Auto. / Man.
NiCd - scarica - Auto./Manuale
NiCd - discharge - Auto. / Man.
Arresto di capacità
Capacity Cut-o
Arresto di temperatura -
Abilitazione USB
Temp Cut-o - USB Enable
LiPo/Lilo/LiFe -
tempo diriconoscimento
LiPo/Lilo/LiFe CHk Time
Scarica piombo
Pb battery - discharge
Lixx - scarica
Lixx - Discharge
Lixx - caricamento rapido
Lixx - Fast charge
NiMH - ciclico
NiMH - cycle
NiCd - ciclico
NiCd - cycle
Allarme di tensione ingresso
Input Power Low Cut-o
Allarme di tasti e toni
Key Beep Buzzer
Capacità NiCd
NiCd D. Peak Sensitivity
NiCd - Altezza unità di carico
NiCd D. Peak Sensitivity
Lixx - salvare
Lixx - Storage
Start / Enter
Start / Enter
Start / Enter
Start / Enter
Start / Enter
Start / Enter
Start / Enter
Status -
Status +
Status -
Status +
Status -
Status +
Status -
Status +
Status -
Status +
Status -
Status +
Status -
Status +
Stop / Bat.Type
Stop / Bat.Type
Stop / Bat.Type
Stop / Bat.Type
Stop / Bat.Type
Stop / Bat.Type
Status -
Status +
Status - Status +
Status - Status +
Status - Status +
Status - Status +
Status -
Status +
Status -
Status +
Status -
Status +
Status -
Status +
Status -
Status +
Status -
Status +
IT - Attenzione!
Per impostazione di base, il caricabatterie è pre-programmato per le impostazioni utente.
Quando si collega per la prima volta a una batteria a 12 V, le seguenti informazioni vengono
visualizzate sullo schermo una dopo l'altra e l'utente può modicare i parametri.
Se è necessario modicare il valore del parametro nel programma, premere il tasto "Start /
Enter" per farlo lampeggiare, quindi modicare il valore con il tasto „Status -“ o „Status + “.
Il valore desiderato viene memorizzato premendo una volta il tasto "Start / Enter".
GB - Warning
As default this charger will be set to typical user settings when it is connected to a 12 V battery
for the rst time. The screen displays the following information in sequence and the user can
change the parameter on each screen.
If you need to alter the parameter value in the program, press „Start/Enter“ key to make it
blink then change the value with „ Status -“ or „Status + “ key. The value will be stored by
pressing „Start/Enter“ key once

5
IT - Impostazione dei parametri
Menu di selezione per le batterie di litio:
LiFe = 3,3 V; LiIo = 3,6 V; LiPo = 3,7 V
E´ strettamente necessario impostare il tipo esatto di batterie, altrimenti le celle
possano danneggiarsi.
La X-Peak 80 BAL Pult è dotato di un rilevamento automatico della quantità di
celle delle batterie al litio. Se le celle sono troppo scaricate a fondo, il risultato
della misurazione potrebbe essere sbagliato. In questo menu, si può impostare
un periodo di tempo, in cui il numero di celle in serie collegati va costantemente
controllato e se necessario corretto. Normalmente un periodo di 15 minuti è
suciente. Per batterie ad alta capacità, il tempo richiesto potrebbe essere
superiore.
In entrambi i menu, va programmato la sensibilità del Cut-O della carica per le
batterie NiMH e NiCd. L‘intervallo è compreso tra 5 e 20 mV. Più alto è pro-
grammato il valore, più cariche diventano le batterie e più si può ridurre´ la
durata di vita delle batterie a causa di possibili sovraccarichi. Le impostazioni
di fabbrica sono 12 mV per NiCd e NiMH 7 mV.
Sul lato sinistro del caricabatterie è presente un connetto-
re a 3 pin utilizzato come collegamento per un sensore di
temperatura (non incluso). Quando la temperatura viene
visualizzata sullo schermo, è possibile utilizzare il senso-
re di temperatura opzionale per collegarsi alla supercie
della batteria. La funzione USB non è disponibile in
questo modello.
La temperatura massima della batteria può essere impos-
tata durante la carica. Il processo viene terminato automa-
ticamente per proteggere la batteria quando la temperatu-
ra della batteria raggiunge questi valori. Questa funzione è
realizzata da un sensore di temperatura (opzionale, non incluso).
Attenzione
Collegate il cavo del sensore di temperatura ( non incluso nel kit di consegna)
solo come indicato. Non invertite mai il cavo, altrimenti il carica batterie o il
sensore di temperatura possano danneggiarsi.
In questo menu può essere impostato un periodo di attesa tra un ciclo di una
carica e una scarica. Superiore è il tempo, più si raredda la batteria. In segui-
to il ciclo completo richiede un tempo superiore. E´possibile programmare da
1 a 60 minuti.
Quando inizia il processo di carica, inizia contemporaneamente il timer di si-
curezza integrato. Se non viene rilevato un errore o il circuito di terminazione,
questo dispositivo è programmato per evitare un sovraccarico. Fare riferimento
alle istruzioni della sezione "Calcolo dei valori predeniti del timer di sicurezza
(Safety Timer)" per calcolare il timer impostato.
In questa impostazione si programma la capacità massima per un processo.
Questa possibilità aumenta la sicurezza di una carica o la scarica a ne di
evitare danneggiamenti delle celle. Raggiunto il limite, il processo di carica
termina automaticamente.
In questo sottomenu, si può impostare che a ogni uso di qualsiasi tasto
è emesso un suono acustico. Anche la ne di un processo va segnalato
con un segnale acustico.
Il generatore di corrente ( batterie, alimentatori ect.) e´ sorvegliato da un soft-
ware, per evitare una scarica profonda. Se la tensione è inferiore al valore
impostato dall'utente, il programma si spegne automaticamente per proteggere
la batteria.
GB - Specication of the parameters
The screen shows the nominal voltage of Lithium battery.There are three
kinds of Lithium battery:
LiFe = 3,3 V; LiIo = 3,6 V; LiPo = 3,7 V
This is very important so you have to check the battery carefully and set
it up correctly. If it is dierent from correct value the battery can explode
during charge process.
To avoid from erroneous setting by users. The X-Peak 80 BAL V2 detects the
cell count of Lithium battery automatically at the beginning of charge or di-
scharge process. But deeply discharged battery can be perceived incorrectly.
To avoid this error, the time can bye set to verify the cell count by the processor.
Normally, 15 seconds are enough to detect the cell count correctly. You need
to extend the time term limit for the battery of large capacity. But the charge or
discharge process can may come to an end within the time term because of
the time limit decided by the wrong count if you set too long time limit for the
battery of small capacity. This may cause fatal error. You have to extend the
time term if the processor detect the cell count incorrctly at the beginning of
charge or discharge process. Otherwise, default value is recommended to use.
This shows the trigger voltage for automatic charge termination of NiMH and
NiCd battery. The valid value ranges from 5 to 20 mV per cell. Setting the
trigger voltage higher brings a danger of overcharging; whereas setting it lower
brings a possibility of premature termination. Please refer to the techincal spe-
cication of the battery. (NiCd default: 12 mV, NiMH default: 7 mV).
On the left side of the charger is a 3-pin port used as a
connection for a temperature sensor (not included).
If the screen displays temperature, you can use the
optional temperature probe to connect to the surface of
the battery. The USB function is not available for this
charger.
The maximum temperature of the battery can be set du-
ring the charge process. The process will be terminated
automatically to protect battery once the temperature of
battery reaches this values. This feature is accomplished
through temperature probe (optional, not supplied).
Attention!
Plug the temperature sensor cable (not supplied) only as shown. Plug the cable
not reverse polarity. Your charger or the temperature sensor can be damaged.
The battery become warm after cyclec of charge/discharge process. The
program will insert a time delay after each charge/discharge process to allow
the battery enough time to cool down before beginning next cyle of charge/
discharge process. The valid value ranges from 1 to 60 minutes.
When the charge process starts, the integral safety timer starts to run simulta-
neously. If error detected or the termination circuit can not detect whether the
battery is fully charged or not, this unit is programmed to prevent overcharging.
Please refer to the below statement to calculate the timer you set.
This program provides maximum capacity protection function. If the Delta peak
voltage can not be detected or the saftey timer times out, the charge process
will stopp automatically, when the battery reaches the user-set maximum char-
ge capacity.
The beep to conrm userts operation sounds every time a button is pressed.
The beep or melody sounds at various times during operation to conrm die-
rent mode change. These functions can be switched on or o.
This funktion monitors the voltage of the input battery used to power this char-
ger. If the voltage is lower than user-set value, the program will end forcibly to
protect the input battery.
- +
Status
- +
Status
- +
Status
- +
Status
- +
Status
- +
Status
- +
Status
- +
Status
- +
Status
- +
Status
- +
Status
Status
Status
Status
Status
Status
Status
Status
Status
- +
Status
- +
Status
Status
Status

6
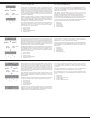
IT - Carico diretto delle celle di litio
Dopo l´attivazione del pulsante ’Batt-Type/Stop’ del programma Li, inizia la
fase di programmazione. Il display per una batteria LiPo appare come sotto in-
dicato. A sinistra nella prima riga è indicato il tipo di cella. Nella seconda riga va
programmato il tipo di corrente di carica da 0,1 a 5,0 A e la tensione delle celle
o la quantità ´di celle (da 1 a 6) tramite il pulsante ’Status ’.
Se tutte le impostazioni sono corrette o se viene caricato la stessa batteria
della volta precedente, l avvio deve essere preparato premendo min. 3 secondi
il pulsante ’Start/Enter’-Taste. Il display appare poi come indicato. Dopo l`avvio
viene mostrato il display di lavoro.
Tutte le informazioni importanti vengano messo a diposizione. Si tratta di (1)
Tipo e Nr. di celle (2) Tempo di ricarica (3) Corrente di carica (4)
Tensione attuale della batteria (5) Capacità di carica.
Per terminare una ricarica, premere il pulsante ’Batt-Type/Stop’. Se viene
interrotto il processo in questo modo le batterie non sono completamente
cariche.
GB - Charging of lithium battery
The left side of the rst line shows the type of battery you choose. The value
on the left of the second line of the charger is current user set. After setting the
current and voltage, press START/ENTER key for more than 3 seconds to start
the process.(charge current: 0.1-5.0A,voltage:1-5V).
This displays the number of cells you set up and the processsor detects. „R“
shows the number of cells detected by the charger and “S“ is the number of
cells set by you at the previous screen. If both numbers are identical you can
start charging by press START/ENTER button. If not,press BATT TYPE/STOP
button to go back to previous screen to carefully check the number of cells of
the battery pack before going ahead.
This screen shows the real-time status during charge process.
Press BATT TYPE/STOP key once to stop the charge process.
1 Number of cell
2 Charging time
3 Charging current
4 Battery voltage
5 Charged capacity
IT - Calcolo delle impostazioni del timer di sicurezza:
Per caricare batterie NiCd- o NiMH dividete il valore della capacità con il valore della corrente
di carica. L´importo ottenuto va diviso con 11,9. Il valore nale di questo calcolo indica i minuti
necessari di ricarica.
Esempio:
• 1.000 mAh capacità / 1,2 A corrente di carica /
fattore 11,9 = risultato 70 Min. come valore d´impostazione
• 2.000 mAh capacità / 2,0 A corrente di carica /
fattore 11,9 = risultato 84 Min. come valore d´impostazione
• 3.300 mAh capacità / 3,3 A corrente di carica /
fattore 11,9 = risultato 92 Min. come valore d´impostazione
GB - Safety Timer Calculations
When charging NiCd or NiMH batteries, divide the battery‘s rated capacity (mAh) by the
charge current (A). And divide the result by 11.9.
For example:
• 1.000 mAh Capacity / 1,2 A Current / Safety timer setting, divided by 11,9 = 70 minutes
• 2.000 mAh Capacity / 2,0 A Current / Safety timer setting, divided by 11,9 = 84 minutes
• 3.300 mAh Capacity / 3,3 A Current / Safety timer setting, divided by 11,9 = 92 minutes
- +
Status
- +
Status
Stop /
Bat.Type Start/
Enter> 3 sec.
Start/
Enter
1
2
1
3
4
5
IT - Caricare celle di litio con bilanciatore
Durante la carica e scarica di celle litio è consigliabile usare un bilanciatore. Il
caricadore ha il bilanciatore integrato, ma deve essere necessariamente col-
legato il Port-bilanciatore.
Il display appare come sotto indicato. Il processo di programmazione è identico
a quello descritto in precedenza. Con il pulsante ’Status ’ si programma la
tensione delle celle o la quantità ´di celle.
Se tutte le impostazioni sono corrette o se viene caricato la stessa batteria
della volta precedente, l avvio deve essere preparato premendo min. 3 secondi
il pulsante ’Start/Enter’-Taste. Il display appare poi come indicato.
Dopo l`avvio viene mostrato il display di lavoro . Tutte le informazioni importanti
vengano messo a diposizione. Si tratta di (1) Tipo e Nr. di celle (2) Tempo di
ricarica (3) Corrente di carica (4) Tensione attuale della batteria (5) Capacità
di carica.
Per terminare una ricarica, premere il pulsante ’Batt-Type/Stop’. Se viene inter-
rotto il processo in questo modo le batterie non sono completamente cariche.
GB - Charging Lithium battery in the Balance mode
This function is for balancing the voltage of Lithium-polymer battery cells while
charging. In the balance mode, the battery needs to have a balance lead to
connect to the individual port at the right side of the charger. And you need to
connect the battery‘s output plug to the output of charger.
Charging in this mode is dierent from the normal modes, because the built-in
processor monitors voltage of individual cell and control input current fed into
each cell to normalize the voltage.
The value on the left side of the second lines sets the charge current. The
value on the right side of the second lines sets the battery pack‘s voltage.After
setting current and voltage, press START/ENTER for more than 3 seconds to
start the process.
This displays the number of cells you set up and the processor detects. “R“
shows the number of cells detected by the charger and “S“ is the number of
cells set by you at the previous screen. If both numbers are identical you can
start charging by press START/ENTER button. If not, press BATT TYPE/STOP
button to go back to previous screen to carefully check the number of cells of
the battery pack before going ahead.
This screen shows the real-time status during charge process. Press BATT
TYPE/STOP key once to stop the charge process.
1 Number of cell
2 Charging time
3 Charging current
4 Supplied capacity
5 Current voltage battery
IT - Schema di collegamento
La scheda sopra mostra la con gurazione del connettore
di bilanciamento. L`caricadore possiede un Port-bilanci-
atore del sistema d’innesto di Jamara (XH). Se la vostra
batteria è dotata di uno standard diverso, usate un adat-
tatore adeguato del nostro sortimento.
GB - Individual cell connection diagram
The illustration opposite shows the conguration of the
balancer connector. The charger is provided with a balan-
cer port after Jamara connector system (XH). Your battery
should be provided with a dierent norm, use suitable ad-
apters from our range.
1
2
3
4
5
- +
Status
- +
Status
Start/
Enter
Stop / Bat.Type Start/ Enter > 3 sec.

7
- +
Status
- +
Status
Stop /
Bat.Type
Stop /
Bat.Type
Start/
Enter
Start/
Enter
> 3 sec.
> 3 sec.
- +
Status
- +
Status
- +
Status
IT - Modalita´di carica rapida
Questa modalità di carica per batterie al litio è usato per raggiungere in fretta
la ne del processo di carica. Durante il processo di carica normale, la secon-
da parte, la quale si occupa della carica di tensione costante, impegna molto
tempo ma aumenta solo di poco la capacità. Con la modalità di carica rapida
la seconda parte viene ridotta e cosi il processo di carica nisce prima, però
tenete conto che la batteria non e´completamente carica.
Dopo che questo sotto-menu di programmi di carica delle batterie al litio viene
impostato con il pulsante ’Status viene mostrato il seguente display. In ques-
to menu si possano programmare in modo già descritto, la corrente di carica e
il numero di celle da caricare.
Sul display di lavoro vengano indicate (1) Tipo e Nr. di celle (2) Tempo di ri-
carica (3) Corrente di carica (4) Tensione attuale della batteria (5) Capacità di
carica come nei altri processi di carica per le batterie al litio.
Premendo il pulsante ’Start/Enter’ inizia il processo di carica. Premendo il
pulsante ’Batt-Type/Stop’ si po’ interrompere la ricarica in qualsiasi momento.
GB - Fast charging of Lithium battery
Charging current will become lower when it progress to the end of charging.A
specic CV process will be reduced to end the charging process earlier.In
fact,the charging current will goes to 1/5 when the charging process comes to
1/10.Charging capacity will be a little smaller than normal charging,but char-
ging time will be shortened accordingly.
You can set up the charging current and voltage of the battery pack Press
START/ENTER key to display voltage conrmation.Then press START/ENTER
key again to conrm and begin to charge.
This screen shows the real-time status of“fast charging“.Press BATT TYPE/
STOP key once to stop the charge process
1 Number of cell
2 Elapsed time
3 Charge current
4 Supplied capacity
5 Current voltage battery
IT - Modalità di carica di Storage
Questo metodo di carica, per batterie al litio è usato prima del stoccaggio a
lungo termine, ad esempio, per una carica in modo ottimale, prima della pausa
invernale. A tal ne, si raccomanda che la batteria abbia tale tensione di celle:
3,75 V per Lilo, 3,85V per LiPo e 3,30 V per LiFe .
Dopo che questo sotto-menu di programmi di carica delle batterie al litio viene
impostato con il pulsante ’Status ’ viene mostrato il seguente display. In ques-
to menu si possano programmare in modo già descritto, la corrente di carica e
il numero di celle da caricare.
Sul display di lavoro sono indicati i valori di carica come negli altri processi con
batterie al litio. Premendo il pulsante ’Start/Enter’ inizia il processo di carica.
Con il pulsante ’Batt-Type/Stop’ la modalita´Storage può essere interrotto in
qualsiasi momento.
1 Tipo e Nr. di celle
2 Tempo di ricarica
3 Corrente di carica/scarica
4 Tensione attuale della batteria
5 Capacità di carica
GB - Storage control of Lithium battery
This function is for charging/discharging batteries which are not used at once.
This program is designed for charging or discharging of batteries of specic
original state.They are classied by types: 3.75 V LiIo, 3.85 V LiPo and 3.3
V LiFe. The program will begin to discharge if the original state of the battery
exceeds the voltage level of storage.
At this screen,you can set up the current and voltage of the battery pack.
Charging and discharging will make the batteries come to the voltage level
of“storage“state.
This screen shows the real-time status charging.Press BATT TYPE/STOP key
once to stop the charge process.
1 Number of cell
2 Elapsed time
3 Charge or discharge current
4 Supplied capacity
5 Current voltage battery
1
1
1
2
2
2
3
3
3
4
4
4
5
5
5
IT - Scaricare celle al litio
Con l´caricatore si po’ anche scaricare batterie al litio, per esempio per indivi-
duare la capacità rimanente dopo l uso.
Dopo che questo sotto-menu viene impostato si po’ inserire come già descritto,
la corrente di scarica e il numero di celle. Premendo il pulsante ’Start/Enter’ in-
izia il processo di scarica. Con il pulsante ’Batt-Type/Stop’ la modalità di carica
po’ essere interrotto in qualsiasi momento.
Sul display di lavoro sono indicato i attuali valori di scarica di corrente (numero
di celle, corrente di carica, tensione corrente della batteria, modalità di scarica,
il tempo trascorso e la capacità di scarica ad ora scaricata) esattamente come
appaiono nelle altre operazioni di batterie al litio.
1 Tipo e Nr. di celle
2 Tempo di ricarica
3 Corrente di scarica
4 Tensione attuale della batteria
5 Capacità di carica
GB - Discharging of Lithium battery
The value of discharge current on the left can not exceed 1C,and the value
on the right can not be under the voltage recommended by the manufacturer
to avoid deep discharging.Press START/ ENTER for more than 3 seconds to
start charging.
This shows the real-time status of discharging,you can press BATT TYPE/
STOP key to stop discharging.
1 Number of cell
2 Elapsed time
3 Discharging current
4 Battery voltage
5 Discharged capacity
- +
Status
Stop /
Bat.Type
Start/
Enter > 3 sec.
IT - Überwachtes Be- und Entladung mit der Balancer-Funktion
Sia durante la carica sia durante la scarica di batterie al litio si consiglia
usare la funzione bilanciatrice del caricatore. Per questo è necessario che
la batteria sia collegata con il Port-bilanciatore del caricatore. Cosi il pro-
cessore sorveglia le singole celle e stabilisce la tensione. Se la tensione
di una o più celle ha delle anomalie durante un processo, il caricatore in-
terrompe il processo e segnala l´errore sul display. Spesso il motivo è una
cella difettosa o una saldatura/ un collegamento improprio.
Sul display viene segnalato se la software riconosce una cella con la tensi-
one troppo bassa. Con il pulsante ’Status ’ si po’ attivare un altro display
che segnala la tensione di ogni singola cella. Nell’esempio la cella 4 ha una
tensione troppo bassa.
GB - Voltage balancing and monitoring in the discharge
process
The processor monitors voltage of each cell when the battery packs are
during its “storage“ and „discharging“ process. To achieve this feature,plug
each battery to the charger individually. If voltage of any cell is abnormal,B6
will show error message and terminate the program forcibly. So if there
is battery damage or disconnection, you can see the error message and
press Status to know which cell is damaged.
The processor detects voltage of one cell is too low. The 4th cell was dama-
ged. The value of voltage may be zero if disconnection occurs.
Status

8
IT - Caricare celle NiMH e NiCd
Questa funzione carica batterie NiMH- e NiCd. Sono disponibili una versio-
ne automatica e una manuale. Nella modalità ’Aut’-Modus deve essere, per
motivi di sicurezza, solo il limite superiore di corrente di carica. Il processore,
rispettando il valore, cerca la corrente ideale. Impostare la soglia in modo che
le cellule non possono essere danneggiati, altrimenti il processore potrebbe
caricare una corrente troppo alta per batterie con celle con una capacità bas-
sa. In modalità manuale (‚MAN‘), si usa la corrente di carica, che è stato pro-
grammato con il ’ Status ’.
operazioni di programmazione e le indicazioni sui valori di carica sul display
di lavoro corrispondono esattamente a quelli in modalità litio. Importante da
sapere e´: Il cambio modo (‚AUT‘ a ‚MAN‘ o viceversa) avviene premendo con-
temporaneamente ’ Status ’ e il pulsante ‚DEC‘ mentre il display lampeggia.
La modalità attiva viene visualizzata sulla riga superiore.
Con il pulsante ’Batt-Type/Stop’ la carica può essere interrotto in qualsiasi mo-
mento. Se viene interrotto il processo in questo modo le batterie non sono
completamente cariche. La ne della carica, viene segnalato sul display e
inoltre viene emesso un segnale acustico.
1 Tipo e Nr. di celle
2 Tempo di ricarica
3 Corrente di carica
4 Tensione attuale della batteria
5 Capacità di carica
GB - Charging of NiCd/NiMH battery
This program is for charging and discharging of NiCd/NiMH batteries associa-
ted with R/C models applications.You can press START/ENTER key to make
it blink and then Status to change the parameter value.Press START/
ENTER key to store the value.
This program charge the battery using the current you set up.In the
„auto“state,you should set up the upper limit of the charge current to avoid
damage by excessive feeding current.Some batteries of low resistance
and capacity can lead to higher current in the“auto“charging mode. But in
the manual mode,it will charge with the current you set. You can make it blink
in the current eld and press Status at the same time to switch mode.
The screen shows the real-time status. Press BATT TYPE/STOP key to end the
program.The sound will emitted to indicates the end of program.
1 Battery type
2 Elapsed time
3 Charge current
4 Battery voltage
5 Charged capacity
IT - Scaricare celle NiMH e NiCd
Questa funzione scarica batterie NiMH e NiCd. La programmazione include
l’impostazione della corrente di scarica da 0,1 a 1,0 A , come anche la rego-
lazione della tensione di carica verso la ne della carica (Impostazioni da 0,1
no a 25,0 V) Dopo l´attivazione di questa funzione viene mostrato il seguente
display. Se la corrente di scarica e la tensione di scarica verso la ne sono
state impostate correttamente con il pulsante ’ Status ’, si attiva il processo
di scarico premendo per 3 secondi il pulsante ’Start/Enter’.
Sul display di lavoro appaiano tutti i valori del processo di scarica in corso. Con
il pulsante ’Batt-Type/Stop’ la scarica può essere interrotto in qualsiasi momen-
to. Considerate pero che se viene interrotto il processo, le batterie non sono
completamente scariche. La ne del processo viene segnalato sul display e
inoltre con un segnale acustico.
1 Tipo e Nr. di celle
2 Tempo di ricarica
3 Corrente di scarica
4 Tensione attuale della batteria
5 Capacità di scarica
GB - Discharge of NiCd/NiMH battery
Set charge current on the left and the nal voltage on the right. Range of the
charge current is 0.1-1.0A;range of nal voltage is 0.1-25.0V. Press START/
ENTER key for more than 3 seconds to start the program.
The screen indicates the discharging state.You can press START/ENTER key
to alter discharge current.Press START/ENTER again to store the value. Press
BATT TYPE/STOP key to stop discharging. The emitted sound alerts the end
of discharging
1 Battery type
2 Elapsed time
3 Discharge current
4 Battery voltage
5 Discharged capacity
12
3
45
1
2
3
4
5
- +
Status
- +
Status
- +
Status
Stop /
Bat.Type
Stop /
Bat.Type
Stop /
Bat.Type
Start/
Enter
Start/
Enter
Start/
Enter
> 3 sec.
> 3 sec.
> 3 sec.
- +
Status
- +
Status
IT - Processi ciclici
Questa funzione serve a formare nuove batterie NiMH- e NiCd e anche per
fare riprendere la piena potenza alle batterie dopo un lungo periodo di inuti-
lizzo. In questo menu si po’ inoltre impostare l´ordine dello svolgimento dei
processi (DCHG > CHG o CHG > DCHG). Si po’ decidere se un ciclo inizia
con un processo di scarico o carico. Cosi viene ssato se alla ne dei cicli
abbiamo una batteria carica o scarica. Inoltre si po’ prede nire la quantità dei
cicli da svolgere da 1 a 5. Nelle impostazioni di base è possibile tra ogni fase
impostare anche una pausa.
Dopo l´attivazione di questa funzione è visibile il seguente display. Se sono
impostati correttamente la sequenza desiderata, il numero di cicli, e la corrente
tramite il pulsante ’ Status ’, si po’ avviare il ciclo premendo 3 sec. Il pul-
sante ’Start/Enter’.
Sul display di lavoro sono visualizzati i valori correnti del processo attualmente
in corso ciclico. Nella foto sopra è visibile un programma di scarico (D> C).
1 Tipo e Nr. di celle
2 Tempo di ricarica
3 Corrente di carica
4 Tensione attuale della
5 Capacità di carica
Il processo può essere interrotto in qualsiasi momento con il pulsante ’Batt-
Type/Stop’. La ne del ciclo è segnalata da un segnale acustico. Alla ne di un
programma sono indicate la capacità caricata e quella scaricata. Premendo il
tasto ’ Status ’, sono visualizzati i risultati dei singoli cicli.
GB - Charge/discharge and discharge/charge cycle of NiCd/NiMH battery
You can set up sequence on the left and the number of cycles on the right.
You can balance,refresh and bread-in the battery with this function.You can
set a temporary cool-o procedure in the use‘s setting. Range of the cycle
number is 1-5.
Press BATT TYPE/STOP key to stop program,you can press START/ ENTER
key to alter charge current.The sound indicates the end of program.
When it approaches to the end,you can see the capacity of the battery being
charged or discharged.You can press Status key to display result of each
cycle.
1 Number of cell
2 Elapsed time
3 Charge or discharge current
4 Battery voltage
5 Charge or discharge capacity
1
23
4
5
- +
Status

9
- +
Status
- +
Status
Stop /
Bat.Type
Stop /
Bat.Type
Start/
Enter
Start/Enter
Start/
Enter
> 3 sec.
> 3 sec.
- +
Status
- +
Status
IT - Caricare celle al piombo
Con questo programma si possano trattare batterie al piombo. Qui si possano
sia caricare sia scaricare batterie con una tensione da 2 a 20 V (1-10 celle).
Usare 1/10 di corrente della capacità della batteria è il modo migliore per cari-
care questo tipo di batteria.
Dopo l’attivazione di questa funzione e da impostare l’intensità della corrente
(Amperaggio) ed i numeri delle celle (Voltaggio).
Il processo di carica viene avviato nel modo conosciuto con il pulsante ‚Start /
Enter‘ (3 secondi).
Sul display di lavoro sono indicati tutti i soliti parametri del processo. Con il
pulsante ’Batt-Type/Stop’ la carica può essere interrotto in qualsiasi momento.
Considerate pero che se viene interrotto il processo, le batterie non sono com-
pletamente cariche. La ne del processo viene segnalato sul display e inoltre
con un segnale acustico.
1 Tipo e Nr. di celle
2 Tempo di ricarica
3 Corrente di carica
4 Tensione attuale della batteria
5 Capacità di carica
GB - Charging of the Pb battery
This program is only suitable for charging Pb (lead-acid) battery with nominal
voltage from 2 to 20 V. Pb (lead-acid) battery is completely dierent from NiCd/
NiMh battery. These batteries can only deliver current lower in comparison to
their capacity. The same restriction applies to the charging process. Conse-
quently, the optimum charge current can only be 1/10 of the capacity. Pb batte-
ry can not be used for fast-charging, please follow
the instructions provided by the battery manufacturer.
You can press START/ENTER key to make it blink and alter the value of para-
meters using Status , press START/ENTER key to store the value.
Set up the charge current on the left and nominal voltage on the right Range
of current is 0.1 - 5.0 A, the voltage should match the battery being charged.
Press START/ENTER key for more than 3 seconds to start charging.
The screen displays the real-time discharging status.Press START/ ENTER
key to alter discharge current.Press START/ENTER key again to store the pa-
rameter value you set.Press BATT TYPE/STOP key to end the program.
1 Battery type
2 Elapsed time
3 Charge current
4 Battery voltage
5 Charged capacity
IT - Scaricare celle al piombo
Per scaricare batterie al piombo deve essere attivata questo menu. Dopo aver
richiamato questa funzione, il display mostrato appare. Deve essere la corren-
te nell‘intervallo di 0,1 A a 1,0 A e il numero programmato di cellule.
Se la corrente di scarica e il numero di celle è stato impostato correttamente
con il pulsante ’ Status ’, si attiva il processo di scarico premendo per 3
secondi il pulsante ’Start/Enter’. Sul display di lavoro sono indicati i soliti para-
metri per un processo di scarico. Con il pulsante ’Batt-Type/Stop’ la scarica può
essere interrotto in qualsiasi momento.
Considerate pero che se viene interrotto il processo le batterie non sono com-
pletamente scariche. La ne del processo viene segnalato sul display e inoltre
con un segnale acustico. Le batterie al piombo non hanno memoria, e per
questo motivo non richiedono processi di formazione (carico o scarico) Questo
processo non è disponibile nella modalità Pb.
1 Tipo e Nr. di celle
2 Tempo di ricarica
3 Corrente di carica
4 Tensione attuale della batteria
5 Capacità di scarica
GB - Discharging of the Pb battery
Set up the charge current on the left and nominal voltage on the right. Range
of discharge current is 0.1-5.0A,the voltage should match the battery being
charged. Press START/ENTER key for more than 3 seconds to start charging.
The screen displays the real-time discharging status.Press START/ ENTER
key to alter discharge current.Press START/ENTER key again to store the pa-
rameter value you set.Press BATT TYPE/STOP key to end the program.
1 Battery type
2 Elapsed time
3 Discharge current
4 Battery voltage
5 Discharged capacity
1
2
3
4
5
1
2
3
4
5
IT - Gestione memoria
Il caricatore ore 5 memorie per impostazioni diversi con i quali si possano re-
gistrare i dati, delle batterie spesso usate, sotto un elenco di numeri progressivi
(01 a 05). Cosi si attivano i dati in un modo molto confortevole, senza doverli
riprogrammare. La gestione della memoria possiede due funzioni. E´ possibile
salvare i dati con il pulsante (SAVE DATA) ma anche a caricarli con il pulsante
(LOAD DATA).
Salvare i dati delle batterie
Premendo il ‚pulsante „Start / Enter si arriva alle impostazioni.
Nella prima fase, come già sopra indicato, possano essere impostato i
seguenti parametri per le batterie.
1 Tensione 2 Posto di programma
3 Capacità di carica 4 Tipo di cella
Nella seconda fase si imposta la corrente massima di carico manualmente o
in automatico.
Nel prossimo display si programmi i stessi dati per un processo di scarico.
Nella prossima fase si programma le impostazioni per processi ciclici.t.
Dopo le varie selezioni, il pulsante ‚Start /Enter viene premuto per almeno
3 secondi. In questo modo si attiva il salvataggio.
Sul display appare la scritta ’Save’. Il pulsante ’ Status’ permette di tornare
indietro di un livello nel menu.
GB - Data storage program
For your convenience, X-Peak 80 BAL V2 has a data storage and load pro-
gram. It can store ve battery data representing the respective specications
of batteries. You can call back the data when charging or discharging without
setting up the program again.Press START/ENTER key to make it blink, and
use Status to set up the parameter.
Data storage
Setting of the parameter in the screen will not aect the charge and dischar-
ge process. They just present the specication of the battery. The example is
NiMH battery pack,including 12 cells,the capacity is 3000mAh.
Set up the charge current in the manual mode,or current limit in the auto mode.
Press INC and DEC key simultaneously to make the current eld blink to switch
the charge mode.
1 Voltage 2 Data number
3 Capacity 4 Type of battery
Set up the discharge current and nal Voltage.
Set up the charge/discharge sequence and cycle number.
Saving the data
12 3 4
- +
Status
- +
Status
- +
Status
- +
Status
Start/Enter > 3 sec.
- +
Status
Stop/Bat.Type Start/Enter > 3 sec.
Status Status
Status

10
IT - Caricare i dati della batteria
Con questa scelta, i dati di un’altra batteria possono essere caricati dalla me-
moria del caricatore.
Dopo l´attivazione di questa funzione viene mostrato il seguente display.
Premendo il‘tasto „Start / Enter si raggiunge il livello di selezione.
Nel prossimo menu si po’ scegliere lo spazio di memoria desiderata. Dopo la
selezione, il‘Start / Enter viene premuto per 3 secondi e cosi si caricano i dati
desiderati.
I display si presentano come sotto indicato.
GB - Load data program
This program is to load the data stored at the“save data“program.Press
START/ENTER key to make the data eld blink and press INC or DEC for
more than 3 seconds to load the data.
Choose the data number you want to call back.The data you want to call back
will be displayed.
Loading the data.
Start/Enter
Start/Enter
Start/
Enter
> 3 sec.
IT - Altri indicatori di valori
Con questa scelta si possono caricare dati di una batteria da una delle
memorie.
Visualizzazione del livello di tensione della batteria al termine di un processo.
Visualizzazione della massima capacità registrata nelle preferenze.
Visualizzazione della massima capacità registrata nelle preferenze.
Assegnazione dell’USB / Ports di temperatura.
La funzione USB non è disponibile con questo carica-batterie.
Visualizzazione della temperatura della batteria, solo se si utilizza un
sensore di temperatura
Visualizzazione della tensione d’ingresso.
Visualizzazione di tensioni delle singole celle di batterie al litio.
La batteria è collegata ad ogni attacco tramite un cavo; è possibile control-
lare la tensione di ogni cella del pacco batterie. Quando il cavo è collegato
ai connettori a destra del caricabatterie, il programma visualizza la tensione
no a 6 batterie. Il pacco batteria richiede un connettore di uscita collegato a
ciascuna cella.
GB - Various information in the program
You can inquire variors information on the LCD screen during the charging
and discharging process. Press Status’ key, the charger will display user‘s
setting. You can press ’Status ’ key to monitor voltage of each cell while the
battery is connected with each port of the charger:
It comes to the nal voltage when the program ended.
Indication of the max. capacity preset in the presettings.
Display of the max. process time specied in the presettings
3-pin connector is selected to be the USB port.
For this charger the USB function is not available.
The external temperature is displayed when the temperature probe is used.
Present input voltage
Display of the single cell voltages of a lithium battery.
The battery is connected with each port through cable; you can check voltage
of each cell in the battery pack. When the cable is connected with the ports on
the right of the charger, the program will display voltage of up to 6 batteries.
The battery pack needs an output connector connected with each cell.
Status
Status
Status
Status
Status

11
IT - Segnalazioni d´errore
Il caricatore fornisce una serie di messaggi di errore. Tutte le segnalazioni di
errore vengano accompagnato da un segnale acustico. L‘allarme visivo e acu-
stico può essere disattivato premendo qualsiasi tasto dopo che l‘errore è stato
corretto o la batteria è stata scollegata.
Il collegamento della batteria è stato invertito.
Nel circuito di carica è un’interruzione.
Cortocircuito
La tensione d’ingresso supera i valori accettabili.
Impostazione errate della quantità di celle delle batterie Li.
Errore sconosciuto, scollegare immediatamente l‘unità dalla fonte di
alimentazione.
Il numero di celle in una batteria al litio è troppo basso.
Il numero di celle in una batteria al litio è troppo alto.
Una cella di una batteria al litio ha una tensione troppo bassa.
Una cella di una batteria al litio ha una tensione troppo alta.
Collegamenti disturbati nel circuito di carica.
Il caricatore è troppo caldo, lasciarlo rareddare.
Si è vericato un grave errore, il caricabatterie deve essere riparato
GB - Warning and orror information
X-Peak 80 BAL V2 incorporates a variety of functions for the systems to verify
processes and the state of the electronics. In case of an error the screen will
display the cause of error and emit an audible sound.
Incorrect polarity connected.
Battery connection is interrupted.
Short-circuit of the output termination.
Erroneous selection of voltage of Lithium pack, please check the voltage of
the battery pack.
The voltage of the battery pack has been selected incorrectly!
The charger has malfunctioned for some reason. Seek professional
advice.
The voltage is lower than which is set. Please check the nubmer of cells in
the battery pack.
The voltage is higher than which is set. Please check the number of cells in
the battery pack.
Voltage of one cell in the battery pack is too low, please check the voltage of
each cell.
Voltage of one cell in the battery pack is too high, please check the
voltage of each cell.
Wrong connection of the connector detected; please check the connector and
cable.
The internal temperature is too high, please cool down.
The processor cannot control the feeding current, please repair it.

Irrtum und technische Änderungen vorbehalten. Copyright JAMARA e.K. 2022
Kopie und Nachdruck, auch auszugsweise, nur mit Genehmigung von JAMARA e. K.
All rights reserved. Copyright JAMARA e.K. 2022
Copying or reproduction in whole or part, only with the expressed permission of JAMARA e.K.
JAMARA e.K.
Inh. Manuel Natterer
Am Lauerbühl 5 - DE-88317 Aichstetten
Tel. +49 (0) 75 65/94 12-0 - Fax +49 (0) 75 65/94 12-23
[email protected] ● www.jamara.com
Service - Tel. +49 (0) 75 65/94 12-777
service@ jamara.com
IT - Istruzioni per lo smaltimento
Apparecchi elettrici non devono essere smaltiti nei riuti domestici, ma devono essere
smaltiti separatamente. Siete obbligati di rimuovere le batterie e portare l´apparecchi
elettrici vecchi ai punti di raccolta comunali. Qualora ci sono dati personali sul apparec-
chio elettrico, devono essere rimossi da voi stessi.
GB - Disposal restrictions
Electrical appliances must not be disposed of in domestic waste and must be disposed of separately.
You are obliged to take out the batteries, if possible, and to dispose of the electrical equipment at
the communal collection points. Should personal data be stored on the electrical appliance you must
remove them by yourself.
IIT - struzioni per la sicurezza
• Vi preghiamo di leggere attentamente le istruzioni e Istruzioni per la sicurezza prima di
usare il modello.
• Questo prodotto non è destinato ad essere utilizzato da persone (bambini compresi) con
capacità siche limitate, con limitazioni sensoriale o mentali oppure mancanza di esperienza e/o
di conoscenza. A meno che siano sorvegliate da una persona responsabile della loro sicurezza
o ricevano istruzioni su come usare il prodotto in modo corretto. Bambini devono essere super-
visionati per assicurare che non giocano con l’apparecchio.
• I bambini devono essere sorvegliati per assicurarsi che non giochino con l‘apparecchio.
• Solo per uso interno.
• Il caricabatteria si può scaldare durante l´utilizzo e va posizionato in modo che il calore può
essere scaricato in modo adeguato.
• Proteggere il caricatore da polvere, sporcizia, umidità e raggi di sole diretti.
• Dopo l‘uso, prima scollegare il caricabatteria dalla presa di corrente e poi scollegate le batterie.
• Non appoggiate mai il caricabatterie e le batterie su super ci inammabili. Inoltre il caricabatterie
va sempre sorvegliato durante l’uso.
• Evitate assolutamente sopracarichi e cortocircuiti e fate attenzione alla polarità.
• Non caricate o scaricate mai batterie ancora calde subito dopo il primo uso. Fatele sempre
rareddare prima.
• Caricate o scaricate sempre solo una confezione di batterie a volta. Si possano usare insieme
solo prodotti dello stesso fornitore e della stessa potenza.
• Girare in nessun caso, batterie per la ricarica e la scarica in parallelo.
• Non caricate o scaricate mai batterie che sono direttamente collegate a un circuito elettronico,
scollegare la batteria quando non è disponibile un interruttore.
• Quando si collega la batteria, sempre collegare prima il cavo di ricarica al dispositivo e poi
collegare la batteria.
• Non caricate mai batterie rotte o danneggiate.
• Si prega di rispettare sempre le informazioni fornite dal produttore della batteria.
• Il caricabatterie ´solo adatto per la carica e scarica delle batterie ricaricabili indicati (vedi dati
tecnici)
• Non aprite il caricabatterie per nessun motivo per ripararlo. E` pericoloso e inoltre decade
qualsiasi diritto di garanzia. Per riparazione mandate l´articolo direttamente al nostro servizio di
assistenza.
GB - Safety Information
• Whenever you operate your charger the following safety instructions must be followed.
• This device is not intended for use by individuals (including children) with reduced physical
sensory, mental abilities, lack of experience and / or knowledge, unless they are supervised in
how the device is to be used.
• Children should be supervised to ensure that they do not play with the appliance.
• Only for indoor use.
• The charger may get hot in use, position the unit so that the heat can dissipate.
• Never expose the charger to moisture or direct sun light.
• After use always disconnect the unit from the mains and unplug any batteries.
• Never leave the charger unattended when in use, and always operate it on a re proof surface.
• Avoid short circuits at all costs. Always observe the correct polarity.
• Batteries should always be allowed to cool down before you charge or discharge them.
• Only charge or discharge packs containing cells from the same manufacturer and of the same
capacity.
• Do not connect packs in parallel to charge or discharge them.
• Always disconnect the pack from any electronic system (ESC etc.) before attempting to charge
it.
• Connect the charging cable to the charger rst and then to the battery.
• Never try to charge/discharge damaged packs or cells.
• Follow the directions given by the battery manufacturer.
• The charger may only be used to charge / discharge the types of cells listed in the technical
specications.
• Do not open the unit. This will void the guarantee and may be dangerous. If the charger is
damaged or faulty, return it our service department for repair.
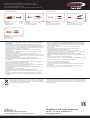
IT - Accessori raccomandati
GB - Accessories
No. 332057 MPX
Cavo di ricarica Deluxe
Charging lead Deluxe
No. 332058 LiPo
Deans cavo di ricarica Deluxe
Deans Charging lead Deluxe
No. 091114
Cavo di ricarica BEC con spina a banana
BEC charging lead with banana plug
No. 332059
Cavo di ricarica XT60
Charging lead XT60
No. 332051
Tam cavo di ricarica cavo caricatore
Tam charging lead with lead gold
-
 1
1
-
 2
2
-
 3
3
-
 4
4
-
 5
5
-
 6
6
-
 7
7
-
 8
8
-
 9
9
-
 10
10
-
 11
11
-
 12
12


Jamara 153059 Manuale utente
- Categoria
- Caricabatterie per auto
- Tipo
- Manuale utente
in altre lingue
- English: Jamara 153059 User manual
Documenti correlati
Altri documenti
-
MULTIPLEX Multicharger Ln 6015 Equ Manuale del proprietario
-
-
-
-
LRP 41420 Manuale utente
-