Jamara 153059 Manuale utente

Categoria
Caricabatterie per auto
Tipo
Manuale utente
ES - Dichiarazione di conformità
Por la presente JAMARA e.K. dichiara che il prodotto „Cargador X-Peak 80 BAL V2, No.
153059“ cumplen con las Directivas 2014/30/UE, 2014/35/UE e 2011/65/UE.
Il testo integrale della dichiarazione di conformità UE è disponibile al seguente indirizzo
Internet: www.jamara-shop.com/Conformity
GB - Certicate of Conformity
Hereby JAMARA e.K. declares that the product „Charger X-Peak 80 BAL V2, No. 153059“
complies with Directive 2014/30/EU, 2014/35/EU and 2011/65/EU.
The full text of the EU Declaration of Conformity is available at the following Internet
address: www.jamara-shop.com/Conformity
Cargador | Charger
X-Peak 80 BAL V2
No. 153059
ES - Instruccion
GB - Instruction
ES - Información general
JAMARA e.K. no se hace responsable de los daños causados al producto en sí o por medio de
esto, a menos que esto se debe al mal funcionamiento o errores de manejo. El cliente solo tiene la
responsabilidad completa para el uso y manejo adecuado, incluyendo, sin limitaciones, el montaje,
el proceso de carga, el uso de hasta la elección de la zona de aplicación. Por favor, consulte las
instrucciones de uso y funcionamiento, contiene información y avisos importantes.
GB - General information
JAMARA e.K. is not liable for any damage caused to the product itself or through this, provided this
is due to improper operation or handling errors. The Customer alone bears the full responsibility for
the proper use and handling, including without limitation, the assembly, the charging process, the
use and choice of the operation area. Please refer to the operating and user instructions, it contains
important information and warnings.
ES - Lea atentamente la instruccion completa y seguridad antes de poner el modelo
en funcionamiento.
Atención! Leer completamente las notas de advertencia / instrucciones de
seguridad estos son para su seguridad y puede evitar accidentes / lesiones
GB - Read the complete instructions and security instructions carefully before using the
model.
Caution! Please fully and carefully read warnings/ safety instructions. These
are for our own security and can avoid accidents/injuries.
21/22
ES - Datos tecnicos:
Input AC 100 - 240 V; 50 Hz; 0,84 - 0,35 A; 84 W
DC 11 - 18,0 V; 5 - 7,2 - 4,55 A; 80 W
Output LiIon/LiPo/LiFePo: 1 - 6
NiCd/NiMH: 1 - 15
Pb 2V ~ 20 V
Corriente de carga max. 80 W, 0,1 ~ 6,0 A
Corriente de descarga max. 10 W, 0,1 ~ 2,0 A
Corriente de balancador 300 mAh/Célula
Dimension 136 x 113 x 63 mm
Peso 639 g
GB - Technical data:
Input AC 100 - 240 V; 50 Hz; 0,84 - 0,35 A; 84 W
DC 11 - 18,0 V; 5 - 7,2 - 4,55 A; 80 W
Output LiIon/LiPo/LiFePo: 1 - 6
NiCd/NiMH: 1 - 15
Pb 2V ~ 20 V
Charging current max. 80 W, 0,1 ~ 6,0 A
Discharge current max. 10 W, 0,1 ~ 2,0 A
Balance current 300 mAh/cell
Dimensions 136 x 113 x 63 mm
Weight 639 g
ES - Highlights:
Adaptador Dual Power AC/DC 230V y 11 - 18V
• Balancador encorporado en Lithium
• Equilibrador individual para la descarga de las baterías
• El modo de memoria más rápida para varios tipos de bateías
• Máxima seguridad
Automática protección de sobretensiones
• Corriente de entrada de supervisión
• Capacidad de Limite
• Proceso de límite de tiempo
• Visulización de carga de la capacidad
• Compatible con litio, NiMh, NiCD y baterías de plombo
• 5 posiciones de memoria
• Ventilador activo
GB - Highlights:
• Dual Power Built-in AC Adapter 230V and 11 - 18V
• Internal independent lithium battery balancer
• Individually balanced battery discharge
• Fast and storage model for various type of battery
• Maximum safety
Automatic charging current limit
• Input power monitoring
• Capacity limit
• Proscessing time limit
• Load capacity display
• Supports Lithium, NiMh, NiCd and Lead battery packs
• 5 memory locations
• Active fan
ES - Contenido de el kit:
• Cargador
• Cable de carga: BEC, Tamiya, Conector de alta tensión LiPo Bujía, Pinzas de cocodrilo, Placa
equilibrador, Cable de alimentación para fuente de alimentación de 12 V, Cables de alimentación
• Instrucciones
GB - Box content:
• Charger
• Charging lead: BEC, Tamiya, LiPo high-current plug, Crocodile clips,
Balancer board 12 V for power supply, Supply cable, Power cable
• Instructions
2
ES - Características especiales
Balancador encorporado en Lithium
Especialmente útil es el balanceador incorporado activos que pueden trabajar con hasta seis ele-
mentos de litio. La carga de estas baterías es cómodo y seguro. No es necesario conectar un
equilibrador separado para la carga.
Bilancador individual
Durante el proceso de descarga, X-Peak 80 BAL V2 puede controlar y equilibrar cada celda de la
batería de forma individual. Mensaje de error se indicará y el proceso será terminado automática-
mente si la tensión de que exista sólo una célula es anormal.
Utilizable para varios tipos de bateías de litio
Como ya le hemos comentado trabaja a la perfección con los más novedosos elementos de Litio,
tales como los elementos de Iones de Litio-hierro-fosfato (LiFePO4).
El modo de memoria rápida
Propósitos para cargar diferentes tipos de baterías, „rápida“ carga reducir la duración de la carga,
mientras que „almacén“ estado puede controlar el voltaje  nal de la batería, así como para almace-
nar FO un largo tiempo y proteger el tiempo útil de la batería.
Máxima seguridad
Delta-Peak sensibilidad: El cargador controlar el voltaje en la batería durante la carga. Cuando el
voltaje de carga de la batería se alcanza o supera, el dispositivo se apaga automáticamente.
Automática protección sobretensiones
Se puede establecer el límite superior de la corriente de carga para recargar su batería de NiCd o
NiMH tipo de batería. Esto es útil para NiMh con menor capacidad en el modo de carga automática.
Capacidad de Limit
Por razones de seguridad, la capacidad de carga se controla. El tiempo de carga („Safety‘-tempo-
rizador) se controla constantemente. Si la capacidad de carga excede el valor máximo, el proceso
se termina automáticamente.
Particolarità
Control de la temperatura con programación de corte*
En el cargador hay un sensor de temperatura que puede infectarse. Entonces, la temperatura de la
batería puede variar hasta 80° C, tener cuidado.
* Esta función no es sólo a través de la conexión de un sensor de temperatura opcional
(Ref. 153057) es posible, se incluye.
Proceso de límite de tiempo
Para evitar posibles errores, también se puede cargar manualmente programieren tiempo.
Corriente de entrada de supervisión
Por lo tanto, no llega a una descarga profunda, la batería del coche de la tensión de entrada del
cargador es monitoreada continuamente. Si se alcanza el límite, el cargador pasa automáticamente
detiene el proceso.
Visulización de carga de la capacidad
El cargador está conectado a una instalación de almacenamiento equipado de hasta 5 baterías. En
cada memoria, está los datos de un paquete de baterías. Depósito este, que es rápidamente clave
en su acceso a la batería, elimina una gran medida de programación.
Cíclica de carga / descarga
1 a 5 cíclico y continuo proceso de carga> descarga o carga y descarga>es operable para la ba-
tería refrescante y equilibrado para simular la actividad de la batería. Por favor, consulte los datos
técnicos.
GB - Special features
Internal independent lithium battery balancer
The Charger has an integrated balancer connection for the included Balander board (up to 6-cell
lithium). It isn‘t necessary to connect an external balancer for balance charging.
Balancing individual cells battery charging/discharging
During the process of discharging, the charger can monitor and balance each cell of the battery in-
dividually. Error message will be indicated and the process will be ended automatically if the voltage
of any single one cell is abnormal.
Adaptable to various type of lithium battery
Charger is adaptable to various types of Lithium batteries, such as Li-ion, LiPo and LiFe series of
batteries.
Fast and storage mode of lithium battery
Purposes to charge dierent battery types, „fast“ charge reduce the duration of charging, whereas
„store“ state can control the nal voltage of your battery, so as to store fo a long time and protect
useful time of the battery.
Maximum safety
Delta-peak sensitivity: the automatic charge termination program based on the principle of the Delta-
peak voltage detection. When the battery‘s voltage exceeds the threshold, the process will be ter-
minated automatically.
Automatic charging current limit
You can set up the upper limit of the charging current when charging your NiCd or NiMh battery. It is
useful for the NiMh battery of low impendance and capacity in the „Auto“ charging mode.
Capacity limit
The charging capacity is always calculated as the charging current multiplied by time. If the charging
capacity exceeds the limit, the process will be terminated automatically when you set the maximum
value.
Special features
Temperatur monitoring with programmable cut-o *
The battery‘s internal chemical reaction will cause the temperature of the battery to rise. If the tem-
perature limit is reached, the process will be terminated.
* This function is available by connecting optional temperatur probe (Ord. No. 153057), which is not
included in our package.
Processing time limit
You can also limit the maximum process time to avoid any possible defect.
Input power monitoring
To portect the car battery used as DC input power from being damaged, its voltage keeps being
monitored. If it drops below the lower limit, the process will be ended automatically.
Data store/load
The maximum ve batteries‘ data can be stored for users‘ convenience. You can keep the data
pertaining to program setting of the battery of continuous charging or discharging. Users can call out
these data at any time without any special program setting.
Cyclic charging / discharging
1 to 5 cyclic and continuous process of charge>discharge or discharge>charge is operable for bat-
tery refreshing and Balancing to simulate the battery‘s activity.
3
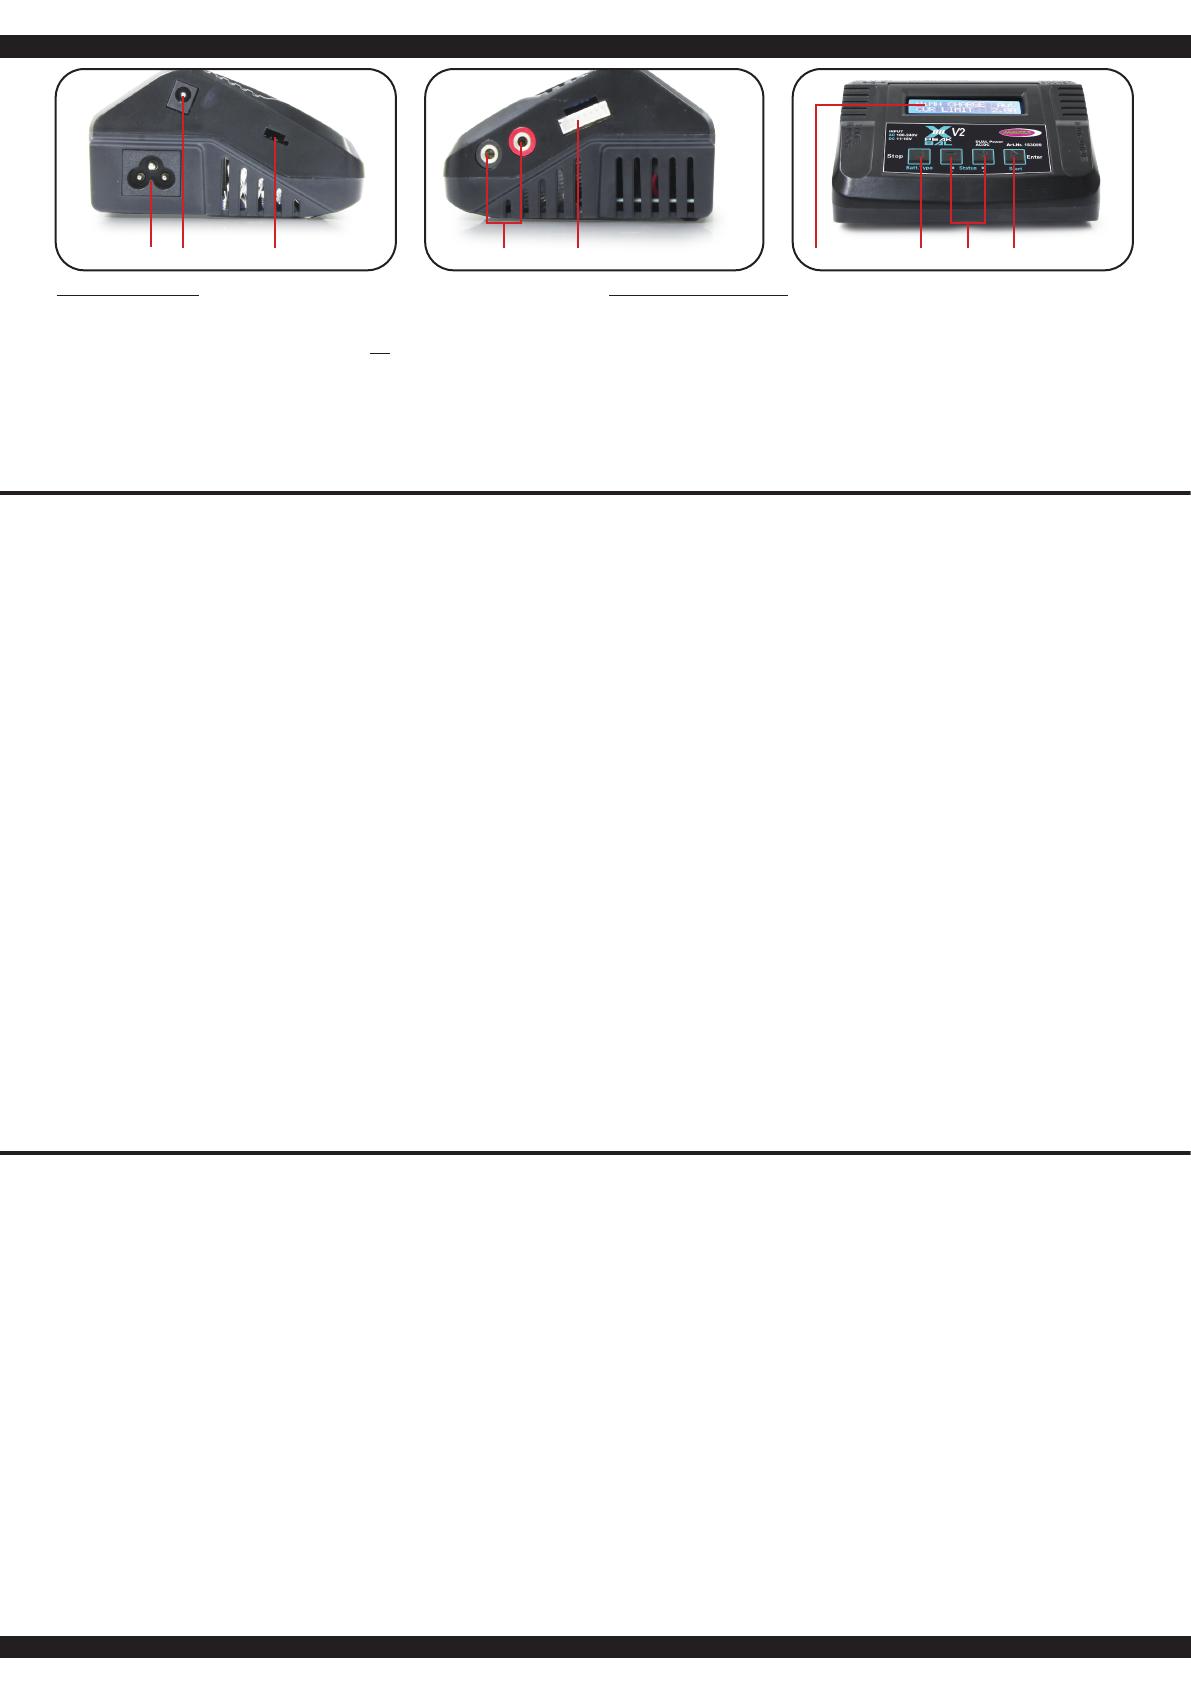
ES - Conexiones y teclas
1 Ingresso 230 V
2 Ingresso 11 - 18 V
3 Collegamento per il sensore di temperatura (Sensore non è incluso nel kit di consegna)
4 Porta di ricarica - rosso = più (+) | nero = meno (-)
5 Attacchi di bilanciatore (1 - 6)
6 LED Display
7 Batt. Type = Se utiliza para seleccionar los tipos de batería
Interrumpe el proceso de carga
8 Status - / + = Cambio de modo
Disminución o aumento de un valor.
9 Start / Enter = Inicio del proceso de carga
Para conrmar las opciones del menú
GB - Connections and Controls
1 230 V AC Input
2 11 - 18 V DC Input
3 Temperature sensor socket (sensor not included)
4 Output charge lead - red = plus (+) | black = minus (-)
5 Balancer lead sockets (1 - 6)
6 LED screen
7 Batt. Type = Scroll through the Main Menu
Stop any charge processes
8 Status - / + = After values
See the status of individual cells in balance charge mode
9 Start / Enter button = Resume or start charge processes.
Conrm an action.
3457
6 8 9
1 2
ES - Puesta en marcha del cargador
El cargador puede ser alimentado de dos maneras distintas, pero no simultáneamente. Dispone de
la posibilidad de obtener la energía de una toma de corriente casera, un enchufe, o bien de una
batería de automóvil o de una fuente de alimentación estabilizada de 12 V.
Conecte el cargador a la toma de alimentación seleccionada. Si lo conecta a una toma de alimen-
tación de 12 V y corriente continua debe comprobar que la polaridad sea la correcta. Conecte la
pinza de cocodrilo roja con el polo positivo (+), y la negra con el negativo (-), de la batería o fuente
de alimentación.
Cuando la puesta en marcha, aparece „Charge Discharge“ Durante este tiempo, el procesador com-
prueba el cargador de batería y fuente de alimentación. Si se produce un fallo, por ejemplo, porque
la tensión de entrada está por debajo de 10 V o 18 V, un mensaje correspondiente aparecerá en la
pantalla y un zumbido. Si ese es el caso debe veri car la fuente de alimentación.
Notas importantes!
Nunca mezclar las dos fuentes de energía, el cargador se puede dañar.
Asegúrese de utilizar el programa de carga correcto (litio, NiMh, plomo, etc.) para cada
batería. Intentar cargar una batería con un programa de carga no compatible puede causar
graves daños a la batería y al cargador. Existe riesgo de incendio o explosión. Si no está
seguro del programa de carga que debe utilizar para su batería, póngase en contacto con
el fabricante de la misma o con nuestro servicio de atención al cliente.
El cargador es capaz de cargar de forma desequilibrada baterías de litio multicelulares en
condiciones controladas cuando se selecciona el programa de carga adecuado. La
carga desequilibrada de las baterías de litio multicelulares es responsabilidad del usuario.
Se desaconseja encarecidamente y se recomienda que las baterías de litio multicelulares
se carguen siempre de forma equilibrada. Una carga desequilibrada puede provocar una
desviación del voltaje de las celdas, lo que puede hacer que la batería envejezca más
rápidamente y, en el peor de los casos, puede dañar gravemente la batería. Existe riesgo
de incendio o explosión.
La conexión a la batería de GE cargada o descargada aparece por dos códigos de colores hembril-
las de 4 mm. Conecte la batería con estas tomas. Cuando conectada – en continuación, la terminal
positiva de la batería que corresponde a la roja (+) y la terminal negativa de la batería con el negro
(-). Utilice sólo el cargador de alta calidad.
Cuando se carga o descarga una batería de litio, debes usar para la seguridad necesariamente
la función de balanceador de los cargador. Es la única forma que las células de litio queden bien
protegidas contra una falta de tratamiento.
Cuidado con los terminales y el equilibrador de la batería con el cargador. Si el puerto balanceador
no se utiliza, una carga o descarga se lleva a cabo sin el control de la tensión de celda individual.
Además, el voltaje de las células individuales no se pueden mostrar.
GB - Using your charger for the rst time
The X-Peak 80 BAL V2 is tted with 2 power inputs which gives you the choice of powering the unit
from the household mains supply (220 V AC) or via 12 V DC. The 12 V DC can be either a vehicle
battery or a stabilised transformer (11 - 18V).
Connect the charger to an input of your choice, if using 12 V pay particular attention to the polarity.
The red crocodile clip must be connected to the plus pole (+) and the black clip to the minus pole (-).
After connection the charger will display „Charge Discharge“ whilst a self test is conducted. If an
error is encountered, for example if the input voltage is outside the allowed range of 11-15 V, a mes-
sage will be displayed and the buzzer will sound. Disconnect the power supply and rectify the fault.
Important notes!
Never connect both power inputs simultaneously as this will destroy the charger!
Make sure to use the correct charging programme (Lithium, NiMh, Lead etc.) for the
respective battery! Attempting to charge a battery with a non-compatible charging
programme can cause serious damage to the battery and charger. There is a risk of re
or explosion! If you are not sure which charging programme to use for your battery, please
contact the manufacturer of the battery or contact our customer service.
The charger is capable of unbalanced charging of multi-cell lithium batteries under
controlled conditions when the appropriate charging programme is selected. Unbalanced
charging of multi-cell lithium batteries is at your own risk. We strongly advise against this
and recommend that multi-cell lithium batteries are always charged balanced. Unbalanced
charging can lead to cell voltage drift which can cause the battery to age more quickly and
in the worst case can severely damage the battery. There is a risk of re or explosion!
Battery packs to be charged or discharged are attached to the charger via 2 colour coded banana
sockets using a good quality charging cable. Make sure that the plus (+) pole of the battery is con-
nected to the red socket on the charger and that the minus (-) pole of the battery is connected to the
black socket of the charger.
When charging or discharging Lithium packs, always use the balancer function of the charger. This
will not only provide protection for your cells, but also ensure maximum eciency and long life.
To do so, you must connect both the charging cable and the balancer plug/socket. Not doing this
will result in the individual cells not being protected and you will not be able to monitor the individual
cell voltage in the display.
ES - Estructura del menú del cargador
Después de conectar el cargador a la fuente de alimentación los últimos ajustes se queda en la últi-
ma memoria utilizada, haciendo que se convierta en activa. La misma batería puede ser reutilizada
dando dados de alta, a penas deberás realizar el cambio de lo que deseas. El último modo de
carga se muestra.
Por un cambio de la conguración debe ser establecido primero a que tipo de batería deserá carga-
da o descargada. Utilizarás, la tecla „BATT TYP/STOP“‚se puede usar repetidamente hasta que la
pantalla aparezca el tipo de batería deseado, empiezará a parpadear. Los tipos de baterías están
dispuestos uno detrás del otro.
Si el botón „Start/ENTER“ se pulsa, inicia el ajuste de parámetros, por ejemplo la corriente de carga
empieza a parpadear. Al pulsar el ’Status - / + ’, este valor puede ser cambiado si lo desea.
Cuando la batería está conectada, la operación programada puede ser iniciada presionando la tecla
‚Enter‘. Cuando todo se haya completado correctamente y no hay presente una batería defectuosa,
el proceso comienza. En caso de fallo, se acompaña de una señal auditiva, recibirá un mensaje
de error. Durante una carga o descarga de los datos más importantes se muestran en la pantalla.
El siguiente cuadro muestra la estructura del menú completo del cargador X-Peak 80 BAL V2:
GB - Menu Structures
Having connected the charger to a power supply, the last settings used will be displayed. If you are
going to charge/discharge the same pack, no settings need to be changed. The last used mode will
be displayed.
If a dierent pack is to be charged/discharged the setting must be changed, starting with the battery
type. To do this, press the ‘Batt.Typ/Stop’ button until the correct battery type ashes in the display.
This menu option is an endless loop.
The displayed battery type is conrmed by pressing the ‚Start/Enter‘ button. If you wish, each key
press is conrmed by a brief acoustic signal.
Pressing the ’Start/Enter’ button allows the user to access the various parameters which can be
changed, for example the charging current. The ’Status - / + ’ buttons are used to change the
values.
Once a battery pack has been connected, the selected operation can be started by pressing the
’Start/Enter’ button for 3 seconds. Providing that the battery is not damaged and correctly connec-
ted, the selected operation will begin. If a problem is encountered, a warning bleep will sound and
a warning message displayed. When operationing the charger will display the relevant information.
The following program ow chart shows the complete menu structure of the X-Peak 80 BAL V2:
4
ES - Estructura del menú GB - Menu Structures
Programa de las baterías litio
Program select - Lithium battery
Programa de las baterías NiMh
Program select - NiMH battery
Programa de las baterías NiCd
Program select - NiCd battery
Programa de las baterías de plomo
Program select - Pb battery
Programa de la memoria
Program select - Save Data
Seleccione el programa almacenado
Program select - Load Data
De nido por el usuario del
programa
User Set Program
Guardar conguración
Save Data
Programa almacenado de carga
Load Data
Lixx carga
Lixx charge
NiMh carga - Auto./Manual
NiMH charge - Auto. / Man.
NiCd carga - Auto./Manual
NiCd charge - Auto. / Man.
Timer seguridad
Safety Timer
Carga/descargada alto
CHg>Dchg Waste Time
Lixx Tipo
Lixx V. Type
El plomo carga
Pb battery charge
Lixx balanceo de carga
Lixx - Balance
NiMh - descarga - Auto./Manual
NiMH - discharge - Auto. / Man.
NiCd - descarga- Auto./Manual
NiCd - discharge - Auto. / Man.
Capacidad de corte
Capacity Cut-o
Temperatura de cierre -
USB habilitado
Temp Cut-o - USB Enable
LiPo/Lilo/LiFe
tiempo de detección
LiPo/Lilo/LiFe CHk Time
El plomo descargada
Pb battery - discharge
Lixx - descargar
Lixx - Discharge
Lixx de carga rápida
Lixx - Fast charge
NiMH - ciclica
NiMH - cycle
NiCd - ciclica
NiCd - cycle
Input advertencia de tensión
Input Power Low Cut-o
Botones y pitidos
Key Beep Buzzer
NiCd unidad de carga de altura
NiCd D. Peak Sensitivity
NiMh unidad de carga
NiCd D. Peak Sensitivity
Lixx - memorizar
Lixx - Storage
Start / Enter
Start / Enter
Start / Enter
Start / Enter
Start / Enter
Start / Enter
Start / Enter
Status -
Status +
Status -
Status +
Status -
Status +
Status -
Status +
Status -
Status +
Status -
Status +
Status -
Status +
Stop / Bat.Type
Stop / Bat.Type
Stop / Bat.Type
Stop / Bat.Type
Stop / Bat.Type
Stop / Bat.Type
Status -
Status +
Status - Status +
Status - Status +
Status - Status +
Status - Status +
Status -
Status +
Status -
Status +
Status -
Status +
Status -
Status +
Status -
Status +
Status -
Status +
ES - Atención!
Predeterminado, el cargador está preprogramado para los ajustes del usuario. Cuando se
conecta a una batería de 12V por primera vez, la siguiente información se muestra en la pan-
talla una tras otra y el usuario puede cambiar los parámetros.
Si necesita cambiar el valor del parámetro en el programa, pulse el botón "Start / Enter" para
que parpadee y, a continuación, cambie el valor con el botón „Status -“ o „Status + “. El
valor deseado se memoriza pulsando una vez el botón "Start / Enter".
GB - Warning
As default this charger will be set to typical user settings when it is connected to a 12 V battery
for the rst time. The screen displays the following information in sequence and the user can
change the parameter on each screen.
If you need to alter the parameter value in the program, press „Start/Enter“ key to make it
blink then change the value with „ Status -“ or „Status + “ key. The value will be stored by
pressing „Start/Enter“ key once
5
ES - Ajuste de los parámetros
Menú para seleccionar los tipos de baterías de litio:
LiFe = 3,3 V; LiIo = 3,6 V; LiPo = 3,7 V
Es fundamental, que el tipo de batería sea colocada correctamente antes
de empiezar el proceso, las células se pueden dañar
El cargador está equipado con una detección automática del número de célu-
las de Li-pilas. Con demasiadas descargadas de las células, el resultado de
la medición puede ser erróneo. Este menú, por lo tanto puede establecer un
tiempo de constante revisión, en el número de serie de Li-células, y corregir
si es necesario. Normalmente, un valor predeterminado de 15 minutos. Sobre
todo la batería de alta capacidad dura un buen tiempo.
En estos dos menús para las baterías de NiMH y NiCd está programado. El
rango es entre 5 y 20 mV. Cuanto más alto sea el valor se establece, al máxi-
mo, las baterías, pero por la sobrecarga de posibles, se reduce el tiempo de
vida. La con guración predeterminada es 12 mV para NiCd y 7 mV con NiMH.
En el lado izquierdo del cargador hay un conector de 3
pines utilizado como conexión para un sensor de tempera-
tura (no incluido). Cuando la temperatura se muestra en la
pantalla, puede utilizar el sensor de temperatura opcional
para conectarse a la supercie de la batería. La pantalla
muestra un puerto USB con discapacidad.
La temperatura máxima de la batería se puede ajustar
durante la carga. El proceso se termina automáticamente
para proteger la batería cuando la temperatura de la ba-
tería alcanza estos valores. Esta función se consigue me-
diante un sensor de temperatura (opcional, no incluido).
Atención!
Conecte el cable del sensor de temperatura (no incluido), tal como se muestra.
No enchufes el cable invertido. El cargador o el sensor de temperatura se
podría dañar
Este menú puede ser un período de espera entre una decisión y una carga al
nal de un ciclo. Marca cuanto el tiempo se enfría la batería. El rango de ajuste
es entre 1 y 60 minutos.
Cuando se inicia el proceso de carga, el temporizador de seguridad integrado
se pone en marcha al mismo tiempo. Si no se detecta un error o el circuito de
terminación, este dispositivo está programado para evitar sobrecargas. Con-
sulte las instrucciones de la sección "Cálculo de los valores predeterminados
del temporizador de seguridad (Safety Timer)" para calcular el temporizador
que ha congurado.
En ese marco posue la màxima capacidad para programar. Esta posibilidad
aumenta la seguridad de la carga o descarga, por lo que no signica que las
células se dañan. Una vez que se alcanza el umbral, el proceso de carga se
naliza.
Este submenú se puede con gurar para que cada vez que uno de los botones,
emita al nal de una operación una señal acústica.
La batería del coche se controla por el software para evitar una descarga pro-
funda. Si la tensión es inferior al valor establecido por el usuario, el programa
se apagará automáticamente para proteger la batería.
GB - Specication of the parameters
The screen shows the nominal voltage of Lithium battery.There are three
kinds of Lithium battery:
LiFe = 3,3 V; LiIo = 3,6 V; LiPo = 3,7 V
This is very important so you have to check the battery carefully and set
it up correctly. If it is dierent from correct value the battery can explode
during charge process.
To avoid from erroneous setting by users. The X-Peak 80 BAL V2 detects the
cell count of Lithium battery automatically at the beginning of charge or di-
scharge process. But deeply discharged battery can be perceived incorrectly.
To avoid this error, the time can bye set to verify the cell count by the processor.
Normally, 15 seconds are enough to detect the cell count correctly. You need
to extend the time term limit for the battery of large capacity. But the charge or
discharge process can may come to an end within the time term because of
the time limit decided by the wrong count if you set too long time limit for the
battery of small capacity. This may cause fatal error. You have to extend the
time term if the processor detect the cell count incorrctly at the beginning of
charge or discharge process. Otherwise, default value is recommended to use.
This shows the trigger voltage for automatic charge termination of NiMH and
NiCd battery. The valid value ranges from 5 to 20 mV per cell. Setting the
trigger voltage higher brings a danger of overcharging; whereas setting it lower
brings a possibility of premature termination. Please refer to the techincal spe-
cication of the battery. (NiCd default: 12 mV, NiMH default: 7 mV).
On the left side of the charger is a 3-pin port used as a
connection for a temperature sensor (not included).
If the screen displays temperature, you can use the
optional temperature probe to connect to the surface of
the battery. The USB function is not available for this
charger.
The maximum temperature of the battery can be set du-
ring the charge process. The process will be terminated
automatically to protect battery once the temperature of
battery reaches this values. This feature is accomplished
through temperature probe (optional, not supplied).
Attention!
Plug the temperature sensor cable (not supplied) only as shown. Plug the cable
not reverse polarity. Your charger or the temperature sensor can be damaged.
The battery become warm after cyclec of charge/discharge process. The
program will insert a time delay after each charge/discharge process to allow
the battery enough time to cool down before beginning next cyle of charge/
discharge process. The valid value ranges from 1 to 60 minutes.
When the charge process starts, the integral safety timer starts to run simulta-
neously. If error detected or the termination circuit can not detect whether the
battery is fully charged or not, this unit is programmed to prevent overcharging.
Please refer to the below statement to calculate the timer you set.
This program provides maximum capacity protection function. If the Delta peak
voltage can not be detected or the saftey timer times out, the charge process
will stopp automatically, when the battery reaches the user-set maximum char-
ge capacity.
The beep to conrm userts operation sounds every time a button is pressed.
The beep or melody sounds at various times during operation to conrm die-
rent mode change. These functions can be switched on or o.
This funktion monitors the voltage of the input battery used to power this char-
ger. If the voltage is lower than user-set value, the program will end forcibly to
protect the input battery.
- +
Status
- +
Status
- +
Status
- +
Status
- +
Status
- +
Status
- +
Status
- +
Status
- +
Status
- +
Status
- +
Status
Status
Status
Status
Status
Status
Status
Status
Status
- +
Status
- +
Status
Status
Status
6
ES - Almacenan las células de litio
Después de Activación con el botón ’Batt-Type/Stop’‚en el Li-programa de la
entrada en la fase de programación, pulse el botón ‚Start / Enter‘. La pantalla
pondrá batería LiPo, como se ha dicho. Izquierda en la primera línea muestra
el tipo de células activadas. En la segunda línea, la corriente de carga que
puede variar desde 0,1 a 5,0. A y el voltaje de la celda o el recuento de células
(1-6) a la ’Status ’ se programado la tecla.
Si todos los valores predeterminados están bien ajustados, o la misma batería
se debe cargar de nuevo como antes, debe iniciar pulsando el botón Start /
Enter „por lo menos 3 segundos”. La pantalla muestrará para dar continuedad.
Después se muestreará la salida de la pantalla de trabajo. Mostrando toda la
información importante disponible que usted hizo. El tipo celular y el númerol
(1), tipo de carga de corriente (2), voltaje de la batería de tareas (3), tiempo de
carga (4) y la capacidad de carga (5).
Para nalizar el proceso de carga, pulse el botón „Batt-Type/Stop ‚botón. Sin
embargo, la batería está totalmente cargada.
GB - Charging of lithium battery
The left side of the rst line shows the type of battery you choose. The value
on the left of the second line of the charger is current user set. After setting the
current and voltage, press START/ENTER key for more than 3 seconds to start
the process.(charge current: 0.1-5.0A,voltage:1-5V).
This displays the number of cells you set up and the processsor detects. „R“
shows the number of cells detected by the charger and “S“ is the number of
cells set by you at the previous screen. If both numbers are identical you can
start charging by press START/ENTER button. If not,press BATT TYPE/STOP
button to go back to previous screen to carefully check the number of cells of
the battery pack before going ahead.
This screen shows the real-time status during charge process.
Press BATT TYPE/STOP key once to stop the charge process.
1 Number of cell
2 Charging time
3 Charging current
4 Battery voltage
5 Charged capacity
ES - Cálculo de los requisitos de seguridad del temporizador:
Al cargar las baterías de NiCd o NiMH, dividir la capacidad de la corriente de carga, el resul-
tado que luego se divide por el factor 11.9. El resultado  nal se obtiene el tiempo de carga
en cuestión de minutos
Ejemplo
• 1.000 mAh / 1,2 A corriente de carga / factor 11,9 = 70 minutos como escenario
• 2.000 mAh / 2,0 A corriente de carga / factor 11,9 = 84 minutos como escenario
• 3.300 mAh / 3,3 A corriente de carga / factor 11,9 = 92 minutos como escenario
GB - Safety Timer Calculations
When charging NiCd or NiMH batteries, divide the battery‘s rated capacity (mAh) by the
charge current (A). And divide the result by 11.9.
For example:
• 1.000 mAh Capacity / 1,2 A Current / Safety timer setting, divided by 11,9 = 70 minutes
• 2.000 mAh Capacity / 2,0 A Current / Safety timer setting, divided by 11,9 = 84 minutes
• 3.300 mAh Capacity / 3,3 A Current / Safety timer setting, divided by 11,9 = 92 minutes
- +
Status
- +
Status
Stop /
Bat.Type Start/
Enter> 3 sec.
Start/
Enter
1
2
1
3
4
5
ES - Las células de litio con balanceador de carga
Con las células de lítio es necesario el uso de balanceadores para la carga
y descarga de las células. El cargador posue un equilibrador integrado y no
necesita un equilibrador de puerto conectado a la batería.
Es como se muestra en la pantalla. El proceso de programación es el mis-
mo que se describió anteriormente. Con el ’ Status o la carga de la clave
Status’ cuenta actual y se puede establecer la celda.
Si todos los valores predeterminados están bien ajustados, o la misma batería
se debe cargar de nuevo como antes, debe iniciar pulsando el botón Start /
Enter „por lo menos 3 segundos”. La pantalla muestrará para dar continuedad.
Después se muestreará la salida de la pantalla de trabajo. Mostrando toda la
información importante disponible que usted hizo. El tipo celular y el número
(1), tipo de carga de corriente (2), voltaje de la batería de tareas (3), tiempo de
carga (4) y la capacidad de carga (5).
Para detener una carga, pulsar el botón ‚Batt-Type/Stop‘. Sin embargo, la
batería está totalmente cargada.
GB - Charging Lithium battery in the Balance mode
This function is for balancing the voltage of Lithium-polymer battery cells while
charging. In the balance mode, the battery needs to have a balance lead to
connect to the individual port at the right side of the charger. And you need to
connect the battery‘s output plug to the output of charger.
Charging in this mode is dierent from the normal modes, because the built-in
processor monitors voltage of individual cell and control input current fed into
each cell to normalize the voltage.
The value on the left side of the second lines sets the charge current. The
value on the right side of the second lines sets the battery pack‘s voltage.After
setting current and voltage, press START/ENTER for more than 3 seconds to
start the process.
This displays the number of cells you set up and the processor detects. “R“
shows the number of cells detected by the charger and “S“ is the number of
cells set by you at the previous screen. If both numbers are identical you can
start charging by press START/ENTER button. If not, press BATT TYPE/STOP
button to go back to previous screen to carefully check the number of cells of
the battery pack before going ahead.
This screen shows the real-time status during charge process. Press BATT
TYPE/STOP key once to stop the charge process.
1 Number of cell
2 Charging time
3 Charging current
4 Supplied capacity
5 Current voltage battery
ES - Diagrama de conexión
La ilustración muestra la conguración el puerto equilib-
rador. El cargador, viene con un puerto equilibrador equi-
pado, el sistema de conector Jamara (XH). Si, la batería
está equipada con un estándar diferente, usar uno ad-
aptador adecuado de nuestra gama..
GB - Individual cell connection diagram
The illustration opposite shows the conguration of the
balancer connector. The charger is provided with a balan-
cer port after Jamara connector system (XH). Your battery
should be provided with a dierent norm, use suitable ad-
apters from our range.
1
2
3
4
5
- +
Status
- +
Status
Start/
Enter
Stop / Bat.Type Start/ Enter > 3 sec.
7
- +
Status
- +
Status
Stop /
Bat.Type
Stop /
Bat.Type
Start/
Enter
Start/
Enter
> 3 sec.
> 3 sec.
- +
Status
- +
Status
- +
Status
ES - El modo de carga rápida
Este modo de carga rápida para las baterías de litio se usa para evitar inne-
cesariamente larga espera para el nal de la carga. Durante el procedimiento
de carga normal, se toma el segundo cargo a la sección de carga, la cons-
tante tensión de carga tarda mucho tiempo, y no hace nada para aumentar
la capacidad.
n el modo de carga rápida de la última sección se reduce, el proceso de carga
y termina más rápidamente, pero la batería no está del todo completa. Una
vez que este menú se ha establecido los programas de carga de litio con la
’Status ’INC‘-clave, aparecerá en la pantalla. En este menú en la forma ya
descrita, aparecerá la corriente de carga y el número de células para ser pro-
gramado.
Se muestran los valores de la misma carga número de células (1), tiempo de
carga (2), corriente de carga (3), el modo de carga; transcurrido el tiempo de
carga (4) y hasta ahora la capacidad de carga (5) como las operaciones de
carga de litio y otros representados.
Con el botón Start / Enter ‚en el proceso de carga se ha iniciado. Con el botón
„Batt-Type/ Stop, la carga puede ser interrumpida en cualquier momento.
GB - Fast charging of Lithium battery
Charging current will become lower when it progress to the end of charging.A
specic CV process will be reduced to end the charging process earlier.In
fact,the charging current will goes to 1/5 when the charging process comes to
1/10.Charging capacity will be a little smaller than normal charging,but char-
ging time will be shortened accordingly.
You can set up the charging current and voltage of the battery pack Press
START/ENTER key to display voltage conrmation.Then press START/ENTER
key again to conrm and begin to charge.
This screen shows the real-time status of“fast charging“.Press BATT TYPE/
STOP key once to stop the charge process
1 Number of cell
2 Elapsed time
3 Charge current
4 Supplied capacity
5 Current voltage battery
ES - Modo de almacenamiento de carga
Este modo de carga para las baterías de litio se usa para protegerse de un
almacenamiento prolongado, por ejemplo para las vacaciones de invierno para
cargar de forma óptima. Por eso, se recomienda este propósito que la batería
use un voltaje de la célula de 3,75 V a Lilo, 3.85V para LiPo y 3.30 V, para la
vida de la carga, le sugerimos estés voltajes para el periodo de invierno.
Una vez que este menú se ha establecido los programas de carga de litio
con la ’Status ’ -clave, aparecerá en la pantalla. En este menú, la forma ya
descrita, el número corriente de carga y el de las células será programado.
En la pantalla de carga de trabajo se presentan todos los valores para la carga
de litio y otros procesos. Con el botón Start / Enter el proceso de carga se ha
iniciado.
Con el botón „Batt-Type/Stop, el almacenaje de la carga se puede inter-
rumpir en cualquier momento.
1 Número de células
2 Tiempo de carga
3 Carga o descarga de la batería
4 Modo de carga
5 Capacidad de carga
GB - Storage control of Lithium battery
This function is for charging/discharging batteries which are not used at once.
This program is designed for charging or discharging of batteries of specic
original state.They are classied by types: 3.75 V LiIo, 3.85 V LiPo and 3.3
V LiFe. The program will begin to discharge if the original state of the battery
exceeds the voltage level of storage.
At this screen,you can set up the current and voltage of the battery pack.
Charging and discharging will make the batteries come to the voltage level
of“storage“state.
This screen shows the real-time status charging.Press BATT TYPE/STOP key
once to stop the charge process.
1 Number of cell
2 Elapsed time
3 Charge or discharge current
4 Supplied capacity
5 Current voltage battery
1
1
1
2
2
2
3
3
3
4
4
4
5
5
5
ES - Litio células de descarga
Con el cargador también puede baterías de litio son dados de alta, por ejemplo
determinar la capacidad residual después de la operación.
Una vez que el menú correspondiente se ha activado en varias ocasiones se
describe la forma de descarga, y también se pueden especicar el número
de células. Con el botón „Batt-Type/Stop, la carga se interrumpe en cualquier
momento. Con el botón Start / Enter, el proceso de descarga se inicia.
El trabajo muestra la tasa de aprobación de la gestión actual (número de célu-
las, el modo de carga de corriente, voltaje de la batería actual de descarga; el
tiempo de descarga transcurrido y capacidad de descarga hasta el momento
al igual que se muestra otras operaciones de lítio.
1 Número de células
2 Tiempo de carga
3 Descarga de la batería
4 Modo de carga
5 Capacidad de carga
GB - Discharging of Lithium battery
The value of discharge current on the left can not exceed 1C,and the value
on the right can not be under the voltage recommended by the manufacturer
to avoid deep discharging.Press START/ ENTER for more than 3 seconds to
start charging.
This shows the real-time status of discharging,you can press BATT TYPE/
STOP key to stop discharging.
1 Number of cell
2 Elapsed time
3 Discharging current
4 Battery voltage
5 Discharged capacity
- +
Status
Stop /
Bat.Type
Start/
Enter > 3 sec.
ES - Encuadramiento de carga y descarga con la función de equilibrador
Tanto durante la carga y descarga de a batería de litio, el cargador cubre el
uso de balance en la función. Esto requiere una conexión de la batería al
puerto equilibrador del cargador. Luego, el procesador controla las células
individuales, que trata de aproximar los niveles de tensión. Si la tensión
de una o más células anormales se cambia durante una operación, el car-
gador interrumpe el proceso actual con un mensaje de error. La causa ge-
neral es que una célula puede estar defectuosa o para buscar una unión de
soldadura o conexión impropia.
Esta pantalla aparece cuando se detecta el software a una celda con la
baja tensión. El botón ’Status ’ puede activar otra pantalla en la que se
muestran las tensiones de las células individuales.
En el ejemplo, 4. La célula tiene un nivel de tensión demasiado baja.
GB - Voltage balancing and monitoring in the discharge
process
The processor monitors voltage of each cell when the battery packs are
during its “storage“ and „discharging“ process. To achieve this feature,plug
each battery to the charger individually. If voltage of any cell is abnormal,B6
will show error message and terminate the program forcibly. So if there
is battery damage or disconnection, you can see the error message and
press Status to know which cell is damaged.
The processor detects voltage of one cell is too low. The 4th cell was dama-
ged. The value of voltage may be zero if disconnection occurs.
Status
8
ES - Níquel células de carga
Esta función se utiliza para cargar las baterías de NiMH o NiCd. Aquí hay un
modo automático y un modo manual. En el modo ‚Aut‘, por razones de seguri-
dad, sólo se pretende el límite superior a la corriente de carga. El procesador
determina teniendo en cuenta este valor, la corriente de carga óptimizada.
Establecer el límite para que no se dañen las células, porque podría suceder
que en una célula baja de capacidad del procesador, no aguentara la corriente
de carga.
En el modo manual („Man“), los ujos decorriente de carga, el programa se
puede programar con las teclas ’ Status ’.
Todas las operaciones de programación y la visualización de los valores de
carga se muestreará en la pantalla de trabajo correspondente exactamente
con los en el modo de litio. Es importante saber: el cambio de modo („Aut“
a „Man“ o viceversa) se realiza pulsando simultáneamente las teclas ’Status
’ y el botón de ’ Status’, que aparecen en el modo activo actual, que se
encuentra en la línea superior.
Con el botón „Batt-Type/Stop, la carga se puede interrumpir en cualquier mo-
mento. Recuerde que la batería no está completamente cargada. El nal de la
carga se detecta en la pantalla y una señal acústica.
1 Tipo de batería
2 Tiempo transcurrido
3 Corriente de carga
4 Voltaje de la batería
5 Capacidad de carga
GB - Charging of NiCd/NiMH battery
This program is for charging and discharging of NiCd/NiMH batteries associa-
ted with R/C models applications.You can press START/ENTER key to make
it blink and then Status to change the parameter value.Press START/
ENTER key to store the value.
This program charge the battery using the current you set up.In the
„auto“state,you should set up the upper limit of the charge current to avoid
damage by excessive feeding current.Some batteries of low resistance
and capacity can lead to higher current in the“auto“charging mode. But in
the manual mode,it will charge with the current you set. You can make it blink
in the current eld and press Status at the same time to switch mode.
The screen shows the real-time status. Press BATT TYPE/STOP key to end the
program.The sound will emitted to indicates the end of program.
1 Battery type
2 Elapsed time
3 Charge current
4 Battery voltage
5 Charged capacity
ES - Níquel células de alta
Está función se utiliza para la descarga directa de las baterías de NiMH o
NiCd. La programación incluye el establecimiento de la corriente de descarga
en el rango de 0,1 a 1,0 A, y la especi cación de voltaje de carga del circuito
de la batería (ajustable de 0,1 a 25,0 V).
Después de activar esta función, se muestra en la pantalla. Si, hay un buen
desempeño se ajusta al voltaje de la descarga con la ’Status ’ o el botón de
Status’, la descarga con el „Inicio / Enter ‚se activará (3 segundos).
La pantalla de trabajo se muestra todos los valores del proceso de aprobación
de la gestión actual. Con la tecla ‚Batt-Type/Stop‘ , la descarga puede ser
interrumpida en cualquier momento. Recuerde que la batería no se descarga
completamente. El proceso nal se informa en la pantalla y con una señal
acústica.
1 Tipo de batería
2 Tiempo transcurrido
3 Corriente de descarga
4 Voltaje de la batería
5 Capacidad de carga
GB - Discharge of NiCd/NiMH battery
Set charge current on the left and the nal voltage on the right. Range of the
charge current is 0.1-1.0A;range of nal voltage is 0.1-25.0V. Press START/
ENTER key for more than 3 seconds to start the program.
The screen indicates the discharging state.You can press START/ENTER key
to alter discharge current.Press START/ENTER again to store the value. Press
BATT TYPE/STOP key to stop discharging. The emitted sound alerts the end
of discharging
1 Battery type
2 Elapsed time
3 Discharge current
4 Battery voltage
5 Discharged capacity
1
2
3
45
1
2
3
4
5
- +
Status
- +
Status
- +
Status
Stop /
Bat.Type
Stop /
Bat.Type
Stop /
Bat.Type
Start/
Enter
Start/
Enter
Start/
Enter
> 3 sec.
> 3 sec.
> 3 sec.
- +
Status
- +
Status
ES - Procesos cíclicos
Esta función se utiliza para NiMH totalmente nuevo o pilas NiCd „para cargar,
sino también las baterías para un uso prolongado o en el periodo de invierno
para traer de vuelta hasta su máxima capacidad. En este menú, se dan el or-
den de las secuencias (DCHG> CHG o CHG> DCHG). Es posible determinar
si un ciclo debe comenzar con una descarga o carga. Esto también determi-
nará si hay después de los ciclos una descarga la batería. Además, el número
de ciclos se dan en 1 a 5 en la congu ración básica. Es posible que la persona
que utilize el aparato pueda especi car una fase de pausa.
Después de activar esta función, se muestra en la pantalla. Puede ser
establecido el orden deseado y el número de ciclos, y el poder con el ’Status
o el botón de ’ Status’, el ciclo de uso debe ser „Inicio / Enter para
empezar (3 segundos).
La pantalla se presenta todos los valores actuales del proceso cíclico. En la
imagen de arriba es solamente una descarga activa (D> C).
1 Tipo de batería
2 Tiempo transcurrido
3 Corriente de carga o descarga
4 Voltaje de la batería
5 Capacidad de carga
El proceso puede parar pulsando la tecla ‚Batt-Type/Stop‘ en cualquier mo-
mento.
El nal del ciclo se indica mediante una señal acústica. Tras el nal de todo el
proceso, los egresados y su capacidad de carga se muestra. Por Presione la
tecla ’Status ’ o el botón de ’ Status’, el resultado de los ciclos individuales
se muestran.
GB - Charge/discharge and discharge/charge cycle of NiCd/NiMH battery
You can set up sequence on the left and the number of cycles on the right.
You can balance,refresh and bread-in the battery with this function.You can
set a temporary cool-o procedure in the use‘s setting. Range of the cycle
number is 1-5.
Press BATT TYPE/STOP key to stop program,you can press START/ ENTER
key to alter charge current.The sound indicates the end of program.
When it approaches to the end,you can see the capacity of the battery being
charged or discharged.You can press Status key to display result of each
cycle.
1 Number of cell
2 Elapsed time
3 Charge or discharge current
4 Battery voltage
5 Charge or discharge capacity
1
23
4
5
- +
Status
9
- +
Status
- +
Status
Stop /
Bat.Type
Stop /
Bat.Type
Start/
Enter
Start/Enter
Start/
Enter
> 3 sec.
> 3 sec.
- +
Status
- +
Status
ES - Células de carga de plomo
Con este punto del programa se pueden tratar las baterías de plomo ácido.
Esta batería puede con una tensión de 2 a 20 V (1 a 10 células) tanto de carga
y descarga. Las baterías de plomo ácido son los mejores carga con una corri-
ente de 1 / 10 de la capacidad de la batería, se carga rápidamente.
Después de habilitar esta característica se pueden especi car, la intensidad
de la corriente y el número de células. El proceso de carga se inicia con el
‚Start / Enter‘ (3 segundos).
En la pantalla de trabajo se muestran todos los parámetros habituales corre-
spondientes del proceso. Con el tipo „Batt /STOP„, el cargo será interrumpido
en cualquier momento. Recuerde que la batería puede no estar ser plenamen-
te cargada. El proceso nal se informa en la pantalla y una señal acústica.
1 Número de células
2 Tiempo de carga
3 Carga de la batería
4 Modo de carga
5 Capacidad de carga
GB - Charging of the Pb battery
This program is only suitable for charging Pb (lead-acid) battery with nominal
voltage from 2 to 20 V. Pb (lead-acid) battery is completely dierent from NiCd/
NiMh battery. These batteries can only deliver current lower in comparison to
their capacity. The same restriction applies to the charging process. Conse-
quently, the optimum charge current can only be 1/10 of the capacity. Pb batte-
ry can not be used for fast-charging, please follow
the instructions provided by the battery manufacturer.
You can press START/ENTER key to make it blink and alter the value of para-
meters using Status , press START/ENTER key to store the value.
Set up the charge current on the left and nominal voltage on the right Range
of current is 0.1 - 5.0 A, the voltage should match the battery being charged.
Press START/ENTER key for more than 3 seconds to start charging.
The screen displays the real-time discharging status.Press START/ ENTER
key to alter discharge current.Press START/ENTER key again to store the pa-
rameter value you set.Press BATT TYPE/STOP key to end the program.
1 Battery type
2 Elapsed time
3 Charge current
4 Battery voltage
5 Charged capacity
ES - Células de alta de plomo
Este menú está habilitado para usar las baterías de plomo-ácido. Después
de poner esta función, se muestreará en la pantalla. La inten sidad de la cor-
riente debe de tener el rango de 0,1 A a 1,0 A y el número de células a ser
programado.
Para la corriente de descarga y el número de células con el ‚Status ’ o juego
de llaves ’ Status‘, comenza con el botón Start/Enter‚(3 segundos). La pan-
talla de trabajo se muestran todos los parámetros habituales de descarga. Con
el botón „Batt-Type/Stop ‚, la descarga puede ser interrumpida en cualquier
momento.
Recuerde que la batería no se descarga completamente. El proceso nal se
informa en la pantalla y una señal acústica. Las baterías de plomo no tienen
efecto memoria, no tienen procesos de formación por ciclos de carga / descar-
ga. Este modo, PB-Modo, no está disponible.
1 Número de células
2 Tiempo de carga
3 Descarga de la batería
4 Modo de carga
5 Capacidad de descarga
GB - Discharging of the Pb battery
Set up the charge current on the left and nominal voltage on the right. Range
of discharge current is 0.1-5.0A,the voltage should match the battery being
charged. Press START/ENTER key for more than 3 seconds to start charging.
The screen displays the real-time discharging status.Press START/ ENTER
key to alter discharge current.Press START/ENTER key again to store the pa-
rameter value you set.Press BATT TYPE/STOP key to end the program.
1 Battery type
2 Elapsed time
3 Discharge current
4 Battery voltage
5 Discharged capacity
1
2
3
4
5
1
2
3
4
5
ES - Administrar las posiciones de memoria
El cargador representa los almacenes de datos, en los que, cada uno bajo
una constante un número de ubicación (01 a 05) los datos de una batería
que es utilizada a menudo, se almacena en la memoria del programa. Muy
cómodo, estos datos pueden ser seleccionados, los parámetros para el pro-
ceso están disponibles de inmediato, un programa. La gestión de la memoria
tiene dos funciones. Se pueden almacenar ambos conjuntos de datos SAVE
DATA(GUARDAR DATOS) Asimismo, los datos de carga LOAD DATA(carga
de datos).
Ahorro de batería de datos
Después de activar esta función, la pantalla se muestra la función activada.
Manteniendo el botón Start / Enter se puede acceder a la con guración. En el
primer nivel, por el método conocido, los parámetros de la batería.
1 Voltaje 2 Canal de programación.
3 Capacidad de carga 4 Número de células
En el segundo nivel de la corriente de carga para una operación manual, ni
a la percepción actual límite superior para un proceso de con guración au-
tomática.
La siguiente pantalla muestra el mismo argumento puede ser programado
para una descarga.
Un nivel seguirá el programa de la conguración de los procesos cíclicos.
Después de todos los parámetros estén incluidos en la batería, presionar la
tecla ‚Start / Enter „ durante al menos 3 segundos. Por lo tanto, el proceso
de almacenamiento se dispara. En la pantalla, las letras, en SAVE „Guardar“
se muestra.
Con la tecla ’ Status’ vuelve entrar en el menú en la función anterior.
GB - Data storage program
For your convenience, X-Peak 80 BAL V2 has a data storage and load pro-
gram. It can store ve battery data representing the respective specications
of batteries. You can call back the data when charging or discharging without
setting up the program again.Press START/ENTER key to make it blink, and
use Status to set up the parameter.
Data storage
Setting of the parameter in the screen will not aect the charge and dischar-
ge process. They just present the specication of the battery. The example is
NiMH battery pack,including 12 cells,the capacity is 3000mAh.
Set up the charge current in the manual mode,or current limit in the auto mode.
Press INC and DEC key simultaneously to make the current eld blink to switch
the charge mode.
1 Voltage 2 Data number
3 Capacity 4 Type of battery
Set up the discharge current and nal Voltage.
Set up the charge/discharge sequence and cycle number.
Saving the data
12 3 4
- +
Status
- +
Status
- +
Status
- +
Status
Start/Enter > 3 sec.
- +
Status
Stop/Bat.Type Start/Enter > 3 sec.
Status Status
Status
10
ES - Batería de datos de carga
Con esta opción, usted puede guardar los datos de una batería en una carga
de memoria.
Después de activar esta función, aparece en la pantalla. Pulsando el botón
Start ‚/ Enter ‚para alcanzar el nivel de selección.
En el instante siguiente, el espacio deseado se puede determinar. Después de
la selección, el Inicio / Intro „durante 3 segundos son operados. Estos datos
son cargados.
En la pantalla aparecerá el cambio.
GB - Load data program
This program is to load the data stored at the“save data“program.Press
START/ENTER key to make the data eld blink and press INC or DEC for
more than 3 seconds to load the data.
Choose the data number you want to call back.The data you want to call back
will be displayed.
Loading the data.
Start/Enter
Start/Enter
Start/
Enter
> 3 sec.
ES - Pantalla de otros valores
Con esta opción, los datos de la batería se pueden caragar desde una
memoria.
Muestra el voltaje de una batería al  nal de una tarea.
Visualización de las preferencias concedidas por el máximo Capacidad.
Visualización de las preferencias concedidas por el máximo. El tiempo
de procesamiento.
Asignación de la USB / Puertos temperatura
La función USB no està disponible para este cargador.
Mostrar la temperatura de la batería, sólo cuando se utiliza el sensor de
temperatura.
De tensión de entrada de visualización.
Visualización de tensiones de los elementos individuales de una batería
de litio.
La batería está conectada a cada salida a través de un cable; puede compro-
bar el voltaje de cada celda en el paquete de baterías. Cuando el cable está
conectado a los conectores a la derecha del cargador, el programa muestra
el voltaje de hasta 6 baterías. El paquete de baterías requiere un conector de
salida conectado a cada celda.
GB - Various information in the program
You can inquire variors information on the LCD screen during the charging
and discharging process. Press Status’ key, the charger will display user‘s
setting. You can press ’Status ’ key to monitor voltage of each cell while the
battery is connected with each port of the charger:
It comes to the nal voltage when the program ended.
Indication of the max. capacity preset in the presettings.
Display of the max. process time specied in the presettings
3-pin connector is selected to be the USB port.
For this charger the USB function is not available.
The external temperature is displayed when the temperature probe is used.
Present input voltage
Display of the single cell voltages of a lithium battery.
The battery is connected with each port through cable; you can check voltage
of each cell in the battery pack. When the cable is connected with the ports on
the right of the charger, the program will display voltage of up to 6 batteries.
The battery pack needs an output connector connected with each cell.
Status
Status
Status
Status
Status
11
ES - Los mensajes de error
El cargador está preparado con una serie de mensajes de error. Todos los
mensajes de error son acompañados por una señal acústica. La señal visual y
audible puede ser restablecida por un botón que se coloca después del error
se ha sido corregido, o se la batería ha sido desconectada.
La batería se ha conectada con la polaridad inversa.
El circuito de carga tiene una ruptura.
No hay batería conectada.
El voltaje de entrada está fuera de los límites permitidos.
Número incorrecto de las células de un conjunto de baterías de Li.
Dispositivo de error desconocido inmediatamente desconectar de la fuente de
alimentación.
Número de celdas de una batería de litio es demasiado baja.
Número de celdas de una batería de litio es demasiado alta.
Una celda de una batería de litio tiene un nivel de tensión insuciente.
Una celda de una batería de litio tiene un nivel de voltaje demasiado alto.
Mal, conexión de alta resistencia en el circuito de carga.
El cargador está demasiado caliente, dejar enfriar.
Se produjo un error grave, el cargador necesita reparación.
GB - Warning and orror information
X-Peak 80 BAL V2 incorporates a variety of functions for the systems to verify
processes and the state of the electronics. In case of an error the screen will
display the cause of error and emit an audible sound.
Incorrect polarity connected.
Battery connection is interrupted.
Short-circuit of the output termination.
Erroneous selection of voltage of Lithium pack, please check the voltage of
the battery pack.
The voltage of the battery pack has been selected incorrectly!
The charger has malfunctioned for some reason. Seek professional
advice.
The voltage is lower than which is set. Please check the nubmer of cells in
the battery pack.
The voltage is higher than which is set. Please check the number of cells in
the battery pack.
Voltage of one cell in the battery pack is too low, please check the voltage of
each cell.
Voltage of one cell in the battery pack is too high, please check the
voltage of each cell.
Wrong connection of the connector detected; please check the connector and
cable.
The internal temperature is too high, please cool down.
The processor cannot control the feeding current, please repair it.
Salvo error o modicación técnica. Copyright JAMARA e. K. 2022
Prohibida su reproducción o distribución, por cualquier medio, salvo consentimiento expreso de JAMARA e. K.
All rights reserved. Copyright JAMARA e.K. 2022
Copying or reproduction in whole or part, only with the expressed permission of JAMARA e.K.
JAMARA e.K.
Inh. Manuel Natterer
Am Lauerbühl 5 - DE-88317 Aichstetten
Tel. +49 (0) 75 65/94 12-0 - Fax +49 (0) 75 65/94 12-23
[email protected] www.jamara.com
Service - Tel. +49 (0) 75 65/94 12-777
service@ jamara.com
ES - Notas sobre el reciclado
Aparatos eléctricos no pueden desecharse en la basura doméstica, pero se deben
desechar de forma separada. Usted está obligado, a quitar las baterías y llevar los
aparatos eléctricos viejos en los puntos de recogida comunales. En caso de que hay
datos personales en el aparato eléctrico se deben remover de usted mismo.
GB - Disposal restrictions
Electrical appliances must not be disposed of in domestic waste and must be disposed of separately.
You are obliged to take out the batteries, if possible, and to dispose of the electrical equipment at
the communal collection points. Should personal data be stored on the electrical appliance you must
remove them by yourself.
ES - Seguridad
Lea atentamente las instrucciones y seguridad antes de poner el modelo en funciona-
miento!
Es producto no es para personas (incluidos niños) con discapacidad física, mental y sensonri-
ais. O ninguna experiencia ni conocimiento, a menos que vayan acompañados de un responsa-
ble o recibir instrucciones ¿Cómo se debe usar. Los niños deben ser supervisados para ase-
gurarse de que no te metas con el producto.
Los niños deben ser supervisados para asegurarse de que no jueguen con el aparato.
Sólo para uso en interiores.
El cargador puede calentarse durante la operación, asegúrese de que el calor se pueda ampliar
de una manera equilibrada.
Asegúrese de que el contacto de carga con la humedad y la exposición a la luz solar directa.
Cuando deje de utilizar, desenchufe la fuente de alimentación y las baterías.
No coloque el cargador o las pilas en las zonas in amables y los procedimientos de seguimien-
to, no deje desatendida.
Evite cualquier corto circuito y comprobe la polaridad de las dos potencias, la de entrada y la
batería conectada.
No cargar o descargar en caliente o en frío, dejar que enfríe antes de volver a usarla.
Sólo debe cargar las baterías compuesto por elementos del mismo fabricante y con la misma
capacidad.
En ningún caso, cargar o descargar baterías en paralelo.
Nunca carga / descarga directa baterías equipadas con un circuito electrónico, apague el circuito
antes de de carga.
Cuando se conecta la batería, primero conecte el cable de carga al dispositivo y luego conectar
las baterías.
No cargar las baterías defectuosas o dañadas.
Respetar a la indicación del fabricante de la batería.
El cargador está diseñado exclusivamente para la carga o tipos de descarga recargables
especicadas (véase características técnicas).
No abra el cargador, y no trate de repararlo. Es peligroso, y anular la garantía. Presentarle a
nuestro departamento técnico para futuras reparaciones.
GB - Safety Information
Whenever you operate your charger the following safety instructions must be followed.
This device is not intended for use by individuals (including children) with reduced physical
sensory, mental abilities, lack of experience and / or knowledge, unless they are supervised in
how the device is to be used.
Children should be supervised to ensure that they do not play with the appliance.
Only for indoor use.
The charger may get hot in use, position the unit so that the heat can dissipate.
Never expose the charger to moisture or direct sun light.
After use always disconnect the unit from the mains and unplug any batteries.
Never leave the charger unattended when in use, and always operate it on a re proof surface.
Avoid short circuits at all costs. Always observe the correct polarity.
Batteries should always be allowed to cool down before you charge or discharge them.
Only charge or discharge packs containing cells from the same manufacturer and of the same
capacity.
Do not connect packs in parallel to charge or discharge them.
Always disconnect the pack from any electronic system (ESC etc.) before attempting to charge
it.
Connect the charging cable to the charger rst and then to the battery.
Never try to charge/discharge damaged packs or cells.
Follow the directions given by the battery manufacturer.
The charger may only be used to charge / discharge the types of cells listed in the technical
specications.
Do not open the unit. This will void the guarantee and may be dangerous. If the charger is
damaged or faulty, return it our service department for repair.
ES - Accesorios
GB - Accessories
No. 332057 MPX
Cable cargador Deluxe
Charging lead Deluxe
No. 332058 LiPo
Cable cargador Deluxe
Charging lead Deluxe
No. 091114
BEC-cable carga con banana macho
BEC charging lead with banana plug
No. 332059
Cable cargador XT60
Charging lead XT60
No. 332051
Tamiya cable cargador dorado
Tam charging lead with lead gold
  • Page 1 1
  • Page 2 2
  • Page 3 3
  • Page 4 4
  • Page 5 5
  • Page 6 6
  • Page 7 7
  • Page 8 8
  • Page 9 9
  • Page 10 10
  • Page 11 11
  • Page 12 12

Jamara 153059 Manuale utente

Categoria
Caricabatterie per auto
Tipo
Manuale utente

in altre lingue