
CS1922 / CS1924 2/4-Port USB 3.0 4K DisplayPort KVMP™ Switch
VM0808HA 8 x 8 4K HDMI Matrix Switch Quick Start Guide
A
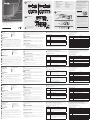
Overview
Front view
1
Port Selection Pushbuttons
2
Port LEDs
3
Audio Ports
4
USB 3.0 Hub
B
Installation
Hardware
To set up the switch, refer to the diagram above and do the following:
1
Plug the USB keyboard and mouse into the console ports on the rear panel.
2
Plug the monitor into the DisplayPort console port and power on the monitor.
3
Plug the main microphone and speakers into the microphone and speaker
jacks on the front panel. These ports have priority over those on the rear
panel.
4
(Optional) Plug the secondary microphone and speakers into the console
audio ports on the rear panel.
5
Using the cables provided with this package, plug the DisplayPort, USB 3.0,
microphone, and speaker connectors into their corresponding sockets in the
KVM Port section of the switch.
6
At the other ends of the cables, plug the DisplayPort, USB 3.0, microphone,
and speaker connectors into their respective ports on the computer.
7
(Optional) Plug the USB peripherals into the type A sockets in the USB 3.0
hub sections.
8
Plug the power adapter (provided with this package) into the switch’s Power
Jack and then plug the other end into a DC power source.
9
Power on the computers.
C
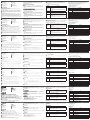
Operation
There are three convenient methods to switch between the computers: Manual –
by pressing the port selection pushbuttons on the front panel, Mouse – by clicking
the scroll wheel of the mouse, and Hotkey – by entering combinations on the
keyboard.
1
Manual Switching
For manual port selection: Press a front panel port selection pushbutton once
to bring the KVM, audio, and USB focus to the computer attached to the
corresponding port.
2
Mouse Switching
For mouse port selection: Double-click the scroll wheel of your USB mouse to
cycle through the ports.
Note: 1. Mouse switching is only supported by USB 3-key scroll wheel mice.
2. Mouse switching is disabled by default.*
3. Mouse switching is only supported when Mouse Emulation is enabled.
*See Hotkey Setting Mode section to enable mouse switching.
3
Hotkey Switching
All port switches from the keyboard begin by pressing the Scroll Lock key twice.
The tables below describe the actions used to switch ports.
Cycling through Ports
Hotkey Action
[Scroll Lock]
[Scroll Lock]
[Enter]
Moves the KVM, USB hub, and audio focus from the current
port to the next port on the switch (1 to 2 and 2 to 1 for the
CS1922) (1 to 2, 2 to 3, 3 to 4, and 4 to 1 for the CS1924).
Note: The KVM, USB hub, and audio focus all go to these
ports even if they were initially on different ports.
Going Directly to a Port
Hotkey Action
[Scroll Lock]
[Scroll Lock]
[n]
[Enter]
Moves the KVM, USB hub, and audio focus to the computer
attached to the port corresponding to the specifi ed Port ID. The
[n] stands for the computer’s Port ID number (1, 2, 3, or 4).
Note: The KVM, USB hub, and audio focus all go to these
ports even if they were initially on different ports.
Hotkey Setting Mode
Hotkey Setting Mode (HSM) is used to set functions on the switch. Invoke HSM
and then press a key in the table below to perform the corresponding function.
To invoke HSM, do the following:
1. Press and hold the Num Lock key.
2. Press and release the minus key.
3. Release the Num Lock key.
HSM Summary Table
Key Function
[F2] Enables Mac keyboard emulation.
[F10]
Automatically detects and sets the keyboard operating
platform.
[F4]
Lists the current switch settings. After pressing [F4], open a
text editor and select paste to list the settings.
[F5] Performs a reset on all USB devices.
[E] Enables/Disables the Power on Detection feature.
[H]
Toggles between the default ([Num Lock] [-]) and alternate
([Ctrl] [F12]) HSM invocation keys.
[M] Toggles mouse emulation On and Off.
[R] [Enter] Resets the hotkey settings to their default status.
[u] [p] [g] [r] [a]
[d] [e] [Enter]
Invokes Firmware Upgrade Mode.
[W] Enables/Disable mouse port switching.
C
B
Package Contents
CS1922
1 2-Port USB 3.0 4K
DisplayPort KVMP™ Switch
2 DisplayPort Cables
2 USB 3.0 Cables
4 Audio Cables
1 Power Adapter
1 User Instructions
CS1924
1 4-Port USB 3.0 4K
DisplayPort KVMP™ Switch
4 DisplayPort Cables
4 USB 3.0 Cables
8 Audio Cables
1 Power Adapter
1 User Instructions
Operation
Installation
© Copyright 2019 ATEN
®
International Co., Ltd.
ATEN and the ATEN logo are trademarks of ATEN International Co., Ltd. All rights reserved. All
other trademarks are the property of their respective owners.
This product is RoHS compliant.
Part No. PAPE-1223-F80G Printing Date: 04/2019
2/4-Port USB 3.0 4K DisplayPort
KVMP™ Switch
Quick Start Guide
CS1922 / CS1924
Commutateur KVMP™ CS1922 / CS1924 2/4 Ports USB 3.0 4K DisplayPort
www.aten.com
2/4-Port-USB-3.0-4K-DisplayPort-KVMP™-Switch CS1922 / CS1924
www.aten.com
Switch USB 3.0 2/4 porte 4K DisplayPort KVMP™ CS1922 / CS1924
www.aten.com
Conmutador KVMP™ DisplayPort 4K USB 3.0 de 2/4 Puertos CS1922 / CS1924
www.aten.com
Rear view
1
Console Ports
2
KVM Ports
3
Power Jack
4
USB 3.0 Hub
1 2 3 4
1 2
2
1
1 2
3
4
3 4
1 2
3 4
2
1
3
4
CS1922 Front View
CS1922 Rear View
CS1924 Front View
CS1924 Rear View
CS1922 (Front)
CS1922 (Rear)
3
1
8
4
7
5
2
7
Scroll
Lock
Scroll
Lock
Enter
+ +
1
2
3
A
Vue d'ensemble
Vue de devant
1
Boutons poussoirs de sélection de port
2
LED de port
3
Ports audio
4
Concentrateur USB 3.0
B
Installation
Matériel
Pour installer le commutateur, reportez-vous au schéma ci-dessus et effectuez les étapes
suivantes :
1
Branchez le clavier et la souris USB sur les ports de la console au niveau du panneau arrière.
2
Branchez le moniteur sur le port DisplayPort de la console et l’alimentation sur le moniteur.
3
Branchez le microphone principal et haut-parleurs sur les prises microphone et haut-
parleur au niveau du panneau avant. Ces ports ont la priorité sur ceux du panneau arrière.
4
(Optionnel) Branchez le microphone et les haut-parleurs secondaires sur les ports audio
de la console au niveau du panneau arrière.
5
En utilisant les câbles fournis dans l’emballage, branchez les connecteurs DisplayPort,
USB 3.0, microphone et haut-parleurs sur les prises correspondantes dans la section Port
KVM du commutateur.
6
Aux autres extrémités des câbles, branchez les connecteurs DisplayPort, USB 3.0,
microphone et haut-parleurs sur les connecteurs des ports respectifs de l'ordinateur.
7
(Optionnel) Branchez les périphériques USB sur les prises de type A dans les sections USB
3.0 du concentrateur.
8
Branchez l'adaptateur secteur (fourni dans l’emballage) sur la prise d’alimentation du
commutateur, puis reliez l'autre extrémité à une source d'alimentation CC.
9
Allumez les ordinateurs.
C
Fonctionnement
Il y a trois méthodes pratiques pour commuter entre les ordinateurs : Manuelle - en
appuyant sur les boutons poussoirs de sélection du port du panneau avant, à la souris - en
cliquant sur la molette de défi lement de la souris, et par touche de raccourci - en entrant des
combinaisons de touches sur le clavier.
1
Commutation manuelle
Pour la sélection manuelle du port : Appuyez une fois sur un bouton poussoir de sélection de
port du panneau avant pour amener la cible KVM, audio, et USB sur l'ordinateur connecté
au port correspondant.
2
Commutation à la souris
Pour la sélection du port à la souris : Double-cliquez sur la molette de défi lement de votre
souris USB pour basculer de façon cyclique entre les ports.
Remarque :
1. La commutation à la souris est uniquement prise en charge par les souris à 3 boutons et
molette de défi lement USB.
2. La commutation à la souris est désactivée par défaut.*
3. La commutation à la souris est uniquement prise en charge lorsque l'émulation de souris
est activée.
* Consultez la section Mode de réglage des touches raccourci pour activer la commutation
à la souris.
3
Commutation par touche de raccourci
Tous les commutations de ports à partir du clavier commencent en appuyant deux fois
sur la touche Arrêt Défi lement. Les tableaux ci-dessous décrivent les actions à utiliser
pour commuter les ports.
Commutation cyclique des ports
Raccourci Action
[Arrêt défi l]
[Arrêt défi l]
[Entrée]
Déplace la cible KVM, concentrateur USB et audio depuis le port
actuel jusqu’au port suivant sur le commutateur (de 1 à 2 et de 2 à
1 pour le CS1922) (de 1 à 2, de 2 à 3, de 3 à 4, et de 4 à 1 pour le
CS1924).
Remarque : Les cibles KVM, concentrateur USB et audio vont
toutes vers ces ports, même si elles étaient initialement
sur des ports différents.
Aller directement à un port
Raccourci Action
[Arrêt défi l]
[Arrêt défi l]
[n]
[Entrée]
Déplacez la cible KVM, concentrateur USB et audio vers l'ordinateur
connecté au port correspondant à l’ID Port indiqué. Le [n] représente
le numéro d’ID Port de l'ordinateur (1, 2, 3 ou 4).
Remarque : Les cibles KVM, concentrateur USB et audio vont
toutes vers ces ports, même si elles étaient initialement
sur des ports différents.
Mode de réglage des touches de raccourcis
Le Mode de réglage des touches de raccourcis (Hotkey Setting Mode ou HSM) est
utilisé pour régler les fonctions du commutateur. Appelez l’HSM, puis appuyez sur
une touche du tableau ci-dessous pour exécuter la fonction correspondante.
Pour appeler l’HSM, procédez comme suit :
1. Appuyez sur la touche Verr num et maintenez-la.
2. Appuyez et relâchez la touche moins.
3. Relâchez la touche Verr Num.
Tableau récapitulatif HSM
Touche Fonction
[F2] Active l’émulation de clavier Mac.
[F10]
Détecte et confi gure automatiquement la plateforme d'utilisation
du clavier.
[F4]
Liste les réglages actuels du commutateur. Après avoir appuyé sur
[F4], ouvrez un éditeur de texte et sélectionnez « Coller » pour
lister les paramètres.
[F5] Effectue une réinitialisation sur tous les périphériques USB.
[E] Active / Désactive la fonction d'alimentation sur détection.
[H]
Bascule entre les touches d'invocation HSM ([Num Lock] [-]) et
([Ctrl] [F12]) en alternative.
[M] Active / Désactive l'émulation de la souris.
[R] [Entrée] Réinitialise les paramètres de raccourcis à leurs états par défaut.
[u] [p] [g] [r] [a]
[d] [e] [Entrée]
Appelle le mode de mise à niveau du fi rmware.
[W] Active / Désactive la commutation de port à la souris.
Vue de derrière
1
Ports console
2
Ports KVM
3
Fiche d'alimentation
4
Concentrateur USB 3.0
A
Übersicht
Ansicht von vorne
1
Anschlussauswahltasten
2
Anschluss-LEDs
3
Audioanschlüsse
4
USB-3.0-Hub
B
Installation
Hardware
Beachten Sie zur Einrichtung des Switch die obige Abbildung und gehen Sie wie folgt vor:
1
Schließen Sie USB-Tastatur und -Maus an den Konsolenanschlüssen an der Rückblende an.
2
Schließen Sie den Monitor am DisplayPort-Konsolenanschluss an und schalten Sie ihn ein.
3
Schließen Sie das Hauptmikrofon und Lautsprecher an den Mikrofon- und
Lautsprecheranschlüssen an der Frontblende an. Diese Anschlüsse haben Priorität
gegenüber denen an der Rückblende.
4
(Optional) Schließen Sie das sekundäre Mikrofon und Lautsprecher an den
Konsolenaudioanschlüssen an der Rückblende an.
5
Verbinden Sie DisplayPort-, USB-3.0-, Mikrofon- und Lautsprecheranschlüsse über die
mitgelieferten Kabel mit den entsprechenden Anschlüssen im KVM-Anschlussbereich des
Switch.
6
Schließen Sie am anderen Ende der Kabel die DisplayPort-, USB-3.0-, Mikrofon- und
Lautsprecheranschlüsse an ihre entsprechenden Anschlüsse am Computer an.
7
(Optional) Schließen Sie USB-Peripherie an die Typ-A-Anschlüsse in den USB-3.0-Hub-
Bereichen an.
8
Schließen Sie das Netzteil (im Lieferumfang enthalten) an den Netzanschluss des Switch
an und verbinden Sie das andere Ende mit einer Gleichspannungsquelle.
9
Schalten Sie die Computer ein.
C
Bedienung
Es gibt drei komfortable Methoden zum Umschalten zwischen den Computern: Manuell –
durch Betätigung der Anschlussauswahltasten an der Frontblende, Maus – durch Klicken
des Scrollrades der Maus, Tastenkombination – durch Betätigung der entsprechenden
Tastenkombinationen an der Tastatur.
1
Manuell wechseln
Manuelle Anschlussauswahl: Drücken Sie eine Anschlussauswahltaste an der Frontblende,
wenn KVM, Audio und USB auf den am entsprechenden Anschluss angeschlossenen
Computer übertragen werden sollen.
2
Per Maus wechseln
Anschlussauswahl per Maus: Doppelklicken Sie das Scrollrad Ihrer USB-Maus zum
Umschalten zwischen den Anschlüssen.
Hinweis:
1. Der Mauswechsel wird nur von einer 3-Tasten-USB-Maus mit Scrollrad unterstützt.
2. Der Mauswechsel ist standardmäßig deaktiviert.*
3. Mauswechsel wird nur unterstützt, wenn Mausemulation aktiviert ist.
* Beachten Sie den Abschnitt Tastenkombinationseinstellungsmodus zur Aktivierung des
Mauswechsels.
3
Per Tastenkombination wechseln
Alle Anschlusswechsel per Tastatur beginnen mit zweimaligem Drücken der Rollen-Taste. Die
nachstehenden Tabellen beschreiben die Aktionen zum Wechseln der Anschlüsse.
Zwischen Anschlüssen umschalten
Schnelltaste Aktion
[Rollen-Taste]
[Rollen-Taste]
[Eingabe]
Verschiebt KVM, USB-Hub und Audio vom aktuellen zum nächsten
Anschluss am Switch (1 zu 2 und 2 zu 1 beim CS1922) (1 zu 2, 2 zu 3,
3 zu 4 und 4 zu 1 beim CS1924).
Hinweis: KVM, USB-Hub und Audio wechseln gemeinsam zu diesen
Anschlüssen, selbst wenn sie anfänglich auf verschiedene
Anschlüsse aufgeteilt waren.
Direkt zu einem Anschluss wechseln
Schnelltaste Aktion
[Rollen-Taste]
[Rollen-Taste]
[n]
[Eingabe]
Verschiebt KVM, USB-Hub und Audio von dem am entsprechenden
Anschluss angeschlossenen Computer zu der angegebenen
Anschlusskennung. Das [n] steht für die Anschlusskennung des
Computers (1, 2, 3 oder 4).
Hinweis: KVM, USB-Hub und Audio wechseln gemeinsam zu diesen
Anschlüssen, selbst wenn sie anfänglich auf verschiedene
Anschlüsse aufgeteilt waren.
Tastenkombinationseinstellungsmodus
Der Tastenkombinationseinstellungsmodus (Hotkey Setting Mode; HSM) dient der
Konfi guration der Funktionen am Switch. Rufen Sie den HSM auf und drücken Sie eine
Taste in der nachstehenden Tabelle zur Ausführung der entsprechenden Funktion.
Gehen Sie zum Aufrufen des HSM wie folgt vor:
1. Halten Sie die Num-Taste gedrückt.
2. Drücken Sie kurz die Minus-Taste.
3. Lassen Sie die Num-Taste los.
HSM-Übersichtstabelle
Taste Funktion
[F2] Aktiviert die Mac-Tastaturemulation.
[F10] Erkennt und konfi guriert automatisch die Tastaturbetriebsplattform.
[F4]
Listet die aktuellen Switch-Einstellungen auf. Öffnen Sie nach
Betätigung der Taste [F4] einen Texteditor und wählen Sie zum
Aufl isten der Einstellungen die Einfügen-Funktion.
[F5] Führt eine Rücksetzung an allen USB-Geräten durch.
[E] Aktiviert/deaktiviert die Einschalterkennung.
[H]
Wechselt zwischen der standardmäßigen ([Num-Taste] [-]) und
alternativen ([Strg] [F12]) Tastenkombination zur HSM-Aktivierung.
[M] Schaltet die Mausemulation ein und aus.
[R] [Enter]
Setzt die Tastenkombinationseinstellungen auf ihren Standardzustand
zurück.
[u] [p] [g] [r] [a]
[d] [e] [Eingabe]
Ruft den Modus zur Firmware-Aktualisierung auf.
[W] Aktiviert/deaktiviert den Wechsel des Mausanschlusses.
Ansicht von hinten
1
Konsolenports
2
KVM-Ports
3
Netzanschluss
4
USB-3.0-Hub
A
Descrizione
Vista anteriore
1
Pulsanti di selezione porta
2
LED porta
3
Porte audio
4
Hub USB 3.0
B
Installazione
Hardware
Per installare lo switch, fare riferimento alla fi gura di cui sopra ed attenersi a quanto segue:
1
Collegare la tastiera ed il mouse USB alle porte console sul pannello posteriore.
2
Collegare il monitor alla porta console DisplayPort ed accendere il monitor.
3
Collegare il microfono e gli altoparlanti principali ai connettori microfono e
altroparlanti del pannello frontale. Queste porte hanno la priorità su quelle del
pannello posteriore.
4
(Optional) Collegare microfono e gli altoparlanti secondari alle porte audio console
del pannello posteriore.
5
Utilizzando i cavi forniti in dotazione, collegare i connettori DisplayPort, USB 3.0,
microfono ed altoparlanti ai rispettivi connettori della sezione porte KVM dello switch.
6
All'altra estremità dei cavi, collegare i connettori DisplayPort, USB 3.0, microfono
ed altoparlanti alle rispettive porte del computer.
7
(Optional) Collegare le periferiche USB ai connettori di tipo A della sezione hub
USB 3.0.
8
Collegare l'adattatore di corrente (fornito in dotazione) al connettore alimentazione
dello switch ed alla presa di corrente DC.
9
Accendere i computer.
C
Funzionamento
Ci sono a disposizione tre comodi metodi per passare da un computer all'altro:
Manuale – premendo i pulsanti di selezione porta del pannello frontale, Mouse –
facendo clic sulla rotella del mouse e Tasto di scelta rapida – inserendo le combinazioni
di tasti sulla tastiera.
1
Cambio manuale
Per la selezione manuale delle porte: Premere una volta il pulsante di selezione
porta del pannello frontale per portare la selezione KVM, audio, e USB sul computer
collegato alla porta corrispondente.
2
Cambio con mouse
Per la selezione delle porte con il mouse: Fare doppio clic sulla rotella del mouse USB
per passare tra le varie porte.
Nota:
1. Il cambio con mouse è supportato solo con mouse USB dotati di rotellina di
scorrimento a 3 tasti.
2. Il cambio con mouse è disabilitato per impostazione predefi nita.*
3. Il cambio con mouse è supportato solamente quando la modalità Emulazione
mouse è abilitata.
* Fare riferimento alla sezione Modalità d'impostazione tasti di scelta rapida per
abilitare il cambio con mouse.
3
Cambio con tasto di scelta rapida
Tutti i cambi di porta da tastiera iniziano premendo due volte il tasto Bloc Scorr. Le
tabelle che seguono descrivono le azioni necessarie per cambiare porte.
Passare da una porta all'altra
Tasto di
scelta rapida
Azione
[Bloc Scorr]
[Bloc Scorr]
[Invio]
Porta la selezione KVM, hub USB e audio dalla porta corrente a
quella successiva dello switch (1 a 2 e 2 a 1 per CS1922) (1 a 2, 2
a 3, 3 a 4 e 4 a 1 per CS1924).
Nota: Le selezioni KVM, hub USB e audio sono portate tutte a
queste porte anche se inizialmente erano su porte diverse.
Portarsi direttamente su una porta
Tasto di
scelta rapida
Azione
[Bloc Scorr]
[Bloc Scorr]
[n]
[Invio]
Sposta la selezione KVM, hub USB e audio al computer collegato
alla porta che corrisponde all'ID porta specifi cato. [n] sta per il
numero ID porta del computer (1, 2, 3 o 4).
Nota: Le selezioni KVM, hub USB e audio sono portate tutte a
queste porte anche se inizialmente erano su porte diverse.
Modalità d'impostazione tasti di scelta rapida
La modalità d'impostazione tasti di scelta rapida (HSM - Hotkey Setting Mode) è
utilizzata per impostare le funzioni sullo switch. Richiamare la modalità HSM e premere
un tasto, indicato nella tabella che segue, per eseguire la funzione corrispondente.
Fare come segue per richiamare la modalità HSM:
1. Tenere premuto il tasto Bloc Num.
2. Premere e lasciare il tasto meno.
3. Lasciare il tasto Bloc Num.
Tabella modalità HSM
Tasto Funzione
[F2] Abilita l'emulazione tastiera Mac.
[F10]
Rileva ed imposta automaticamente la piattaforma operativa
della tastiera.
[F4]
Elenca le impostazioni correnti dello switch. Dopo avere
premuto [F4], aprire un editor di testo, quindi selezionare di
incollare per elencare le impostazioni.
[F5] Esegue un ripristino di tutti i dispositivi USB.
[E] Abilita/disabilita la funzione Rilevamento accensione.
[H]
Passa tra i tasti di richiamo HSM predefi niti ([BLOC NUM] [-]) e
alternati ([Ctrl] [F12]).
[M] Attiva e disattiva l'emulazione mouse.
[R] [Invio]
Ripristina le impostazioni predefi nite del tasto di scelta rapida
sui valori predefi niti.
[u] [p] [g] [r] [a] [d]
[e] [Invio]
Richiama la modalità Aggiornamento fi rmware.
[W] Abilita/disabilita la funzione di cambio porta del mouse.
Vista posteriore
1
Porte console
2
Porte KVM
3
Connettore d'alimentazione
4
Hub USB 3.0
A
Descripción
Vista frontal
1
Pulsadores de selección de puerto
2
LEDs de puerto
3
Puertos de audio
4
Concentrador USB 3.0
B
Instalación
Hardware
Para confi gurar el conmutador, consulte el diagrama anterior y haga lo siguiente:
1
Conecte el teclado y ratón USB en los puertos de la consola en el panel posterior.
2
Conecte el monitor en el puerto de la consola DisplayPort y encienda el monitor.
3
Conecte el micrófono principal y los altavoces en las tomas de micrófono y altavoz en el
panel frontal. Estos puertos tienen prioridad sobre los del panel trasero.
4
(Opcional) Conecte el micrófono y los altavoces secundarios en los puertos de audio de
la consola en el panel posterior.
5
Utilizando los cables suministrados con este paquete, conecte el DisplayPort, USB 3.0,
micrófono y los conectores de los altavoces en sus correspondientes tomas en la sección
de puerto KVM del conmutador.
6
En el otro extremo de los cables, conecte el DisplayPort, USB 3.0, micrófono y los
conectores de altavoz en sus respectivos puertos en el PC.
7
(Opcional) Conecte los periféricos USB en los conectores de tipo A en las secciones del
concentrador USB 3.0.
8
Conecte el adaptador de alimentación (incluido en este paquete) en la toma de
alimentación del conmutador y luego conecte el otro extremo a una fuente de
alimentación de CC.
9
Encienda los ordenadores
.
C
Funcionamiento
Hay tres cómodos métodos para cambiar entre los PC: Manual - pulsando los botones de
selección de puertos en el panel frontal, Ratón - haciendo clic en el botón de la rueda del
ratón, y la tecla de Acceso Directo - mediante la introducción de combinaciones de teclas en
el teclado.
1
Conmutación Manual
Para la selección manual de puertos: Presione un pulsador de selección de puerto del
panel frontal una vez para llevar el foco del KVM, audio y USB al PC conectado al puerto
correspondiente.
2
Conmutación de ratón
Para la selección manual de ratón: Haga doble clic en la rueda de desplazamiento del ratón
USB para alternar entre los puertos.
Nota:
1. La conmutación de ratón solo es compatible con los ratones USB de 3 botones con rueda
de desplazamiento.
2. La conmutación del ratón está desactivada por defecto.*
3. La conmutación de ratón solo se admite cuando la emulación del ratón está habilitada.
* Consulte la sección Confi guración de modo tecla de acceso directo para activar la
conmutación del ratón.
3
Conmutación por Tecla de acceso directo
Todos los conmutaciones de puerto desde el teclado comienzan pulsando la tecla
Bloqueo de desplazamiento (Bloqueo de desplazamientos) dos veces. Las siguientes
tablas describen las acciones que se utilizan para cambiar los puertos.
Recorrido a través de los puertos
Tecla de
acceso rápido
Acción
[Bloqueo de
desplazamiento]
[Bloqueo de
desplazamiento]
[Entrar]
Desplaza el foco del KVM, concentrador USB y audio desde el
puerto actual al siguiente puerto en el conmutador (1 a 2 y 2 a 1
para el CS1922) (1 a 2, 2 a 3, 3 a 4, y 4 a 1 para el CS1924).
Nota:
El foco del KVM, concentrador USB y audio va a
estos puertos en todos los casos, aunque estuvieran
inicialmente en diferentes puertos.
Ir directamente a un puerto
Tecla de
acceso rápido
Acción
[Bloqueo de
desplazamiento]
[Bloqueo de
desplazamiento]
[n]
[Entrar]
Desplaza el foco del KVM, concentrador USB y audio al
PC conectado al puerto correspondiente a la ID de puerto
especifi cado. La [n] representa el número de la ID de puerto del
PC (1, 2, 3 o 4).
Nota:
El foco del KVM, concentrador USB y audio va a estos
puertos en todos los casos, aunque estuvieran inicialmente
en diferentes puertos.
Ajuste del modo de teclas de acceso rápido
El Hotkey Setting Mode (HSM; Ajuste del modo de teclas de acceso rápido) se usa
para confi gurar las funciones del conmutador. Invoque el HSM y luego pulse una
tecla de la tabla a continuación para realizar la función correspondiente.
Para invocar el HSM, haga lo siguiente:
1. Presione y mantenga pulsada la tecla Bloq Num.
2. Presione y suelte la tecla menos.
3. Suelte la tecla de bloqueo numérico.
Tabla resumen del HSM
Tecla Función
[F2] Habilita emulación de teclado Mac.
[F10] Detecta y confi gura automáticamente la interfaz de teclado.
[F4]
Muestra los ajustes de conmutación actuales. Después de pulsar [F4],
abra un editor de texto y seleccione pegar para mostrar los ajustes.
[F5] Realiza un restablecimiento en todos los dispositivos USB.
[E] Activa/Desactiva la función de detección de encendido.
[H]
Alterna entre el valor por defecto ([Bloq Num] [-]) y las alternativas
([Ctrl] [F12]) teclas de acceso de HSM.
[M] Alterna la emulación del ratón entre Activado y Desactivado.
[R] [Entrar]
Restablece la confi guración de teclas de acceso rápido a su estado
predeterminado.
[u] [p] [g] [r] [a]
[d] [e] [Entrar]
Invoca el modo de actualización del fi rmware.
[W] Habilita/Deshabilita la conmutación de puerto del ratón.
Vista posterior
1
Puertos de consola
2
Puertos KVM
3
Conector de alimentación
4
Concentrador USB 3.0
Support and Documentation Notice
All information, documentation, fi rmware,
software utilities, and specifi cations
contained in this package are subject to
change without prior notifi cation by
the manufacturer.
To reduce the environmental impact of our
products, ATEN documentation and software
can be found online at
http://www.aten.com/download/
Technical Support
www.aten.com/support
이 기기는 업무용(A급) 전자파적합기기로서 판매자 또는
사용자는 이 점을 주의하시기 바라며, 가정외의 지역에
서 사용하는 것을 목적으로 합니다.
EMC Information
FEDERAL COMMUNICATIONS COMMISSION INTERFERENCE
STATEMENT:
This equipment has been tested and found to comply with the limits
for a Class A digital device, pursuant to Part 15 of the FCC Rules.
These limits are designed to provide reasonable protection against
harmful interference when the equipment is operated in a commercial
environment. This equipment generates, uses, and can radiate radio
frequency energy and, if not installed and used in accordance with
the instruction manual, may cause harmful interference to radio
communications. Operation of this equipment in a residential area
is likely to cause harmful interference in which case the user will be
required to correct the interference at his own expense.
FCC Caution: Any changes or modifi cations not expressly approved by
the party responsible for compliance could void the user's authority to
operate this equipment.
Warning: This equipment is compliant with Class A of CISPR 32. In a
residential environment this equipment may cause radio interference.
This device complies with Part 15 of the FCC Rules. Operation is subject
to the following two conditions:(1) this device mat not cause harmful
interference, and(2) this device must accept any interference received,
including interference that may cause undesired operation.
Scan for
more information
To prevent damage to your installation
from power surges or static electricity,
it is important that all connected
devices are properly grounded.
www.aten.com
A
Overview
La pagina si sta caricando...
-
 1
1
-
 2
2


in altre lingue
- English: ATEN CS1922 Quick start guide
- français: ATEN CS1922 Guide de démarrage rapide
- español: ATEN CS1922 Guía de inicio rápido
- Deutsch: ATEN CS1922 Schnellstartanleitung
- русский: ATEN CS1922 Инструкция по началу работы
- português: ATEN CS1922 Guia rápido
- 日本語: ATEN CS1922 クイックスタートガイド