
CS22DP 2-Port USB DisplayPort Cable KVM Switch
Conmutador KVM de Cable DisplayPort USB de 2 puertos CS22DP
Commutateur KVM à câble DisplayPort USB 2 ports CS22DP Switch KVM cavo USB DisplayPort 2 porte CS22DP
2-Port-USB-DisplayPort-Kabel-KVM-Switch CS22DP
CS22DP 2-портовый USB DisplayPort кабельный KVM переключатель
www.aten.com www.aten.com
www.aten.com www.aten.com
www.aten.com www.aten.com
A
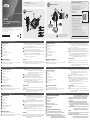
Hardware Review
1
Micro USB Power Port
2
Port LEDs
3
Console Ports
4
KVM Cables
5
Remote Port Selector
6
USB Keyboard and Mouse Connectors
7
DisplayPort Connectors
8
Audio Connectors
B
Hardware Installation
To set up the CS22DP, do the following:
1
Plug the USB mouse, USB keyboard, monitor, microphone and speakers
into their respective ports on the CS22DP.
Note: The USB ports can be used for USB peripheral sharing. To do so, plug
the peripherals and the keyboard or mouse into a USB hub, then plug
the hub into the keyboard or mouse port.
2
Plug the DisplayPort, USB and Audio connectors of the attached KVM cables
into their respective ports on the computers you are installing.
3
(Optional) If the power supply to the attached USB peripherals is not suffi cient,
plug a USB cable into the Micro USB power jack to get power from another
USB power source (i.e. PC, USB hub, DC 5V USB power adapter).
Note: A USB to Micro USB cable is not included in this package. Contact your
ATEN dealer for product information.
Operation
Use the Remote Port Selector pushbutton* to switch between the two computers.
Note*: Long press the remote port selector pushbutton for 3 seconds to enable/
disable monitor re-detection mode on the selected PC port.
A
Hardware Review
B
Hardware Installation
© Copyright 2019 ATEN
®
International Co., Ltd.
ATEN and the ATEN logo are trademarks of ATEN International Co., Ltd. All rights reserved. All
other trademarks are the property of their respective owners.
This product is RoHS compliant.
Part No. PAPE-1223-H62G Printing Date: 04/2019
2-Port USB DisplayPort Cable KVM Switch
Quick Start Guide
CS22DP
Package Contents
1 CS22DP 2-Port USB DisplayPort Cable KVM Switch
1 User Instructions
2
1
3
2
or
2
1
5
6
7
3
4
8
A
Resumen de hardware
1
Puerto de alimentación micro USB
2
LEDs de puerto
3
Puertos de consola
4
Cables KVM
5
Selector de puerto remoto
6
Conectores de teclado y ratón USB
7
Conectores DisplayPort
8
Conectores de audio
B
Instalación del hardware
Para confi gurar el CS22DP, realice lo siguiente:
1
Conecte el ratón USB, el teclado USB, monitor, micrófono y altavoces en sus
correspondientes puertos del CS22DP.
Nota: Los puertos USB pueden ser utilizados para compartir periféricos
USB. Para hacerlo, conecte los periféricos y el teclado o ratón en un
concentrador USB, y a continuación, conecte el concentrador en el
puerto de teclado o ratón.
2
Conecte las clavijas DisplayPort, USB y audio de los cables KVM conectados
en sus respectivos puertos en los equipos que está instalando.
3
(Opcional) Si la fuente de alimentación a los periféricos USB conectados no
es sufi ciente, conecte un cable USB en el conector de alimentación Micro
USB para obtener energía desde otra fuente de alimentación USB (p.ej. un
PC, concentrador USB, adaptador de alimentación USB de 5V CC).
Nota: No se incluye un cable USB a Micro USB en este paquete. Contacte
con su distribuidor ATEN para información sobre el producto.
Funcionamiento
Utilice el pulsador* de Selector de Puerto Remoto para cambiar entre los dos
equipos.
Nota*: Mantenga presionado el botón selector de puerto remoto durante
3 segundos para habilitar/deshabilitar el modo de re-detección de
monitor en el puerto PC seleccionado.
A
Обзор аппаратного обеспечения
1
Разъем электропитания Micro USB
2
Индикаторы портов
3
Порты консоли
4
Кабели KVM
5
Селектор удаленных портов
6
USB разъемы для клавиатуры и мыши
7
Разъемы DisplayPort
8
Аудио разъемы
B
Установка аппаратного обеспечения
Для установки CS22DP выполните следующие действия.
1
Подключите USB мышь, USB клавиатуру, монитор, микрофон и
наушники к соответствующим разъемам на CS22DP.
Примечание. USB разъемы можно использовать для подключения
периферийных общих устройств USB. Для этого
подключите периферийные устройства и клавиатуру
или мышь к USB концентратору, а затем подключите
концентратор к разъему для клавиатуры или мыши.
2
Подключите разъемы DisplayPort, USB и Аудио прикрепленных
KVM кабелей к соответствующим портам на устанавливаемых
компьютерах.
3
(Дополнительно) Если на подключенные периферийные USB
устройства подается недостаточное питание, подключите USB
кабель к разъему питания Micro USB для подачи питания от другого
источника USB (т.е. ПК, USB концентратора, блока питания USB 5 В
постоянного тока).
Примечание. Кабель USB - Micro USB не входит в комплект поставки
данного устройства. Для получения сведений об
изделии обращайтесь к торговому представителю ATEN.
Работа
Для переключения между двумя компьютерами используется нажимная
кнопка* "Селектор удаленных портов"
.
Примечание*: Для включения/выключения режима перенаправления
монитора на выбранный порт ПК нажмите и удерживайте
в течение 3 секунд кнопку выбора удаленного порта.
A
Descrizione hardware
1
Porta di alimentazione micro USB
2
LED porta
3
Porte console
4
Cavi KVM
5
Selettore porta remota
6
Connettori per tastiera e mouse USB
7
Connettori DisplayPort
8
Connettori audio
B
Installazione dell'hardware
Per impostare CS22DP, agire come segue:
1
Collegare il mouse USB, la tastiera USB, il monitor, il microfono e gli
altoparlanti nelle rispettive porte di CS22DP.
Nota: Le porte USB possono essere utilizzate per la condivisione delle
periferiche USB. A tal fi ne, collegare le periferiche e la tastiera o
il mouse in un hub USB, quindi collegare l'hub nella porta della
tastiera o del mouse.
2
Collegare i connettori DisplayPort, USB e audio dei cavi KVM collegati alle
rispettive porte dei computer che si stanno installando.
3
(Opzionale) Se l'alimentazione delle perfi cheti USB collegate non è
suffi ciente, collegare un cavo USB nel jack di alimentazione micro USB per
ottenere alimentazione da un altra fonte di alimentazione USB (ovvero PC,
hub USB, adattatore di alimentazione USB 5 V CC).
Nota: IL cavo USB-micro USB non è incluso nella confezione. Contattare il
rivenditore ATEN per informazioni sul prodotto.
Funzionamento
Utilizzare il pulsante* Selettore porta remota per commutare tra i due
computer.
Nota*: Premere a lungo il pulsante di selezione della porta remota per 3
secondi per attivare/disattivare la modalità di ri-rilevazione del monitor
sulla porta PC selezionata.
A
Présentation du matériel
1
Port d’alimentation micro USB
2
LED de port
3
Ports console
4
Câbles KVM
5
Sélecteur de port distant
6
Connecteurs USB clavier et souris
7
Connecteurs DisplayPort
8
Connecteurs audio
B
Installation du matériel
Pour confi gurer le CS22DP, procédez comme suit :
1
Branchez la souris USB, le clavier USB, le moniteur, le microphone et les
haut-parleurs sur les ports respectifs du CS22DP.
Remarque : Les ports USB peuvent être utilisés pour le partage de
périphériques USB. Pour ce faire, branchez les périphériques et
le clavier ou la souris sur le concentrateur USB, puis branchez le
concentrateur sur le port clavier ou souris.
2
Branchez les connecteurs DisplayPort, USB et audio des câbles du KVM reliés
sur leurs ports respectifs sur les ordinateurs que vous installez.
3
(Facultatif) Si l’alimentation vers les périphériques USB reliés n’est pas
suffi sante, branchez un câble USB sur le port d’alimentation Micro USB pour
obtenir l’alimentation d'une autre source d’alimentation USB (c’est-à-dire le
PC, le concentrateur USB, l’adaptateur secteur USB 5V).
Remarque : Aucun câble USB vers Micro USB n’est inclus dans cet emballage.
Contactez votre revendeur ATEN pour des informations sur le
produit.
Fonctionnement
Utilisez le bouton poussoir* de sélection de port distant pour basculer entre les
deux ordinateurs.
Remarque* : Appuyez longuement sur le bouton de sélecteur de port distant
pendant 3 secondes pour activer/désactiver le mode de re-détection
de moniteur sur le port du PC sélectionné.
A
Hardwareübersicht
1
Micro-USB-Stromanschluss
2
Anschluss-LEDs
3
Konsolenports
4
KVM-Kabel
5
Remote-Port-Wähler
6
Anschlüsse für USB-Tastatur und -Maus
7
DisplayPort-Anschlüsse
8
Audioanschlüsse
B
Hardwareinstallation
Gehen Sie zur Einrichtung des CS22DP wie folgt vor:
1
Schließen Sie USB-Maus, USB-Tastatur, Monitor, Mikrofon und Lautsprecher
an ihre entsprechenden Anschlüsse am CS22DP an.
Hinweis: Die USB-Anschlüsse können zur Freigabe von USB-Peripherie
genutzt werden. Schließen Sie dazu Peripherie und Tastatur oder
Maus an einen USB-Hub an. Verbinden Sie dann den Hub mit
einem Tastatur- oder Mausanschluss.
2
Verbinden Sie die DisplayPort-, USB- und Audioanschlüsse der angeschlossenen
KVM-Kabel mit ihren entsprechenden Anschlüssen den den Computern, die
Sie installieren.
3
(Optional) Falls die Stromversorgung der angeschlossenen USB-Peripherie nicht
ausreicht, schließen Sie zur Versorgung über eine weitere USB-Stromquelle
(z. B. PC, USB-Hub, 5-V-Gleichspannung-USB-Netzteil) ein USB-Kabel an den
Micro-USB-Stromanschluss an.
Hinweis: Ein USB-zu-Micro-USB-Kabel sind im Lieferumfang enthalten.
Wenden Sie sich für Produktinformationen an Ihren ATEN-Händler.
Bedienung
Wechseln Sie mit der Remote-Port-Wähler-Drucktaste* zwischen zwei Computern.
Hinweis*: Drücken Sie 3 Sekunden lang die Taste zur Auswahl des Remote-Ports,
um den Monitor-Wiedererkennungsmodus am ausgewählten PC-Port
zu aktivieren/deaktivieren.
Support and Documentation Notice
All information, documentation, fi rmware, software utilities, and
specifi cations contained in this package are subject to change without
prior notifi cation bythe manufacturer.
To reduce the environmental impact of our products, ATEN
documentation and software can be found online at
http://www.aten.com/download/
Technical Support
www.aten.com/support
이 기기는 가정용(B급) 전자파적합기기로서 주로 가정에서 사용하는 것을 목적
으로 하며, 모든 지역에서 사용할 수 있습니다.
EMC Information
FEDERAL COMMUNICATIONS COMMISSION INTERFERENCE
STATEMENT:
This equipment has been tested and found to comply with
the limits for a Class B digital service, pursuant to Part 15 of
the FCC rules. These limits are designed to provide reasonable
protection against harmful interference in a residential
installation. Any changes or modifi cations made to this
equipment may void the user s authority to operate this
equipment. This equipment generates, uses, and can radiate
radio frequency energy. If not installed and used in accordance with the instructions, may cause harmful
interference to radio communications. However, there is no guarantee that interference will not occur
in a particular installation. If this equipment does cause harmful interference to radio or television
reception, which can be determined by turning the equipment off and on, the user is encouraged to try
to correct the interference by one or more of the following measures:
- Reorient or relocate the receiving antenna;
- Increase the separation between the equipment and receiver;
- Connect the equipment into an outlet on a circuit different from
that to which the receiver is connected;
- Consult the dealer/an experienced radio/television technician for help.
FCC Caution: Any changes or modifi cations not expressly approved by the party responsible for
compliance could void the user's authority to operate this equipment.
This device complies with Part 15 of the FCC Rules. Operation is subject to the following two
conditions:(1) this device mat not cause harmful interference, and(2) this device must accept any
interference received, including interference that may cause undesired operation.
Scan for
more information
To prevent damage to your installation from power
surges or static electricity, it is important that all
connected devices are properly grounded.
La pagina sta caricando ...
-
 1
1
-
 2
2


ATEN CS22DP Manuale utente
- Tipo
- Manuale utente
- Questo manuale è adatto anche per
in altre lingue
- English: ATEN CS22DP User manual
- français: ATEN CS22DP Manuel utilisateur
- español: ATEN CS22DP Manual de usuario
- Deutsch: ATEN CS22DP Benutzerhandbuch
- русский: ATEN CS22DP Руководство пользователя
- português: ATEN CS22DP Manual do usuário
- 日本語: ATEN CS22DP ユーザーマニュアル