La pagina si sta caricando...

Blade Pro Installation Instructions: Helpline +44 (0) 845 862 6400.
1
INS211 Rev.2. 25.05.2018
Blade Pro: Installation Instructions
English
• Only to be installed by a qualied electrician.
• Disconnect the unit from mains power before installing
or servicing to avoid shock
• Installation must be carried out in accordance with
national and local standards.
• Class 1 luminaires must be earthed.
• Class 3 luminaires must only be used with Class 2 power
supply (US markets only).
• Use correct polarity when wiring. If in any doubt contact
the installation helpline.
• acdc luminaires are designed for lighting applications
and must not be used for any other purpose.
• Do not exceed the product specied power ratings.
• Unauthorised repairs or modications will void warranty.
Required Tools
Deutsche
• Nur von einem Elektrofachmann installiert werden.
• Trennen Sie das Gerät vom Netz, bevor Sie die War
tung des Servers durchführen, um Stöße zu vermeiden
• Die Installation muss gemäß den nationalen und
lokalen Normen durchgeführt werden.
• Leuchten der Klasse 1 müssen geerdet sein.
• Leuchten der Klasse 3 dürfen nur mit Netzteil der
Klasse 2 verwendet werden. (Nur US-Märkte).
• Bei der Verdrahtung die richtige Polarität
verwenden. Bei Zweifeln wenden Sie sich bitte an die
Installations-Helpline.
• acdc-Leuchten sind für Beleuchtungsanwendungen
ausgelegt und dürfen nicht für andere Zwecke
verwendet werden.
• Überschreiten Sie nicht die angegebenen
Produktleistungen.
• Unbefugte Reparaturen oder Änderungen erlischt.
Italiano
• Solo per essere installato da un elettricista qualicato.
• staccare l’apparecchio dalla corrente prima
installingor manutenzione per evitare urti
• L’installazione deve essere effettuata in conformità
con le norme nazionali e locali.
• Classe 1 apparecchi devono essere messi a terra.
• Classe 3 apparecchi devono essere utilizzati solo con
classe 2 di alimentazione (Mercati USA solo).
• Utilizzare la corretta polarità durante il cablaggio.
In caso di dubbio contattare il servizio di assistenza di
installazione.
• Gli apparecchi ACDC sono progettate per
applicazioni di illuminazione e non devono essere
utilizzati per altri scopi.
• Non superare il prodotto specicato potenze.
• riparazioni o modiche non autorizzate saranno
invalidare la garanzia.
Français
• Ne doit être installé que par un électricien qualié.
• Débranchez l’appareil de son alimentation secteur
avant d’installer ou d’entretenir
• L’installation doit être effectuée conformément aux
normes nationales et locales.
• Les luminaires de classe 1 doivent être mis à la terre.
• Les luminaires de classe 3 ne doivent être utilisés
qu’avec une alimentation de classe 2
(Marchés américains uniquement).
• Utilisez la polarité correcte lors du câblage. En cas de
doute, contactez la ligne d’assistance de l’installation.
• les luminaires acdc sont conçus pour des applications
d’éclairage et ne doivent pas être utilisés à d’autres
ns.
• Ne dépassez pas les valeurs de puissance spéciées
par le produit.
• Les réparations ou modications non autorisées
annulent la garantie.
Warning Notice
IP67
Suitable for wet locations

Blade Pro Installation Instructions: Helpline +44 (0) 845 862 6400.
2
INS211 Rev.2. 25.05.2018
English
• This product is not to be installed under water.
• The tting should not be exposed to harsh chemicals.
(e.g. Acids, fertilisers or lime).
• Never allow visible parts of the luminaire to be covered.
• Luminaire must not be cleaned with high
pressure washers.
• The ttings is not suitable for use in high chlorine
environments such as spas and swimming pools.
• Do not expose the luminaire to petroleum.
• All electrical connections must be sealed to IP67.
• Operational ambient temperature range -20
0C to 500C.
• Do not use if the luminaire, connectors or cabling
are damaged.
Blade Pro: Guidelines & Information
Product specic warnings.
Exploded View, What’s In The Box?
Deutsche
• Dieses Produkt darf nicht unter Wasser installiert werden.
• Die Armatur darf nicht harten Chemikalien ausgesetzt
sein (z. B. Säuren, Düngemittel oder Kalk).
• Die Leuchte niemals bedecken lassen.
• Die Leuchte darf nicht mit Hochdruckreinigern
gereinigt werden.
• Die Armaturen eignen sich nicht für den Einsatz in
Hochchlor-Umgebungen wie Spas und Schwimmbädern.
• Setzen Sie die Leuchte nicht dem Erdöl aus.
• Alle elektrischen Anschlüsse müssen nach IP67
versiegelt werden.
• Betriebsbereichstemperaturbereich -20C bis 50C.
• Nicht verwenden, wenn die Leuchte, die Steckverbinder
oder die Verkabelung beschädigt sind.
Italiano
• Questo prodotto non deve essere installato
sotto l’acqua.
• Il raccordo non deve essere esposto a sostanze
chimiche aggressive. (Acidi, fertilizzanti o calce ad es).
• Non permettere mai che l’apparecchio da coprire.
• Apparecchio non deve essere pulito con idropulitrici.
• I raccordi non è adatto per l’uso in ambienti ad alta
cloro, come terme e piscine.
• Non esporre l’apparecchio al petrolio.
• I collegamenti elettrici devono essere sigillati IP67.
• Operativo Temperatura ambiente -20C a 50C.
• Non utilizzare se l’apparecchio, connettori o cavi
sono danneggiati.
Français
• Ce produit ne doit pas être installé sous l ‘eau.
• Le raccord ne doit pas être exposé à des produits
chimiques agressifs (par exemple, des acides, des
engrais ou de la chaux).
• Ne laissez jamais le luminaire être recouvert.
• Le luminaire ne doit pas être nettoyé avec des
rondelles haute pression.
• Les raccords ne conviennent pas aux environnements
à forte teneur en chlore tels que les spas et les piscines.
• N’exposez pas le luminaire au pétrole.
• Toutes les connexions électriques doivent être scellées
selon IP67.
• Température ambiante d’utilisation -20C à 50C.
• Ne pas utiliser si le luminaire, les connecteurs ou le
câblage sont endommagés.

Blade Pro Installation Instructions: Helpline +44 (0) 845 862 6400.
3
INS211 Rev.2. 25.05.2018
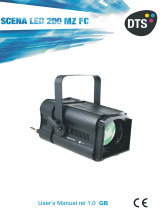
Blade Pro: Guidelines & Ground Sleeve Installation
X
X
X
max. 30 min.
The sleeve must be fully supported from below and installed level.
Failure to level the product may impact the lit effect.
Make sure the ground sleeve is installed level with
the nished ground surface.
Blade Pro 300 = 2.2L / 0.58 US gal.
Blade Pro 600 = 4.3L/ 1.14 US gal.
Blade Pro 900 = 6.4L/ 1.69 US gal.
Blade Pro 1200 = 8.5 L/ 2.24 US gal. Drainage
testing should be carried out prior to the
installation of the luminaire.
This tting is designed to be used with
the provided ground sleeve for external
recessed installation only. This product is
not to be installed under water.
Failing to ensure appropriate drainage
will void warranty.
X X
Ensure proper drainage. A quantity of
water the equivalent to the volume of the
sleeve should drain completely in 30mins or
less.

Blade Pro Installation Instructions: Helpline +44 (0) 845 862 6400.
4
INS211 Rev.2. 25.05.2018
Blade Pro: Step-By-Step Installation
1. Drill drainage holes,
In the bottom of the installation sleeve.
2. Assemble the ground sleeve.
Contractor to supply conduit to suit location
5. Remove the peal strip.
3. Placing the wiring for the ttings.
Install cables or draw wire through conduit before
laying concrete.
When looking at the object to be lit the starter cable
should be fed to the left of the tting.
Use minimum conduit size 1 1/2” or 35mm
to allow connector to pass through.
4. Prepare the ground and install installation sleeve.
The sleeve must be fully supported
from below and installed level.
Paving or concrete
Concrete
Layers of drainage
material
7. Connect Cables.
Check the orientation of the tting, as per the picture
shown.
Make sure the connectors click together to ensure the
IP seal.
Any cables not being connected must be capped
using the supplied bungs to ensure the IP rating
*Product placement
240v
CLICK
Link lead
wall
Starter cable
acdc xxx
acdcxxx/10m
acdc xxx/20m
acdc xxx/50m
6. Test Drainage.
Refer to guidelines on page 3.

Blade Pro Installation Instructions: Helpline +44 (0) 845 862 6400.
5
INS211 Rev.2. 25.05.2018
Blade Pro: Step-By-Step Installation
10. Place luminaire into the ground sleeve.
If anged end caps are required install these now as
shown.
Carefully place the luminaire into the sleeve ensuring
that the clip ttings click into place.
11. Ground removal.
To remove the luminaire use the provided tool in
the recess locations as shown and lift the unit out
with care.
8. Remoter driver installation.
IP20 driver suitable for dry location only.
See wiring table on pg. 6.
*Product placement
9. Check luminaires are working
Turn the power on and check that luminaires are fully
functional before placing in the ground sleeve.
CLICK
Flanged
end cap
Flanged
end cap
acdc xxx
acdcxxx/10m
acdc xxx/20m
acdc xxx/50m

A
B
+ - + - + - + - + -
Standard
Bright
300 / 600 / 900 /
1200
2000mm 0.22mm² Red Black Green Yellow
300 Red Black Green Yellow
600 / 900 / 1200 Red Black Green Yellow Blue White Brown Orange Pink
A B
+ - + - + - + - + -
RGB
300 / 600 / 900 /
1200
2000mm 0.22mm² Red Black Green Yellow Blue White Pink
RGBX
300 / 600 / 900 /
1200
2000mm 0.22mm² Red Black Green Yellow Blue White Brown Orange Pink
A B
+ - + - + - + - + -
Dynamic
White
300 / 600 / 900 /
1200
2000mm 0.22mm² Green Yellow Brown
Orange Red Black Blue White Pink
LED Code
Extra
Bright
Fing LengthOutput
6000K 6000K 2700K
Fing LengthOutput
Channel 1 Channel 2 Channel 3 Channel 4
LED Code
Channel 1 Channel 2 Channel 3 Channel 4
A B
2000mm 0.22mm²
2700K
Output Fing Length
RED GREEN BLUE
LED Code
Channel 1 Channel 2 Channel 3 Channel 4
WHITE / AMBER
Grey/
Violet
Grey/
Violet
Grey/
Violet
Grey/
Violet
Live Earth Neutral Data + Data - Shield
Switched Brown Green Blue
DMX Brown Green Blue Red White Silver
Dali Brown Green Blue Red White
Blade Pro: Wiring Information
Remote driver.
Driver on board.
Max 16 Fittings on a
single mains supply.
Blade Pro Installation Instructions: Helpline +44 (0) 845 862 6400.
INS211 Rev.1
/