
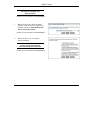
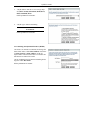
ZyXEL P-336M
802.11g Wireless MIMO Router
Quick Start Guide
Version 1.0
1/2006
CONTENTS
ENGLISH 2
DEUTSCH 16
ESPAÑOL 32
FRANÇAIS 48
ITALIANO 64
РУССКИЙ 80
SVENSKA 97
繁體中文
111

ZyXEL P-336M
2
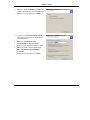
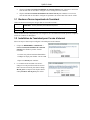
Introducing the ZyXEL P-336M
The ZyXEL P-336M 802.11g Wireless MIMO Router is a broadband sharing gateway with a
built-in wireless LAN access point, four-port 10/100 Mbps switch, and a USB port for the Microsoft
Windows® Connect Now (WCN) technology.
Key features of the ZyXEL P-336M include advanced WPA2 wireless security, firewall with DoS protection,
VPN pass-through, NAT and UPnP. See your User’s Guide for more details on all ZyXEL P-336M features.
The ZyXEL P-336M will be referred to as the P-336M in this guide.
You should have an Internet account already set up and have been given most of the following information.
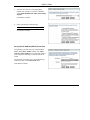
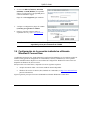
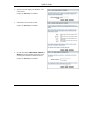
Internet Account Information
Your device’s WAN IP Address (if given): __________________
DNS Server IP Address (if given): First ______________, Second ______________, Third ______________
Encapsulation: (select one below):
Ethernet
Service Type: _______________________
Login Server IP Address: ______________
User Name: ____________ Password: ____________
PPPoE
(PPPoE) Service Name: ____________
User Name: ____________ Password: ____________

ZyXEL P-336M
3
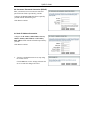
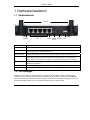
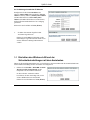
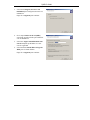
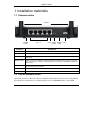
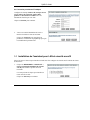
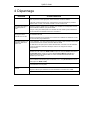
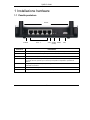
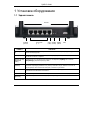
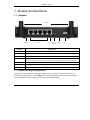
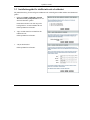
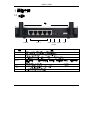
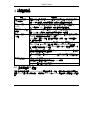
1 Hardware Installation
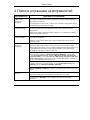
1.1 Rear Panel
LABEL DESCRIPTION
LAN 1-4 Use an Ethernet cable to connect at least one computer for initial configuration.
WAN Connect your broadband modem to this port with the cable that came with your modem.
ON/OFF (WLAN) Slide this switch to enable (ON) or disable (OFF) the wireless LAN feature.
RESET Use this button to restore the P-336M back to the factory default settings. Push the button for less
than 5 seconds to reboot, push for 10 seconds to reset to the factory defaults.
USB Connect this port to a computer to set up a wireless LAN using the Microsoft Windows® Connect
Now feature.
Antennas The P-336M includes 2 adjustable external antennas and 2 internal antennas.
POWER Connect the included power adaptor to this power socket.
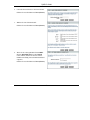
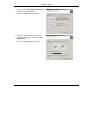
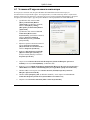
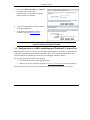
1.2 Front Panel LEDs
After you’ve made the connections, connect the included power adaptor to a power source to turn on the P-
336M. Look at the front panel LEDs. The PWR LED turns on. The LAN LED turns on if the LAN port is
properly connected. Refer to the User’s Guide for detailed LED descriptions.
POWER LAN 1 .. 4 WAN ON/OFF
(
WLAN
)
RESET USB
A
ntennas

ZyXEL P-336M
4
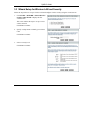
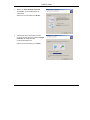
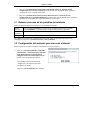
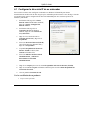
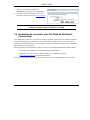
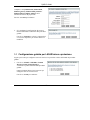
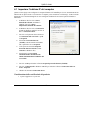
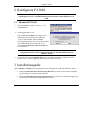
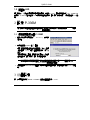
2 Configuring Your P-336M
This guide shows you how to use the web configurator setup wizard only. See your
User’s Guide for background information on all P-336M features.
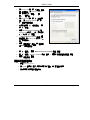
2.1 Accessing the P-336M
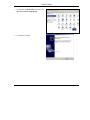
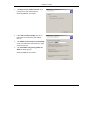
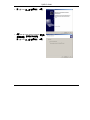
1. Launch your web browser. Enter “192.168.1.1” as
the web site address.
2. A LOGIN screen displays.
Select the admin user name to log in as an
administrator and enter the password (the default is
“1234”) in the Password field. Click Login.
If the login screen does not display, make sure your
computer IP address is set up correctly. Refer to
Section 4.1 for more information.
It is highly recommended you change the default password. You can change the
login password in the Internet access wizard or the ADMIN screen (click TOOLS >
Admin).
3. You should see the DEVICE INFO screen displaying the current device information (such as the
firmware version and WAN IP address, etc.).
3 Wizard Setup
Click BASIC > START in the navigation panel to configure the P-336M using the wizard screens.
• Click Launch Internet Connection Setup Wizard to begin a series of screens to help you
configure your P-336M for Internet access.
• Click Launch Wireless Security Setup Wizard to begin a series of screens to help you configure
your P-336M wireless security settings.

ZyXEL P-336M
5
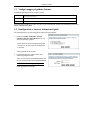
3.1 Common Wizard Screen Buttons
Use the following buttons to navigate the wizard screens:
Cancel Click Cancel in any wizard screen to return to the main WIZARD screen. All unsaved custom
settings will be lost.
Next Click Next to continue to the next screen.
Prev Click Prev to return to the last screen.
No configuration changes will be saved to the P-336M until you go through the entire setup process and click
Connect or Save.
3.2 Wizard Setup for Internet Access
Follow the steps below to configure the P-336M for Internet access.
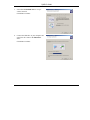
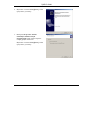
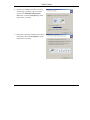
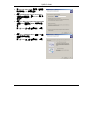
1. Click START > WIZARD > Launch Internet
Connection Setup Wizard to display the first
wizard screen.
This screen introduces you to the setup wizard
and outlines the steps to set up your P-336M.
Click Next to continue.
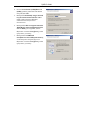
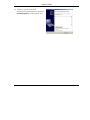
2. The second wizard screen prompts you to change
the login password.
Enter a new password in the Password field and
retype the password in Verify Password field to
verify.
Passwords are case sensitive.
Click Next to continue.

ZyXEL P-336M
6
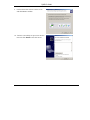
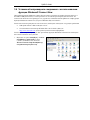
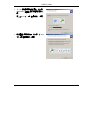
3. Select the time zone for your geographical
location. For example, if you are in California,
select (GMT-08:00) Pacific Time (US/Canada),
Tijuana.
Click Next to continue.
4. Select your Internet connection type.
If you do not know, contact your ISP.
Click Next to continue.
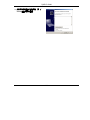
4a. Dynamic IP Address (DHCP) Connection
If required by your ISP, enter your computer MAC
address in the MAC Address field or click Clone
Your PC’s MAC Address to copy the MAC address
of the computer connecting to your ISP onto the P-
336M.
If a host name is necessary for a successful Internet
connection, enter it in the Host Name field.
Click Next to continue.

ZyXEL P-336M
7
4b. Username / Password Connection (PPPoE)
Enter your Internet access account user name and
password in the fields as provided by your ISP.
Configure the Service Name field when required by
your ISP with the information given.
Click Next to continue.
4c. Static IP Address Connection
Configure the IP Address, Subnet Mask, Gateway
Address, Primary DNS Address and Secondary
DNS Address fields with the information provided by
your ISP.
Click Next to continue.
5. You have completed Internet access setup using
the wizard screens.
Click Connect to save the settings and restart the
device to make the changes take effect.

ZyXEL P-336M
8
3.3 Wizard Setup for Wireless LAN and Security
Follow the steps below to set up a wireless LAN and configure wireless security using the wizard screens.
1. Click START > WIZARD > Launch Wireless
Security Setup Wizard to display the first
wizard screen.
This screen outlines the steps to set up a secure
wireless network.
Click Next to continue.
2. Specify a unique name to identify your wireless
LAN.
Click Next to continue.
3. Select a security level.
Click Next to continue.

ZyXEL P-336M
9
4. If you select BEST, BETTER or GOOD in the
previous screen, enter a security key for secure
wireless connection.
Click Next to continue.
5. Verify your settings and click Save to save the
changes.
6. Test your Internet connection. Launch your web
browser and navigate to www.zyxel.com
.
Wireless clients must also set to use the same security option and key to connect
to the P-336M.
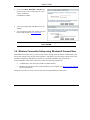
3.4 Wireless Connection Setup using Windows® Connect Now
With Windows® Connect Now, you can store the wireless settings on the P-336M on a USB memory stick
and save the settings to the wireless client computer(s). This allows you to wirelessly connect devices with
minimum configuration. Windows® Connect Now is available in Windows XP, Service Pack 2.
To take advantage of this feature, make sure you have the following requirements:
• A USB memory stick with at least 300K of available memory.
• Windows XP with Service Pack 2 (SP2) installed on your computer (see http://www.microsoft.com
for more information).
Follow the steps below to create a new wireless network using Windows® Connect Now.

ZyXEL P-336M
10
1. Click Start > Control Panel and double-click
Wireless Network Setup Wizard.
2. Click Next to continue.

ZyXEL P-336M
11
3. Select Set up a new wireless network to
configure a new wireless network.
Click Next to continue.
4. In the Network name (SSID) field, specify a
unique name to identify your wireless LAN.
5. Select Automatically assign a network key
to have Windows create a security key.
6. Select Use WPA encryption instead of WEP
for data encryption.
Click Next to continue.

ZyXEL P-336M
12
7. Select Use a USB Flash drive to set up a
wireless network.
Click Next to continue.
8. Connect the USB drive to your computer and
specify the drive letter in the Flash drive
field.
Click Next to continue.


ZyXEL P-336M
14
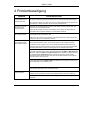
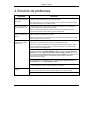
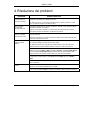
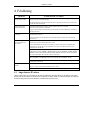
4 Troubleshooting
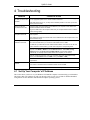
PROBLEM CORRECTIVE ACTION
None of the LEDs turn
on when you turn on the
P-336M.
Make sure that you have the included power adaptor connected to the P-336M and plugged
in to an appropriate power source. Check all cable connections.
If the LEDs still do not turn on, you may have a hardware problem. In this case, you should
contact your local vendor.
Cannot access the
P-336M from the LAN.
Check the cable connection between the P-336M and your computer or hub. Refer to the
Hardware Installation section for details.
Ping the P-336M from a LAN computer. Make sure your computer Ethernet card is installed
and functioning properly.
Cannot ping any
computer on the LAN.
If the 10/100M LAN LEDs are off, check the cable connections between the P-336M and your
LAN computers.
Verify that the IP address and subnet mask of the P-336M and the LAN computers are in the
same IP address range.
If you are using a cable modem, you must first turn off your cable modem and wait for about
two to three minutes before you connect the cable modem to the P-336M.
The WAN IP is provided after the ISP verifies the MAC address, host name or user ID. Find
out the verification method used by your ISP and configure the corresponding fields.
If the ISP checks the WAN MAC address, you should clone the MAC address from a LAN
computer. Click BASIC > WAN and click the Advanced button. Select MAC Cloning
Enabled and then click Clone Your PC’s MAC Address to get the MAC address
automatically, or manually enter the MAC address of a computer you are cloning.
If the ISP checks the host name, enter your computer’s name (refer to the Wizard Setup
section) in the Host Name field in the WAN screen (click BASIC > WAN).
Cannot get a WAN IP
address from the ISP.
If the ISP checks the user ID, click BASIC > WAN and check your service type, user name,
and password.
Check the P-336M’s connection to the broadband modem.
Turn off and on to restart both the broadband modem and the P-336M.
Cannot access the
Internet.
Click the WAN screen to verify your Internet connection settings.
4.1 Set Up Your Computer’s IP Address
This section shows you how to set your Windows NT/2000/XP computer to automatically get an IP address.
This ensures that your computer can with your Prestige. Refer to your User’s Guide for detailed IP address
configuration for other Windows and Macintosh computer operating systems.

ZyXEL P-336M
15
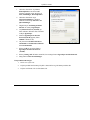
1. In Windows XP, click start, Control
Panel. In Windows 2000/NT, click Start,
Settings, Control Panel.
2. In Windows XP, click Network
Connections. In Windows 2000/NT,
click Network and Dial-up Connections.
3. Right-click Local Area Connection and
then click Properties.
4. Select Internet Protocol (TCP/IP)
(under the General tab in Windows XP)
and click Properties.
5. The Internet Protocol TCP/IP
Properties screen opens (the General tab
in Windows XP).
6. Select the Obtain an IP address
automatically and Obtain DNS server
address automatically options.
7. Click OK to close the Internet Protocol (TCP/IP) Properties window.
8. Click Close (OK in Windows 2000/NT) to close the Local Area Connection Properties window.
9. Close the Network Connections screen.
Viewing Your Product’s Certifications
1. Go to www.zyxel.com.
2. Select your product from the drop-down list box on the ZyXEL home page to go to that product's
page.
3. Select the certification you wish to view from this page.

ZyXEL P-336M
16
ZyXEL P-336M - Einführung
Der ZyXEL P-336M 802.11g Wireless MIMO Router ist ein Breitband-Gateway mit integriertem
Wireless-LAN Access-Point und gleichzeitig ein 10/100-Mbps-Switch mit vier Anschlüssen sowie einem
USB-Anschluss, der die Technologie Microsoft Windows® Connect Now (WCN) unterstützt.
Zu den wichtigsten Leistungsmerkmalen des P-336M gehören die erweiterte Drahtlossicherheit mit WPA2,
die Firewall DoS-Schutz, VPN Pass-Through, NAT und UPnP. Eine ausführliche Beschreibung der
Leistungsmerkmale des ZyXEL P-336M finden Sie im Benutzerhandbuch. In dieser Anleitung wird der
ZyXEL P-336M im Folgenden P-336M genannt.
Voraussetzung für die Benutzung sind ein bestehendes Internetkonto und die folgenden Informationen.
Daten zum Internetkonto
Die WAN-IP-Adresse Ihres Geräts (wenn vorhanden):
Die IP-Adresse des DNS-Servers (wenn vorhanden): Erste______________, zweite______________, dritte
______________
Verkapselung: (wählen Sie eine der Folgenden):
Ethernet
Diensttyp: _______________________
Login Server IP-Adresse: ______________
Benutzername: ____________ Kennwort: ____________
PPPoE
(PPPoE) Dienstname: ____________
Benutzername: ____________ Kennwort: ____________

ZyXEL P-336M
17
1 Hardwareinstallation
1.1 Geräterückseite
KENNZEICHNUNG BESCHREIBUNG
LAN 1-4 Schließen Sie mindestens einen Computer mit einem Ethernet-Kabel für die Erstkonfiguration an.
WAN Schließen Sie das Kabel-/Satelliten-/DSL-Breitbandmodem mit dem Kabel, das Sie mit dem
Modem erhalten haben, an diesen Anschluss an.
ON/OFF (WLAN) Mit Hilfe dieses Schalters können Sie die LAN-Funktion aktivieren (ON) oder deaktivieren (OFF).
RESET Mit dieser Taste können Sie die Einstellungen des P-336M auf die Standardeinstellungen
zurücksetzen. Drücken Sie höchstens 5 Sekunden lang auf diese Taste, um das Gerät neu zu
starten. Drücken Sie 10 Sekunden lang darauf, um die Standardeinstellungen wiederherzustellen.
USB Hier können Sie einen Computer anschließen, um mit Microsoft® Windows® Connect Now ein
Wireless-LAN aufzubauen.
Antennen
Der P-336M hat zwei einstellbare externe und zwei interne Antennen.
POWER An diesen Netzanschluss wird der mitgelieferte Netzadapter angeschlossen.
1.2 LED-Anzeigen
Nachdem Sie alle Geräte angeschlossen haben, schließen Sie den Netzadapter an das Stromnetz an und
schalten Sie den P-336M ein. Die LED-Anzeigen befinden sich an der Gerätevorderseite. Die PWR-LED
beginnt zu leuchten. Die LAN-LED beginnt zu leuchten, wenn der LAN-Anschluss richtig angeschlossen ist.
Im Benutzerhandbuch finden Sie eine ausführliche Beschreibung der LED-Anzeigen.
POWER LAN 1 .. 4 WAN ON/OFF
(
WLAN
)
RESET USB
A
ntennen

ZyXEL P-336M
18
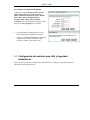
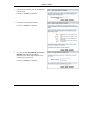
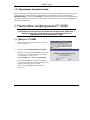
2 Konfigurieren des P-336M
In dieser Anleitung wird nur die Verwendung des Konfigurationsassistenten beschrieben.
Eine ausführliche Beschreibung der Leistungsmerkmale des P-336M finden Sie im
Benutzerhandbuch.
2.1 Zugreifen auf den P-336M
1. Starten Sie Ihren Webbrowser. Geben Sie als
Websiteadresse “192.168.1.1” ein.
2. Ein LOGIN-Fenster erscheint auf dem Bildschirm.
Wählen Sie den Benutzernamen admin, um sich als
Administrator einzuloggen und geben Sie im Feld
Kennwort das Kennwort (die Standardeinstellung ist
“1234”) ein. Klicken Sie auf Login.
Wenn das Login-Fenster nicht angezeigt wird, prüfen
Sie, ob die IP-Adresse des Computers richtig
eingegeben wurde. Weitere Informationen hierzu
finden Sie unter 4.1.
Es wird dringend empfohlen, das Standardkennwort zu ändern! Das Login-Kennwort kann
beim Assitenten für den Internet-Zugriff oder im ADMIN-Fenster geändert werden (klicken
Sie auf EXTRAS > Admin).
3. Nun erscheint das Fenster GERÄTE-INFORMATIONEN, in dem die aktuellen Geräteinformationen
(z.B. Firmware-Version und WAN-IP-Adresse) angezeigt werden.
3 Einrichten des Geräts mit dem Assistenten
Klicken Sie im Navigationsfeld auf BASIC > START, um den P-336M mit dem Assistenten einzurichten.
• Klicken Sie auf Launch Internet Connection Setup Wizard, um den Assistenten zu starten, mit
dem Sie den P-336M für den Internet-Zugriff konfigurieren können.

ZyXEL P-336M
19
• Klicken Sie auf Launch Wireless Security Setup Wizard, um den Assistenten zu starten, mit dem
Sie die Sicherheitseinstellungen für die drahtlose Datenübertragung des P-336M konfigurieren
können.
3.1 Die wichtigsten Tasten des Assistenten
Mit den folgenden Tasten können Sie in den Fenstern des Assistenten navigieren:
Cancel
(Abbrechen)
Sie können in jedem beliebigen Fenster des Assistenten auf Cancel klicken, um zum
Hauptfenster des ASSISTENTEN zurückzukehren. Alle neuen, nicht gespeicherten
Einstellungen gehen dabei verloren.
Next (Weiter)
Klicken Sie auf Next (Weiter), um zum nächsten Fenster zu wechseln.
Prev
(Vorhergehendes)
Klicken Sie auf Prev, um zum vorhergehenden Fenster zurückzukehren.
Die Änderungen der Konfiguration speichert der P-336M nur dann, wenn der gesamte Setup-Vorgang
abgeschlossen wurde und Sie abschließend auf Connect (Verbinden) oder Save (Speichern) klicken.
3.2 Einrichten des Internet-Zugriffs mit dem Assistenten
Führen Sie die nachfolgenden Schritte aus, um den P-336M für den Internet-Zugriff zu konfigurieren.
1. Klicken Sie auf START > WIZARD > Launch
Internet Connection Setup Wizard, um das
Hauptfenster des Assistenten aufzurufen.
In diesem Fenster wird der Assistent vorgestellt
und Sie erhalten eine Beschreibung der Schritte,
die für das Einrichten des P-336M erforderlich
sind.
Klicken Sie zum Fortfahren auf Next (Weiter).
2. Im zweiten Fenster des Assistenten werden Sie
aufgefordert, das Login-Kennwort zu ändern.
Geben Sie im Feld Password (Kennwort) ein
neues Kennwort ein und wiederholen Sie das
neue Kennwort zum Bestätigen im Feld Verify
Password (Kennwort bestätigen).

ZyXEL P-336M
20
Achten Sie beim Eingeben des
Kennworts auf die Groß- und
Kleinschreibung.
Klicken Sie zum Fortfahren auf Next (Weiter).
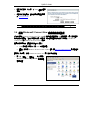
3. Wählen Sie die für Ihre Region geltende
Zeitzone. Wenn Sie sich z.B. in Kalifornien
befinden, wählen Sie (GMT-08:00) Pacific
Time (US/Canada), Tijuana.
Klicken Sie zum Fortfahren auf Next (Weiter).
4. Wählen Sie die Art der verwendeten
Internetverbindung.
Wenn Sie keine genauen Angaben
machen können, kann Ihnen Ihr
Internetdienstanbieter weiterhelfen.
Klicken Sie zum Fortfahren auf Next (Weiter).
La pagina si sta caricando...
La pagina si sta caricando...
La pagina si sta caricando...
La pagina si sta caricando...
La pagina si sta caricando...
La pagina si sta caricando...
La pagina si sta caricando...
La pagina si sta caricando...
La pagina si sta caricando...
La pagina si sta caricando...
La pagina si sta caricando...
La pagina si sta caricando...
La pagina si sta caricando...
La pagina si sta caricando...
La pagina si sta caricando...
La pagina si sta caricando...
La pagina si sta caricando...
La pagina si sta caricando...
La pagina si sta caricando...
La pagina si sta caricando...
La pagina si sta caricando...
La pagina si sta caricando...
La pagina si sta caricando...
La pagina si sta caricando...
La pagina si sta caricando...
La pagina si sta caricando...
La pagina si sta caricando...
La pagina si sta caricando...
La pagina si sta caricando...
La pagina si sta caricando...
La pagina si sta caricando...
La pagina si sta caricando...
La pagina si sta caricando...
La pagina si sta caricando...
La pagina si sta caricando...
La pagina si sta caricando...
La pagina si sta caricando...
La pagina si sta caricando...
La pagina si sta caricando...
La pagina si sta caricando...
La pagina si sta caricando...
La pagina si sta caricando...
La pagina si sta caricando...
La pagina si sta caricando...
La pagina si sta caricando...
La pagina si sta caricando...
La pagina si sta caricando...
La pagina si sta caricando...
La pagina si sta caricando...
La pagina si sta caricando...
La pagina si sta caricando...
La pagina si sta caricando...
La pagina si sta caricando...
La pagina si sta caricando...
La pagina si sta caricando...
La pagina si sta caricando...
La pagina si sta caricando...
La pagina si sta caricando...
La pagina si sta caricando...
La pagina si sta caricando...
La pagina si sta caricando...
La pagina si sta caricando...
La pagina si sta caricando...
La pagina si sta caricando...
La pagina si sta caricando...
La pagina si sta caricando...
La pagina si sta caricando...
La pagina si sta caricando...
La pagina si sta caricando...
La pagina si sta caricando...
La pagina si sta caricando...
La pagina si sta caricando...
La pagina si sta caricando...
La pagina si sta caricando...
La pagina si sta caricando...
La pagina si sta caricando...
La pagina si sta caricando...
La pagina si sta caricando...
La pagina si sta caricando...
La pagina si sta caricando...
La pagina si sta caricando...
La pagina si sta caricando...
La pagina si sta caricando...
La pagina si sta caricando...
La pagina si sta caricando...
La pagina si sta caricando...
La pagina si sta caricando...
La pagina si sta caricando...
La pagina si sta caricando...
La pagina si sta caricando...
La pagina si sta caricando...
La pagina si sta caricando...
La pagina si sta caricando...
La pagina si sta caricando...
La pagina si sta caricando...
La pagina si sta caricando...
La pagina si sta caricando...
La pagina si sta caricando...
La pagina si sta caricando...
La pagina si sta caricando...
La pagina si sta caricando...
La pagina si sta caricando...
La pagina si sta caricando...
La pagina si sta caricando...
La pagina si sta caricando...
-
 1
1
-
 2
2
-
 3
3
-
 4
4
-
 5
5
-
 6
6
-
 7
7
-
 8
8
-
 9
9
-
 10
10
-
 11
11
-
 12
12
-
 13
13
-
 14
14
-
 15
15
-
 16
16
-
 17
17
-
 18
18
-
 19
19
-
 20
20
-
 21
21
-
 22
22
-
 23
23
-
 24
24
-
 25
25
-
 26
26
-
 27
27
-
 28
28
-
 29
29
-
 30
30
-
 31
31
-
 32
32
-
 33
33
-
 34
34
-
 35
35
-
 36
36
-
 37
37
-
 38
38
-
 39
39
-
 40
40
-
 41
41
-
 42
42
-
 43
43
-
 44
44
-
 45
45
-
 46
46
-
 47
47
-
 48
48
-
 49
49
-
 50
50
-
 51
51
-
 52
52
-
 53
53
-
 54
54
-
 55
55
-
 56
56
-
 57
57
-
 58
58
-
 59
59
-
 60
60
-
 61
61
-
 62
62
-
 63
63
-
 64
64
-
 65
65
-
 66
66
-
 67
67
-
 68
68
-
 69
69
-
 70
70
-
 71
71
-
 72
72
-
 73
73
-
 74
74
-
 75
75
-
 76
76
-
 77
77
-
 78
78
-
 79
79
-
 80
80
-
 81
81
-
 82
82
-
 83
83
-
 84
84
-
 85
85
-
 86
86
-
 87
87
-
 88
88
-
 89
89
-
 90
90
-
 91
91
-
 92
92
-
 93
93
-
 94
94
-
 95
95
-
 96
96
-
 97
97
-
 98
98
-
 99
99
-
 100
100
-
 101
101
-
 102
102
-
 103
103
-
 104
104
-
 105
105
-
 106
106
-
 107
107
-
 108
108
-
 109
109
-
 110
110
-
 111
111
-
 112
112
-
 113
113
-
 114
114
-
 115
115
-
 116
116
-
 117
117
-
 118
118
-
 119
119
-
 120
120
-
 121
121
-
 122
122
-
 123
123
-
 124
124
-
 125
125


ZyXEL P-336M - V1.0 Manuale del proprietario
- Tipo
- Manuale del proprietario
- Questo manuale è adatto anche per
in altre lingue
Documenti correlati
-
ZyXEL NBG-334SH Manuale utente
-
ZyXEL NBG-460N Manuale utente
-
-
-
-
-
-
-
-
ZyXEL UAG50 Guida Rapida

