
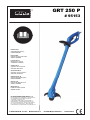
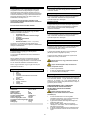
GRT 250 P
# 95153
© Güde GmbH & Co. KG - Birkichstrasse 6 - D-74549 Wolpertshausen - Deutschland
Deutsch DE 4
Originalbetriebsanleitung
RASENTRIMMER
English GB 8
Original Operating Instructions
GRASS TRIMMER
Français FR 12
Mode d’emploi original
TONDEUSE Á GAZON
Čeština CZ 16
Originální návod k obsluze
STRUNOV SEKACKA
Slovenčina SK 20
Originálny návod na obsluhu
STRUNOV KOSACKA
Nederlands NL 24
Originele gebruiksaanwijzing
GRASSTRIMMER
Italiano IT 28
Originale del Manuale d’Uso
GRASS TRIMMER
Magyar HU 32
Eredeti használati utasítás
SZEGÉLYNYÍRÓ
EG-KONFORMITÄTSERKLÄRUNG 36
EC-DECLARATION OF CONFORMITY • DECLARATION CE
DE CONFORMITÉ • PROHLÁŠENÍ O SHODĚ EU •
VYHLÁSENIE O ZHODE EÚ • EG-
CONFORMITEITVERKLARING • DICHARAZIONE DI
CONFORMITÁ CE • AZONOSSÁGI NYILATKOZAT EU •
IZJAVA O ISTOVETNOSTI EU • IZJAVA O SUKLADNOSTI
EU • IZJAVA O SUKLADNOSTI EU • DECLARAŢIE DE
CONFORMITATE UE • ДЕКЛАРАЦИЯ ЗА СХОДСТВО С ЕС

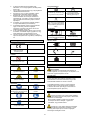
A
1
2
3
4
5
6
7
8
B
C
D E F
I G H
9
1
2
3
4
5
6
7
2

KL
M N
J
3

Einleitung
Damit Sie an Ihrem neuen Gerät möglichst lange Freude
haben, bitten wir Sie, die Betriebsanweisung und die
beiliegenden Sicherheitshinweise vor Ingebrauchnahme
sorgfältig durchzulesen. Ferner wird empfohlen, die
Gebrauchsanweisung für den Fall aufzubewahren, dass
Sie sich die Funktionen des Artikels später nochmals ins
Gedächtnis rufen möchten.
Im Rahmen ständiger Produktweiterentwicklung
behalten wir uns vor zur Verbesserung technische
Änderungen umzusetzen. Abbildungen können daher
abweichen.
Bei diesem Dokument handelt es sich um die
Originalbetriebsanweisung.
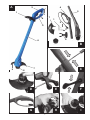
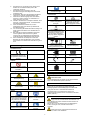
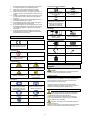
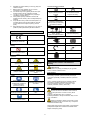
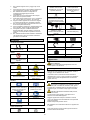
Lieferumfang Abb. B
Nehmen Sie das Gerät aus der Transportverpackung und
prüfen Sie die Vollständigkeit und das Vorhandensein
folgender Teile:
• Griffteil
• Motorteil mit vormontierter Spule
• Griff
• Spulenschutz
• Ersatzspule
• Befestigungsmaterial (3 Schrauben + 2 Muttern)
Sollten Teile des Lieferumfangs fehlen oder beschädigt
sein, wenden Sie sich bitte an Ihren Händler.
Bestimmungsgemäße Verwendung
Rasentrimmer für die schnelle und bequeme Rasenpflege.
Zur einfachen Entfernung von Gras und Unkraut unter
Büschen, Böschungen und an Kanten.
Es dürfen mit dieser Maschine keine anderen Arbeiten
verrichtet werden, als die Arbeiten, für die die Maschine
gebaut ist und die in der Bedienungsanleitung beschrieben
werden.
Jeder darüber hinausgehende Gebrauch gilt als nicht
bestimmungsgemäß. Für daraus resultierende Schäden
oder Verletzungen haftet der Hersteller nicht. Bitte
beachten Sie das dieses Gerät bestimmungsgemäß nicht
für den gewerblichen Einsatz konstruiert sind.
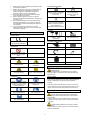
Gerätebeschreibung (Abb. A)
1. Halteknauf
2. Griff
3. Anschlusskabel
4. Anschlusskabelarretierung/Kabelzugentlastung
5. Gashebel
6. Bajonettverschluss
7. Fadenspulenschutz
8. Fadenspule
9. Messer zur Fadenlängenregulierung
Technische Daten
Anschluss: 230 V ~ 50 Hz
Schutzklasse: II
Schutzart: IPX0
Max. Leistung: 250 W
Motordrehzahl: 14.000 min-1
Schnittbreite: 200 mm
Fadenspulen-Ø: 1,2 mm
Arbeitsgriffhöhe: 780 mm
Anschlusskabel: 300 mm
Gewicht: 1,2 kg
Anforderungen an den Bediener
Der Bediener muss vor Gebrauch des Gerätes
aufmerksam die Bedienungsanleitung gelesen haben.
Qualifikation
Außer einer ausführlichen Einweisung durch eine
sachkundige Person ist keine spezielle Qualifikation für
den Gebrauch des Gerätes notwendig.
Mindestalter
Das Gerät darf nur von Personen betrieben werden, die
das 16. Lebensjahr vollendet haben. Eine Ausnahme stellt
die Benutzung als Jugendlicher dar, wenn die Benutzung
im Zuge einer Berufsausbildung zur Erreichung der
Fertigkeit unter Aufsicht eines Ausbilders erfolgt.
Schulung
Die Benutzung des Gerätes bedarf lediglich einer
entsprechenden Unterweisung. Eine spezielle Schulung ist
nicht notwendig.
Vor Inbetriebnahme
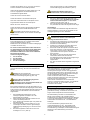
Montage
Stecken Sie das Griffteil (Abb B/4) und den Motorteil (Abb
B/5) durch Drehen zusammen. Fixieren Sie die beiden
Teile mit der Schraube und der Mutter (Abb. B/2; Abb.C).
Bringen Sie den Spulenschutz (Abb. B/7) mittels der
Schrauben (Abb- B/3) an den Maschinenkopf an (Abb. D).
Schrauben Sie den Halteknauf (Abb. B/6) an das Griffteil
mittels Schraube und Mutter an (Abb. B/1; Abb. E-F).
Achten Sie bitte auf festen Sitz der montierten
Teile.
Prüfen Sie das Gerät vor jeder Inbetriebnahme
auf:
• Beschädigte Kabel
• Einwandfreien Zustand der Schutzeinrichtungen und
der Schneidvorrichtungen
• Fester sitz sämtlicher Verschraubungen
Sicherheitshinweise
Die Bedienungsanleitung muss vor der ersten Anwendung
des Gerätes ganz durchgelesen werden. Falls über den
Anschluss und die Bedienung des Gerätes Zweifel
entstehen sollten, wenden Sie sich an den Hersteller
(Service-Abteilung).
UM EINEN HOHEN GRAD AN SICHERHEIT ZU
GEWÄHRLEISTEN, BEACHTEN SIE AUFMERKSAM
FOLGENDE HINWEISE:
Achtung! Nur an Stromnetz mit
Fehlerstromschalter (FI) anschließen!
1. Hände und Füße stets vom Schneidbereich fern
halten, vor allem beim Start der Maschine. Die Hand
auf dem Zusatzhandgriff stets frei halten
2. Das Gerät stets in einem angemessenen
Sicherheitsabstand vom Körper halten und eine
stabile Körperposition einnehmen.
3. Stets ein Gesichtsschutzschild/Schutzbrille, Helm
sowie Sicherheitsstiefel und Handschuhe tragen.
4. Die Maschine nur bei ausreichenden
Lichtverhältnissen betreiben.
5. Die Maschine nicht bei Regen oder feuchtem Gras
verwenden.
4

6. Die Maschine vor Verwendung oder infolge eines
Stoßes auf eventuelle Schäden prüfen, falls
notwendig, reparieren.
7. Die Maschine nicht verwenden, wenn die
Schutzvorrichtungen beschädigt oder nicht korrekt
angebracht sind.
8. Sicherstellen, dass die Lüftungsschlitze des Motors
stets frei von Schmutz oder Rückständen sind.
9. Während der Arbeitsvorgänge stets sicherstellen,
dass sich in einem Umkreis von mindestens 3 m
weder Personen noch Tiere
10. befinden. Die Maschine unverzüglich abstellen, wenn
Personen, insbesondere Kinder, in die Reichweite
der Maschine gelangen.
11. Wenn die Maschine in Betrieb ist, sich den
beweglichen Teilen nicht nähern (Im Bereich der
Schneidvorrichtung).
12. Vor Verwendung des Geräts sind Steine, Zweige und
jedes weitere Festmaterial vom Arbeitsbereich zu
entfernen.
13. Bei Verlängerung des Schneidfadens ist höchste
Vorsicht geboten. Nach Durchführung dieser
Vorgänge ist vor Inbetriebsetzung der Maschine
erneut die korrekte Arbeitsposition einzunehmen.
14. Keine metallischen Schneidspulen verwenden.
Beachten Sie, dass die Maschine nach Loslassen
des Schalters noch weitere fünf Sekunden lang nach
läuft.
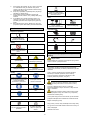
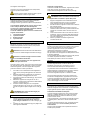
Kennzeichnungen
Kennzeichnungen
Produktsicherheit:
Produkt ist mit den
einschlägigen Normen der
Europäischen Gemeinschaft
konform
Verbote:
Vor Regen und Feuchtigkeit
schützen! Kein nasses Gras
schneiden!
Warnung:
Warnung/Achtung Verletzungsgefahr durch
weggeschleuderte Teile.
Abstand halten Warnung vor rotierenden
Teilen - Einzugsgefahr
Gebote:
Lesen Sie die
Gebrauchsanleitung sorgfältig
durch. Machen Sie sich mit
dem Gebrauch des Gerätes
vorab sorgfältig vertraut.
Augen- und Gehörschutz
benutzen
Schutzhandschuhe benutzen Sicherheitsschuhe
benutzen
Schutzhelm tragen
Umweltschutz:
Abfall nicht in die Umwelt
sondern fachgerecht
entsorgen.
Verpackungsmaterial aus
Pappe kann an den dafür
vorgesehen Recycling-
Stellen abgegeben werden.
Schadhafte und/oder zu
entsorgende elektrische oder
elektronische Geräte müssen
an den dafür vorgesehen
Recycling-Stellen abgegeben
werden.
Verpackung:
Vor Nässe schützen
Achtung Zerbrechlich
Packungsorientierung Oben
Interseroh-Recycling
Technische Daten:
Anschluss Motorleistung
Motordrehzahl Schnittbreite
Gewicht
Gerätespezifische Sicherheitshinweise
Rotierender Faden
Arbeiten/Einstellungen am Gerät nur bei abgeschaltetem
Motor und stillstehender Spule vornehmen.
Vor dem Mähen
Prüfen Sie vor jeder Benutzung (Sichtprüfung) die
Befestigungsmittel auf Beschädigungen und festen Sitz.
Überprüfen Sie das zu bearbeitende Gelände auf
Gegenstände die vom Rasentrimmer erfasst und
weggeschleudert werden können und entfernen Sie diese.
(Steine, Äste etc.)
Während dem Mähen
Tragen Sie eine Schutzbrille/Schutzschild/Helm und
einen Gehörschutz sowie Handschuhe beim Arbeiten mit
dem Rasentrimmer.
Mähen Sie nur mit Sicherheitsschuhe mit Stahlkappen/-
sohlen und langer Hose, niemals barfuss oder in
Sandalen.
Achten Sie auf den angemessenen Abstand von
Personen, Kindern und Lebewesen.
5

Schalten Sie den Motor nur ein, wenn sich Ihre Füße in
sicherem Abstand zum Schneidkopf befinden.
Halten Sie das Gerät stets an beiden Griffen fest, so ist
auch der vorgegebenen Sicherheitsabstand zum
Schneidebereich gewährleistet.
Achten Sie auf einen sicheren Stand.
Greifen Sie niemals in die laufende Fadenspule.
Nach dem Ausschalten dreht sich die Spule noch für
einige Sekunden. Berühren niemals die Spule.
Mähen Sie nicht in nassem Gras.
Achten Sie darauf das die Lüftungsschlitze des Motors
stets frei von Schmutz und Mährückständen sind.
Beim Mähen können Steine oder andere Teile
weggeschleudert werden, die zu schweren Verletzungen
führen können.
Verhalten im Notfall
Leiten Sie die der Verletzung entsprechend notwendigen
Erste Hilfe Maßnahmen ein und fordern Sie schnellst
möglich qualifizierte ärztliche Hilfe an.
Bewahren Sie den Verletzten vor weiteren Schädigungen
und stellen Sie diesen ruhig.
Für einen eventuell eintretenden Unfall sollte immer
ein Verbandskasten nach DIN 13164 am Arbeitsplatz
griffbereit vorhanden sein. Dem Verbandskasten
entnommenes Material ist sofort wieder aufzufüllen.
Wenn Sie Hilfe anfordern,
machen Sie folgende Angaben:
1. Ort des Unfalls
2. Art des Unfalls
3. Zahl der Verletzten
4. Art der Verletzungen
Bedienung
Beachten Sie bitte die gesetzlichen Bestimmungen zur
Lärmschutzverordnung, die örtlich unterschiedlich sein
können.
Achtung! An der Unterseite des
Fadenspulenschutzes befindet sich ein Messer für die
automatische Fadenlängenregulierung (Abb. A/9)
Achtung! Das Schneidwerkzeug beginnt bei
startendem Motor sich zu drehen.
Einstellungen nur bei ausgeschaltetem Gerät und
gezogenem Netzstecker vornehmen.
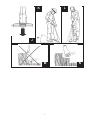
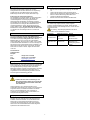
Bevor Sie den Motorstarten muss der Nylonfaden evt. bis
zum Rand der Schutzhaube herausgezogen werden. Beim
ersten Anlaufen des Schneidkopfes wird der Faden auf die
richtige Länge durch das Messer an der Schutzhaube
abgeschnitten.
1. Das Netzkabel des Rasentrimmer an das
Verlängerungskabel anschließen und in die
Kabelarretierung einhängen.
2. Halten Sie das Gerät mit beiden Händen fest und
nehmen die Arbeitsposition ein.
3. Durch drücken des Gashebels (Abb. A/5) starten Sie
den Rasentrimmer.
4. Halten Sie das Gerät in einem Winkel von ca. 30°
und bewegen Sie diesen mit einer gleichmäßigen
halbkreisförmigen Bewegung von rechts nach links.
(Abb. K-L)
5. Die besten Ergebnisse erhält man bei einer max.
Graslänge von 15 cm. (Abb. M)
Wenn das Gras höher ist, ist es empfehlenswert,
mehrere Mähvorgänge durchzuführen. (Abb. N)
ACHTUNG! Den Mähkopf während des
Maschinenbetriebes nicht auf den Boden legen.
Nachstellen des Spulenfadens:
1. Das sich im Betrieb befindende Gerät über einen
grasigen Bereich halten. Den Mähkopf ein paar Mal
leicht auf den Boden klopfen. Auf diese Weise
verlängert sich der Faden. (Abb. J)
2. Das in die Schutzhaube eingefügte Messer (Abb.
A/9) schneidet den Faden auf der gewünschte Länge.
Abschaltfolge:
Durch los lassen des Gashebels stoppt das Gerät nach
wenigen Sekunden. Trennen Sie nun das Gerät von der
Verlängerungsleitung bzw. dem Netzkabel.
Wechsel der Fadenspule
ACHTUNG! Vor Austausch der Fadenspule
unbedingt den Netzstecker ziehen!
1. Schalten Sie den Rasentrimmer aus und warten Sie
bis der Nylonfaden komplett Still steht, trennen Sie
das Gerät von der Netzleitung.
2. Greifen Sie nun die Spule und drehen diese nach
links in Richtung „offenes Schloss-Symbol“.
3. Entnehmen Sie die leere Spule und ersetzen diese
durch eine neue Spule. In dem Sie die Spule auf die
Feder setzen und nach rechts in Richtung
„geschlossenes Schloss-Symbol“ drehen bis die
Spule einrastet.
4. Den Faden evt. bis zum Rand der Schutzhaube
herausziehen. Beim ersten Anlaufen des
Schneidkopfes wird der Faden auf die richtige Länge
durch das Messer an der Schutzhaube
abgeschnitten.
5. Nun kann das Gerät wieder eingesteckt und gestartet
werden.
Training
Lesen Sie die Betriebs- und Wartungsanleitung sorgfältig
durch. Machen Sie sich gründlich mit den
Steuerungseinrichtungen und dem ordnungsgemäßen
Gebrauch des Gerätes vertraut. Sie müssen wissen, wie
das Gerät arbeitet, und wie die Steuerungseinrichtungen
schnell ausgeschaltet werden können.
Lassen Sie niemals Kinder mit dem Gerät arbeiten.
Lassen Sie niemals Erwachsene ohne ordnungsgemäße
Einweisung mit dem Gerät arbeiten.
Halten Sie den Arbeitsbereich frei von sämtlichen
Personen, insbesondere kleinen Kindern, und Haustieren.
Seien Sie vorsichtig, um zu vermeiden, dass Sie
ausrutschen oder hinfallen.
Gewährleistung
Die Gewährleistungszeit beträgt 12 Monate bei
gewerblicher Nutzung, 24 Monate für Verbraucher und
beginnt mit dem Zeitpunkt des Kaufs des Gerätes.
Die Gewährleistung erstreckt sich ausschließlich auf
Mängel, die auf Material- oder Herstellungsfehler
zurückzuführen sind. Bei Geltendmachung eines Mangels
im Sinne der Gewährleistung ist der Kaufbeleg - der das
Verkaufsdatum auszuweisen hat - mit Verkaufsdatum
beizufügen.
Von der Gewährleistung ausgeschlossen sind
unsachgemäße Nutzung, wie z. B. Überlastung des
Gerätes, Gewaltanwendung, Beschädigungen durch
Fremdeinwirkung, Fremdkörper, sowie Nichtbeachtung der
Gebrauchs- und Aufbauanleitung und normaler
Verschleiß.
6

Entsorgung
Die Entsorgungshinweise ergeben sich aus den
Piktogrammen die auf dem Gerät bzw. der Verpackung
aufgebracht sind. Eine Beschreibung der einzelnen
Bedeutungen finden Sie im Kapitel „Kennzeichnung“.
Entsorgung der Transportverpackung
Die Verpackung schützt das Gerät vor Transportschäden.
Die Verpackungsmaterialien sind in der Regel nach
umweltverträglichen und entsorgungstechnischen
Gesichtspunkten ausgewählt und deshalb recycelbar.
Das Rückführen der Verpackung in den Materialkreislauf
spart Rohstoffe und verringert das Abfallaufkommen.
Verpackungsteile (z.B. Folien, Styropor®) können für
Kinder gefährlich sein. Es besteht Erstickungsgefahr!
Bewahren Sie Verpackungsteile außerhalb der Reichweite
von Kindern auf und entsorgen Sie sie so schnell wie
möglich.
Service
Sie haben technische Fragen? Eine Reklamation?
Benötigen Ersatzteile oder eine Bedienungsanleitung?
Auf unserer Homepage www.guede.com im Bereich
Service helfen wir Ihnen schnell und unbürokratisch
weiter. Bitte helfen Sie uns Ihnen zu helfen. Um Ihr Gerät
im Reklamationsfall identifizieren zu können benötigen wir
die Seriennummer sowie Artikelnummer und Baujahr. Alle
diese Daten finden Sie auf dem Typenschild. Um diese
Daten stets zur Hand zu haben, tragen Sie diese bitte
unten ein.
Seriennummer:
Artikelnummer:
Baujahr:
Tel.: +49 (0) 79 04 / 700-360
Fax: +49 (0) 79 04 / 700-51999
E-Mail: [email protected]de.com
Wichtige Kundeninformation
Bitte beachten Sie, dass eine Rücksendung innerhalb oder
auch außerhalb der Gewährleistungszeit grundsätzlich in
der Originalverpackung erfolgen sollte. Durch diese
Maßnahme werden unnötige Transportschäden und deren
oft strittige Regelung wirkungsvoll vermieden. Nur im
Originalkarton ist Ihr Gerät optimal geschützt und somit
eine reibungslose Bearbeitung gesichert.
Wartung
Schalten Sie das Gerät vor Wartungs- und
Reinigungsarbeiten immer ab und warten Sie
bis das Gerät vollends stillsteht. Ziehen Sie
den Netzstecker.
Wartungsarbeiten, die in diesem Handbuch nicht
ausdrücklich beschrieben sind, müssen von Fachpersonal
ausgeführt werden, da Gefahrensituationen entstehen
können, auf die der Bediener nicht vorbereitet ist.
Austausch von Ersatzteilen dürfen ausschließlich von
Fachpersonal ausgeführt werden.
Reinigung
Reinigen Sie nach jeder Benutzung den Rasentrimmer
entweder mit einem sauberen Tuch, einer Bürste oder
blasen Sie es mit Druckluft bei niedrigem Druck aus.
Verwenden Sie keine Reinigungs- oder Lösungsmittel,
diese können die Kunststoffteile des Gerätes angreifen.
Spritzen Sie den Rasenmäher nicht
Lagerung im Winter
• Nehmen Sie eine gründliche Reinigung des Gerätes
vor.
• Lagern Sie das Gerät in einem trockenen Raum.
• Führen Sie alle allgemeinen Wartungsarbeiten durch,
welche im Abschnitt Wartung beschrieben sind.
• Lassen Sie die Maschine abkühlen.
• Säubern Sie das äußere Gehäuse der Maschine
Fehlersuche
Die Tabelle zeigt mögliche Fehler, deren mögliche
Ursache und Möglichkeiten zur Abhilfe. Sollten Sie das
Problem trotzdem nicht beseitigen können, ziehen Sie eine
Fachkraft zu Rate.
Vor Wartung- oder Reinigungsarbeiten das Gerät
ausschalten und den Netzstecker ziehen.
Symptome Mögliche Ursache Abhilfe
Schneidet nicht
Spulenfaden zu
kurz
Spule leer
Spulenfaden
Nachstellen
Spule wechseln
Gerät läuft nicht
an
Stromzufuhr
unterbrochen
Steckverbindung,
Netzkabel und
Verlängerungskabel
prüfen.
7

Introduction
To enjoy your new appliance as long as possible, please
read carefully the Operating Instructions and the attached
safety instructions before putting the appliance into
operation. We also recommend keeping the Operating
Instructions for future reference.
Making technical changes to improve the appliance as
part of the continuous product development reserved.
Illustrations may therefore be different.
This document represents the original Operating
Instructions.
Supply includes, pic. B
Take the appliance out of the transport container and
check whether there are the following parts:
• Part with handle
• Part with engine and pre-fitted spool
• Handle
• Spool cover
• Spare spool
• Fixing material (3 bolts + 2 nuts)
If any parts are missing or are damaged, please contact
your dealer.
Use as designated
String trimmer for fast and comfortable lawn treatment.
For easy removal of grass and weed under bushes, banks
and on edges.
The appliance cannot be used for other works than those
for which it has been designed and which are specified in
the Operating Instructions.
Any other use will be considered a use in conflict with the
designation. The manufacturer will not be liable for any
consequential damage and injuries. Please be sure to
know that the appliance has not been designed for
industrial purposes.
Appliance description (pic. A)
1. Fixture
2. Handle
3. Feeder cable
4. Feeder cable/cable strain relief lock
5. Hand throttle
6. Bayonet cap
7. Spool of string cover
8. Spool of string
9. String cut-off knife
Technical specifications
Connection: 230 V ~ 50 Hz
Protection class: II
Protection type: IPX0
Max. output: 250 W
Engine speed: 14,000 per min-1
Cutting width: 200 mm
Ø spool of string: 1.2 mm
Operating handle height: 780 mm
Feeder cable: 300 mm
Weight: 1.2 kg
Operator requirements
The operator must carefully read the Operating
Instructions before using the appliance.
Qualification
No special qualification is necessary for using the
appliance apart from detailed instruction by an expert.
Minimum age
The appliance can only be operated by persons over 16
years of age. An exception includes youngsters operating
the appliance within their professional education to
achieve necessary skills under trainer's supervision.
Training
Using the appliance only requires appropriate instructions
by a professional or reading the Operating Instructions. No
special training necessary.
Before putting the appliance into operation
Assembly
Screw the part with handle (pic. B/4) and part with engine
(pic. B/5) to each other. Fix both parts with a bolt and nut
(pic. 2/B; pic.C).
Fix the spool cover (pic. B/7) to the appliance head (pic. D)
with a bolt (pic. B/3).
Mount the fixture (pic. B/6) to the handle using a bolt and
nut (pic. 1/B; pic. E-F).
Please make sure the assembled parts are firmly
tightened.
Before putting the appliance into operation, check
it for the following:
• Cable not damaged
• Perfect state of the protection and cutting equipment
• Firm tightening of all the screwing
Safety instructions
Please read carefully the Operating Instructions before
using the appliance for the first time. If there are any
doubts regarding the appliance connection and operation,
please contact the manufacturer (service department).
PLEASE FOLLOW CAREFULLY THESE
INSTRUCTIONS TO ENSURE HIGH SAFETY LEVEL:
Caution! To be plugged to network with safety
switch against stray current (FI) only!
1. At all times, keep your hands and feet in a sufficient
distance from the string, especially when starting the
engine. The hand on the additional handle should
always be free
2. At all times, keep the appliance in a reasonable safe
distance from your body and take a stable posture.
3. A protective face shield/protective glasses, helmet
and safety shoes and gloves should always be worn.
4. Appliance to be worked with only under adequate
visibility.
5. Do not use the appliance when raining and when the
grass is wet.
6. Check the appliance for any damage before using it
or after hitting any object and have it repaired if
necessary.
7. Do not use the appliance if any protection equipment
is damaged or assembled inappropriately.
8

8. Make sure the engine ventilation slots are with no dirt
and remains at all times.
9. Make sure there are no persons or animals within at
least 3 metres when working with the appliance.
Switch the appliance immediately off if persons,
especially children, get near the appliance.
10. Do not get near the moving parts (near the string)
when the appliance is running.
11. Before using the appliance, remove any stones,
branches and other solid materials from the place you
are going to cut.
12. Pay maximum attention when extending the string.
After taking these steps, it is necessary to take the
right operating posture before putting the appliance
into operation.
13. Do not use metal spools. Be sure to know the
appliance keeps running for five more seconds after
the throttle is released.
Označení
Marking
Product safety:
Product corresponds to
appropriate EU standards
Prohibitions:
Protect against rain and
moisture! Do not cut wet
grass!
Warning:
Warning/caution Risk of injury by thrown-
away items
Keep your distance Warning against rotating
parts – risk of drawing-in
Commands:
Do not touch these parts to
avoid burns. Learn carefully
how the appliance works
before operating it.
Use protective glasses and
headphones
Use protective gloves Use safety shoes
Wear safety helmet
Environment protection:
Dispose waste professionally
so as not to harm the
environment.
Packing cardboard material
may be delivered to
collecting centres for
recycling.
Any faulty and/or disposed
electric or electronic devices
must be delivered to
appropriate collection centres.
Package:
Protect against moisture
Caution - fragile
This side up
Interseroh-Recycling
Technical specifications:
Connection Engine output
Engine speed Cutting width
Weight
Appliance-specific safety instructions
Rotating string
Works on/adjustment of the appliance to be performed
when the engine is switched off and cutting knife/string in
idle state only.
Before cutting
Every time the appliance is to be used, check (visually) the
means of fastening for any damage and if tightened
properly.
Check the ground where the string trimmer is to be used
for any items that may get caught and thrown away by the
trimmer and remove such items (stones, branches, etc.).
When cutting
Wear protective glasses/protection shield/helmet
and hearing protection and gloves when working with the
string trimmer.
Cutting to take place only with safety shoes with steel toe
cap/sole and long trousers. Never cut when barefooted or
in sandals.
Provide adequate distance from persons, children
and animals.
Start the engine only after your feet are in a safe distance
from the cutting head.
9

Hold the appliance by both handles at all times to
guarantee the specified safe distance from the cutting
area.
Make sure your posture is safe.
Never touch inside the spool of string.
After switching the appliance off, the string keeps rotating
for a few seconds. Never touch the string when running.
Do not cut wet grass.
Make sure the engine ventilation slots are always clean
and with no grass remains.
Stones or other items may be thrown away when
cutting and cause serious injuries.
Behaviour in case of emergency
Provide necessary first aid treatment corresponding to the
injury nature and seek qualified medical help as soon as
possible. Protect the injured person from other injuries and
calm him/her down.
First aid kit must always be available in the place of
your work in case of accident in accordance with DIN
13164. Material taken out of the first aid kit needs to be
supplemented right away.
If help is needed, please provide the following details:
1. Place of accident
2. Accident nature
3. Number of injured persons
4. Injury type
Operating
Please follow the statutory regulations regarding the
protection against noise provisions that may differ in
individual locations.
Caution! The automatic string cut-off knife (pic. A/9)
is located underneath the spool of string cover.
Caution! The cutting tool starts rotating when the
engine is started.
Adjustment to be only performed when the
appliance is switched off and unplugged.
If necessary, the nylon string must be pulled out to the
protection cover edge before starting the engine. When the
cutting head is initially run, the string is cut to the
appropriate length by the knife on the protection cover.
1. Connect the string trimmer feeder cable to the
extension cable and hang it to the cable lock.
2. Hold the appliance by both hands and take the
operating posture.
3. To start the string trimmer, press the hand throttle
(pic. A/5).
4. Hold the appliance at an angle of app. 30° and move
it from the right to the left in half-circle (pic. K-L).
5. Best results are achieved with max. grass length of
15 cm (pic. M).
More cuttings are recommended when the grass is
higher (pic. N).
CAUTION! Do not put the cutting head on the
ground when the appliance is running.
Spool of string adjustment:
1. Keep the running appliance above the grass plot. Tap
slightly the cutting head by the ground. By this,
the string will be extended (pic. J).
2. The knife in the protection cover (pic. A/9) will cut the
string to the required length.
Switch-off order:
The appliance gets stopped after a few seconds when the
hand throttle is released. Now disconnect the appliance
from the extension or feeder cable.
Spool of string change
CAUTION! The appliance must necessarily be
unplugged before changing the spool of string!
1. Switch the string trimmer off and wait until the nylon
string fully stops and disconnect the appliance from
the feeder cable.
2. Now grasp the spool and turn it to the left in the “open
lock symbol“ direction.
3. Remove the empty spool and replace it with a new
one. Fit the spool on the spring and turn it to the right
in the “closed lock symbol“ direction until it snaps in.
4. If necessary, when the cutting head is initially run, the
string is cut to the appropriate length by the knife on
the protection cover.
5. The appliance may now be plugged and started now.
Training
Please read carefully the Operating Instructions and the
servicing instructions. Familiarise thoroughly with the
controls and proper using of the appliance. You must know
how the appliance works and how controls can quickly be
switched off.
Never let children work with the appliance. Never let an
adult person work with the appliance without proper
training.
Do not let any persons, especially small children and pets,
to the place of your work.
Be careful to prevent slipping or falling.
Warranty
A warranty period of 12 months applies to commercial use
and 24 months apply to private use and commences on
the day of purchase of the device.
Warranty applies exclusively to failures due to defective
material or workmanship. An original sale slip with
indication of date of sale must be presented in case of
claiming for the warranty rights.
Warranty does not cover unprofessional use such as
device overload, violent use, damage caused by third party
or foreign materials, failure to comply with operations and
assembly manual, and normal wear and tear.
Disposal
The disposal instructions are based on icons placed on the
appliance or its package. The description of the meanings
can be found in the “Marking” section.
Transport package disposal
The package protects the appliance against damage
during transport. Packing materials are usually chosen
depending on their environmental friendliness and disposal
method and can therefore be recycled.
Returning the package to material circulation saves raw
materials and reduces waste disposal costs.
Parts of packages (e.g. foils, styropor®) can be dangerous
to children. Risk of suffocation!
Keep parts of packages away from children and dispose
them as soon as possible.
10

Maintenance
Do you have any technical questions? A claim? Do you
need spare parts or the Operating Instructions?
You will be helped quickly and without needless
bureaucracy at our webpage www.guede.com in the
Services part. Please help us be able to assist you. To be
able to identify your appliance when claimed, we need to
know its serial No., order No. and year of production. All
these details can be found on the type label. Enter the
details below for future reference.
Serial No.
Order No.
Year of production:
Tel.: +49 (0) 79 04 / 700-360
Fax: +49 (0) 79 04 / 700-51999
E-Mail: [email protected]de.com
Servicing
The appliance must always be switched off
before any servicing and cleaning. Wait until
it fully stops. Unplug it.
Servicing works not specified in these Operating
Instructions must be performed by authorised staff as
there may be dangerous situations the operator is unable
to handle. Spare parts may only be replaced by authorised
staff.
Cleaning
Every time the appliance has been used, it should be
cleaned by a clean cloth, brush or blown with compressed
air under low pressure.
Do not use cleaning agents and solvents as they may
damage the plastic parts of the appliance.
Do not spray on the string trimmer.
Winterising
• Clean the appliance thoroughly.
• Keep the appliance in a dry room.
• Provide overall servicing as described in the
Servicing section.
• Let the appliance cool down.
• Clean the appliance external surface.
Troubleshooting
The table shows potential failures, their possible cause
and removal options. However, if you are unable to
remove the problem, contact a professional to assist you.
Switch off and unplug the appliance before any
servicing and cleaning.
Symptom Possible cause Remedy
Appliance not
cutting
Spool of string is
too short
Spool is empty
Adjust the spool of
string
Change the spool
Appliance not
starting
Power supply is
interrupted
Check the plug, feeder
and extension cable.
11

Introduction
Afin de pouvoir profiter le plus longtemps possible de votre
nouvel appareil, veuillez lire attentivement le mode
d’emploi et les consignes de sécurité jointes. Nous vous
recommandons également de conserver le mode d’emploi
pour une consultation ultérieure éventuelle.
Dans le cadre du développement continu de nos
produits, nous nous réservons le droit aux
modifications techniques dans le but d’améliorer nos
produits. Par conséquent, les images peuvent différer.
Ce document est un mode d’emploi original.
Contenu du colis fig. B
Sortez l’appareil de l’emballage de transport et contrôlez
l’intégralité et l’existence des pièces suivantes :
• Partie avec poignée
• Partie avec moteur et bobine prémontée
• Poignée
• Capot de la bobine
• Bobine de remplacement
• Matériel de fixation (3 vis + 2 écrous)
Si certaines pièces manquent ou sont endommagées,
veuillez contacter votre vendeur.
Utilisation en conformité avec la
destination
Coupe-bordures pour un traitement rapide et confortable
de la pelouse.
Pour une suppression facile de l’herbe et des mauvaises
herbes sous arbustes, talus et sur les bords.
Cet appareil ne doit pas être utilisés pour d’autres travaux
que ceux pour lesquels il a été conçu et qui sont décrits
dans le mode d’emploi.
Toute autre utilisation est considérée comme contraire à la
destination. Le fabricant décline toute responsabilité pour
des dommages consécutifs à une telle utilisation. Notez
que nos appareils ne sont pas conçus pour l’utilisation
industrielle.
Description de l’appareil (fig. A)
1. Manche
2. Poignée
3. Câble d‘alimentation
4. Blocage du câble d’alimentation/dispositif
d’allègement du câble en traction
5. Manette de gaz
6. Fixation à baïonnette
7. Capot de la bobine de fil
8. Bobine de fil
9. Coupe-fil
Caractéristiques techniques
Fiche : 230 V ~ 50 Hz
Classe de protection : II
Type de protection : IPX0
Puissance maximale : 250 W
Tours du moteur : 14.000 min-1
Prise : 200 mm
Ø de la bobine de fil : 1,2 mm
Hauteur de la poignée
de travail : 780 mm
Câble d’alimentation : 300 mm
Poids : 1,2 kg
Exigences à l’égard de l’opérateur
L’opérateur doit lire attentivement la notice avant d’utiliser
l’appareil.
Qualification
Mis à part l’instruction détaillée par un spécialiste, aucune
autre qualification spécifique n’est requise.
Âge minimal
L’appareil peut être utilisé uniquement par des personnes
de plus de 16 ans, exception faite des adolescents
manipulant l’appareil dans le cadre de l’enseignement
professionnel sous la surveillance du formateur.
Formation
L’utilisation de l’appareil nécessite uniquement l’instruction
par un spécialiste, éventuellement par la notice. Une
formation spéciale n’est pas nécessaire.
Avant la mise en marche
Montage
Vissez ensemble la partie avec poignée (fig. B/4) et la
partie avec moteur (fig. B/5). Fixez les deux pièces à l’aide
d’une vis avec écrou (fig. 2/B; fig. C).
Fixez le capot de la bobine (fig. B/7) à l’aide d’une vis (fig.
B/3) à la tête de l‘appareil (fig. D)
Fixez le manche (fig. B/6) à la poignée à l’aide d’une vis et
d’un écrou (fig. 1/B; fig. E-F).
Veillez à ce que les pièces montées soient
correctement serrées.
Avant la mise en marche, contrôlez l’appareil du
point de vue de :
• Étanchéité du système d’alimentation
• État parfait des dispositifs de protection et de coupe
• Serrage solide de tous les boulonnages
Consignes générales de sécurité
Avant la première utilisation, il est nécessaire de lire
entièrement le mode d’emploi. Si vous avez des doutes en
ce qui concerne le branchement ou la manipulation,
contactez le fabricant (service après-vente).
AFIN D’ASSURER UN GRAND DEGRÉ DE SÉCURITÉ,
RESPECTEZ LES CONSIGNES SUIVANTES :
Attention ! Branchez uniquement au secteur
équipé d’un disjoncteur différentiel (FI)!
1. Respectez une distance de sécurité des mains et
pieds du fil, en particulier lorsque vous mettez le
moteur en marche. Ayez toujours la main sur la
poignée auxiliaire libre.
2. Maintenez toujours l’appareil à une distance
suffisante du corps et adoptez une posture stable.
3. Portez toujours un écran de protection/lunettes de
protection, un casque, des chaussures de sécurité et
des gants.
4. Travaillez avec l’appareil uniquement lorsque la
visibilité est suffisante.
5. N’utilisez pas l’appareil sous la pluie ou si l’herbe est
mouillée.
6. Contrôlez l’appareil avant l’utilisation ou après un
choc du point de vue de dommages éventuels et
réparez-les si nécessaire.
12

7. N’utilisez pas l’appareil si les dispositifs de protection
sont endommagés ou incorrectement montés.
8. Veillez à ce que les fentes d’aération du moteur
soient toujours exemptes d’impuretés et résidus.
9. Veillez à ce que personne, y compris les animaux, ne
se trouve dans un rayon minimal de 3 mètres lors du
travail.
10. Arrêtez immédiatement l’appareil si des personnes et
en particulier les enfants se trouvent à la portée de
l’appareil.
11. N’approchez pas les pièces mobiles (dans la zone du
fil) lorsque l’appareil est en marche.
12. Avant d’utiliser l’appareil, retirez pierres, branches et
autre matériel fixe de la zone de travail.
13. Soyez très prudents lors du rallongement du fil. Avant
de remettre l’appareil en marche après avoir effectué
ces opérations, adoptez à nouveau une posture de
travail sûre.
14. N’utilisez pas des bobines métalliques. Notez que
l’appareil continue à tourner quelques instants après
le relâchement de l’interrupteur.
Symboles
Sécurité du produit :
Produit répond aux normes
correspondantes de la CE
Interdictions :
Protégez de la pluie et de
l’humidité ! Ne coupez pas
l’herbe mouillée !
Avertissement :
Avertissement/attention Avertissement – danger de
blessures par objets éjectés
Gardez vos distances
Avertissement – pièces
rotatives – danger
d’entraînement
Consignes :
Pour éviter des brûlures, ne
touchez pas ces parties.
Familiarisez-vous avec
l’utilisation de l’appareil.
Portez un casque et des
lunettes de protection
Utilisez des gants de
protection
Utilisez des chaussures de
protection
Portez un casque
Protection de l’environnement :
Liquidez les déchets de
manière à ne pas nuire à
l’environnement.
Déposez l’emballage en
carton au dépôt pour
recyclage.
Déposez les appareils
électriques ou électroniques
défectueux et/ou destinés à
liquidation au centre de
ramassage correspondant.
Emballage :
Protégez de l’humidité
Attention - fragile
Sens de pose
Interseroh-Recycling
Caractéristiques techniques :
Fiche Puissance du moteur
Tours du moteur Prise
Poids
Consignes de sécurité spécifiques pour
l’appareil
Fil rotatif
Procédez aux travaux/réglages sur l’appareil uniquement
lorsque le moteur est arrêté et le fil au repos.
Avant de couper
Contrôlez avant toute utilisation (contrôle visuel) les outils
de coupe et leurs moyens de fixation du point de vue
d’endommagement et de serrage.
Contrôlez le terrain sur lequel vous souhaitez utiliser
l’appareil et éliminez les objets pouvant être accrochés et
éjectés par la tondeuse (pierres, branches, etc.).
Pendant la coupe
Portez lors du travail avec le coupe-bordures des
lunettes de protection/écran de protection, un casque et
une protection auditive ainsi que des gants.
Portez lors du travail des chaussures de sécurité avec
bout en acier/semelle et un pantalon long, ne travaillez
jamais pieds nus ou en sandales.
Respecter une distance de sécurité des personnes,
enfants et animaux.
Mettez le moteur en marche uniquement lorsque vos pieds
se trouvent à une distance sûre de la tête de coupe.
13

Tenez l’appareil par les deux mains, ce qui permet de
respecter la distance de sécurité prescrite de la zone de
coupe.
Respecter une posture sûre.
Ne touchez jamais la bobine de fil en rotation.
La bobine continue à tourner quelques secondes après
l’arrêt de l’appareil. Ne touchez jamais la bobine en
rotation.
Ne coupez jamais la pelouse humide.
Veillez à ce que les fentes d’aération du moteur soient
toujours propres et sans restes d’herbe.
Le travail avec le coupe-bordures peut provoquer
l’éjection de pierres ou d’autres objets pouvant provoquer
des blessures graves.
Conduite en cas d’urgence
Effectuez les premiers gestes de secours et appelez
rapidement les premiers secours.
Protégez le blessé d’autres blessures et calmez-le.
Pour des raisons de risque d’accident, le lieu de travail
doit être équipé d’une armoire à pharmacie selon DIN
13164. Il est nécessaire de compléter immédiatement
le matériel pris dans l’armoire à pharmacie. Si vous
appelez les secours, fournissez les renseignements
suivants :
1. Lieu d‘accident
2. Type d‘accident
3. Nombre de blessés
4. Type de blessure
Manipulation
Veuillez respecter les dispositions légales relatives au
règlement sur la protection du bruit, pouvant différent d’un
endroit à l’autre.
Attention ! Sur la partie inférieure du capot de la
bobine de fil se trouve un coupe-fil pour la coupe
automatique du fil (fig. A/9).
Attention ! L’outil de coupe commence à tourner
après le démarrage du moteur.
Procédez au réglage uniquement lorsque
l’appareil est arrêté et la fiche retirée.
Avant de mettre le moteur en marche, il est nécessaire
que le fil en nylon soit sorti éventuellement jusqu’au bord
du capot de protection. Lors du premier démarrage de la
tête de coupe, le fil sera coupé à la longueur adéquate par
le coupe-fil situé sur le capot de protection.
1. Branchez le câble d’alimentation du coupe-bordures
à la rallonge et accrochez-le au blocage du câble.
2. Tenez l’appareil fermement des deux mains et
adoptez la posture de travail.
3. Démarrez le coupe-bordures en appuyant sur la
manette de gaz (fig. A/5).
4. Tenez l’appareil à environ 30° et faites des
mouvements réguliers en demi-cercle de la droite
vers la gauche (fig. K-L)
5. Les meilleurs résultats sont obtenus avec une
longueur maximale de l’herbe de 15 cm (fig. M).
Si l’herbe est plus haute, il est recommandé
d’effectuer plusieurs coupes (fig. N).
ATTENTION ! Ne posez jamais la tête de coupe
sur le sol pendant son fonctionnement.
Réglage de la bobine de fil :
1. Tenez l’appareil en marche au-dessus de la surface
herbeuse. Cognez légèrement la tête de coupe à
plusieurs reprises contre le sol. Ceci permet de
prolonger le fil (fig. J).
2. Le coupe-fil situé dans le capot de protection (fig.
A/9) coupera le fil à la longueur souhaitée.
Arrêt de l’appareil :
L’appareil s’arrête quelques secondes après le
relâchement de la manette de gaz. À présent, débranchez
l’appareil de la rallonge ou du câble d’alimentation.
Remplacement de la bobine de fil
ATTENTION ! Avant de procéder au remplacement
de la bobine de fil, retirez la fiche de la prise !
1. Arrêtez le coupe-bordures et attendez que le fil en
nylon s’arrête complètement, débranchez ensuite
l’appareil du câble d’alimentation.
2. A présent, saisissez la bobine et tournez-la à gauche
vers le „symbole de verrou ouvert“.
3. Retirez la bobine vide et remplacez-la par une neuve.
Placez la bobine sur le ressort et tournez-la à droite
vers le „symbole de verrou fermé“ de façon à ce que
la bobine s‘enclenche.
4. Tirez éventuellement la bobine jusqu’au bord du
capot de protection. Le fil sera coupé par le coupe-fil
situé sur le capot de protection lors du premier
démarrage de la tête de coupe.
5. A présent, l’appareil peut être à nouveau branché au
secteur et démarré.
Entraînement
Lisez attentivement le mode d’emploi et d’entretien.
Familiarisez vous bien avec les dispositifs de commande
et l’utilisation correcte de l’appareil. Vous devez savoir
comment l’appareil fonctionne et comment arrêter
rapidement de dispositif de commande.
Ne laissez jamais les enfants travailler avec l’appareil. Ne
laissez jamais les adultes travailler avec l’appareil sans
formation préalable.
Empêchez l’accès à votre lieu de travail aux personnes, en
particulier aux enfants ainsi qu‘aux animaux,
Soyez prudents pour éviter le risque de glissement ou de
chute.
Garantie
La durée de la garantie est de 12 mois en cas d’une
utilisation industrielle et de 24 mois pour le consommateur
final. La période de garantie commence à courir à compter
de la date d’achat de l’appareil.
La garantie s’applique exclusivement sur les défauts de
matériel ou des défauts de fabrication. En cas de
réclamation pendant la durée de la garantie, veuillez
joindre l’original du justificatif d’achat comportant la date
d’achat.
La garantie ne couvre pas une utilisation incompétente,
telle que surcharge de l’appareil, utilisation de force,
endommagement par une personne étrangère ou un objet
étranger, non respect du mode d’emploi et du mode de
montage et usure normale.
14

Liquidation
Les consignes de liquidation résultent des pictogrammes
indiqués sur l’appareil ou sur l’emballage. La description
des significations individuelles se trouve dans le chapitre
« Indications sur l’appareil ».
Liquidation de l’emballage de transport
L’emballage protège l’appareil de l’endommagement lors
du transport. En général, le matériel d’emballage est choisi
de façon à ce qu’il réponde aux règles de protection de
l’environnement et de liquidation des déchets, par
conséquent, il peut être recyclé.
La remise de l’emballage dans le circuit de matières
permet d’économiser des matières premières et de réduire
les déchets.
Des parties de l’emballage (telles que films, styropore)
peuvent être dangereux pour les enfants. Danger
d’étouffement !
Rangez les parties de l’emballage hors de portée des
enfants et liquidez-les le plus rapidement possible.
Service
Vous avez des questions techniques ? Une réclamation
? Vous avez besoin de pièces détachées ou d’un mode
d’emploi ?
Nous vous aiderons rapidement et sans bureaucratie
inutile par l’intermédiaire de nos pages Web
www.guede.com dans la rubrique Service. Aidez-nous
pour que nous puissions vous aider. Pour identifier votre
appareil en cas de réclamation, nous avons besoins du
numéro de série, numéro de produit et l’année de
fabrication. Toutes ces informations se trouvent sur la
plaque signalétique. Pour avoir ces informations toujours à
porté de main, veuillez les inscrire ici :
Numéro de série :
N° de commande :
Année de fabrication :
Tél.: +49 (0) 79 04 / 700-360
Fax: +49 (0) 79 04 / 700-51999
E-mail: [email protected]m
Entretien
Avant tout entretien et nettoyage, arrêtez
l’appareil et attendez qu’il s’arrête
complètement. Retirez la fiche.
Les travaux d’entretien non décrits explicitement dans ce
mode d’emploi, doivent être réalisés par un personnel
qualifié, car ils peuvent engendrer des situations
dangereuses auxquelles l’utilisateur n’est pas préparé. Le
remplacement des pièces détachées doit être réalisé
uniquement par un personnel qualifié.
Nettoyage
Nettoyez le coupe-bordures après chaque utilisation à
l’aide d’un chiffon propre ou soufflez-la à l’air comprimé
avec une faible pression.
N’utilisez pas de produits de nettoyage et dissolvants
pouvant nettoyer des parties en plastique de l’appareil.
Ne pulvérisez pas de l’eau sur le coupe-bordures.
Stockage en hiver
• Nettoyez l’appareil.
• Rangez l’appareil dans une pièce sèche.
• Procédez à l’entretien global décrit dans le chapitre
Entretien.
• Laissez l’appareil refroidir.
• Nettoyez la surface extérieure de l’appareil.
Recherche des pannes
Le tableau représente les pannes possibles, leur cause
probable et les possibilités de leur résolution. Si le
problème persiste, faites appel à un spécialiste.
Avant l’entretien et le nettoyage, arrêtez l’appareil et
retirez la fiche.
Symptôme Cause probable Solution
L’appareil ne
coupe pas
Fil trop court
Bobine vide
Réglez le fil
Remplacez la bobine
L’appareil ne
démarre pas
Amenée de
courant
interrompue
Contrôlez la fiche, le
câble d’alimentation et
la rallonge.
15

Úvod
Abyste ze svého nového přístroje měli co možná nejdéle
radost, přečtěte si prosím před uvedením do provozu
pečlivě návod k obsluze a přiložené bezpečnostní pokyny.
Dále doporučujeme, abyste si návod k použití uschovali
pro případ, že byste si později chtěli znovu připomenout
funkce výrobku.
V rámci neustálého dalšího vývoje výrobku si
vyhrazujeme právo provádět technické změny za
účelem vylepšení. Obrázky se proto mohou lišit.
U tohoto dokumentu se jedná o originální návod k
obsluze.
Objem dodávky obr. B
Přístroj vyjměte z přepravního obalu a zkontrolujte úplnost
a existenci těchto dílů:
• Část s rukojetí
• Část s motorem a předmontovanou cívkou
• Rukojeť
• Kryt cívky
• Náhradní cívka
• Materiál pro připevnění (3 šrouby + 2 matice)
Pokud díly v dodávce chybí nebo jsou poškozené, obraťte
se prosím na svého prodejce.
Použití v souladu s určením
Strunová sekačka pro rychlé a pohodlné ošetření trávníku.
K jednoduchému odstranění trávy a plevele pod keři,
náspy a na hranách.
S tímto strojem nelze vykonávat jiné práce, než pro jaké
byl tento stroj zkonstruován a jež jsou popsány v návodu k
obsluze.
Každé jiné použití je považováno za použití v rozporu s
určením. Za následné škody a úrazy výrobce neručí.
Dbejte prosím na to, že tento přístroj není konstruován pro
průmyslové použití.
Popis přístroje (obr. A
1. Úchyt
2. Rukojeť
3. Napájecí kabel
4. Aretace napájecího kabelu/zařízení pro
odlehčení kabelu v tahu
5. Plynová páčka
6. Bajonetový uzávěr
7. Kryt strunové cívky
8. Strunová cívka
9. Nůž pro odříznutí struny
Technické údaje
Přípojka: 230 V ~ 50 Hz
Třída ochrany: II
Typ ochrany: IPX0
Max. výkon: 250 W
Otáčky motoru: 14.000 min-1
Záběr: 200 mm
Ø strunové cívky: 1,2 mm
Výška pracovní rukojeti: 780 mm
Napájecí kabel: 300 mm
Hmotnost: 1,2 kg
Požadavky na obsluhu
Obsluha si musí před použitím přístroje pozorně přečíst
návod k obsluze.
Kvalifikace
Kromě podrobného poučení odborníkem není pro
používání přístroje nutná žádná speciální kvalifikace.
Minimální věk
Na přístroji smí pracovat jen osoby, jež dosáhly 16 let.
Výjimku představuje využití mladistvých, pokud se toto
děje během profesního vzdělávání za účelem dosažení
dovednosti pod dohledem školitele.
Školení
Používání přístroje vyžaduje pouze odpovídající poučení
odborníkem resp. návodem k obsluze. Speciální školení
není nutné.
Před uvedením do provozu
Montáž
Část s rukojetí (obr. B/4) a část s motorem (obr. B/5)
zašroubujte do sebe. Oba díly zafixujte šroubem a maticí
(obr. 2/B; obr.C).
Kryt cívky (obr. B/7) připevněte šroubem (obr. B/3) k hlavě
stroje (obr. D)
Úchyt (obr. B/6) připevněte k rukojeti šroubem a maticí
(obr. 1/B; obr. E-F).
Dbejte prosím na to, aby montované díly byly
pevně
utaženy.
Přístroj před uvedením do provozu zkontrolujte
z hlediska:
• Poškozeného kabelu
• Bezvadného stavu ochranných a sekacích zařízení
• Pevného utažení všech šroubení
Bezpečnostní pokyny
Návod k obsluze je třeba před prvním použitím přístroje
kompletně přečíst. Pokud nastanou o zapojení a obsluze
přístroje pochybnosti, obraťte se na výrobce (servisní
oddělení).
ABY BYL ZARUČEN VYSOKÝ STUPEŇ BEZPEČNOSTI,
DODRŽUJTE POZORNĚ NÁSLEDUJÍCÍ POKYNY:
Pozor! Zapojte jen do sítě s
ochranným vypínačem proti chybovému proudu
(FI)!
1. Ruce a nohy držte vždy v dostatečné vzdálenosti od
struny, zvláště pak, když zapínáte motor. Ruku na
přídavné rukojeti mějte vždy volnou
2. Přístroj držte vždy v přiměřeně bezpečné vzdálenosti
od těla a zaujměte stabilní postoj.
3. Noste vždy ochranný obličejový štít/ochranné brýle,
helmu a bezpečnostní obuv a rukavice.
4. Se strojem pracujte jen při dostatečné viditelnosti.
5. Stroj nepoužívejte za deště a je-li tráva vlhká.
6. Stroj před použitím nebo po nárazu zkontrolujte z
hlediska případných škod a v případě nutnosti
opravte.
7. Stroj nepoužívejte, jsou-li ochranná zařízení
poškozená nebo nejsou-li správně namontovaná.
16

8. Zajistěte, aby větrací štěrbiny motoru byly vždy bez
nečistot a zbytků.
9. Během práce vždy zajistěte, aby se v okruhu
minimálně 3 m nezdržovaly osoby
10. ani zvířata. Stroj ihned vypněte, jakmile se do jeho
dosahu dostanou osoby, především pak děti.
11. Je-li stroj v provozu, nepřibližujte se k pohyblivým
součástem (v oblasti struny).
12. Před použitím přístroje odstraňte z oblasti, kde
budete pracovat, kameny, větve a každý další pevný
materiál.
13. Při prodloužení struny buďte maximálně opatrní. Po
provedení těchto kroků je před uvedením stroje do
provozu třeba znovu zaujmout správný pracovní
postoj.
14. Nepoužívejte kovové cívky. Dbejte na to, aby stroj po
puštění spínače ještě dalších pět sekund dobíhal.
Označení
Označení
Bezpečnost produktu:
Produkt odpovídá
příslušným normám EU
Zákazy:
Chraňte před deštěm a
vlhkostí! Nesečte mokrou
trávu!
Výstraha:
Výstraha/Pozor Nebezpečí úrazu
odhozenými předměty.
Udržujte vzdálenost
Výstraha před rotujícími
součástmi - Nebezpečí
vtažení
Příkazy:
Nedotýkejte se těchto
součástí, abyste zabránili
popáleninám. Předem se
pečlivě seznamte s
používáním přístroje.
Používejte ochranné brýle a
sluchátka
Používejte ochranné rukavice Používejte bezpečnostní
obuv
Noste ochrannou helmu
Ochrana životního prostředí:
Odpad zlikvidujte odborně tak,
abyste neškodili životnímu
prostředí.
Obalový materiál z lepenky
lze odevzdat za účelem
recyklace do sběrny.
Vadné a/nebo likvidované
elektrické či elektronické
přístroje musí být odevzdány
do příslušných sběren.
Obal:
Chraňte před vlhkem
Pozor - křehké
Obal musí směřovat nahoru
Interseroh-Recycling
Technické údaje:
Přípojka Výkon motoru
Otáčky motoru Záběr
Hmotnost
Bezpečnostní pokyny specifické pro
přístroj
Rotující struna
Práce/seřízení na přístroji provádějte jen při vypnutém
motoru a struně v klidovém stavu.
Před sečením
Před každým použitím (vizuální kontrola) zkontrolujte
upevňovací prostředky z hlediska poškození a pevného
utažení.
Terén, na kterém budete strunovou sekačku používat,
zkontrolujte z hlediska předmětů, které mohou být
strunovou sekačkou zachyceny a odhozeny, a tyto
předměty odstraňte. (kameny, větve atd.)
Během sečení
Při práci se strunovou sekačkou noste ochranné
brýle/ochranný štít/ helmu a ochranu sluchu, jakož i
rukavice.
Sečte jen s bezpečnostní obuví s ocelovými
špičkami/podrážkou a dlouhými kalhotami, nikdy ne bosí
nebo v sandálech.
Dbejte na přiměřený odstup od osob, dětí a zvířat.
Motor zapínejte jen tehdy, jsou-li Vaše nohy v bezpečné
vzdálenosti od řezací hlavy.
Přístroj držte vždy pevně za obě rukojeti, je tak zaručena i
předepsaná bezpečnostní vzdálenost od oblasti sečení.
Dbejte na bezpečný postoj.
17

Je-li přístroj v chodu, nikdy nesahejte do strunové cívky.
Po vypnutí se cívka ještě několik sekund točí. Cívky se
nikdy nedotýkejte.
Nesečte mokrou trávu.
Dbejte na to, aby větrací štěrbiny motoru byly vždy čisté a
beze zbytků trávy.
Při sečení mohou být odhozeny kameny či jiné
předměty, které mohou způsobit vážné úrazy.
Chování v případě nouze
Zaveďte úrazu odpovídající potřebnou první pomoc a
vyzvěte co možná nejrychleji kvalifikovanou lékařskou
pomoc.
Chraňte zraněného před dalšími úrazy a uklidněte jej.
Kvůli případné nehodě musí být na pracovišti vždy po
ruce lékárnička první pomoci dle DIN 13164. Materiál,
který si z lékárničky vezmete, je třeba ihned doplnit.
Pokud požadujete pomoc,
uveďte tyto údaje:
1. Místo nehody
2. Druh nehody
3. Počet zraněných
4. Druh zranění
Obsluha
Dodržujte prosím zákonná ustanovení, týkající se nařízení
o ochraně před hlukem, která se mohou v jednotlivých
místech lišit.
Pozor! Na spodní straně krytu strunové cívky se
nachází nůž pro automatické odříznutí struny (obr. A/9)
Pozor! Žací nástroj se začíná při spuštěném
motoru točit.
Seřízení provádějte jen při vypnutém přístroji a
vytažené zástrčce.
Před spuštěním motoru musí být nylonová struna vytažena
případně až k okraji ochranného krytu. Při prvním rozběhu
řezací hlavy se struna zařízne na správnou délku nožem
na ochranném krytu.
1. Napájecí kabel strunové sekačky připojte k
prodlužovacímu kabelu a zavěste do aretace kabelu.
2. Přístroj držte pevně oběma rukama a zaujměte
pracovní postoj.
3. Stlačením plynové páčky (obr. A/5) nastartujte
strunovou sekačku.
4. Přístroj držte v úhlu cca 30° a pohybujte jím
pravidelným půlkruhovitým pohybem zprava doleva.
(obr. K-L)
5. Nejlepších výsledků se dosahuje při max. délce trávy
15 cm. (obr. M)
Je-li tráva vyšší, doporučuje se provést několik
sekání. (obr. N
POZOR! Žací hlavu nepokládejte během provozu
na zem.
Seřízení strunové cívky:
1. Přístroj, který je v provozu, držte nad travnatou
plochou. Žací hlavou několikrát lehce ťukněte o
zem. Tímto způsobem se struna prodlouží. (obr. J.
2. Nůž v ochranném krytu (obr. A/9) zařízne strunu na
požadovanou délku.
Pořadí při vypnutí:
Puštěním plynové páčky se přístroj po několika sekundách
zastaví. Nyní odpojte přístroj od prodlužovacího resp.
napájecího kabelu.
Výměna strunové cívky
POZOR! Před výměnou strunové cívky vytáhněte
bezpodmínečně zástrčku!
1. Strunovou sekačku vypněte a počkejte, až se
nylonové vlákno kompletně zastaví, pak odpojte
přístroj od napájecího kabelu.
2. Nyní uchopte cívku a otočte ji doleva ve směru
„symbol otevřeného zámku“.
3. Vyjměte prázdnou cívku a nahraďte ji novou. Cívku
nasaďte na pružinu a otáčejte doprava ve směru
„symbol zavřeného zámku“ tak, aby cívka zapadla.
4. Strunu případně vytáhněte až k okraji ochranného
krytu. Při prvním rozběhu řezací hlavy se struna
zařízne na správnou délku nožem na ochranném
krytu.
5. Nyní lze přístroj opět zapojit do sítě a nastartovat.
Trénink
Pečlivě si pročtěte návod k obsluze a údržbě. Důkladně se
seznamte s ovládacím zařízením a řádným použitím
přístroje. Musíte vědět, jak přístroj pracuje a jak lze rychle
vypnout ovládací zařízení.
Nikdy nenechávejte děti pracovat s přístrojem. Nikdy
nenechávejte s přístrojem pracovat dospělé bez řádného
zaškolení.
Na své pracoviště nepouštějte žádné osoby, především
pak malé děti a domácí zvířata.
Buďte opatrní, abyste zabránili uklouznutí či pádu.
Záruka
Záruční doba činí 12 měsíců při průmyslovém použití, 24
měsíců pro spotřebitele a začíná dnem nákupu přístroje.
Záruka se vztahuje výhradně na nedostatky způsobené
vadou materiálu nebo výrobní vadou. Při reklamaci v
záruční době je třeba přiložit originální doklad o koupi s
datem prodeje.
Do záruky nespadá neodborné použití jako např. přetížení
přístroje, použití násilí, poškození cizím zásahem nebo
cizími předměty, nedodržení návodu k použití a montáži a
normální opotřebení.
Likvidace
Pokyny pro likvidaci vyplývají z piktogramů umístěných na
přístroji resp. obalu. Popis jednotlivých významů najdete v
kapitole „Označení“.
Likvidace přepravního obalu
Obal chrání přístroj před poškozením při přepravě.
Obalové materiály jsou zvoleny zpravidla podle jejich
šetrnosti vůči životnímu prostředí a způsobu likvidace a lze
je proto recyklovat.
Vrácení obalu do oběhu materiálu šetří suroviny a snižuje
náklady na likvidaci odpadů.
Části obalu (např. fólie, styropor®) mohou být nebezpečné
pro děti. Existuje riziko udušení!
Části obalu uschovejte mimo dosah dětí, a co nejrychleji
zlikvidujte.
18

Servis
Máte technické otázky? Reklamaci? Potřebujete
náhradní díly nebo návod k obsluze?
Na naší domovské stránce www.guede.com Vám v
oddílu Servis pomůžeme rychle a nebyrokraticky. Prosím
pomožte nám pomoci Vám. Aby bylo možné Váš přístroj v
případě reklamace identifikovat, potřebujeme sériové číslo,
objednací číslo a rok výroby. Všechny tyto údaje najdete
na typovém štítku. Abyste měli tyto údaje vždy po ruce,
zapište si je prosím dole.
Sériové číslo:
Objednací číslo:
Rok výroby:
Tel.: +49 (0) 79 04 / 700-360
Fax: +49 (0) 79 04 / 700-51999
E-Mail: [email protected]de.com
Údržba
Přístroj před údržbou a čištěním vždy vypněte
a počkejte, až se zcela zastaví. Vytáhněte
zástrčku.
Údržbové práce, jež nejsou v této příručce výslovně
popsány, musí provést odborný personál, neboť mohou
nastat nebezpečné situace, na něž není obsluha
připravena. Výměnu náhradních dílů smí provést výhradně
jen odborný personál.
Čištění
Po každém použití vyčistěte strunovou sekačku čistým
hadrem, kartáčem nebo ji vyfoukejte tlakovým vzduchem
při nízkém tlaku.
Nepoužívejte čističe a rozpouštědla, tyto mohou poškodit
plastové součásti přístroje.
Na strunovou sekačku nestříkejte
Zazimování
• Přístroj důkladně vyčistěte.
• Přístroj uložte v suché místnosti.
• Proveďte celkovou údržbu, která je popsána v oddíle
Údržba.
• Stroj nechte vychladnout.
• Vyčistěte vnější povrch stroje
Vyhledávání poruch
Tabulka ukazuje možné poruchy, jejich možnou příčinu a
možnosti jejich odstranění. Pokud problém přesto
nemůžete odstranit, přizvěte si na pomoc odborníka.
Před údržbou a čištěním přístroj vypněte a vytáhněte
zástrčku.
Symptomy Možná příčina Náprava
Přístroj neseká
Příliš krátká
strunová cívka
Prázdná cívka
Strunovou cívku
seřiďte
Cívku vyměňte
Přístroj se
nerozběhne
Přerušený přívod
proudu
Zkontrolujte zástrčku,
napájecí a
prodlužovací kabel.
19

Úvod
Aby ste zo svojho nového prístroja mali čo možno
najdlhšie radosť, prečítajte si, prosím, pred uvedením do
prevádzky pozorne návod na obsluhu a priložené
bezpečnostné pokyny. Ďalej odporúčame, aby ste si návod
na použitie uschovali pre prípad, že by ste si neskôr chceli
znovu pripomenúť funkcie výrobku.
V rámci neustáleho ďalšieho vývoja výrobku si
vyhradzujeme právo vykonávať technické zmeny s
cieľom vylepšenia. Obrázky sa preto môžu líšiť.
Pri tomto dokumente ide o originálny návod na
obsluhu.
Objem dodávky obr. B
Prístroj vyberte z prepravného obalu a skontrolujte úplnosť
a existenciu týchto dielov:
• Časť s rukoväťou
• Časť s motorom a predmontovanou cievkou
• Rukoväť
• Kryt cievky
• Náhradná cievka
• Materiál na pripevnenie (3 skrutky + 2 matice)
Ak diely v dodávke chýbajú alebo sú poškodené, obráťte
sa, prosím, na svojho predajcu.
Použitie v súlade s určením
Strunová kosačka na rýchle a pohodlné ošetrenie trávnika.
Na jednoduché odstránenie trávy a buriny pod kríkmi,
násypmi a na hranách.
S týmto strojom nie je možné vykonávať iné práce, než na
aké bol tento stroj skonštruovaný a ktoré sú opísané v
návode na obsluhu.
Každé iné použitie je považované za použitie v rozpore s
určením. Za následné škody a úrazy výrobca neručí.
Dbajte, prosím, na to, že tento prístroj nie je konštruovaný
na priemyselné použitie.
Popis prístroja (obr. A)
1. Úchyt
2. Rukoväť
3. Napájací kábel
4. Aretácia napájacieho kábla/zariadenia na
odľahčenie kábla v ťahu
5. Plynová páčka
6. Bajonetový uzáver
7. Kryt strunovej cievky
8. Strunová cievka
9. Nôž na odrezanie struny
Technické údaje
Prípojka: 230 V ~ 50 Hz
Trieda ochrany: II
Typ ochrany: IPX0
Max. výkon: 250 W
Otáčky motora: 14 000 min-1
Záber: 200 mm
Ø strunovej cievky: 1,2 mm
Výška pracovnej rukoväti: 780 mm
Napájací kábel: 300 mm
Hmotnosť: 1,2 kg
Požiadavky na obsluhu
Obsluha si musí pred použitím prístroja pozorne prečítať
návod na obsluhu.
Kvalifikácia
Okrem podrobného poučenia odborníkom nie je na
používanie prístroja nutná žiadna špeciálna kvalifikácia.
Minimálny vek
Na prístroji smú pracovať len osoby, ktoré dosiahli 16
rokov. Výnimku predstavuje využitie mladistvých, ak sa to
deje počas profesijného vzdelávania s cieľom dosiahnutia
zručností pod dohľadom školiteľa.
Školenie
Používanie prístroja vyžaduje iba zodpovedajúce poučenie
odborníkom, resp. návodom na obsluhu. Špeciálne
školenie nie je nutné.
Pred uvedením do prevádzky
Montáž
Časť s rukoväťou (obr. B/4) a časť s motorom (obr. B/5)
zaskrutkujte do seba. Oba diely zafixujte skrutkou a
maticou (obr. 2/B; obr. C).
Kryt cievky (obr. B/7) pripevnite skrutkou (obr. B/3) k hlave
stroja (obr. D).
Úchyt (obr. B/6) pripevnite k rukoväti skrutkou a maticou
(obr. 1/B; obr. E-F).
Dbajte, prosím, na to, aby montované diely boli
pevne utiahnuté.
Prístroj pred uvedením do prevádzky skontrolujte
z hľadiska:
• Poškodeného kábla
• Bezchybného stavu ochranných a sekacích zariadení
• Pevného utiahnutia všetkých skrutkových spojov
Bezpečnostné pokyny
Návod na obsluhu je potrebné pred prvým použitím
prístroja kompletne prečítať. Ak nastanú o zapojení a
obsluhe prístroja pochybnosti, obráťte sa na výrobcu
(servisné oddelenie).
ABY BOL ZARUČENÝ VYSOKÝ STUPEŇ
BEZPEČNOSTI, DODRŽUJTE DÔKLADNE
NASLEDUJÚCE POKYNY:
Pozor! Zapojte len do siete s ochranným
vypínačom proti chybovému prúdu (FI)!
1. Ruky a nohy držte vždy v dostatočnej vzdialenosti od
struny, hlavne potom, keď zapínate motor. Ruku na
prídavnej rukoväti majte vždy voľnú.
2. Prístroj držte vždy v primerane bezpečnej
vzdialenosti od tela a zaujmite stabilný postoj.
3. Noste vždy ochranný tvárový štít/ochranné okuliare,
helmu a bezpečnostnú obuv a rukavice.
4. So strojom pracujte len pri dostatočnej viditeľnosti.
5. Stroj nepoužívajte za dažďa a ak je tráva vlhká.
6. Stroj pred použitím alebo po náraze skontrolujte z
hľadiska prípadných škôd a v prípade nutnosti
opravte.
7. Stroj nepoužívajte, ak sú ochranné zariadenia
poškodené alebo ak nie sú správne namontované.
8. Zaistite, aby vetracie štrbiny motora boli vždy bez
nečistôt a zvyškov.
20
La pagina sta caricando ...
La pagina sta caricando ...
La pagina sta caricando ...
La pagina sta caricando ...
La pagina sta caricando ...
La pagina sta caricando ...
La pagina sta caricando ...
La pagina sta caricando ...
La pagina sta caricando ...
La pagina sta caricando ...
La pagina sta caricando ...
La pagina sta caricando ...
La pagina sta caricando ...
La pagina sta caricando ...
La pagina sta caricando ...
La pagina sta caricando ...
La pagina sta caricando ...
La pagina sta caricando ...
La pagina sta caricando ...
La pagina sta caricando ...
-
 1
1
-
 2
2
-
 3
3
-
 4
4
-
 5
5
-
 6
6
-
 7
7
-
 8
8
-
 9
9
-
 10
10
-
 11
11
-
 12
12
-
 13
13
-
 14
14
-
 15
15
-
 16
16
-
 17
17
-
 18
18
-
 19
19
-
 20
20
-
 21
21
-
 22
22
-
 23
23
-
 24
24
-
 25
25
-
 26
26
-
 27
27
-
 28
28
-
 29
29
-
 30
30
-
 31
31
-
 32
32
-
 33
33
-
 34
34
-
 35
35
-
 36
36
-
 37
37
-
 38
38
-
 39
39
-
 40
40


in altre lingue
- français: Güde GRT 250 P Manuel utilisateur
- Deutsch: Güde GRT 250 P Benutzerhandbuch
- Nederlands: Güde GRT 250 P Handleiding
- slovenčina: Güde GRT 250 P Používateľská príručka
Documenti correlati
Altri documenti
-
BLACK+DECKER GL200 Manuale utente
-
Dolmar LT-210 Manuale del proprietario
-
Scheppach RT450 Translation Of Original Instruction Manual
-
Toro 51466 Manuale utente
-
Black & Decker GL545 Manuale utente
-
Wolf Garten GT 835 Manuale utente
-
BLACK DECKER GL220SC T2 Manuale del proprietario
-