Tascam DR-680MKII Manuale del proprietario
- Categoria
- Apparecchiature di registrazione
- Tipo
- Manuale del proprietario

DR-680)"
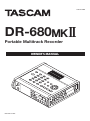
Portable Multitrack Recorder
OWNER'S MANUAL
D01252220B
0619.MA-2936A

2 TASCAM DR-680MKII
IMPORTANT SAFETY PRECAUTIONS
The exclamation point within an equilateral triangle is intended to alert the
user to the presence of important operating and maintenance (servicing)
instructions in the literature accompanying the appliance.
The lightning flash with arrowhead symbol, within equilateral triangle, is
intended to alert the user to the presence of uninsulated “dangerous voltage”
within the product’s enclosure that may be of sufficient magnitude to
constitute a risk of electric shock to persons.
CAUTION: TO REDUCE THE RISK OF ELECTRIC SHOCK, DO NOT REMOVE
COVER (OR BACK). NO USER-SERVICEABLE PARTS INSIDE. REFER SERVICING TO
QUALIFIED SERVICE PERSONNEL.
WARNING: TO PREVENT FIRE OR
SHOCK HAZARD, DO NOT EXPOSE
THIS APPLIANCE TO RAIN OR
MOISTURE.
TO THE USER
This equipment has been tested and found to comply
with the limits for a Class B digital device, pursuant to
Part 15 of the FCC Rules. These limits are designed to
provide reasonable protection against harmful inter-
ference in a residential installation. This equipment
generates, uses, and can radiate radio frequency
energy and, if not installed and used in accordance
with the instruction manual, may cause harmful inter-
ference to radio communications.
However, there is no guarantee that interference will
not occur in a particular installation. If this equipment
does cause harmful interference to radio or television
reception, which can be determined by turning the
equipment off and on, the user is encouraged to try
to correct the interference by one or more of the
following measures.
a) Reorient or relocate the receiving antenna.
b) Increase the separation between the equipment
and receiver.
c) Connect the equipment into an outlet on a
circuit different from that to which the receiver is
connected.
d) Consult the dealer or an experienced radio/TV
technician for help.
CAUTION:
Changes or modifications to this equipment not
expressly approved by TEAC CORPORATION for
compliance could void the user's authority to operate
this equipment.
For U.S.A.
Declaration of Conformity
Responsible party: TEAC AMERICA, INC.
Address: 10410 Pioneer Blvd. Suite #1 and #4,
Santa Fe Springs, California 90670,
U.S.A.
Telephone number: 1-323-726-0303
This device complies with Part 15 of the FCC Rules.
Operation is subject to the following two conditions:
(1) this device may not cause harmful interference, and
(2) this device must accept any interference received,
including interference that may cause undesired
operation.
For Canada
THIS CLASS B DIGITAL APPARATUS COMPLIES WITH
CANADIAN ICES-003.
CET APPAREIL NUMERIQUE DE LA CLASSE B EST
CONFORME A LA NORME NMB-003 DU CANADA.
This product complies with the
European Directives request and the
other Commission Regulations.

TASCAM DR-680MKII 3
IMPORTANT SAFETY INSTRUCTIONS
1 Read these instructions.
2 Keep these instructions.
3 Heed all warnings.
4 Follow all instructions.
5 Do not use this apparatus near water.
6 Clean only with dry cloth.
7 Do not block any ventilation openings. Install in accor-
dance with the manufacturer's instructions.
8 Do not install near any heat sources such as radiators,
heat registers, stoves, or other apparatus (including
ampliers) that produce heat.
9 Do not defeat the safety purpose of the polarized or
grounding-type plug. A polarized plug has two blades
with one wider than the other. A grounding type plug
has two blades and a third grounding prong. The wide
blade or the third prong are provided for your safe-
ty. If the provided plug does not t into your outlet,
consult an electrician for replacement of the obsolete
outlet.
10 Protect the power cord from being walked on or
pinched particularly at plugs, convenience recepta-
cles, and the point where they exit from the appara-
tus.
11 Only use attachments/accessories specified by the
manufacturer.
12 Use only with the cart, stand, tripod, bracket, or table
specied by the manufacturer, or sold with the appa-
ratus. When a cart is used, use caution when moving
the cart/apparatus combination to avoid injury from
tip-over.
13 Unplug this apparatus during lightning storms or
when unused for long periods of time.
14 Refer all servicing to qualified service personnel.
Servicing is required when the apparatus has been
damaged in any way, such as power-supply cord or
plug is damaged, liquid has been spilled or objects
have fallen into the apparatus, the apparatus has
been exposed to rain or moisture, does not operate
normally, or has been dropped.
• The apparatus draws nominal non-operating
power from the AC outlet with its POWER or
STANDBY/ON switch not in the ON position.
• The mains plug is used as the disconnect device,
the disconnect device shall remain readily opera-
ble.
• Caution should be taken when using earphones
or headphones with the product because exces-
sive sound pressure (volume) from earphones or
headphones can cause hearing loss.
• If you are experiencing problems with this prod-
uct, contact TEAC for a service referral. Do not
use the product until it has been repaired.
CAUTION
• Do not expose this apparatus to drips or
splashes.
• Do not place any objects filled with liquids, such
as vases, on the apparatus.
• Do not install this apparatus in a confined space
such as a book case or similar unit.
• The apparatus should be located close enough
to the AC outlet so that you can easily grasp the
power cord plug at any time.
• If the product uses batteries (including a battery
pack or installed batteries), they should not be
exposed to sunshine, fire or excessive heat.
• CAUTION for products that use replaceable
lithium batteries: there is danger of explosion
if a battery is replaced with an incorrect type
of battery. Replace only with the same or
equivalent type.
WARNING
• Products with Class ! construction are equipped
with a power supply cord that has a grounding
plug. The cord of such a product must be
plugged into an AC outlet that has a protective
grounding connection.

4 TASCAM DR-680MKII
IMPORTANT SAFETY INSTRUCTIONS
CAUTIONS ABOUT BATTERIES
This product uses batteries. Misuse of batteries could
cause a leak, rupture or other trouble. Always abide by the
following precautions when using batteries.
• Never recharge non-rechargeable batteries. The
batteries could rupture or leak, causing fire or injury.
• When installing batteries, pay attention to the polarity
indications (plus/minus (¥/^) orientation), and install
them correctly in the battery compartment as indicated.
Putting them in backward could make the batteries
rupture or leak, causing fire, injury or stains around
them.
• When you store or dispose batteries, isolate their
terminals with insulation tape or something like that to
prevent them from contacting other batteries or metallic
objects.
• When throwing used batteries away, follow the disposal
instructions indicated on the batteries and the local
disposal laws.
• Do not use batteries other than those specified. Do not
mix and use new and old batteries or different types of
batteries together. The batteries could rupture or leak,
causing fire, injury or stains around them.
• Do not carry or store batteries together with small metal
objects. The batteries could short, causing leak, rupture
or other trouble.
• Do not heat or disassemble batteries. Do not put them in
fire or water. Batteries could rupture or leak, causing fire,
injury or stains around them.
• If the battery fluid leaks, wipe away any fluid on the
battery case before inserting new batteries. If the battery
fluid gets in an eye, it could cause loss of eyesight. If
fluid does enter an eye, wash it out thoroughly with
clean water without rubbing the eye and then consult a
doctor immediately. If the fluid gets on a person’s body
or clothing, it could cause skin injuries or burns. If this
should happen, wash it off with clean water and then
consult a doctor immediately.
• The unit power should be off when you install and
replace batteries.
• Remove the batteries if you do not plan to use the unit
for a long time. Batteries could rupture or leak, causing
fire, injury or stains around them. If the battery fluid
leaks, wipe away any fluid on the battery compartment
before inserting new batteries.
• Do not disassemble a battery. The acid inside the battery
could harm skin or clothing.
8For European Customers
Disposal of electrical and electronic equipment
(a) All electrical and electronic equipment should be
disposed of separately from the municipal waste
stream via designated collection facilities appointed by
the government or the local authorities.
(b) By disposing of the electrical and electronic equipment
correctly, you will help save valuable resources and
prevent any potential negative effects on human
health and the environment.
(c) Improper disposal of waste equipment can have
serious effects on the environment and human health
as a result of the presence of hazardous substances in
electrical and electronic equipment.
(d) The crossed out wheeled dust bin symbol
indicates that electrical and electronic
equipment must be collected and disposed of
separately from household waste.
(e) The return and collection systems are available
to the end users. For more detailed information about
disposal of old electrical and electronic equipment,
please contact your city office, waste disposal service
or the shop where you purchased the equipment.
Disposal of batteries and/or accumulators
(a) Waste batteries and/or accumulators should be
disposed of separately from the municipal waste
stream via designated collection facilities appointed by
the government or the local authorities.
(b) By disposing of waste batteries and/or accumulators
correctly, you will help save valuable resources and
prevent any potential negative effects on human
health and the environment.
(c) Improper disposal of waste batteries and/or accumu-
lators can have serious effects on the environment and
human health as a result of the presence of hazardous
substances in batteries and/or accumulators.
(d) The crossed out wheeled dust bin symbol
indicates that batteries and/or accumulators
must be collected and disposed of separately
from household waste.
If the battery or accumulator contains more
than the specified values of lead (Pb), mercury (Hg),
and/or cadmium (Cd) defined in the Battery Directive
(2006/66/EC), then the chemical symbols for lead (Pb),
mercury (Hg) and/or cadmium (Cd) will be indicated
beneath the crossed out wheeled dust bin symbol.
(e) The return and collection systems are available to
the end users. For more detailed information about
disposal of waste batteries and/or accumulators, please
contact your city office, waste disposal service or the
shop where you purchased them.
Pb, Hg, Cd

TASCAM DR-680MKII 5
Contents
1 – Introduction ........................................ 7
Features ..........................................................................7
Items included with the product ..........................7
Conventions used in this manual .......................... 7
Intellectual property rights .....................................8
About SD cards ............................................................8
Precautions for use ..............................................8
Precautions for placement and use ......................9
Beware of condensation ...........................................9
Cleaning the unit .........................................................9
Product registration ...................................................9
Using the TEAC Global Site ...................................... 9
About TASCAM customer support service ........9
2 – Names and Functions of Parts ......... 10
Top panel .....................................................................10
Front panel ................................................................. 11
Left side panel ...........................................................12
Right side panel ........................................................13
Bottom panel .............................................................14
Home Screen .............................................................15
Menu structure ..........................................................16
Using menus ...............................................................17
Operation basics .......................................................18
Functions Screen .......................................................18
Repeat activation ...............................................18
Pre-record activation ........................................18
Auto-record activation .....................................18
DIN/MIX monitor settings ...............................19
Limiter activation ...............................................19
Low-cut filter activation ..................................19
3 – Preparations ...................................... 20
Powering the unit .................................................... 20
About the power supply ................................ 20
Using AA batteries ............................................ 20
Using the AC adaptor ....................................... 20
Changing the outlet plug ................................21
Turning the power on and putting the unit into
standby .........................................................................21
Turning the power on ....................................... 21
Putting the unit into standby ........................21
Inserting and removing SD cards ........................21
Inserting an SD card ..........................................21
Ejecting an SD card ........................................... 22
Preparing an SD card for use ............................... 22
Card write-protection ...................................... 22
Setting the date and time ..................................... 22
Turning the built-in speaker output on and off
.. 23
Connecting monitoring equipment ................. 23
Adjusting the display contrast ............................ 23
4 – Recording .......................................... 24
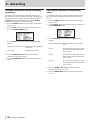
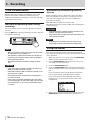
Files and takes ............................................................24
Recording settings....................................................24
Setting the recording file format..................24
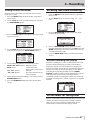
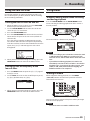
Setting the sampling frequency .................. 25
Setting the file recording mode .................. 25
Stereo track recording settings .................... 25
Arming and disarming tracks for recording
.. 25
Creation of new takes when restarting
recording ...............................................................26
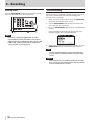
Setting the name given to recording takes
..26
Editing the user take names ...........................27
Resetting take name numbering ........................27
Available recording time display ..................27
Set the folder for saving takes ..............................27
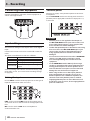
Connecting other equipment ............................. 28
Input settings ............................................................ 28
Setting the input sources ............................... 28
Phantom power ................................................. 28
Selecting the inputs for recording to tracks
5 and 6
................................................................... 29
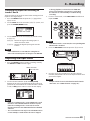
Adjusting the input levels ..................................... 29
Recording a take ....................................................... 30
Recording a stereo mix ...........................................31
Simultaneously recording two files at different
input levels (DUAL REC)
...........................................31
Enabling dual recording ..................................31
Starting dual recording ....................................32
Dual recording take names ............................32
Using the solo function ..........................................32
Automatically starting and pausing recording
(auto-record function) .............................................32
Using the auto-record function ....................32
Auto-record settings .........................................32
Automatically cutting unnecessary silences
when recording (silent cut function)
...........33
Automatically adding marks at the position
where recording restarts .................................33
Track incrementation .............................................. 34
Manually incrementing tracks during

6 TASCAM DR-680MKII
Contents
recording .............................................................. 34
Automatically incrementing tracks by file
size .......................................................................... 34
Using the limiter ....................................................... 34
Using the low-cut filter ...........................................35
Turning the low-cut filter on and off ...........35
Setting the cut-off frequency of the
low-cut filter .........................................................35
Using marks ................................................................35
Manually adding marks when recording
and during playback .........................................35
Moving to a mark ...............................................35
Erasing marks ..................................................... 36
Pre-recording ............................................................ 36
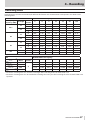
Recording times ........................................................37
5 – Take and folder operations
(BROWSE screen) ............................... 38
Navigating the BROWSE screen .......................... 38
Icons on the BROWSE screen ............................... 38
Take operations ........................................................ 38
Folder operations ......................................................39
6 – Playback ............................................. 40
Playback....................................................................... 40
Starting playback .............................................. 40
Stopping playback ............................................ 40
Pausing playback............................................... 40
Searching forward and backward ............... 40
Selecting a take for playback ........................ 40
Changing the playback position
(scrubbing) .......................................................... 40
Mixing and outputting a multitrack recording
... 41
Using the internal mixer ..................................41
Using the solo function ....................................41
Playing a stereo track ...............................................41
Setting the playback area ......................................42
Selecting a folder for the playback area on the
BROWSE screen ..........................................................42
Setting the search speed .......................................42
Repeat playback ........................................................42
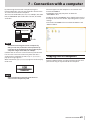
7 – Connection with a computer ............ 43
Copying files to a computer ..................................43
Copying files from a computer ........................... 44
Ending the connection with a computer ........ 44
8 – Cascade function ............................... 45
Preparing to use the cascade function .............45
Cascade recording ....................................................45
Cascade playback .....................................................45
Disabling cascade operation ................................45
Precautions for use of the cascade function .. 46
9 – Other Settings and Information
Display ................................................ 47
Using mid-side mic decoding...............................47
Connecting a mid-side microphone ...........47
Setting the MS decoding mode .........................47
Recording with mid-side decoding ....................47
GANG function .......................................................... 48
Output settings ........................................................ 48
Analog output settings ................................... 48
Digital output settings .................................... 49
System settings ......................................................... 49
Power AUTO OFF settings .............................. 49
Turning the backlight off automatically ... 49
Cascade settings ................................................ 50
Setting the extent of the panel operation
lock function ....................................................... 50
Setting the battery type ................................. 50
Initializing the unit ............................................ 50
Viewing system information ......................... 50
Reformatting SD cards ............................................51
Viewing SD card information ................................51
10 – Messages ......................................... 52
11 – Troubleshooting .............................. 54
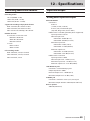
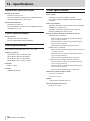
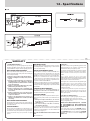
12 – Specifications .................................. 55
Recording media and formats..............................55
Input and output .......................................................55
Analog audio input and output ....................55
Digital audio input and output .................... 56
Control input and output ............................... 56
Audio performance ................................................. 56
Other specifications ................................................ 56
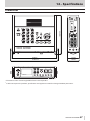
Dimensions .................................................................57
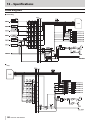
Block diagrams .......................................................... 58

TASCAM DR-680MKII 7
1 – Introduction
Thank you very much for purchasing a TASCAM
DR-680MKII Portable Multitrack Recorder. Please read
this manual thoroughly before using the unit so that you
understand correct operating procedures and can use its
functions fully. We hope that you enjoy using this unit for
many years.
Please keep this manual so that you can read it at any time.
A digital copy of this manual can also be downloaded from
the TEAC Global Site (http://teac-global.com/).
Features
• 8-track recording with a resolution of up to 24-bit, 96
kHz (6 analog inputs with stereo mix, or 6 analog inputs
with digital stereo input)
• 2-track recording resolution of up to 24-bit, 192 kHz
• Recording/playback media: SD/SDHC/SDXC cards (up to
128 GB)
• Recording/playback formats: BWF, WAV, MP3
• Recording up to 4 tracks in MP3 format simultaneously
possible
• Sampling frequencies: 44.1 k, 48 k, 96 k and 192 kHz
• Quantization rates: 16-bit, 24-bit
• MP3 files can be recorded at resolutions of
96/128/192/320 kbps
• 6 balanced mic/line inputs (1–4 are XLR/TRS combo jacks
and 5–6 are TRS jacks)
• Mic inputs can provide +48V phantom power
• Limiters on each input can automatically adjust their
levels appropriately if input levels are too high
• Low-cut filters on each input are useful for reducing
low-frequency noise
• 6 unbalanced line outputs (RCA pin jacks)
• S/PDIF and AES/EBU digital input and output (coaxial)
• Supports MS mic decoding
• Cascade function allows the transport of multiple
DR-680MKII units to be controlled by a single master unit
• Pre-record function allows up to 2 seconds of input
before the start of recording to be captured
• Auto-record function allows the unit to start recording
automatically when it detects a set sound input level
• Mark function allows movement to specific playback
positions
• Button lock function can be used to prevent
misoperation
• Repeat playback function
• Mixer for monitoring with level and pan controls
• User can start a new take at any time without
interrupting recording
• Take names can be based on a word set by the user or
the date
• 500-mW monaural output speaker built-in
• 50-mW + 50-mW headphones output
• Operates on power from 8 AA batteries or an AC adaptor
(GPE248-120200-Z)
• LCD with 128 x 64 pixel resolution and a backlight
• USB2.0 port
• USB cable included
Items included with the product
The DR-680MKII package contains the following items.
Take care when opening the package not to damage the
items. Keep the package materials for transportation in the
future.
Please contact the store where you purchased this unit
if any of these items are missing or have been damaged
during transportation.
• Main unit ..................................................................................×1
• AC adaptor (GPE248-120200-Z) ....................................... ×1
• USB cable ................................................................................. ×1
• Shoulder strap ........................................................................×1
• Owner’s manual (this document) ...................................×1
The warranty is included at the end of English manual.
CAUTION
Always use the included AC adapter (GPE248-
120200-Z) with this unit. Never use the included AC
adapter with any other device. Doing so could cause
damage, fire or electric shock.
NOTE
The included AC adapter (GPE248-120200-Z) is
shipped with exchangeable outlet plugs. For details
about changing the outlet plug, see page 21.
Conventions used in this manual
The following conventions are used in this manual.
• “SD card” indicates SD, SDHC and SDXC memory cards.
• When we refer to a button or connector or control on
the DR-680MKII, the typeface looks like this: MENU.
• When we show messages, for example, that appear on
the screen, the typeface looks like this:
BROWSE
.
• Additional information is provided as necessary in tips,
notes and cautions
TIP
These are tips about how to use the unit.
NOTE
These include additional explanations and special
cases.
CAUTION
Failure to follow these instructions could result in
injury, equipment damage or lost data, for example.

8 TASCAM DR-680MKII
1 – Introduction
Intellectual property rights
• TASCAM is a registered trademark of TEAC Corporation.
• SDXC Logo is a trademark of SD-3C, LLC.
• Microsoft and Windows are either registered trademarks
or trademarks of Microsoft Corporation in the United
States and/or other countries.
• Apple, Mac OS and Mac OS X are trademarks of Apple
Inc.
• MPEG Layer-3 audio coding technology licensed from
Fraunhofer IIS and Thomson.
Supply of this product does not convey a license nor
imply any right to distribute MPEG Layer-3 compliant
content created with this product in revenue-generating
broadcast systems (terrestrial, satellite, cable and/or
other distribution channels), streaming applications (via
Internet, intranets and/or other networks), other content
distribution systems (pay-audio or audio-on-demand
applications and the like) or on physical media (compact
discs, digital versatile discs, semiconductor chips, hard
drives, memory cards and the like). An independent
license for such use is required. For details, please visit
http://mp3licensing.com.
• Other company names, product names and logos in this
document are the trademarks or registered trademarks
of their respective owners.
Any data, including, but not limited to information,
described herein are intended only as illustrations of
such data and/or information and not as the specifi-
cations for such data and/or information. TEAC Corpo-
ration disclaims any warranty that any use of such data
and/or information shall be free from infringement
of any third party’s intellectual property rights or
other proprietary rights, and further, assumes no
liability of whatsoever nature in the event of any such
infringement, or arising from or connected with or
related to the use of such data and/or information.
This product is designed to help you record and
reproduce sound works to which you own the
copyright, or where you have obtained permission
from the copyright holder or the rightful licensor.
Unless you own the copyright, or have obtained the
appropriate permission from the copyright holder
or the rightful licensor, your unauthorized recording,
reproduction or distribution thereof may result in
severe criminal penalties under copyright laws and
international copyright treaties. If you are uncertain
about your rights, contact your legal advisor. Under no
circumstances will TEAC Corporation be responsible
for the consequences of any illegal copying performed
using the recorder.
About SD cards
This unit uses SD cards for recording and playback.
64MB–2GB SD cards, 4–32GB SDHC cards and 48–128GB
SDXC cards can be used.
A list of SD cards that have been confirmed for use with
this unit can be found on our web site. Please access to a
product page of this product from the TEAC Global Site
(http://teac-global.com) to find the list or contact the
TASCAM customer support service.
Precautions for use
SD cards are delicate media. In order to avoid damaging a
card or the card slot, please take the following precautions
when handling them.
• Do not leave in extremely hot or cold places.
• Do not leave them in extremely humid places.
• Do not let them get wet.
• Do not put things on top of them or twist them.
• Do not hit them.
• Do not remove or insert a card during recording,
playback, data transmission or other access.
• When transporting a memory card, put it into a case, for
example.

TASCAM DR-680MKII 9
1 – Introduction
Precautions for placement and use
• The environmental temperature operating range of this
unit is 0–40°C (32–104°F).
• Do not install this unit in the following types of locations.
Doing so could degrade the sound quality and/or cause
malfunctions.
Places with significant vibrations
Near windows or other places exposed to direct
sunlight
Near heaters or other extremely hot places
Extremely cold places
Places with bad ventilation or high humidity
Very dusty locations
Places exposed directly to rain or other water
• Do not place this unit on top of a power amplifier or
other device that generates heat.
• If this unit is placed near a power amplifier or other
device with a large transformer, it could cause a hum. If
this occurs, increase the distance between this unit and
the other device.
• This unit could cause color irregularities on a TV screen
or noise from a radio if used nearby. If this occurs, use
this unit farther away.
• This unit might produce noise if a mobile phone or other
wireless device is used nearby to make calls or send
or receive signals. If this occurs, increase the distance
between this unit and those devices or turn them off.
• To enable good heat dissipation, do not place anything
on top of this unit.
• Do not place this unit on top of a power amplifier or
other device that generates heat.
Beware of condensation
If the unit is moved from a cold to a warm place, or used
after a sudden temperature change, there is a danger of
condensation; vapor in the air could condense on the
internal mechanism, making correct operation impossible.
To prevent this, or if this occurs, let the unit sit for one or
two hours at the new room temperature before using.
Cleaning the unit
Use a dry soft cloth to wipe the unit clean. Do not clean the
unit with a chemically treated cloth or substances such as
thinner and alcohol because they might cause damage to
the surface of the unit.
Product registration
Customers in the USA, please visit the following TASCAM
website to register your TASCAM product online.
https://tascam.com/us/
Using the TEAC Global Site
You can download updates for this unit from the TEAC
Global Site:http://teac-global.com/
In the TASCAM Downloads section, select the desired
language to open the Downloads website page for that
language.
About TASCAM customer support
service
TASCAM products are supported and warrantied only in
their country/region of purchase.
To receive support after purchase, on the TASCAM Distrib-
utors list page of the TEAC Global Site (http:// teac-global.
com/), search for the local company or representative for
the region where you purchased the product and contact
that organization.
When making inquiries, the address (URL) of the shop or
web shop where it was purchased and the purchase date
are required. Moreover, the warranty card and proof of
purchase might also be necessary.

10 TASCAM DR-680MKII
2 – Names and Functions of Parts
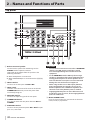
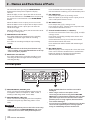
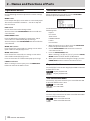
Top panel
1 Built-in monaural speaker
Use this built-in speaker for monitoring. Use the
PHONES knob to adjust the volume.
Sound will not be output from the speaker in the
following conditions.
oWhen headphones are connected
oWhen SPEAKER output is set to OFF on the
GENERAL
page
2 INPUT switches
Use these to set the inputs to LINE or MIC.
3 HOLD switch
Slide this in the direction of the arrow to disable the
STANDBY/ON button to prevent the power from
accidentally being cut.
4 MIC GAIN switches
Use these to adjust the gain of the mic inputs.
5 STANDBY/ON button
Press this to switch the unit power between ON and
STANDBY.
6 PHANTOM switches
Use these to turn phantom power ON or OFF for input
pairs 1/2, 3/4 and 5/6.
CAUTION
• Do not connect or disconnect mics when a PHANTOM
switch is set to ON. Doing so could cause a loud
noise and might damage this unit and connected
equipment.
• Set the PHANTOM switch to ON only when using a
condenser microphone that requires phantom power.
Turning phantom power on when a dynamic mic or
other mic that does not require it is connected could
damage this unit and connected equipment.
• When using condenser mics that require phantom
power and dynamic mics together, be sure to use
balanced dynamic mics. Unbalanced dynamic mics
cannot be used when phantom power is enabled.
• Supplying phantom power to some ribbon mics will
break them. If you are unsure, do not supply phantom
power to a ribbon mic.
7 MULTI/STEREO button
Press to select whether the stereo track or the multi-
track (6-track) is played back.

TASCAM DR-680MKII 11
2 – Names and Functions of Parts
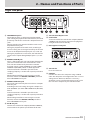
8 MENU button
Press this button when the Home Screen is open to
open the
MENU
screen. (See “Menu structure” on page
16.) (See “Using menus” on page 17.)
9 DATA wheel
Use this to select items and change values on various
settings screens.
When the Home Screen is open, use the DATA wheel to
move the playback position in the take.
0 ENTER/MARK button
Use this to confirm selections, advance to the next level
in a menu and respond “YES” to confirmation pop-up
messages on various settings screens.
q MARK (Â/¯) buttons
Use these on various settings screens to move the
cursor left and right.
On the
BROWSE
screen, use these to move up and
down levels.
Use MARK (Â) button to respond “NO” to confir-
mation pop-up messages on various settings screens
or to cancel the current operation.
w Ô[Â] button
Press this button during playback or when stopped in
the middle of a take to return to the beginning of the
current take.
Press when stopped at the beginning of the take to
skip to the beginning of the previous take.
Press and hold to search backwards.
e [¯] button
Press this button during playback or when stopped to
skip to the beginning of the next take.
Press and hold to search forward.
r STOP button
Press to stop recording and playback and locate the
transport to the beginning of the current take.
Press to end recording standby.
t PLAY/PAUSE button
Press when stopped or paused to start playback.
Press during playback to pause at that position.
Front panel
y PHONES jack and knob
Use this standard stereo phone jack to connect
headphones. Use the PHONES knob to adjust the
headphones and speaker output level.
u Display
This shows a variety of information related to the
operation of the unit.
i MENU button
Press this button when the Home Screen is open to
open the
MENU
screen.
o HOME/DISPLAY button
Press when any screen other than the Home Screen is
open to return to the Home Screen.
Change the counter display mode.
While pressing and holding this button, turn the
VALUE/MARK knob on the front of the unit to adjust
the display contrast.
p FUNCTION button
When the Home Screen is open, press to open the
Functions Screen.
a MIX PAN button
Press to open the
PAN
settings screen. Press when the
PAN
settings screen is open to close it and return to the
Home Screen.
s VALUE/MARK knob
Use this to change the value of the selected item on
the
TRIM
,
LEVEL
and
PAN
settings screens.
On the Functions Screen, use this to select function
items, and press the knob to turn each function item
ON or OFF.

12 TASCAM DR-680MKII
2 – Names and Functions of Parts
Turn this knob while pressing the HOME/DISPLAY
button on the front panel to adjust the display
contrast.
When the
MENU
screen is open, this dial can be used
for the same functions as the DATA wheel and pressing
this dial has the same function as the ENTER/MARK
button.
When the Home Screen is open, press to set a mark.
When the Home Screen is open, turn to skip to a mark.
When the
MENU
screen is open, press to move the
cursor left or right.
When the
MENU
screen is open, turn to move the cursor
or change a setting value.
d PAUSE button and indicator
Press when stopped or recording to start recording
standby. The indicator lights when in recording
standby.
Press when in recording standby to stop recording
standby.
NOTE
The PAUSE button on the front panel functions only
when recording. Use the PLAY/PAUSE button on the top
of the unit to pause playback.
f REC button and indicator
Press when stopped or in recording standby to start
recording. The indicator lights when recording or in
recording standby.
Press this button when recording to end the current
take and continue recording a new take without pause.
g REC TRIM button
Press to open the input
TRIM
settings screen.
When the input
TRIM
settings screen is open, press to
close it and open the Home Screen.
h MIX LEVEL button
Press to open the
LEVEL
settings screen.
Press when the
LEVEL
settings screen is open to close
it and return to the Home Screen.
j Channel number buttons (1–6 buttons)
Use these to select tracks on the
TRIM
,
LEVEL
and
PAN
settings screens.
Press when in recording standby to arm/disarm that
track for recording.
On the Functions Screen, press to turn the selected
function ON or OFF for that track.
Press and hold to enable/disable solo monitoring of
that track.
k MIX [LOCK] button
When the
LEVEL
screen is open, this selects the stereo
track as the track to be controlled. Press and hold this
button to engage or disengage the lock function,
which disables the use of other buttons.
Left side panel
l MIC/LINE INPUTS (XLR/TRS) jacks
These are balanced analog XLR/TRS combo jacks for
microphone and line level inputs (1: GND 2: HOT 3:
COLD, Tip: HOT Ring: COLD Sleeve: GND).
; MIC/LINE INPUTS (TRS) jacks
These are balanced analog TRS jacks for microphone
and line level inputs (Tip: HOT Ring: COLD Sleeve:
GND).
CAUTION
• Confirm that phantom power is OFF before connecting
a line level device to a MIC/LINE INPUTS jack. If you
connect a line level device while phantom power is
being supplied, that device and this unit could be
damaged.
• When using a condenser microphone, before
connecting to and disconnecting from a MIC/LINE
INPUTS jack, confirm that the phantom power for that
jack is OFF. If you connect or disconnect a mic while
phantom power is being supplied, that mic and this
unit could be damaged.
• Do not connect an unbalanced dynamic mic to an XLR
connector when phantom power is being supplied.
Doing so could damage that mic and this unit.

TASCAM DR-680MKII 13
2 – Names and Functions of Parts
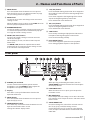
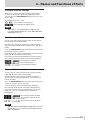
Right side panel
z LINE OUTPUTS jacks
These RCA pin jacks are unbalanced analog output
jacks. During the playback of multitrack files, the sound
previously recorded on each track is output from these
jacks.
During recording, the sound recorded to each track is
output from these jacks.
During the playback of the multi-track, according to
the unit setting, the stereo signal mixed by the internal
mixer can be output from output jacks 1/2, 3/4 or 5/6.
During the playback of a stereo track, the sound of the
stereo track is output through output jacks 1/2, 3/4 or
5/6.
x DIGITAL/SYNC IN jack
This is a digital input jack. The signal input through this
jack can be recorded to tracks 5 and 6 or the stereo
track. The unit automatically determines whether
the input signal is S/PDIF (IEC60958-3) or AES3-2003/
IEC60958-4 (AES/EBU), which are both supported.
Transmission occurs at double speed when the
sampling frequency is 96 kHz and at quad speed when
192 kHz.
When linking two of these units using the cascade
function, connect the DIGITAL/SYNC OUT jack of the
other DR-680MKII to this jack.
c DIGITAL/SYNC OUT jack
The stereo signal mixed by the internal mixer is output
from this jack.
According to the unit setting, the signal is output in S/
PDIF (IEC60958-3) or AES3-2003/IEC60958-4 (AES/EBU)
format.
Transmission occurs at double speed when the
sampling frequency is 96 kHz and at quad speed when
192 kHz.
When linking two of these units using the cascade
function, connect the DIGITAL/SYNC IN jack of the
other DR-680MKII to this jack.
v DC IN 12V jack
Connect the included AC adaptor (GPE248-120200-Z),
which matches the power specifications of this unit.
b SD card slot/USB port cover
n Cord holder
Secure the cord of the included AC adaptor (GPE248-
120200-Z) with this holder to prevent the plug from
being disconnected accidentally.
m Kensington security slot
, SD card slot
Insert SD cards here.
. USB port
Connect this unit with a computer using a USB2.0
cable. The computer will recognize this unit as a mass
storage device. No driver software is necessary.
Audio files can be transferred between an SD card in
this unit and a computer by the USB connection.

14 TASCAM DR-680MKII
2 – Names and Functions of Parts
Bottom panel
/ Hook for the shoulder strap
Attach the included shoulder strap here.
! Stand
Use this stand to raise the front of the unit when
operating it on a flat surface.
@ Battery compartment cover
# Battery compartment
Install batteries (8 AA) for powering the unit in this
compartment. (See “Using AA batteries” on page 20.)

TASCAM DR-680MKII 15
2 – Names and Functions of Parts
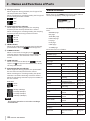
Home Screen
1 Take name
When stopped or during playback, the name of the
currently loaded take is shown.
When recording or in recording standby, the name of
the take being recorded is shown.
Up to 11 characters are shown. Longer names are
scrolled.
2 Recorder operation status
The operation status of the recorder is shown with one
of the following icons.
: Stopped
: Playing back
: Paused
: Searching forward
: Searching backwards
: Recording
: Recording standby
: Skip forward
: Skip backward
3 Repeat icon
When the repeat function is ON, the repeat icon
appears.
4 Power supply status
When operating on battery power, a battery icon
appears.
Depending on the amount of remaining battery power,
a number of bars appear ( , or ).
When the battery charge is very low, the last bar disap-
pears, the icon blinks, and the unit’s power will
soon change to standby.
When using the included AC adaptor (GPE248-
120200-Z), the icon appears.
NOTE
Even before the batteries lose their charge, a “Battery
Low” warning pop-up message might appear if you try
to start recording or conduct another operation that
requires considerable power.
5 Level meters
These show the levels of tracks 1–6 and the stereo
track.
When recording, if stereo track recording is ON and the
stereo track recording source is set to DIGITAL IN, the
stereo track meters become the DIGITAL IN input level
meters.
During playback of a multitrack file, the playback levels
of each track are shown.
When recording, the recording levels of each track are
shown.
When recording, if a signal is distorted at the input
stage, the area beneath its meter is highlighted.
If a recording level exceeds 2.0 dB below the maximum
level, a mark appears at the top of its meter, indicating
an overload.
Ch2: Signal is distorted at the input stage
Ch4: Recording level exceeds 2.0dB less than the
maximum level.
During stereo track playback, the meters for tracks 1
and 2 function as the L and R meters.
When a track is armed for recording, “º” appears
beneath its meter.
When a track is soloed, “ ” appears beneath its meter.
NOTE
If a track is both armed for recording and soloed, only
“ ” appears beneath its meter.
6 Time (hours: minutes: seconds)
During playback, the elapsed playback time of the take
is shown.
Press the HOME/DISPLAY button on the front panel
to show the remaining time of the take as a negative
number.
When recording, the elapsed recording time of the take
is shown.
Press the HOME/DISPLAY button on the front panel
to show the remaining available recording time for the
take.
7 Playback position
This bar shows the current playback position during
playback or the amount of remaining time available for
recording during recording. As recording or playback
progresses, the bar darkens from the left.
8 Mark information
The mark number and the total number of marks in the
current take are shown.
During playback, the number of the mark that is before
and closest to the current position is shown.
When recording, the last added mark number is shown.

16 TASCAM DR-680MKII
2 – Names and Functions of Parts
9 File type indicator
When stopped or during playback, the file type of the
currently loaded take is shown.
When recording or in recording standby, the file type of
the take being recorded is shown.
: BWF
: WAV
: MP3
0 Sampling frequency indicator
When stopped or during playback, the sampling
frequency of the currently loaded take is shown.
When recording or in recording standby, the sampling
frequency of the take being recorded is shown.
: 44.1 kHz
: 48 kHz
: 96 kHz
: 192 kHz
q LOCK indicator
When the lock function for the front panel and/or top
panel buttons is ON, the indicator appears.
w STEREO indicator
When a stereo track is being played, the
indicator appears. During stereo track playback, the
meters for tracks 1 and 2 function as the L and R
meters.
e SOLO indicator
When a track has been soloed, the indicator
appears. An icon appears beneath the meter of the
currently soloed track.
r Quantization/bit-rate indicator
When stopped or during playback, the quantization/
bit-rate of the currently loaded take is shown.
When recording or in recording standby, the quanti-
zation/bit-rate of the take being recorded is shown.
When the take being recorded or played is an MP3, its
bit rate is shown.
BWF/WAV
: 16-bit
: 24-bit
MP3
: 96 kbps (48 kbps)
: 128 kbps (64 kbps)
: 192 kbps (96 kbps)
: 320 kbps (160 kbps)
NOTE
The bit rate in parentheses is for when recording a
monaural take.
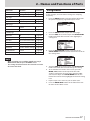
Menu structure
When you press the MENU button on the top or front of
the unit, the
GENERAL
menu page will open.
The MENU screen has 8 pages organized by types of menu
items.
GENERAL page
REC page
AUTO REC page
LOW CUT page
I/O page
PLAY page
CARD page
SYSTEM page
The menu items are as follows.
Menu item Function Reference
GENERAL page
BROWSE Open BROWSE screen page 38
SPEAKER Set the built-in speaker page 23
REC page
FORMAT Set recording file
format page 24
SAMPLE Set sampling frequency page 25
DUAL REC Set dual recording page 31
FILE Set recording file mode page 25
TRACK Set recording track page 25
ST REC Set stereo track
recording page 25
PAUSE Set recording after
recording pauses page 26
NAME Set take name format page 27
TAKE NO. INIT Reset take name
numbering page 27
AUTO REC page
LEVEL Set automatic recording
function page 32
SILENT CUT Set silence cutting
function page 33
SILENT DELAY
AUTO MARK Set automatic mark
function page 33
LOW CUT page
FREQUENCY Set low cut filter page 35
I/O page
INPUT 5/6
Set the recording
source for tracks 5
and 6
page 29

TASCAM DR-680MKII 17
2 – Names and Functions of Parts
Menu item Function Reference
LINE OUT Set analog output page 48
DIGITAL OUT Set digital output page 49
PLAY page
AREA Set playback area page 42
SEARCH SPEED Set search speed page 42
CARD page
INFORMATION Show SD card infor-
mation page 51
FORMAT Format SD card page 51
SYSTEM page
AUTO OFF Set automatic powering
off page 49
BACKLIGHT Set display backlight page 49
CASCADE Set cascade connection page 50
LOCK MODE Set lock function page 50
BATTERY Set battery type page 50
INITIALIZE Restore default settings page 50
INFORMATION View system infor-
mation page 50
DATE/TIME Set date and time page 22
NOTE
• When recording or in recording standby, pressing a
MENU button will not open the MENU screen.
• The settings for all menu items are retained even when
the unit is turned off.
Using menus
In this example, we show how to change the sampling
frequency.
1. Press the MENU button on the top or front of the unit
to open the
GENERAL
page of the
MENU
screen.
2. Press the MENU button to open the menu page.
3. Turn the DATA wheel on the top or the VALUE/MARK
knob on the front of the unit to select (highlight) a
setting item.
4. Press the ENTER/MARK button on the top or the
VALUE/MARK knob on the front to move the cursor to
the setting value.
5. Turn the DATA wheel on the top or the VALUE/MARK
knob on the front of the unit to change the setting.
6. To set another item on the same screen, press the
MARK (.) button on the top of the unit. This
enables setting item selection again. Turn the DATA
wheel on the top or the VALUE/MARK knob on the
front of the unit to select (highlight) the desired setting
item.
7. Repeat steps 4–6 as necessary to set other items.
8. Press the HOME/DISP button on the front of the unit
to return to the Home Screen.

18 TASCAM DR-680MKII
2 – Names and Functions of Parts
Operation basics
Use the following controls to operate the various settings
screens.
MENU button
Press to open the
MENU
screen when it is not already open.
This unit has two of these buttons — one on its top and
one on its front.
DATA wheel
Use to select items and to change values.
You can also use the VALUE/MARK knob instead for the
same functions.
ENTER/MARK button
Press to confirm the selection of a setting item, and to
select “YES” on a confirmation pop-up message.
You can also press the VALUE/MARK knob instead for the
same function.
MARK (¯) button
Press to move the cursor right in a settings screen and to
open a folder on the
BROWSE
screen.
MARK (Â) button
Press to move the cursor left in a settings screen and to
close a folder on the
BROWSE
screen.
Press to select “NO” on a confirmation pop-up message.
HOME/DISP button
When a settings screen is open, press the HOME/DISP
button to return to the Home Screen.
Functions Screen
When the Home Screen is open, press the FUNCTION
button to open the Functions Screen.
On the Functions Screen, you can view and activate the
following items.
Repeat
Pre-record
Auto-record
DIN/MIX monitor
Limiter
Low-cut filter
1. When the Home Screen is open, press the FUNCTION
button to open the Functions Screen.
2. Use the VALUE/MARK knob to move the cursor to
select the item to set.
3. Press the VALUE/MARK knob.
When selecting
LIMITER
or
LOW
CUT
, press the VALUE/
MARK knob or channel number (1–6) buttons.
4. When you have finished making the settings, press the
HOME/DISP button to return to the Home Screen.
Repeat activation
Use the
REPEAT
item to turn loop playback ON or OFF. The
default value is OFF.
: Repeat playback ON
: Repeat playback OFF
Pre-record activation
Use the
PRE.REC
item to turn the pre-record function ON
or OFF. The default value is OFF.
: Pre-record ON
: Pre-record OFF
Auto-record activation
Use the
A.R E C
item to turn the auto-record function ON or
OFF. The default value is OFF.
: Auto-record function ON
: Auto-record function OFF

TASCAM DR-680MKII 19
2 – Names and Functions of Parts
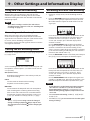
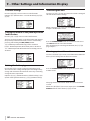
DIN/MIX monitor settings
When the
ST REC
item on the
REC
page of the
MENU
screen is set to
DIN
, the signal to be monitored can be
selected. Press the VALUE/MARK knob to select
DIN MON
or
MIX MON
.
The default value is
MIX MON
.
: Set to monitor the stereo mix
: Set to monitor the digital input
NOTE
When the
ST REC
item on the
REC
page is set to
MIX
, this setting is fixed to
MIX MON
, and it cannot be
changed to
DIN MON
.
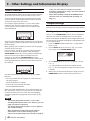
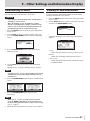
Limiter activation
Use the
LIMITER
item to turn the limiter function ON or
OFF for each input independently.
The limiter for an input is ON when its number appears
light on a dark background. The default value is OFF for all
inputs.
Press the VALUE/MARK knob to turn the limiter ON or OFF
for all inputs at the same time.
Press the channel number (1–6) buttons to turn the limiter
ON or OFF for each input independently.
If the limiter has been turned ON for one or more inputs,
the
LIMITER
indicator appears with a dark background.
: Limiter ON for all inputs
: Limiter ON for input 1
: Limiter OFF for all inputs
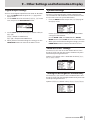
Low-cut filter activation
Use the
LOW
CUT
item to turn the low-cut filter function
ON or OFF for each input independently.
The low-cut filter for an input is ON when its number
appears light on a dark background. The default value is
OFF for all inputs.
Press the VALUE/MARK knob to turn the low-cut filter ON
or OFF for all inputs at the same time.
Press the channel number (1–6) buttons to turn the
low-cut filter ON or OFF for each input independently.
If the low-cut filter has been turned ON for one or more
inputs, the
LOW
CUT
indicator appears with a dark
background.
: Low-cut filter ON for all inputs
: Low-cut filter function ON for
input 1
: Low-cut filter OFF for all inputs
NOTE
You can set the cut-off frequency with the
FREQUENCY
item of the
LOW CUT
menu. (See “Using the low-cut
filter” on page 35.)

20 TASCAM DR-680MKII
3 – Preparations
Powering the unit
About the power supply
This unit can be powered by 8 AA batteries or the included
GPE248-120200-Z AC adaptor, which matches the power
specifications of this unit.
This unit can use alkaline, Ni-MH or lithium AA batteries.
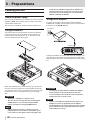
Using AA batteries
Slide off the battery compartment cover on the bottom
panel of this unit, insert 8 AA batteries into the battery
compartment according to the ¥/^ indications, and
close the compartment cover again.
When using AA batteries, set the battery type so that the
unit can accurately display the remaining battery charge
and determine the necessary minimum remaining charge
for operation. (See “Setting the battery type” on page
50.)
CAUTION
• Manganese AA batteries cannot be used.
• This unit cannot recharge AA nickel-metal hydride
(NiMH) batteries. Use a commercially-available
battery recharger to recharge NiMH batteries.
NOTE
A great amount of power is required to provide
phantom power to a condenser microphone. If you
use a condenser microphone while running the unit
on AA batteries (NiMH rechargeable or alkaline), the
operation time will be greatly shortened. If you need
to operate the unit for a long time, use the included
GPE248-120200-Z AC adaptor.
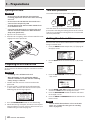
Using the AC adaptor
As shown in the figure, connect the included GPE248-
120200-Z AC adaptor, which conforms to the specifications
of this unit, to the DC IN 12V jack.
AC outlet
DC plug
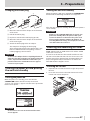
A hook (cord holder) to fix the cord of the AC adaptor is on
the right side panel. Wrap the cord around the hook when
connecting it to prevent it from being disconnected during
use.
CAUTION
Use only the included GPE248-120200-Z AC adaptor,
which conforms to the specifications of this unit.
Use of an adaptor other than this model could cause
malfunction, fire or electric shock.
NOTE
• If power is available from both batteries and the AC
adaptor, the power is supplied by the AC adaptor.
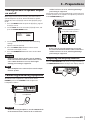
• The AC adapter for the unit includes two types of outlet
plugs. Attach the type of plug that matches the power
outlet that you are using.
La pagina si sta caricando...
La pagina si sta caricando...
La pagina si sta caricando...
La pagina si sta caricando...
La pagina si sta caricando...
La pagina si sta caricando...
La pagina si sta caricando...
La pagina si sta caricando...
La pagina si sta caricando...
La pagina si sta caricando...
La pagina si sta caricando...
La pagina si sta caricando...
La pagina si sta caricando...
La pagina si sta caricando...
La pagina si sta caricando...
La pagina si sta caricando...
La pagina si sta caricando...
La pagina si sta caricando...
La pagina si sta caricando...
La pagina si sta caricando...
La pagina si sta caricando...
La pagina si sta caricando...
La pagina si sta caricando...
La pagina si sta caricando...
La pagina si sta caricando...
La pagina si sta caricando...
La pagina si sta caricando...
La pagina si sta caricando...
La pagina si sta caricando...
La pagina si sta caricando...
La pagina si sta caricando...
La pagina si sta caricando...
La pagina si sta caricando...
La pagina si sta caricando...
La pagina si sta caricando...
La pagina si sta caricando...
La pagina si sta caricando...
La pagina si sta caricando...
La pagina si sta caricando...
La pagina si sta caricando...
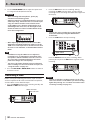
-
 1
1
-
 2
2
-
 3
3
-
 4
4
-
 5
5
-
 6
6
-
 7
7
-
 8
8
-
 9
9
-
 10
10
-
 11
11
-
 12
12
-
 13
13
-
 14
14
-
 15
15
-
 16
16
-
 17
17
-
 18
18
-
 19
19
-
 20
20
-
 21
21
-
 22
22
-
 23
23
-
 24
24
-
 25
25
-
 26
26
-
 27
27
-
 28
28
-
 29
29
-
 30
30
-
 31
31
-
 32
32
-
 33
33
-
 34
34
-
 35
35
-
 36
36
-
 37
37
-
 38
38
-
 39
39
-
 40
40
-
 41
41
-
 42
42
-
 43
43
-
 44
44
-
 45
45
-
 46
46
-
 47
47
-
 48
48
-
 49
49
-
 50
50
-
 51
51
-
 52
52
-
 53
53
-
 54
54
-
 55
55
-
 56
56
-
 57
57
-
 58
58
-
 59
59
-
 60
60


Tascam DR-680MKII Manuale del proprietario
- Categoria
- Apparecchiature di registrazione
- Tipo
- Manuale del proprietario
in altre lingue
- English: Tascam DR-680MKII Owner's manual
Documenti correlati
-
Tascam Portacapture X6 Manuale utente
-
Tascam X8 Manuale del proprietario
-
Tascam Model 24 Manuale utente
-
-
Tascam us-4x4 Manuale del proprietario
-
Tascam DR-44WLB Manuale del proprietario
-
-
Tascam DR-05 Manuale utente
-
-