
Gigaset DA710 / en / A30350-M213-R101-4-7W19 / overview.fm / 29.03.2018
de en fr nl 1
1110-01
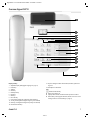
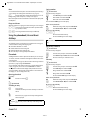
Overview Gigaset DA710
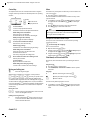
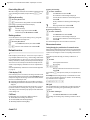
Display and keys
1 Adjustable display (Changing the language
£ page 11)
2 Control key
3Shift key
4Menu key
5 Redial/pause key
6Recall key
7Mute key
8Direct dial key
9 Insert strip for writing the assignment of direct dial keys
10 Star key, selecting/deselecting the ring tone (press and hold)
11 Hash key, selecting/deselecting the key lock (press and hold)
12 Hands-free/headset key
13 Keys for setting the volume of the handset, headset, speaker and
ring tone
14 Microphone for hands-free
LED
A Hands-free/headset key
¤ flashes on incoming call
¤ lights up when the call is transferred to the speaker or headset
¤ flashes when you hang up the handset, either if a new call or a new
message has been received (settings
£ page 11)
1
3
6
4
13
7
9
8
12
5
2
14
10
11

Gigaset DA710 / en / A30350-M213-R101-4-7W19 / overview.fm / 29.03.2018
2 de en fr nl
1110-01
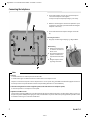
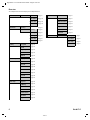
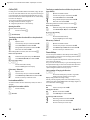
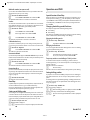
Connecting the telephone
7
¤ Connect the telephone connector (1) to the main telephone
socket. Use the telephone cable supplied.
You may need a phone adapter depending on your country.
Connecting the headset
¤ Plug in (5) a headset using an RJ9 plug, e.g. a Gigaset ZX410.
¤ Guide the cable through the cable channel: upwards for operat-
ing the phone on the table (2); downwards when mounting the
telephone on the wall (3).
¤ Connect the handset to the telephone using the coiled cable
(4).
Wall mounting
¤ Drill two holes into the wall
at a distance of 12.4 cm and
fix two screws.
¤ Lift out the handset bracket
(6) with a screwdriver and
clip it into the handset cradle
(7).
¤ Hang the telephone on the
projecting screw heads.
4
1
6
2
5
3
Notes
u First use
1. Lift the handset for 5 seconds and place it back in the cradle.
2. Lift the handset again. You will hear the free tone and the device is now ready to be used.
The phone is connected to the power source via the phone line. In case of a power cut (e.g. if the PBX is switched off at night), the above men-
tioned steps need to be repeated. Phonebook entries and speed dialling destinations are stored indefinitely.
u The device is designed to be used as a single-line system (on the main extension or a telephone system).
It cannot be operated as a second phone on a line splitter.
u Operation on a PBX or router
The private branch exchange (PBX) or the router must supply the phone with continuous DC voltage, even when ringing. If this is not the case,
the phone may switch off briefly when ringing. As a result, saved information may be lost. Refer to the operating manual for your PBX or router
for information in this regard or contact the manufacturer.

Gigaset DA710 / en / A30350-M213-R101-4-7W19 / DA710IVZ.fm / 29.03.2018
de en fr nl 3
1110-01
Table of contents
Overview Gigaset DA710 . . . . . . . . . . . . . . . . . . . . 1
Connecting the telephone . . . . . . . . . . . . . . . . . . 2
Notes . . . . . . . . . . . . . . . . . . . . . . . . . . . . . . . . . . . . . . . . . . . . . . . . . . . . . 2
Safety precautions . . . . . . . . . . . . . . . . . . . . . . . . . . 4
Setting up the telephone for use . . . . . . . . . . . . . 4
Operating the telephone . . . . . . . . . . . . . . . . . . . . . 4
Display . . . . . . . . . . . . . . . . . . . . . . . . . . . . . . . . . . . . . . . . . . . . . . . . . . . . 4
Control key . . . . . . . . . . . . . . . . . . . . . . . . . . . . . . . . . . . . . . . . . . . . . . . . 5
Writing and editing text . . . . . . . . . . . . . . . . . . . . . . . . . . . . . . . . . . . 5
Menu . . . . . . . . . . . . . . . . . . . . . . . . . . . . . . . . . . . . . . . . . . . . . . . . . . . . . 5
Phonebook, call list and redial list . . . . . . . . . . . . . . . . . . . . . . . . . . 5
Menu tree . . . . . . . . . . . . . . . . . . . . . . . . . . . . . . . . . . . . . . . . . . . . . . . . . 6
Telephoning . . . . . . . . . . . . . . . . . . . . . . . . . . . . . . . . 7
Making a call . . . . . . . . . . . . . . . . . . . . . . . . . . . . . . . . . . . . . . . . . . . . . . 7
Incoming calls . . . . . . . . . . . . . . . . . . . . . . . . . . . . . . . . . . . . . . . . . . . . . 8
Using open listening / hands-free / headset . . . . . . . . . . . . . . . . 8
Settings during a call . . . . . . . . . . . . . . . . . . . . . . . . . . . . . . . . . . . . . . 8
Using the phonebook, lists and direct
dial keys . . . . . . . . . . . . . . . . . . . . . . . . . . . . . . . . . . . . 9
Phonebook . . . . . . . . . . . . . . . . . . . . . . . . . . . . . . . . . . . . . . . . . . . . . . . . 9
Call list (CLIP) . . . . . . . . . . . . . . . . . . . . . . . . . . . . . . . . . . . . . . . . . . . . . 10
Last number redial list . . . . . . . . . . . . . . . . . . . . . . . . . . . . . . . . . . . . 10
Direct dial keys . . . . . . . . . . . . . . . . . . . . . . . . . . . . . . . . . . . . . . . . . . . 10
Adjusting the telephone . . . . . . . . . . . . . . . . . . . 11
Basic settings . . . . . . . . . . . . . . . . . . . . . . . . . . . . . . . . . . . . . . . . . . . . . 11
Setting the volume . . . . . . . . . . . . . . . . . . . . . . . . . . . . . . . . . . . . . . . 11
Setting the ringer . . . . . . . . . . . . . . . . . . . . . . . . . . . . . . . . . . . . . . . . . 12
Security settings . . . . . . . . . . . . . . . . . . . . . . . . . . . 12
Locking the telephone . . . . . . . . . . . . . . . . . . . . . . . . . . . . . . . . . . . . 12
Emergency calls . . . . . . . . . . . . . . . . . . . . . . . . . . . . . . . . . . . . . . . . . . 12
Direct calling (baby call) . . . . . . . . . . . . . . . . . . . . . . . . . . . . . . . . . . 13
Blocking numbers . . . . . . . . . . . . . . . . . . . . . . . . . . . . . . . . . . . . . . . . 13
Network services . . . . . . . . . . . . . . . . . . . . . . . . . . 13
Caller display (CLIP) . . . . . . . . . . . . . . . . . . . . . . . . . . . . . . . . . . . . . . . 13
Call Divert . . . . . . . . . . . . . . . . . . . . . . . . . . . . . . . . . . . . . . . . . . . . . . . . 13
Other network services . . . . . . . . . . . . . . . . . . . . . . . . . . . . . . . . . . . 13
Recall key . . . . . . . . . . . . . . . . . . . . . . . . . . . . . . . . . . . . . . . . . . . . . . . . 14
Setting up of dialling code . . . . . . . . . . . . . . . . . . . . . . . . . . . . . . . . 14
Operation on a PABX. . . . . . . . . . . . . . . . . . . . . . . 14
Special functions/Recall key . . . . . . . . . . . . . . . . . . . . . . . . . . . . . . . 14
Changing the dialling mode/flash time . . . . . . . . . . . . . . . . . . . . 14
Setting dialling prefixes . . . . . . . . . . . . . . . . . . . . . . . . . . . . . . . . . . . 14
Appendix . . . . . . . . . . . . . . . . . . . . . . . . . . . . . . . . . 15
Other settings . . . . . . . . . . . . . . . . . . . . . . . . . . . . . . . . . . . . . . . . . . . . 15
Predefined key combinations . . . . . . . . . . . . . . . . . . . . . . . . . . . . . 15
Standard characters . . . . . . . . . . . . . . . . . . . . . . . . . . . . . . . . . . . . . . . 16
Care . . . . . . . . . . . . . . . . . . . . . . . . . . . . . . . . . . . . . . . . . . . . . . . . . . . . . . 16
Contact with liquid . . . . . . . . . . . . . . . . . . . . . . . . . . . . . . . . . . . . . . . 16
Questions and answers . . . . . . . . . . . . . . . . . . . . . . . . . . . . . . . . . . . 16
Protecting our environment . . . . . . . . . . . . . . . . . . . . . . . . . . . . . . . 16
Authorisation . . . . . . . . . . . . . . . . . . . . . . . . . . . . . . . . . . . . . . . . . . . . . 16
Contacts . . . . . . . . . . . . . . . . . . . . . . . . . . . . . . . . . . . . . . . . . . . . . . . . . . 16
Index . . . . . . . . . . . . . . . . . . . . . . . . . . . . . . . . . . . . . 17

Gigaset DA710 / en / A30350-M213-R101-4-7W19 / using.fm / 29.03.2018
4 de en fr nl
1110-01
Safety precautions
When installing, connecting and operating the telephone, always
observe the following precautions:
u Only use the jacks and leads supplied.
u Only connect the connecting lead to the intended socket.
u Only connect the approved accessories, such as the Gigaset ZX410
headset for example.
Your Gigaset DA710 has been tested and approved with the Gigaset
ZX410 headset.
u Other headsets may only function to a limited extent or not at all. Be
sure to reduce the volume of the Gigaset DA710 when connecting
another headset. As a headset from another manufacturer may emit
a harmful and loud acoustic signal due to alignment differences.
u Lay the connecting lead where it will not cause accidents.
u Position the telephone on a non-slip surface.
u For your safety and protection, the telephone may not be used in the
bath or shower rooms (wet locations). The telephone is not splash
proof.
u Never expose the telephone to sources of heat, direct sunlight or
other electrical devices.
u Protect your telephone from moisture, dust, corrosive liquids and
vapours.
u Never open up the telephone yourself.
u Do not touch the plug contact with pointed or metallic objects.
u Do not carry the telephone by the leads.
u If you give your Gigaset DA710 to someone else, make sure you also
give them the operating manual. Your Gigaset DA710 has a perma-
nent memory, so you may want to delete any stored numbers before
passing it on.
Setting up the telephone for use
Recommended installation of telephone:
u Do not expose the telephone to direct sunlight or other sources of
heat.
u Operate at temperatures of between + 5° C and + 40° C.
u Maintain a distance of at least one metre between the telephone
and radio equipment, e.g. radio telephones, radio paging equip-
ment or TV sets. Otherwise telephone communication could be
impaired.
u Do not install the telephone in dusty rooms as this can limit the ser-
vice life of the telephone.
u Furniture lacquer and polish can be adversely affected by contact
with parts of the unit (e.g. feet).
Operating the telephone
The keypad and the display are available to operate your Gigaset DA710.
In addition, the display menu together with the control key provides
access to the configuration and use of the many functions of the tele-
phone. All usage possibilities are described in the handbook.
Display
In stand-by mode, the time, date and calendar week are displayed. You
can set the date and time and the format in which it is displayed
(
£ page 11). Symbols on the display also provide information regarding
the status of your telephone.
Display symbols
f Flashes for a new call in the call list if the caller's number
transmission (CLIP) is active (
£ page 13)
Z Phonebook open
h Shift key pressed
i Key lock activated
k Ring tone switched off
l Flashes on incoming VIP call
Is indicated if at least one entry with activated VIP mode is
present in the phonebook (
£ page 9).
m Mute mode activated
n Headset connected
Note
Some of your telephone's functions may only be available without
restriction if they are supported by your and the caller's network pro-
vider, e. g. functions for which information on the caller's telephone
number is required.
This applies for the following functions, for example:
u Displaying the number of an incoming call (
£ page 8)
u Indicating a caller with VIP melody (
£ page 8)
u Call list (
£ page 10)
u Call forwarding and other network services (
£ page 13)
nlm
14:00
23.08.2011 CW34
Toolbar
Time (24h format)
Date / Calendar week

Gigaset DA710 / en / A30350-M213-R101-4-7W19 / using.fm / 29.03.2018
de en fr nl 5
1110-01
Control key
The telephone's functions are activated and the menu is navigated
using the control key. The functions offered depend on the operating
situation.
Writing and editing text
~ Enter text using the keypad.
Multiple letters and numbers are assigned to each key between
and O and Q, * and #. The entry of a specific charac-
ter is carried out by pressing the corresponding key multiple times.
You will find a table of applicable characters in the Appendix
£ page 16.
To switch between capital letters (ABC), lower case (abc) and numbers
(123), press the shift key
L until the desired figure is briefly displayed
on the bottom right. This mode is not available in lines for telephone
number entry.
Moving the cursor
t s Press the control key up/downwards in order to move the
cursor to the left/right in the text.
Deleting/correcting characters
X Press the left-hand side u of the control key. The cha-
racter to the left of the cursor is deleted. Press and hold
down to delete the whole line.
Menu
The functions of your telephone are offered to you via a menu that con-
sists of several levels.
¤ Press the M key to open the menu.
The menu functions and submenu functions where necessary are dis-
played in list form.
¤ Scroll with the control key q to the required function and press
the right-hand side of the control key
v, ([) to confirm your
selection.
¤ Press u (X) in order to return to the previous menu level.
¤ Press the M key to return to the start menu.
Description of the menu selection steps
The steps to select a menu function are set out in these operating
instructions as follows:
M ¢ Phone setup ¢ Language
This is accessed as follows:
¤ Open the menu using the M key.
¤ Using the control key q, select the entry Phone setup and press
the right-hand side of the control key
v, ([).
¤ Using the control key q, select the entry Language and press the
right-hand side of the control key
v, ([).
Phonebook, call list and redial list
Phonebook, call list and redial list can be opened using the menu or
keys.
Using the menu
¤ Press the M key to open the menu.
¤ Select Call list (CLIP) or Phonebook or Redial in order to open the
desired list.
Using keys
Y Open the call list using the control key t.
Z Open the phonebook using the control key s.
I Open the redial list.
The first list entry will be displayed in each case.
¤ Scroll with the control key q to the desired entry and press the
right-hand side of the control key
v, ([) to open the context
menu.
In standby:
t
Y
Open the call list
s
Z
Open phonebook
t
s
In menus and lists:
Scrolls one entry upwards/downwards.
Hold down: Scrolls the list fast upwards/downwards.
While editing names and numbers:
Moves the cursor to the left/right.
Hold down: Moves the cursor fast to the left/right.
While pressing the direct dial key:
Displays long phone numbers completely.
u
In menus, lists and with direct dial keys:
Exits the menu, list or direct dial key.
While changing settings:
Terminates the action without changing the setting.
While editing names and numbers:
Deletes the character to the left of the cursor.
Hold down: Deletes the line.
If the entry is empty: Exits the editing mode.
v
Phone number entered or direct dial key pressed:
Dials the phone number.
In menus and lists:
Opens the submenu/context menu.
While editing entries/changing settings:
Saves the edits or activates the selected settings.
W
TU
V
Note
To exit the menu without saving any previous entries simply lift and
then hang up the handset. After a short time the display will then
once again show the standby mode.

Gigaset DA710 / en / A30350-M213-R101-4-7W19 / using.fm / 29.03.2018
6 de en fr nl
1110-01
Menu tree
The complete menu tree of the display menu is depicted below.
Call list (CLIP) Entry 1- 50
Call back
£ page 7
Save number
£ page 10
Delete entry
£ page 10
Delete all
£ page 10
Phonebook
New entry
£ page 9
Entry 1-100
Dial entry
£ page 7
Edit entry
£ page 9
New entry
£ page 9
Delete entry
£ page 9
Delete all
£ page 9
Security
Change PIN
£ page 12
Key lock
£ page 12
Emergency
£ page 13
Direct call
£ page 12
Call block
£ page 13
Phone setup Language
£ page 11
Date/time
£ page 11
Dial mode
£ page 14
Flash time
£ page 14
PABX code
£ page 14
Date/Time format
£ page 11
Area code
£ page 14
Speaker LED
£ page 11
Audio setup Ring tones
£ page 12
VIP Melody
£ page 12
Handset Volume
£ page 11
Speaker Volume
£ page 11
Headset Volume
£ page 11
Mute mode
£ page 11
Ringer mode
£ page 12
CLASS Call Divert
£ page 13
CW Signal
£ page 13
Withhold number
£ page 14
Hotline
£ page 14
Ringback
£ page 14
Auto recall
£ page 14
Phonemail
£ page 14
Redial Entry 1- 5 Dial entry
£ page 7
Save number
£ page 10
Delete entry
£ page 10
Delete all
£ page 10

Gigaset DA710 / en / A30350-M213-R101-4-7W19 / telephony.fm / 29.03.2018
de en fr nl 7
1110-01
Telephoning
In addition to the headset, you can also call using the speaker (hands-
free function) or using a headset connected to the telephone
(
£ page 8). In the following instructions, the symbol c also always
stands for
A.
Making a call
Entering the telephone number using the keypad
~c Dial the number, lift the handset.
or
c~ Lift the handset, dial the number.
Instead of lifting the handset:
A Press the hands-free/headset key to make a call via the
speaker or the connected headset.
You can switch over at any time during the conversation.
Making a correction when entering the telephone number (only
possible if the handset is in its cradle):
X Press the control key u to delete a digit entered in error
to the left of the cursor.
Dialling from the phonebook
If you have already saved numbers in your phonebook (£ page 9), you
can make a call directly from the phonebook.
M ¢ Phonebook
or
Z Open the phonebook using the control key s.
Searching an entry
q Select an entry.
Hold down the top or bottom of the key to scroll fast in the
list.
or
~ Enter letters (£ page 5). The first entry starting with this
letter is displayed.
Dialling numbers
c Lift the handset.
or
[ Open context menu.
q Select Dial entry and initiate the call using the speaker
with
[. Lift the handset to make the call using the hand-
set.
Dialling from the call list
The call list contains the numbers of the last 50 incoming and outgoing
calls. Prerequisite: Telephone number display is possible for incoming
calls (
£ page 13).
Multiple calls from one number are only displayed once (with the infor-
mation of the last call). If the number is saved to the phonebook or to the
direct dial keys, the accompanying name is also displayed if present.
M ¢ Call list (CLIP)
or
Y Open the call list using the control key t.
Dialling numbers
q Select the number or name.
c Lift the handset.
or
q Select the entry and open context menu with [.
q Select Call back and initiate the call using the speaker with
[. Lift the handset to make the call using the handset.
Last number redial
The last five numbers dialled are automatically saved (each a max. of
32 digits).
Dialling the last saved number:
I c Press the redial key, lift the handset.
or
c I Lift the handset, press the redial key.
Dialling one of the last five numbers saved:
M ¢ Redial
or
I Press the redial key.
Dialling numbers
q Select the number.
c Lift the handset.
or
q Select the entry and open context menu with [.
q Select Dial entry and initiate the call using the speaker
with
[. Lift the handset to make the call using the hand-
set.
Note
You can also first lift the handset before opening the phonebook.
Note
You can also first lift the handset before opening the call list.
Note
You can also first lift the handset before opening the redial list.

Gigaset DA710 / en / A30350-M213-R101-4-7W19 / telephony.fm / 29.03.2018
8 de en fr nl
1110-01
Dialling a number using the direct dial key
You can save 16 numbers to 8 direct dial keys and dial directly (two num-
bers can be allocated to each direct dial key, each with a max. of
32 digits). Use the shift key
L to access the key's second storage area.
The display symbol
h indicates that the shift function is active.
Saving and editing the direct dial keys is possible using the context
menu of the direct dial key (
£ page 10), from the phonebook, the call
list and the redial list.
c Lift the handset, press the direct dial key.
or
B c Press the direct dial key, lift the handset.
or
B Press the direct dial key and open the context menu with
[.
[ Initiate the call over the speaker using the control key. Lift
the handset to make the call using the handset.
You can extend the selected number by entering additional digits.
Incoming calls
Incoming calls are indicated by the ring tone and in the display.
For number displays (
£ page 13), the number is visible in the display
and the
f symbol flashes. This symbol disappears when you answer the
call or (if you don't answer) by calling up the call list.
The name is also displayed for callers who are stored in the phonebook
or on the direct dial keys with names.
If the VIP mode is activated (
£ page 12) the VIP symbol flashes in the
display and the VIP ring tone signals the call.
Accepting a call
c Lift the handset.
or
A Press the hands-free key to accept the call via the speaker
or the connected headset.
Call waiting
If the Call waiting service is activated (£ page 13), an incoming call is
indicated during the conversation. You will hear the call waiting tone.
The display shows the caller number if the number can be displayed, and
the name if it is saved in the phonebook (
£ page 9).
H Press the callback key to accept the call. The first caller
hears a wait melody.
H Press the callback key again to end the second call and to
return to the first call.
Using open listening / hands-free / headset
Switching open listening on/off
The persons present in the room can listen to the call over the speaker.
During the call using the handset:
A Press the hands-free key to switch open listening on or off.
When the speaker is switched on and the handset is picked up, open lis-
tening is switched on. In this case, the hands-free microphone is
switched off.
When the speaker is switched on and the handset is in the cradle, hands-
free via the hands-free microphone is switched on.
Switching from open listening to hands-free:
A & Replace the handset whilst pressing the hands-free key.
Switching the hands-free on/off
You can also make a call via the microphone with the handset in the cra-
dle. The optimum distance from the microphone is approx. 50 cm.
Switching on hands-free during a call
A & Replace the handset whilst pressing the hands-free key.
Switching on hands-free prior to dialling
A Hands-free key, wait for dial tone.
Switching off hands-free
c Lift the handset during the call. The call is transferred to
the handset.
Ending a call
A Press the hands-free key during a call over the speaker.
Using a headset
Connect the headset (£ page 2). You can then make a call over the
headset whilst the handset is in the cradle. (Please note the safety pre-
cautions
£ page 4.)
A The telephone is operated using the hands-free/headset
key in the same way as for the hands-free function (see
above).
Once the headset is connected this is indicated in the display with the
n
symbol.
Settings during a call
The settings described below can also be changed in the menu
(
£ page 11).
Setting the handset/headset volume
There are three adjustable levels.
E / D Set the volume using the volume up/volume down keys.
The set volume is shown in the display.
Setting the speaker
There are seven adjustable levels.
E / D Set the volume using the volume up/volume down keys.
The set volume is shown in the display.
Note
Hands-free and open listening are not possible if a headset is con-
nected.

Gigaset DA710 / en / A30350-M213-R101-4-7W19 / telephony.fm / 29.03.2018
de en fr nl 9
1110-01
Mute
You can switch off the microphone or handset and microphone during a
call according to the setting of the mute function (
£ page 11):
C Press the mute key to switch the mute function on or off.
During muting of the microphone, a melody can be played.
Once the telephone has been muted this is indicated in the display with
the
m symbol.
Ringer and volume
Whilst the telephone is ringing, the volume and ringer can be changed.
E / D Set the ringer volume with the volume up/volume down
keys (5 levels, 0=silent).
Q .. O Select ringer with the numeric keys (10 different).
Using the phonebook, lists and direct
dial keys
The following options are available on your telephone for storing your
contacts and the incoming and outgoing calls:
u Phonebook with max. 100 entries
u Call list with the last 50 incoming calls
u Redial list with the last 5 outgoing calls
u Direct dial keys for storing 16 important numbers
Phonebook
Your Gigaset DA710 contains a phonebook in which you can save up to
100 entries, each with a maximum of 32 digits for numbers and 16 char-
acters for names.
You can make a call (
£ page 7), add new entries and manage and mod-
ify entries (
£ page 9) using the Phonebook.
You can manually enter numbers and names or transfer them from the
call list (
£ page 10). You can also allocate VIP mode to a number.
The
Z symbol is indicated in the display if the phonebook has been
opened. In addition, the phonebook entry number is also indicated in
the display (01.. 99, 00 is displayed for 100).
Opening phonebook
In standby:
Z Press the control key s.
or
M ¢ Phonebook
Searching an entry
q Select an entry.
Hold down the the top or botton of the key to scroll fast in
the list.
or
~ Enter letters (£ page 5). The first entry starting with this
letter is displayed.
Saving numbers
M ¢ Phonebook
The first list entry is displayed.
t Select New entry and confirm with [.
~ Enter number and confirm with [.
~ Enter name and confirm with [.
The notice Save to PBK? appears in the display.
Either: save in phonebook
[ Confirm the saving of the entry in the Phonebook.
q Select VIP mode (On / Off) and confirm with [.
Or: save to a direct dial key
B / L B
Press the desired direct dial key.
The notice Saved appears in the display.
Delete entry / Delete all
M ¢ Phonebook
The first list entry is displayed.
q Select the entry and open context menu with [.
q Select Delete entry or Delete all and confirm with [.
[ Press the control key to confirm the action.
Edit entry
M ¢ Phonebook
The first list entry is displayed.
q Select the entry and open context menu with [.
q Select Edit entry and confirm with [.
~ Change number and confirm with [.
~ Change name and confirm with [.
The notice Save to PBK? appears in the display.
Either: save in phonebook
[ Confirm the saving of the entry in the Phonebook.
q Select VIP mode (On / Off) and confirm with [.
Or: save to a direct dial key
B / L B
Press the desired direct dial key.
The notice Saved appears in the display.
Note
If you press
*, the entry is set as a VIP entry or the setting is dele-
ted.
Note
You can save an entry first in the phonebook and then to a direct dial
key.

Gigaset DA710 / en / A30350-M213-R101-4-7W19 / telephony.fm / 29.03.2018
10 de en fr nl
1110-01
Call list (CLIP)
Incoming calls are saved if the number is transmitted (£ page 13). Up to
50 calls are saved. If the number is the same, only the last incoming call
is saved. The oldest call is automatically deleted when there are more
than 50 calls. If the caller is saved to the phonebook or to a direct dial key,
the name is also displayed.
You can use the call list for the following functions:
¤ Calling a number from the list (£ page 7).
¤ Saving in the phonebook or to direct dial keys.
Opening the call list
Open the call list in standby mode:
Y Press the control key t.
or
M ¢ Call list (CLIP)
Transferring a number from the call list to the phonebook/
direct dial key
Y Open the call list.
q Select the entry and open context menu with [.
q Select Save number and confirm with [.
~ Change number (if required) and confirm with [.
~ Enter name and confirm with [.
While editing numbers and names, move the cursor with
q.
Either: save in phonebook
[ Confirm the saving of the entry in the Phonebook.
q Select VIP mode (On / Off) and confirm with [.
Or: save to a direct dial key
B / L B
Press the desired direct dial key.
The notice Saved appears in the display.
Delete entry / Delete all
Y Open the call list.
q Select the entry and open context menu with [.
q Select Delete entry or Delete all and confirm with [.
[ Press the control key to confirm the action.
Last number redial list
The last five numbers called are automatically saved (each a max. of
32 digits).
Opening the last number redial list
I Press the redial key.
or
M ¢ Redial
Transferring a number from the redial list to the phonebook/
direct dial key
I Open the last number redial list.
q Select the entry and open context menu with [.
q Select Save number and confirm with [.
~ Change number (if required) and confirm with [.
~ Enter name and confirm with [.
While editing numbers and names, move the cursor with
q.
Either: save in phonebook
[ Confirm the saving of the entry in the Phonebook.
q Select VIP mode (On / Off) and confirm with [.
Or: save to a direct dial key
B / L B
Press the desired direct dial key.
The notice Saved appears in the display.
Delete entry / Delete all
I Open the last number redial list.
q Select the entry and open context menu with [.
q Select Delete entry or Delete all and confirm with [.
[ Press the control key to confirm the action.
Direct dial keys
You can save up to 16 numbers on direct dial keys. Use the shift key L
to access the keys’ second storage area. The display symbol
h indicates
that the shift function is active.
You can also assign direct dial keys from the entries in the phonebook,
in the call list or the redial list.
They can also be used as function keys e. g. for call forwarding. Your net-
work provider will notify you of the services and functions offered and
the corresponding key sequences. The menu offers you additional
optional settings for network services (
£ page 13).
Saving numbers / Changing the allocation
B / L B
Press the direct dial key that you want to assign with a
number or the entry of which is to be changed.
Empty is displayed when the storage is empty.
If the key is already assigned you will see the saved number. For long
numbers (more than 16 digits) switch between the display of digits 1-16
and 17-32 with the control key
q.
New entry
[ Switch to the entry mode with [.
Changing the allocation
[ Open the context menu with [.
q Select Edit entry and confirm with [.
Enter/change number and name
~ Enter/change number and confirm with [.
~ Enter/change name and confirm with [.
[ Press the control key to save the entry.

Gigaset DA710 / en / A30350-M213-R101-4-7W19 / telephony.fm / 29.03.2018
de en fr nl 11
1110-01
Delete entry / Delete all
B / L B
Press the direct dial key the entry of which is to be deleted
and open the context menu with
[.
q Select Delete entry or Delete all and confirm with [.
[ Press the control key to confirm the action.
Adjusting the telephone
Basic settings
All basic settings are accessed via the menu Phone setup.
The current setting is marked at the right-hand side of the display with *.
Changing the Language
You can change the language for display messages. There are four lan-
guages to choose from.
M ¢ Phone setup ¢ Language
q Select the desired language and confirm with [.
[ Press the control key to save the setting.
Setting the date and time
You can adjust the current date manually and change the format of the
display. The time is updated by incoming calls with telephone number
displays. You can adjust this setting if necessary (
£ page 15).
M ¢ Phone setup ¢ Date/time
~ Enter 6-digit date (DDMMYY).
~ Enter 4-digit time (HHMM).
[ Confirm entry.
The entry is always performed as described here, regardless of the set
date and time format.
Setting the Date/Time format
M ¢ Phone setup ¢ Date/Time format
q Select the date format and confirm with [. For example:
31. December 2011
YYYY.MM.DD: 2011.12.31
DD.MM.YYYY: 31.12.2011
DD/MM/YYYY: 31/12/2011
MM/DD/YYYY: 12/31/2011
[ Press the control key to save the setting.
q Select the required time format and confirm with [.
24h: 24 hour format
12h: 12 hour format
[ Press the control key to save the setting.
Set LED on hands-free/headset key
You can specify when the telephone LED should flash (key A).
M ¢ Phone setup ¢ Speaker LED
q Select the required setting and confirm with [.
Off: never
Incoming Call: for a new call
Messages: if a network provider signals the receipt of a
new message
On: for incoming calls and new messages
[ Press the control key to save the setting.
Setting the volume
Handset, speaker and headset volumes can be set using the menu or
changed during the telephone conversation directly using the keys
(
£ page 8).
Setting the handset volume
There are three adjustable levels.
M ¢ Audio setup ¢ Handset Volume
q Select the required volume and confirm with [.
The current value will be displayed.
Setting the speaker volume
There are seven adjustable levels.
M ¢ Audio setup ¢ Speaker Volume
q Select the required volume and confirm with [.
The current value will be displayed.
Setting the headset volume
There are three adjustable levels.
M ¢ Audio setup ¢ Headset Volume
q Select the required volume and confirm with [.
The current value will be displayed.
Mute
You can mute only the microphone or the speaker and microphone.
M ¢ Audio setup ¢ Mute mode
q Select the required function and confirm with [. Micro
off: You are still able to hear the person on the end of the
line, however they cannot hear you.
Micro&Spk. Off: The telephone is completely muted.
Mute melody: Whilst in mute mode, the person on the
other end of the line hears a melody.
The set function can also be activated using the mute key during a call
(
£ page 9).

Gigaset DA710 / en / A30350-M213-R101-4-7W19 / telephony.fm / 29.03.2018
12 de en fr nl
1110-01
Setting the ringer
The following optional settings are available:
¤ Melody and volume
¤ VIP Melody
¤ Switching the ringer off
Setting the melody and volume
You can set the ringer melody and volume or switch the ringer off. There
are 10 different ringers available, the volume can be adjusted in 5 levels
(0=silent).
You can also change both settings directly using the keys while the tele-
phone is ringing (
£ page 9).
M ¢ Audio setup ¢ Ring tones
~ Select the required ringer.
D / E Set the volume for the ringer currently selected.
[ Press the control key to save the setting.
Setting the VIP Melody
You can set one of the ringers as VIP Melody. When you have assigned a
number from the phonebook VIP mode status (
£ page 9), an incoming
call from this number will be indicated with the VIP Melody ring tone.
M ¢ Audio setup ¢ VIP Melody
~ Select the required ringer.
D / E Set the volume for the ringer currently selected.
[ Press the control key to save the setting.
Setting the ring mode
If you do not wish to be disturbed, you can switch off the telephone's
ringer. The three following optional settings are available: All tones off,
VIP only (see above), All tones on (default setting).
M ¢ Audio setup ¢ Ringer mode
q Select the required setting and confirm with [.
[ Press the control key to save the setting.
Switching the ring tone off using the key
+ Hold the key down to switch the ring tone off and back on.
Once the ring tone has been switched off, this is indicated with the
k
symbol in the display.
Security settings
Locking the telephone
You can secure your telephone against unauthorised access by using the
Key lock and PIN entry, in order to lift the Key lock.
Setting up the Key lock
When the Key lock is activated, all keys are locked, with the exception of
the menu key, the hands-free/headset key and the stored emergency
numbers (
£ page 12).
Activating the Key lock
$ When the telephone is on stand-by, press and hold down
the lock key.
or
M ¢ Security ¢ Key lock
Deactivating the Key lock
$ Hold down the lock key.
or
M Press the menu key.
Q ... O If the preset PIN (0000) is changed, enter a 4-digit PIN and
confirm with
[.
Once the key lock has been switched on, this is indicated with the
i
symbol in the display.
Changing the PIN
The default setting for the Key lock PIN is 0000. You should change this
PIN in the interests of security.
M ¢ Security ¢ Change PIN
Q...O Enter a new 4-digit PIN and confirm with [.
Repeat the entry and re-confirm with
[.
Emergency calls
There are two emergency numbers stored in the telephone as a default
setting (110, 112). You can store an additional emergency number with
a max. of 28 digits. These emergency numbers can also be selected
when the Key lock is switched on.
Selecting an emergency number
c Lift the handset.
~ Enter the emergency number.
Emergency is indicated in the display.
Saving the emergency number
M ¢ Security ¢ Emergency
Q...O Enter the emergency number and confirm with [.
Note
The melodies are played over the speaker if you lift the handset
before commencing with the settings.
Q ... O Ringer 1 - 10
Note
The ring melody can only sound when the ring pulse arrives from the
telephone network. The length of the pulses may differ from network
to network. It is therefore possible that some ring tones for selection
may seem clipped. If this is the case please select another ring tone.
Q ... O Ringer 1 - 10
Note
If you have changed the telephone PIN you must always enter the PIN
after selecting the Security menu entry.

Gigaset DA710 / en / A30350-M213-R101-4-7W19 / telephony.fm / 29.03.2018
de en fr nl 13
1110-01
Direct calling (baby call)
When direct calling is activated, the stored number is dialled by pressing
any key after lifting the handset (except for the keys
A, D and
E).
Activating direct calling
M ¢ Security ¢ Direct call
Q...O Enter the direct calling number and confirm with [.
Direct calling is activated and indicated in the display.
Deactivating direct calling
M Press the menu key.
~ Enter PIN (£ page 12) and confirm with [.
Confirm the question Disable direct? with
[.
Blocking numbers
You can block phone calls to specific dialling codes (e.g. chargeable
codes), max. 3 numbers with 5 digits each.
M ¢ Security ¢ Call block
s Select Call block 1 (or 2 or 3) and confirm with [.
Q...O Enter the call block number and confirm with [.
Network services
Public telephone systems offer you – in some cases only on request – a
range of helpful, additional services (e. g. call forwarding, callback when
busy, withheld number, etc.). These services can be selected using spec-
ified key combinations, of which your network provider will notify you.
These services can be called up and activated in the telephone menu
and the corresponding key combinations can be set or adjusted if nec-
essary.
A list with predefined key combinations can be found in the Appendix
(
£ page 15).
Caller display (CLIP)
If the caller display service is activated, an incoming call is shown on the
display with the number and saved in the call list. Prerequisite: The net-
work provider supports the following service features and the number
transfer is not withheld by the caller:
u CLI (Calling Line Identification): The caller's number is transferred.
u CLIP (Calling Line Identification Presentation): The caller's number is
displayed.
You can transfer this number to the phonebook and edit it (
£ page 9).
If you have saved the local dialling code (
£ page 14), a call with the
same dialling code is automatically only displayed as the number with-
out the dialling code.
Call Divert
Call forwarding can be set up for three different conditions:
¤ All Calls (CFU, Call Forwarding Unconditional)
¤ No Answer (CFNR, Call Forwarding No Reply)
¤ When Busy (CFB, Call Forwarding Busy)
Activating call forwarding
M ¢ CLASS ¢ Call Divert
q Select Activate and confirm with [.
The conditions for call forwarding are displayed.
q Select the desired condition for call forwarding and con-
firm with
[.
The key combination for initiating call forwarding is dis-
played.
~ Enter target number and confirm with [.
The call forwarding for the selected condition is activated.
Deactivating call forwarding
M ¢ CLASS ¢ Call Divert
q Select Deactivate and confirm with [.
The conditions for call forwarding are displayed.
q Select the desired condition for call forwarding and con-
firm with
[.
The call forwarding for the selected condition is deactivated.
Other network services
Setting/changing key combinations for network services
If the preset key combinations for the network services do not match the
information from your network provider, or if no key combination is pre-
set, these can be changed or set in the corresponding network services
menu.
Your network provider will notify you of the key combinations - if
offered.
M ¢ CLASS
q Select required network service.
H Press recall key.
Q .. O, +, $
Enter key combination for the network service and con-
firm with
[.
Use the shift key
L in the position, in which you are required to enter
data.
For example: Call forwarding when busy is activated with *67* <num-
ber> #. You are required to enter data for <number>. Use the following
key combination for the configuration:
+ L M * L #
CW Signal
If the call waiting function is available from your network provider and
you activate it, an incoming call is signalled during the conversation
(
£ page 8).
M ¢ CLASS ¢ CW Signal
q Select Activate / Deactivate and confirm with [.
The signalling of an incoming call by call waiting is activated or deacti-
vated.

Gigaset DA710 / en / A30350-M213-R101-4-7W19 / telephony.fm / 29.03.2018
14 de en fr nl
1110-01
Withheld number (anonymous call)
If you activate the withheld number function, your number will not be
displayed for the person you are calling.
M ¢ CLASS ¢ Withhold number
q Select Activate / Deactivate and confirm with [.
The withheld number function is activated or deactivated.
Hotline
The network service Hotline allows a special number to be selected sim-
ply by lifting the handset, e.g. in case of emergency. This function is not
available if it is not supported by your network provider.
M ¢ CLASS ¢ Hotline
q Select Activate and confirm with [.
~ Enter target number and confirm with [.
q Select Deactivate and confirm with [.
The network service Hotline is activated or deactivated.
Call back when busy
If you make a call but the person you are calling is already on the line,
you can arrange an automatic callback as soon as the connection is free.
M ¢ CLASS ¢ Ringback
q Select Activate / Deactivate and confirm with [.
The callback is activated or deactivated.
Automatic callback
If your network provider supports automatic callback and you activate
this function, the number of the caller who called you last while your line
was busy will be dialled automatically.
M ¢ CLASS ¢ Auto recall
q Select Activate / Deactivate and confirm with [.
The automatic callback is activated or deactivated.
Network mailbox
If you use a network mailbox, the telephone display shows new incom-
ing messages. The request for the mailbox can be started via the menu.
You can also set the LED so that it lights up to indicate incoming mes-
sages (
£ page 11).
M ¢ CLASS ¢ Phonemail
The network service number is selected.
Recall key
In public telephone systems the recall key (flash) is required for the use
of various additional services; e.g. for "callback when busy".
If necessary, the flash time on your telephone must be adjusted to the
requirements of the telephone system (
£ page 14).
Setting up of dialling code
If necessary you can change the default setting for the area code for your
connection which is saved in the telephone. The number saved here is
then used to display only the number of the person calling without area
code in the call lists, provided that they have the same area code.
M ¢ Phone setup ¢ Area code
The default number is displayed.
Q...O Enter the new area code (max. 6 digits) and confirm with
[.
Operation on a PABX
Special functions/Recall key
During an external call, you can make an enquiry or forward the call. To
do this, press the recall key
H. The subsequent procedure depends
on your PABX. To set the recall key, the telephone's flash time must be set
consistently with your PABX. Please refer to the operating instructions
for your PABX.
Changing the dialling mode/flash time
The telephone supports the following dialling modes:
u Tone dialling
u Pulse dialling
Depending on your PABX, you may need to change your phone's dialling
mode or the flash time. (Default setting: Tone dialling)
Changing the dialling mode
M ¢ Phone setup ¢ Dial mode
q Select Ton e or Pulse and confirm with [.
Changing the flash time
You can change the flash time if the dialling mode is set to tone dialling
(see above) (default setting 90 ms).
M ¢ Phone setup ¢ Flash time
q Select flash time, the following values are available:
90, 120, 270, 375, 600 ms and confirm with
[.
Temporary switch to tone dialling in "Pulse" position
To use functions that require tone dialling (e.g. remote control of
answering machine), you can set the telephone to tone dialling for the
duration of the call.
After the connection is established:
* Press the star key.
After the connection is terminated, the setting reverts to pulse dialling.
Setting dialling prefixes
If your phone is connected to a PABX, you may have to use a dialling pre-
fix to make external calls. You can save up to three prefixes in your tele-
phone.
If a dialling prefix is recognised during dialling, a dialling pause will auto-
matically be applied. You can adjust the time of the dialling pause if nec-
essary (
£ page 15).
M ¢ Phone setup ¢ PABX code
The current setting is displayed.
Q.... O Enter the dialling prefix (1 to 3 digits) and confirm with [.
Use the control key to switch between the dialling prefixes:
t s Press the control key up/downwards in order to jump left/
right

Gigaset DA710 / en / A30350-M213-R101-4-7W19 / appendix.fm / 29.03.2018
de en fr nl 15
1110-01
Appendix
Other settings
In addition to the options described in section Adjusting the tele-
phone (
£ page 11), you can perform further settings with the help of
Feature codes (e.g. reset the factory settings). These are summarised in
the following table.
Default settings are displayed in bold. If there is no bold value for a set-
ting, the presetting is country-dependent.
M Press the menu key and 1.
~ Enter the key sequence for the Feature code and confirm
with
[.
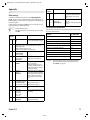
Predefined key combinations
The following key combinations are predefined for the activation/deac-
tivation of network services.
<number> This will be replaced by the phone number, which has
been specified for the corresponding function in the
menu CLASS (
£ page 13).
Key
sequence
Value Description
02 0
1
2
1 s
3 s
6 s
Sets the length of the pause that
can be inserted with the pause key
25 0
1
2
3
4
Restores all settings to the factory settings
Deletes the contents of all programmable direct dial keys
Deletes PABX codes
Restores all network service codes
Deletes all stored numbers (not phonebook)
50 0
1
2
Time display off
24 hour format
12 hour format
Sets the time format
57 0
1
2
Deactivate
500 ms/500 ms
30 ms/70 ms
Interval for the LED (hands-free/
headset key) on incoming call
70 0
1
Deactivate
Activate
Eliminates click tone at the begin-
ning or end of ringer.
If network transmits only a very
short ringer impuls, the click tone
can be prevented by deactivating
(setting 0) the setting.
83 0
1
2
Deactivate
Activate
Automatic
Withholds the first ringer. With this
setting, it is possible to determine,
if an incoming call comes from a VIP
number, and to select a VIP ring
tone instead of the normal ring
tone.
88 1~9
B
Settings 1-11
1 = minimum contrast
5 = default setting
11 = maximum contrast
Sets the contrast of the display.
Setting 10: Direct dial key 1
Setting 11: Direct dial key 2
91 0
1
1,5 : 1
2 : 1
Sets the pulse ratio for pulse dial-
ling
92 0
1
2
3
4
85 / 85 ms
85 / 110 ms
85 / 140 ms
110 / 110 ms
70 / 70 ms
Sets signal time/signal pause for
tone dialling
#2 0
1
Activate
Deactivate
Updates time automatically accor-
ding to CLIP information
#4 0
1
Ringer
AC
Start signal for CLIP recognition.
If CLIP does not function with the
default setting 0, select setting
"AC".
#6 3~15
B
Seconds
Settings 3-15
Default setting: 8
Time for termination of an inco-
ming call
Settings 10-15: Press the direct dial
keys 1-5.
Function Key combination
Activate call forwarding for all calls (CFU) *21*<number>#
Deactivate call forwarding for all calls #21#
Activate call forwarding when no reply (CFNR) *61*<number>#
Deactivate call forwarding when no reply #61#
Activate call forwarding when busy (CFB) *67*<number>#
Deactivate call forwarding when busy #67#
Activate signalling for call waiting (CW) *43#
Deactivate signalling for call waiting #43#
Activate hotline *53*<number>#
Deactivate hotline #53#
Key
sequence
Value Description

Gigaset DA710 / en / A30350-M213-R101-4-7W19 / appendix.fm / 29.03.2018
16 de en fr nl
1110-01
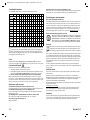
Standard characters
The following characters can be entered using the keypad:
*) Space
The mode for text entry is changed by repeatedly pressing the shift key
L. Change between capitals (ABC), lower case (abc) and digits (123).
The mode is briefly indicated on the lower right of the display when
switching. By selecting the (123) mode, you can enter digits directly by
pressing the respective key once.
Care
Wipe the unit with a damp cloth or an antistatic cloth. Do not use
solvents or microfibre cloths. Never use a dry cloth; this can cause static.
Contact with liquid
If the device comes into contact with liquid:
1 Allow the liquid to drain from the device.
2 Pat all parts dry. Place the device (the keypad facing down) in a dry,
warm place for at least 72 hours (not in a microwave, oven etc.).
3 Do not switch on the device again until it is completely dry.
When it has fully dried out, you will normally be able to use it again.
In rare cases, contact with chemical substances can cause changes to the
telephone's exterior. Due to the wide variety of chemical products avail-
able on the market, it was not possible to test all substances.
Questions and answers
You lift the handset, but don't hear the free tone:
Lift the handset for 5 seconds, put it back in the cradle and lift it again.
You lift the handset but you hear no dialling tone:
Is the connecting lead correctly plugged into the telephone and the
telephone socket?
The dialling tone is audible but the telephone will not dial:
The connection is OK. Is the dialling mode set correctly?
The other party cannot hear you:
Mute activated?
Regular pulse noises can be heard during a call:
The connection is receiving metering pulses from the exchange, which
the telephone cannot interpret. Contact your network operator.
Protecting our environment
Our environmental statement
We at Gigaset Communications GmbH are aware of our social responsi-
bility. That is why we actively take steps to create a better world. In all
areas of our business - from product planning and production to sales
and waste of disposal - following our environmental conscience in eve-
rything we do is of utmost importance to us. Learn more about our
earth-friendly products and processes online at www.gigaset.com
.
Environmental management system
Gigaset Communications GmbH is certified according to the
international standards ISO 14001 and ISO 9001. ISO 14001
(Environment): Certified since September 2007 by TüV SÜD
Management Service GmbH. ISO 9001 (Quality): Certified
since 17/02/1994 by TüV SÜD Management Service GmbH.
Disposal
All electrical and electronic products should be disposed of sep-
arately from the municipal waste stream via designated collec-
tion facilities appointed by the government or the local authori-
ties.
This crossed-out wheeled bin symbol on the product means the product
is covered by the European Directive 2012/19/EU. The correct disposal
and separate collection of your old appliance will help prevent potential
negative consequences for the environment and human health. It is a
precondition for reuse and recycling of used electrical and electronic
equipment.
For more detailed information about disposal of your old appliance,
please contact your local council refuse centre or the original supplier of
the product.
Authorisation
This device is intended for analogue phone lines in the UK and on the
Irish network.
Country-specific requirements have been taken into consideration.
We, Gigaset Communications GmbH, declare that this device meets the
essential requirements and other relevant regulations laid down in
Directives 2014/30/EU and 2014/35/EU.
The full text of the EU declaration of conformity is available at the follow-
ing internet address:
www.gigaset.com/docs
.
This declaration could also be available in the "International Declara-
tions of Conformity" or “European Declarations of Conformity” files.
Therefore please check all of these files.
Contacts
If you should encounter any problems when operating the telephone
connected to a communication system with analogue network access,
please contact the network operator responsible or your dealer.
Key 1x 2x 3x 4x 5x 6x 7x 8x 9x 10x 11x 12x 13x 14x
1 €£$¥¤
2
a b c2äáàâãç
3
d e f3ëéèê
4
g h i4ïíìî
5
jkl5
L
m n o6öñóòôõ
M
pqrs7ß
N
t u v8üúùû
O
wxyz9ÿýæøå
Q
.,?!0+-:¿¡”’;_
*
*/()<=>%
#
#@\&§
*)
!

Gigaset DA710 / en / A30350-M213-R101-4-7W19 / DA710SIX.fm.fm / 29.03.2018
de en fr nl 17
1110-01
Index
A
Answering machine . . . . . . . . . . . . . . . . . . . . . . . . . . . . . . . . . . . . . . . . . . . . . . . .14
Authorisation . . . . . . . . . . . . . . . . . . . . . . . . . . . . . . . . . . . . . . . . . . . . . . . . . . . . . .16
B
Baby call . . . . . . . . . . . . . . . . . . . . . . . . . . . . . . . . . . . . . . . . . . . . . . . . . . . . . . . . . . . 13
Blocking dialling codes . . . . . . . . . . . . . . . . . . . . . . . . . . . . . . . . . . . . . . . . . . . . . 13
Blocking numbers . . . . . . . . . . . . . . . . . . . . . . . . . . . . . . . . . . . . . . . . . . . . . . . . . . 13
C
Call forwarding . . . . . . . . . . . . . . . . . . . . . . . . . . . . . . . . . . . . . . . . . . . . . . . . . . . . .13
Call list . . . . . . . . . . . . . . . . . . . . . . . . . . . . . . . . . . . . . . . . . . . . . . . . . . . . . . . . . . . . . 10
Dialling . . . . . . . . . . . . . . . . . . . . . . . . . . . . . . . . . . . . . . . . . . . . . . . . . . . . . . . . . . 7
Saving numbers . . . . . . . . . . . . . . . . . . . . . . . . . . . . . . . . . . . . . . . . . . . . . . . . .10
Callback
Automatic. . . . . . . . . . . . . . . . . . . . . . . . . . . . . . . . . . . . . . . . . . . . . . . . . . . . . . .14
When busy . . . . . . . . . . . . . . . . . . . . . . . . . . . . . . . . . . . . . . . . . . . . . . . . . . . . . .14
Caller display . . . . . . . . . . . . . . . . . . . . . . . . . . . . . . . . . . . . . . . . . . . . . . . . . . . . . . . 13
Changing the dialling mode . . . . . . . . . . . . . . . . . . . . . . . . . . . . . . . . . . . . . . . . 14
Changing the PIN . . . . . . . . . . . . . . . . . . . . . . . . . . . . . . . . . . . . . . . . . . . . . . . . . . 12
CLI, CLIP. . . . . . . . . . . . . . . . . . . . . . . . . . . . . . . . . . . . . . . . . . . . . . . . . . . . . . . . . . . .13
Contact with liquid . . . . . . . . . . . . . . . . . . . . . . . . . . . . . . . . . . . . . . . . . . . . . . . . .16
Control key. . . . . . . . . . . . . . . . . . . . . . . . . . . . . . . . . . . . . . . . . . . . . . . . . . . . . . . . . . 5
D
Date and time . . . . . . . . . . . . . . . . . . . . . . . . . . . . . . . . . . . . . . . . . . . . . . . . . . . . . . 11
Dialling
Number using the direct dial key. . . . . . . . . . . . . . . . . . . . . . . . . . . . . . . . . . 8
Telephone number . . . . . . . . . . . . . . . . . . . . . . . . . . . . . . . . . . . . . . . . . . . . . . . 7
Dialling code . . . . . . . . . . . . . . . . . . . . . . . . . . . . . . . . . . . . . . . . . . . . . . . . . . . . . . . 14
Dialling prefixes . . . . . . . . . . . . . . . . . . . . . . . . . . . . . . . . . . . . . . . . . . . . . . . . . . . . 14
Direct calling . . . . . . . . . . . . . . . . . . . . . . . . . . . . . . . . . . . . . . . . . . . . . . . . . . . . . . .13
Direct dial key . . . . . . . . . . . . . . . . . . . . . . . . . . . . . . . . . . . . . . . . . . . . . . . . . . . .1, 10
Display functions . . . . . . . . . . . . . . . . . . . . . . . . . . . . . . . . . . . . . . . . . . . . . . . . . . . . 5
Display symbols . . . . . . . . . . . . . . . . . . . . . . . . . . . . . . . . . . . . . . . . . . . . . . . . . . . . . 4
Disposal. . . . . . . . . . . . . . . . . . . . . . . . . . . . . . . . . . . . . . . . . . . . . . . . . . . . . . . . . . . .16
E
Emergency calls . . . . . . . . . . . . . . . . . . . . . . . . . . . . . . . . . . . . . . . . . . . . . . . . . . . .12
Entering characters. . . . . . . . . . . . . . . . . . . . . . . . . . . . . . . . . . . . . . . . . . . . . . .5, 16
F
Flash time. . . . . . . . . . . . . . . . . . . . . . . . . . . . . . . . . . . . . . . . . . . . . . . . . . . . . . . . . .14
Function code. . . . . . . . . . . . . . . . . . . . . . . . . . . . . . . . . . . . . . . . . . . . . . . . . . . . . .15
H
Hands-free . . . . . . . . . . . . . . . . . . . . . . . . . . . . . . . . . . . . . . . . . . . . . . . . . . . . . . . . . . 8
Hands-free/headset key . . . . . . . . . . . . . . . . . . . . . . . . . . . . . . . . . . . . . . . . . . . . . 1
Headset. . . . . . . . . . . . . . . . . . . . . . . . . . . . . . . . . . . . . . . . . . . . . . . . . . . . . . . . . . . . .8
K
Key combinations, predefined . . . . . . . . . . . . . . . . . . . . . . . . . . . . . . . . . . . . . .15
Key lock. . . . . . . . . . . . . . . . . . . . . . . . . . . . . . . . . . . . . . . . . . . . . . . . . . . . . . . . . .1, 12
Keys . . . . . . . . . . . . . . . . . . . . . . . . . . . . . . . . . . . . . . . . . . . . . . . . . . . . . . . . . . . . . . . . 1
L
Language . . . . . . . . . . . . . . . . . . . . . . . . . . . . . . . . . . . . . . . . . . . . . . . . . . . . . . . . . . 11
Last number redial . . . . . . . . . . . . . . . . . . . . . . . . . . . . . . . . . . . . . . . . . . . . . . . . . . 7
LED . . . . . . . . . . . . . . . . . . . . . . . . . . . . . . . . . . . . . . . . . . . . . . . . . . . . . . . . . . . . . .1, 11
M
Menu. . . . . . . . . . . . . . . . . . . . . . . . . . . . . . . . . . . . . . . . . . . . . . . . . . . . . . . . . . . . . . . 5
Menu key. . . . . . . . . . . . . . . . . . . . . . . . . . . . . . . . . . . . . . . . . . . . . . . . . . . . . . . . . . . 1
Menu tree . . . . . . . . . . . . . . . . . . . . . . . . . . . . . . . . . . . . . . . . . . . . . . . . . . . . . . . . . . 6
Mute . . . . . . . . . . . . . . . . . . . . . . . . . . . . . . . . . . . . . . . . . . . . . . . . . . . . . . . . . . . . . . . 9
Mute key . . . . . . . . . . . . . . . . . . . . . . . . . . . . . . . . . . . . . . . . . . . . . . . . . . . . . . . . . . . 1
N
Network mailbox . . . . . . . . . . . . . . . . . . . . . . . . . . . . . . . . . . . . . . . . . . . . . . . . . . 14
Network services. . . . . . . . . . . . . . . . . . . . . . . . . . . . . . . . . . . . . . . . . . . . . . . . . . . 13
Key combinations . . . . . . . . . . . . . . . . . . . . . . . . . . . . . . . . . . . . . . . . . . . . . . . 13
O
Open listening . . . . . . . . . . . . . . . . . . . . . . . . . . . . . . . . . . . . . . . . . . . . . . . . . . . . . . 8
P
Phonebook . . . . . . . . . . . . . . . . . . . . . . . . . . . . . . . . . . . . . . . . . . . . . . . . . . . . . . . . . 9
Dialling . . . . . . . . . . . . . . . . . . . . . . . . . . . . . . . . . . . . . . . . . . . . . . . . . . . . . . . . . . 7
Editing . . . . . . . . . . . . . . . . . . . . . . . . . . . . . . . . . . . . . . . . . . . . . . . . . . . . . . . . . . 9
Saving numbers . . . . . . . . . . . . . . . . . . . . . . . . . . . . . . . . . . . . . . . . . . . . . . . . . 9
Pulse dialling . . . . . . . . . . . . . . . . . . . . . . . . . . . . . . . . . . . . . . . . . . . . . . . . . . . . . . 14
R
Recall key. . . . . . . . . . . . . . . . . . . . . . . . . . . . . . . . . . . . . . . . . . . . . . . . . . . . . . . . 1, 14
Redial list . . . . . . . . . . . . . . . . . . . . . . . . . . . . . . . . . . . . . . . . . . . . . . . . . . . . . . . . . . 10
Dialling . . . . . . . . . . . . . . . . . . . . . . . . . . . . . . . . . . . . . . . . . . . . . . . . . . . . . . . . . . 7
Saving numbers . . . . . . . . . . . . . . . . . . . . . . . . . . . . . . . . . . . . . . . . . . . . . . . . 10
Redial/pause key. . . . . . . . . . . . . . . . . . . . . . . . . . . . . . . . . . . . . . . . . . . . . . . . . . . . 1
Restore factory settings . . . . . . . . . . . . . . . . . . . . . . . . . . . . . . . . . . . . . . . . . . . . 15
Ringer . . . . . . . . . . . . . . . . . . . . . . . . . . . . . . . . . . . . . . . . . . . . . . . . . . . . . . . . . . . . . . 9
Setting . . . . . . . . . . . . . . . . . . . . . . . . . . . . . . . . . . . . . . . . . . . . . . . . . . . . . . . . . 12
Switching off . . . . . . . . . . . . . . . . . . . . . . . . . . . . . . . . . . . . . . . . . . . . . . . . . . . 12
S
Safety precautions . . . . . . . . . . . . . . . . . . . . . . . . . . . . . . . . . . . . . . . . . . . . . . . . . . 4
Saving
Number . . . . . . . . . . . . . . . . . . . . . . . . . . . . . . . . . . . . . . . . . . . . . . . . . . . . . . . . . 9
Setting the volume . . . . . . . . . . . . . . . . . . . . . . . . . . . . . . . . . . . . . . . . . . . . . . . . 11
Handset . . . . . . . . . . . . . . . . . . . . . . . . . . . . . . . . . . . . . . . . . . . . . . . . . . . . . . . . . 8
Headset . . . . . . . . . . . . . . . . . . . . . . . . . . . . . . . . . . . . . . . . . . . . . . . . . . . . . . . . . 8
Speaker. . . . . . . . . . . . . . . . . . . . . . . . . . . . . . . . . . . . . . . . . . . . . . . . . . . . . . . . . . 8
Shift key . . . . . . . . . . . . . . . . . . . . . . . . . . . . . . . . . . . . . . . . . . . . . . . . . . . . . . . . . . . . 1
T
Telephon e
Changing the language . . . . . . . . . . . . . . . . . . . . . . . . . . . . . . . . . . . . . . . . . 11
Installing . . . . . . . . . . . . . . . . . . . . . . . . . . . . . . . . . . . . . . . . . . . . . . . . . . . . . . . . 4
Locking. . . . . . . . . . . . . . . . . . . . . . . . . . . . . . . . . . . . . . . . . . . . . . . . . . . . . . . . . 12
Setting the date/time . . . . . . . . . . . . . . . . . . . . . . . . . . . . . . . . . . . . . . . . . . . 11
Text entry. . . . . . . . . . . . . . . . . . . . . . . . . . . . . . . . . . . . . . . . . . . . . . . . . . . . . . . . . . . 5
Tone dialling. . . . . . . . . . . . . . . . . . . . . . . . . . . . . . . . . . . . . . . . . . . . . . . . . . . . . . . 14
V
VIP melody . . . . . . . . . . . . . . . . . . . . . . . . . . . . . . . . . . . . . . . . . . . . . . . . . . . . . . . . 12
W
Withheld number . . . . . . . . . . . . . . . . . . . . . . . . . . . . . . . . . . . . . . . . . . . . . . . . . . 14
All rights reserved. Rights of modification reserved.

Gigaset DA710 / en / A30350-M213-R101-4-7W19 / Cover_back.fm / 29.03.2018
18 de en fr nl
1110-01
Issued by
Gigaset Communications GmbH
Frankenstrasse 2a, D-46395 Bocholt
© Gigaset Communications GmbH 2018
Subject to availability.
All rights reserved. Rights of modification reserved.
www.gigaset.com
A30350-M213-R101-4-7W19
-
 1
1
-
 2
2
-
 3
3
-
 4
4
-
 5
5
-
 6
6
-
 7
7
-
 8
8
-
 9
9
-
 10
10
-
 11
11
-
 12
12
-
 13
13
-
 14
14
-
 15
15
-
 16
16
-
 17
17
-
 18
18


