Whirlpool WWDC 9716 Guida utente
- Categoria
- Lavatrici
- Tipo
- Guida utente

1
IT
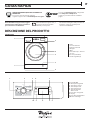
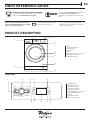
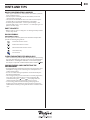
DESCRIZIONE DEL PRODOTTO
GUIDA RAPIDA
PANNELLO COMANDI
1. Piano
2. Cassetto detersivi
3. Pannello comandi
4. Maniglia
5. Oblò
6. Filtro dell'acqua - dietro lo
zoccolo
7. Zoccolo (amovibile)
8. Piedini regolabili (2)
APPARECCHIO
Prima di utilizzare l'apparecchio, leggere
attentamente le indicazioni su Istruzioni
per la sicurezza e l’installazione.
Prima di utilizzare l'apparecchio, è
necessario rimuovere i bulloni
utilizzati per il trasporto.
Per istruzioni dettagliate sulla procedura di
rimozione, vedere le Istruzioni per la
sicurezza e l’installazione.
1. Tasto On/O
2. Manopola Programmi
3. Tasto Avvio / Pausa
4. Tasto Temperatura
5. Tasto Colours 15°C
6. Tasto Asciugatura
/Blocco Tasti
7. Tasto Tipo asciugatura
8. Display
9. Tasto Partenza Ritardata
10. Tasto Centrifuga
GRAZIE PER AVERE ACQUISTATO UN PRODOTTO
WHIRLPOOL.
Per ricevere un'assistenza più completa,
registrare l'apparecchio su www.whirlpool.eu/register
1.
3.
2.
5.
4.
7.
6.
8.
Centrifuga
Partenza
Ritardata
Temp°
40° 60°
Asciugatura
Tipo
asciugatura
Colours
15°
Cotone
Lana
Delicati
Misti
Colorati
Lava & Asciuga 45’
Risciacquo + Centrifuga Lava & Asciuga 90’
Steam refresh
Rapido 30’
Cotone + Prelavaggio
Centrifuga + Scarico
Sintetici
Cotone
1.
2.
3. 4.
5.
7.
8.
9.
10. 6.
Scaricare le Istruzioni per l’uso collegandosi
al sito http://docs.whirlpool.eu
Seguire la procedura indicata nell’ultima
pagina.
WWW

2
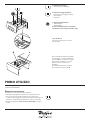
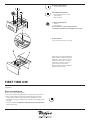
CASSETTO DETERSIVI
Per informazioni sulla selezione e l'avvio di un programma, vedere la
sezione USO QUOTIDIANO.
Primo ciclo di lavaggio
Per rimuovere eventuali residui di produzione:
1. Selezionare il programma “Cotone” alla temperatura di 90 °C.
2. Versare una piccola quantità di detersivo in polvere nello
scomparto del lavaggio principale del cassetto detersivi (max. 1/3
della dose consigliata dal produttore per i capi poco sporchi).
3. Avviare il programma senza caricare la lavasciuga (a cestello
vuoto).
PRIMO UTILIZZO
Scomparto prelavaggio
• Detersivo per il prelavaggio
Scomparto lavaggio principale
• Detersivo per il lavaggio principale
• Smacchiatore
• Anticalcare
Scomparto ammorbidente
• Ammorbidente
• Amido liquido
Versare l'ammorbidente o la soluzione
inamidante senza superare il livello “max”.
Tasto di sblocco
(Premere per rimuovere il cassetto
per la pulizia).
Nel caso di utilizzo di detersivo liquido
per il lavaggio, si consiglia di utilizzare
la paretina A per un corretto dosaggio
(la paretina è in dotazione e si trova
all’interno del sacchetto con le
Istruzioni).
Per l’utilizzo del detersivo in polvere
riporre la paretina nella cavità B.
B
A

3
IT
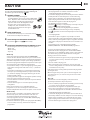
USO QUOTIDIANO
1. INTRODURRE LA BIANCHERIA.
• Preparare la biancheria seguendo le
raccomandazioni della sezione “CONSIGLI E
SUGGERIMENTI”. - Aprire l’Oblò e introdurre la
biancheria rispettando i valori di carico massimo
indicati nella Tabella Programmi.
• Chiudere l’oblò no a sentire lo scatto
facendo attenzione che la biancheria non
rimanga incastrata tra il vetro dell’oblò e la
guarnizione di gomma.
2. APRIRE IL RUBINETTO DELL’ACQUA.
Controllare che la lavsciuga sia collegata alla rete
idrica. Aprire il rubinetto dell’acqua.
3. ACCENDERE LA LAVASCIUGA.
Premere il tasto ; la spia lampeggerà lentamente.
4. SCEGLIERE IL PROGRAMMA E PERSONALIZZARE IL CICLO.
Con questo apparecchio è possibile eettuare:
• Solo Lavaggio
• Lavaggio ed asciugatura
• Solo asciugatura
Solo lavaggio
Selezionare con la manopola PROGRAMMI il programma
desiderato. Sul display comparirà la durata del ciclo di
lavaggio. La lavasciuga visualizza automaticamente la
temperatura e la centrifuga massime previste per il
programma impostato. Agire sugli appositi tasti per
modicare la temperatura e/o la centrifuga.
• Premere il tasto “Temp°”, si riduce progressivamente la
temperatura sino al lavaggio a freddo (il display visualizzarà
“- -“).
• Premere il tasto “Centrifuga”, si riduce progressivamente la
centrifuga sino alla sua esclusione (il display visualizzarà
“0”). Un’ulteriore pressione dei tasti riporterà i valori a quelli
massimi previsti.
Un’ulteriore pressione dei tasti riporterà i valori a quelli
massimi previsti.
Selezionare le opzioni desiderate (se necessario).
• Premereiltastoperattivarel’opzione;laspia
corrispondente al pulsante si accende.
• Premerenuovamenteiltastoperdisattivarel’opzione;la
spia si spegnerà.
! Se l’opzione selezionata non è compatibile con il
programma impostato, si udirà un suono di errore e la spia
lampeggerà tre volte. L’opzione non verrà attivata.
Lavaggio ed asciugatura
Se si vuole lavare e asciugare un carico senza alcuna
interruzione tra lavaggio e asciugatura bisogna essere sicuri
che il carico da lavare corrisponda al carico massimo di
asciugatura previsto per il programma selezionato (vedi la
Tabella programmi nella colonna “Carico max. per
l’asciugatura”).
1. Seguire le istruzioni indicate nel paragrafo “Solo Lavaggio”
per selezionare ed eventualmente personalizzare il
programma desiderato.
2. Selezionare il tipo di asciugatura desiderata premendo il
tasto “Tipo asciugatura”. E’ possibile selezionare due tipi di
asciugatura: asciugatura automatica o asciugatura a tempo.
- Asciugatura automatica a livelli:
Con l’asciugatura automatica la lavasciuga asciugherà no al
raggiungimento del livello di asciugatura impostato. Alla
prima pressione del tasto “Tipo asciugatura” la lavasciuga
seleziona automaticamente il livello di asciugatura massimo
compatibile con il programma selezionato. Le successive
pressioni fanno diminuire il livello di asciugatura.
I livelli disponibili sono:
Armadio : adatto per ottenere un bucato asciutto e
pronto per essere riposto nell’armadio senza bisogno di
stiratura.
Stampella : adatto per i capi che si vogliono mantenere
leggermente umidi in modo da minimizzare la formazione di
pieghe. Necessita che i capi vengano poi appesi per
completare l’asciugatura all’aria.
Stiro : adatto se si vogliono mantenere i capi abbastanza
umidi in modo da rendere più facile la stiratura.
- Asciugatura a tempo:
Se si vuole impostare un’asciugatura a tempo premere
ripetutamente il tasto “Tipo asciugatura”. Dopo che
tutti i livelli di asciugatura automatica sono stati
visualizzati continuare a premere il tasto “Tipo asciugatura”
no a quando il tempo desiderato non viene visualizzato.
Sono disponibili valori da 210 a 30 minuti.
L’asciugatura a tempo non è compatibile con i programmi
STEAM REFRESH, RAPIDO 30’ e SOLO SCARICO.
Se invece si vuole lavare e asciugare un carico di biancheria
superiore al carico massimo previsto per l’asciugatura (vedi la
Tabella programmi nella colonna “Carico max. per
l’asciugatura”), bisognerà rimuovere alcuni capi alla ne del
lavaggio prima di procedere con l’asciugatura. Procedere
come indicato:
1. Seguire le istruzioni indicate nel paragrafo “Solo Lavaggio”
per selezionare ed eventualmente personalizzare il
programma desiderato.
2. Non aggiungete alcun tipo di asciugatura.
3. Al termine del lavaggio aprire lo sportello e ridurre il carico
togliendo alcuni capi. Seguire a questo punto le istruzioni
per eettuare “Solo asciugatura”.
N.B: alla ne dell’asciugatura viene eettuato sempre un
periodo di rareddamento.
Sono presenti due cicli preimpostati “Lava & Asciuga 45’” e
“Lava & Asciuga 90’” , in questi casi non è necessario attivare
l’asciugatura.
Solo asciugatura
Se si vuole solo asciugare un carico bagnato lavato in
precedenza con la lavasciuga o a mano.
1. Selezionare il programma compatibile con il tipo di capi da
asciugare (es. selezionare cotone se si deve asciugare un
carico di cotone bagnato).
2. Premere il tasto “Asciugatura” per eseguire solo l’asciugatura
escludendo quindi la fase di lavaggio.
3. Selezionare il tipo di asciugatura desiderata premendo il
tasto “Tipo asciugatura”. E’ possibile selezionare due tipi di
asciugatura: asciugatura automatica o asciugatura a tempo.
Per maggiori informazioni sulle funzioni, è possibile richiedere o
scaricare dal WEB una guida più dettagliata seguendo le
indicazioni nell’ultima pagina.
WWW

4
- Asciugatura automatica a livelli:
Con l’asciugatura automatica la lavasciuga asciugherà no al
raggiungimento del livello di asciugatura impostato. Alla
prima pressione del tasto “Tipo asciugatura” la lavasciuga
seleziona automaticamente il livello di asciugatura massimo
compatibile con il programma selezionato. Le successive
pressioni fanno diminuire il livello di asciugatura.
I livelli disponibili sono:
Armadio : adatto per ottenere un bucato asciutto e pronto
per essere riposto nell’armadio senza bisogno di stiratura.
Stampella : adatto per i capi che si vogliono mantenere
leggermente umidi in modo da minimizzare la formazione di
pieghe. Necessita che i capi vengano poi appesi per
completare l’asciugatura all’aria.
Stiro : adatto se si vogliono mantenere i capi abbastanza
umidi in modo da rendere più facile la stiratura.
- Asciugatura a tempo:
Se si vuole impostare un’asciugatura a tempo premere
ripetutamente il tasto “Tipo asciugatura”. Dopo che tutti i
livelli di asciugatura automatica sono stati visualizzati
continuare a premere il tasto “Tipo asciugatura” no a
quando il tempo desiderato non viene visualizzato. Sono
disponibili valori da 210 a 30 minuti.
L’asciugatura a tempo non è compatibile con i programmi
STEAM REFRESH, RAPIDO 30’ e SOLO SCARICO.
N.B: alla ne dell’asciugatura viene eettuato sempre un
periodo di rareddamento.
5. DOSARE IL DETERSIVO. Estrarre il cassetto e versare il
detersivo nelle apposite vaschette come spiegato in
“Cassetto Detersivi ”. Solo in caso in cui si voglia fare un
lavaggio o lavaggio + asciugatura.
6. RITARDARE L’AVVIO DEL PROGRAMMA. Volendo ritardare
l’avvio del programma vedi la sezione “Opzioni e Funzioni”.
7. AVVIARE IL PROGRAMMA.
Premere il tasto START/PAUSE. La spia relativa si illumina,
l’oblò si blocca e il simbolo oblò aperto si spegne. Per
cambiare un programma mentre un ciclo è in corso, mettere
la lavasciuga in pausa premendo il tasto START/PAUSE (la spia
START/ PAUSE lampeggerà lentamente di colore ambra);
selezionare quindi il ciclo desiderato e premere nuovamente
il tasto START/PAUSE. Per aprire la porta mentre un ciclo è in
corso premere il tasto START/PAUSE; se il simbolo si
accende sarà possibile aprire l’oblò. Premere nuovamente il
tasto START/PAUSE per far ripartire il programma dal punto in
cui era stato interrotto.
8. ANNULLARE UN PROGRAMMA IN CORSO (SE NECESSARIO)
Premere e tenere premuto il tasto nché la lavasciuga si
spegne.
Se il livello e la temperatura dell’acqua sono bassi l’oblò si
sblocca e sarà possibile aprirlo.
Se rimane acqua in vasca l’oblò rimane bloccato. Per
sbloccarlo accendere la lavasciuga ed impostare il programma
CENTRIFUGA + SCARICO escludendo però la centrifuga
(impostare valore 0), l’acqua viene scaricata e al termine del
programma l’oblò si sblocca.
9. SPEGNERE LA LAVASCIUGA ALLA FINE DEL PROGRAMMA.
Alla ne del ciclo a scritta “END” viene visualizzata sul display.
E’ possibile aprire l’oblò solo quando il simbolo si
accende. Assicurarsi che il simbolo oblò aperto sia acceso,
aprire l’oblò e scaricare la biancheria.
Premere il tasto per spegnere la lavasciuga. Per
risparmiare energia, se la lavasciuga non viene spenta
manualmente con il tasto si spegnerà automaticamente
dopo circa 30 minuti dal termine del programma.
Lasciare lo sportello socchiuso per far sì che l’interno della
lavasciuga si asciughi.

5
IT
CRITERI PER LA DIVISIONE DELLA BIANCHERIA
• Tipo di tessuto / indicazioni riportate sull'etichetta (cotone,
tessuto misto, tessuto sintetico, lana, capi da lavare a mano)
• Colore (separare i capi colorati da quelli bianchi, lavare
separatamente i capi colorati nuovi)
• Dimensioni (introdurre capi di dimensioni diverse nello stesso
carico per aumentare l'ecacia del lavaggio e distribuire meglio
il peso all'interno del cestello)
• Delicati (lavare i capi piccoli – come le calze di nylon – e i capi con
gancetti – come i reggiseni – chiudendoli in un sacchetto per
lavare la biancheria o in una federa con cerniera).
SVUOTARE LE TASCHE
• Oggetti come monete o spille da balia possono danneggiare la
biancheria e il cestello della lavasciuga.
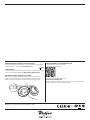
SIMBOLI DI LAVAGGIO
PRESENTI SULLE ETICHETTE DEI CAPI
Il valore riportato nel simbolo della vasca indica la massima
temperatura di lavaggio del capo.
Azione meccanica normale
Azione meccanica ridotta
Azione meccanica estremamente ridotta
Solo lavaggio a mano
Non lavare
PULIRE REGOLARMENTE IL FILTRO DELL’ACQUA
• In questo modo si eviterà che il ltro si ostruisca e che l’acqua di
scarico non deuisca correttamente. Vedere la sezione “Pulizia e
Manutenzione” / “Pulizia del ltro dell’acqua” presente nella guida
più dettagliata che è possibile richiedere o scaricare dal WEB.
RISPARMIO ENERGETICO E TUTELA
DELL’AMBIENTE
• Attenendosi ai limiti di carico indicati nella tabella programmi si
potranno ottimizzare il consumo di energia, acqua e detersivo e
la durata del lavaggio.
• Non superare le dosi di detersivo raccomandate dal produttore di
detersivi.
• Per risparmiare energia, scegliere un programma di lavaggio a
60°C anziché un programma a 90°C, oppure un programma a
40°C invece di uno a 60°C. Per i capi di cotone, si raccomanda il
programma “ Cotone “ 60°C che è quello con il consumo
minore pur avendo una durata maggiore.
• Per risparmiare energia e tempo se si vuole anche asciugare
selezionare la massima velocità di centrifuga selezionabile al ne
di ridurre la quantità d’acqua trattenuta dai capi.
CONSIGLI E SUGGERIMENTI
WWW

6
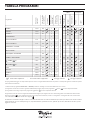
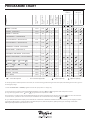
TABELLA PROGRAMMI
La durata del ciclo indicata sul display o sul libretto è una stima calcolata in base a condizioni standard. Il tempo eettivo può variare in base a numerosi fattori
quali temperatura e pressione dell’acqua in ingresso, temperatura ambiente, quantità di detersivo, quantità e tipo di carico, bilanciamento del carico, opzioni
aggiuntive selezionate.
Detersivi e
additivi
Detersivo
consigliato
Programma
Temperatura
disponibili
Velocità centrifuga
max. (giri/min)
Asciugatura
Carico max per il
lavaggio (kg)
Carico max per
l’asciugatura (kg)
Durata (Minuti)
Prelavaggio
Lavaggio
Ammorbidente
Polvere
Liquido
COTONE 0-90°C 1600 9 7 -
SINTETICI 0-60°C 1000
5 5 -
RAPIDO 30’ 0-30°C 800 - 4 - -
STEAM REFRESH - - - 2 - - - -
LAVA & ASCIUGA 45’ 30°C 1600
1 1 -
LAVA & ASCIUGA 90’ 30°C 1200 2 2 -
CENTRIFUGA + SCARICO - 1600 9 7 - - -
SOLO SCARICO
*
- 0 - 9 - - - -
RISCIACQUO + CENTRIFUGA - 1600
9 7 - -
COTONE + PRELAVAGGIO 0-90°C 1600 9 7
COTONE 1
0-60°C 1600
9 7 -
COTONE 2
0-40°C 1600
9 7 -
LANA 0-40°C 800
2,5 2,5 -
DELICATI 0-30°C 0 1 1 -
COLORATI 0-40°C 1600 9 7 -
MISTI 0-40°C 1000 5,5 5,5 -
Selezionabile / Opzionale
-
Non selezionabile / Applicabile Dosaggio richiesto Dosaggio opzionale
La durata dei programmi viene visualizzata sul display.
* Selezionando il programma CENTRIFUGA + SCARICO portando la centrifuga a 0 la macchina eettuerà solo lo scarico.
1) Programma di controllo secondo il regolamento EN 50229 (Lavaggio): impostare il programma “ Cotone ” con una temperaura di 60°C .
2) Programma cotone lungo: impostare il programma “ Cotone ” con una temperatura di 40°C.
Programma di controllo secondo il regolamento EN 50229 (Asciugatura): l’asciugatura del carico minore (2kg) deve essere eettuata selezionando il
livello di asciugatura ; il carico di biancheria deve essere composto da 2 lenzuola, 1 federa e 1 asciugamano. L’asciugatura del carico restante deve
essere eettuata selezionando il livello di asciugatura .
Per i programmi di lavaggio con temperatura superiore a 50°C si consiglia l’utilizzo di detersivi in polvere e comunque di seguire le indicazioni riportate
sulla confezione di detersivo.

7
IT
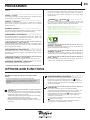
PROGRAMMI
OPZIONI E FUNZIONI
COTONE + PRELAVAGGIO
è ideato per lavare asciugamani, biancheria intima, tovaglie
ecc. in tessuto di cotone e lino resistente molto sporco per cui
è indicato il prelavaggio. Nello “Scomparto lavaggio principale”
utilizzare esclusivamente detersivo in polvere.
COTONE
è ideato per lavare capi di cotone mediamente sporchi. A 40°C
e 60°C è il programma standard per il lavaggio dei capi di
cotone, il più eciente in termini di consumo combinato di
acqua ed elettricità.
LANA - Woolmark Apparel Care - Green:
Il ciclo di lavaggio “Lana” di questa lavasciuga è stato
approvato dalla Woolmark Company per il lavaggio di capi di
lana classicati come “lavabili a mano”, purché il lavaggio
venga eseguito nel rispetto delle istruzioni riportate
sull’etichetta dell’indumento e delle indicazioni fornite dal
produttore di questa lavasciuga. (M1135)
DELICATI
è ideato per il lavaggio dei capi particolarmente delicati. Si
raccomanda di rovesciare i capi prima del lavaggio.
COLORATI
è ideato per lavare capi in cotone colorati. Il programma è
studiato per il mantenimento della vivacità dei colori nel
tempo.
MISTI
è ideato per lavare capi resistenti di cotone, lino, bre sintetiche
e tessuti misti, da poco a mediamente sporchi.
COTONE
è ideato per lavare asciugamani, biancheria intima, tovaglie ecc. in
tessuto di cotone e lino resistente, da mediamente a molto sporco.
SINTETICI
è ideato per lavare capi in bre sintetiche (come poliestere,
poliacrilico, viscosa ecc.) o misto cotone, mediamente sporchi.
RAPIDO 30’
è ideato per lavare capi leggermente sporchi in poco tempo: dura
solo 30 minuti e fa così risparmiare energia e tempo. Carico
massimo 4 kg.
STEAM REFRESH
è ideato per rinfrescare i capi togliendo odori sgradevoli e
rilassando le bre, producendo vapore all’interno della vasca. Al
termine del ciclo i capi risulteranno umidi.
LAVA & ASCIUGA 45’
il ciclo è ideato per lavare e asciugare capi (Cotone e Sintetici)
leggermente sporchi in poco tempo. Selezionando questo ciclo è
possibile lavare e asciugare no a 1 kg di bucato in soli 45 minuti.
LAVA & ASCIUGA 90’
è ideato per lavare e asciugare capi (Cotone e Sintetici) in poco
tempo. Selezionando questo ciclo è possibile lavare e asciugare
no a 2 kg di bucato in soli 90 minuti.
CENTRIFUGA + SCARICO
è ideato per centrifugare e scaricare l’acqua. Per capi resistenti.
RISCIACQUO + CENTRIFUGA
è ideato per risciacquare e centrifugare. Per capi resistenti.
Attenersi alle raccomandazioni indicate sui simboli di
lavaggio dei capi.
COLOURS 15°
Questa opzione aiuta a preservare i colori dei capi
eseguendo il lavaggio in acqua fredda (15°C). Consente di
consumare meno energia per il riscaldamento dell’acqua
mantenendo un buon risultato di lavaggio.
Indicata per i capi leggermente sporchi e senza macchie in
base al programma precedentemente selezionato.
Nota: attivando questa opzione con il programma “MISTI”
si otterrà ad una temperatura di 15°C un risultato di
lavaggio paragonabile ad un ciclo a 40°C.
OPZIONI direttamente selezionabili premendo il tasto
corrispondente
! Se l’opzione selezionata non è compatibile con il
programma impostato, si udirà un suono di errore e la spia
lampeggerà tre volte. L’opzione non verrà attivata.
PARTENZA RITARDATA
Per impostare la partenza ritardata del programma prescelto,
premere il tasto relativo no a raggiungere il tempo di ritardo
desiderato. Quando tale opzione è attiva, sul display si
illumina il simbolo
h.
. Per rimuovere la partenza ritardata
premere il tasto no a che sul display compare il valore “0”.
BLOCCO TASTI
per attivare il blocco del pannello di controllo, tenere
premuto il tasto “Asciugatura” per circa 3 secondi. Il simbolo
nel display acceso indica che il pannello di controllo è
bloccato (ad eccezione del tasto ). In questo modo si
impediscono modiche accidentali dei programmi,
soprattutto se in casa ci sono dei bambini.
Se si prova a interagire con il pannello di controllo Il simbolo
all’interno del display lampeggia.
Per disattivare il blocco del pannello di controllo, tenere
premuto il tasto “Asciugatura” per circa 3 secondi.
h.

8
COME OTTENERE LE ISTRUZIONI PER L’USO
> Telefonare al Serivizio Assistenza
> Utilizzare questo QR Code
> Scaricarla dal sito Web Whirlpool
http://docs.whirlpool.eu
Questa operazione richiede di inserire l’esatto codice commerciale
del prodotto riportato sull’etichetta adesiva.
MANUTENZIONE E GUIDA ALLA RICERCA GUASTI
Per le procedure di manutenzione e per la risoluzione dei problemi
di funzionamento, vedere le Istruzioni per l’uso.
FICHE TECNICA
La che tecnica contenente i dati di consumo energetico può essere
scaricata dal sito Web Whirlpool
http://docs.whirlpool.eu
PER CONTATTARE IL SERVIZIO ASSISTENZA
Quando si contatta il Servizio Assistenza, è necessario fornire i
codici riportati sull’etichetta adesiva applicata all’interno dello
Oblò. Il numero di telefono è riportato sul libretto di garanzia.
Whirlpool® is a registered trademark of Whirlpool, USA.
WWW
n
001
Whirlpool Europe s.r.l.
Viale G.Borghi 27
21025 Comerio - Italy

9
EN
DAILY REFERENCE GUIDE
Please read the content of the Health &
Safety and Installation Guides thoroughly
before you use this appliance.
The transit bolts must be removed
before the appliance is used.
See the Health & Safety and Installation
Guides for detailed instructions on how to
remove the transit bolts
THANK YOU FOR BUYING A WHIRLPOOL PRODUCT.
For even more complete user support, register your
appliance at www.whirlpool.eu/register
Download the Instructions for use from the
website http://docs.whirlpool.eu
Follow the procedure described on the last
page.
WWW
PRODUCT DESCRIPTION
CONTROL PANEL
1. Top
2. Detergent dispenser
3. Control Panel
4. Lid handle
5. Door
6. Water lter - behind kick panel
7. Removable kick panel
8. Adjustable feet (2)
APPLIANCE
1. On/O button
2. Programme selector
3. Start/Pause button
4. Temperature button
5. Colours 15°C button
6. Dry Only Button / Lock button
7. Drying settings button
8. Display
9. Start delay button
10. Spin speed button
1.
3.
2.
5.
4.
7.
6.
8.
Centrifuga
Partenza
Ritardata
Temp°
40° 60°
Asciugatura
Tipo
asciugatura
Colours
15°
Cotone
Lana
Delicati
Misti
Colorati
Lava & Asciuga 45’
Risciacquo + Centrifuga Lava & Asciuga 90’
Steam refresh
Rapido 30’
Cotone + Prelavaggio
Centrifuga + Scarico
Sintetici
Cotone
1.
2.
3. 4.
5.
7.
8.
9.
10. 6.

10
DETERGENT DISPENSER
See the section DAILY USE for instructions on selecting and starting a
programme.
First cycle operation
Remove any manufacturing debris:
1. Select the “Cotone” programme with a temperature setting of 90 °C.
2. Pour a small quantity of detergent powder into the main wash
compartment of the detergent dispenser (maximum 1/3 of the
quantity the detergent manufacturer recommends for lightly soiled
laundry).
3. Start the programme without loading the washer dryer machine
(with empty drum).
FIRST TIME USE
Prewash Compartment
• Detergent for prewash
Main Wash Compartment
• Detergent for the main wash
• Stain remover
• Water softener
Softener compartment
• Softener
• Liquid starch
Pour softener or starch solution into the
compartment without exceeding the “max” level.
Release button
(press to remove tray for cleaning).
Preferably use the partition A when
washing with a liquid detergent for
washing, to ensure that the correct
quantity of detergent is used (the
partition is included in the bag
containing the instructions).
Move the partition into slot B when
using detergent powder.
B
A

11
EN
DAILY USE
1. LOADING LAUNDRY.
• Prepare the laundry, following the
recommendations given in the section “HINTS AND
TIPS”. - Open the door and load the laundry into the
drum, without exceeding the maximum load
capacities indicated in the Programme Chart.
• Close the door, pressing until the latch
audibly locks, and check that there is no
laundry trapped between the door glass
and the rubber seal.
2. OPEN THE WATER TAP
Check that the washer dryer is connected correctly
to the water mains. Open the water tap.
3. SWITCHING ON THE WASHER DRYER MACHINE.
Press button ; the lamp ashes slowly.
4. SELECTING A PROGRAMME AND CUSTOMISING A CYCLE.
The following functions are possible with this appliance:
• Wash only
• Wash and dry
• Dry only
Wash only
Select the required programme with the PROGRAMME
selector dial. The duration of the wash cycle is shown on the
display. The washer dryer machine automatically displays the
maximum temperature and spin speed settings possible for
the selected programme. Adjust the temperature and/or spin
speed settings if needed with the relative buttons.
• Press button “Temp°” to cycle through progressively lower
temperature settings until cold wash is set (“- -“) shown on
display.
• Press button “Centrifuga” to cycle through progressively
lower spin speed settings until the spin cycle is turned o
(“0” shown on display). Pressing the button again sets the
highest possible setting.
Pressing the button again sets the highest possible setting.
Select the required options (if necessary).
• Pressthebuttontoselecttheoption;therespectivebutton
lamp illuminates.
• Pressthebuttonagaintocanceltheoption;thelamp
extinguishes.
! If the selected option is not compatible with the
programme set, an error warning tone sounds and the
indicator lamp ashes three times. The option is not selected.
Wash and dry
To wash and dry a load with no interruption between the
wash and dry cycles, make sure that the load does not
exceed the maximum permissible drying load for the
selected programme (see the column “Max. load for drying
cycle” in the Programme chart).
1. Follow the instructions given in the paragraph “Wash Only”
to select and, if necessary, customise the required
programme.
2. Press “Tipo asciugatura” to select the required drying mode.
Two drying modes are available: automatic or timer.
- Automatic drying with selectable levels:
In automatic drying mode, the washer dryer machine dries the
laundry until the set level of dryness is reached. Pressing
button “Tipo asciugatura” once automatically selects the
highest drying level available for the selected programme.
Press the button again to reduce the drying level.
The following levels are available:
Wardrobe : laundry is completely dry and ready to be put
away in the wardrobe without ironing.
Hanger : laundry is left slightly damp to minimise
creasing. Garments must be hung to air dry completely.
Iron : garments are left reasonably damp to make ironing
easier.
- Timer drying mode:
Press button “Tipo asciugatura” repeatedly to set timer
drying mode. After cycling through all the automatic drying
levels, continue pressing button “Tipo asciugatura” until the
desired time is displayed. Values from 210 to 30 minutes are
settable.
Timer drying is not compatible with the STEAM
REFRESH, RAPIDO 30’ and SOLO SCARICO programmes.
To wash a load of laundry larger than the maximum
permissible load for drying (see the column “Max. load for
drying cycle” in the Programme chart), remove a few garments
once the washing cycle has nished before starting the
drying cycle. Proceed as follows:
1. Follow the instructions given in the paragraph “Wash Only”
to select and, if necessary, customise the required
programme.
2. Do not include a drying cycle.
3. Once the washing cycle is nished, open the door and
remove a few garments to reduce the load. Now follow the
instructions for “Dry only”.
N.B.: always allow a cooling down period after drying before
opening the door.
When using the two preset cycles “Lava & Asciuga 45’” and
“Lava & Asciuga 90’”, it is not necessary to select and start a
drying cycle.
Dry only
This function is used to simply dry a wet load washed
previously in the washer dryer or by hand.
1. Select a suitable programme for the laundry you want to dry
(e.g. select cotton to dry wet cotton laundry).
2. Press button “Asciugatura” to dry without a wash cycle.
3. Press “Tipo asciugatura” to select the required drying
mode. Two drying modes are available: automatic or timer.
- Automatic drying with selectable levels:
In automatic drying mode, the washer dryer machine dries
the laundry until the set level of dryness is reached. Pressing
button “Tipo asciugatura” once automatically selects the
highest drying level available for the selected programme.
Press the button again to reduce the drying level.
For more information on functions, a more detailed guide may
be requested or downloaded from the website following the
instructions given on the last page.
WWW

12
The following levels are available:
Wardrobe : laundry is completely dry and ready to be put
away in the wardrobe without ironing.
Hanger : laundry is left slightly damp to minimise
creasing. Garments must be hung to air dry completely.
Iron : garments are left reasonably damp to make ironing
easier.
- Timer drying mode:
Press button “Tipo asciugatura” repeatedly to set timer
drying mode. After cycling through all the automatic drying
levels, continue pressing button “Tipo asciugatura” until the
desired time is displayed.
Values from 210 to 30 minutes are settable.
Timer drying is not compatible with the STEAM REFRESH,
RAPIDO 30’ and SOLO SCARICO programmes.
N.B.: always allow a cooling down period after drying before
opening the door.
5. USING THE CORRECT AMOUNT OF DETERGENT. Pull out
the tray and pour detergent into the relative compartments
as described in “Detergent dispenser”. This is only necessary
when using a wash only or a wash + dry programme.
6. DELAYING THE START OF A PROGRAMME. To set a
programme to start at a later time, see the section “Options
and Functions”.
7. STARTING A PROGRAMME.
Press the START/PAUSE button. The relative indicator lamp
illuminates, the door locks and the door open symbol
extinguishes. To change a programme while a cycle is in
progress, press START/PAUSE to pause the washer dryer (the
START/ PAUSE lamp ashes amber slowly); then select the
required cycle and press START/PAUSE again. To open the
door while a cycle is in progress, press START/PAUSE; the door
may be opened if the symbol lights. Press the START/
PAUSE button again to resume the programme from where it
was paused.
8. CANCELLING A RUNNING PROGRAMME IF NECESSARY
Press and hold the button until the washer dryer stops.
If the water level and temperature are low enough, the door
unlocks and may be opened.
The door remains locked if there is water in the drum. To
unlock the door, switch the washer dryer on, select the
CENTRIFUGA + SCARICO programme and turn the spin function
o by setting the spin speed to 0. The water is emptied and
the door unlocks at the end of the programme.
9. SWITCHING THE WASHER DRYER OFF AT THE END OF A
PROGRAMME.
At the end of the cycle, the message “END” is shown on the
display. The door can only be opened when the symbol
lights. Check that the door unlocked symbol is lit, then open
the door and take out the laundry.
Press to switch the washer dryer o. To save energy, if the
washer dryer is not switched o manually with the
button, it turns o automatically approximately 30 minutes
after the end of the programme.
Leave the door ajar to let the interior of the washer dryer dry.

13
EN
RULES FOR SEPARATING LAUNDRY
• Fabric type / indications on label (cotton, mixed bres, synthetic,
wool, handwash items)
• Colour (separate coloured garments from whites, wash new
coloured items separately)
• Size (wash items of dierent sizes in the same load to improve
washing ecacy and weight distribution in the drum)
• Delicates (place small items – such as nylon stockings – and
garments with clasps – such as braziers – in a laundry bag or in a
pillow case with a zip).
EMPTY POCKETS
• Objects such as coins or safety pins can damage laundry and the
washer dryer drum.
WASH SYMBOLS
ON GARMENT LABELS
The value given in the tub symbol is the maximum temperature
possible for washing the garment.
Normal mechanical action
Reduced mechanical action
Much reduced mechanical action
Hand wash only
Do not wash
CLEAN THE WATER FILTER REGULARLY
• This is needed to prevent the lter from blocking and preventing
the water from draining correctly. See the section “Cleaning and
Maintenance” / “Cleaning the water lter” in the detailed guide
that may be requested or downloaded from the website.
WWW
SAVING ENERGY AND PROTECTING THE
ENVIRONMENT
• Keeping within the load limits indicated in the programme chart
will optimise energy, water and detergent consumption and
reduce washing times.
• Do not exceed the detergent quantities recommended by the
detergent manufacturer.
• Save energy by using a 60°C instead of a 90°C wash programme,
or by using a 40°C instead of a 60°C wash programme. We
recommend using the “ Cotone ” 60°C programme for
cotton garments, which is longer but uses less energy.
• To save energy and time when washing and drying, select
highest spin speed available for the programme to reduce the
residual water remaining in the garments at the end of the wash
cycle.
HINTS AND TIPS

14
PROGRAMME CHART
The cycle duration indicated on the display or in the manual is an estimated time calculated for standard conditions. The actual cycle time may vary in relation
to a number of dierent factors, such as inlet water temperature and pressure, ambient temperature, quantity of detergent, size and type of load, load
balancing and any additional optional functions selected.
* Select the CENTRIFUGA + SCARICO programme and set the spin speed to 0 to empty only.
1) Test programme in compliance with standard EN 50229 (Wash): select the “ Cotone ” programme with a temperature of 60°C.
2) Long cotton programme: set the “ Cotone “ programme with a temperature of 40°C.
Test programme in compliance with standard EN 50229 (Drying): the smaller load (2kg) must be dried by selecting the dryness level. The load must
consist of 2 sheets, 1 pillowcase and 1 hand towel; the remainder of the load must be dried by selecting the dryness level.
For wash programmes with temperatures above 50°C, we recommend using powder detergent rather than liquid, and following the directions given on
the detergent package.
Detergents and
additives
Recommended
detergent
Programme
Available tempera-
tures
Max. spin speed
(rpm)
Drying
Max. load for wash
cycle (kg)
Max. load for dry-
ing cycle (kg)
Duration (Minutes)
Prewash
Main
Softener
Powder
Liquid
COTONE COTTON 0-90°C 1600 9 7 -
SINTETICI SYNTHETICS 0-60°C 1000
5 5 -
RAPIDO 30’ RAPID 30’ 0-30°C 800 - 4 - -
STEAM REFRESH STEAM REFRESH - - - 2 - - - -
LAVA & ASCIUGA 45’ WASH & DRY 45’ 30°C 1600
1 1 -
LAVA & ASCIUGA 90’ WASH & DRY 90’ 30°C 1200 2 2 -
CENTRIFUGA + SCARICO SPIN & DRAIN - 1600 9 7 - - -
SOLO SCARICO
* DRAIN ONLY *
- 0 - 9 - - - -
RISCIACQUO + CENTRIFUGA RINSE & SPIN - 1600
9 7 - -
COTONE + PRELAVAGGIO COTTON+PREWASH 0-90°C 1600 9 7
COTONE 1 COTTON
0-60°C 1600
9 7 -
COTONE 2 COTTON
0-40°C 1600
9 7 -
LANA WOOL 0-40°C 800
2,5 2,5 -
DELICATI DELICATES 0-30°C 0 1 1 -
COLORATI COLOURS 0-40°C 1600 9 7 -
MISTI (MIXED) 0-40°C 1000 5,5 5,5 -
Selectable/optional
-
Not selectable/applicable Required quantity Optional quantity
The duration of the programme is shown on the display.

15
EN
PARTENZA RITARDATA START DELAY
To set the selected programme to start at a later time, press
the button to set the desired delay time. The
h.
symbol
lights on the display when this function is enabled. To cancel
the delayed start, press the button again until the value “0” is
shown on the display.
LOCK BUTTON
to lock the control panel, press and hold the button
“Asciugatura” for approximately 3 seconds. the symbol
lights on the display to indicate that the control panel is
locked (with the exception of the button). This prevents
unintentional changes to programmes, especially with
children near the machine.
If any attempt is made to use the control panel, the symbol
ashes on the display.
To unlock the control panel, press and hold the button
“Asciugatura” for approximately 3 seconds.
PROGRAMMES
OPTIONS AND FUNCTIONS
COTONE + PRELAVAGGIO COTTON+PREWASH
for washing heavily soiled towels, underwear, table and bed
linen etc. in resilient cotton and linen where a prewash is
required. Use only powder detergent in the “Main Wash
Compartment”.
COTONE COTTON
for washing normally soiled cotton garments. At 40°C and
60°C, this is the standard cotton programme and the most
ecient and terms of water and energy consumption.
LANA WOOL - Woolmark Apparel Care - Green:
The wool wash cycle of this machine has been approved by
The Woolmark Company for the washing of wool garments
labelled as “hand wash” provided that the products are
washed according to the instructions on the garment label
and those issued by the manufacturer of this washer dryer.
(M1135)
DELICATI DELICATES
for washing particularly delicate garments. Preferably turn
garments inside out before washing.
COLORATI COLOURS
for washing coloured cotton garments. This programme is
optimised to keep colours bright even after repeated washing.
MISTI MIXED
for washing lightly to normally soiled resilient garments in
cotton, linen, synthetic bres and mixed bres.
COTONE COTTON
for washing normally to heavily soiled towels, underwear, table
and bed linen etc. in resilient cotton and linen.
SINTETICI SYNTHETICS
for washing normally soiled garments made from synthetic
bres (such as polyester, polyacrylic, viscose etc.) or cotton/
synthetic blends.
RAPIDO 30’ (RAPID 30’)
for washing lightly soiled garments quickly: this cycle lasts only 30
minutes, saving time and energy. Maximum load 4 Kg.
STEAM REFRESH STEAM REFRESH
for refreshing garments, neutralised unpleasant odours and
relaxing the bres by delivering steam into the drum. The
garments will be damp at the end of the cycle.
LAVA & ASCIUGA 45’ WASH & DRY 45’
for washing and drying lightly soiled cotton and synthetic bre
garments quickly. This cycle washes and dries a laundry load of
up to 1 Kg in just 45 minutes.
LAVA & ASCIUGA 90’ WASH & DRY 90’
for washing and drying cotton and synthetic bre garments
quickly. This cycle washes and dries a laundry load of up to 2 Kg in
just 90 minutes.
CENTRIFUGA + SCARICO SPIN & DRAIN
spins the load then empties the water. For resilient garments.
RISCIACQUO + CENTRIFUGA RINSE & SPIN
rinses and then spins. For resilient garments.
Follow the directions indicated in the garment wash
symbols.
COLOURS 15°
This option helps protect colours by washing in cold water
(15°C). This option uses less energy to heat the water while
still oering satisfactory wash results.
Suitable for lightly soiled, unstained garments, depending
on the programme selected previously.
Note: selecting this option together with the “MISTI”
programme oers wash results comparable to a 40°C cycle
at just 15°C.
OPTIONS selectable directly by pressing the relative
button
! If the selected option is not compatible with the
programme set, an error warning tone sounds and the
indicator lamp ashes three times. The option is not
selected.
h.

16
HOW TO RECEIVE THE INSTRUCTIONS FOR USE
> Phone the After-Sales Service
> Use this QR Code
> Download the guide from the Whirlpool website
http://docs.whirlpool.eu
To do this, you need to enter the correct commercial code of the
product indicated on the adhesive label.
MAINTENANCE AND TROUBLESHOOTING GUIDE
See the Instructions for use for instructions on maintenance
procedures and troubleshooting problems.
TECHNICAL DOSSIER
The technical dossier containing energy consumption gures may be
downloaded from the Whirlpool website
http://docs.whirlpool.eu
CONTACTING THE AFTER-SALES SERVICE
When contacting the After-Sales Service, you will need to be able to
provide the codes indicated on the adhesive label on the inner side
of the door. The telephone number is indicated in the warranty
booklet.
Whirlpool® is a registered trademark of Whirlpool, USA.
WWW
n
001
Whirlpool Europe s.r.l.
Viale G.Borghi 27
21025 Comerio - Italy
1 9 5 1 3 6 9 1 3 . 0 0
Printed in Italy
ENIT
-
 1
1
-
 2
2
-
 3
3
-
 4
4
-
 5
5
-
 6
6
-
 7
7
-
 8
8
-
 9
9
-
 10
10
-
 11
11
-
 12
12
-
 13
13
-
 14
14
-
 15
15
-
 16
16


Whirlpool WWDC 9716 Guida utente
- Categoria
- Lavatrici
- Tipo
- Guida utente
in altre lingue
- English: Whirlpool WWDC 9716 User guide
Documenti correlati
Altri documenti
-
Bauknecht WATR 976 Guida utente
-
-
-
HOTPOINT/ARISTON RDPD 96407 JX IT Guida utente
-
-
Bauknecht WATK Prime 8614 Guida utente
-
-