JennAir ALOVE24FLC Guida d'installazione

Tipo
Guida d'installazione
 l
COLUMN REFRIGERATION
MULTIPLE UNITS
 l at i o n
DE RÉFRIGÉRATEURS
PLUSIEURS UNITÉS
W10919013B
2 INTRODUCTION
IMPORTA NT SAFETY INSTRUCTIONS
WARNING:
To reduce the risk of fire, electric shock, or injury when using your refrigerator, follow these basic precautions:
SAVE THESE INSTRUCTIONS
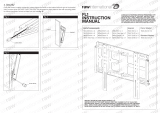
To avoid a hazard due to instability of the appliance, it must
be fixed in accordance with the instructions.
Plug into a grounded 3 prong outlet.
Installation shall be performed only by manufacturer, or an
authorized agent.
Do not remove ground prong.
Do not use an adapter.
Do not use an extension cord.
Disconnect power to all units before servicing.
Replace all parts and panels before operating.
Remove doors from your old refrigerator.
Use nonflammable cleaner.
Do not store or use petrol, flammable liquids or gas in the
vicinity of this or other electrical appliances. The fumes can
cause fires or explosions.
Do not store explosive substances such as aerosol cans
with a flammable propellant in this refrigerator.
Do not use or place electrical devices inside the refrigerator
compartments if they are not of the type expressly
authorized by the manufacture.
Use two or more people to move and install refrigerator.
Disconnect power before installing ice maker (on ice maker
kit ready models only).
A qualified service technician must install the water line and
ice maker. See installation instruction supplied with
ice maker kit IC13B for complete details.
Connect to a potable water supply only.
Use a sturdy glass when dispensing ice (on some models).
This appliance is not intended for use by persons (including
children) with reduced physical, sensory or mental
capabilities, or lack of experience and knowledge, unless
they have been given supervision or instruction concerning
use of the appliance by a person responsible for their safety.
Children should be supervised to ensure that they do not
play with the appliance.
To avoid the risk of children becoming trapped and
suffocating, do not allow them to play or hide inside
the refrigerator.
If the supply cord is damaged, it must be replaced by the
manufacturer, its service agent or similarly qualified person
in order to avoid a hazard.
This refrigerator is intended to be used in household and
similar applications such as:
– staff kitchen areas in shops, offices, and other working
environments
– farm houses and by clients in hotels, motels, and other
residential type environments
– bed and breakfast type environments
– catering and similar non-retail applications
You can be killed or seriously injured if you don't immediately
You
can be killed or seriously injured if you don't
follow
All safety messages will tell you what the potential hazard is, tell you how to reduce the chance of injury, and tell you what can
happen if the instructions are not followed.
Your safety and the safety of others are very important.
We have provided many important safety messages in this manual and on your appliance. Always read and obey all safety
messages.
This is the safety alert symbol.
This symbol alerts you to potential hazards that can kill or hurt you and others.
All safety messages will follow the safety alert symbol and either the word “DANGER” or “WARNING.”
These words mean:
follow instructions.
instructions.
DANGER
WARNING
INTRODUCTION 3
IMPORTANT: Child entrapment and
suffocation are not problems of the past.
Junked or abandoned refrigerators are still
dangerous – even if they will sit for "just a
few days." If you are getting rid of your old
refrigerator, please follow these instructions
to help prevent accidents.
Before You Throw Away Your Old
Refrigerator or Freezer:
■ Take off the doors.
Leave the shelves in place so that children
may not easily climb inside.
WARNING
Suffocation Hazard
Remove doors from your old refrigerator.
Failure to do so can result in death or brain damage.
Important information to know about disposal of
refrigerants:
Dispose of refrigerator in accordance with Federal and Local
regulations. Refrigerants must be evacuated by a licensed,
EPA certified refrigerant technician in accordance with
established procedures.
4 INTRODUCTION
WHY WE LOVE
JENNAIR INSTALLERS
THEY’RE TOTAL PROFESSIONALS AND PERFECTIONISTS.
It’s all about getting that seamless flush execution, that down-to-the-millimeter adjustment. Flawless
installation is incredibly important to the function, appearance and lifetime enjoyment of our products, and
our installers make it happen every day.
THEY DO THEIR HOMEWORK. AND HELP US WITH OURS.
These experts know JennAir
®
products inside and out. They train extensively on JennAir installation, learning
the latest techniques and insider tips so they can install our cutting edge appliances with ease. And we
value their input, incorporating installer feedback to refine and perfect our installations.
THEY THINK THROUGH EVERY DETAIL OF THE EXPERIENCE.
Above and beyond dedication is the baseline. The JennAir experience starts the minute an installer brings
the customer’s column home. Keeping the site spotless, taking extreme care with both the appliances and
the home and providing an unforgettable introduction to columns is all part of the game plan.
With the launch of the first ever JennAir
®
columns, we reimagined the entire columns
installation process, eliminating problems that affect our sub-par competitors. Some of the
features professional installers are most excited about:
Concealed six-point panel adjustment
Easy and precise alignment
Site-tailored Rotter system shims
and badass bracket
Guide and keep column in position
Precision four-point front leveling
On sturdy rollers that easily bear full weight
EASE. SPEED. SAFETY.
Metal fascia
Increases durability
Solid wood core stainless steel panels
Easy to prep and hang and do not
require drilling through steel
Expanded utility areas
Reduced changes to replace built-ins
or upgrade from competitor columns
And with your help, we’ll just keep getting better.
Contact the JennAir Epicenter through jennair.com or at 1-800-JENNAIR (536-6247)
to report installation tips and tricks, or to consult with experts who know
the installation process inside and out.
INTRODUCTION 5
TABLE OF CONTENTS
INTRODUCTION
02 SAFETY INSTRUCTIONS
06 TOOLS & PARTS
08 JOIN KITS
11 CONFIGURATIONS
13 PRODUCT DIMENSIONS
15 DOOR STYLE
16 OPENING DIMENSIONS
21 SITE PREP
24 INSTRUCTION KEY
PREPARATION
25 SECTION 1  PREPARE COLUMNS
32 SECTION 2  PREPARE JOIN KIT
37 SECTION 3  PREPARE POSITIONING BRACKET
40 SECTION 4  BADASS BRACKET INSTALLATION
49 SECTION 5  PREPARE FURNITURE
INSTALLATION
55 SECTION 6  FIRST COLUMN INSTALLATION
65 SECTION 7  SECOND COLUMN INSTALLATION
73 SECTION 8  THIRD COLUMN INSTALLATION
81 SECTION 9  PREPARE COLUMN FOR USE
ACCESSORIES
87 SECTION 10  TOEKICK: CUSTOM WOOD PREPARATION
90 SECTION 11  TOEKICK: STAINLESS STEEL PREPARATION
93 SECTION 12  TOEKICK: ALIGN AND INSTALL
98 SECTION 13  PANEL: CUSTOM WOOD PREPARATION
103 SECTION 14  PANEL: STAINLESS STEEL PREPARATION
106 SECTION 15  PANEL: HANG AND ALIGN
COMPLETE
113 SECTION 16  COMPLETE INSTALLATION
116 FINAL CHECKLIST
120 TABLE DES MATIÈRES
6 INTRODUCTION
TOOLS + PARTS
PROVIDED
READ AND FOLLOW THE INSTRUCTIONS PROVIDED WITH
ANY OF THE TOOLS LISTED.
TOOLS + PARTS
PROVIDED
Five installation shims
(W10913387)
#2 Square-drive screws
(3-24004-079)
8-18 x 3/4
Phillips head screws
(W11041176)
6-20 x .375 screws
(246131)
5 mm driver bit
(W11121505)
3 mm driver bit
(W11121512)
Shim installation template
(W11040585)
3MM
5MM
Toe-kick and door panel installation template
(W11040865)
3 mm
Allen® wrench
5 mm Allen® wrench
Gripping pads
(W10840464)
†®
Allen is a registered trademark of Apex Brands, Inc.
INTRODUCTION 7
TOOLS + PARTS
NOT PROVIDED
TOOLS
Cordless drill and drill bits or impact driver
Drill bit set including 3/32" and 1/8" diameter bits
Two adjustable wrenches
#2 Phillips bit
1/4" magnetic nut driver
#2 square-drive bit
48" or longer level or straight edge
(Can substitute a factory-installed trim
piece, once removed.)
3/8" and 1/2" open-end wrenches
Tape measure
Utility knife
Masking tape
Appliance dolly
Right angle drill adapter
6" drill extension
#8 pan head wood screws of assorted lengths
including 1", 1-1/4", 1-1/2"
PARTS
Flexible code-approved water supply line
Custom door overlay panels
Stainless steel panels: order from JennAir
Custom wood panels: consult a qualified
cabinetmaker or carpenter
Additional fasteners will be required according
to the kitchen furniture construction
WHY USE
ROTTER
SYSTEM
SHIMS
AND THE
BADASS
BRACKET?
9/32"
1/4"
3/16" 1/8"
1/16"
This recommended process might be unfamiliar to
you as an installer, but it adds enormous value to both
you and your client. Use the Rotter system to:
Help position column without scratching
Create precise 1/8" reveals on each side
Always have ready-made shims tailored to each site
Keep column stable in cutout over lifetime
Eliminate misalignment issues for your client
8 INTRODUCTION
JOIN KITS
SOLD SEPERATELY
READ AND FOLLOW THE INSTRUCTIONS PROVIDED WITH
ANY OF THE TOOLS LISTED.
(17) Flat washers
(8534057)
10-13 x PN CR
(W11117666)
10-13 x 2.0 FL CR
Join kit spacer
(W11111782)
8-18 x MFI 6L HL SS BLK
(W11117377)
Handle-to-handle join kit
(JAJ13HSS)
Hinge-to-handle join kit
(JAJ12HSS)
Handle-to-hinge join kit
(JAJ11HSS)
Burlesque Handle-to-handle join kit
(JAJ14JSS)
TOOLS AND PARTS INCLUDED IN JOIN KITS
INTRODUCTION 9
Badass soffit bracket
(W11111754)
Positioning bracket
(W11111771)
JOIN KITS
SOLD SEPERATELY
READ AND FOLLOW THE INSTRUCTIONS PROVIDED WITH
ANY OF THE TOOLS LISTED.
Soffit bracket installation template
(W11040584)
ALLIGNMENT TO THE
CABINET FACE
FRAME
Peel and stick heating pad
(W10912090)
(8) M6-1 x 6 10 mm metric hex nuts
(W10854505)
(14) 8-15 x “L” Mtr cr cone screws
(8281252)
Positioning bracket mount
(W11111772)
TOOLS AND PARTS INCLUDED IN JOIN KITS CONTD.
10 INTRODUCTION
JOIN KITS
SOLD SEPERATELY
TOOLS AND PARTS INCLUDED IN JOIN KITS CONTD.
Handle-to-handle join kit
Left-hand (handle) trim
(W11103734)
Right-hand (handle) trim
(W11103737)
Handle-to-hinge join kit
Left-hand (handle) trim
(W11103734)
Right-hand (hinge) trim
(W11103736)
Hinge-to-handle join kit
Left-hand (handle) trim
(W11103737)
Right-hand (hinge) trim
(W11103735)
INTRODUCTION 11
CONFIGURATIONS
2UNITS
PERMISSABLE 2UNIT CONFIGURATIONS
NONPERMISSABLE 2UNIT CONFIGURATIONS
Hinge-to-hinge
Pinch Hazard
Installation of door panels with less than a 3/8"
(0.95 cm) gap between the door panel and the
adjacent cabinet increases the risk of potential
pinching.
CAUTION
Hinge-to-handle
join kit
(JAJ12HSS)
Handle-to-handle
join kit
(JAJ13HSS)
Handle-to-hinge
join kit
(JAJ11HSS)
X
12 INTRODUCTION
CONFIGURATIONS
3UNITS
PERMISSABLE 3UNIT CONFIGURATIONS
NONPERMISSABLE 3UNIT CONFIGURATIONS
Handle-to-hinge and
handle-to-hinge
join kits:
JAJ11HSS (X2)
Hinge-to-hinge
Handle-to-hinge and
handle-to-handle
join kits:
JAJ11HSS and JAJ13HSS
Hinge-to-handle and
hinge-to-handle
join kits:
JAJ12HSS (x2)
Hinge-to-hinge
Handle-to-handle and
hinge-to-handle
join kits:
JAJ13HSS and JAJ12HSS
X X
INTRODUCTION 13
DIMENSIONS
PRODUCT
OVERALL PRODUCT NO PANEL
Width See unit width table below
Height 79-7/8" – 85-5/16" (202.9 – 215.9 cm)
Depth 24-1/8" (61.3 cm)
Raw Door Height 79-7/8" (202.9 cm)
Toe-kick Height 3-9/16" (9.1 cm)
Toe-kick Depth 3-1/4" – 4-7/8" (8.3 – 12.4 cm)
PRODUCT WIDTH
Model Width
18"
JBZFR18IGX
JBZFL18IGX
ALOVE18FL
17-3/4"
(45.1 cm)
24"
JBRFR24IGX
JBRFL24IGX
JBZFR24IGX
JBZFL24IGX
ALOVE24FL
ALOVE24RR
23-3/4"
(60.3 cm)
30"
JBRFR30IGX
JBRFL30IGX
JBZFR30IGX
JBZFL30IGX
ALOVE30RR
29-3/4"
(75.6 cm)
36"
JBRFR36IGX
JBRFL36IGX
35-3/4"
(90.8 cm)
Width varies
(See table)
83-1/2"
24-1/8"
14 INTRODUCTION
DIMENSIONS
ACCESSORIES
CUSTOM TOEKICK
Height 3-9/16" (9.1 cm)
Thickness 3/16"-3/4" (4.8 – 1.9 mm)
STAINLESS STEEL PANEL
Height 80" (203.2 cm)
Thickness 13/16" (2.1 cm)
CUSTOM PANEL
Thickness 3/4" (1.9 cm) max.
Weight 60 lbs. (27.2 kg) max.
Typical Height 80" (203.2 cm)
INTRODUCTION 15
MODEL FLUSH WIDTH
18" 17-3/4" (45.1 cm)
24" 23-3/4" (63.5 cm)
30" 29-3/4" (75.6 cm)
36" 35-3/4" (90.8 cm)
Furniture
Panel
PanelPanel
MODEL FLUSH WIDTH
18" 17-3/4" (45.1 cm)
24" 23-3/4" (63.5 cm)
30" 29-3/4" (75.6 cm)
36" 35-3/4" (90.8 cm)
MODEL OVERLAY WIDTH
18" 18-3/8" (46.7 cm)
24" 24-3/8" (61.9 cm)
30" 30-3/8" (77.2 cm)
36" 36-3/8" (92.4 cm)
1/6"
Furniture
Panel
DOOR STYLE
CUSTOM PANEL WIDTH
1/6"
Pinch Hazard
Installation of door panels with less than a ³⁄₈" (0.95 cm) gap
between the door panel and the adjacent cabinet increases
the risk of potential pinching.
CAUTION
Panel
1/6"
5/8"
Furniture
Panel
5/8"
Panel
1/6"
16 INTRODUCTION
DIMENSIONS
OPENING
42"
CUTOUT WIDTH
18" 24"
48"
CUTOUT WIDTH
18" 30"
48"
CUTOUT WIDTH
24" 24"
36"
CUTOUT WIDTH
18" 18"
66"
CUTOUT WIDTH
30" 36"
72"
CUTOUT WIDTH
36" 36"
54"
CUTOUT WIDTH
18" 36"
54"
CUTOUT WIDTH
24" 30"
60"
CUTOUT WIDTH
36"24" 30"
60"
CUTOUT WIDTH
30"
2UNIT CONFIGURATIONS
NOTE: These diagrams show cutout width of product combinations.
Products may be arranged into any permissable configuration shown on pg. 10-11.
INTRODUCTION 17
DIMENSIONS
OPENING
54"
CUTOUT WIDTH
18" 18" 18"
60"
CUTOUT WIDTH
18" 18" 24"
66"
CUTOUT WIDTH
66"
CUTOUT WIDTH
18" 18" 30"
66"
CUTOUT WIDTH
18" 24" 24"
72"
CUTOUT WIDTH
18" 18"
36"
72"
CUTOUT WIDTH
18" 24" 30"
72"
CUTOUT WIDTH
24" 24" 24"
78"
CUTOUT WIDTH
18" 24" 36"
78"
CUTOUT WIDTH
24" 24" 30"
78"
CUTOUT WIDTH
18" 30" 30"
3UNIT CONFIGURATIONS
NOTE: These diagrams show cutout width of product combinations.
Products may be arranged into any permissable configuration shown on pg. 10-11.
18 INTRODUCTION
DIMENSIONS
OPENING
3UNIT CONFIGURATIONS
84"
CUTOUT WIDTH
18" 30" 36"
84"
CUTOUT WIDTH
24" 24" 36"
84"
CUTOUT WIDTH
24" 30" 30"
90"
CUTOUT WIDTH
30" 30" 30"
90"
CUTOUT WIDTH
24" 30" 36"
90"
CUTOUT WIDTH
18" 36" 36"
96"
CUTOUT WIDTH
24" 36" 36"
96"
CUTOUT WIDTH
30" 30" 36"
36"
102"
CUTOUT WIDTH
30" 36"
108"
CUTOUT WIDTH
36" 36" 36"
NOTE: These diagrams show cutout width of product combinations.
Products may be arranged into any permissable configuration shown on pg. 10-11.
INTRODUCTION 19
B
C
D
A
DIMENSIONS
OPENING
Model 115º Door Swing "A" 90º Door Swing "B" Wall Gap "C" Door Open Depth "D"
18" 10-1/2" (26.7 cm) 5" (12.7 cm) 2-1/2" (6.4 cm) 44-1/2" (113 cm)
24" 13" (33 cm) 5" (12.7 cm) 2-1/2" (6.4 cm) 50-1/2" (128.3 cm)
30" 15-1/2" (39.4 cm) 5" (12.7 cm) 2-1/2" (6.4 cm) 56-3/8" (143.2 cm)
36" 18" (45.7 cm) 5" (12.7 cm) 2-1/2" (6.4 cm) 62-7/16" (158.6 cm)
Pinch Hazard
Installation of door panels with less than a ³⁄₈" (0.95 cm) gap
between the door panel and the adjacent cabinet increases
the risk of potential pinching.
CAUTION
DOOR SWING REQUIREMENTS
Dimensions give 2-1/2" spacing between stainless steel handle accessory and wall to avoid pinching.
For a custom wood panel, consider handle depth to maintain 2-1/2" spacing.
20 INTRODUCTION
DIMENSIONS
OPENING
OPENING WIDTH
Model Width (A)
18"
JBZFR18IGX
JBZFL18IGX
ALOVE18FL
18"
(45.7 cm)
24"
JBRFR24IGX
JBRFL24IGX
JBZFR24IGX
JBZFL24IGX
ALOVE24FL
ALOVE24RR
24"
(61 cm)
30"
JBRFR30IGX
JBRFL30IGX
JBZFR30IGX
JBZFL30IGX
ALOVE30RR
30"
(76.2 cm)
36"
JBRFR36IGX
JBRFL36IGX
36"
(91.4 cm)
10"
84"
25"
*
*24" with 24" trim kit
Width (A)
Furniture
return
Soft
8"
  • Page 1 1
  • Page 2 2
  • Page 3 3
  • Page 4 4
  • Page 5 5
  • Page 6 6
  • Page 7 7
  • Page 8 8
  • Page 9 9
  • Page 10 10
  • Page 11 11
  • Page 12 12
  • Page 13 13
  • Page 14 14
  • Page 15 15
  • Page 16 16
  • Page 17 17
  • Page 18 18
  • Page 19 19
  • Page 20 20
  • Page 21 21
  • Page 22 22
  • Page 23 23
  • Page 24 24
  • Page 25 25
  • Page 26 26
  • Page 27 27
  • Page 28 28
  • Page 29 29
  • Page 30 30
  • Page 31 31
  • Page 32 32
  • Page 33 33
  • Page 34 34
  • Page 35 35
  • Page 36 36
  • Page 37 37
  • Page 38 38
  • Page 39 39
  • Page 40 40
  • Page 41 41
  • Page 42 42
  • Page 43 43
  • Page 44 44
  • Page 45 45
  • Page 46 46
  • Page 47 47
  • Page 48 48
  • Page 49 49
  • Page 50 50
  • Page 51 51
  • Page 52 52
  • Page 53 53
  • Page 54 54
  • Page 55 55
  • Page 56 56
  • Page 57 57
  • Page 58 58
  • Page 59 59
  • Page 60 60
  • Page 61 61
  • Page 62 62
  • Page 63 63
  • Page 64 64
  • Page 65 65
  • Page 66 66
  • Page 67 67
  • Page 68 68
  • Page 69 69
  • Page 70 70
  • Page 71 71
  • Page 72 72
  • Page 73 73
  • Page 74 74
  • Page 75 75
  • Page 76 76
  • Page 77 77
  • Page 78 78
  • Page 79 79
  • Page 80 80
  • Page 81 81
  • Page 82 82
  • Page 83 83
  • Page 84 84
  • Page 85 85
  • Page 86 86
  • Page 87 87
  • Page 88 88
  • Page 89 89
  • Page 90 90
  • Page 91 91
  • Page 92 92
  • Page 93 93
  • Page 94 94
  • Page 95 95
  • Page 96 96
  • Page 97 97
  • Page 98 98
  • Page 99 99
  • Page 100 100
  • Page 101 101
  • Page 102 102
  • Page 103 103
  • Page 104 104
  • Page 105 105
  • Page 106 106
  • Page 107 107
  • Page 108 108
  • Page 109 109
  • Page 110 110
  • Page 111 111
  • Page 112 112
  • Page 113 113
  • Page 114 114
  • Page 115 115
  • Page 116 116
  • Page 117 117
  • Page 118 118
  • Page 119 119
  • Page 120 120
  • Page 121 121
  • Page 122 122
  • Page 123 123
  • Page 124 124
  • Page 125 125
  • Page 126 126
  • Page 127 127
  • Page 128 128
  • Page 129 129
  • Page 130 130
  • Page 131 131
  • Page 132 132
  • Page 133 133
  • Page 134 134
  • Page 135 135
  • Page 136 136
  • Page 137 137
  • Page 138 138
  • Page 139 139
  • Page 140 140
  • Page 141 141
  • Page 142 142
  • Page 143 143
  • Page 144 144
  • Page 145 145
  • Page 146 146
  • Page 147 147
  • Page 148 148
  • Page 149 149
  • Page 150 150
  • Page 151 151
  • Page 152 152
  • Page 153 153
  • Page 154 154
  • Page 155 155
  • Page 156 156
  • Page 157 157
  • Page 158 158
  • Page 159 159
  • Page 160 160
  • Page 161 161
  • Page 162 162
  • Page 163 163
  • Page 164 164
  • Page 165 165
  • Page 166 166
  • Page 167 167
  • Page 168 168
  • Page 169 169
  • Page 170 170
  • Page 171 171
  • Page 172 172
  • Page 173 173
  • Page 174 174
  • Page 175 175
  • Page 176 176
  • Page 177 177
  • Page 178 178
  • Page 179 179
  • Page 180 180
  • Page 181 181
  • Page 182 182
  • Page 183 183
  • Page 184 184
  • Page 185 185
  • Page 186 186
  • Page 187 187
  • Page 188 188
  • Page 189 189
  • Page 190 190
  • Page 191 191
  • Page 192 192
  • Page 193 193
  • Page 194 194
  • Page 195 195
  • Page 196 196
  • Page 197 197
  • Page 198 198
  • Page 199 199
  • Page 200 200
  • Page 201 201
  • Page 202 202
  • Page 203 203
  • Page 204 204
  • Page 205 205
  • Page 206 206
  • Page 207 207
  • Page 208 208
  • Page 209 209
  • Page 210 210
  • Page 211 211
  • Page 212 212
  • Page 213 213
  • Page 214 214
  • Page 215 215
  • Page 216 216
  • Page 217 217
  • Page 218 218
  • Page 219 219
  • Page 220 220
  • Page 221 221
  • Page 222 222
  • Page 223 223
  • Page 224 224
  • Page 225 225
  • Page 226 226
  • Page 227 227
  • Page 228 228
  • Page 229 229
  • Page 230 230
  • Page 231 231
  • Page 232 232
  • Page 233 233
  • Page 234 234
  • Page 235 235
  • Page 236 236

JennAir ALOVE24FLC Guida d'installazione

Tipo
Guida d'installazione