
English · 简体中文 · Deutsch · Français · Italiano · Español
Pусский · Português · 日本語 · 한국어 · 繁體中文 ·
QUICKSTART GUIDE
快速入门指南


1
EN
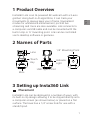
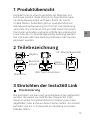
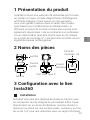
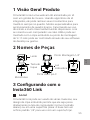
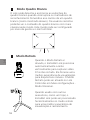
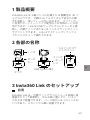
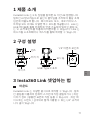
2 Names of Parts
Touch
Key
Mics
1/4" Mounting Point
USB Type-C Port
Lens
Indicator
Light
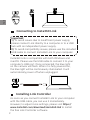
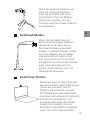
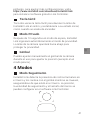
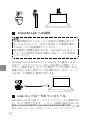
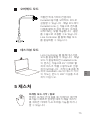
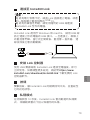
Insta360 Link can be deployed in a number of ways, with
its built-in clip design allowing it to be clipped directly onto
a computer screen (as shown below) or placed on a flat
surface. The base has a 1/4" screw hole for use with a
stand/tripod.
3 Setting up Insta360 Link
Placement
1 Product Overview
Insta360 Link is an AI-powered 4K webcam with a 3-axis
gimbal. Using built-in AI algorithms, it can track your
movements to always keep you in frame. Specialized
modes for whiteboard enhancement, portrait live
streaming and more are also available. Link connects to
a computer via USB cable and can be mounted with the
built-in clip or ¼” mounting point. Link can be controlled
via its desktop software or gestures.

2
EN
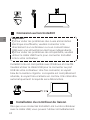
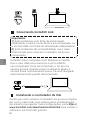
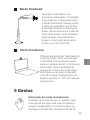
Connecting to Insta360 Link
Insta360 Link is compatible with both Windows and
macOS. Please use the USB cable to connect it to your
computer's USB port. Once connected, the blue light
on the camera will flash. When it is fully powered on,
the blue light will be continuously illuminated. It will
automatically power off when unplugged.
Important:
1) To avoid issues due to insufficient power supply,
please connect Link directly to a computer or to a USB
hub with an independent power supply.
2) To avoid compatibility issues, please use the included
USB cable to connect Insta360 Link to your computer.
Installing Link Controller
As soon as you connect Insta360 Link to your computer
with the USB cable, you can use it immediately.
However, to adjust more settings, please visit https://
www.insta360.com/download/insta360-link to install
the free Link Controller software.

EN
3
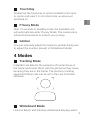
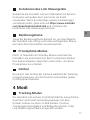
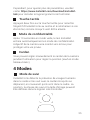
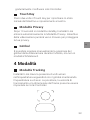
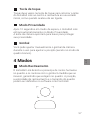
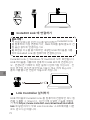
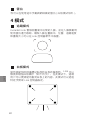
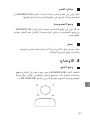
Privacy Mode
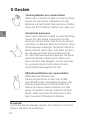
Tracking Mode
Insta360 Link detects the presence of human faces in
the frame and tracks them with the gimbal as they move,
ensuring they are in the frame. The position, tracking
speed and frame size can be set in the Link Controller
software.
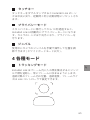
4 Modes
Gimbal
You can manually adjust the camera's gimbal during use
to adjust the position (except in Whiteboard Mode).
Touch Key
Double tap the touch key to return Insta360 Link's lens
to center and reset it to its initial state, as when just
switched on.
After 10 seconds in standby mode, the Insta360 Link
will automatically enter Privacy Mode. The camera lens
will point downwards to protect your privacy.
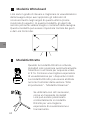
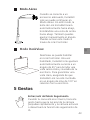
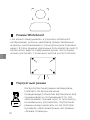
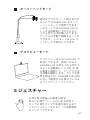
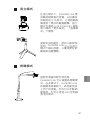
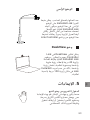
Whiteboard Mode
Link can detect and enhance whiteboard displays when

4
EN
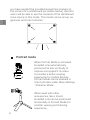
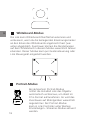
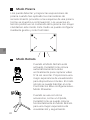
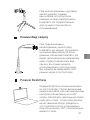
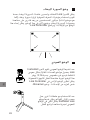
When used with other
accessories, like a tripod,
Insta360 Link can be positioned
horizontally in Portrait Mode for
a better viewing and tracking
experience.
Portrait mode
When Portrait Mode is activated,
Insta360 Link automatically
positions the lens vertically to
capture uncropped 9:16 video.
It provides a better viewing
experience for mobile devices.
Portrait Mode can be enabled in
Link Controller under More Settings
- Streamer Mode.
you have applied the provided recognition markers to
the corners of a whiteboard (as shown below). Remote
users will be able to see the contents of the whiteboard
more clearly in this mode. This mode can be set up via
gestures and Link Controller.

5
EN
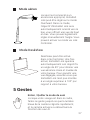
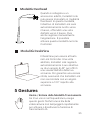
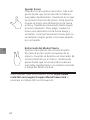
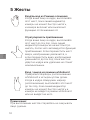
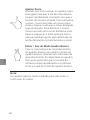
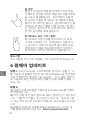
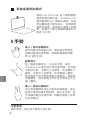
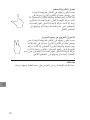
5 Gestures
Enter / Exit Tracking Mode
When your face is in the frame, make this
gesture until the camera's blue light flashes
rapidly, and the camera will switch the AI
tracking function on or off.
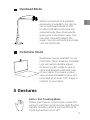
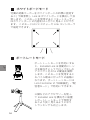
Overhead Mode
When connected to a suitable
accessory, Insta360 Link can be
set to Overhead Mode. In this
mode, Insta360 Link's lens will
automatically face downwards,
giving you a top-down view. You
can also manually adjust the
angle. You can activate this mode
via Link Controller.
DeskView can be enabled in Link
Controller. Once enabled, Insta360
Link will automatically adjust
its lens to a 45° angle to give a
clear and leveled overhead view
of your desk. To ensure a clear
view, ensure Insta360 Link is not
mounted at an over 100° angle in
relation to your desk.

6
Note:
When performing gestures, please be careful not to cover
your face with your hands.
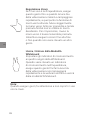
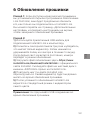
Enter / Exit Whiteboard Mode
Fix the whiteboard recognition markers to
the four corners of the whiteboard. When a
recognition marker is detected in the frame,
make this gesture until the camera's blue
light flashes rapidly and the camera will
enter or exit Whiteboard Mode.
EN
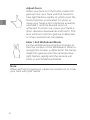
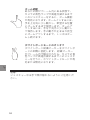
Adjust Zoom
When your face is in the frame, make this
gesture near your face until the camera's
blue light flashes rapidly, at which point the
zoom function is activated. To zoom in,
move your hand a short distance upwards
and hold it until the desired zoom is
achieved. To zoom out, move your hand a
short distance downwards and hold it. The
lens will zoom until no gesture is detected
or it has zoomed out completely.

7
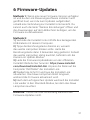
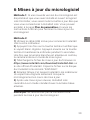
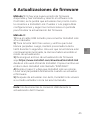
Note: Do not disconnect the USB connection during
the firmware update.
6 Firmware Updates
Method 1: If there's a new firmware version available
and you've installed and opened the Link Controller
software, you'll be prompted to update as soon as
connecting to Insta360 Link. You can go to the More
Settings page and follow the onscreen instructions to
finish the firmware update.
Method 2:
1) Use the included USB cable to connect Insta360 Link
to your computer.
2) Tap the Touch Key three times and check that the
white light flashes. Then, press and hold the Touch
Key for 5 seconds. Once the white light is continuously
illuminated, the camera will have entered update mode.
3) Download the firmware update file here https://www.
insta360.com/download/insta360-link from Insta360's
official website. Copy the file to the Insta360 Link hard
drive named "INSTA360".
4) Repeat step 2, and let Insta360 Link reboot. The
blue light will flash slowly when the firmware is being
updated.
5) After successfully updating, Insta360 Link will return
to its standard mode with the blue light illuminated.
EN

8
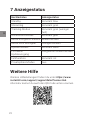
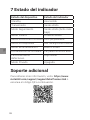
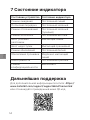
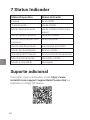
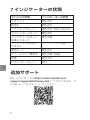
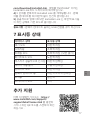
Device Status Indicator Status
Standby Solid blue
Streaming Solid green
Tracking mode Solid green (lower
brightness)
Whiteboard mode Solid yellow
Gesture successfully
recognized
Flashing blue
Gesture not available Flashing orange
Update mode Solid white
Firmware updating Slow flashing blue
Malfunction Solid red
Privacy mode Off
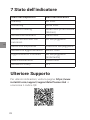
7 Indicator Status
EN
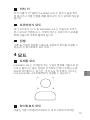
Further Support
For more guidance, please visit: https://www.insta360.
com/support/supportdetail?name=link or scan the QR
code below.

9
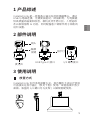
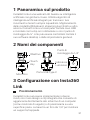
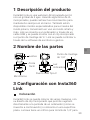
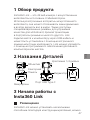
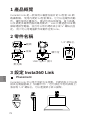
2 部件说明
1 产品综述
触摸
按键
麦克风 1/4 螺母接口
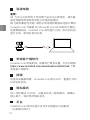
Insta360 Link 支持多种部署方式,其内置的卡夹设计使其
可直接夹在显示器上(参见下图)使用,或者直接平放于
桌面。底座的 1/4 螺口可与支架 / 三脚架搭配使用。
Insta360 Link 是一款具备三轴云台的网络摄像头,通过
USB 与电脑连接,无需安装驱动,即插即用,为电脑提
供高质量的画面和收音。相机支持手势识别、人物追踪
及白板增强等 AI 功能,同时配备客户端软件用于相机的
进阶设置。
USB Type-C 接口
镜头
指示灯
3 使用说明
CHS

10
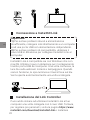
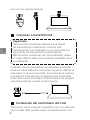
重要:
为防止出现供电不足导致产品无法正常使用,请尽量
直连电脑使用或使用有独立供电的拓展坞。
为避免兼容性问题,请务必使用随附数据线连接计算机。
Insta360 Link 可兼容 Windows 和 macOS 系统的计算机。
连接数据线后,Insta360 Link 启动蓝灯闪烁,成功开机后,
蓝灯长亮。断电后自动关机。
快速双击触摸按键,Insta360 Link 镜头归中,重置为开机
时的初始状态。
进入待机模式 10 秒后,设备自动进入隐私模式。摄像头
镜头朝下,保护您的隐私安全。
Insta360 Link 使用过程中支持手动调整云台的角度。
(白板模式除外)
Insta360 Link 即插即用,如需进行更多设置,可访问链接:
https://www.insta360.com/download/insta360-link 下载
安装客户端软件。
CHS

11
CHS
4 模式说明
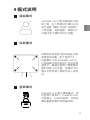
将随附的白板定位贴纸贴在白板
或黑板的四角(如下图所示),
白板模式下的 Insta360 Link 可
以将画面中的白板进行识别并增
强显示,确保远端用户更清晰的
看到白板上的内容。该模式可以
通过手势及客户端软件进入或退
出。
Insta360 Link 默认横屏模式。启
动竖屏分辨率时,Insta360 Link
可拍摄 9:16 纵向视频。为移动
端设备提供更好的观看体验。
Insta360 Link 可检测画面中出现
的人物,在人物移动时通过云台
进行追踪,确保人物处于画面中。
人物位置、追踪速度、画幅大小
可通过客户端软件进行设置。

12
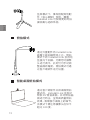
通过外置配件将 Insta360 Link
悬置于被拍摄物体上方,俯拍
模式下的 Insta360 Link 会自动
竖直向下拍摄,无需您对摄像
头进行调平。此时仍可手动调
整画面的角度。俯拍模式可通
过客户端软件进行设置。
通过客户端软件开启桌面俯拍
模式后,Insta360 Link 会自动
倾斜 45°俯拍桌面,并对俯拍画
面进行矫正,呈现高质量俯拍
效果,清晰展示桌面上的细节。
该模式下需注意摄像头后仰不
超过 100 度。
竖屏模式下,推荐搭配其他配
件(如三脚架)使用,横置
Insta360 Link 可获得更好的拍
摄视角与追踪体验。
CHS

13
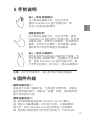
当人脸处在画面中时,比出该手势,直到
Insta360 Link 蓝色指示灯快速闪烁,此时激
活缩放功能。手势向上并悬停,则持续放大
画面,手势向下并悬停,则持续缩小画面,
直到检测不到手势或者无法再缩放。
进行手势操作时,请注意手部不要遮挡面部。
使用白板定位贴纸贴在白板的四个角落。当
定位贴纸处于画面中时,在画面中比出该手
势,直到 Insta360 Link 蓝灯快速闪烁,表
示手势识别成功,即可进入 / 退出白板模式。
6 固件升级
固件升级方式一:
安装并打开客户端软件后,当有固件可更新时,连接设
备后将有相应提示,请前往“设置”页面,并根据页面
提示完成固件升级。
固件升级方式二:
使用随附数据线连接 Insta360 Link 与计算机。
短按三次触摸按键,此时白灯闪烁,长按触摸按
键 5 秒,此时 Insta360 Link 白灯常亮进入升级模式。
将官网下载的固件文件拷贝到命名为 “INSTA360”
5 手势说明
当人脸处在画面中时,比出该手势,
直到 Insta360 Link 蓝灯快速闪烁,即
可进入或退出追踪模式。
CHS

14
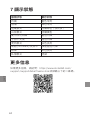
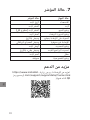
更多信息,请访问:https://www.insta360.com/support/
supportdetail?name=link 或扫描以下二维码。
7 指示灯说明
更多信息
正常待机 蓝灯长亮
视频流开启 绿灯长亮
追踪开启 绿灯长亮(低亮度)
白板模式 黄灯长亮
手势识别成功 蓝灯快闪
手势不可用 橙灯快闪
升级模式 白灯长亮
固件升级中 蓝灯慢闪
故障 红灯长亮
隐私待机 灯灭
固件升级过程中,请勿断开 USB 连接。
的硬盘中。
重复步骤 2 中的操作,Insta360 Link 重启。此时蓝灯
慢闪,固件升级中。
升级成功后恢复正常工作模式,蓝灯长亮。
CHS

15
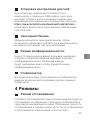
2 Teilebezeichnung
Berührun-
gstaste
Mikrofone
1/4"-Standardgewinde
USB Typ-C-Anschluss
Objektiv
Status-
lämpchen
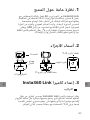
Die Insta360 Link kann auf verschiedene Arten aufgestellt
werden; du kannst sie mithilfe des integrierten Clips
direkt an einen Computerbildschirm klippen (wie unten
abgebildet) oder auf eine ebene Fläche stellen. Am Sockel
befindet sich ein 1/4"-Gewinde zur Nutzung mit einem
Ständer/Stativ.
3 Einrichten der Insta360 Link
Positionierung
1 Produktübersicht
Insta360 Link ist eine KI-gestützte 4K Webcam mit
3-Achsen-Gimbal. Dank interner KI-Algorithmen kann
sie deine Bewegungen verfolgen, damit du immer
im Bild bleibst. Außerdem gibt es spezielle Modi zur
Whiteboard-Verbesserung, für Portrait-Live-Streaming
und mehr. Die Link lässt sich per USB-Kabel mit einem
Computer verbinden und kann mithilfe des integrierten
Clips oder des ¼”-Standardgewindes befestigt werden.
Die Link kann über ihre Desktop-Software oder Gesten
gesteuert werden.
DE

16
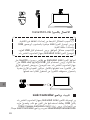
Verbindung mit der Insta360 Link
Die Insta360 Link ist sowohl mit Windows als auch
macOS kompatibel. Bitte verwende das USB-Kabel,
um sie mit dem USB-Anschluss deines Computers zu
verbinden. Nach erfolgreicher Verbindung blinkt das
blaue Lämpchen auf der Kamera. Sobald sie vollständig
gestartet ist, leuchtet das blaue Lämpchen konstant.
Wenn du die Verbindung trennst, schaltet sie sich
automatisch aus.
Wichtig:
1) Um Probleme aufgrund unzureichender
Stromversorgung zu vermeiden, schließe die Link
bitte direkt an einen Computer oder USB-Hub mit
unabhängiger Stromversorgung an.
2) Um Kompatibilitätsprobleme zu vermeiden,
verwende bitte das beiliegende USB-Kabel, um die Link
mit deinem Computer zu verbinden.
DE

17
Tracking-Modus
Die Insta360 Link erfasst im Bild befindliche menschliche
Gesichter und trackt sie bei Bewegungen mit dem
Gimbal, sodass sie stets im Bild bleiben. Position,
Trackinggeschwindigkeit und Bildgröße können in der
Link Steuerungssoftware eingestellt werden.
4 Modi
Privatsphäre-Modus
Gimbal
Du kannst das Gimbal der Kamera während der Nutzung
manuell anpassen, um die Position einzustellen (außer
im Whiteboard-Modus).
Berührungstaste
Tippe die Berührungstaste doppelt an, um das Objektiv
der Insta360 Link mittig und in den anfänglichen Status
wie nach dem Einschalten zurückzusetzen.
Nach 10 Sekunden im Standby-Modus wechselt die
Insta360 Link automatisch in den Privatsphäre-Modus.
Das Kameraobjektiv zeigt dann nach unten, um deine
Privatsphäre zu schützen.
Sobald du die Insta360 Link per USB-Kabel mit deinem
Computer verbunden hast, kannst du sie direkt
verwenden. Wenn du allerdings weitere Einstellungen
vornehmen willst, gehe bitte auf https://www.insta360.
com/download/insta360-link und installiere die
kostenlose Link Steuerungssoftware.
Installieren des Link Steuergeräts
DE

18
Whiteboard-Modus
Die Link kann Whiteboard-Oberflächen erkennen und
verbessern, wenn du die beiliegenden Erkennungsmarker
an den Ecken des Whiteboards angebracht hast (wie
unten abgebildet). Zuschauer können die Darstellungen
auf dem Whiteboard in diesem Modus wesentlich besser
erkennen. Dieser Modus kann per Gestensteuerung oder
Link Steuergerät eingestellt werden.
Portrait-Modus
Bei aktiviertem Portrait-Modus
richtet die Insta360 Link das Objektiv
automatisch vertikal aus, um direkt im
9:16-Format aufzunehmen. So wird das
Zuschauen auf Mobilgeräten wesentlich
angenehmer. Der Portrait-Modus
kann in Link Controller unter Weitere
Einstellungen - Streamer-Modus aktiviert
werden.
DE
La pagina sta caricando ...
La pagina sta caricando ...
La pagina sta caricando ...
La pagina sta caricando ...
La pagina sta caricando ...
La pagina sta caricando ...
La pagina sta caricando ...
La pagina sta caricando ...
La pagina sta caricando ...
La pagina sta caricando ...
La pagina sta caricando ...
La pagina sta caricando ...
La pagina sta caricando ...
La pagina sta caricando ...
La pagina sta caricando ...
La pagina sta caricando ...
La pagina sta caricando ...
La pagina sta caricando ...
La pagina sta caricando ...
La pagina sta caricando ...
La pagina sta caricando ...
La pagina sta caricando ...
La pagina sta caricando ...
La pagina sta caricando ...
La pagina sta caricando ...
La pagina sta caricando ...
La pagina sta caricando ...
La pagina sta caricando ...
La pagina sta caricando ...
La pagina sta caricando ...
La pagina sta caricando ...
La pagina sta caricando ...
La pagina sta caricando ...
La pagina sta caricando ...
La pagina sta caricando ...
La pagina sta caricando ...
La pagina sta caricando ...
La pagina sta caricando ...
La pagina sta caricando ...
La pagina sta caricando ...
La pagina sta caricando ...
La pagina sta caricando ...
La pagina sta caricando ...
La pagina sta caricando ...
La pagina sta caricando ...
La pagina sta caricando ...
La pagina sta caricando ...
La pagina sta caricando ...
La pagina sta caricando ...
La pagina sta caricando ...
La pagina sta caricando ...
La pagina sta caricando ...
La pagina sta caricando ...
La pagina sta caricando ...
La pagina sta caricando ...
La pagina sta caricando ...
La pagina sta caricando ...
La pagina sta caricando ...
La pagina sta caricando ...
La pagina sta caricando ...
La pagina sta caricando ...
La pagina sta caricando ...
La pagina sta caricando ...
La pagina sta caricando ...
La pagina sta caricando ...
La pagina sta caricando ...
La pagina sta caricando ...
La pagina sta caricando ...
La pagina sta caricando ...
La pagina sta caricando ...
La pagina sta caricando ...
La pagina sta caricando ...
La pagina sta caricando ...
La pagina sta caricando ...
La pagina sta caricando ...
La pagina sta caricando ...
-
 1
1
-
 2
2
-
 3
3
-
 4
4
-
 5
5
-
 6
6
-
 7
7
-
 8
8
-
 9
9
-
 10
10
-
 11
11
-
 12
12
-
 13
13
-
 14
14
-
 15
15
-
 16
16
-
 17
17
-
 18
18
-
 19
19
-
 20
20
-
 21
21
-
 22
22
-
 23
23
-
 24
24
-
 25
25
-
 26
26
-
 27
27
-
 28
28
-
 29
29
-
 30
30
-
 31
31
-
 32
32
-
 33
33
-
 34
34
-
 35
35
-
 36
36
-
 37
37
-
 38
38
-
 39
39
-
 40
40
-
 41
41
-
 42
42
-
 43
43
-
 44
44
-
 45
45
-
 46
46
-
 47
47
-
 48
48
-
 49
49
-
 50
50
-
 51
51
-
 52
52
-
 53
53
-
 54
54
-
 55
55
-
 56
56
-
 57
57
-
 58
58
-
 59
59
-
 60
60
-
 61
61
-
 62
62
-
 63
63
-
 64
64
-
 65
65
-
 66
66
-
 67
67
-
 68
68
-
 69
69
-
 70
70
-
 71
71
-
 72
72
-
 73
73
-
 74
74
-
 75
75
-
 76
76
-
 77
77
-
 78
78
-
 79
79
-
 80
80
-
 81
81
-
 82
82
-
 83
83
-
 84
84
-
 85
85
-
 86
86
-
 87
87
-
 88
88
-
 89
89
-
 90
90
-
 91
91
-
 92
92
-
 93
93
-
 94
94
-
 95
95
-
 96
96


Insta360 Link Guida utente
- Tipo
- Guida utente
- Questo manuale è adatto anche per
in altre lingue
- français: Insta360 Link Mode d'emploi
- español: Insta360 Link Guía del usuario
- português: Insta360 Link Guia de usuario
- 日本語: Insta360 Link ユーザーガイド
Altri documenti
-
 eMeet SmartCam C950 Guida utente
-
dji Goggles RE Guida Rapida
-
Panasonic TH80LFB70E Istruzioni per l'uso
-
OBSBOT OWB-2004-CE Guida utente
-
eMeet C960 Guida utente
-
-
dji Goggles Guida Rapida
-
Align RM42507XT / RM42508XT Manuale del proprietario
-
BenQ MX661 Manuale utente
-
LG LMF100EMW.ANLDAY Manuale utente
