CAME SIPA08, SIPA09 Guida d'installazione
- Tipo
- Guida d'installazione

SIPA08 / SIPA09
www.came.com
TX
RX
TX
RX
2
1
3
2
3
4
4
001SIPA08
001SIPA09
39
13
28
24
20 1,5
11
Ø 3
40 40
=
=
28 mm
Ø 2,5 mm
Ø 13 mm
TX1 TX2 GND
A K
TX1
RX2
RX1
TX2
RX1
RX2
TX1
TX2
001SIPA09 001SIPA08
TX1 TX2 GND
A K
TX1
RX1
RX1TX1
001SIPA03
001SIPA04
ON
12
DOCP1
SAP
RFPA
SENSOR 1
AF/R700/R800
DOCP1
DOCP1
DOCP1
ZP11
Italiano
IT
IT
English
EN
EN
Français
FR
FR
Русский
RU
RU
FA00634M4A - ver. 1 - 12/2016
FA00634M4A

FA00634M4A - ver. 1 - 12/2016
ITALIANO
Descrizione
Coppia (001SIPA08) o doppia coppia
(001SIPA09) di microfotocellule da
incasso a raggio infrarosso con portata
max.10 m complete di cavi schermati e
scheda DOCP1.
Descrizione delle parti
Scheda DOCP1
Fotocellula di trasmissione (TX)
Fotocellula di ricezione (RX)
Cavi schermati da 6 m
Dati tecnici
Modello SIPA08 /
SIPA09
Alimentazione (V) 24 AC/DC
Assorbimento max. (mA) AC=125
DC=40
Temperatura di
funzionamento (°C) -20 ÷ +55
Portata max. (m) 10
Tempo di intervento (ms) 25
Tempo di ripristino (ms) 200
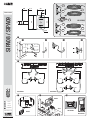
Installazione
- Forare la struttura per permettere il
passaggio dei cavi e il fissaggio delle
microfotocellule.
- Far passare i cavi schermati nei fori
centrali e collegare le microfotocellule ai
cavi (TX da un lato e RX dall’altro).
- Fissare le microfotocellule con le viti
(non fornite).
Attenzione! Prima di eseguire i
collegamenti elettrici, togliere la tensione.
- Collegare i cavi delle microfotocellule ai
morsetti (A-K) e (TX1, TX2, GND) della
scheda ZP11.
- A seconda del tipo di impianto, imposta-
re i DIP sulla scheda DOCP1:
DIP
Descrizione
1 ON Due coppie di microfotocellule
1
OFF Una coppia di microfotocellule
2 ON Portata fino a 10 m
2 OFF Portata fino a 6 m
- Inserire la scheda sul connettore de-
dicato (DOCP1) sulla scheda ZP11.
- Dal selettore SIPA03 o SIPA04, selezio-
nare e confermare DOCP sulla funzione
FOTOCELLULA nel menu INSTALLAZIO-
NE.
ENGLISH
Description
Set (001SIPA08) or double set
(001SIPA09) of built-in infrared micro-
photocells with 10 m. maximum range
complete with shielded cables and
DOCP1 card.
Description of parts
DOCP1 card
Photocell transmitter (TX)
Photocell receiver (RX)
6 m. shielded cables
Technical data
Model SIPA08 /
SIPA09
Power supply (V) 24 AC/DC
Max current draw (mA) AC=125
DC=40
Operating
temperature (°C) -20 ÷ +55
Max range (m) 10
Tripping time (ms) 25
Recovery time (ms) 200
Installing
- Drill holes in the structure to allow cable
routing and mounting of the micro-pho-
tocells.
- Route the shielded cables through
the central holes and connect the mi-
cro-photocells to the cables (TX on
one end and RX on the other).
- Fix the Micro-photocells with screws
(not supplied).
Caution! Disconnect power before
making electrical connections.
- Connect the wires to the termi-
nals of the micro-photocells (AK) and
(TX1, TX2, GND) of the ZP11 card.
- Depending on the type of system, set
the dip on the DOCP1 card:
DIP
Description
1 ON Two sets of micro-photocells
1
OFF One set of micro-photocells
2 ON 10 m. max. range
2 OFF 6 m. max. range
Insert the card into its connec-
tor (DOCP1) on the ZP11 card.
From the SIPA03 or SIPA04 selector,
select and confirm DOCP on the PHO-
TOCELL function in the INSTALLATION
menu.
This product complies with the law.
DISMANTLING AND DISPOSALThe packaging materials
(cardboard, plastic, and so on) should be disposed of as
solid household waste. The product components (metals;
electronic boards, batteries, etc.) must be separated from
other waste for recycling. Check your local laws to properly
dispose of the materials.
DO NOT DISPOSE OF IN NATURE!
THE CONTENTS OF THIS MANUAL MAY CHANGE, AT
ANY TIME, AND WITHOUT NOTICE.
MEASUREMENTS, UNLESS OTHERWISE INDICATED,
ARE IN MILLIMETRES.
Il prodotto è conforme alle direttive di riferimento vigenti.
DISMISSIONE E SMALTIMENTO - I componenti
dell’imballo (cartone, plastica, etc.) sono assimilabili ai rifi uti
solidi urbani. I componenti del prodotto (metallo, schede
elettroniche, batterie, etc.) vanno separati e di erenziati.
Per le modalità di smaltimento verifi care le regole vigenti
nel luogo d’installazione.
NON DISPERDERE NELL’AMBIENTE!
I CONTENUTI DEL MANUALE SONO DA RITENERSI
SUSCETTIBILI DI MODIFICA IN QUALSIASI MOMENTO
SENZA OBBLIGO DI PREAVVISO.
LE MISURE, SE NON DIVERSAMENTE INDICATO, SONO
IN MILLIMETRI.
FRANÇAIS
Description
Une paire (001SIPA08) ou deux paires
(001SIPA09) de micro-photocellules à
encastrer à rayon infrarouge d’une por-
tée max. de 10 m avec câbles blindés et
carte DOCP1.
Description des parties
Carte DOCP1
Photocellule de transmission (TX)
Photocellule de réception (RX)
Câbles blindés de 6 m
Données techniques
Modèle SIPA08 /
SIPA09
Alimentation (V) 24 AC/DC
Absorption max. (mA) AC=125
DC=40
Température de
fonctionnement (°C) -20 ÷ +55
Portée max. (m) 10
Temps d'intervention
(ms) 25
Temps de remise à zéro
(ms) 200
Installation
- Percer la structure pour permettre le
passage des câbles et la fixation des mi-
cro-photocellules.
- Faire passer les câbles blindés
dans les trous centraux et connec-
ter les micro-photocellules aux câbles
(TX d’un côté et RX de l’autre).
- Fixer les micro-photocellules à l’aide
des vis (non fournies).
Attention ! Mettre hors tension avant
d’effectuer les branchements électriques.
- Connecter les câbles des micro-pho-
tocellules aux bornes (A-K) et (TX1,
TX2, GND) de la carte ZP11.
- En fonction du type d’instal-
lation, configurer les commuta-
teurs DIP sur la carte DOCP1:
DIP
Description
1 ON
Deux paires de micro-photocellules
1
OFF
Une paire de micro-photocellules
2 ON Portée jusqu’à 10 m
2 OFF Portée jusqu’à 6 m
- Insérer la carte sur le connecteur
dédié (DOCP1) sur la carte ZP11.
- Par le biais du sélecteur SIPA03 ou
SIPA04, sélectionner et confirmer DOCP
sur la fonction PHOTOCELLULE dans le
menu INSTALLATION.
Le produit est conforme aux directives de référence en
vigueur.
MISE AU REBUT ET ÉLIMINATION - Les composants
de l’emballage (carton, plastique, etc.) sont assimilables
aux déchets urbains solides. Les composants du produit
(métal, cartes électroniques, batteries, etc.) doivent être
triés et di érenciés. Pour les modalités d'élimination,
vérifi er les normes en vigueur sur le lieu d'installation.
NE PAS JETER DANS LA NATURE !
LE CONTENU DE CE MANUEL EST SUSCEPTIBLE DE
SUBIR DES MODIFICATIONS À TOUT MOMENT ET
SANS AUCUN PRÉAVIS.
LES DIMENSIONS SONT EXPRIMÉES EN MILLIMÈTRES,
SAUF INDICATION CONTRAIRE.
РУССКИЙ
Описание
Пара (001SIPA08) или двойная пара
(001SIPA09) встраиваемых ИК-
фотоэлементов с максимальной
дальностью действия 10 м, в комплекте
с экранированными кабелями и платой
DOCP1.
Основные компоненты
Плата DOCP1
Фотоэлемент-передатчик (TX)
Фотоэлемент-приемник (RX)
Экранированные кабели длиной 6 м
Технические характеристики
Модель SIPA08 /
SIPA09
Напряжение питания (В) ~/=24 В
Макс. потребляемый
ток (мA) AC=125
DC=40
Диапазон рабочих
температур (°C) -20 ÷ +55
Макс. дальность
действия (м) 10
Время срабатывания (мс) 25
Время восстановления
(мс) 200
Монтаж
-
Просверлите в конструкции отверстия
для прокладки кабелей и крепления фо-
тоэлементов.
- Просуньте экранированные кабели в
центральные отверстия и подключите ми-
крофотоэлементы к кабелям (передатчик
с одной стороны, приемник с другой).
- Зафиксируйте фотоэлементы с помо-
щью болтов (не входят в комплект по-
ставки).
Внимание! Перед тем как выполнить
электрические подключения, отключите
электропитание.
- Подключите провода фотоэлемен-
тов к контактам (A-K) и (TX1, TX2,
GND) платы блока управления ZP11.
- Исходя из типа системы, выполните на-
стройки с помощью DIP-переключателей
на плате DOCP1:
DIP
Описание
1 ON Две пары фотоэлементов
1
OFF Одна пара фотоэлементов
2 ON
Дальность действия до 10 м
2 OFF Дальность действия до 6 м
- Вставьте плату в указанный разъем
( DOC P1) на п лат е бл ок а уп ра вл ени я ZP 11.
- С помощью программатора SIPA03 или
SIPA04 выберите и подтвердите присво-
ение DOCP функции ФОТОЭЛЕМЕНТА в
меню «УСТАНОВКА».
Изделие соответствует требованиям действующих
директив.
УТИЛИЗАЦИЯ — Упаковочные материалы (картон,
пластмасса и т. д.) могут быть утилизированы как
бытовые отходы. Материалы и компоненты изделия
(металл, электронные платы, элементы питания
и т.д.) необходимо разделить перед утилизацией.
Утилизацию изделия необходимо проводить в
соответствии с действующим законодательством
местности, в которой производилась его эксплуатация.
НЕ ЗАГРЯЗНЯЙТЕ ОКРУЖАЮЩУЮ СРЕДУ!
ВСЕ ДАННЫЕ, СОДЕРЖАЩИЕСЯ В ЭТОЙ
ИНСТРУКЦИИ, МОГУТ БЫТЬ ИЗМЕНЕНЫ В ЛЮБОЕ
ВРЕМЯ И БЕЗ ПРЕДВАРИТЕЛЬНОГО УВЕДОМЛЕНИЯ.
ВСЕ РАЗМЕРЫ ПРИВЕДЕНЫ В МИЛЛИМЕТРАХ,
ЕСЛИ НЕ УКАЗАНО ИНОЕ.
-
 1
1
-
 2
2


CAME SIPA08, SIPA09 Guida d'installazione
- Tipo
- Guida d'installazione
in altre lingue
Documenti correlati
-
CAME SIPARIO Guida d'installazione
-
-
-
-
-
-
-
-