Hoover HESD4 WIFI Manuale utente
- Categoria
- Piani cottura
- Tipo
- Manuale utente
Questo manuale è adatto anche per

MODEL : WIFI
UK
ENGLISH
ITALIAN
SPANISH
POLISH
PORTUGUESE
SLOVENIAN
Instruction Manual For Induction Hob
Manuale di istruzioni per piano cottura a
induzione
Manual de instrucciones para encimera de
inducción
Instrukcja uĪytkowania indukcyjnej páyty
grzejnej
Manual de Instruções da placa de indução
þ
Navodila za uporabo indukcijskih kuhalnih
ploš
İndüksiyonlu Ocak için Kullanım Kılavuzu
TÜRKÇE
Інструкція на індукційну варильну поверхню
Manual de utilizare pentru plite cu inducţie
GREECE
HOOVER • Via Privata Eden Fumagalli • 20861 Brugherio (MB) Italy.
HESD4
HUNGARY
Indukciós tűzhelylap
Felhasználói kézikönyv
DEUTSCH
Gebrauchsanleitung für Induktions-Kochfeld
FRANÇAIS
Manuel d’utilisation de la table de cuisson à induction
ROMANIAN

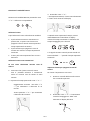
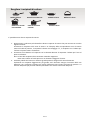
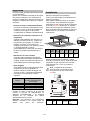
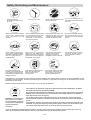
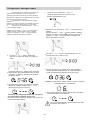
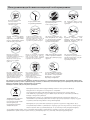
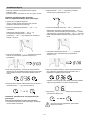
WARNING: The appliance and its accessible parts become hot
during use. Care should be taken to avoid touching heating
elements.
Children under 8 Year of age must be kept away from the
appliance unless they are continuously supervised.
This appliance can be used by children aged from 8 years and
above and persons with reduced physical, sensory or mental
capabilities or lack of experience and knowledge if they have
been given supervision or instruction concerning use of the
appliance in a
safe way and understand the hazards involved.
Children must not play with the appliance.
Cleaning and user maintenance shall not be made by children
without supervision
WARNING: Unattended cooking on a hob with fat or oil can be
dangerous and may result in fire.
NEVER try to extinguish a fire with water, but switch off the
appliance and then cover flame e.g. with a lid or a fire blanket.
WARNING: Danger of fire: do not store items on the cooking
surfaces.
LSXWfk KW_[`V[`Y S`V GS[`fW`S`UW=
EN-1
By placing the CE mark on this product, we are
confirming compliance to all relevant European safety, health
and environmental requirements which are applicable in
legislation for this product.

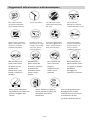
Metallic objects such as knives, forks, spoons and sauce pan
lids must not be placed on the hob surface as they can get hot.
Any spillage should be removed from the lid before opening.
The hob surface must be allowed to cool down before closing
the lid.
After use, switch off the hob element by its control. Do not
rely on the pan detector.
This appliance is not intended to be operated by means of an
external timer or separate remote - control system.
The means for disconnection must be incorporated in the fixed
wiring in accordance with the wiring rules.
The instructions state the type of cord to be used, taking into
account the temperature of the rear surface of the appliance.
If the supply cord is damaged, it must be replaced by the
manufacturer, its service agent or similarly qualified persons in
order to avoid a hazard.
CAUTION: In order to avoid a hazard due to inadvertent
resetting of the thermal cutout, this appliance must not be
supplied through an external switching device, such as a timer,
or connected to a circuit that is regularly switched on and off
by the utility.
EN-2
WARNING: If the surface is cracked, switch off the appliance to
avoid the possibility of electric shock.
Do not use a steam cleaner for cleaning operations

]fi kf[Xp
-
BVRc Afde`^Vc>
Oc\Xj\ i\X[ k_`j `ejkilZk`fe dXelXc ZXi\]lccp Y\]fi\ lj`e^ k_\ _fY Xe[ b\\g `k `e X jX]\ gcXZ\
]fi ]lkli\ i\]\i\eZ\3
Jc`UfTe E_ec`UfTeZ`_
P`c\Z_X JcZ_TZa]V
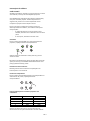
2*.3-8/+ +/6+9/8
+-6*2/+ .1*77 51*8-
/3,9+8/43 +4/1
y3,9+-, +966-387
S_\ `e[lZk`fe _fY ZXk\ij ]fi Xcc b`e[ f] Zffb`e^1 n`k_ `kj \c\ZkifdX^e\k`Z
S_Xeb pfl ]fi gliZ_Xj`e^ `e[lZk`fe _fY3
LXel]XZkli\[ n`k_ jg\Z`Xccp `dgfik\[ dXk\i`Xcj1 k_\ `e[lZk`fe _fY `j \oki\d\cp lj\i2
]i`\e[cp1
[liXYc\ Xe[ jX]\3
Zffb`e^ qfe\j1
d`Zif2Zfdglk\i`j\[ Zfekifcj Xe[ dlck`2]leZk`fej1 dXb`e^ `k k_\ `[\Xc Z_f`Z\
j
]Xd`cp3
this
THIS INFORMATION IS IN ANOTHER INDUCITON HOB AND IS A BETTER
EXPLAINATION
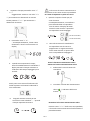
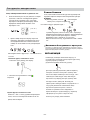
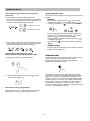
INDUCTION
An electronic generator powers a coil located inside the appliance. This coil creates a magnetic
field, so that when the pan is placed on the hob, it is permeated by the induction currents.
These currents make the pan into a real heat transmitter, while the glass ceramic hob remains
cold.
This system is designed for use with magnetic-bottomed pans.
pan
EN-3

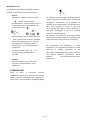
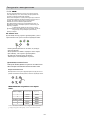
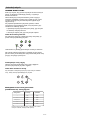
Jc`eVTeZ`_ Wc`^ `gVc1YVReZ_X
A j\ejfi dfe`kfij k_\ k\dg\iXkli\ `e k_\ Zffb`e^
qfe\j3 V_\e k_\ k\dg\iXkli\ \oZ\\[j X jX]\
c\m\c1 k_\ Zffb`e^ qfe\ `j XlkfdXk`ZXccp jn`kZ_\[
f]]3
BVeVTeZ`_ `W d^R]] `c _`_1^RX_VeZT ZeV^d
V_\e X gXe n`k_ X [`Xd\k\i f] c\jj k_Xe =5 dd1
fi jfd\ fk_\i jdXcc `k\d .\3^3 be`]\1 ]fib/ fi
X efe2dX^e\k`Z gXe .\3^3 Xcld`e`ld/ _Xj Y\\e
KVdZUfR] YVRe hRc_Z_X
V_\e k_\ _fY _Xj Y\\e fg\iXk`e^ ]fi jfd\ k`d\1
k_\i\ n`cc Y\ jfd\ i\j`[lXc _\Xk3 S_\ c\kk\i ~G*
Xgg\Xij kf nXie pfl
?fe` dYfeU`h_
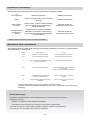
Aefk_\i jX]\kp ]\Xkli\ f] k_\ `e[lZk`fe _fY `j Xlkf
j_lk[fne3 S_`j fZZlij n_\e\m\i pfl ]fi^\k kf
jn`kZ_ f]] X Zffb`e^ qfe\3 S_\ [\]Xlck j_lk[fne
k`d\j Xi\ j_fne `e k_\ kXYc\ Y\cfn?
V_\e k_\ gXe `j i\dfm\[ ]ifd k_\ Zffb`e^
qfe\1
PRc_Z_X> Aepfe\ n_f _Xj Y\\e ]`kk\[ n`k_ X
_\Xik gXZ\dXb\i j_flc[ Zfejlck X [fZkfi Y\]fi\
lj`e^ k_\ `e[lZk`fe
S_`j _fY nXj [\j`^e\[ ]fi
[fd\jk`Z
lj\3
He `kj ZfejkXek j\XiZ_ kf `dgifm\ gif[lZkj1
JIKI D HJ
JIKI D JJ
JIKI B HJ
A`i \o`k
LRWVej
E_deR]]ReZ`_
ENGLISH
Oem[h b[l[b
R^[ ^[Wj_d] ped[ i^kj Zemd
WkjecWj_YWbbo W\j[h
6q:
;q65
66q69
= ^ekhi
9 ^ekhi
7 ^ekhi
6:
6^ekhi
i\j\im\j k_\ i`^_k kf df[`]p Xep
k\Z_e`ZXc1
gif^iXdd\ fi X\jk_\k`Z Xjg\Zkj f]
k_\
Xggc`XeZ\ Xk Xep k`d\3
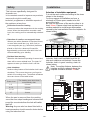
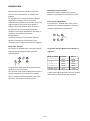
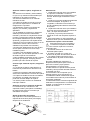
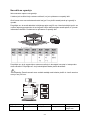
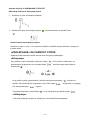
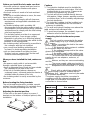
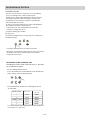
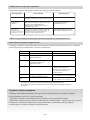
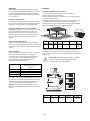
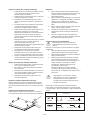
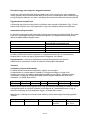
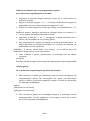
Selection of installation equipment
Cut out the work surface according to the sizes
shown in the drawing.
For the purpose of installation and use, a
minimum of
around the hole.
Be sure the thickness of the work surface is at
least 30mm. Please select heat-resistant work
surface material to avoid larger deformation
caused by the heat radiation from the hotplate. As
shown below:
L(m
m)
W(m
m)
H(m
m)
D(m
m)
A(m
m)
B(m
m)
X(m
m)
590 520 60 56 560+
4
+1
490+
4
+1
50
mini
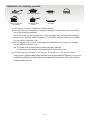
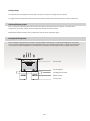
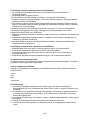
Induction hob is well ventilated and the air
inlet and outlet are not blocked. Ensure the
Induction hob is in good state. As
shown below
Note: The safety distance between the
hotplate and the cupboard above the
hotplate should be at least 760mm.
A(mm) B(mm) C(mm) D E
760 50
mini
20
mini
Air
intake
Air exit
min.5mm
specifically
our
50mm space needs to be left
placed on the hob, a buzzer will sound for
approximately one minute, after which the hob
will automatically go to standby.
M ake sure the
working
that the hob is still hot.
hob.
the zone stops heating and a buzzer will
sound for one minute then the hob will switch
itself off.
EN-4

Before you install the hob, make sure that
• the work surface is square and level, and no
structural members interfere with space
requirements
• the work surface is made of a heat-resistant
material
• if the hob is installed above an oven, the oven
has a built-in cooling fan
• the installation will comply with all clearance
requirements and applicable standards and
regulations
• a suitable isolating switch providing full
disconnection from the mains power supply is
incorporated in the permanent wiring, mounted
and positioned to comply with the local wiring
rules and regulations.
The isolating switch must be of an approved
type and provide a 3 mm air gap contact
separation in all poles (or in all active [phase]
conductors if the local wiring rules allow for this
variation of the requirements)
• the isolating switch will be easily accessible to
the customer with the hob installed
• you consult local building authorities and
by-laws if in doubt regarding installation
• you use heat-resistant and easy-to-clean
finishes (such as ceramic tiles) for the wall
surfaces surrounding the hob.
When you have installed the hob, make sure
that
• the power supply cable is not accessible
through cupboard doors or drawers
• there is adequate flow of fresh air from outside
the cabinetry to the base of the hob
• if the hob is installed above a drawer or
cupboard space, a thermal protection barrier is
installed below the base of the hob
• the isolating switch is easily accessible by the
customer
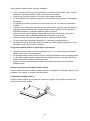
Before locating the fixing brackets
The unit should be placed on a stable, smooth
surface (use the packaging). Do not apply force
onto the controls protruding from the hob.
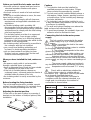
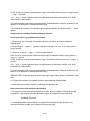
Adjusting the bracket position
Fix the hob on the work surface by screwing 4
brackets on the bottom of hob(see picture) after
installation.
Cautions
1. The induction h
qualified personnel or technicians. Please
never conduct the poeration by yourself.
2. The hob must not be installed directly above a
dishwasher, fridge, freezer, washing machine
or tumble dryer, as the humidity may damage
the hobs electronics
3. The induction hob should be installed in such
ion can be ensured
4. The wall and induced heating zone above the
table surface shall withstand heat.
5. To avoid any damage, the sandwich layer and
adhesive must be resistant to heat.
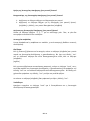
Connecting the hob to the mains power
supply
This hob must be connected to the mains
power supply only by a suitably qualified
person.
Before connecting the hob to the mains
power supply, check that:
1. The domestic wiring system is suitable
for the power drawn by the hob.
2. The voltage corresponds to the value
given in the rating plate
3. The power supply cable sections can
withstand the load specified on the rating plate.
The power supply cable must not touch
any hot parts and must be positioned so that its
temperature will not exceed 75
˚
C at any
point.
Check with an electrician whether the
domestic wiring system is suitable without
alterations. Any alterations must only be made
by a domestic qualified electrician.
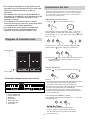
The power supply should be connected in
compliance with the relevant standard, or a
single-pole circuit breaker. the method of
connection is shown below.
50/60Hz
50/60Hz
jZi\n
YiXZb\k
YXj\
jZi\n _fc\
ob must be installed by
a way that better heat radiat
to enhance its reliability.
Adapters,reducers or branching devices
must not be used to connect the hob to the mains
power supply, as they can cause overheating and
fires.
EN-5

ENGLISH
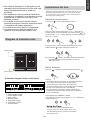
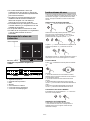
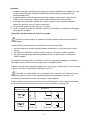
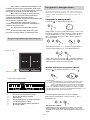
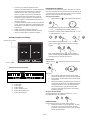
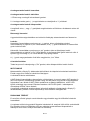
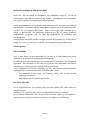
Cfekifc gXe\c
C\iXd`Z gcXk\
LTYV^ReZT UZRXcR^ `W eYV T`_ec`] aR_V]
BZRXcR^ `W Z_UfTeZ`_ Y`S>
1. Power regular control
2. Timer regular control
3. WIFI control
6. Lock/Inlock control
7. On/Off control
5. Keep warm control
4. Booster control
E_decfTeZ`_d W`c NdV
• If the cable is damaged or to be replaced, the
operation must be carried out by the after-sale
agent with dedicated tools to avoid any
accidents.
• If the appliance is being connected directly to
the mains an omnipolar circuit-breaker must be
installed with a minimum opening of 3mm
between contacts.
• The installer must ensure that the correct
electrical connection has been made and that it
is compliant with safety regulations.
• The cable must not be bent or compressed.
• The cable must be checked regularly and
replaced by authorised technicians only.
U^[d j^[ fem[h _i im_jY^[Z ed1 j^[ Xkpp[h m_bb
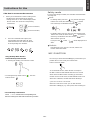
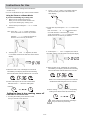
Operating instructions
--
Boost function
Warning:
2. The boost function works on the all cooking zone.
Cancelling the "BOOST" mode
1.Press the " " control, all the indicators show "--".
Press the“ " control, the power level indicator showing " "
iekdZ edY[
WdZ Wbb j^[ _dZ_YWjehi m_bb Yec[ ed
\eh ed[ i[YedZ WdZ j^[d
]e 3 R^[ ^eX _i dem
_d ijWdZXo ceZ[3
ObWY[ j^[ fWd _d
j^[
Y[djh[ e\ j^[ Yeea_d] ped[3
Select the power level by pressing the "+" or "-" control for the
relevant cooking zone. To begin with the indicator shows" "or " "
by pressing the "+" or "-" control. Adjust up or down by pressing
the "+" or "-" control.
If you press the "+" and "-" controls simultaneously, the power
setting returns to" "and the cooking zone switches off.
NB : When the " " control is pressed, the induction hob returns
to standby mode if no other operation is carried out
within one minute.
1. The boost function only operates for 5 minutes, after which
the cooking zone will revert to its original setting.
Cancel the "Boost" mode by pressing the "+" or "-" control of the
corresponding zone.
3. As the boost function of 1st or 3rd cooking zone is activated,
the PRO zone is limited at level 2 automatically.
Vice versa if the boost function of PRO cooking zone is
activated, both the 1st and 3rd cooking zone are limited at
level 2 automatically.
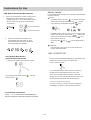
Using the Timer
You can use the timer in two different ways:
• You can use it as a minute minder. In this case,
the timer will not turn any cooking zone off when
the set time is up.
off
EN-6
6
7
4 5
1
2
13

E_decfTeZ`_d W`c NdV
• You can set it to turn cooking zones off after the
set time is up.
• You can set the timer for up to 9 hour and 59 minutes.
Using the Timer as a Minute Minder
If you are not selecting any cooking zone
1. Make sure the cooktop is turned on.
Note: you can use the minute minder even
if you’re not selecting any cooking zone.
2. Set the time by touching the “ - ” or “ + ” control
of the timer
Hint: Touch the “ - ” or “ + ” control of the timer
once to decrease or increase by 1 minute.
Hold the “ - ” r “ + ” control of the timer to
decrease or increase by 10 minutes.
3. Touching the “ - ” and “ + ” together, the timer
is cancelled, and the”0:00” will show in the minute
display.
4. When the time is set, it will begin to count down
immediately. The display will show the remaining
time and the timer indicator will flash for 5 seconds.
5. Buzzer will beep for 30 seconds and the timer
indicator shows “- - “ when the setting time
finished.
Setting the timer to turn cooking
zones off
If the timer is set on one zone:
1. Touching the heating zone selection control
that you want to set the timer for.
.
.
.
.
2. Touch “ - ”or “ + ” control , The minder indicator
will start flashing and “0:10” will show in the
timer display.
3. Set the time by touching the“ - ”or “ + ” control of the
timer
Hint: Touch the “ - ” or “ + ” control of the timer
once will decrease or increase by 1 minute.
Touch and hold the “ - ” or “ + ” control of the timer
will decrease or increase by 10 minutes.
4. Touching the “ - ” and “ + ” together, the timer is
cancelled, and the” 00” will show in the minute display.
5. When the time is set, it will begin to count down
immediately. The display will show the remaining
time and the timer indicator flash for 5 seconds.
NOTE: The red dot next to power level indicator
will illuminate indicating that zone is selected.
6. When cooking time expires, the corresponding
cooking zone will be switch off automatically.
Other cooking zone will keep operating if
they are turned on previously.
:
.
.
.
.
EN-7

ENGLISH
E_decfTeZ`_d W`c NdV
If the timer is set on more than one zone:
1. When you set the time for several cooking zones
simultaneously, decimal dots of the relevant
cooking zones are on. The minute display shows
the min. timer. The dot of the corresponding
zone flashes.
(set to 15 minutes)
(set to 45 minutes)
2. Once the countdown timer expires, the
corresponding zone will switch off. Then
it will show the new min. timer and the dot
of corresponding zone will flash.
Using the Keep Warm function
Actived the Keep warm function
1. Touching the heating zone selection control
2. Touching the keep warm control ,the zone
indicator show “ “
Cancel the keep warm function
:
.
.
Touch "-" or "+" control of the corresponding zone,
then the cooking zone will revert to the level you select.
Safety mode
Unlock:
Lock:
To ensure the safety of children, the induction hob is fitted with
an safety lock.
In working mode, press the " " key, the hob then goes
into the lock mode, timer will display " " and the
rest of the keys are disabled except the " " key.
In standby mode, press the "lock" key, the hob then goes
into the lock mode, the timer shows " " and the rest
of the keys are disabled. The timer shows" " for a
while and then goes off.
If you press the control , " " will be displayed for a
while.
Hold down the "Lock" key for 3 second, and the lock
function will be deactivate.
First of all, you should download SSimply-Fy and install to your
To use the WIFI function, switch the hob on and press
the WIFI control.The wifi LED will flash fast for 5 seconds
which means the WIFI module is booting up. If the WIFI
module connects to the router, the wifi LED will remain on all
cycles of 1 second on 1 second off.
WIFI FUNCTION
portable device. Then enroll your induction hob.
Refer to annex for details.
all the time. Otherwise, the WIFI LED will be flashing in
When the connection is made, you can find numerous
information on Simply-Fy, e.g. Zone power, time remaining etc.
EN-8

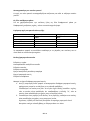
FLEXIBLE AREA
This area can be used as a single zone or as two different
zones, accordingly to your cooking needs.
Flexible area is made of two independent inductors that can
be controlled separately. When working as a single zone,
the part that is not covered by cookware is automatically
switched off after one minute.
- Anywhere with bigger cookware.
To grant a correct pan detection and a even heat distribution,
the cookware should be correctly placed:
- In the front or rear side of the flexible zone when the
cookware is smaller than 22 cm.
As large zone
To activate the flexible area as a single large zone, simply press
the dedicated keys.
The power setting works as any other cooking zone.
If the pan is moved from the front to the rear part of the zone (or vice versa),
the flexible area automatically detects the new position,
keeping the same power.
As two independent zones
To use the flexible area as two different zones with different
power settings, press the dedicated controls.
6
7
8
Beeij
1800
MehcWb
3000
Heating
Zone
The maximum power of cooking zones is
as follows:
R^[ WXel[ cWo lWho e j^[ i_p[
e\
j^[
fWd WdZ
j^[ cWj[h_Wb _j _i cWZ[ \hec
WYYehZ_d] j
3000
Flexible
Area
9
1800
000
3000
Deactivation of the continuum zone
the continuum key again
Resetting the power of the continuum zone or
pressing
1800
4000
1800
3
E_decfTeZ`_d W`c NdV
3000
EN-9

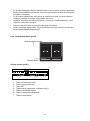
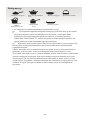
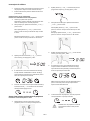
Hife f`c ]ip`e^ gXe RkX`ec\jj jk\\c gfk Hife gXe
EeXd\c jkX`ec\jj
jk\\c b\kkc\
EeXd\c Zffb`e^
lk\ej`c
Hife b\kkc\
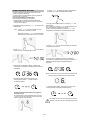
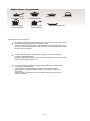
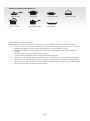
Wfl dXp _Xm\ X eldY\i f] [`]]\i\ek Zffb`e^ m\jj\cj
S_`j `e[lZk`fe _fY ZXe `[\ek`]p X mXi`\kp f] Zffb`e^ m\jj\cj1 n_`Z_ pfl ZXe k\jk Yp
fe\ f] k_\ ]fccfn`e^ d\k_f[j?
OcXZ\ k_\ m\jj\c fe k_\ Zffb`e^ qfe\3 H] k_\ Zfii\jgfe[`e^ Zffb`e^ qfe\ [`jgcXpj
X gfn\i c\m\c1 k_\e k_\ m\jj\c `j jl`kXYc\3 H]
,
T
,
]cXj_\j1 k_\e k_\ m\jj\c `j efk jl`kXYc\
]fi lj\ n`k_ k_\ `e[lZk`fe _fY3
Gfc[ X dX^e\k kf k_\ m\jj\c3 H] k_\ dX^e\k `j XkkiXZk\[ kf k_\ m\jj\c1 `k `j jl`kXYc\
]fi lj\ n`k_ k_\ `e[lZk`fe _fY3
MB? S_\ YXj\ f] k_\ m\jj\c dljk ZfekX`e dX^e\k`Z dXk\i`Xc3
6
Hife gcXk\
LV]VTeZ`_ `W T``\Z_X gVddV]d
Hk dljk _Xm\ X ]cXk Yfkkfd n`k_ X [`Xd\k\i f] dfi\ k_Xe Zd3
14
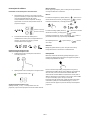
Use pans whose diameter is as large as the graphic of the zone selected.
6
Using a pot a slightly wider energy will be used at its maximum efficiency.If you use
smaller pot efficiency could be less than expected. Pot less than 140 mm could be
undetected by the hob.
EN-10

ENGLISH
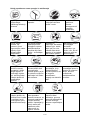
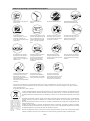
Cc\Xe k_\ `e[lZk`fe _fY
i\^lcXicp kf jkfg ]fi\`^e fYa\Zkj
]ifd ^\kk`e^ `ekf k_\ ]Xe Xe[
gi\m\ek`e^ k_\ Xggc`XeZ\ ]ifd
nfib`e^ gifg\icp3
Df efk jkfi\ [\k\i^\ekj fi
]cXddXYc\ dXk\i`Xcj Y\e\Xk_
k_\ _fY3
AcnXpj fg\e j\Xc\[ ZfekX`e\ij1
jlZ_ Xj ZXej1 Y\]fi\ _\Xk`e^
k_\d1 fk_\in`j\ k_\p dXp
\ogcf[\3
M\m\i _Xm\ k_\ `e[lZk`fe
_fkgcXk\ kf nfib n`k_flk ]ff[
`ej`[\1 fk_\in`j\ `kj fg\iXk`feXc
g\i]fidXeZ\ dXp Y\ X]]\Zk\[
Xe[ [Xe^\i dXp _Xgg\e3
Df efk gcXZ\ ifl^_ fi le\m\e
m\jj\cj fe k_\ _fY1 Xj k_\p
dXp [XdX^\ k_\ Z\iXd`Z
jli]XZ\3
H] k_\ jli]XZ\ f] k_\ _fY `j
ZiXZb\[1 jn`kZ_ f]] k_\
Xggc`XeZ\ kf Xmf`[ Xep
gfjj`Y`c`kp f] \c\Zki`Z j_fZbj3
Df efk c\Xm\ d\kXcc`Z fYa\Zkj1
jlZ_ Xj be`m\j1 ]fibj1 jgffej
Xe[c`[jfek_\_fYXjk_\pdXp
^\k _fk3
A [\[`ZXk\[ gfn\i
gifk\Zk`fe X`i jn`kZ_ dljk
Y\ lj\[3
M\m\i nXj_ k_\ `e[lZk`fe _fY
[`i\Zkcp n`k_ nXk\i3
M\m\i lj\ k_\ `e[lZk`fe _fY
e\Xi Xefk_\i Xggc`XeZ\ n_`Z_
^\e\iXk\j X _`^_ k\dg\iXkli\1
jlZ_ Xj X ^Xj Zffb\i fi X
gXiX]]`e _\Xk\i3
BELJIL?F> B` _`e UZda`dV
eYZd ac`UfTe Rd f_d`ceVU
^f_ZTZaR] hRdeV2 A`]]VTeZ`_
`W dfTY hRdeV dVaRcReV]j W`c
daVTZR] ecVRe^V_e Zd
_VTVddRcj2
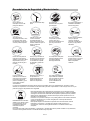
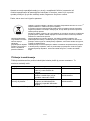
MYZd Raa]ZR_TV Zd ]RSV]]VU Z_ T`^a]ZR_TV hZeY Cfc`aVR_ UZcVTeZgV W`c PRdeV
C]VTecZTR] R_U C]VTec`_ZT CbfZa^V_e .PCCC/2
@j V_dfcZ_X eYRe eYZd Raa]ZR_TV Zd UZda`dVU `W T`ccVTe]j0 j`f hZ]] YV]a acVgV_e R_j a`ddZS]V
UR^RXV e` eYV V_gZc`_^V_e R_U e` Yf^R_ YVR]eY0 hYZTY ^ZXYe `eYVchZdV SV TRfdVU ZW Ze
hVcV UZda`dVU `W Z_ eYV hc`_X hRj2
MYV dj^S`] `_ eYV ac`UfTe Z_UZTReVd eYRe Ze ^Rj _`e SV ecVReVU Rd _`c^R] Y`fdVY`]U
hRdeV2 Ee dY`f]U SV eR\V_ e` R T`]]VTeZ`_ a`Z_e W`c eYV cVTjT]Z_X `W V]VTecZTR] R_U V]VTec`_ZT
X``Ud2
MYZd Raa]ZR_TV cVbfZcVd daVTZR]Zde hRdeV UZda`dR]2 D`c WfceYVc Z_W`c^ReZ`_ cVXRcUZ_X eYV
ecVRe^V_e0 cVT`gVcj R_U cVTjT]Z_X `W eYZd ac`UfTe a]VRdV T`_eRTe j`fc ]`TR] T`f_TZ]0 j`fc
Y`fdVY`]U hRdeV UZda`dR] dVcgZTV0 `c eYV dY`a hYVcV j`f afcTYRdVU Ze2
D`c ^`cV UVeRZ]VU Z_W`c^ReZ`_ RS`fe ecVRe^V_e0 cVT`gVcj R_U cVTjT]Z_X `W eYZd ac`UfTe0 a]VRdV T`_eRTe j`fc ]`TR] TZej
`WWZTV0 j`fc Y`fdVY`]U hRdeV UZda`dR] dVcgZTV `c eYV dY`a hYVcV j`f afcTYRdVU eYV ac`UfTe2
V_\e X Zffb`e^ qfe\ _Xj Y\\e
fe ]fi X cfe^ k`d\ k_\ jli]XZ\
i\dX`ej _fk ]fi jfd\ k`d\
X]k\inXi[j 2 jf [f efk kflZ_
k_\ Z\iXd`Z jli]XZ\3
Fifd k`d\ kf k`d\ Z_\Zb k_Xk
efk_`e^ .\3^3 ^cXjj1 gXg\i1 \kZ3/
`j fYjkilZk`e^ k_\ X`i `ekXb\
Y\e\Xk_ k_\ `e[lZk`fe _fY3
J\\g Z_`c[i\e fi `e]`id g\ijfej
XnXp ]ifd k_\ Xggc`XeZ\3
M\m\i c\k k_\d lj\ `k
lejlg\im`j\[3
H] k_\ gfn\i ZXYc\ `j [XdX^\[
`k j_flc[ Y\ i\gcXZ\[ Yp fli
j\im`Z\ X^\ek fi Yp Xefk_\i
jl`kXYcp hlXc`]`\[ g\ijfe3
Ffi `e[ffi lj\ fecp3
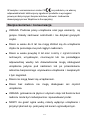
LRWVej KV^Z_UZ_X R_U GRZ_eV_R_TV>
This appliance is not intended for use by persons (including children) with reduced physical, sensory or mental capabilities, or lack
of experience and knowledge, unless they have been given supervision or instruction concerning use of the appliance by a person
responsible for their safety.
Children should be supervised to ensure that they do not play with the appliance.
EN-11
2012/19/EC

H] Xep XYefidXc`kp fZZlij1 k_\ `e[lZk`fe _fY n`cc XlkfdXk`ZXccp ^f `ekf gifk\Zk`m\ df[\ Xe[ [`jgcXp
fe\ f] k_\ ]fccfn`e^ Zf[\j?
S_\ XYfm\ kXYc\ j_fnj _fn kf Xjj\jj Xe[ Z_\Zb Zfddfe ]Xlckj3
Df efk [`jdXekc\ k_\ Xggc`XeZ\ pflij\c]1 fk_\in`j\ pfl dXp [XdX^\ k_\ `e[lZk`fe
_fY3
K`^_k Cc\Xe`e^ jgfe^\
Q`e^j Xe[ c`d\
jZXc\
Aggcp n_`k\ m`e\^Xi kf k_\ Xi\X1 n`g\ n`k_
X jf]k Zcfk_ fi lj\ X Zfdd\iZ`Xccp
XmX`cXYc\ gif[lZk
Tj\ X jg\Z`Xc jZiXg\i ]fi Z\iXd`Z ^cXjj
kf i\dfm\ i\j`[l\ .X j`c`Zfe gif[lZk `j
Y\jk/
Rg\Z`Xc X[_\j`m\ ]fi Z\iXd`Z
^cXjj
Rg\Z`Xc X[_\j`m\ ]fi Z\iXd`Z
^cXjj
MYV dfcWRTV `W eYV Z_UfTeZ`_ Y`S ^Rj SV VRdZ]j T]VR_VU Z_ eYV W`]]`hZ_X
MB? D`jZfee\Zk k_\ gfn\i jlggcp Y\]fi\ Zc\Xe`e^3
MjaV `W T`_eR^1
Z_ReZ`_
GVeY`U `W T]VR_Z_X
A]VR_Z_X ^ReVcZR]d
R_U GRZ_eV_R_TV
DRZ]fcV BZda]Rj R_U E_daVTeZ`_
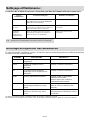
H] X ]Xlck j_flc[ fZZli1 Y\]fi\ ZXcc`e^ A]k\i RXc\j R\im`Z\1 gc\Xj\ [f k_\ ]fccfn`e^?
2C_\Zb k_Xk k_\ Xggc`XeZ\ `j Zfii\Zkcp gcl^^\[ `e
2Q\X[ k_\ ]X`cli\ Xe[ [`jgcXp kXYc\ XYfm\
H] pfl Xi\ jk`cc leXYc\ kf i\jfcm\ k_\ gifYc\d1 jn`kZ_ f]] k_\ Xggc`XeZ\1 [f efk kip kf [`jdXekc\ `k1
Xe[ ZXcc
A]k\i RXc\j R\im`Z\3
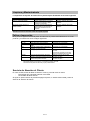
Afde`^Vc ARcV LVcgZTV
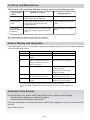
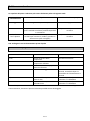
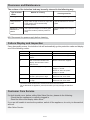
Problem Possible causes What to do
F1-F6 Temperature sensor failure Please contact the supplier.
F9-FA
Temperature sensor of the IGBT
failure.
Please contact the supplier.
FC
The connection between the
display board and the main
board has failed.
Please contact the supplier.
E1/E2
Abnormal supply voltage Please inspect whether power
supply is normal.
Power on after the power
supply is normal.
E3/E4
Temperature sensor of the
ceramic glass plate is high
Please restart after the
induction hob cools down.
E5
Temperature sensor of the IGBT
Please restart after the
induction hob cools down.
is high
Cleaning
ways:
THE HOB SHOULD NOT BE
IMMERSED IN HOT WATER!!!
Food residue,
melted aluminium
or plastics
EN-12

S_\ Zfek\ekj f] k_`j dXelXc _Xm\ Y\\e ZXi\]lccp Z_\Zb\[3 Gfn\m\i1 k_\
ZfdgXep ZXeefk Y\ _\c[ i\jgfej`Yc\ ]fi Xep d`jgi`ekj fi fd`jj`fej3
Acjf1 Xep k\Z_e`ZXc df[`]`ZXk`fej dXp Y\ `eZcl[\[ `e X i\m`j\[ m\ij`fe f]
k_\ dXelXc n`k_flk efk`Z\3 S_\ Xgg\XiXeZ\ Xe[ Zfcfli f] k_\ Xggc`XeZ\ `e
k_`j dXelXc dXp [`]]\i ]ifd k_\ XZklXc fe\3
LaVTZR] BVTERcReZ`_
EN-13

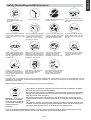
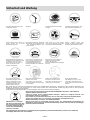
ATTENZIONE: l'apparecchio e le parti accessibili
diventano calde durante l'uso. Prestare attenzione a non
toccare le parti calde.
I bambini al di sotto di 8 anni dovrebbero essere tenuti a
distanza se non continuamente supervisionati.
L'apparecchio può essere usato da bambini dagli 8 anni in
su e persone con ridotte capacità fisiche, sensoriali o
mentali o senza esperienza e conoscenza del prodotto se
supervisionate o dando loro istruzioni riguardo al
funzionamento dell'apparecchio in maniera sicura e
coscente del rischio possibile.
I bambini non dovrebbero giocare con l'apparecchio.
La pulizia e la manutenzione non dovrebbero essere fatte
da bambini senza supervision
ATTENZIONE: cucinare senza supervisione grasso o olio
sul piano cottura può essere pericoloso e
può provocare
incendi
MAI provare a spegnere il fuoco con acqua. Prima
spegnere l'apparecchio e poi coprire le fiamme, ad
esempio con un coperchio o un telo non infiammabile.
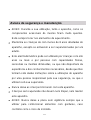
Sicurezza e manutenzione
ITA-1
“Inserendo la marcatura CE su questo prodotto, si
dichiara , sotto la nostra responsabilità , la conformità a tutti i
requisiti sulla sicurezza europea, sulla salute e sull’ambiente
stabiliti dalla legislazione per questo prodotto.”

ATTENZIONE: Se la superficie è incrinata, spegnere
l’apparecchio per evitare la possibilità di scosse elettriche.
non utilizzare un pulitore a vapore.
Oggetti metallici quali coltelli, forchette, cucchiai o coperchi
non dovrebbero essere posti sulla superficie del piano di
cottura perché possono scaldarsi.
rimuovere gli eventuali liquidi tracimati dal coperchio prima
di aprirlo.
Far raffreddare la superficie del piano di cottura prima di
chiudere il coperchio.
Dopo l’uso, spegnere il piano di cottura tramite il suo
dispositivo di comando e non fare affidamento sul
rivelatore di pentole.
L'apparecchio non è progettato per funzionare con un
timer esterno o con un sistema di comando separato .
Il mezzo di disconnessione deve essere incorporato nel
cablaggio fisso in accordo con le leggi di cablaggio .
le istruzioni devono indicare quale tipo di cavo debba
essere utilizzato, tenendo presente la temperatura della
superficie posteriore dell’apparecchio.
Se il cavo di alimentazione è danneggiato, esso deve
essere sostituito dal costruttore o dal suo servizio
ITA-2
ATTENZIONE: pericolo di incendo: non lasciare oggetti sul
piano cottura.

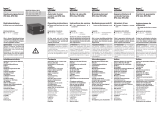
Gentile cliente:
Grazie per aver acquistato il piano cottura a induzione. Ci auguriamo che possa offrirti parecchi anni di
ottimo servizio.
Le chiediamo cortesemente di leggere con attenzione il manuale prima di utilizzare il piano cottura e
conservarlo attentamente per gli utilizzi futuri.
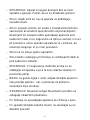
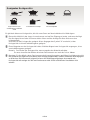
Istruzioni sul prodotto
Il piano a induzione soddisfa tutte le esigenze di cottura, con le sue zone di cottura elettromagnetiche, i
suoi comandi micro-computerizzati e multifunzione, è la scelta ideale per le famiglie moderne.
Prodotto con speciali materiali, il piano a induzione è estremamente facile da usare, duraturo e sicuro.
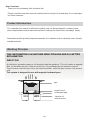
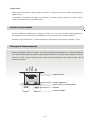
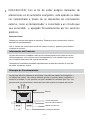
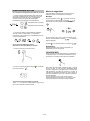
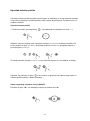
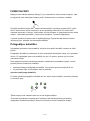
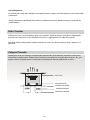
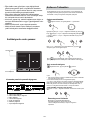
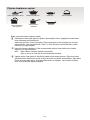
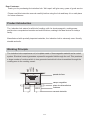
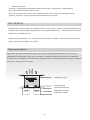
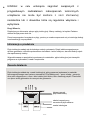
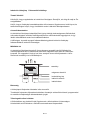
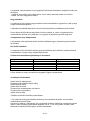
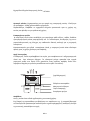
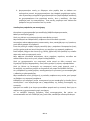
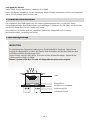
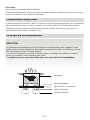
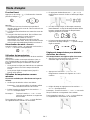
Principio di funzionamento
Il piano a induzione contiene una spirale, una piastra in materiale ferromagnetico e un sistema di controllo.
La corrente elettrica genera un potente campo magnetico attraverso la spirale. Questo produce un elevato
numero di vortici i quali ruotando generano calore che successivamente viene trasmesso dalla zona di
cottura al recipiente.
pentola di ferro
campo magnetico
piano cottura in vetroceramica
induttori
corrente indotta
ITA-3

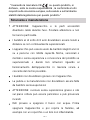
Sicurezza
Questo piano cottura è stato prodotto per un uso
domestico.
Nella costante ricerca di miglioramento dei
prodotti, ci riserviamo il diritto di modificare in
qualunque momento ogni programma, aspetto
tecnico o estetico dell’apparecchio.
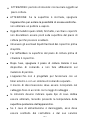
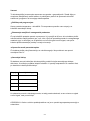
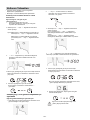
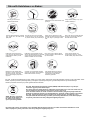
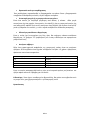
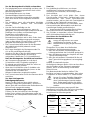
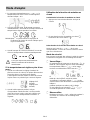
Protezione da iper-riscaldamento
Un sensore monitora la temperatura nella zona di
cottura. Quando la temperatura supera il livello di
sicurezza, la zona di cottura viene spenta
automaticamente.
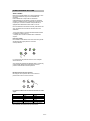
Possesso di strumenti di piccole dimensioni
o non magnetici
Quando vengono lasciate sul piano cottura padelle
con un diametro inferiore a 80 mm, altri
strumenti di piccole dimensioni (es. coltelli,
forchette o chiavi) o padelle non magnetiche (es.
alluminio), un segnale acustico viene emesso per
circa un minuto, al termine del quale il piano entra
automaticamente in modalità stand by.
Spia calore residuo
Quando la piastra viene utilizzata per un certo
periodo di tempo, è possibile che sia presente del
calore residuo. Viene visualizzata la lettera “H” a
indicare la necessità di mantenere una distanza di
sicurezza.
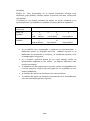
Spegnimento automatico
Un altro strumento di sicurezza del piano a
induzione è lo spegnimento automatico. I tempi di
spegnimento automatico sono mostrati nella
tabella inferiore:
Quando la padella viene rimossa dalla zona di
cottura, il riscaldamento si ferma immediatamente
e si spegne automaticamente dopo l’emissione del
segnale acustico per circa un minuto.
Attenzione: Ogni individuo portatore di
dispositivo peacemaker per il cuore deve
consultare un medico prima di utilizzare la piastra
a induzione.
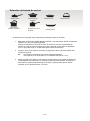
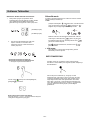
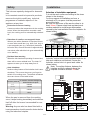
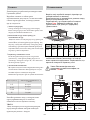
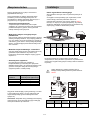
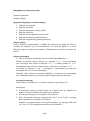
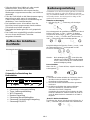
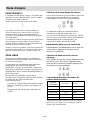
Installazione
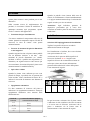
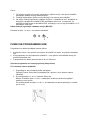
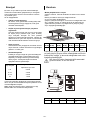
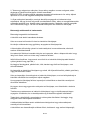
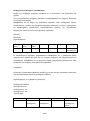
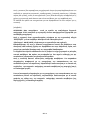
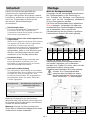
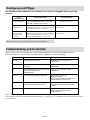
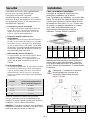
Selezione dell’equipaggiamento di installazione
Tagliare la superficie di lavoro secondo le
dimensioni mostrate nel disegno.
Per l’installazione e l’utilizzo, deve essere lasciato
uno spazio minimo di 5 cm.
Assicurarsi che lo spessore della superficie di
lavoro sia di almeno 30 cm. Scegliere una
superficie di lavoro in un materiale resistente al
calore per evitare una elevata deformazione
generata dalle radiazioni di calore della piastra.
Come mostrato di seguito:
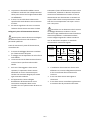
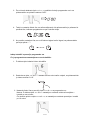
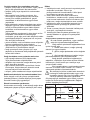
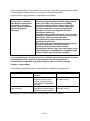
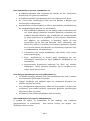
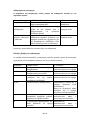
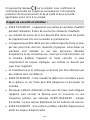
In ogni occasione, assicurarsi che il piano cottura
a induzione sia ben ventilato e che l’aria in entrata
e in uscita non sia bloccata. Assicurarsi che il
piano a induzione sia in buono stato di
funzionamento. Come mostrato di seguito
L(m
m)
W(m
m)
H(m
m)
D(m
m)
A(m
m)
B(m
m)
X(m
m)
590 520 60 56 560+
4
+1
490+
4
+1
50
mini
6q:
;q65
66q69
= eh[
9 eh[
7 eh[
6:
6eh[
Livello di
intensità
La zona di cottura si spegne
automaticamente dopo
ITA-4

N.B. La distanza di sicurezza tra la
piastra e la credenza sopra la piastra deve
essere di almeno 760 mm
Prima di installare il piano, assicurarsi che:
il piano di lavoro sia allineato e regolare, e
che non ci siano interferenze strutturali con lo
spazio richiesto
la superficie di lavoro sia di un materiale
resistente al calore
se il piano è installato sopra un forno, il forno
sia provvisto di una ventola di raffreddamento
per l’installazione siano rispettati tutti gli
spazi richiesti, gli standard e le normative
un interruttore adatto che fornisce piena
disconnessione dalla fonte di alimentazione
sia incluso nel cablaggio permanente, montato
e posizionato in modo da rispettare leggi e
normative locali sul cablaggio.
l’interruttore deve essere di una tipologia
approvata e deve fornire 3 mm di separazione
di tutti poli (o in tutti i conduttori attivi [fasi]
se le norme locali sul cablaggio permettono
questa variazione di requisito) nel circuito
magnetico.
l’interruttore deve essere accessibile
facilmente dall’utente una volta che il piano è
stato installato
consultare, per legge, le autorità locali se si
hanno dubbi riguardo l’installazione.
utilizzare finiture facili da pulire e resistenti al
calore per le superfici del muro che circonda il
piano cottura.
Quando stai installando il piano assicurarsi che:
Il cavo che fornisce l’alimentazione non sia
accessibile dai cassetti o dalle porte della
dispensa.
Ci sia un sufficiente flusso d’aria fresca
dall’esterno del mobile al piano
Se il piano è installato sopra un cassetto o una
dispensa, una barriera di protezione termica
sia installata al di sotto della base del piano.
L’interruttore deve essere facilmente
accessibile dall’utente.
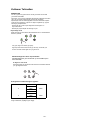
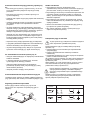
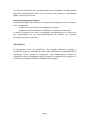
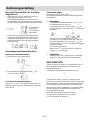
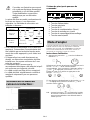
Prima di posizionare le staffe di fissaggio:
L’unità deve essere posizionata su una superficie
liscia e stabile (usare l’imballaggio). Non applicare
troppa forza sui controlli sporgenti dal piano.
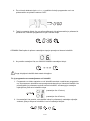
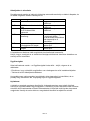
Regolare le staffe di posizionamento
Fissare il piano sulla superficie di lavoro avvitando
4 staffe sul fondo del piano (guarda la figura)
dopo l’installazione
Attenzione
1. L’installazione del piano a induzione deve
essere effettuata da personale qualificato o
da tecnici.
2. Il piano non deve essere installato
direttamente sopra una lavastoviglie, un
frigorifero, un freezer, una lavatrice,
un’asciugatrice, in quanto l’umidità potrebbe
danneggiare le piastre elettroniche
JIKI D HJ
JIKI D JJ
JIKI B HJ
A`i \o`k
A(mm) B(mm) C(mm) D E
760 50
mini
20
mini
Air
intake
Air exit
min.5mm
Vite
Squadretta
Base
Foro per la vite
ITA-5

3. Le piastre a induzione dovrebbero essere
installate in modo tale che la dispersione del
calore possa assicurare il miglioramento della
sua affidabilità.
4. Il muro e la zona del calore indotto sulla
superfice del tavolo devono essere resistenti
al calore.
5. Per evitare ogni danno lo strato in mezzo e
l’adesivo devono essere resistenti al calore
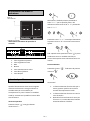
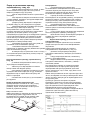
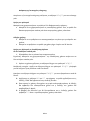
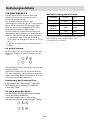
Collegare il piano all’alimentazione elettrica
Questo piano cottura deve essere collegato
all’alimentazione elettrica solo da idoneo
personale qualificato
Prima di connettere il piano all’alimentazione,
controllare che:
1. Il sistema di cablaggio domestico sia adatto
per l’alimentazione del piano
2. Il voltaggio sia corrispondente ai valori forniti
nella tabella
3. La sezione dei cavi di alimentazione elettrica
resista al carico specifico indicato nella
tabella
Connettere il piano all’alimentazione senza usare
ramificazioni, adattatori o riduttori che possono
causare surriscaldamento e incendio. Il cavo di
alimentazione non deve entrare in contatto con
le parti calde e deve essere posizionato in modo
tale che la sua temperatura non superi i 75°C in
tutti i suoi punti.
Controllare con un elettricista che il sistema
di cablaggio domestico sia idoneo e senza
alterazioni. Ogni modifica deve essere fatta da un
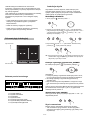
elettricista qualificato. L’alimentazione deve
essere collegata seguendo i relativi standard o
con un interruttore unipolare. Il metodo di
connessione è mostrato di seguito.
Se il cavo è danneggiato e deve essere
sostituito, le operazioni devono essere
effettuate un centro di assistenza post-
vendita con strumenti adeguati per evitare
ogni eventuale incidente.
Se l’apparecchio è stato collegato
direttamente all’alimentazione con un
interruttore omnipolare deve essere
installato con uno spazio minimo di 3mm tra i
contatti.
L’installatore deve assicurare che sia stato
effettuato un corretto collegamento elettrico
e che sia conforme alle normative sulla
sicurezza.
Il cavo non deve essere attorcigliato o
schiacciato
Il cavo deve essere controllato regolarmente
e sostituito solo da personale autorizzato.
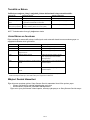
Voltaggio e
frequenza
Connessione elettrica
400V 2-N
50/60Hz
Nero Marrone Grigio e Blu
Giallo/
verde
220-240V
50/60Hz
Nero e Marrone Grigio e Blu
Giallo/
verde
ITA-6
La pagina si sta caricando...
La pagina si sta caricando...
La pagina si sta caricando...
La pagina si sta caricando...
La pagina si sta caricando...
La pagina si sta caricando...
La pagina si sta caricando...
La pagina si sta caricando...
La pagina si sta caricando...
La pagina si sta caricando...
La pagina si sta caricando...
La pagina si sta caricando...
La pagina si sta caricando...
La pagina si sta caricando...
La pagina si sta caricando...
La pagina si sta caricando...
La pagina si sta caricando...
La pagina si sta caricando...
La pagina si sta caricando...
La pagina si sta caricando...
La pagina si sta caricando...
La pagina si sta caricando...
La pagina si sta caricando...
La pagina si sta caricando...
La pagina si sta caricando...
La pagina si sta caricando...
La pagina si sta caricando...
La pagina si sta caricando...
La pagina si sta caricando...
La pagina si sta caricando...
La pagina si sta caricando...
La pagina si sta caricando...
La pagina si sta caricando...
La pagina si sta caricando...
La pagina si sta caricando...
La pagina si sta caricando...
La pagina si sta caricando...
La pagina si sta caricando...
La pagina si sta caricando...
La pagina si sta caricando...
La pagina si sta caricando...
La pagina si sta caricando...
La pagina si sta caricando...
La pagina si sta caricando...
La pagina si sta caricando...
La pagina si sta caricando...
La pagina si sta caricando...
La pagina si sta caricando...
La pagina si sta caricando...
La pagina si sta caricando...
La pagina si sta caricando...
La pagina si sta caricando...
La pagina si sta caricando...
La pagina si sta caricando...
La pagina si sta caricando...
La pagina si sta caricando...
La pagina si sta caricando...
La pagina si sta caricando...
La pagina si sta caricando...
La pagina si sta caricando...
La pagina si sta caricando...
La pagina si sta caricando...
La pagina si sta caricando...
La pagina si sta caricando...
La pagina si sta caricando...
La pagina si sta caricando...
La pagina si sta caricando...
La pagina si sta caricando...
La pagina si sta caricando...
La pagina si sta caricando...
La pagina si sta caricando...
La pagina si sta caricando...
La pagina si sta caricando...
La pagina si sta caricando...
La pagina si sta caricando...
La pagina si sta caricando...
La pagina si sta caricando...
La pagina si sta caricando...
La pagina si sta caricando...
La pagina si sta caricando...
La pagina si sta caricando...
La pagina si sta caricando...
La pagina si sta caricando...
La pagina si sta caricando...
La pagina si sta caricando...
La pagina si sta caricando...
La pagina si sta caricando...
La pagina si sta caricando...
La pagina si sta caricando...
La pagina si sta caricando...
La pagina si sta caricando...
La pagina si sta caricando...
La pagina si sta caricando...
La pagina si sta caricando...
La pagina si sta caricando...
La pagina si sta caricando...
La pagina si sta caricando...
La pagina si sta caricando...
La pagina si sta caricando...
La pagina si sta caricando...
La pagina si sta caricando...
La pagina si sta caricando...
La pagina si sta caricando...
La pagina si sta caricando...
La pagina si sta caricando...
La pagina si sta caricando...
La pagina si sta caricando...
La pagina si sta caricando...
La pagina si sta caricando...
La pagina si sta caricando...
La pagina si sta caricando...
La pagina si sta caricando...
La pagina si sta caricando...
La pagina si sta caricando...
La pagina si sta caricando...
La pagina si sta caricando...
La pagina si sta caricando...
La pagina si sta caricando...
La pagina si sta caricando...
La pagina si sta caricando...
La pagina si sta caricando...
La pagina si sta caricando...
La pagina si sta caricando...
La pagina si sta caricando...
La pagina si sta caricando...
La pagina si sta caricando...
La pagina si sta caricando...
La pagina si sta caricando...
La pagina si sta caricando...
La pagina si sta caricando...
La pagina si sta caricando...
La pagina si sta caricando...
La pagina si sta caricando...
La pagina si sta caricando...
La pagina si sta caricando...
La pagina si sta caricando...
La pagina si sta caricando...
La pagina si sta caricando...
La pagina si sta caricando...
La pagina si sta caricando...
La pagina si sta caricando...
La pagina si sta caricando...
La pagina si sta caricando...
La pagina si sta caricando...
La pagina si sta caricando...
La pagina si sta caricando...
La pagina si sta caricando...
La pagina si sta caricando...
La pagina si sta caricando...
La pagina si sta caricando...
La pagina si sta caricando...
La pagina si sta caricando...
La pagina si sta caricando...
-
 1
1
-
 2
2
-
 3
3
-
 4
4
-
 5
5
-
 6
6
-
 7
7
-
 8
8
-
 9
9
-
 10
10
-
 11
11
-
 12
12
-
 13
13
-
 14
14
-
 15
15
-
 16
16
-
 17
17
-
 18
18
-
 19
19
-
 20
20
-
 21
21
-
 22
22
-
 23
23
-
 24
24
-
 25
25
-
 26
26
-
 27
27
-
 28
28
-
 29
29
-
 30
30
-
 31
31
-
 32
32
-
 33
33
-
 34
34
-
 35
35
-
 36
36
-
 37
37
-
 38
38
-
 39
39
-
 40
40
-
 41
41
-
 42
42
-
 43
43
-
 44
44
-
 45
45
-
 46
46
-
 47
47
-
 48
48
-
 49
49
-
 50
50
-
 51
51
-
 52
52
-
 53
53
-
 54
54
-
 55
55
-
 56
56
-
 57
57
-
 58
58
-
 59
59
-
 60
60
-
 61
61
-
 62
62
-
 63
63
-
 64
64
-
 65
65
-
 66
66
-
 67
67
-
 68
68
-
 69
69
-
 70
70
-
 71
71
-
 72
72
-
 73
73
-
 74
74
-
 75
75
-
 76
76
-
 77
77
-
 78
78
-
 79
79
-
 80
80
-
 81
81
-
 82
82
-
 83
83
-
 84
84
-
 85
85
-
 86
86
-
 87
87
-
 88
88
-
 89
89
-
 90
90
-
 91
91
-
 92
92
-
 93
93
-
 94
94
-
 95
95
-
 96
96
-
 97
97
-
 98
98
-
 99
99
-
 100
100
-
 101
101
-
 102
102
-
 103
103
-
 104
104
-
 105
105
-
 106
106
-
 107
107
-
 108
108
-
 109
109
-
 110
110
-
 111
111
-
 112
112
-
 113
113
-
 114
114
-
 115
115
-
 116
116
-
 117
117
-
 118
118
-
 119
119
-
 120
120
-
 121
121
-
 122
122
-
 123
123
-
 124
124
-
 125
125
-
 126
126
-
 127
127
-
 128
128
-
 129
129
-
 130
130
-
 131
131
-
 132
132
-
 133
133
-
 134
134
-
 135
135
-
 136
136
-
 137
137
-
 138
138
-
 139
139
-
 140
140
-
 141
141
-
 142
142
-
 143
143
-
 144
144
-
 145
145
-
 146
146
-
 147
147
-
 148
148
-
 149
149
-
 150
150
-
 151
151
-
 152
152
-
 153
153
-
 154
154
-
 155
155
-
 156
156
-
 157
157
-
 158
158
-
 159
159
-
 160
160
-
 161
161
-
 162
162
-
 163
163
-
 164
164
-
 165
165
-
 166
166
-
 167
167
-
 168
168
-
 169
169
-
 170
170
-
 171
171
-
 172
172
-
 173
173


Hoover HESD4 WIFI Manuale utente
- Categoria
- Piani cottura
- Tipo
- Manuale utente
- Questo manuale è adatto anche per
Documenti correlati
Altri documenti
-
Candy CFID 36 WIFI Manuale utente
-
-
-
-
-
-
-
DeLonghi KIT ENTRETIEN Manuale del proprietario
-
 Kromschroder IFD 244, IFD 258 Istruzioni per l'uso
-
Vertiv SL-70997_GXE UPS 6-10 kVA_REVA_IT Manuale utente
