GYS GYSFLASH 1.12 PL Manuale del proprietario
- Tipo
- Manuale del proprietario

C73514_V3_16/02/2021
GYSFLASH 1.12 PL
www.gys.fr
FR
2-6 / 37-40
EN
7-11 / 37-40
DE
12-16 / 37-40
ES
17-21 / 37-40
RU
22-26 / 37-40
NL
27-31 / 37-40
IT
32-36 / 37-40
Find more languages of user manuals on our website

2
GYSFLASH 1.12 PL
FR
INSTRUCTIONS DE SÉCURITÉ
Ce manuel d’utilisation comprend des indications sur le
fonctionnement de l’appareil et les précautions à suivre pour
la sécurité de l’utilisateur. Merci de le lire attentivement avant
la première utilisation et de le conserver soigneusement
pour toute relecture future. Ces instructions doivent être lues
et bien comprises avant toute opération. Toute modication
ou maintenance non indiquée dans le manuel ne doit pas
être entreprise. Tout dommage corporel ou matériel dû à
une utilisation non-conforme aux instructions de ce manuel
ne pourra être retenu à la charge du fabricant. En cas de
problème ou d’incertitude, consulter une personne qualiée
pour manier correctement l’appareil. Cet appareil doit
être utilisé uniquement pour faire de la recharge dans les
limites indiquées sur l’appareil et le manuel. Il faut respecter
les instructions relatives à la sécurité. En cas d’utilisation
inadéquate ou dangereuse, le fabricant ne pourra être tenu
responsable.
Cet appareil peut être utilisé par des enfants âgés d’au moins
8 ans et par des personnes ayant des capacités physiques,
sensorielles ou mentales réduites ou dénuées d’expérience ou
de connaissance, s’ils (si elles) sont correctement surveillé(e)
s ou si des instructions relatives à l’utilisation de l’appareil en
toute sécurité leur ont été données et si les risques encourus
ont été appréhendés. Les enfants ne doivent pas jouer avec
l’appareil. Le nettoyage et l’entretien par l’usager ne doivent
pas être effectués par des enfants sans surveillance.
A n’utiliser en aucun cas pour charger des piles ou des
batteries non rechargeables.
Ne pas utiliser l’appareil, si le cordon d’alimentation ou la
che de secteur sont endommagés.
Ne pas utiliser l’appareil, si le cordon de charge est
endommagé ou présente un défaut d’assemblage, an
d’éviter tout risque de court-circuit de la batterie.
Ne jamais charger une batterie gelée ou endommagée.
Le mode de fonctionnement automatique ainsi que les
restrictions applicables à l’utilisation sont expliqués ci-après
dans ce mode d’emploi.
Risque d’explosion et d’incendie!
Une batterie en charge peut émettre des gaz explosifs.
• Pendant la charge, la batterie doit être placée dans un
emplacement bien aéré.
• Éviter les ammes et les étincelles. Ne pas fumer.
Ne pas laisser une batterie en cours de charge sans
surveillance sur une longue durée.

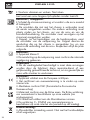
3
GYSFLASH 1.12 PL
FR
Connexion / déconnexion :
• Déconnecter l’alimentation avant de brancher ou de
débrancher les connexions sur la batterie.
• La borne de la batterie non reliée au châssis doit être
connectée la première. L’autre connexion doit être effectuée
sur le châssis loin de la batterie et de la canalisation
de combustible. Le chargeur de batterie doit alors être
raccordé au réseau.
• Après l’opération de charge, débrancher le chargeur de
batterie du réseau puis retirer la connexion du châssis et
enn la connexion de la batterie, dans l’ordre indiqué.
Raccordement :
• Appareil de classe II
• Le raccordement au réseau d’alimentation doit être
effectué conformément aux règles d’installation nationales.
Entretien :
• Si le câble d’alimentation est endommagé, il doit être
remplacé par le fabricant, son service après-vente ou des
personnes de qualication similaire an d’éviter un danger.
Règlementation :
• Appareil conforme aux directives européennes.
• La déclaration de conformité est disponible sur notre site
internet.
• Marque de conformité EAC (Communauté économique
Eurasienne)
• Matériel conforme aux exigences britanniques. La décla-
ration de conformité britannique est disponible sur notre site
(voir à la page de couverture).
• Appareil conforme aux normes Marocaines.
• La déclaration C
م (CMIM) de conformité est disponible
sur notre site internet.
Mise au rebut :
• Ce matériel fait l’objet d’une collecte sélective. Ne pas jeter
dans une poubelle domestique.
DESCRIPTION GÉNÉRALE
Le GYSFLASH 1.12 PL est idéal pour recharger la plupart des batteries au plomb (Gel, AGM, Liquide, …) et lithium de type Lithium
Fer Phosphate (LFP / LiFePO4) couramment utilisées pour les motos, scooters des mers et pour de nombreux autres petits véhicules.
Ce chargeur est parfaitement adapté pour:
- La recharge de batteries plomb 12 V (6 éléments en série de 2 V) de 2 Ah à 32 Ah, et jusqu’à 100 Ah pour du maintien de charge.
- La recharge de batteries LFP 12V (4 éléments en série de 3 V) de 0.5 Ah à 20 Ah, et jusqu’à 50 Ah pour du maintien de charge.

4
GYSFLASH 1.12 PL
FR
MISE EN ROUTE
1. Brancher le chargeur sur la batterie avec l’accessoire souhaité (pinces, cosses, etc).
2. Brancher le chargeur sur la prise secteur (réseau monophasé 220-240 Vac 50-60Hz).
3. Sélectionner le mode en appuyant sur le bouton
. Après environ cinq secondes, la charge se lance automatiquement.
4. Durant la charge, l’appareil indique l’état d’avancement de la charge. Lorsque le voyant
clignote, la batterie est prête à
démarrer le moteur. Et lorsque le voyant
reste allumé, la batterie est entièrement chargée.
5. La charge peut être interrompue à tout moment en débranchant la prise secteur ou en appuyant sur le bouton
.
6. Après l’opération de charge, débrancher le chargeur du réseau puis retirer les connexions de la batterie.
MODES DE CHARGE
• Description des Modes et des Options :
Mode CHARGE Plomb (14.4 V/1 A) :
Mode destiné à la charge de batteries 12 V au plomb de 2 Ah à 32 Ah et jusqu’à 100 Ah pour du
maintien de charge. Cycle de charge automatique sept étapes.
Option FROID/AGM (14.7 V/1 A) :
Option modiant la tension de charge à 14.7 V pour la charge de batterie par temps froid
(moins de 5°C) ou pour certaines batteries AGM ou batteries avec bouchons.
Mode CHARGE Lithium (14.4 V/1 A) :
Mode destiné à la charge de batteries 12 V au lithium de 0.5 Ah à 20 Ah et jusqu’à 50 Ah pour du
maintien de charge. Cycle de charge automatique en huit étapes.
Certaines batteries lithium intègrent une protection UVP (Under Voltage Protection) qui
déconnecte la batterie en cas de décharge profonde. Cette protection empêche le chargeur
de détecter la batterie. An que le Gysash 1.12 PL puisse charger la batterie, il faut désacti-
ver la protection UVP. Pour cela, placer le chargeur en mode de charge Lithium, puis appuyer
10 secondes sur le bouton
. Le chargeur va alors désactiver la protection UVP et lancer
automatiquement la charge.
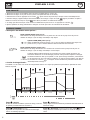
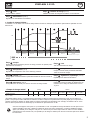
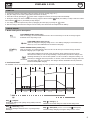
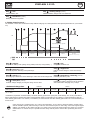
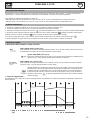
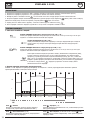
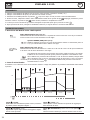
• Courbe de charge Plomb :
Le GYSash 1.12 PL utilise une courbe de charge Plomb évoluée en 7 étapes qui garantit les performances optimales de votre
batterie au plomb.
U
I
1 2 3 4 5 6 7
Analyse Récupération Test Désulfatation Charge Absorption
Maintien de
charge
max 8h
no limit
CHARGE
OK
Voyant
max 25hmax 12h< 1smax 8h< 1s
Étape
1
: Analyse
Analyse de l’état de la batterie (niveau de charge, inversion
de polarité, mauvaise batterie connectée…)
Étape
5
: Charge (1 A)
Charge rapide à courant maximum permettant d’atteindre 80% du
niveau de charge.
Étape
2
: Récupération (0.5 A)
Algorithme de récupération des éléments endommagés
suite à une décharge profonde.
Étape
6
: Absorption (14.4 V ou 14.7 V avec option
AGM)
Charge à tension constante pour amener le niveau de charge à
100%.

5
GYSFLASH 1.12 PL
FR
Étape
3
: Test
Test de batterie sulfatée
Étape
7
: Maintien de charge (13.6 V)
Maintien du niveau de charge de la batterie à son maximum.
Étape
4
: Désulfatation (15.8 V)
Algorithme de désulfatation de la batterie.
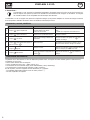
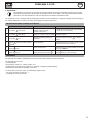
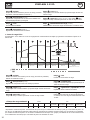
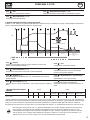
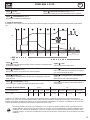
• Courbe de charge Lithium :
Le GYSash 1.12 PL utilise une courbe de charge Lithium évoluée en 8 étapes qui garantit les performances optimales de votre
batterie LFP.
U
I
1 2 3 4 5 6 7
Analyse Récupération Charge Absorption Complément
Egalisation /
équilibrage
Maintien de
charge
< 1s Max 5 min Max 30 h Max 20 h 3 min Max 10 h Max 2 h No limit
(maintenance tous les 10 jours)
CHARGE
OK
Voyant
8
Test
Equalizing Battery System
Étape
1
: Analyse
Analyse de l’état de la batterie (niveau de charge, inversion de polarité, mau-
vaise batterie connectée…)
Étape
5
: Test
Test de conservation de charge.
Étape
2
: Récupération (0.2 A)
Algorithme de récupération suite à une décharge profonde.
Étape
6
: Complément
Charge à courant réduit permettant d’atteindre
100% du niveau de charge.
Étape
3
: Charge (1 A)
Charge rapide à courant maximum permettant d’atteindre 90% du niveau de
charge.
Étape
7
: Égalisation / équilibrage (14.4 V)
Équilibrage des cellules de la batterie
Étape
4
: Absorption (13.8 V)
Charge à tension constante pour amener le niveau de charge à 98%.
Étape
8
: Maintien de charge (13.8 V)
Maintien du niveau de charge de la batterie à son
maximum avec charge de maintenance tous les
10 jours.
• Temps de charge estimé
Plomb Lithium
Capacité de la batterie 2 Ah 10 Ah 20 Ah 32 Ah
1 Ah
(3 Ah EqPb*)
5 Ah
(15 Ah EqPb*)
10 Ah
(30 Ah EqPb*)
20 Ah
(60 Ah EqPb*)
Temps de charge
0% >> 90%
2 h 9 h 18 h 29 h 1 h 30 4 h 30 8 h 30 16 h
*Équivalent batterie plomb : Une batterie lithium possède de meilleures performances de démarrage (CCA) qu’une batterie au
plomb. C’est pourquoi certains fabricants de batteries au lithium indiquent l’équivalent batterie plomb (EqPb) qui correspond à la
capacité qu’aurait une batterie au plomb ayant les mêmes performances de démarrage. Par exemple, une batterie LFP de 10 Ah
aura les mêmes performances de démarrage qu’une batterie au plomb d’environ 30 Ah.
Si la moto est équipée d’une prise 12 V, le GYSFLASH 1.12 PL est capable de charger la batterie via cette prise avec le
système CAN-BUS, sans avoir à allumer le tableau de bord. Dans cette conguration, connecter l’adaptateur allume-
cigare (ref. 029439) sur le chargeur et la prise 12 V de la moto puis suivre la procédure de «Mise en route» détaillée
précédemment. Dans certains cas, il est possible que la charge ne débute qu’au bout de 2 minutes après avoir eectué
les connexions.

6
GYSFLASH 1.12 PL
FR
• Protections :
Le GYSFLASH 1.12 PL possède un ensemble de dispositifs le protégeant contre les courts circuits et inversion de po-
larité. Il dispose d’un système qui évite toute étincelle lors du branchement du chargeur sur la batterie. Ce chargeur
est à double isolation et est compatible avec l’électronique des véhicules.
Le GYSFLASH 1.12 PL est équipé d’un capteur de température intégré qui lui permet d’adapter son courant de charge en fonction
de la température ambiante an d’éviter toute surchaue de l’électronique interne.
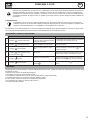
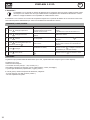
ANOMALIES, CAUSES, REMÈDES
Anomalies Causes Remèdes
1
Le voyant
clignote rapidement.
• Inversion de polarité
• Tension batterie trop élevée
• Pinces en court-circuit
• Vérier que les pinces sont correctement connec-
tées
• Vérier qu’il s’agit bien d’une batterie 12 V.
2
Le voyant
clignote lentement.
Batterie HS ou de très faible tension. Changer la batterie.
3
Le voyant
est allumé.
Échec lors de la charge, batterie non
récupérable.
Changer de batterie et appuyer sur
pour
relancer une charge.
4
Le voyant
reste allumé même après un
appui sur le bouton
.
Défaut thermique
Température environnante trop élevée (>60°C),
aérer le local et laisser le chargeur se refroidir
5
Le voyant
clignote.
Chargeur en veille.
Appuyer sur le bouton
ou connecter une bat-
terie au chargeur pour sortir de la veille.
6
Le voyant
reste allumé.
Charge interrompue en appuyant sur le
bouton
.
Appuyer de nouveau sur
pour relancer la
charge.
CONDITIONS DE GARANTIE
La garantie couvre tous défauts ou vices de fabrication pendant 2 ans, à compter de la date d’achat (pièces et main d’œuvre).
La garantie ne couvre pas :
• Toutes autres avaries dues au transport.
• L’usure normale des pièces (Ex. : câbles, pinces, etc.).
• Les incidents dus à un mauvais usage (erreur d’alimentation, chute, démontage).
• Les pannes liées à l’environnement (pollution, rouille, poussière).
En cas de panne, retourner l’appareil à votre distributeur, en y joignant :
- un justicatif d’achat daté (ticket de sortie de caisse, facture….)
- une note explicative de la panne.

7
GYSFLASH 1.12 PL
EN
SAFETY INSTRUCTIONS
This manual contains safety and operating instructions, to be
followed for your safety. Please read it carefully before using
the device for the rst time and keep it for future reference.
Read and understand the following safety instructions before
use. Any modication or updates that are not specied
in the instruction’s manual should not be undertaken. The
manufacturer is not liable for any injury or damage due to
non-compliance with the instructions featured in this manual.
If there is any issue or uncertainty, please consult a qualied
individual to operate the equipment correctly. This machine
should only be used for charging operations specied within
the limits indicated on the machine and in the instruction
manual. The operator must observe the safety precautions. In
case of improper or unsafe use, the manufacturer cannot be
held liable.
This unit can be used by children aged 8 or over and by
people with reduced physical, sensory or mental capabilities
or lack of experience or knowledge, if they are properly
monitored or if instructions for using the equipment have
safely been read and risks made aware of. Children must
not play with the product. Cleaning and maintenance should
not be performed by an unsupervised child.
Do not use to charge domestic batteries or non rechargeable
batteries.
Do not operate the device with a damaged power supply
cord or a damaged mains plug.
Do not use the device if the charging cable appears to be
damaged or assembled incorrectly in order to avoid any risk
of short circuiting the battery.
Never use on a frozen or damaged battery.
The operating mode of the automatic charger and the
restrictions applicable to its use are explained later in this
manual.
Fire and explosion risks!
A battery can emit explosive gases when on charge.
• During the charge, the battery must be placed in a well
ventilated area.
• Avoid ames and sparks. Do not smoke near the device.
Do not leave a charging battery unattended for a long time.

8
GYSFLASH 1.12 PL
EN
Connection / disconnection :
• Ensure that the charger’s power supply is disconnected
before connecting or disconnecting to the battery terminals.
• Always ensure the Red clamp is connected to the «+»
battery terminal rst. If it is necessary to connect the black
clamp to the vehicle chassis, make sure it is a safe distance
from the battery and the fuel/exhaust pipe. The charger must
be connected to the mains.
• After charging, disconnect the charger from the mains, then
disconnect the negative clamp from the car body and then
disconnect the positive clamp from the battery, in this order.
Connection :
• Class II device
• The connection to the power supply must be carried out in
compliance with national standards.
Maintenance :
• If the power cable is damaged, it must be replaced by the
manufacturer, its after sales or by an equally qualied person
to prevent any accidents.
Regulations :
• The Machine is compliant with European directives.
• The declaration of conformity is available on our website.
• EAEC Conformity marking (Eurasian Economic Community).
• Equipment in compliance with British requirements. The British
Declaration of Conformity is available on our website (see home
page).
• Equipment in conformity with Moroccan standards.
• The declaration Cم (CMIM) of conformity is available on
our website (see cover page).
Waste management :
• This product should be disposed of at an appropriate
recycling facility. Do not throw away in a household bin.
GENERAL DESCRIPTION
The GYSFLASH 1.12 PL is designed to charge lead-acid batteries (Gel, AGM, Liquid, …) and lithium of the Lithium Iron Phosphate
(LFP / LiFePO4).commonly used for motorcycles, water scooters and many other small vehicles.
This charger is suited for the charge of:
- Lead-acid batteries 12 V (6 elements in series of 2V) from 2 Ah to 32 Ah, and up to 100 Ah for charge support.
- The charge 12V LFP batteries (4 cells in series of 3V) from 0.5 Ah to 20 Ah, and up to 50 Ah for charge support.

9
GYSFLASH 1.12 PL
EN
START UP
1. Connect the charger to the battery using the proper accessory (clamps, lugs, etc...).
2. Plug the charger to the mains (single phase 220-240Vac 50-60Hz).
3. Select the mode by pressing the
button. After roughly ve seconds, the charge starts automatically.
4. During the charge, the device indicates the charge progress. When indicator
blinks, the battery is ready to start the vehicle.
Once indicator
stays on, the battery is fully charged.
5. The charge can be interrupted at any time by unplugging the mains plug or pressing the
button.
6. After the charge, disconnect the charger from the mains, then disconnect the clamps from the battery.
CHARGE MODES
• Modes and Options description :
Lead CHARGE mode (14.4 V/1 A) :
Mode for charging 12 V lead-acid batteries from 2 Ah to 32 Ah and up to 100 Ah for charge support.
Automatic seven step charge cycle.
COLD/AGM option (14.7 V/1 A) :
Option to change the charging voltage to 14.7 V for battery charging in cold weather (less
than 5°C) or for some AGM batteries or batteries with plugs.
Lithium CHARGE mode (14.4 V/1 A) :
Mode for charging 12 V lithium batteries from 0.5 Ah to 20 Ah and up to 50 Ah for charge retention.
Automatic charging cycle in eight steps.
Some Lithium batteries incorporate a UVP protection (Under Voltage Protection) which
disconnect the battery in case of deep discharge. This protection prevents the charger from
detecting the battery. In order for the Gysash 1.12 PL to be able to charge the battery, it is
necessary to deactivate the UVP protection. To do this, select the Lithium charging mode and
press the button
for 10 seconds. The charger will then deactivate the UVP protection
and automatically start charging.
• Load curve Lead:
The GYSash 1.12 PL uses an advanced 7-step lead charging curve that guarantees the optimal performance of your lead battery.
U
I
1 2 3 4 5 6 7
Analysis Recovery Test Desulfation Charge Absorption
Floating
charge
max 8h
no limit
CHARGE
OK
Led
max 25hmax 12h< 1smax 8h< 1s
Step
1
: Analysis
Analyses the battery state (charge level, polarity inversion,
wrong battery…)
Step
5
: Charge (1 A)
Maximum current fast charge to reach an 80% charge level.
Step
2
: Recovery (0.5 A)
Recovering damaged elements due to a prolonged deep
discharge.
Step
6
: Absorption (14.4 V or 14.7 V with
AGM option)
Constant voltage charging to bring the charge level to 100%.

10
GYSFLASH 1.12 PL
EN
Step
3
: Test
Sulfated battery test
Step
7
: Floating charge (13.6 V)
Maintains battery charge level at its maximum.
Step
4
: Desulfation (15.8 V)
Battery desulfation algorithm.
• Lithium charging curve :
The GYSash 1.12 PL uses an advanced 8-step Lithium charging curve that guarantees the optimal performance of your LFP bat-
tery.
U
I
1 2 3 4 5 6 7
Analysis Recovery Charge Absorption Supplement
Equalization /
balancing
Floating charge
< 1s Max 5 min Max 30 h Max 20 h 3 min Max 10 h Max 2 h No limit
(maintenance every 10 days)
CHARGE
OK
Led
8
Test
Equalizing Battery System
Step
1
: Analysis
Analyses the battery state (charge level, polarity inversion, wrong battery…)
Step
5
: Test
Charge conservation test.
Step
2
: Recovery (0.2 A)
Recovery algorithm following a deep discharge.
Step
6
: Supplement
Reduce current charge to reach 100% charge
level.
Step
3
: Charge (1 A)
Fast charging at maximum current allowing to reach 90% of the charge level.
Step
7
: Equalization / balancing (14.4 V)
Balancing the battery cells
Step
4
: Absorption (13.8 V)
Constant voltage charging to bring the charge level to 98%.
Step
8
: Floating charge (13.8 V)
Maintain the battery charge level at its maximum
with maintenance charging every 10 days.
• Estimated charge time
Lead-acid Lithium
Battery capacity 2 Ah 10 Ah 20 Ah 32 Ah
1 Ah
(3 Ah EqPb*)
5 Ah
(15 Ah EqPb*)
10 Ah
(30 Ah EqPb*)
20 Ah
(60 Ah EqPb*)
Charging time
0% >> 90%
2 h 9 h 18 h 29 h 1 h 30 4 h 30 8 h 30 16 h
*Lead battery equivalent: A lithium battery has better starting performance (CCA) than a lead battery. This is why some lithium
battery manufacturers indicate the battery lead equivalent (EqPb) corresponding to the capacity of a lead-acid battery with the
same starting performance. For instance, a LFP battery of 10 Ah will have the same starting performance as a lead-acid battery of
around 30 Ah.
If the motorcycle is equipped with a 12 V socket, the GYSFLASH 1.12 PL is able to charge the battery via this socket
with the CAN-BUS system, without having to switch on the instrument panel. In this setup, connect the cigratte lighter
adapter (ref. 029439) on the charger and the 12 V socket of the motorcycle and then follow the «Start-up» procedure
detailed above. In certain cases, it is possible that the charge will only start 2 minutes after performing the connec-
tions.

11
GYSFLASH 1.12 PL
EN
• Protections :
The GYSFLASH 1.12 PL has a set of devices to protect it against short circuits and polarity reversal. It has an anti-
spark feature which prevents sparks whilst connecting the device to the battery. This charger has double insulation
and is safe to use with the battery in situ as it will protect the vehicle’s on-board electronics.
The GYSFLASH 1.12 PL is equipped with an integrated temperature sensor that allows it to adapt its charging current according to
the ambient temperature in order to avoid any overheating of the internal electronics.
TROUBLESHOOTING, CAUSES, SOLUTIONS
Troubleshooting Causes Solutions
1
The indicator
blinks rapidly.
• Polarity reversal
• Battery voltage is too high
• Clamps in short-circuit
• Check that the clamps are correctly connected
• Check that it is a 12 V battery.
2
The indicator
blinks slowly.
Battery out of order or very low voltage. Change the battery.
3
The indicator
is on.
Failure during charging, battery not
recoverable.
Change the battery and press
to restart a
charge.
4
Indicator
stays on even after pressing
button.
Thermal protection
Ambient temperature is too high (>60°C), cool the
room and let the charger cool down.
5
Indicator
ashes.
Charger in sleep mode.
Press button
or connect a battery to the char-
ger to exit sleep mode.
6
Indicator
stays on.
Charge interrupted by pressing
. Press again to restart the charge.
WARRANTY
The warranty covers faulty workmanship for 2 years from the date of purchase (parts and labour).
The warranty does not cover:
• Transit damage.
• Normal wear of parts (eg. : cables, clamps, etc..).
• Damages due to misuse (power supply error, dropping of equipment, disassembling).
• Environment related failures (pollution, rust, dust).
In case of failure, return the unit to your distributor together with:
- The proof of purchase (receipt etc ...)
- A description of the fault reported

12
GYSFLASH 1.12 PL
DE
SICHERHEITSANWEISUNGEN
Diese Betriebsanleitung enthält Sicherheits- und Betriebshinweise.
Bitte lesen Sie diese Anleitung aufmerksam durch, bevor Sie
das Gerät zum ersten Mal benutzen und bewahren Sie diese
sorgfältig auf. Lesen Sie diese Anleitung vor Inbetriebnahme des
Gerätes sorgfältig durch. Nehmen Sie keine Wartungarbeiten
oder Veränderungen am Gerät vor, die nicht in der Anleitung
erwähnt werden. Der Hersteller haftet nicht für Verletzungen
oder Schäden, die durch unsachgemäße Handhabung dieses
Gerätes entstanden sind. Bei Problemen oder Fragen zum
korrekten Gebrauch dieses Gerätes, wenden Sie sich bitte
an entsprechend qualiziertes und geschultes Fachpersonal.
Dieses Gerät darf ausschließlich zum Starten und/oder
zur Spannungsversorgung für die in der Anleitung oder auf
dem Gerät genannten Anforderungen genutzt werden. Die
Sicherheitshinweise müssen in jedem Fall beachtet werden.
Im Fall einer unangemessenen oder gefährlichen Verwendung
kann der Hersteller nicht haftbar gemacht werden.
Dieses Gerät kann von Personen ab 8 Jahren, und von
Personen mit eingeschränkten physischen, sensorischen oder
geistigen Fähigkeiten sowie von Personen ohne Erfahrungen
oder Kenntnissen benutzt werden, wenn sie durch eine für ihre
Sicherheit verantwortliche Person beaufsichtigt oder bezüglich
des Gebrauchs des Gerätes angeleitet werden. Das Gerät ist
kein Spielzeug! Die Reinigung und Wartung darf nicht von
unbewachten Kindern durchgeführt werden.
Laden Sie nie defekte oder nicht auadbare Batterien.
Benutzen Sie das Gerät nicht, wenn der Stecker, die Klemmen
oder das Zubehör defekt ist.
Wenn das Ladekabel beschädigt ist oder ein Verbindungsfehler
auftritt, bitte das Gerät nicht benutzen, um jeglichen Kurzschluss
der Batterie zu vermeiden.
Laden Sie NIE eine eingefrorene oder beschädigte Batterie auf!
Der Automatik-Modus sowie die Einschränkungen bei der
Benutzung werden nachfolgend in der Betriebsanleitung erklärt.
Brand- und Explosionsgefahr!
Beim Auaden einer Batterie können explosive Gase freigesetzt
werden.
• Während des Ladevorgangs muss die Batterie in einem gut
belüfteten Bereich plaziert werden.
• Vermeiden Sie Funken und Flammen. Rauchen Sie nicht!

13
GYSFLASH 1.12 PL
DE
Lassen Sie nicht den Akku während des Ladevorganges ohne
Überwachung für eine längere Zeitspanne.
Verbinden/Trennen:
• Trennen Sie das Gerät vom Spannungsnetz bevor Sie Kabel
und Klemmen anschließen oder trennen.
• Versichern Sie sich immer, dass die rote Klemme zuerst mit dem
«+» Pol der Batterie verbunden wird. Verbinden Sie die schwarze
Klemme mit einem Massepunkt an der Fahrzeugkarosserie
möglichst weit weg von Benzintank/Aufspuff. Achten Sie
während der Ladung auf einen frei zugänglichen Netzanschluss.
• Beachten Sie am Ende des Ladevorgangs folgendes: Trennen
Sie erst das Gerät vom Spannungsnetz und entfernen Sie dann
erst die Klemmen von der Batterie.
Anschluss:
• Klasse II-Gerät
• Der Anschluss an die Spannungsversorgung muss den
nationalen Vorschriften entsprechen.
Wartung:
• Ist das Ladegerät und/oder die Kabel defekt/beschädigt,
geben Sie das Ladegerät zur Reparatur zum Hersteller bzw.
an einen geeigneten Fachbetrieb.
Richtlinien:
• Das Gerät entspricht den europäischen Richtlinien und
Normen.
• Die Konformitätserklärung ist auf unserer Internetseite
verfügbar.
• EAC-Konformitätszeichen (Eurasische
Wirtschaftsgemeinschaft)
• Equipo conforme a los requisitos británicos. La Declaración
de Conformidad Británica está disponible en nuestra página
web (véase la portada).
• Equipamiento conforme a las normas marroquíes.
• La declaración de conformidad Cم (CMIM) está disponible
en nuestra página web (ver página de portada).
Entsorgung:
• Produkt für getrennte Entsorgung (Elektroschrott). Werfen Sie
es daher nicht in die Mülltonne! Entsorgen Sie das Gerät über
Ihre kommunale Sammelstelle für Elektro-Altgeräte!

14
GYSFLASH 1.12 PL
DE
BESCHREIBUNG
Das GYSFLASH 1.12 PL ist zum Auaden der meisten Blei- (Gel, AGM, üssig…) und Lithiumbatterien bzw. Lithium-Eisen-Phosphat
(LFP / LiFePO4) Batterien geeignet. Diese Batterien ndet man z.B. in Motorrädern, Motorollern und kleinen Fahrzeugen.
Dieses Ladegerät eignet sich zum Laden folgender Batterien:
- 12V Blei-Säure-Batterien (6 2V Elemente in Reihe) von 2Ah bis 32Ah, und bis 100Ah zur Ladungserhaltung.
- 12V Lithium-Eisen-Phosphat-Batterien (4 3V Elemente in Reihe) von 0,5Ah bis 20Ah, und bis 50Ah zur Ladungserhaltung.
INBETRIEBNAHME
1. Schließen Sie das Gerät mit dem geeigneten Zubehör (Klemme, Hülse, usw.) an die Batterie an.
2. Danach das Gerät an das Spannungsnetz anschließen (1-ph. 220-240Vac 50-60Hz).
3. Den Modus mit der Taste
auswählen. Nach ca. fünf Sekunden startet die Ladung automatisch.
4. Das Gerät zeigt den Ladefortschritt an. Blinkt die Kontrollleuchte
, ist die Batterie so weit aufgeladen, dass der Motor ges-
tartet werden kann. Leuchtet die Kontrollleuchte
konstant, ist die Batterie voll aufgeladen.
5. Die Ladung kann jederzeit mit Ziehen des Netzsteckers oder mit der Taste
abgebrochen werden.
6. Nach dem Ladevorgang trennen Sie erst das Ladegerät vom Spannungsnetz und dann von der Batterie.
LADEMODI
• Beschreibung der Modi und Optionen:
LADEMODUS Blei-Säure-Batterie (14,4V / 1A):
Zum Laden von 12V Batterien von 2Ah bis 32Ah und zur Ladungserhaltung bis 100Ah. Automatischer
Ladezyklus in sieben Stufen.
LADEMODUS Option KÜHL/AGM (14,7V/1A) :
Diese Option ermöglicht ein Auaden der Batterie auf 14,7V bei niedreigen Temperaturen
(unter 5°C) oder für manche AGM-Batterien oder Batterien mit Verschlußstopfen.
LADEMODUS Lithium (14,4 V/1A) :
Zum Laden von 12V Lithiumbatterien von 0,5Ah bis 20Ah und zur Ladungserhaltung bis 50Ah. Automati-
scher Ladezyklus in acht Stufen.
Einige Lithium-Batterien enthalten einen UVP-Schutz (Under Voltage Protection), der die Bat-
terie im Falle einer Tiefentladung trennt. Dieser Schutz verhindert, dass das Ladegerät den
Akku erkennt. Damit der Gysash Lithium 6.12 die Batterie laden kann, muss der UVP-Schutz
deaktiviert werden. Wählen Sie dazu den Lademodus (Moto oder Auto) und drücken Sie
dann die Taste
für 10 Sekunden. Das Ladegerät deaktiviert dann den UVP-Schutz und
beginnt automatisch mit dem Laden.
• Ladekurve Blei-Säure:
Das GYSFLASH 1.12 PL benutzt eine fortgeschrittene 7-stuge Ladekurve, die die optimale Leistung Ihrer Blei-Säure-Batterie
gewährleistet.
U
I
1 2 3 4 5 6 7
Analyse Wiederherstellung Test Desulfutarierung Ladung Absorption
Erhaltungsla-
dung
max 8h
no limit
CHARGE
OK
Led
max 25hmax 12h< 1smax 8h< 1s

15
GYSFLASH 1.12 PL
DE
1
Stufe: Analyse
Analyse des Batteriezustands (Ladezustand, Verpolung,
falsch angeschlossene Batterie...)
5
Stufe: Ladung (1 A)
Schnelle Ladung mit Maximalstrom bis die Batterie zu 80% aufge-
laden ist.
2
Stufe: Wiederherstellung (0.5 A)
Wiederherstellungsfunktion für eine tiefenentladene Batte-
rie.
6
Stufe: Absorption (14,4V oder 14,7V mit Option
AGM)
Ladung mit konstanter Spannung bis die Batterie zu 100% aufge-
laden ist.
3
Stufe: Test
Test auf sulfatierte Batterie.
7
Stufe: Erhaltungsladung (13.6 V)
Maximale Ladungserhaltung.
4
Stufe: Desulfutarierung (15.8 V)
Desulfutarierung der Batterie.
• Ladekurve-Lithium:
Das GYSFLASH 1.12 PL benutzt eine fortgeschrittene 8-stuge Ladekurve, die die optimale Leistung Ihrer LFP-Batterie gewährleis-
tet.
U
I
1 2 3 4 5 6 7
Analyse
Wiederherstel-
lung
Ladung Absorption Vervollständigung
Egalisierung /
Ausgleich
Erhaltungsladung
< 1s Max 5 min Max 30 h Max 20 h 3 min Max 10 h Max 2 h No limit
(Wartung alle 10 Tage)
CHARGE
OK
Led
8
Test
Equalizing Battery System
1
Stufe: Analyse
Analyse des Batteriezustands (Ladezustand, Verpolung, falsch angeschlos-
sene Batterie...)
5
Stufe: Test
Test der Ladungserhaltung.
2
Stufe: Wiederherstellung (0.2 A)
Wiederherstellungsfunktion für eine tiefenentladene Batterie.
6
Stufe: Vervollständigung
Ladung mit Minimalstrom bis die Batterie zu
100% aufgeladen ist.
3
Stufe: Ladung (1 A)
Schnelle Ladung mit Maximalstrom bis die Batterie zu 90% aufgeladen ist.
7
Stufe: Egalisierung / Ausgleich (14.4 V)
Ausgleich der Batteriezellen
4
Stufe: Absorption (13.8 V)
Ladung mit konstanter Spannung bis die Batterie zu 98% aufgeladen ist.
8
Stufe: Erhaltungsladung (13.8 V)
Maximale Ladungserhaltung (alle 10 Tage).
• Geschätzte Ladedauer
Blei-Säure Lithium
Batteriekapazität 2 Ah 10 Ah 20 Ah 32 Ah
1 Ah
(3 Ah EqPb*)
5 Ah
(15 Ah EqPb*)
10 Ah
(30 Ah EqPb*)
20 Ah
(60 Ah EqPb*)
Ladedauer
0% >> 90%
2 h 9 h 18 h 29 h 1 h 30 4 h 30 8 h 30 16 h
*Bleibatterie-Gegenstück: eine Lithiumbatterie hat eine höhere Startleistung (CCA) als eine Blei-Säure-Batterie. Aus diesem Grund
zeigen einige Lithiumbatterienhersteller das Bleibatterie-Gegenstück (EqPb) an, das der Kapazität einer Blei-Säure-Batterie mit
gleicher Startleistung entspricht. Zum Beispiel hat eine 10Ah LFP-Batterie die gleiche Startleistung wie eine ca. 30Ah Blei-Säure-
Batterie.

16
GYSFLASH 1.12 PL
DE
Wenn das Motorrad mit einem 12V-Anschluss ausgestattet ist, kann das GYSFLASH 1.12 PL durch diesen Anschluss
dank dem CAN-BUS-System die Batterie auaden, ohne die Bordelektronik einschalten zu müssen. In diesem Fall
schließen Sie den Zigarettenanzünderadapter (Art.-Nr. 029439) am Ladegerät und am 12V Stecker des Motorrads an
und starten das Gerät. Es kann vorkommen, dass der Ladevorgang erst nach 2 Minuten nachdem das Gerät anges-
chlossen worden ist, beginnt.
• Schutz:
Das GYSFLASH 1.12 PL ist gegen Kurzschlüsse und Verpolung geschützt. Das Gerät ist gegen die Entstehung elektri-
scher Funken beim Anschluss des Geräts geschützt. Es besitzt eine doppelte Isolierung und beeinusst nicht die
Fahrzeugelektronik.
Das GYSFLASH 1.12 PL besitzt einen integrierten Temperatursensor, der die Ladeleistung der Umgebungstemperatur anpasst und
somit die Überhitzung der internen Elektronik vermeidet.
FEHLER, URSACHE, LÖSUNG
Fehler Ursache Lösung
1
Die Kontrollleuchte
blinkt.
• Verpolung
• Batteriespannung zu hoch
• Klemmen im Kurzschluss
• Prüfen Sie, ob die Klemmen richtig angeschlossen
sind.
• Prüfen Sie, dass es tatsächlich um eine 12V-Bat-
terie handelt.
2
Die Kontrollleuchte
blinkt langsam.
Batterie defekt oder tiefentladen. Ersetzen Sie die Batterie.
3
Die Kontrollleuchte
leuchtet.
Ladefehler, nicht mehr auadbare
Batterie.
Batterie austauschen und
drücken, um neu zu
laden.
4
Die Kontrollleuchte
leuchtet weiter,
selbst nach einem Druck auf die Taste
.
Thermischer Fehler
Umgebungstemperatur zu hoch (>60°C), den Raum
lüften und das Ladegerät abkühlen lassen.
5
Die Kontrollleuchte
blinkt.
Ladegerät im Standby-Modus.
Auf
drücken oder eine Batterie an das
Ladegerät anschließen, um den Standby-Modus zu
verlassen.
6
Die Kontrollleuchte
leuchtet weiter.
Ladung mit Taste
unterbrochen.
Wieder auf drücken, um die Ladung neu zu
starten.
HERSTELLERGARANTIE
Die Garantieleistung des Herstellers erfolgt ausschließlich bei Fabrikations- oder Materialfehlern, die binnen 24 Monate nach Kauf
angezeigt werden (nachweis Kaufbeleg). Nach Anerkenntnis des Garantieanspruchs durch den Hersteller bzw. seines Beauftragten
erfolgen eine für den Käufer kostenlose Reparatur und ein kostenloser Ersatz von Ersatzteilen. Die Garantiezeitraum bleibt aufgrund
erfolgter Garantieleistungen unverändert.
Ausschluss:
Die Garantieleistung erfolgt nicht bei Defekten, die durch unsachgemäßen Gebruach, Sturz oder harte Stöße sowie durch nicht
autorisierte Reparaturen oder durch Transportschäden, die infolge des Einsendens zur Reparatur, hervorgerufen worden sind. Keine
Garantie wird für Verschleißteile (z. B. Kabel, Klemmen, Vorsatzscheiben usw.) sowie bei Gebruachsspuren übernommen.
Das betreende Gerät bitte immer mit Kaufbeleg und kurzer Fehlerbeschreibung ausschließlich über den Fachhandel einschicken.
Die Reparatur erfolgt erst nach Erhalt einer schriftlichen Akzeptanz (unterschrift) des zuvor Kostenvoranschlags durch den Besteller.
Im Fall einer Garantieleistung trägt der Hersteller ausschließlich die Kosten für den Rückversand an den Fachhändler.

17
GYSFLASH 1.12 PL
ES
INSTRUCCIONES DE SEGURIDAD
Este manual de uso incluye indicaciones sobre el
funcionamiento de su aparato y las precauciones a seguir
para su seguridad. Lea atentamente este documento antes
del primer uso y consérvelo para una futura lectura. Estas
instrucciones deben leerse y ser comprendidas antes de toda
operación. Toda modicación o mantenimiento no indicado
en el manual no se debe llevar a cabo. Todo daño físico o
material debido a un uso no conforme con las instrucciones
de este manual no podrá atribuírsele al fabricante. En caso
de problema o de incertidumbre, consulte con una persona
cualicada para manejar correctamente el aparato. Este
aparato se debe utilizar solamente para realizar la recarga
dentro de los límites indicados en el aparato y el manual. Se
deben respetar las instrucciones relativas a la seguridad: En
caso de uso inadecuado o peligroso, el fabricante no podrá
considerarse responsable.
Este aparato se puede utilizar por niños de al menos 8
años y por personas con capacidades físicas, sensoriales o
mentales reducidas o sin experiencia o conocimiento, siempre
y cuando estén correctamente vigilados o si han recibido
instrucciones respecto al uso del aparato con toda seguridad
y si los riesgos que conllevan se hayan comprendido. Los niños
no deben jugar con el aparato. Los niños sin vigilancia no
deben limpiar ni efectuar mantenimiento alguno del aparato.
En ningún caso se debe usar este aparato para cargar pilas
o baterías no recargables.
No utilice el aparato si el cable de suministro de corriente o
la clavija están dañados.
No utilizar el aparto si el cordón de carga está dañado o
presenta un defecto de ensamblaje, para evitar cualquier
riesgo de corto-circuito de la batería.
No cargue nunca una batería helada.
El modo de funcionamiento automático y las restricciones de
uso están explicadas en este manual.
Riesgo de explosión y de incendio.
Una batería en carga puede emitir gases explosivos.
• Durante la carga, la batería debe ponerse en un lugar
aireado.
• Evite las llamas y las chispas. No fume.

18
GYSFLASH 1.12 PL
ES
No deje la batería en carga y sin vigilancia durante mucho
tiempo
Conexión / desconexión:
• Desconecte la alimentación eléctrica antes de conectar o
desconectar las conexiones sobre la batería.
• El borne de la batería no conectado al chasis debe
conectarse primero. La otra conexión se debe efectuar en el
chasis, lejos de la batería y de la canalización de combustible.
El cargador de baterías debe conectarse después a la red
eléctrica.
• Tras la operación de carga, desconecte el cargador de la
red eléctrica, retire la conexión del chasis y la conexión de
la batería, en este orden.
Conexiones:
• Aparato de clase II
• La conexión a la red eléctrica se debe efectuar conforme
a las reglas de instalación nacionales.
Mantenimiento:
• Si se daña el cable de alimentación, deberá ser reemplazado
por el fabricante, su servicio post-venta o una persona
cualicada, para evitar todo peligro.
Normativa:
• Aparato conforme a las directivas europeas.
• La declaración de conformidad está disponible en nuestra
página Web.
• Marca de conformidad EAC (Comunidad económica
Euroasiática)
• Equipo conforme a los requisitos británicos. La Declaración
de Conformidad Británica está disponible en nuestra página
web (véase la portada).
• Equipamiento conforme a las normas marroquíes.
• La declaración de conformidad Cم (CMIM) está disponible
en nuestra página web (ver página de portada).
Desecho:
• Este material es objeto de una recogida selectiva. No lo
deposite en un contenedor doméstico.

19
GYSFLASH 1.12 PL
ES
DESCRIPCIÓN GENERAL
El GYSFLASH 1.12 PL es ideal para cargar la mayoría de las baterías de plomo (Gel, AGM, Líquido,...) y de litio LiFePO4 (LFP /
LiFePO4) que se utilizan comúnmente en motocicletas, motos acuáticas y muchos otros vehículos pequeños..
Este cargador se adapta perfectamente a la carga de:
- Baterías al plomo de 12V (6 elementos en serie) de 2 Ah a 32 Ah, o para el mantenimiento de carga hasta 100 Ah.
- Baterías LFP de 12V (4 elementos en serie) de 0.5 Ah a 20 Ah, o para el mantenimiento de carga hasta 50 Ah.
PUESTA EN MARCHA
1. Conecte el cargador a la batería con el accesorios de su preferencia (pinzas, terminales, etc).
2. Conecte el cargador sobre la toma de corriente (red monofásica 220-240Vac 50-60Hz).
3. Seleccione el modo presionando sobre el botón
. Tras aproximadamente cinco segundos, la carga se inicia automáticamente.
4. Durante la carga, el aparato indica el estado de avance de esta. Cuando el indicador
parpadea, la batería está lista para
arrancar el motor. Y cuando el indicador
sigue encendido, la batería está completamente cargada.
5. La carga se puede interrumpir en todo momento desconectando el aparato de la red eléctrica o presionando el botón
.
6. Tras la operación de carga, desconecte el cargador de la red eléctrica y luego retire la conexión de la batería.
MODOS DE CARGA
• Descripción de los modos y de las opciones:
Modo CARGA Plomo (14.4 V/1 A) :
Modo destinado a la carga de pequeñas baterías al plomo de 12V de 2Ah a 32Ah y hasta 100 Ah para el
mantenimiento de carga. Ciclo de carga automático en siete etapas.
Opción FRIO/AGM (14.7 V/1 A) :
Opción que modica la tensión de carga a 14.7V para la carga de baterías en ambientes fríos
(menos de 5°C) o para algunas baterías AGM o baterías con tapones.
Modo CARGA Litio (14.4 V/1 A) :
Modo destinado a la carga de baterías de 12V al litio de 0.5 Ah a 20 Ah y hasta 50 Ah para el manteni-
miento de carga. Ciclo de carga automático en ocho etapas.
Algunas baterías Litio integran una protección UVP (Under Voltage Protection) que desconec-
ta la batería en caso de descarga profunda. Esta protección impide que el cargador detecte
la batería. Para que el GYSFLASH 1.12 PL pueda cargar la batería, es necesario desactivar
la protección UVP. Para ello, seleccione el modo de carga (Moto o Auto), luego presione 10
segundos sobre el botón
. El cargador desactivará la protección UVP e iniciará automáti-
camente la carga.
• Curva de carga Plomo :
El GYSFLASH 1.12 PL utiliza una curva de carga para plomo evolucionada de 7 etapas que garantiza el rendimiento óptimo de su
batería al plomo.
U
I
1 2 3 4 5 6 7
Análisis Recuperación Test Desulfatado Carga Absorción
Mantenimien-
to de carga
max 8h
no limit
CHARGE
OK
Led
max 25hmax 12h< 1smax 8h< 1s

20
GYSFLASH 1.12 PL
ES
Etapa
1
: Análisis
Analyse de l’état de la batterie (niveau de charge, inversion
de polarité, mauvaise batterie connectée…)
Etapa
5
: Carga (1 A)
Carga rápida con corriente máxima que permite llegar al 80% del
nivel de carga.
Etapa
2
: Recuperación (0.5 A)
Algoritmo de recuperación de los elementos dañados tras
una descarga profunda y prolongada
Etapa
6
: Absorción (14.4 V ou 14.7 V avec option
AGM)
Carga con voltaje constante para llevar el nivel de carga a 100%.
Etapa
3
: Test
Test de batería sulfatada
Etapa
7
: Mantenimiento de carga (13.6 V)
Mantenimiento del nivel de carga de la batería a su máximo nivel.
Etapa
4
: Desulfatado (15.8 V)
Algoritmo de desulfatación de la batería.
• Curva de carga Litio :
El GYSFLASH 1.12 PL utiliza una curva de carga para litio evolucionada de 8 etapas que garantiza el rendimiento óptimo de su
batería LFP.
U
I
1 2 3 4 5 6 7
Análisis Recuperación Carga Absorción Complemento
Igualización /
equilibrado
Mantenimiento
de carga
< 1s Max 5 min Max 30 h Max 20 h 3 min Max 10 h Max 2 h No limit
(mantenimiento cada 10 días)
CHARGE
OK
Led
8
Test
Equalizing Battery System
Etapa
1
: Análisis
Análisis del estado de la batería (nivel de carga, inversión de polaridad,
batería conectada incorrecta…)
Etapa
5
: Test
Prueba de conservación de carga.
Etapa
2
: Recuperación (0.2 A)
Algoritmo de recuperación tras una descarga profunda.
Etapa
6
: Complemento
Carga con corriente reducida que permite llegar al
100% del nivel de carga.
Etapa
3
: Carga (1 A)
Carga rápida con corriente máxima que permite llegar al 90% del nivel de
carga.
Etapa
7
: Igualización / equilibrado (14.4 V)
Equilibrado de las células de la batería.
Etapa
4
: Absorción (13.8 V)
Carga con voltaje constante para llevar el nivel de carga a 98%.
Etapa
8
: Mantenimiento de carga (13.8 V)
Mantenimiento del nivel de carga de la batería a
su máximo nivel con carga de mantenimiento cada
10 días.
• Tiempo de carga estimado
Plomo Litio
Capacidad de la batería 2 Ah 10 Ah 20 Ah 32 Ah
1 Ah
(3 Ah EqPb*)
5 Ah
(15 Ah EqPb*)
10 Ah
(30 Ah EqPb*)
20 Ah
(60 Ah EqPb*)
Tiempo de carga 0% >> 90% 2 h 9 h 18 h 29 h 1 h 30 4 h 30 8 h 30 16 h
*Equivalente en batería al plomo: una batería al litio posee mejores rendimientos de arranque (CCA) que una batería al plomo. Es
por ello que los fabricante de baterías al litio indican el equivalente de la batería al plomo (EqPb) que corresponde a la capacidad
que tendría una batería al plomo con los mismos rendimientos de arranque. Por ejemplo, una batería LFP de 10 Ah tendrá los mis-
mos rendimientos de arranque que una batería al plomo de alrededor de 30 Ah.
La pagina sta caricando ...
La pagina sta caricando ...
La pagina sta caricando ...
La pagina sta caricando ...
La pagina sta caricando ...
La pagina sta caricando ...
La pagina sta caricando ...
La pagina sta caricando ...
La pagina sta caricando ...
La pagina sta caricando ...
La pagina sta caricando ...
La pagina sta caricando ...
La pagina sta caricando ...
La pagina sta caricando ...
La pagina sta caricando ...
La pagina sta caricando ...
La pagina sta caricando ...
La pagina sta caricando ...
La pagina sta caricando ...
La pagina sta caricando ...
-
 1
1
-
 2
2
-
 3
3
-
 4
4
-
 5
5
-
 6
6
-
 7
7
-
 8
8
-
 9
9
-
 10
10
-
 11
11
-
 12
12
-
 13
13
-
 14
14
-
 15
15
-
 16
16
-
 17
17
-
 18
18
-
 19
19
-
 20
20
-
 21
21
-
 22
22
-
 23
23
-
 24
24
-
 25
25
-
 26
26
-
 27
27
-
 28
28
-
 29
29
-
 30
30
-
 31
31
-
 32
32
-
 33
33
-
 34
34
-
 35
35
-
 36
36
-
 37
37
-
 38
38
-
 39
39
-
 40
40


GYS GYSFLASH 1.12 PL Manuale del proprietario
- Tipo
- Manuale del proprietario
in altre lingue
- français: GYS GYSFLASH 1.12 PL Le manuel du propriétaire
- español: GYS GYSFLASH 1.12 PL El manual del propietario
- Deutsch: GYS GYSFLASH 1.12 PL Bedienungsanleitung
- Nederlands: GYS GYSFLASH 1.12 PL de handleiding
Documenti correlati
-
GYS GYSFLASH 1.12 PL Scheda dati
-
-
-
GYS GYSFLASH 20.12/24 PL Manuale del proprietario
-
GYS GYSLASH 18.12 PL Manuale del proprietario
-
-
GYS GYSFLASH 1.12 Scheda dati
-
-
-