Becken MAQ LAVAR LOICA DWD147 ANDAMAN IX Manuale del proprietario
- Categoria
- Lavastoviglie
- Tipo
- Manuale del proprietario

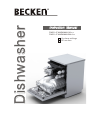
Instruction ManualInstruction Manual
DishwasherDishwasher
DWD 147 ANDAMAN IX A++
DWD 147 ANDAMAN WH A++
14 place settings
Alt function
´ËÄÚÈÝ¿ÉÑ¡´ËÄÚÈÝ¿ÉÑ¡

Witheachwashcycle.
For programmes with pre-wash only.
(Follow the user instructions!)
Electric indicator on control panel (if provided).
Check the rinse aid level
(On models with water softener system only.)
Electric indicator on control panel (if provided).
If there is no salt warning light in the control panel
(for some models), you can estimate when to fill the salt into
the softener by the number of cycles the dishwasher has run.
Check the regeneration
salt level
Load the baskets
Select a programme
Close the door, turn on the water tap and press the . The machine will start working
after about 10 seconds.
Start/Pause Button
Running the dishwasher
Switch off the appliance
Turn off the water tap,
unload the baskets
Fill the detergent dispenser
Warning: wait a few minutes (about 15 minutes) before unloading the dishwasher to avoid handling
the dishes and utensils while they are still hot and more susceptible to break.
They will alsodry better.Unload the appliance, startingfrom the lower basket.
Changing theprogramme
Add forgottendishes in the
dishwasher.
Scrape off any large amount of leftover food. Soften remnants of burnt food in pans,
then load the baskets. Refer to the dishwasher loadinginstructions.
Press the Programme Button until the selected programme lights up.
( See the section entitled Operationg instruction )“”
When the working cycle has finished, the buzzer of the
dishwasher will sound 8 times, then stop.
Turn off the appliance using the On/Off Button.
If the appliance is switched
off during a wash cycle.
Open the door carefully.
Hotsteammay escape
when thedoorisopened!
If the appliance is switched off during a wash cycle, when switched
on again, please re-select the washing cycle and operate the dishwasher
according to the original Power-on state ).
Switch on the appliance Press the On/Off button to switch on the appliance, Open the door.
For detailed operating method read the corresponding content on the instruction manual.
1. A runningcycle can only be modified ifit has been running for a short time. Otherwise the detergent
may have already been released and the water already drained. If this is the case, the detergent
dispenser must be refilled.
2.
Press the Start/Pause button, the machine will be in standby state, press the program
button more than 3 seconds then you can change the program to the desired cycle setting
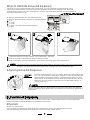
1.Press the Start/Pause Button to stop the washing.
2.Open the door a little .
3.After the spray arms stop working, you can open the door
completely.
4.Add forgotten dishes.
5.Close the door
6.Press the Start/Pause Button, the dishwasher will run
after 10 seconds.

To review the section on troubleshooting Tips
willhelp you tosolve some common problems
by yourself .
Dear Customer,
Please carefully readthismanualbefore usingthe
dishwasher,it will help you to use andmaintainthe
dishwasher properly.
Pass it on to anysubsequent owner of the appliance.
Thismanual contains sections on safety Instructions,
Operating Instructions, InstallationInstructionsand
Troubleshooting Tips, etc.
The manufacturer, following a policy of constant
development andupdating of the product, may
make modifications without giving prior notice.
Dishwasher Features.................................... ...3
A Water Softener...........................................4、
Attention before or after loading the Dishwasher
Baskets..........................................................9
FilteringSystem.............................................15
Caring forthe Dishwasher...............................16
B Loading the Salt into the Softener.................5、
C Fill theRinseAid Dispenser.........................5、
D Function ofDetergent .................................6
、
Loadingthe upper Basket...............................10
LoadingtheLowerBasket...............................10
Cutlery Basket........................................... ...11
Therecommended method loading big
dishware.................................................... ...12
Wash CycleTable...........................................13
Turning on theAppliance................................14
Change the Programme..................................14
At the End of the Wash Cycle...........................14
Positioningthe Appliance...............................17
Water Connection..........................................18
About Power Connection................................17
Start of dishwasher........................................19
Beforecallingfor service.................................20
Errorcodes...................................................21
Technical information.....................................22
Control Panel...................................................3
Keep it as arefer in the later days.
If you can not solvethe problems by yourself ,
please ask for the help of professional technicians.
This appliance is intended tobe used in household
andsimilar applications suchas:
-staff kitchen areas in shops,offices and other
working environments;
-farm houses;
-byclients inhotels,motels and otherresidential
type environments;
-bed and breakfast type environments.

This appliance must be grounded. In the event of a
malfunction or breakdown, grounding will reduce
the risk of anelectric shock by providing a path of
least resistance of electric current. This appliance
is equipped with a cord having an equipment-
grounding conductor and a grounding plug.
The plug must be plugged into an appropriate outlet
that is installed and grounded in accordance with
all local codes and ordinances.
Keep children away from detergent and rinse aid, keep
children away from the open door of the dishwasher,
there could still be some detergent left inside.
Donotabuse,siton,orstandonthedoorordish
rack of the dishwasher.
Do not touch the heating element during or
immediately after use.
(This instruction is only applicable to machines
with a visual heating element.)
Do not wash plastic items unless they are marked
dishwasher safe or the equivalent. For plastic items
not so marked, check the manufacturer's
recommendations.
Use only detergent and rinse additives
designed for an automatic dishwasher.
Never use soap, laundry detergent, or hand
washing detergent in your dishwasher. Keep
these products out of the reach of children.
During installation, the power supply must not
be excessively or dangerously bent or flattened.
Do not tamper with controls.
Do not place any heavy objects on or stand on the
door when it is open. The appliance could tip
forward.
When loading items to be washed:
1) Locate sharp items so that they are not likely
to damage the door seal;
2) Warning: Knives and other utensils with
sharp points must be loadedinthe basket
with their points down orplaced in a
horizontal position.
When usingyour dishwasher, youshould
prevent plastic items from coming into contact
with the heating element.(This instruction is only
applicable to machines with a visual heating
element.)
Ifthesupplycordis damaged, itmust bereplaced
bythemanufactureroritsserviceagentora
similarly qualified person in order to avoid a
hazard.
Please dispose of packing materials properly.
Use the dishwasher only for its intended function.
Remove the door to the washing compartment when
removing an old dishwasher from service or discarding it.
Dishwasher detergents are strongly alkaline, they
can be extremely dangerousif swallowed.Avoid
contact with skin and eyes and keep children away
from the dishwasher when the door is open.
Check that the detergent comparment isempty
after completionof the wash cycle.
The applianceis to be connected to the water
mains using new hose sets and that old hose-sets
should not be reused.
The maximum number of place settings to be
washed is14.
The maximum permissible inlet water pressure is
1Mpa.
The minimum permissible inlet water pressure is
0.04Mpa.
Children should be supervised to ensure that they do
not play with the appliance.
This appliance is not intended for use by persons
(including children )with reduced physical, sensory or
mental capabilities, or lack of experience and
knowledge ,unless they have been given supervision
or instruction concerning use of the appliance by a
person responsible for their safety.
When using your dishwasher, follow the precautions listed below:
The door should not be left open,
since this could increase the riskof tripping.
Improper connection of the equipment-grounding
conductor can result in the risk of an electric shock.
Check with a qualified electrician or service
representative if you are in doubt whether the
appliance is properly grounded. Do not modify the
plug provided with the appliance; If it does not fit
the outlet. Have a proper outlet installed by a
qualified electrician.
Do not operate your dishwasher unless all
enclosure panels are properly in place. Open
the door very carefully if the dishwasher is
operating, there is a risk of water squirting out.

Dispose of the dishwasher packaging material correctly.
All packaging materials can be recycled.
Plastic parts aremarked with the standard international abbreviations:
PE for polyethylene, e.g. sheet wrapping material
PS for polystyrene, e.g.padding material
POM polyoxymethylene, e.g. plastic clips
PP polypropylene, e.g. Salt filler
ABS Acrylonitrile Butadiene Styrene, e.g. Control Panel .
Packaging materialcouldbedangerous for children!
Fordisposing ofpackage and theappliance please goto arecycling centre. Therefore cut
off the powersupplycable and make the door closingdevice unusable.
Cardboard packaging is manufactured from recycledpaper and shouldbe disposedin the
waste papercollection for recycling.
By ensuring thisproduct is disposed of correctly, you will help prevent potential negative
consequences for the environment and human health,which could otherwise be caused
by inappropriatewaste handling of this product.
For more detailed information about recycling of this product, please contact your local
city office and your household waste disposal service.
DISPOSAL: Do not dispose this product as unsorted municipal waste. Collection of such
waste separately for special treatment is necessary.

beforeusingit for the firsttime.
To getthe best performance from yourdishwasher,read all operating instructions
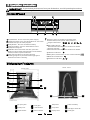
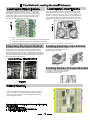
On/Off Button: To turn on/off the power supply.
Child lockbutton: press the two buttons for 3seconds
simultaneously to lock the program.
Displayscreen: to showthereminding time
and the state(running state, delay time etc )
Program indicators:
RinseAid indicator:
Indicates when the dispenser needs to be refilled.
Child lock indicator:
Add salt indicator:
Indicates when the dispenser needs to be refilled.
Delay time ,Remain time ,or error codes indicator:
Start /Pause button:To start the selected
washing program orpause the washing program
when the machine is working.
Delay Button : ToPress the button todelay.
Program Button: To Press the button to select
appropriateProgram.
Water faucet indicator:
Alt function indicator:
11 12
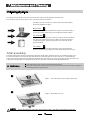
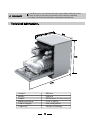
Back View
1
2
3
4
5
7
8
910
Front view
Lower basket
Salt container
Dispenser
Cupshelf
Spray arms
Filter assembly
Inlet pipe connector
Drain pipe
Upperbasket
Cutlery rack
Top spray arm
1
Innerpipe
5
6
7
8
9
10
12
11
3
24
6
Alt Button: Dual zone wash function, press the
button to select either upperbasket or lower basket
loaded, and the responseindicator .

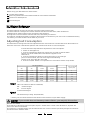
The water softener must be set manually, using the water hardness dial.
The water softener is designed to remove minerals and salts from thewater, which wouldhave
a detrimentalor adverse effect on the operation ofthe appliance.
The higherthe content of these minerals and salts,theharder your water is.
The softener should be adjusted according to the hardness of the water in your area. Your local WaterAuthority
can adviseyou onthehardnessofthewater inyourarea.
Adjusting Salt Consumption
The dishwasher is designed toallow for adjustment in the amount of salt consumed based on the hardness of
the water used.This is intended tooptimiseand customise thelevel o f salt consumption.
1. Switch on theappliance;
2. Press the Start/Pause button for morethan 5 seconds to start the water
softener set model within 60seconds after the appliance was
switched on;
3. Press the Start/Pause button to select the proper set according to
your local environment, the sets will change in the following
sequence: H1->H2->H3->H4->H5->H6;
4. Press the On/Off button or no operation for 5 seconds to end theset up model.
WATER SOFTENER
Thehardness of the water variesfrom place to place.If hard water is used inthe dishwasher, deposits will
form on the dishesand utensils.
Theapplianceis equipped with aspecial softener that uses a salt container specifically designed to eliminate
lime and minerals from the water.
Contact your local water board for information on the hardness of your water supply.
Please follow the steps below for adjustment in salt consumption.
If your model does not have any water softener, you mayskip this section.
Clark:British degree
fH: French degree
DH: German degree
dH=1.25Clarke=1.78fH=0.178mmol/l
1
The manufactory setting: H4 (EN 50242)
Before using your dishwasher for the first time:
A. Set the water softener
B. Add 1.5Kg dishwasher salt and then full fill the salt container with water
C. Filltherinseaiddispenser
D. Fill in detergent
dH mmol/l
0~90~5 0~0.94 H1 0
10-20
6-11
1.0-2.0 H2 9
21-30
12-17 2.1-3.0
H3
12
H4 20
fH
0~6
7-14
15-21
Clarke
WATER HARDNESS
SelectorPosition Salt consumption
(gram/cycle)
18-22 31-40 22-28 3.1-4.0
41-60
23-34 4.1-6.0 H5 30
H6 60
29-42
35-55 61-98 43-69 6.1-9.8

1. The salt container must only be refilled when the salt warning light in the control panel comes on.
Depending on how well the salt dissolves,thesalt warning light may still be on even though the
salt container is filled.
If there is no salt warning light in the control panel (for some Models),you can estimate whento fill
the salt into the softener by the cycles that the dishwasher has run.
2. If thereare spills ofthe salt,a soak or a rapid program should be runto remove the excessivesalt.
Always use the salt intended foruse with dishwasher.
The salt container islocated beneath the lower basket and shouldbe filled as explained
inthe following:
Attention!
Only use salt specifically designed for the use in dishwashers! Every other type of
salt not specificallydesigned for theuse in adishwasher, especiallytable salt, will
damage the water softener. In case of damages caused by the use of unsuitable
salt the manufacturer does not give any warranty nor is liable forany damagescaused.
Only fillwithsalt justbefore starting one of thecomplete washingprograms.
This will prevent any grains of salt or salty water, which may have been spilled,
remaining on the bottom of the machine for any period of time, which may cause
corrosion.
Therinse aid is releasedduring the final rinseto prevent water from forming droplets onyour dishes, which can
leave spots andstreaks. It also improvesdryingby allowing water toroll offthe dishes. Your dishwasheris
designed to use liquidrinseaids. The rinseaiddispenser islocated inside the door next to the detergentdispenser.
To fill the dispenser, open the cap and pour the rinse aid into the dispenser until the level indicator turns completely
black. The volume ofthe rinseaidcontaineris about 110ml.
RinseAid Dispenser
Function of RinseAid
Rinse aid is automatically added during thelast rinse, ensuring thorough rinsing, and spot and streak free drying.
Attention!
Only usebranded rinse aid for dishwasher. Never fill therinse aid dispenserwithanyothersubstances
(e.g. Dishwasher cleaning agent, liquid detergent).This would damage the appliance.
3.If the machine needs to be dumped for the reasons of transit, repair and so on, please use the bibulous cloth or
analogtoblotupthewaterin the salt container,andscrew thecaptightly,afterward, transitor repairthemachine.
Aftertransiting orrepairing themachineandconfirming it in order, load the salt into thesofteneraccordingto the
process of B. Loading the salt into theSoftener .Otherwise, itcould bemake the big damage to the machine,for
example, rustiness, conk and so on. Such problemsareoutof theguarantee range.
“”
Fullfill the salt container with water,Itisnormal for asmall amountofwater tocomeout of the
salt container.
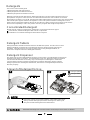
AAfter the lowerbasket has been removed, unscrew and remove the cap from the salt container.
C
DAfter filling the container , screw the cap tightly back clockwise.
EThe salt warning lightwill stopbeing after thesalt container has beenfilled withsalt.
FImmediately afterfilling the salt into the salt container, a washing program should be started
program Otherwise the filter system, pumpor other important parts of the machine may be damaged
bysalty water.This isoutof warranty.
(Wesuggest to use a short
).
BPlace theend of the funnel (supplied) into the hole and introduce about 1.5kg of dishwasher salt.

To open the dispenser, turn the cap to the "open" (left) arrow and lift it out.
Pour the rinse aid into the dispenser, being careful not to overfill.
Replace the cap by inserting italigned with "open" arrow and turning it tothe closed (right) arrow.
Adjusting RinseAid Dispenser
The rinse aid dispenser has six or four settings. Always start with the dispenser
set on "4". If spots and poor drying are a problem, increase the amount of rinse
aid dispensed by removing the dispenser lid and rotating the dial to "5". If the
dishes still are not drying properlyor are show spots, adjustthe dial to the next
higher lever until your dishes are spot-free. The recommended setting is "4".
(Factory value is "4".)
Increase the dose if thereare drops of waterorlimespotson the dishes after washing.
Reduce itif there are sticky whitishstains on your dishes or abluish film on glassware or
knife blades.
1
2
3
As the rinse aid diminishes, the sizeof the black dot
ontherinse aid level indicator changes, as illustrated below.
Full
3/4full
1/2full
1/4 full -Should refillto eliminate spotting
Empty
When to Refill the RinseAid Dispenser
Ifthereis no rinse-aid warning light in thecontrolpanel, youcan estimate the amount from the colour
of the optical level indicator C located next to the cap. When the rinse-aid container is full, the whole
indicator will be dark .As the rinse-aid diminishes, the size of the dark dot decreases. You should never let
the rinse aid level fall 1 / 4 full.
during the next wash.
Don'tforget to replacethe cap before you close dishwasher door.
Clean up any rinse aid spilled while during filling with an absorbent cloth to avoid excessive foaming
Detergents with its chemical ingredients arenecessary to remove dirt,crushdirt andtransport it outof the dishwasher.
Mostof the commercialquality detergents are suitable forthispurpose.
""
Proper Use of Detergent
Useonly detergent specifically made for the useindishwashers. Keep your detergent fresh and dry.
Don't putpowdereddetergentinto the dispenser until you're ready to wash dishes.
Attention!

AmountofDetergenttoUse
Dishwasher detergent is corrosive! Takecare to keepit out of reach of children.
Based ontheir chemicalcomposition, detergentscan besplit in two basictypes:
Detergent tablets of different brandsdissolve at different speeds. For thisreasonsome
detergent tablets cannot dissolve and develop theirfullcleaning power during short
programs. Therefore please use long programs whenusingdetergent tablets, to
ensure the complete removal of detergent residuals.
The dispensermust be refilled before the start of each wash cycle following the instructions
provided in the wash cycle table . Your dishwasher uses less detergent and rinse aid than
Conventionaldishwasher. Generally, onlyone tablespoon of detergent is neededfor
anormal washload. Moreheavily soileditems needmore detergent.Alwaysaddthe
detergent justbefore starting the dishwasher, otherwise it couldget damp and will not
dissolve properly.
Concentrated Detergent
DetergentTablets
DetergentDispenser
conventional, alkaline detergents with caustic components
low alkaline concentrated detergents with natural enzymes
Normally new pulverised detergent is without phosphate.Thus the watersoftener function of
phosphate is not given. In this case we recommend to fill salt in the salt container even when
the hardness of water is only 6 dH. If detergents without phosphate are used in the case of hard water
often white spots appear on dishes and glasses. In this case please add more detergent to reach
better results. Detergents without chlorine do only bleach a little. Strong and coloured spots will not
be removed completely. Inthiscase please choosea program with a higher temperature.
°
Detergents
There are 3 sorts of detergents
1.Withphosphate and withchlorine
2.With phosphate and without chlorine
3.Withoutphosphate and without chlorine
Always add the detergent just before starting each wash cycle.
Only use branded detergent aidfor dishwasher.
If the lid is closed: press release button. The lid will spring open.
Detergent tablet
Detergent powder

Fill the detergent dispenser with detergent.
The marking indicates the dosing levels , as
illustrated on the right:
Theplace of main wash cycle detergent placed.
Theplace of pre-wash cycle detergent placed.
Please observe themanufacturers dosing and storage
Recommendations asstatedonthedetergent packaging.
Close the lid and press untilit locks in place.
If the dishes are heavily soiled, place anadditional
detergent dosein the pre-wash detergent chamber.This detergent will take effect during the pre-wash phase.
A
B
Fill in Detergent
You find information about the amount ofdetergent for thesingle programme onthe last page.
Pleaseaware, that according tothe levelsoiling and the specific hardness of waterdifferencesarepossible.
Pleaseobserve themanufacturer's recommendations onthe detergent packaging.

Cutlery withwooden,horn china or
mother-of-pearl handles
Plastic items that arenot heat resistant
Older cutlery with glued parts that are not
temperatureresistant
Bonded cutlery items or dishes
Pewter or cooper items
Crystal glass
Steel items subject to rusting
Wooden platters
Items madefromsynthetic fibres
Some types of glasses can become
dull aftera large number of washes
Silver and aluminum parts have a
tendencyto discolourduring washing
Glazed patternsmay fade ifmachine
washed frequently
Are not suitable Are oflimited suitability
Dishesand itemsof cutlery mustnot lie insideoneanother, or cover each other.
To avoiddamage to glasses, theymust not touch.
Load large itemswhich are most difficult to cleaninto the lower basket.
The upper basket is designed to hold more delicate and lighter dishware such as glasses, coffee
andteacups
Long bladed knives stored in an upright positionare a potential hazard!
Long and/or sharp items of cutlery such as carving knivesmust be positioned
horizontallyin the upper basket.
Please do not overload your dishwasher. This is important forgoodresults and for
reasonable consumption of energy.
Load hollow items such as cups, glasses, pans etc. With the opening facing downwardsso that
water cannot collect in the container or a deepbase.
Consider buyingutensils which are identifiedas dishwasher-proof.
Usea mild detergentthatisdescribed as'kind todishes'.If necessary, seek further
information fromthedetergent manufacturers.
Forparticular items, select a programwithas low a temperature aspossible.
To prevent damage, do not take glassandcutlery out of the dishwasher immediately
after the programme has ended.
(For best performance of the dishwasher, follow theseloading guidelines.
Features and appearance of baskets and cutlery baskets may vary from your model.)
Scrape off any largeamounts of leftover food.Soften remnants of burnt food in pans.
It is not necessary to rinse thedishes under running water.
Place objects in the dishwasher in following way:
1.Items such as cups, glasses, pots/pans, etc. are faced downwards.
2.Curved items, or ones with recesses, should be loaded aslant so that water can run off.
3.All utensils are stacked securely and can not tipover.
4.All utensils are placed in the way that the spray arms can rotate freely duringwashing.
Very small items should not be washed in the dishwasher as they could easily fall out of the basket.
To prevent water dripping from the upper basket into the lower basket, we recommend that you
empty the lower basket first and thenthe upper basket.

The upper basket is designed to hold more delicate
and lighter dishware such as glasses, coffee and
teacups and saucers, aswell asplates, small bowls
andshallowpans (as long asthey arenot toodirty).
Position the dishes andcookwaresothatthey will
notgetmoved bythespray ofwater.
We suggest that you place large items and the most
difficult to cleanitemsaretobe placedintothelower
basket: suchas pots, pans, lids, serving dishes and
bowls, as shown in the figure below. It is preferable to
place serving dishes and lids on the side of the racks
in order to avoid blocking the rotation of the top spray
arm.
Pots,servingbowls,etc,mustalwaysbeplacedtopdown.
Deep pots should be slanted to allow water to flow out.
Please bereminded that:
The Bottom Basket features folding spikes so that larger or more pots and pans can be loaded.
Folding Spikes of Lower Basket
For better stacking of pots and pans,
the spikescan be folded down as
show in the picture right.
Adjusting the Upper Basket
The height ofthe upperbasket can be adjusted in order to
create more space for largeutensilsbothfor the upper
/lowerbasket. The height of the upper basket can be
adjusted byplacing thewheels on differentheight of the
rails. Long items, serving cutlery, salad servers and knives
shouldbeplacedontheshelfsothatthey donotobstruct
therotationofthesprayarms..
Folding back the cup shelives
For better stacking of pots and pans,
the spikes can be folded down as
show in the picture right.
Cutlery shouldbe placed inthecutlery rackseparately
from each other in the appropriate positions, and do
make sure the utensils do not nest together, this may
causebadperformance.

Starting a cycle wash
Draw out the lower and upper basket, load the dishes and push them back.
Itiscommended to load the lower basketfirst, then the upper one (see the section entitled
Loadingthe Dishwasher ).
Pour in the detergent (see the sectionentitled Salt, Detergent and RinseAid ).
Insert the plug into the socket. The power supplyis 220-240 VAC /50 HZ, the specification
of the socket is 10A 250VAC. Make sure that the water supply is turned on to full pressure.
Close the door, press the ON/OFF Button, and thedisplay will turn on.
Press the program Button , the wash program will be changed asfollows direction:
If a program is selected, the response lightwill light.Then press the Start/Pause button, the
dishwasher beginsto start.
“”
“”
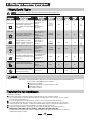
Intensive->Normal->Eco->Glass->60 min ;->Rapid->Soak
1
2
3
4
5
*EN 50242 : This programme is the test cycle. The information for comparability test
in accordance with EN 50242, as follows:
Capacity: 14 setting
Position Upper basket: upper wheels on rails
Rinse aid setting: 6
Pl:0.49w; Po:0.45w.
Means:need to fill rinse into the Rinse-Aid Dispenser.
()
Eco.
Intensive
Normal
(*EN 50242)
(or3in1)
5/30g
(or3in1)
5/30g
(or3in1)
5/30g
Rapid
Pre-wash (50 )
Wash (65 )
Rinse
Rinse
Rinse(55 )
Drying
℃
℃
℃
Pre-wash(45 )
Wash (55 )
Rinse
Rinse(65 )
Drying
℃
℃
℃
Wash (50 )
Drying
Pre-wash
Rinse(60 )
℃
℃
Wash (40 )
Rinse
Rinse(45 )
℃
℃
180
175
165
40
1.3
0.93
1.5
0.6
17
14
10
10
1Hour
(50 )
Wash(60 )
Rinse(60 )
Drying
Pre-wash
℃
℃
℃
60 10
1.15
5/30g
20g
Torinsedishesthatyouplan
to wash later that day
Soak
Pre-wash
80.01
3.5
Glass
(or3in1)
5/25g
Pre-wash
wash(40 )
Rinse
Rinse(60 )
Drying
℃
℃
115
0.87 14
For normally soiled loads,
such as , plates,glasses
andlightly soiled pans.
pots
Standarddaily cyclefor
normally soiled loads, such
aspots plates glasses.、、
For heaviest soiled crockery,
andnormally soiled pots
pans dishes etc with dried
onsoiling.
、
、
For lightly soiled loads that
do not need excellent drying
efficiency.
For lightlysoiled crockery
and glass.
Ashorterwash for lightly
soiled loads and quick wash.

When the working cycle has finished, the buzzer of the dishwasher will sound for 8 seconds, then stop. Turn off
the appliance using the ON/OFF button, shut offthe water supply and open the door of the dishwasher.
Wait for a few minutes before unloading thedishwasherto avoidhandlingthe dishes and utensilswhile they
are still hot and more susceptible to breakage. Theywill also dry better.
Switch Off the Dishwasher
The program light is on but is not blinking, only in this case the programme has ended.
1.Switch off the dishwasher by pressing the ON/OFF button.
2.Turnoff thewatertap!
Open the door carefully.
Hot dishes are sensitive to knocks. The dishes should thereforebe allowed to cool down around 15 minutes
before removing from the appliance.
Open the dishwasher's door, leave it ajar and wait a few minutes before removing the dishes. In this way they
will be cooler andthe drying will beimproved.
Unloading thedishwasher
It is normal that the dishwasher is wet inside.
Empty thelower basket first and then the upper one. This will avoid water dripping from the upper Basket onto
the dishes in thelower one.
If you open the door during awashcycle , the machine will pause. The program lightwill
stop blinking and the buzzerwill mooing every minute unless you close the door . After
you close the door ,the machine will keepon working after 10 seconds.
Premise:
Acycle that is underway canonly be modified if it has only been running for a short time. Otherwise, the
detergent may havealreadybeen released,and the appliance may have already drained the wash water.
If this is the case, the detergent dispenser must be refilled (see the section entitled " Loading the
Detergent " ).
Press the Start/Pausebutton , the machine will be in standby state, press the program button more than
3s then you can change the program to the desired cycle setting (see the section entitled " Starting awash
cycle. . ." ).
1
2
Aforgotten dish can be added any time before the detergent cup opens.
Add forgotten dishes.
Close the door
After the spray arms stop working, you can open the door
completely.
2
3
Open the door a little .
14
5
6
Press the Start/Pause Button to stop the washing.
Press the Start/Pause Button, the dishwasher will run
after 10 seconds.
When you press the Start/Pause button to pause during washing, the will
stop blinkingand the dishwasher will mooingevery minute unless youpressthe
Start/Pause button to start.
runningindicator
Wash thearms in soapy and warm water and use a soft brush to
cleanthejets. Replace them afterrinsing themthoroughly.
When following this procedure from step1 to step 3, the filter system will be removed;
when following it from Step 3 to Step 1, the filter system will be installed.
It is dangerous to open the door when washing, because the hot water may scald you.
If your model has broken remember function, the machine will go on to finish the selected
program .
after the powercut

The filter preventslarger remnants of food or other objects from getting inside thepum.
Theresidues may blockthefilter, inthis casethey must be removed.
The filter systemconsists of a coarse filter,a flat (Main filter)
Anda microfilter(Fine filter).
Food and soil particles trapped inthisfilter arepulverizedby a
special jet on the lower spray arm andwashed down to drain.
Larger items, such as pieces of bones or glass, that couldblock
thedrainaretrappedin the coarse filter.To removetheitems
caught by the filter, gently squeeze the tap on thetop of this
filterandliftout.
Thisfilter holds soil and food residuesin the sumpareaand
preventsitfrom being redeposit on the dishes during wash cycle.
Main filter
1
Coarse filter
2
Fine filter
3
2
3
1
Filterassembly
The filter efficiently removes food particles from the wash water, allowing it to be recycled during the cycle.
For best performance and results, the filter must be cleaned regularly. For this reason, it is a goodidea to
remove thelarger food particlestrapped in the filter aftereach wash cycle by rinsing the semicircular filterand
cup under runningwater. To remove the filter device, pull the cup handle in the upward direction.
The dishwasher must never be used without the filters.
Improper replacement of the filter may reduce the performance level ofthe appliance
and damage dishesand utensils.
1
2
Step 1 Turn the filter in anti-clockwisedirection,:
Step 2 lift the filter assy up:
When following this procedure from step1 to step 2, the filter system will be removed;
when following it from Step 2 to Step 1, the filter system will be installed.

The control panel can be cleaned by using a lightly dampened cloth.
After cleaning, make sure to dry it thoroughly.
For the exterior, use a good appliance polish wax.
Neveruse sharp objects, scouring pads orharsh cleaners onany part of the dishwasher.
ProtectAgainst Freezing
1.Cut off the electrical power to the dishwasher.
2.Turn off the water supply and disconnect the water inlet pipe from the water valve.
3.Drain the water from the inlet pipe and water valve. (Use a pan to gather the water)
4.Reconnect the water inlet pipe to the water valve.
5.Remove the filter at the bottomof the tub and use a spongeto soak up water in the sump.
please take frost protection measures onthe dishwasher in winter.Every fter washing cycles,
please operate as follows time a
:
Cleaning the Filter
Cleaning The Door
To clean the coarsefilter and the fine filter, use acleaning brush. Reassemble the filter parts as shown in the figures
on thelast page and reinsert the entire assembly in the dishwasher, positioning it in itsseat and pressing downwards.
Whencleaning the filters, don't knock on them. Otherwise, the filters could be
contorted andtheperformance ofthe dishwasher couldbe decreased.
To clean theedge around the door,you should use only a soft warm, damp cloth.
To avoid penetrationof water into the door lock and electrical components,do not
use a spray cleaner of any kind.
Never usea spray cleaner to clean the door panel as it may damage the door lock
and electrical components.
Abrasive agents or some paper towels should not be used because of the riskof
scratching or leaving spots on the stainless steel surface.
Cleaning the SprayArms
If your dishwasher cannot work because of the ice,
please contact professional service persons.
It is necessary to clean the spray arms regularly for hard
waterchemicalswillclogthesprayarmjetsandbearings.
- Inspect the filters for blockingafter every time the dishwasher has been used.
- By unscrewing the coarsefilter, you can remove the filter system. Removeany foodremnants and
cleanthefilters underrunningwater.
Remarks:
The entirefilter assembly should be cleanedonce a week.
Toremovethelowerspray arm, pull outthe spray arm upward.
To remove the upper spray arm, hold the nut, rotate the arm
clockwise toremoveit.
Wash the arms in soapy and warm water and use a soft brush to
clean the jets. Replace them after rinsing them thoroughly.

Itisrecommendthatyou run awashcycle withthe
dishwasher emptyand then remove the plug from the
socket, turn off the water supply and leave the door of
the appliance slightly open. This will help the door
sealstolastlonger andprevent odoursfromforming
withintheappliance.
If the appliance must be moved, tryto keep it in the
verticalposition.Ifabsolutelynecessary,itcanbe
positioned on its back.
Oneofthefactorsthatcauseodourstoforminthe
dishwasher is food that remains trapped in the seals.
Periodic cleaning with adamp sponge will prevent this
from occurring.
Ensure the voltage and frequencyof the power being corresponds to
those on the ratingplate. Only insert the plug into an electricalsocket which isearthed
properly. If the electrical socket to which the appliance must be connected is not
appropriate fortheplug , replacethe socket, ratherthan usinga adaptors or thelike as
they couldcause overheating andburns.
Pleaselook at therating label to know the rating voltage and connect the dishwasher to the appropriate power supply.
Use the required fuse 10 amp,timedelay fuse or circuitbreakerrecommended and provide separate circuit serving
only this appliance.
Position the appliance in the desired location.The back should restagainst thewall behind it, and the sides,
along the adjacent cabinetsor walls.The dishwasher is equippedwith water supply and drain hoses that can
be positioned either to the rightor the left sides to facilitateproper installation.
Once the appliance is positioned for levelling, the height of the dishwasher
may be altered via adjustment of the screwing level ofthe feet. In any case,
theappliance should notbe inclined more than 2 .
For personal safety:
DO NOT USEAN EXTENSION CORD OR AN ADAPTER PLUG WITH THIS APPLIANCE.
DO NOT, UNDERANY CIRCUMSTANCES, CUT OR REMOVE THE EARTHING
CONNECTION FROM THE POWER CORD.
Before cleaning or performing maintenance, always
remove the plug from the socket.
Tocleantheexteriorandrubberparts ofthedishwasher,
donot use solventsor abrasivecleaningproducts.
Only use acloth with warm soapy water.
To remove spots or stains from the surface of the
interior, use a cloth dampened withwater ana little
vinegar, ora cleaning product madespecifically for
dishwashers.
Remove the Plug
No Solvents orAbrasive Cleaning Moving theAppliance
Seals
After every wash, turn off the water supply to the
appliance and leave the doorslightlyopen sothat
moisture and odours arenot trapped inside.
After EveryWash
When not in Use for aLongTime
This appliance must be earthed. In the event of a malfunction or breakdown, earthing will reduce the risk of
electric shock by providing a path of least resistance for the electric current. This appliance is equipped with a
cord having an equipment-earthing conductor and an earthing plug. The plug must be plugged into an
appropriate outlet that is installed and earthed in accordance with all local standards and requirements.

Connect the cold water supply hoseto athreaded 3/4(inch) connector andmake sure
that it is fastened tightly in place.
If thewater pipes are new or have not been usedfor an extended period of time, let the
water run to make sure that the water is clear. This precautionis needed to avoid the
riskofthewaterinlettobeblockedanddamagetheappliance.
Please close the hydrant afterusing.
for personal safety:
DO NOT USE AN EXTENSION CORD OR AN ADAPTER PLUG WITH THIS APPLIANCE.
DO NOT, UNDER ANY CIRCUMSTANCES, CUT OR REMOVE THE
FROM THE POWER CORD. EARTHING
CONNECTION
Improper connection of the equipment earthing conductor can result in the risk of an
electric shock.
Check with a qualified electrician or service representative if you are in doubt whether the
appliance is properly earthed.
Do not modify the plug provided with the appliance. If the plug does not fit properly to the
outlet, please have a qualified electrician to install a proper outlet.
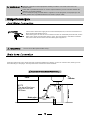
Insert the drainhose into adrainpipe with aminimum diameter of 40mm,or letit run into thesink, making sure to
avoid bendingor crimpingit. The topof the hosemust belessthan 1000mm.
A
Counter
Front
Drain pipe
NOTE
The top of the hose
must be less than
1000mm.
φ40mm
B

The following things should be checked beforestarting the dishwasher.
The content of this manual is very helpfulto the users.
After installation, please make sure to keep this manual.
1
The dishwasher islevel and fixed properly
2
The inlet valve is open
3
There is a leakage at the connections of theconducts
4
The wires are tightly connected
5
The power isswitched on
6
The inlet and drain hoses are knotted
7
Allpackingmaterials and printings shouldbe taken out from the dishwasher
Extension Hose
Ifyouneeda drainhose extension, makesure tousea similar drain hose.
It mustbe no longer than 4 metres; otherwise thecleaning effect of the dishwasher could be reduced.
Water Outlet
Connect the water drain hose. The drain hose mustbe correctly fittedto avoid water leaks.
Ensure that the water drain hose is not kinked or squashed.
If the sink is 1000 higher from the floor, the excess waterin hoses cannot be drained directly
into the sink.Itwillbe necessary todrainexcesswaterfrom hoses into abowlorsuitable
container that is held outside and lower thanthe sink.
How to Drain Excess Water From Hoses
Syphon Connection
The waste connection must be at a height less than 1000 mm (maximum) from thebottom of the dish.
The water drain hose should befixed .
La pagina si sta caricando...
La pagina si sta caricando...
La pagina si sta caricando...
La pagina si sta caricando...
La pagina si sta caricando...
-
 1
1
-
 2
2
-
 3
3
-
 4
4
-
 5
5
-
 6
6
-
 7
7
-
 8
8
-
 9
9
-
 10
10
-
 11
11
-
 12
12
-
 13
13
-
 14
14
-
 15
15
-
 16
16
-
 17
17
-
 18
18
-
 19
19
-
 20
20
-
 21
21
-
 22
22
-
 23
23
-
 24
24
-
 25
25


Becken MAQ LAVAR LOICA DWD147 ANDAMAN IX Manuale del proprietario
- Categoria
- Lavastoviglie
- Tipo
- Manuale del proprietario
in altre lingue
Altri documenti
-
Campomatic DW911ES DW911EB Manuale del proprietario
-
Hoover DDY 065TA-80 Manuale utente
-
-
Candy CDP 6753-OS Manuale utente
-
-
Bauknecht GCX 4862 Guida utente
-
-
-
-
Candy CDPE 6320X Manuale utente