SEVERIN HV 7152 Manuale utente
- Categoria
- Aspirapolvere portatili
- Tipo
- Manuale utente

ART.-NO. HV 7152
DE Gebrauchsanweisung
GB Instructions for use
FR Mode d’emploi
NL Gebruiksaanwijzing
ES Instrucciones de uso
IT Manuale d’uso
DK Brugsanvisning
SE Bruksanvisning
FI Käyttöohje
PT Manual de instruções
PL Instrukcja obsługi
GR Oδηγίες χρήσεως
2in1-Handsauger 4
2in1 Hand-held/Upright Vacuum Cleaner 11
Aspirateur 2 en 1 : balai et main 18
2in1-handzuiger 26
Aspiradora de mango 2 en 1 33
Aspirapolvere a mano 2 in 1 41
2-i-1-håndstøvsuger 49
2 i 1-handdammsugare 56
2in1-varsi-imuri 63
Aspirador manual 2 em 1 70
Odkurzacz ręczny 2w1 78
Σκουπάκι χειρός 2 σε 1 86
142 x 208 mm

2
142 x 208 mm
2
1
3
4
5
10
9
8
7
6

3
142 x 208 mm
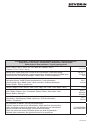
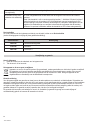
Technische Daten / Technical Data / Caractéristiques techniques / Technische gegevens /
Datos técnicos / Dati tecnici / Tekniske data / Tekniska data / Tekniset tiedot /
Dados técnicos / Dane techniczne / Τεχνικά χαρακτηριστικά
Art.Nr. / Item no. / Art. nº / Art.nr. / Nr. º Art. / Num. art. / Artikelnr. / Art.nr. /
Tuotenro / N.º Art.º / Nr art. / Αρ. πρ. HV 7152
Netzteil Input / Power supply Input / Entrée du bloc d’alimentation / Netvoeding ingang /
Entrada de fuente de alimentación / Ingresso alimentatore / Strømforsyning input / Nätdel Input /
Verkko-osan tulo / Entrada de alimentação / Zasilacz Input / Είσοδος τροφοδοτικού
100-240 V~
50-60 Hz
0.5 A
Netzteil Output / Power supply Output / Sortie du bloc d’alimentation /
Netvoeding uitgang / Salida de fuente de alimentación / Uscita alimentatore /
Strømforsyning output / Nätdel Output / Verkko-osan lähtö / Saída de alimentação /
Zasilacz Output / Έξοδος τροφοδοτικού
26 V⎓
400 mA
Gewicht / Weight / Poids / Gewicht / Peso / Peso / Vægt / Vikt / Paino / Peso / Waga / Βάρος 1,5 kg
Akku / Battery / Batterie / Accu / Acumulador / Batteria / Batteri / Ackumulator / Akku /
Bateria / Bateria / Μπαταρία
22,2 V⎓
2200 mAh
48,84 Wh
Netzteil / Power supply / Bloc d’alimentation / Netvoeding / Fuente de alimentación /
Alimentatore / Strømforsyning / Nätdel / Verkko-osa / Fonte de alimentação /
Zasilacz / Τροφοδοτικό
26 V⎓
400 mA
Nur verwenden mit Netzteil / Use only with power supply /
N’utilisez l’appareil qu’avec le bloc d’alimentation / Alleen gebruiken met netvoeding /
Úselo únicamente con fuente de alimentación / Da utilizzare solo con l‘alimentatore /
Må kun anvendes med strømforsyning / Används bara med nätdel /
Käytä vain verkko-osan kanssa / Utilização apenas com fonte de alimentação /
Stosować tylko z zasilaczem / Να χρησιμοποιείται μόνο με τροφοδοτικό
YLJXA-E260040
ZD012A260040EU

4
142 x 208 mm
2in1-Handsauger
Liebe Kundin, lieber Kunde,
die Gebrauchsanweisung sorgfältig vor der Benutzung des Gerätes durchlesen und
für den weiteren Gebrauch aufbewahren. Das Gerät darf nur von Personen benutzt
werden, die mit den Sicherheitsanweisungen vertraut sind.
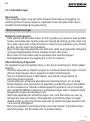
Sicherheitshinweise
Bestimmte Personengruppen
∙Dieses Gerät kann von Kindern ab 8 Jahren und von Personen mit verminderten
körperlichen, sensorischen oder geistigen Fähigkeiten oder Mangel an Erfahrung
und/oder Wissen bedient werden, wenn sie beaufsichtigt werden oder auf den
sicheren Gebrauch des Geräts hingewiesen wurden und die damit verbundenen
Gefahren kennen.
∙Kinder dürfen nicht mit dem Gerät spielen oder sich auf das Gerät stellen
oder setzen. Reinigung und Benutzer-Wartung dürfen nicht durch Kinder ohne
Beaufsichtigung durchgeführt werden.
∙Kinder unter 8 Jahren müssen vom Gerät sowie vom Netzteil ferngehalten werden.
∙Verpackungsmaterial darf nicht zum Spielen verwendet werden. Es besteht
Erstickungsgefahr.
Gerät sicher anschließen
Das Gerät wird mit elektrischem Strom aufgeladen, dabei besteht grundsätzlich die
Gefahr eines elektrischen Schlags.
Deshalb:
∙Gerät und Netzteil vor dem Benutzen auf eventuelle Beschädigungen kontrollieren.
Niemals ein defektes Gerät oder ein Gerät mit defektem Netzteil betreiben.
∙Netzteil nur an Steckdosen anschließen, die den Angaben auf dem Typenschild
des Netzteils entsprechen.
∙Niemals versuchen, Gerät oder Netzteil eigenständig zu reparieren. Um
Gefährdungen zu vermeiden, dürfen Reparaturen an Gerät und Netzteil nur durch
unseren Kundendienst durchgeführt werden. Ein defektes Gerät zur Reparatur
an einen Fachhändler geben oder Kontakt mit dem SEVERIN-Kundendienst
aufnehmen (Kontaktdaten im Anhang dieser Gebrauchsanleitung oder auf www.
severin.de).
∙Gerät oder Netzteil nicht in Wasser oder andere Flüssigkeiten tauchen oder mit
Flüssigkeiten behandeln. Gerät und Netzteil von Regen und Nässe fernhalten.
DE

5
142 x 208 mm
Gerät und Netzteil nicht im Freien oder in Räumen mit hoher Luftfeuchtigkeit
betreiben.
∙Gerät und Netzteil nicht mit nassen Händen anfassen. Beim Herausziehen des
Netzteils aus der Steckdose immer direkt am Netzteil ziehen.
∙Darauf achten, dass das Kabel des Netzteils nicht geknickt, eingeklemmt oder
überfahren wird oder mit Hitzequellen, Feuchtigkeit oder scharfen Kanten
in Berührung kommt. Darauf achten, dass das Kabel des Netzteils nicht zur
Stolperfalle wird.
∙Vor dem Reinigen oder Warten des Geräts sowie vor dem Zubehörwechsel Gerät
ausschalten und sicherstellen, dass das Netzteil nicht angeschlossen ist.
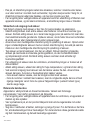
Sicherheit beim Umgang mit Akkus
Bei falschem Umgang mit Akkus besteht Verletzungs- und Explosionsgefahr.
∙Akku niemals durch andere Akkus oder Batterien ersetzen. Ausschließlich
baugleiche Akkus verwenden. Akkus niemals kurzschließen, d.h. nicht beide
Pole zur gleichen Zeit berühren, insbesondere nicht mit elektrisch leitenden
Gegenständen. Akkus so lagern, dass sie auch bei der Lagerung nicht durch
andere Akkus oder Metallgegenstände kurzgeschlossen werden.
∙Zum Auaden des Akkus ausschließlich das mitgelieferte Netzteil verwenden.
Den Akku keinesfalls mit einem anderen Netzteil laden. Das mitgelieferte Netzteil
wiederum ausschließlich zum Auaden des Akkus verwenden.
∙Akku nach Gebrauchsende wie beschrieben ausbauen. Akku danach umgehend
an eine entsprechende Sammelstelle in Ihrer Nähe übergeben und so einer
sicheren und umweltgerechten Entsorgung zuführen. Akku niemals über den
Hausmüll entsorgen.
∙Vor dem Ausbauen des Akkus sicherstellen, dass das Netzteil aus der Steckdose
gezogen ist.
∙Akku niemals auseinandernehmen, hohen Temperaturen aussetzen oder ins Feuer
werfen.
∙Bei unsachgemäßem Umgang kann Flüssigkeit aus dem Akku austreten. Akku
nicht länger verwenden, wenn er beschädigt ist oder gar Flüssigkeit austritt.
- Falls Flüssigkeit ausgetreten ist, Kontakt mit der Flüssigkeit vermeiden.
- Falls es zu Kontakt mit der Flüssigkeit gekommen ist, diese umgehend mit
reichlich Wasser abspülen. Bei Folgeerscheinungen (egal welcher Art) einen Arzt
aufsuchen.
Rotierende Bürstwalze
Das Gerät besitzt eine angetriebene Bürstwalze. Diese kann Verletzungen
hervorrufen. Daher Folgendes beachten:

6
142 x 208 mm
∙Vor der Reinigung oder der Wartung des Geräts sicherstellen, dass das Gerät
ausgeschaltet ist und nicht lädt.
∙Darauf achten, dass zu keiner Zeit Körperteile unter die Bürstwalze gelangen
können.
∙Nicht in der Nähe von Kabeln, Leitungen und langen Fransen saugen. Zum einen
besteht die Gefahr, dass die Kabelisolierung beschädigt wird. Zum anderen
können sich diese Gegenstände in der Bürstwalze verfangen und so das Gerät
beschädigen.
LED-Beleuchtung
An der Bodendüse sind LEDs verbaut, die den Arbeitsbereich vor der Bodendüse
ausleuchten.
∙Während des Betriebs nicht in die LEDs blicken.
∙Ein Austausch der LEDs ist nicht möglich.
Bestimmungsgemäße Verwendung
Das Gerät darf nur im Haushalt eingesetzt werden.
Das Gerät darf ausschließlich für das Reinigen auf ebenen, normal verschmutz-
ten Oberächen, kurzorigen Teppichen oder Polstern eingesetzt werden, die den
Belastungen der rotierenden Bürste unbeschadet standhalten.
Jede weitere Verwendung gilt als nicht bestimmungsgemäß und ist untersagt.
Um Verletzungen, Bränden und Schäden vorzubeugen, darf das Gerät nicht
eingesetzt werden für das Saugen von:
∙Menschen, Tieren oder Panzen. Gerät stets von sämtlichen Körperteilen, Haaren
und Kleidungsstücken (z.B. Schnürsenkeln) fernhalten. Nicht in Kopfnähe saugen.
∙glühenden, brennenden oder glimmenden Partikeln (wie z. B. Asche, Kohle,
Holzkohle, Zigaretten, Streichhölzer).
∙explosiven oder leicht entzündlichen Stoffen oder Toner.
∙Wasser und anderen Flüssigkeiten, z. B. feuchten Teppichreinigern.
∙spitzen Gegenständen wie Glassplittern, Nägeln oder Bauschutt.
Verboten ist außerdem:
∙Selbstständiges Umbauen oder Reparieren des Geräts oder des Netzteils.
∙Hineinstecken von Gegenständen in Öffnungen des Geräts. Hiervon ausge-
nommen ist das dafür vorgesehene Zubehör.
∙Gebrauch, Aufbewahrung oder Auaden im Freien.
Falls das Gerät defekt ist
∙Geben Sie ein defektes Gerät zur Reparatur an einen Fachhändler oder den

7
142 x 208 mm
Kundendienst (Kontaktdaten im Anhang dieser Gebrauchsanleitung oder auf
www.severin.de).
CE-Kennzeichnung
Das Gerät entspricht den EU-Richtlinien, die für die CE-Kennzeichnung verbindlich
sind.
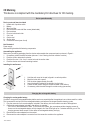
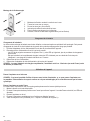
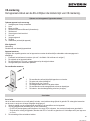
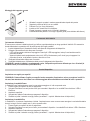
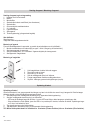
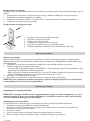
Geräteaufbau / Gerät montieren
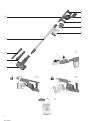
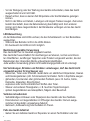
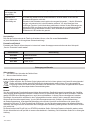
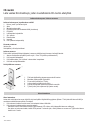
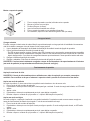
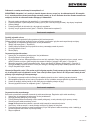
Geräteaufbau und Lieferumfang
1. Handgriff mit 3-Stufen Schalter
2. Akku
3. Motorvorlter
4. Staubbehälter-Einsatz mit Filtersieb (demontierbar)
5. Staubbehälter
6. Bodendüse mit Bürstwalze
7. 2in1-Tool
8. Fugendüse
9. Saugrohr
10. Anschlussbuchse (Geräterückseite)
Ohne Abbildung:
Netzteil
Wandhalterung mit Befestigungsmaterial
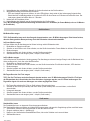
Gerät montieren
Alle Verpackungsreste vom Gerät entfernen und die Einzelteile wie in Abbildung I gezeigt montieren:
1. Gegebenenfalls Staubbehälter montieren (siehe auch Kapitel „Staubbehälter reinigen“)
2. Saugrohr auf Gerät aufstecken.
3. Bodendüse / 2in1-Tool / Fugendüse auf Saugrohr aufstecken.
4. Gerät auf Wandhalterung aufstecken.
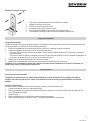
Wandhalterung montieren
1. Wandhalterung senkrecht ausgerichtet an die Wand halten.
2. Löcher mit einem Bleistift anzeichnen.
3. Löcher bohren (ca. 8 mm Ø).
4. Mitgelieferte Dübel in Löcher stecken.
5. Wandhalterung mit mitgelieferten Schrauben befestigen.
6. Kabel ggf. durch die Kabelführung schieben (siehe Pfeile).
Akku laden
Akku laden
Akku am besten vor jedem Gebrauch laden, insbesondere nach längerem Nichtgebrauch. Dies erhöht die Lebensdauer des
Akkus und sorgt für möglichst lange Reinigungszyklen.

8
142 x 208 mm
1. Netzteiladapter des mitgelieferten Netzteils in die Anschlussbuchse des Geräts stecken.
2. Mitgeliefertes Netzteil an Steckdose anschließen.
- LEDs am Handgriff beginnen zu blinken. Je mehr LEDs blinken, desto weiter ist der Ladevorgang fortgeschritten.
- Sobald der Akku vollständig geladen ist, leuchten alle LEDs für eine Dauer von 5 Minuten und erlöschen dann. Der
Ladevorgang dauert bei leerem Akku ca. 5 Stunden.
3. Netzteil aus der Steckdose ziehen.
4. Netzteiladapter des Netzteils aus der Anschlussbuchse des Geräts ziehen.
TIPP: Mit vollständig geladenem Akku beträgt die Betriebszeit ca. 18 Minuten (im Power-Modus) oder ca. 40 Minuten
(im Eco-Modus).
Gerät bedienen
Mit Bodendüse saugen
TIPP: Die Bodendüse kann auch ohne Saugrohr benutzt werden, um z. B. Möbel abzusaugen. Dabei darauf achten,
dass der Untergrund der Beanspruchung durch die Bürstwalze unbeschadet standhält.
Im Power-Modus saugen
Im Power-Modus hat der Handsauger eine höhere Leistung und die Bürstwalze rotiert.
1. Bodendüse am Saugrohr anbringen.
2. Schalter um zwei Stufen nach vorne schieben, um das Gerät einzuschalten. Power-Modus ist aktiviert, LEDs leuchten.
3. Boden absaugen.
4. Schalter komplett nach hinten schieben, um das Gerät auszuschalten.
5. Staubbehälter leeren und reinigen (siehe Kapitel „Gerät warten“).
Im Eco-Modus saugen
Im Eco-Modus wird mit reduzierter Leistung gesaugt. Der Handsauger verbraucht weniger Energie und die Betriebszeit des
Akkus verlängert sich. Auch hier rotiert die Bürstwalze.
1. Bodendüse am Saugrohr anbringen.
2. Schalter um eine Stufe nach vorne schieben, um das Gerät einzuschalten. Eco-Modus ist aktiviert, LEDs leuchten.
3. Boden absaugen.
4. Schalter komplett nach hinten schieben, um das Gerät auszuschalten.
5. Staubbehälter leeren und reinigen (siehe Kapitel „Gerät warten“).
Mit Fugendüse oder 2in1-Tool saugen
TIPP: Das 2in1-Tool kann auch ohne Saugrohr benutzt werden, um z. B. Möbel abzusaugen. Beim 2in1-Tool kann
der Bürstaufsatz durch Verschieben des roten Schiebers eingezogen werden, um z.B. Krümel aufzusaugen. Die
Fugendüse eignet sich auch zum Absaugen von schwer zugänglichen Ecken.
1. Die Fugendüse oder das 2in1-Tool am Gerät oder am Saugrohr anbringen.
2. Schalter um eine Stufe (Eco-Modus) oder zwei Stufen (Power-Modus) nach vorne schieben, um das Gerät
einzuschalten.
3. Untergrund absaugen.
4. Schalter komplett nach hinten schieben, um das Gerät auszuschalten.
5. Staubbehälter leeren und reinigen (siehe Kapitel „Gerät warten“).
Gerät warten
Staubbehälter leeren
Der Staubbehälter kann nur begrenzte Schmutzmengen aufnehmen.
Den Staubbehälter daher am besten nach jedem Reinigungsvorgang und wenn die Saugleistung spürbar nachlässt leeren.
1. Sicherstellen, dass das Gerät ausgeschaltet ist und das Gerät nicht lädt.
2. Saugrohr abziehen (siehe Abbildung II).
3. Klappe an der Unterseite des Staubbehälters öffnen, hierzu den Schieber nach vorne schieben.
4. Staubbehälter leeren.

9
142 x 208 mm
5. Klappe schließen.
Staubbehälter reinigen
1. Sicherstellen, dass das Gerät ausgeschaltet ist und nicht lädt.
2. Staubbehälter leeren (siehe oben).
3. Staubbehälter entnehmen. Die Klappe des Staubbehälters muss geschlossen sein. Den Staubbehälter am vorderen
Ende greifen, an der Stelle des roten Aufklebers fest mit dem Daumen drücken und nach unten ziehen (siehe
Abbildung III).
4. Alle 4 Teile des Staubbehälters demontieren. Dazu den Motorvorlter entnehmen (siehe Abbildung V).
Staubbehälter-Einsatz herausheben. Filtersieb durch Drehen am unteren Teil des Staubbehälter-Einsatzes lösen.
5. Alle Teile von Schmutz befreien.
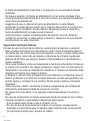
Hinweis: Es dürfen alle Teile und der Filter feucht gereinigt werden. Hierbei unbedingt beachten, dass alle Teile vor
der nächsten Nutzung des Gerätes vollständig getrocknet sind. Die Trocknungszeit des Filters beträgt rund 3 Tage.
Während dieser Zeit ggf. den beiliegenden Ersatzlter verwenden.
6. Nach vollständiger Trocknung Filtersieb in Staubbehälter-Einsatz einsetzen und durch Drehung verriegeln.
7. Einsatz in Staubbehälter einsetzen (die Öffnungen an Staubbehälter und Einsatz müssen übereinander liegen).
8. Motorvorlter auegen (Schaumstoff nach unten, weiße Seite mit Grifasche nach oben).
9. Staubbehälter am Gerät montieren (siehe Abbildung IV).
Gerät warten
Bürstwalze reinigen
Durch Verschmutzung kann sich die Bürstwalze möglicherweise nicht mehr frei drehen. Die Bürstwalze regelmäßig reinigen.
1. Sicherstellen, dass das Gerät ausgeschaltet ist und das Gerät nicht lädt.
2. Bodendüse vom Saugrohr abziehen.
3. Arretierung der Bürstwalze an der Seite der Bodendüse lösen, ggf. eine Münze zur Hilfe nehmen.
4. Bürstwalze vorsichtig zur Seite herausschieben.
Achtung! Verletzungsgefahr durch innenliegende scharfe Kante.
5. Bürste von Haaren und Schmutz befreien, ggf. vorsichtig eine Pinzette oder Schere benutzen.
6. Bürste wieder an der Bodendüse montieren. Hierzu die Bürstwalze seitlich einschieben und mit etwas Druck unter
Zuhilfenahme einer Münze wieder arretieren.
7. Gerät einschalten.
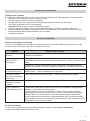
Probleme beheben
Probleme selbst beheben
Damit möglichst gar keine Probleme auftreten, ist es wichtig, den Staubbehälter rechtzeitig zu leeren sowie bei dieser
Gelegenheit den Motorschutzlter zu kontrollieren und zu reinigen.
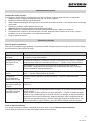
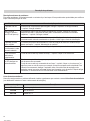
Problem mögliche Ursache / Lösung
Gerät lässt sich nicht
einschalten. Akku ist völlig leer. Gerät ausschalten und Akku laden, Kapitel „Akku laden“.
Gerät lässt sich nicht
laden (LEDs blinken
nicht).
Netzteil ist nicht korrekt eingesteckt. Prüfen, ob Netzteilstecker und Netzteiladapter korrekt in
ihren Buchsen sitzen, Kapitel „Akku laden“.
Akku ist nicht korrekt in das Gerät eingesetzt. Netzteil trennen. Überprüfen, ob der Akku
korrekt im Gerät sitzt. Netzteil erneut anschließen.
Gerät nimmt kaum
Schmutz auf. Staubbehälter muss geleert oder Motorschutzlter und Staubbehälter müssen gereinigt
werden, Kapitel „Gerät warten“.
Betriebsdauer ver- kürzt
sich zuneh- mend. Bürstwalze ist verschmutzt und muss gereinigt werden, Kapitel „Bürstwalze reinigen“.

10
142 x 208 mm
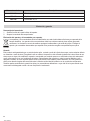
Bürstwalze dreht
sich langsam oder
unregelmäßig.
Bürstwalze ist verschmutzt und muss gereinigt werden, Kapitel „Bürstwalze reinigen“.
Bürstwalze und
LEDs schalten sich
selbstständig aus.
Es handelt sich hierbei um eine Sicherheitsfunktion, die einen Defekt an der Düse bei
verklemmter Bürstwalze verhindert.
Entweder ist die Bürstwalze verschmutzt und muss gereinigt werden, Kapitel „Bürstwalze
reinigen“ oder etwas hat sich in der Bürstwalze verklemmt, z.B. beim Absaugen eines
hochorigen Teppichs. Um die Abschaltung aufzuheben, schalten Sie den Staubsauger aus,
nehmen die Düse vom Saugrohr bzw. dem Handstaubsauger ab und entfernen eventuelle
Gegenstände, die die Bürstwalze blockieren. Nach erneutem Einschalten funktionieren
Bürstwalze und LEDs wieder wie gewohnt.
Servicehotline
Falls Sie das Problem anhand der Tabelle nicht beheben können, rufen Sie unsere Servicehotline
an (siehe Kontaktdaten im Anhang dieser Gebrauchsanleitung).
Ersatzteile und Zubehör
Ersatzteile oder Zubehör können bequem im Internet auf unserer Homepage www.severin.de unter dem Unterpunkt
„Service / Ersatzteile“ bestellt werden.
Artikelnummer Beschreibung
3604-048 Motorschutzlter
3790-048 Bürstwalze
3607-048 Akku 22,2 V
Entsorgung und Garantie
Akku ausbauen
1. Schraube auf der Unterseite des Gerätes lösen.
2. Akku aus dem Akkufach ziehen.
Gerät und Akku separat entsorgen
Geräte und Akkus, die mit diesem Symbol gekennzeichnet sind, müssen getrennt vom Hausmüll entsorgt werden!
Geräte und Akkus enthalten wertvolle Rohstoffe, die wiederverwertet werden können. Eine ordnungsgemäße
Entsorgung schützt die Umwelt und die Gesundheit Ihrer Mitmenschen. Gerät und den ausgebauten Akku separat
zur Entsorgung an die entsprechenden Sammelstellen geben.
Garantie
Von den nachfolgenden Garantiebedingungen bleiben die gesetzlichen Gewährleistungsrechte gegenüber dem Verkäufer
und eventuelle Verkäufergarantien unberührt. Wenden Sie sich im Garantiefall daher direkt an den Fachhändler. Zusätzlich
gewährt SEVERIN eine Herstellergarantie von zwei Jahren ab Kaufdatum. In diesem Zeitraum beseitigen wir kostenlos
alle Mängel, die nachweislich auf Material- oder Fertigungsfehlern beruhen und die Funktion wesentlich beeinträchtigen.
Weitere Ansprüche sind ausgeschlossen. Von der Garantie ausgenommen sind: Schäden, die auf Nichtbeachtung
der Gebrauchsanweisung, unsachgemäße Behandlung oder normalen Verschleiß zurückzuführen sind, ebenso leicht
zerbrechliche Teile wie z. B. Glas, Kunststoff oder Glühlampen. Von der Garantie ausgenommen sind außerdem Batterien
und Akkus, die infolge normalen Verschleißes oder unsachgemäßer Handhabung defekt geworden sind bzw. deren Laufzeit
sich verkürzt hat.
Die Garantie erlischt bei Eingriff nicht von SEVERIN autorisierter Stellen. Sollte eine Reparatur erforderlich werden, setzen
Sie sich bitte telefonisch oder per Mail mit unserem Kundendienst in Verbindung. Die Kontaktdaten nden Sie im Anhang der
Anleitung.

11
142 x 208 mm
2in1 Hand-held/Upright Vacuum Cleaner
Dear Customer,
Before using the appliance, read the following instructions carefully and keep this
manual for future reference. The appliance must only be used by those familiar with
the instructions below.
Safety instructions
Certain groups of persons
∙This appliance may only be operated by children over the age of 8 and by persons
with reduced physical, sensory or mental capacities or a lack of experience and/or
knowledge if they are supervised or have been instructed about the safe use of the
appliance and are aware of the dangers associated with its use.
∙Children are not allowed to play with the appliance or stand or sit on it. Cleaning
and user maintenance may not be performed by children without supervision.
∙Children under the age of 8 must be kept away from the appliance and the mains
adapter.
∙The packaging material must not be used for play purposes. There is a risk of
suffocation.
Connecting the appliance safely
The appliance is charged with electrical current. Thus, there is a risk of electric
shock.
Therefore:
∙Check the appliance and mains adapter for possible damage before use. Never
operate a defective appliance or an appliance with a defective mains adapter.
∙Only connect the mains adapter to sockets which match the specications on the
mains adapter type plate.
∙Never attempt to repair the appliance or its mains adapter yourself. To prevent
hazards, repairs to the appliance and the mains adapter may only be made by our
customer service. Arrange repair of a defective appliance with a specialist dealer
or contact SEVERIN customer service (see contact information in appendix to this
instruction manual or at www.severin.de).
∙Do not immerse the appliance or mains adapter in water or other liquids, or treat
with liquids. Keep the appliance and the mains adapter away from rain and wet
conditions. Do not operate the appliance and mains adapter outdoors or in rooms
with high humidity.
GB

12
142 x 208 mm
∙Do not handle the appliance or mains adapter with wet hands. When unplugging
the mains adapter from the socket, always pull directly on the plug.
∙Make sure that the cable of the mains adapter is not kinked, pinched or run over
and that it does not come in contact with sources of heat, humidity and sharp
edges. Make sure that the cable of the mains adapter does not become a trip
hazard.
∙Before cleaning or servicing the appliance and before changing accessories, switch
off the appliance and make sure that the mains adapter is not connected.
Safety when handling rechargeable batteries
If rechargeable batteries are handled improperly, there is a risk of injury and
explosion.
∙Never replace the rechargeable battery with other rechargeable batteries or other
non-rechargeable batteries. Only use identical rechargeable batteries. Never
short-circuit rechargeable batteries, i.e. never touch both poles at the same time,
especially not with objects that conduct electricity. Store rechargeable batteries so
that they cannot be short-circuited by other rechargeable batteries or metal objects
during storage.
∙To charge the rechargeable battery, only use the mains adapter included in the
delivery. Never charge the rechargeable battery with another mains adapter. Only
use the mains adapter included in the delivery to charge the rechargeable battery
of this appliance.
∙At the end of its life span, remove the rechargeable battery as described. Then take
the rechargeable battery to an appropriate collection point nearby without delay,
thus ensuring safe and environmentally-appropriate disposal. Never dispose of the
rechargeable battery in household waste.
∙Before removing the rechargeable battery, make sure that the mains adapter is
unplugged from the socket.
∙Never take the rechargeable battery apart, expose it to high temperatures or throw
it onto res.
∙In case of improper handling, liquid can escape from the rechargeable battery. Do
not use the rechargeable battery if it is damaged or if it is leaking liquid.
- If liquid has escaped, avoid contact with the liquid.
- In case of contact with the liquid, rinse it off immediately with copious amounts of
water. In case of after effects (irrespective of type), consult a doctor.
Rotating brush roller
The appliance contains a powered brush roller. This can cause injuries. Therefore,
note the following:

13
142 x 208 mm
∙Before cleaning or maintaining the appliance, make sure that the appliance is
switched off and is not on charge.
∙Ensure that parts of your body can never get under the brush roller.
∙Do not vacuum near cables, wires and long fringes. On the one hand, there is
a danger that the cable’s insulation will be damaged. On the other hand, these
objects can get caught in the brush roller and thereby damage the appliance.
LED lighting
LEDs are installed in the oor nozzle. These illuminate the work area in front of the
oor nozzle.
∙Do not look into the LEDs during operation.
∙It is not possible to exchange the LEDs.
Intended use
The appliance must only be used domestically.
The appliance may only be used for cleaning on level, normally-soiled surfaces,
short-pile carpets or upholstery that can withstand exposure to the rotating brush
without sustaining damage.
Any other use is deemed improper and is forbidden.
In order to prevent injuries, res and damage, the appliance must not be used
to vacuum:
∙People, animals or plants. Always keep the device well away from all parts of the
body, and from hair and clothing (e.g. shoelaces). Do not use near to your head.
∙Glowing, burning or smouldering particles (such as ash, coal, charcoal, cigarettes,
matches).
∙Explosive or highly ammable substances or toners.
∙Water and other liquids, e.g. wet carpet cleaning agents.
∙Sharp objects, such as glass splinters, nails or construction waste.
The following is also forbidden:
∙Independent alteration or repair of the appliance or its mains adapter.
∙Inserting objects into the appliance’s openings. The specially provided accessories
are the exception to this rule.
∙Use, storage or charging outdoors.
If the appliance is defective
∙Have a defective appliance repaired by a specialist dealer or customer service (see
contact information in the appendix to this instruction manual or at www.severin.
de).

14
142 x 208 mm
CE Marking
This device is compliant with the mandatory EU directives for CE marking.
Device parts/Assembly
Device parts and items included
1. Handle with 3-position switch
2. Battery
3. Motor pre-lter
4. Dust container insert with lter screen (detachable)
5. Dust container
6. Floor tool with brush roller
7. 2-in-1 tool
8. Crevice tool
9. Suction tube
10. Connection socket (rear of unit)
Not illustrated:
Power supply
Wall mounting bracket with fastening components
Assembling the appliance
Remove any remaining packaging from the device and assemble the component parts as shown in Figure I:
1. If necessary, attach the dust container (also see the “Cleaning the dust container” section)
2. Push the suction tube onto the device.
3. Push the oor tool / 2-in-1 tool / crevice tool onto the suction tube.
4. Push the device onto the wall mounting bracket.
Installing the wall mount
1. Hold the wall mount to the wall, aligned in a vertical position.
2. Mark the holes with a pencil.
3. Drill the holes (approximately 8 mm Ø).
4. Insert the dowels included in the delivery into the holes.
5. Fasten the wall mount using the screws included in the delivery.
6. If necessary, slide the cable through the cable routing (see arrows).
Charging the rechargeable battery
Charging the rechargeable battery
It is best to charge the rechargeable battery before each use, especially after the appliance has not been used for a while.
This increases the service life of the rechargeable battery and ensures the longest possible cleaning cycles.
1. Plug the connector for the mains adapter included in the delivery into the connection socket of the appliance.
2. Connect the mains adapter included in the delivery to a socket.
- The LEDs on the handle start to ash. The more the LEDs ash, the more advanced the charging process is.
- As soon as the rechargeable battery is fully charged, all of the LEDs light up for 5 minutes and then go out. The
charging process takes around 5 hours when the rechargeable battery is empty.
3. Disconnect the mains adapter from the socket.
4. Disconnect the mains adapter’s connector from the connection socket on the appliance.

15
142 x 208 mm
TIP: The operating time with a fully charged rechargeable battery is approximately 18 minutes (in Power mode) or
40 minutes (in Eco mode).
Operating the appliance
Vacuuming with the oor nozzle
TIP: The oor nozzle can also be used without the suction tube in order to vacuum furniture, for instance. When
doing so, make sure that the surface can withstand the contact with the brush roller without sustaining damage.
Vacuuming in Power mode
In Power mode the hand-held vacuum cleaner operates with higher power and the brush roller rotates.
1. Attach the oor nozzle to the suction tube.
2. Push the switch forward two steps to switch on the appliance. Power mode is activated; the LEDs light up.
3. Vacuum the oor.
4. Push the switch back as far as it will go to switch off the appliance.
5. Empty and clean the dust container (see chapter “Maintaining the appliance”).
Vacuuming in Eco mode
Vacuuming is carried out with reduced power in Eco mode. The hand-held vacuum cleaner consumes less energy and the
operating time of the rechargeable battery is extended. The brush roller also rotates in this context.
1. Attach the oor nozzle to the suction tube.
2. Push the switch forward by one position to switch the device on.
Eco mode is activated; the LEDs light up.
3. Vacuum the oor.
4. Push the switch back as far as it will go to switch off the appliance.
5. Empty and clean the dust container (see chapter “Maintaining the appliance”).
Use the crevice tool or the 2-in-1 tool
TIP: The 2-in-1 tool can also be used without the suction tube, e.g. for use on furniture. With the 2-in-1 tool, the
brush attachment can be retracted by moving the red slider, for example to pick up crumbs. The crevice tool is also
suitable for use in corners where access is difcult.
1. Attach the crevice tool or the 2-in-1 tool to the device directly, or to the suction tube.
2. Push the switch forward one step (Eco mode) or two steps (Power mode) to switch on the appliance.
3. Vacuum the oor.
4. Push the switch back as far as it will go to switch off the appliance.
5. Empty and clean the dust container (see chapter “Maintaining the appliance”).
Maintaining the appliance
Emptying the dust container
The dust container can only hold a limited quantity of dirt.
It is therefore best to empty the dust container after every cleaning procedure and if the suction power noticeably drops.
1. Make sure that the appliance is switched off and is not on charge.
2. Take the suction tube off (see Figure II).
3. Open the ap on the underside of the dust container. To do so, push the slider forward.
4. Empty the dust container.
5. Close the ap.

16
142 x 208 mm
Cleaning the dust container
1. Make sure that the appliance is switched off and is not on charge.
2. Empty the dust container (see above).
3. Remove the dust container. The dust container ap must be closed. Hold the front end of the dust container, press rmly
with your thumb where the red sticker is and pull downwards (see Figure III).
4. Dismantle all 4 parts of the dust container. In order to do this, remove the motor pre-lter (see Figure V). Take out the
dust container insert. Loosen the lter screen by rotating the bottom section of the dust container insert.
5. Remove any dirt from all of the parts.
Note: All parts and the lter may be wet cleaned. In this regard, it is imperative to ensure that all parts are fully
dry before the appliance is used again. It takes approximately 3 days for the lter to dry. If necessary, use the
replacement lter provided during this time.
6. After drying completely, insert the lter screen into the dust container insert and rotate it to lock it into place.
7. Place the insert into the dust container (the openings on the dust container and the insert must be lined up).
8. Position the motor pre-lter (foam side downwards, white side with grip upwards).
9. Install the dust container on the device (see Figure IV).
Maintaining the appliance
Cleaning the brush roller
Soiling may prevent the brush roller from rotating freely. Clean the brush roller regularly.
1. Make sure that the appliance is switched off and is not on charge.
2. Disconnect the oor nozzle from the suction tube.
3. Loosen the brush roller locking device from the side of the oor tool, using a coin if necessary.
4. Gently push the brush roller out to the side.
Attention! Risk of injury due to sharp inner edge.
5. Remove any hair and dirt from the brush, using a pair of tweezers or scissors carefully, if necessary.
6. Fit the brush back onto the oor tool. In order to do this, push the brush roller in from the side and lock it again, using a
coin to apply a little pressure.
7. Switch the device on.
Troubleshooting
Troubleshooting by yourself
So that as few problems as possible arise, it is important to empty the dust container regularly and to take this opportunity to
check/clean the motor protection lter.
Problem Possible cause / solution
Appliance cannot b e
switched on. The rechargeable battery is completely discharged. Switch off the appliance and charge the
rechargeable battery, chapter “Charging the rechargeable battery”.
The appliance cannot
be charged (LEDs do not
ash).
The mains adapter is not plugged in correctly. Check whether the mains
adapter’s connector and the mains adapter are connected rmly to their sockets, chapter
“Charging the rechargeable battery”.
The rechargeable battery has not been inserted correctly. Disconnect the
mains adapter. Check that the rechargeable battery is seated correctly in the appliance.
Connect the mains adapter again.
The appliance hardly
picks up any dust. The dust container needs to be emptied or the motor protection lter and the
dust container need to be cleaned, chapter “Maintaining the appliance”.
Operating duration is
becoming progressively
shorter.
The brush roller is soiled and needs to be cleaned, chapter “Cleaning the brush roller”.

17
142 x 208 mm
The brush roller rotates
slowly or irregularly. The brush roller is soiled and needs to be cleaned, chapter “Cleaning the brush roller”.
The brush roller
and LEDs switch off
automatically.
This is a safety function that prevents the nozzle becoming defective if the brush roller gets
jammed.
The brush roller is either dirty and needs to be cleaned, chapter “Cleaning the brush roller”
or something has got jammed in the brush roller, e.g. when vacuuming a high pile carpet. To
override the power-off, switch off the vacuum cleaner, take the nozzle off of the suction tube or
the hand-held vacuum cleaner and remove any objects that may be blocking the brush roller.
The brush roller and LEDs will function again as normal when the
vacuum cleaner is next switched on.
Service hotline
If you cannot solve the problem using the table, call our Service hotline (see contact information in the appendix to this
instruction manual).
Item number Description
3604-048 Motor protection lter
3790-048 Brush roller
3607-048 Rechargeable battery 22.2 V
Disposal and warranty
Removing the rechargeable battery
1. Loosen the screw on the underside of the device.
2. Remove the rechargeable battery from the rechargeable battery compartment.
Disposing of the appliance and rechargeable battery separately
Devices and batteries marked with this symbol must be disposed of separately from household waste! Devices and
batteries contain valuable raw materials that can be recycled. Proper disposal of these items protects the
environment and public health. Return the device and the battery separately to the appropriate collection points for
disposal.
Guarantee
This product is guaranteed against defects in materials and workmanship for a period of two years from the date of
purchase. Under this guarantee the manufacturer undertakes to repair or replace any parts found to be defective, providing
the product is returned to one of our authorised service centres. This guarantee is only valid if the appliance has been
used in accordance with the instructions, and provided that it has not been modied, repaired or interfered with by any
unauthorised person, or damaged through misuse.
This guarantee naturally does not cover wear and tear, nor breakables such as glass and ceramic items, bulbs etc. This
guarantee does not affect your statutory rights, nor any legal rights you may have as a consumer under applicable national
legislation governing the purchase of goods. If the product fails to operate and needs to be returned, pack it carefully,
enclosing your name and address and the reason for return. If within the guarantee period, please also provide the
guarantee card and proof of purchase.
The warranty also excludes batteries and accumulators that have become faulty due to normal wear and tear or incorrect
handling, or those where the battery life has been reduced.

18
142 x 208 mm
Aspirateur 2 en 1 : balai et main
Chère cliente, Cher client,
Avant d’utiliser cet appareil, veuillez lire soigneusement les instructions suivantes et
conserver ce manuel pour future référence. L’appareil doit être utilisé uniquement par
les personnes ayant pris connaissance des conditions d’utilisation ci-dessous.
Consignes de sécurité
Groupes de personnes cibles
∙Les enfants âgés de 8 ans et plus ainsi que les personnes ayant des déciences
physiques, sensorielles ou mentales ou un manque d’expérience ou de
connaissances peuvent utiliser ce produit à condition d’être sous surveillance ou
d’avoir reçu des instructions concernant l’utilisation de l’appareil en toute sécurité
et de comprendre les dangers qui en résultent.
∙Il est interdit aux enfants de jouer avec l’appareil, ainsi que de monter ou de
s’asseoir dessus. Le nettoyage et l’entretien de l’appareil ne doivent pas être
exécutés par des enfants sauf s’ils ont plus de 8 ans et sont sous surveillance.
∙Les enfants de moins de 8 ans ne doivent pas s’approcher de l’appareil, ni du bloc
d’alimentation.
∙Ne pas jouer avec le matériel d’emballage. Il existe un risque d’asphyxie.
Branchement de l’appareil en toute sécurité
L’appareil est chargé par du courant électrique, il existe donc un risque
d’électrocution.
Par conséquent :
∙Vériez avant usage que l’appareil et le cordon électrique sont exempts de défauts.
Ne mettez jamais en marche un appareil défectueux ou dont le bloc d’alimentation
est défectueux.
∙Branchez le bloc d’alimentation uniquement sur des prises de courant dont les
caractéristiques correspondent aux indications de la plaque signalétique du bloc
d’alimentation.
∙N’essayez jamais de pratiquer vous-même des réparations sur l’appareil ou sur le
bloc d’alimentation. Pour éviter tout risque, les réparations doivent être effectuées
exclusivement par notre SAV. Amenez l’appareil défectueux dans un magasin
spécialisé ou contactez le SAV de SEVERIN (coordonnées dans l’annexe de cette
notice ou à l’adresse www.severin.de).
FR

19
142 x 208 mm
∙N’immergez jamais l’appareil ou le bloc d’alimentation dans l’eau ou dans d’autres
liquides, et n’effectuez jamais un traitement avec des liquides. Gardez l’appareil et
le bloc d’alimentation à l’abri de la pluie et de l’humidité. N’utilisez pas l’appareil et
le bloc d’alimentation en plein air ni dans des pièces très humides.
∙Ne touchez pas l’appareil et le bloc d’alimentation avec des mains humides. Pour
débrancher le bloc d’alimentation de la prise, saisissez-le toujours par la che.
∙Veillez à ce que le câble du bloc d’alimentation ne soit ni vrillé, ni coincé, ni écrasé.
Empêchez tout contact avec des sources de chaleur, d’humidité ou avec des objets
tranchants. Veillez à ne pas laisser le câble du bloc d’alimentation dans le passage
pour éviter tout risque de trébucher.
∙Avant le nettoyage ou l’entretien de l’appareil, ainsi qu’avant de remplacer un
accessoire, éteignez l’appareil et assurez-vous que le bloc d’alimentation n’est pas
branché.
Sécurité lors de l’utilisation des batteries
Un maniement incorrect des batteries constitue un risque de blessure ou d’explosion.
∙Ne remplacez jamais la batterie par une autre batterie ou d’autres piles. N’utilisez
que des batteries identiques. Ne court-circuitez jamais la batterie, c’est-à-dire
ne touchez pas les deux pôles en même temps, en particulier avec des objets
conducteurs. Stockez la batterie de façon à ce qu’elle ne puisse pas être
courtcircuitée accidentellement par d’autres batteries ou objets métalliques.
∙Utilisez uniquement le bloc d’alimentation fourni pour la recharge de la batterie. Ne
chargez jamais la batterie avec un bloc d’alimentation différent. De même, n’utilisez
pas le bloc d’alimentation fourni pour recharger autre chose que la batterie.
∙À l’issue de sa durée de vie, démontez la batterie en vous conformant aux
descriptions. Ensuite, apportez immédiatement la batterie à un point de collecte
proche pour garantir son élimination conforme et respectueuse de l’environnement.
Ne jetez jamais la batterie dans les déchets ménagers !
∙Avant le démontage de l’accumulateur, vériez que le bloc d’alimentation est
débranché au niveau de la prise.
∙Ne retirez jamais la batterie et ne l’exposez pas à des températures élevées, et ne
la jetez pas au feu.
∙En cas de maniement incorrect, du liquide peut fuir de la batterie. N’utilisez pas la
batterie si elle est endommagée ou si du liquide s’en échappe.
- Évitez tout contact avec le liquide qui s’écoule d’une batterie.
- Si cela se produit malgré tout, rincez abondamment à l’eau courante la partie
concernée. En cas d’apparition de symptômes (quels qu’ils soient), consultez un
médecin.

20
142 x 208 mm
Brosse cylindrique rotative
L’appareil est équipé d’une brosse cylindrique motorisée. Celle-ci est susceptible de
provoquer des blessures. Par conséquent, respectez les consignes suivantes :
∙Avant le nettoyage et l’entretien de l’appareil, assurez-vous que l’appareil est éteint
et qu’il n’est pas en charge.
∙Veillez à ce qu’à aucun moment des parties du corps ne puissent passer sous la
brosse cylindrique.
∙Ne passez pas l’aspirateur à proximité de câbles, de conduites ou de longues
franges. D’une part, vous risqueriez d’endommager l’isolation des câbles. D’autre
part, ces objets pourraient s’emmêler dans la brosse cylindrique et endommager
l’appareil.
Éclairage LED
Des LED sont montées sur la brosse combinée pour éclairer la zone de travail
devant la brosse combinée.
∙Ne regardez pas directement les LED pendant l’utilisation.
∙Il n’est pas possible de remplacer les LED.
Utilisation conforme
L’utilisation de cet appareil n’est autorisée que pour un usage domestique.
L’appareil ne doit être utilisé que pour le nettoyage de surfaces lisses et normalement
sales, de tapis à poils ras ou de textiles d’ameublement pouvant suppor ter sans
dommages la contrainte exercée par la brosse rotative.
Toute autre utilisation est considérée comme non conforme et est interdite.
Pour éviter tout risque de blessure, de feu et de dégâts matériels, l’appareil ne
doit pas être utilisé pour nettoyer les éléments suivants :
∙Personnes, animaux ou plantes. Tenez en permanence l’appareil éloigné de toute
partie du corps, des cheveux et des vêtements (lacets de chaussures par ex.)
N’utilisez pas l’aspirateur à proximité du visage.
∙Particules incandescentes, non éteintes (p. ex. : cendres, braises, charbon de bois,
cigarettes, allumettes).
∙Matières explosives ou facilement inammables, toner.
∙Eau et autres liquides, p. ex. produits de nettoyage humides pour tapis et
moquettes.
∙Objets pointus tels que du verre cassé, des clous ou des gravats.
La pagina si sta caricando...
La pagina si sta caricando...
La pagina si sta caricando...
La pagina si sta caricando...
La pagina si sta caricando...
La pagina si sta caricando...
La pagina si sta caricando...
La pagina si sta caricando...
La pagina si sta caricando...
La pagina si sta caricando...
La pagina si sta caricando...
La pagina si sta caricando...
La pagina si sta caricando...
La pagina si sta caricando...
La pagina si sta caricando...
La pagina si sta caricando...
La pagina si sta caricando...
La pagina si sta caricando...
La pagina si sta caricando...
La pagina si sta caricando...
La pagina si sta caricando...
La pagina si sta caricando...
La pagina si sta caricando...
La pagina si sta caricando...
La pagina si sta caricando...
La pagina si sta caricando...
La pagina si sta caricando...
La pagina si sta caricando...
La pagina si sta caricando...
La pagina si sta caricando...
La pagina si sta caricando...
La pagina si sta caricando...
La pagina si sta caricando...
La pagina si sta caricando...
La pagina si sta caricando...
La pagina si sta caricando...
La pagina si sta caricando...
La pagina si sta caricando...
La pagina si sta caricando...
La pagina si sta caricando...
La pagina si sta caricando...
La pagina si sta caricando...
La pagina si sta caricando...
La pagina si sta caricando...
La pagina si sta caricando...
La pagina si sta caricando...
La pagina si sta caricando...
La pagina si sta caricando...
La pagina si sta caricando...
La pagina si sta caricando...
La pagina si sta caricando...
La pagina si sta caricando...
La pagina si sta caricando...
La pagina si sta caricando...
La pagina si sta caricando...
La pagina si sta caricando...
La pagina si sta caricando...
La pagina si sta caricando...
La pagina si sta caricando...
La pagina si sta caricando...
La pagina si sta caricando...
La pagina si sta caricando...
La pagina si sta caricando...
La pagina si sta caricando...
La pagina si sta caricando...
La pagina si sta caricando...
La pagina si sta caricando...
La pagina si sta caricando...
La pagina si sta caricando...
La pagina si sta caricando...
La pagina si sta caricando...
La pagina si sta caricando...
La pagina si sta caricando...
La pagina si sta caricando...
La pagina si sta caricando...
La pagina si sta caricando...
-
 1
1
-
 2
2
-
 3
3
-
 4
4
-
 5
5
-
 6
6
-
 7
7
-
 8
8
-
 9
9
-
 10
10
-
 11
11
-
 12
12
-
 13
13
-
 14
14
-
 15
15
-
 16
16
-
 17
17
-
 18
18
-
 19
19
-
 20
20
-
 21
21
-
 22
22
-
 23
23
-
 24
24
-
 25
25
-
 26
26
-
 27
27
-
 28
28
-
 29
29
-
 30
30
-
 31
31
-
 32
32
-
 33
33
-
 34
34
-
 35
35
-
 36
36
-
 37
37
-
 38
38
-
 39
39
-
 40
40
-
 41
41
-
 42
42
-
 43
43
-
 44
44
-
 45
45
-
 46
46
-
 47
47
-
 48
48
-
 49
49
-
 50
50
-
 51
51
-
 52
52
-
 53
53
-
 54
54
-
 55
55
-
 56
56
-
 57
57
-
 58
58
-
 59
59
-
 60
60
-
 61
61
-
 62
62
-
 63
63
-
 64
64
-
 65
65
-
 66
66
-
 67
67
-
 68
68
-
 69
69
-
 70
70
-
 71
71
-
 72
72
-
 73
73
-
 74
74
-
 75
75
-
 76
76
-
 77
77
-
 78
78
-
 79
79
-
 80
80
-
 81
81
-
 82
82
-
 83
83
-
 84
84
-
 85
85
-
 86
86
-
 87
87
-
 88
88
-
 89
89
-
 90
90
-
 91
91
-
 92
92
-
 93
93
-
 94
94
-
 95
95
-
 96
96


SEVERIN HV 7152 Manuale utente
- Categoria
- Aspirapolvere portatili
- Tipo
- Manuale utente
in altre lingue
- français: SEVERIN HV 7152 Manuel utilisateur
- español: SEVERIN HV 7152 Manual de usuario
- Deutsch: SEVERIN HV 7152 Benutzerhandbuch
- Nederlands: SEVERIN HV 7152 Handleiding
- português: SEVERIN HV 7152 Manual do usuário
- dansk: SEVERIN HV 7152 Brugermanual
- polski: SEVERIN HV 7152 Instrukcja obsługi
- svenska: SEVERIN HV 7152 Användarmanual
Documenti correlati
Altri documenti
-
Candy CAS10GC 011 Manuale utente
-
Bosch BSS81POW UNLIMITED Manuale del proprietario
-
-
Hoover VE18LIG 011 Manuale utente
-
-
-
Beko VRT-94929 VV Cordless Stick Vacuum Cleaner Manuale utente
-