Akai 541332 Guida utente
- Categoria
- Attrezzatura musicale
- Tipo
- Guida utente

Quickstart Guide
English ( 3 – 11 )
Guía de inicio rápido
Español ( 12 – 20 )
Guide d’utilisation rapide
Français ( 21 – 29 )
Guida rapida
Italiano ( 30 – 38 )
Schnellstart-Anleitung
Deutsch ( 39 – 47 )
Appendix
English ( 49 – 51 )

2

3
Quickstart Guide (English)
Introduction
Features:
• 20+ cutting edge instrument plugin engines
• A massive 6,000+ sound preset library
• 61 key semi-weighted keyboard with aftertouch
• Vibrant 7” capacitive multi-touch screen
• Standalone MPC workflow with 4 GB RAM
• 16 velocity-sensitive RGB-backlit drum pads
• MPC DAW with MIDI sequencing, audio recording, plugin instruments and audio effects
Box Contents
MPC Key 61 Software Download Card
Power Cable Quickstart Guide
USB Cable Safety & Warranty Manual
Important: Visit akaipro.com and find the webpage for MPC Key 61 to download the complete User
Guide.
Support
For the latest information about this product (documentation, technical specifications, system
requirements, compatibility information, etc.) and product registration, visit akaipro.com.
For additional product support, visit akaipro.com/support.
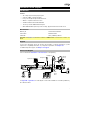
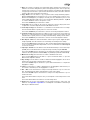
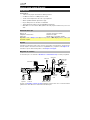
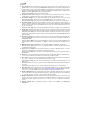
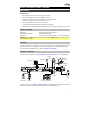
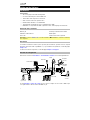
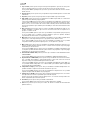
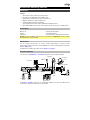
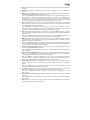
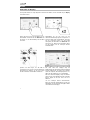
Connection Diagram
Items not listed under Introduction > Box Contents are sold separately.
See Appendix > Signal Flow for a full diagram of how audio and MIDI are routed through MPC Key
61’s different features.
Powered Monitors
Sustain
Pedal
Powe
r
USB
Flash
Drive
Computer
(optional)
Headphones
Synthesizer
Wi-Fi
Compatible
Expression
Pedal
Microphone

4
Features
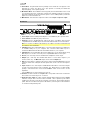
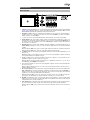
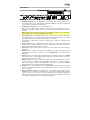
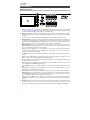
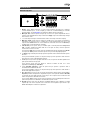
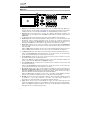
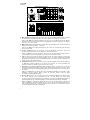
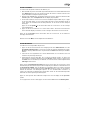
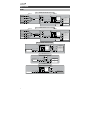
Top Panel
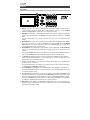
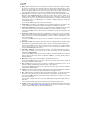
1. Display: This full-color multi-touch display shows information relevant to MPC Key 61’s
current operation. Touch the display (and use the hardware controls) to control the MPC
interface. See Operation to learn how to use some basic functions.
2. Data Dial: Use this dial to scroll through the available menu options or adjust the parameter
values of the selected field on the display. Pressing the dial also functions as an Enter
button.
3. –/+: Press these buttons to increase or decrease the value of the selected field on the
display.
4. Q-Link Knobs: Use these touch-sensitive knobs to adjust various parameters and settings.
The knobs can control one column of parameters at a time. The lights above the Q-Link
button indicate the currently selected column. Press the Q-Link button to change which
column of parameters they currently control.
5. Q-Link Button: Press this button to change which column of parameters the Q-Link Knobs
currently control (indicated by the lights above the button). Each press will select the next
column.
Press and hold Shift and then press this button to view the Q-Link Configuration window.
Press and hold Shift and then press this button again to return to the Main page.
6. </> (Event |</>|): Use these buttons to move the audio pointer left/right, one step at a time.
Press and hold Locate and press one of these buttons to move the audio pointer to the
previous/next event in the sequence grid.
7. Locate: Press this button to open the Locate window, which allows you to quickly jump to
specific points in your project.
Press and hold this button to activate the secondary functions of the </> and <</>> buttons
(i.e., Event |</>| and Start/End, respectively).
8. <</>> (Start/End): Use these buttons to move the audio pointer left/right, one bar at a time.
Press and hold Locate and press one of these buttons to move the audio pointer to the start
or end of the sequence grid.
9. Rec / Recall: Press this button to record-arm the sequence. Press Play or Play Start to start
recording. Recording in this way (rather than using Overdub) erases the events of the current
sequence. After the sequence plays through once while recording, Overdub will be enabled.
Press and hold Shift and press this button to recall recently played MIDI note events when
recording was disabled and insert them into the current sequence.
10. Overdub: Press this button to enable Overdub, which allows you to record note events in a
sequence without overwriting any previously recorded note events. You can enable Overdub
either before or during recording.
12
3
4
5
678
14
11
16
19 20
17 18
12 13
15
9
10
21 22 23

5
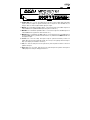
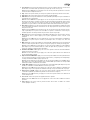
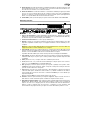
11. Stop / Return: Press this button to stop playback. Double-press this button to immediately
stop all sound.
Press and hold Shift and press this button to stop playback and return the playhead to the
Loop Start value.
12. Play: Press this button to play the sequence from the audio pointer’s current position.
13. Play Start: Press this button to play the sequence from its start point.
14. Edit / XYFX: Press this button to view Program Edit Mode, which contains all parameters
for editing your programs.
Press and hold Shift and press this button to view XYFX Mode, which turns the touchscreen
into an XY pad where each axis represents the range of an effect parameter. As you touch
or move your finger on the touchscreen, the current position will determine the current value
of the two parameters. You can use this mode to create interesting effect automation on
your tracks.
15. Grid / Step Seq: Press this button to enter Grid View Mode, where you can view and edit
the note events of each track of a sequence in a project and their velocities.
Press and hold Shift and press this button to view Step Sequencer Mode where you can
create or edit sequences by using the pads as "step buttons," simulating the experience of
a traditional step-sequencer-style drum machine.
16. Mix / Pad: Press this button to view the Track Mixer where you can set levels, stereo
panning, and other settings for your tracks, programs, returns, submixes, and masters.
Press and hold Shift and then press this button to view the Pad Mixer where you can set a
program’s levels, stereo panning, routing, and effects.
17. Mute / Pad: Press this button to view Track Mute Mode where you can easily mute tracks
within a sequence or set mute groups for each track.
Press and hold Shift and press this button to view Pad Mute Mode where you can easily
mute pads within a program or set mute groups for each pad within a program.
18. Automation Read/Write / Off: Press this button to toggle the Global Automation state
between Read and Write.
Press and hold Shift and press this button to disable or enable Global Automation.
19. Keyboard Control / MIDI Control: Press this button to view the Keyboard Control menu,
where you can customize the functions of the keyboard and wheels, including velocity
response, routing, MIDI assignments, ranges and more.
Press and hold Shift and press this button to view MIDI Control Mode, where you can use
the device as a MIDI controller and customize what MIDI messages are sent from the
hardware controls.
20. Sample Edit / Sampler: Press this button to view Sample Edit Mode where you can edit
your samples using various functions and processes.
Press and hold Shift and press this button to view the Sampler where you can record audio
samples to use in your projects.
21. Timing Correct / On/Off: Press this button to open the Timing Correct window, which
contains various settings to help quantize the events in your sequence.
Press and hold Shift and press this button to turn Timing Correct on and off.
22. Undo / Redo: Press this button to undo your last action.
Press and hold Shift and press this button to redo the last action you undid.
23. Shift: Press and hold this button to access some buttons’ secondary functions (indicated
by white writing).

6
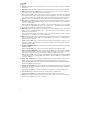
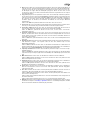
24. Menu / Browse: Press this button to open the Mode Menu. You can tap an option on the
Menu screen to enter that mode, view, etc.
Press and hold Shift and then press this button to view the Browser. You can use the
Browser to locate and select programs, samples, sequences, etc.
25. Main / Track: Press this button to view Main Mode.
Press and hold Shift and press this button to view Track View Mode, an overview of the tracks
of each sequence. You can also set key ranges in this mode.
26. Sounds / Favorites: Press this button to view Sounds Mode, where you can browse MPC
Key 61's built-in instruments and presets.
Press and hold Shift and press this button to view Favorites, where you can quickly select
instruments and presets that you have defined as your favorites.
27. Pads: Use these pads to trigger drum hits or other samples. The pads are velocity-sensitive
and pressure-sensitive, which makes them very responsive and intuitive to play. The pads
will light up different colors, depending on the current function. You can also customize their
colors.
28. Pad Bank Buttons: Press any of these buttons to access Pad Banks A–D. Press and hold
Shift while pressing any of these buttons to access Pad Banks E–H. Alternatively, double-
press one of these buttons.
29. Full Level / Half Level: Press this button to activate/deactivate Full Level. When activated,
the pads will always trigger their samples at the maximum velocity (127), regardless of the
amount of force you use.
Press and hold Shift and press this button to activate/deactivate Half Level. When activated,
the pads will always trigger their samples at half-velocity (64).
30. 16 Level / Notes: Press this button to activate/deactivate 16 Level. When activated, the last
pad that was hit will be temporarily copied to all 16 pads. The pads will play the same sample
as the original pad, but a selectable parameter will increase in value with each pad number,
regardless of the amount of force you use.
Press and hold Shift and press this button to activate/deactivate Notes mode for the pads.
When activated, you can play musical scales/modes, chords or progressions using the pads
while in any mode. Use the Pad Perform window to configure the settings for the pads.
23 24
2526
28
27
29 30
32 31
35
34 33
43
36
39
37
41
40
38
42
44
45

7
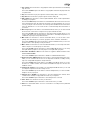
31. Erase: As a Sequence is playing, press and hold this button and then press a pad or key to
delete the note event for that pad or key at the current playback position. This is a quick way
to delete note events from your sequence without having to stop playback. When playback
is stopped, press this button to open the Erase window where notes, automation and other
sequence data can be erased from the sequence.
32. Copy / Delete: Press this button to copy one pad to another in Clip and Drum programs.
When the From Pad field is selected, press the “source” pad (the pad you want to copy).
When the To Pad graphic (of all pads) is selected, press the “destination” pad. You can
select multiple destination pads, and you can select pads in different pad banks. Tap Do It
to continue or Cancel to return to the previous screen.
Press and hold Shift and press this button to delete.
33. Touch Strip: The touch strip can be used as an expressive control for playing and can be
configured to control Note Repeat, Pitch Bend, Modulation and more.
34. Touch Strip / Config: Press this button to cycle between control modes for the Touch Strip.
Press and hold the button to quickly select one of the control modes.
Press and hold Shift and press this button to view the Touch Strip Configuration window.
35. Touch FX / Config: Press this button to enable Touch FX control for the Touch Strip. This
allows you to control parameters from the Touch FX plugin using the Touch Strip. Press and
hold this button to quickly select a Touch FX preset. Alternatively, double press this button.
Press and hold Shift and press this button to view the Touch FX Configuration window.
36. Note Repeat / Latch: Press and hold this button, and then press a pad to trigger that pad’s
sample repeatedly. The rate is based on the current tempo and Timing Correct settings.
Press and hold Shift and press this button to “latch” the Note Repeat feature. When latched,
you do not have to hold the Note Repeat button for it to be activated. Press Note Repeat
once more to unlatch it.
37. Tap Tempo / Global: Press this button in time with the desired tempo to enter a new tempo
(in BPM). Press and hold this button to adjust the tempo manually using the data dial.
Press and hold Shift and press this button to set whether the currently selected sequence
follows its own tempo (the button will be lit white) or a global tempo (the button will be lit red).
38. Metronome / Config: Press this button to enable or disable the metronome.
Press and hold Shift and press this button, or press and hold this button, to open the
Metronome Configuration window.
39. Arp / Config: Press this button to enable or disable the internal Arpeggiator, whose rate is
based on the current Tempo and Time Division settings.
Press and hold Shift and press this button, or press and hold this button, to configure the
Arpeggiator's settings.
40. Latch: Press this button to enable or disable latch for the Arpeggiator. When latched, you
do not have to hold the keys for the arpeggiation to continue.
41. Oct - / Oct +: Press these buttons to transpose the keyboard down or up one octave at a
time. The lights below this button will indicate the current octave setting.
Press and hold Shift and press these buttons to transpose the keyboard down or up one
semitone at a time.
Press and hold both buttons and press a key on the keybed to set the transposition to that
value.
Press and hold both buttons and release to reset the transposition.
42. Keybed: Use this 61-key semi-weighted, velocity-sensitive keybed to input notes and
aftertouch. See Appendix > Signal Flow for a full diagram of how MIDI is routed through
MPC Key 61’s different features.

8
43. Pitch Wheel: The pitch bend wheel is primarily used to bend the notes played on the
keyboard up or down. This allows you to play phrases not normally associated with
keyboard playing, such as guitar-style riffs.
44. Modulation Wheel: The modulation wheel is typically used to add variation for the sound
you are playing. This type of real-time controller was originally introduced on electronic
keyboard instruments to give the performer options such as adding vibrato, just like the
players of acoustic instruments do.
45. Main Volume: Turn this knob to adjust the volume of the outputs and phones output.
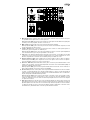
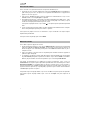
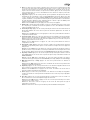
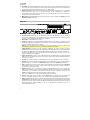
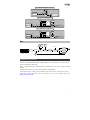
Rear Panel
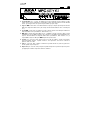
1. Power Input: Use the included power adapter to connect MPC Key 61 to a power outlet.
2. Power Switch: Turns MPC Key 61’s power on/off.
3. Network: Connect a standard Ethernet cable to this port to use Ableton Link and other
compatible devices with MPC Key 61. Download the full User Guide for more information.
Note: You can also use Ableton Link wirelessly over a Wi-Fi connection. Download the full
User Guide for more information.
4. USB-B Port: Use the included USB cable to connect this high-retention-force USB port to
an available USB port on your computer. This connection allows MPC Key 61 to
send/receive MIDI and audio data to/from the MPC software on your computer.
5. USB-A Ports: Connect a USB flash drive to these USB ports to access its files directly using
MPC Key 61. You can also connect any class-compliant MIDI device to these ports.
6. Phones (1/4” / 6.35 mm): Connect standard stereo headphones to this output.
7. Outputs (1/4” / 6.35 mm): Use standard TRS cables to connect these outputs to your
monitors, mixer, etc.). The Main L/R outputs are the same as Outputs 1,2.
8. Gain: Use these knobs to adjust the gain of the incoming signal from Input 1/2 on the rear
panel. Be careful when setting this knob at higher levels, as this can cause the signal to
distort.
9. Inputs 1/2 (XLR or 1/4” / 6.35 mm): Use standard XLR or TRS cables to connect these inputs
to audio sources (microphone, mixer, synthesizer, etc.). When using a 1/4" cable, the Mic
preamp is removed from the circuit, and the Inst/Line switch can be used to set the
impedance.
Turn the Gain knobs to set the input level of each one.
10. Inst/Line: Use these switches to set Inputs 1/2 to accept either a Line-level or Instrument-
level sound source when using a 1/4" connection.
11. Phantom Power (+48V): This switch activates and deactivates phantom power for Inputs
1/2 when using an XLR connection. When activated, +48V of phantom power will be
supplied to both inputs. Note that most dynamic microphones do not require phantom
power, while most condenser microphones do. Refer to your microphone’s documentation
to check if it needs phantom power.
1
2
3
4
56
7
89
9
1010 11
7
8

9
12. CV/Gate Out (1/8" / 3.5 mm, TS): MPC Key 61 will send control voltage (CV) and/or Gate
signals over these outputs to optional external synths or sequencers. Use standard 1/8” (3.5
mm) TS cables to send a single CV/Gate signal per output.
13. MIDI In: Use a standard 5-pin MIDI cable to connect these inputs to the MIDI output of an
external MIDI device (additional MIDI keyboard, pad controller, etc.).
14. MIDI Out: Use a standard 5-pin MIDI cable to connect these outputs to the MIDI input of an
external MIDI device (synthesizer, drum machine, etc.).
15. MIDI Thru: Use a standard 5-pin MIDI cable to connect this thru-port to the MIDI input of
an external MIDI device (synthesizer, drum machine, etc.). MIDI from the MIDI In will be sent
through this output.
16. Sustain (1/4" / 6.35 mm, TRS): This input accepts an optional momentary-contact foot
pedal. When pressed, the pedal will sustain the sound you are playing without having to
keep your fingers pressed down on the keys.
17. FS2 (1/4" / 6.35 mm, TRS): Connect an optional 1/4" (6.35 mm) TRS footswitch or other foot
pedal to this input.
18. Expression (1/4" / 6.35 mm, TRS): Connect an optional expression pedal to this input for
adding expressive changes during performances.

10
Operation
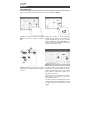
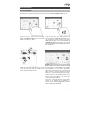
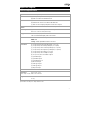
Using the Display
Here is some general information about how to use the MPC Key 61 display:
Tap a button or option to select it. Use the data
dial or –/+ buttons to change its setting or
value
Double-tap a button to access advanced
editing options. In some cases, this will show a
numeric keypad that you can use to enter a
value (an alternative to the data dial or –/+
buttons). Tap the upper-left part of the display
to return to the previous view.
Spread two fingers to zoom in (into a section o
f
a waveform, for example). Pinch two fingers to
zoom out.
The upper edge of the display shows the
toolbar, which contains information about the
current view (often the name of the current
track, sequence, audio pointer position, etc.).
Tap an item to select it.
The lower edge of the display shows various
buttons that you can use in the current view.
Tap a button to press it.
To return to a previous view, either tap outside
of the window currently in the display or tap the
left arrow () in the upper-left part of the
display.

11
Selecting Sounds
To get started with MPC Key 61's array of built-in instruments:
1. When MPC Key 61 is first powered on, press the Empty Project button on the Demo Screen
to create a new project. Tracks 1–8 will automatically be populated with Plugin Programs in
this new project.
2. Press the Sounds button to open the Instruments menu. Alternatively, tap the Sounds icon
when viewing the Main Mode on the display.
3. On the Instruments page, you will see a list of the available plugins for MPC Key 61. Tap the
plugin name to open the preset categories for the selected plugin, and then tap the category
name to view the presets in that category.
To move back to the previous page, tap the icon in the upper-left corner of the
touchscreen.
4. Tap the preset name to load it to the track. You can also use the arrows at the bottom of the
display to move to the previous or next preset.
To return to the Instruments home page, tap the X icon in the upper-left corner of the
touchscreen.
To return to Main Mode, press the Main button.
Editing Sounds
To edit a selected plugin preset:
1. From the Instruments page, tap the Edit Instrument button at the bottom of the display to
switch to Program Edit Mode, where you will see a graphical representation of the plugin
interface. Alternatively, you can press the Edit button on the MPC Key 61 hardware at any
time.
2. Use the tabs at the bottom of the screen to view different pages of parameters for each
plugin.
3. Plugin parameters can be edited directly from the touchscreen, or you can use the Q-Link
knobs to adjust the highlighted parameters. Tap the Q-Link button on the MPC Key 61
hardware to change which column of parameters the Q-Link Knobs currently control.
To enable automation for recording parameter adjustments, tap the automation icon in the
upper-right corner of the touchscreen. Alternatively, press the Automation Read/Write button
on the MPC Key 61 hardware to toggle between the modes. When automation write is enabled,
you can adjust parameters while you are recording or playing back for an expressive
performance that can be saved and replayed. Set the automation state to read to play back
your adjustments.
To save your edited plugin preset, tap the save disk icon at the top of the display.
To load a saved plugin preset, tap the folder icon at the top of the display.

12
Guía de inicio rápido (Español)
Introducción
Características:
• +20 motores de plugins de instrumentos última generación
• Una biblioteca masiva con +6000 presets de sonido
• Teclado semicontrapesado de 61 teclas con postpulsación
• Vibrante pantalla multitáctil capacitiva de 7 pulg.
• Flujo de trabajo autónomo de MPC con 4 GB RAM
• 16 pads de batería sensibles a la velocidad RGB retroiluminados
• MPC DAW con secuenciamiento MIDI, grabación de audio, plugins de instrumentos y efectos de
audio
Contenido de la caja
MPC Key 61 Tarjeta de descarga de software
Adaptador de alimentación Guía de inicio rápido
Cable USB Manual sobre la seguridad y garantía
Importante: Visite en akaipro.com la página correspondiente al MPC Key 61 para descargar la guía
de usuario complete.
Soporte
Para obtener la información más reciente acerca de este producto (documentación, especificaciones
técnicas, requisitos de sistema, información de compatibilidad, etc.) y registrarlo, visite akaipro.com.
Para obtener soporte adicional del producto, visite akaipro.com/support.
Diagrama de conexión
Los elementos que no se enumeran en Introducción > Contenido de la caja se venden por separado.
Consulte en el Apéndice > Flujo de la señal el diagrama completo sobre cómo se encamina el audio
y MIDI a través de las diferentes características del MPC Key 61.
Monitores activos
Ordenador
(opcional)
Toma de
corriente
Unidad de
memoria
USB
Sintetizador
Auriculares
Compatible
con Wi-Fi
Pedal de
expresión Pedal de
sostenido
Micrófono

13
Características
Panel superior
1. Pantalla: Esta pantalla multitáctil a todo color muestra información relevante para la operación actual del MPC
Key 61. Toque la pantalla (y utilice los controles de hardware) para controlar la interfaz del MPC. Consulte
Funcionamiento para aprender a utilizar algunas de las funciones básicas.
2. Cuadrante de datos: Utilice este cuadrante para desplazarse por las opciones de menú disponibles o
ajustar los valores de los parámetros del campo seleccionado en la pantalla. Si se pulsa el cuadrante,
también funciona como botón Enter.
3. –/+: Pulse estos botones para aumentar/disminuir el valor del campo seleccionado en la pantalla.
4. Perillas Q-Link: Utilice estas perillas sensibles al tacto para ajustar diversos parámetros y valores. Las
perillas pueden controlar una columna de parámetros por vez. Las luces encima del botón Q-Link indican
la columna seleccionada actualmente. Pulse el botón Q-Link para cambiar la columna de parámetros
que controlan en ese momento.
5. Botón Q-Link: Pulse este botón para cambiar la columna de parámetros controlada actualmente por las
perillas Q-Link (indicada por las luces encima del botón). Cada pulsación seleccionará la próxima
columna.
Mantenga pulsado Shift y luego pulse este botón para visualizar la ventana de configuración de Q-Link.
Mantenga pulsado Shift y luego pulse este botón para saltar al panel del historial.
6. </> (Evento |</>|): Use estos botones para desplazar el puntero de audio a la derecha/izquierda, de a un
paso por vez.
Mantenga pulsado Locate (Localizar) y pulse uno de estos botones para desplazar el puntero de audio al
evento anterior/siguiente en la grilla de secuencia.
7. Locate (Localizar): Pulse este botón para abrir la ventana de localización, la cual le permite acceder
rápidamente a puntos específicos dentro de su proyecto.
Mantenga pulsado este botón para activar las funciones secundarias de los botones < / > y << / >> (es
decir, Event |< / >| y Start/End respectivamente).
8. <</>> (Comienzo/Final): Use estos botones para desplazar el puntero de audio a la derecha/izquierda,
de a un paso por vez.
Mantenga pulsado Locate y pulse uno de estos botones para desplazar el puntero de audio al inicio o
final de la grilla de secuencia.
9. Record / Recall (Grabación / Recuperar): Pulse este botón para preparar la secuencia para grabar. Pulse
Play o Play Start para comenzar la grabación. Al grabar de esta manera (en lugar de usar Overdub), se
borran los eventos de la secuencia actual. Después de que la secuencia se reproduce una vez durante
la grabación, se activa la función Overdub (Sobregrabación).
Mantenga pulsado Shift y pulse este botón para recuperar eventos de nota MIDI recientemente
reproducidos cuando la grabación estaba desactivada e insertarlos en la secuencia actual.
10. Overdub (Sobregrabación): Pulse este botón para activar la sobre grabación. Una vez activada, podrá
grabar eventos en una secuencia sin sobrescribir ningún evento grabado anteriormente. Puede activar la
sobregrabación antes o durante la grabación.
11. Stop / Return (Detener / Regresar): Pulse este botón para detener la reproducción. Puede pulsar este botón
dos veces para silenciar el audio que aún está sonando una vez que una nota deja de reproducirse.
Mantenga pulsado Shift y pulse este botón para regresar el cabezal de reproducción al valor de inicio
del ciclo.
12
3
4
5
678
14
11
16
19 20
17 18
12 13
15
9
10
21 22 23

14
12. Play (Reproducir): Pulse este botón para reproducir la secuencia desde la posición actual del cabezal de
reproducción.
13. Play Start (Comenzar reproducción): Pulse este botón para reproducir la secuencia desde su punto inicial.
14. Edit (Edición de programa) / XYFX: Pulse este botón para acceder al modo de edición de programa, el
cual contiene todos los parámetros para editar sus programas.
Mantenga pulsado Shift y pulse este botón para acceder al modo XYFX, el cual transforma la pantalla
táctil en un pad XY en donde cada eje representa el rango del parámetro de un efecto. A medida que
toca o mueve su dedo sobre la pantalla táctil, la posición actual determinará el valor actual de los dos
parámetros. Puede usar este modo para crear un interesante efecto de automatización en sus pistas.
15. Grid / Step Seq (Cuadrícula / Secuenciador de pasos): Pulse el botón para ingresar al modo de vista de
cuadrícula, en donde podrá visualizar y editar los eventos de nota de las vistas de cada secuencia en un
proyecto y sus velocidades.
Mantenga pulsado Shift y pulse este botón para acceder al secuenciador de pasos, en el cual podrá
crear o editar secuencias utilizando los pads como “botones de paso”, simulando la experiencia de una
caja de ritmos al estilo de un secuenciador de pasos tradicional.
16. Mix / Pad (Mezclador de canal / pad): Pulse este botón para acceder al mezclador de canal, en el cual podrá
ajustar los niveles, el balance (panning) estéreo y otros ajustes para sus pistas, programas, regresos,
submezclas y mezclas maestras.
Pulse este botón para acceder al mezclador de pad, en el cual podrá ajustar los niveles, el balance
(panning) estéreo, el enrutamiento y los efectos del programa.
17. Mute / Pad (Silenciamiento de pista / pad): Pulse este botón para acceder al modo de silenciamiento de
pista, en el cual podrá silenciar pistas con facilidad dentro de una secuencia o definir grupos de
silenciamiento para cada pista.
Mantenga pulsado Shift y pulse este botón para acceder al modo de silenciamiento de pad, en el cual
podrá silenciar pads con facilidad dentro de un programa o definir grupos de silenciamiento para cada
pad dentro de un programa.
18. Automation Read/Write / Off: Pulse este botón para conmutar el estado de automatización global entre
lectura y escritura.
Mantenga pulsado Shift y pulse este botón para activar o desactivar la automatización global.
19. Keyboard Control / MIDI CTRL (Control del teclado / Control MIDI): Pulse este botón para visualizar el
menú de control del teclado, en donde podrá personalizar las funciones del teclado y las ruedas,
incluyendo la velocidad de respuesta, encaminamiento, asignaciones MIDI, rangos y más.
Mantenga pulsado Shift y pulse este botón para entrar al modo de control MIDI, en donde podrá utilizar
este dispositivo como un controlador MIDI y personalizar los mensajes MIDI que se envían desde los
controles de hardware.
20. Sample Edit / Sampler (Edición de muestra / Muestreador): Pulse este botón para acceder al modo de
edición de muestra, en el cual podrá editar sus muestras utilizando diversas funciones y procesos.
Mantenga pulsado Shift y pulse este botón para acceder al muestreador en el cual podrá grabar muestras
de audio para utilizarlas en sus proyectos.
21. Timing Correct / On/Off (Corrección de temporización / Activar/Desactivar): Pulse este botón para abrir
la ventana de corrección de temporización, la cual contiene diversos ajustes que permiten cuantificar los
eventos en su secuencia.
Mantenga pulsado Shift y pulse este botón para activar o desactivar la corrección de temporización.
22. Undo / Redo (Deshacer / Rehacer): Pulse este botón para deshacer su última acción.
Mantenga pulsado Shift y pulse este botón para volver a hacer la última acción que deshizo.
23. Shift (Función secundaria): Mantenga pulsado este botón para acceder a las funciones secundarias de
algunos botones (indicadas por el texto color blanco).

15
24. Menu / Browse (Menú / Explorar): Pulse este botón para abrir el menú de modo. Puede tocar una opción
en la pantalla del menú para entrar a ese modo, pista, etc.
Mantenga pulsado Shift y luego pulse este botón para ver el navegador. Puede utilizar el navegador para
localizar y seleccionar programas, muestras, secuencias, etc.
25. Main / Track (Principal / Pista): Pulse este botón para entrar al modo principal.
Mantenga pulsado Shift y pulse este botón para acceder al modo de visualización de pistas, una vista
general de las pistas de cada secuencia.
26. Sounds / Favorites: Pulse este botón para entrar al modo de sonidos, en donde podrá explorar los
instrumentos y presets integrados en el MPC Key 61.
Mantenga pulsado Shift y pulse este botón para visualizar los favoritos, en donde podrá rápidamente
seleccionar instrumentos y presets que haya definido como favoritos.
27. Pads: Utilice estos pads para disparar golpes de batería u otras muestras. Son sensibles a la velocidad
y a la presión, lo que los hace muy responsivos e intuitivos para tocar. Los pads se iluminarán con colores
diferentes, dependiendo de la función actual. También puede personalizar sus colores.
28. Botones del banco de pads: Pulse cualquiera de estos botones para acceder a los bancos de pads A–
D. Mantenga pulsado Shift y pulse cualquiera de estos botones para acceder a los bancos de pads E–
H. Como alternativa, pulse dos veces uno de estos botones.
29. Full Level / Half Level (Nivel máximo/Nivel medio): Pulse este botón para activar/desactivar el nivel
máximo. Una vez activado, los pads siempre dispararán sus muestras a la velocidad máxima (127), sin
importar la cantidad de fuerza que utilice.
Mantenga pulsado Shift y pulse este botón para activar/desactivar el nivel medio. Una vez activado, los
pads siempre dispararán sus muestras a medio velocidad (64).
30. 16 Level / Notes (16 niveles / Notas): Pulse este botón para activar/desactivar la función 16 Level. Cuando
se activa, se copia temporalmente en los 16 pads el último pad que se golpeó. Los pads reproducirán la
misma muestra que el pad original, pero un parámetro seleccionable aumentará su valor con cada número
de pad, sin importar la cantidad de fuerza que utilice.
Mantenga pulsado Shift y pulse este botón para activar o desactivar el modo de notas para los pads.
Una vez activado, puede tocar escalas/modos, acordes y progresiones musicales utilizando los pads
estando en cualquiera de los modos. Utilice la ventana de pads para actuación en vivo a fin de configurar
los ajustes de los mismos.
31. Erase (Borrar): Mientras se reproduce una secuencia, mantenga pulsado este botón y pulse un pad o tecla
para suprimir el evento de nota de ese pad o tecla en la posición de reproducción actual. Esta es una manera
rápida de suprimir eventos de nota de su secuencia sin tener que detener la reproducción. Una vez detenido
el cabezal de reproducción, pulse este botón para abrir la ventana de eliminación en donde las notas,
automatizaciones y demás datos de la secuencia se puede eliminar de la misma.
23 24
2526
28
27
29 30
32 31
35
34 33
43
36
39
37
41
40
38
42
44
45

16
32. Copy / Delete (Copiar / Borrar): Pulse este botón para copiar un pad a otro en programas de clip y de
batería. Cuando se selecciona el campo From Pad (desde pad), pulse el pad "fuente" (el pad que desea
copiar). Cuando se selecciona el gráfico To Pad (hacia pad) (de todos los pads), pulse el pad "destino".
Puede seleccionar múltiples pads destino y puede seleccionar pads en diferentes bancos de pads. Toque
Do It para continuar o Cancel para volver a la pantalla anterior.
Mantenga pulsado Shift y pulse este botón para eliminar.
33. Tira táctil: La tira táctil puede utilizarse como un control de expresión durante una ejecución y se puede
configurar para controlar la repetición de nota, la inflexión del trono, la modulación y más.
34. Touch Strip / Config: Pulse este botón para alternar entre los diferentes modos de control de la tira
táctil. Mantenga pulsado el botón para seleccionar rápidamente uno de los modos de control.
Mantenga pulsado Shift y pulse este botón para visualizar la ventana de configuración de la tira táctil.
35. Touch FX / Config: Pulse este botón para activar el control de efectos táctiles para la tira táctil. Esto le
permite controlar los parámetros desde el plugin de efectos táctiles utilizando la tira táctil. Mantenga
pulsado este botón para seleccionar rápidamente un preset de efecto táctil. Alternativamente, presione
dos veces este botón.
Mantenga pulsado Shift y pulse este botón para visualizar la ventana de configuración de efectos táctiles.
36. Note Repeat / Latch: Mantenga pulsado este botón y pulse un pad para disparar la muestra de ese pad
repetidamente. La frecuencia se basa en el tempo actual y los ajustes de corrección de la sincronización.
Mantenga pulsado Shift y pulse este botón para "trabar" la característica de repetición de nota. Una vez
trabada, no necesita mantener pulsado el botón Note repeat para activarlo. Pulse Note Repeat una vez
para destrabarla.
37. Tap Tempo / Global: Pulse este botón en sincronismo con el tempo deseado para introducir un tempo
nuevo (en BPM). Mantenga pulsado este botón para ajustar el tiempo manualmente utilizando el
cuadrante de datos.
Mantenga pulsado Shift y pulse este botón para definir si la secuencia seleccionada actualmente sigue
su propio tempo (el botón se iluminará de color blanco) o el tempo global (el botón se iluminará de color
rojo).
38. Metronome (Metrónomo) / Config: Pulse este botón para habilitar o deshabilitar el metrónomo.
Mantenga pulsado Shift y pulse este botón, o mantenga pulsado este botón para abrir la ventana de
configuración del metrónomo.
39. Arp (Arpegiador) / Config: Pulse este botón para activar o desactivar el arpegiador interno, cuyo ritmo
se basa en el tempo actual y la configuración de la división de tiempo.
Mantenga pulsado Shift y pulse este botón, o mantenga pulsado este botón para configurar los ajustes
del arpegiador.
40. Latch: Pulse este botón para activar o desactivar el pestillo del arpegiador. Cuando está bloqueado, no
es necesario que mantenga presionadas las teclas para que continúe el arpegio.
41. Oct - / Oct +: Pulse estos botones para transponer el teclado una octava hacia arriba o hacia abajo por
vez. Las luces debajo de este botón indicarán el ajuste actual de octava.
Mantenga pulsado Shift y pulse estos botones para transponer el teclado una octava hacia arriba o hacia
abajo por vez.
Mantenga pulsados ambos botones y pulse una tecla de la placa del teclado para ajustar la transposición
a ese valor.
Mantenga pulsados ambos botones y suéltelos para regresar la transposición a su ajuste inicial.
42. Placa del teclado: Utilice esta placa de teclado semicontrapesada de 61 teclas sensibles a la velocidad
para introducir notas y postpulsación. Consulte en el Apéndice > Flujo de la señal el diagrama completo
sobre cómo se encamina el MIDI a través de las diferentes características del MPC Key 61.
43. Rueda de inflexión de tono: La rueda de inflexión de pitch se utiliza principalmente para seleccionar las
notas reproducidas en el teclado hacia arriba o abajo. Esto le permite reproducir frases que normalmente
no se asocian con tocar un teclado, como por ejemplo riffs estilo guitarra.
44. Rueda de modulación: La rueda de modulación suele usarse para añadir variaciones al sonido que está
tocando. Este tipo de controlador en tiempo real se introdujo originalmente en instrumentos de teclado
electrónico para darle al músico opciones tales como vibrato, como si se tratara de un instrumento
acústico.
45. Volumen principal: Gire esta perilla para ajustar el volumen de las salidas y las salidas para
auriculares.

17
Panel trasero
1. Entrada de corriente: Utilice el adaptador de corriente incluido para conectar el MPC Key 61 a
una toma de corriente. Como alternativa, puede alimentar el MPC Key 61 solamente mediante el
puerto USB, pero la pantalla estará desactivada.
2. Interruptor de encendido: Enciende y apaga el MPC Key 61.
3. Red: Conecte un cable Ethernet estándar a este puerto para utilizar Ableton Link y otros
dispositivos compatibles con MPC Key 61. Para más información, descargue la Guía del Usuario
completa.
Nota: También puede utilizar Ableton Link de forma inalámbrica a través de una conexión Wi-Fi.
Para más información, descargue la Guía del Usuario completa.
4. Puerto USB-B: Utilice el cable USB incluido para conectar este puerto a un puerto USB de alta
retención disponible en su ordenador. Esta conexión permite que el MPC Key 61 envíe y reciba
datos MIDI y de audio hacia y desde el software MPC en su ordenador.
Puede alimentar el MPC Key 61 solamente mediante el puerto USB, pero la pantalla estará
desactivada.
5. Puertos USB-A: Conecte una unidad de memoria USB a estos puertos USB para acceder
directamente a sus archivos mediante el MPC Key 61. También puede conectar en estos puertos
cualquier dispositivo MIDI que cumple con la clase.
6. Auriculares (6,35 mm / 1/4 pulg.): Conecte auriculares estéreo estándar de 6,35 mm (1/4 pulg.) a
esta salida.
7. Salidas (6,35 mm / 1/4 pulg.): Utilice cables TRS estándar de 6,35 mm (1/4 pulg.) para conectar
estas salidas a sus monitores, mezclador, etc. Las salidas Main L/R son las mismas que las
salidas 1,2.
8. Ganancia: Utilice estas perillas para ajustar la ganancia de la señal que ingresa por la entrada
1/2 en el panel trasero. Tenga cuidado al ajustar esta perilla a niveles más elevados, ya que esto
puede generar distorsiones en la señal.
9. Entradas 1/2 (XLR o 6,35 mm / 1/4 pulg.): Utilice cables XLR o TRS estándar para conectar estas
entradas a una fuente de audio (mezclador, sintetizador, caja de ritmos, etc.). Al usar un cable de
6,35 mm (1/4 pulg.) se elimina el preamplificador del circuito y el interruptor Inst/Line
(instrumento/línea) se puede utilizar para ajustar la impedancia.
10. Inst/Line: Utilice estos interruptores a fin de ajustar Input 1/2 (entradas 1/2) para que acepten
una fuente de audio de nivel de línea o de nivel de instrumento cuando se use una conexión de
6,35 mm (1/4 pulg.).
11. Potencia fantasma (+48 V): Este interruptor activa y desactiva la potencia fantasma de las
entradas 1/2. Una vez activada, se suministran +48 V de potencia fantasma ambas entradas.
Tenga en cuenta que la mayoría de los micrófonos dinámicos no necesitan potencia fantasma
mientras que la mayoría de los micrófonos condensadores sí lo hacen. Verifique la documentación
de su micrófono para averiguar si necesita alimentación fantasma.
1
2
3
4
56
7
89
9
1010 11
7
8

18
12. Salida de CV/compuerta (3.5 mm / 1/8 pulg., TS): El MPC Key 61 enviará señales de voltaje de
control (CV) y/o compuertas a través de estas salidas hacia sintetizadores o secuenciadores
externos opcionales. Utilice cables TS estándar de 3,5 mm (1/8 pulg.) para enviar una única señal
de CV/compuerta por salida.
13. Entrada MIDI: Utilice un cable MIDI estándar de 5 patillas para conectar esta entrada a la salida
MIDI de un dispositivo MIDI externo (teclado MIDI adicional, controlador de pads, etc.).
14. Salida MIDI: Utilice un cable MIDI estándar de 5 patillas para conectar esta salida a la entrada
MIDI de un dispositivo MIDI externo (sintetizador, caja de ritmos, etc.).
15. Pasante MIDI: Utilice un cable MIDI estándar de 5 patillas para conectar esta pasante MIDI a la
entrada MIDI de un dispositivo MIDI externo (sintetizador, caja de ritmos, etc.). El MIDI entrante
proveniente del puerto MIDI In será pasado hacia esta salida.
16. Sostenido (6,35 mm / 1/4 pulg., TRS): Esta entrada acepta un pedal de sostenido de contacto
momentáneo opcional. Cuando se lo presiona, el pedal sostiene las notas que está tocando sin
que tenga que mantener sus dedos pulsando las teclas.
17. FS2 (6,35 mm / 1/4 pulg., TRS): Conecte a esta entrada un pedal de expresión TRS de 6,35 mm
(1/4 pulg.) opcional.
18. Entrada de expresión (6,35 mm / 1/4 pulg., TRS): Conecta un pedal de expresión opcional a esta
entrada para agregar cambios de expresión durante las actuaciones.

19
Funcionamiento
Uso de la pantalla
A continuación se presenta información general sobre cómo utilizar la pantalla del MPC Key 61:
Toque un botón u opción para seleccionarla.
Utilice el cuadrante de datos o –/+ botones para
modificar sus ajustes o valores.
Toque un botón dos veces para acceder a las
opciones de edición avanzadas. En algunos casos,
esto mostrará un teclado numérico que puede
utilizar para introducir un valor (una alternativa al
cuadrante de datos o a los botones –/+
)
. Toque la
parte superior izquierda de la pantalla para regresa
r
a la vista anterior.
Separe sus dos dedos para hacer zoom (en una
sección de la forma de onda, por ejemplo). Junte
sus dos dedos para alejar el zoom.
El borde superior de la pantalla muestra la barra
de herramientas, la cual contiene información
sobre la pista actual (a menudo el nombre de la
pista, secuencia, o posición de puntero de audio
actual, etc.). Toque un elemento para seleccionarlo.
El borde inferior de la pantalla muestra varios
botones que puede utilizar en la vista actual.
Toque un botón para pulsarlo.
Para volver a una vista anterior, toque la parte
exterior de la pantalla que actualmente se
muestra o toque la flecha izquierda () en la parte
superior izquierda de la pantalla.

20
Selección de sonidos
Cómo comenzar con la gama de instrumentos incorporados del MPC Key 61:
1. La primera vez que se enciende el MPC Key 61, pulse el botón Empty Project en la pantalla Demo
para crear un proyecto nuevo. Las pistas 1-8 se completarán automáticamente con programas de
plugins en este nuevo proyecto.
2. Pulse el botón Sounds para abrir el menú de instrumentos. Alternativamente, toque el icono
Sounds estando en el modo principal en la pantalla.
3. En la página de instrumentos, verá una lista de los plugins disponibles para el MPC Key 61. Toque
el nombre del plugin para abrir las categorías de los presets del plugin seleccionado y toque el
nombre de la categoría para visualizar los presets en ella.
Para regresar a la página anterior, toque el icono en la esquina superior izquierda de la pantalla
táctil.
4. Toque el nombre del preset para cargarlo en la pista. También puede utilizar las flechas en la parte
inferior de la pantalla para pasar al preset anterior o siguiente.
Para regresar a la página de inicio de los instrumentos, toque el icono X en la esquina superior
izquierda de la pantalla táctil.
Para regresar al modo principal, pulse el botón Main.
Edición de sonidos
Cómo editar un preset de plugin seleccionado:
1. Desde la página de instrumentos, toque el botón Edit Instrument en la parte inferior de la pantalla
para pasar al modo de edición de programa, en donde verá una representación gráfica de la
interfaz del plugin. Como alternativa, puede pulsar el botón Edit del hardware MPC Key 61 en
cualquier momento.
2. Utilice las pestañas en la parte inferior de la pantalla para visualizar las diferente páginas de
parámetros para cada plugin.
3. Los parámetros del plugin se pueden editar directamente desde la pantalla táctil o puede utilizar
las perillas Q-Link para ajustar los parámetros resaltados. Toque el botón Q-Link en el hardware
MPC Key 61 para modificar la columna de parámetros que controlan las perillas Q-Link.
Para activar la automatización de la grabación de ajustes de parámetros, toque el icono de
automatización en la esquina superior izquierda de la pantalla táctil. Como alternativa, pulse el botón
Automation Read/Write en el hardware MPC Key 61 para conmutar entre los modos. Cuando se
activa la automatización de escritura, podrá ajustar los parámetros mientras graba o reproduce y así
lograr una actuación expresiva que se podrá grabar y reproducir. Ajuste el estado de automatización
a escritura para reproducir sus ajustes.
Para guardar su preset de plugin editado, toque el icono del disco en la parte superior de la pantalla.
Para cargar un preset de plugin editado, toque el icono de la carpeta en la parte superior de la
pantalla.
La pagina si sta caricando...
La pagina si sta caricando...
La pagina si sta caricando...
La pagina si sta caricando...
La pagina si sta caricando...
La pagina si sta caricando...
La pagina si sta caricando...
La pagina si sta caricando...
La pagina si sta caricando...
La pagina si sta caricando...
La pagina si sta caricando...
La pagina si sta caricando...
La pagina si sta caricando...
La pagina si sta caricando...
La pagina si sta caricando...
La pagina si sta caricando...
La pagina si sta caricando...
La pagina si sta caricando...
La pagina si sta caricando...
La pagina si sta caricando...
La pagina si sta caricando...
La pagina si sta caricando...
La pagina si sta caricando...
La pagina si sta caricando...
La pagina si sta caricando...
La pagina si sta caricando...
La pagina si sta caricando...
La pagina si sta caricando...
La pagina si sta caricando...
La pagina si sta caricando...
La pagina si sta caricando...
La pagina si sta caricando...
-
 1
1
-
 2
2
-
 3
3
-
 4
4
-
 5
5
-
 6
6
-
 7
7
-
 8
8
-
 9
9
-
 10
10
-
 11
11
-
 12
12
-
 13
13
-
 14
14
-
 15
15
-
 16
16
-
 17
17
-
 18
18
-
 19
19
-
 20
20
-
 21
21
-
 22
22
-
 23
23
-
 24
24
-
 25
25
-
 26
26
-
 27
27
-
 28
28
-
 29
29
-
 30
30
-
 31
31
-
 32
32
-
 33
33
-
 34
34
-
 35
35
-
 36
36
-
 37
37
-
 38
38
-
 39
39
-
 40
40
-
 41
41
-
 42
42
-
 43
43
-
 44
44
-
 45
45
-
 46
46
-
 47
47
-
 48
48
-
 49
49
-
 50
50
-
 51
51
-
 52
52


Akai 541332 Guida utente
- Categoria
- Attrezzatura musicale
- Tipo
- Guida utente
in altre lingue
- English: Akai 541332 User guide
- français: Akai 541332 Mode d'emploi
- español: Akai 541332 Guía del usuario
- Deutsch: Akai 541332 Benutzerhandbuch
Documenti correlati
-
Akai Professional MPC ONE Guida utente
-
Akai MPC X Special Edition Guida utente
-
Akai Professional MPC Studio Black Manuale del proprietario
-
-
Akai Professional MPC Element Manuale utente
-
Akai Professional MPK 49 Manuale utente
-
Akai MPK61 Manuale del proprietario
-
Akai APC Key 25 Manuale utente