
Model: H6199
User Manual
Govee RGBIC TV Backlight
(For 55-65 inch TVs)

English 01
Deutsch 10
Français 19
Español 28
Italiano 37
日本語 46

Read and follow all the safety instructions:
●
●
●
●
●
●
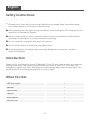
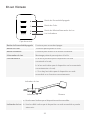
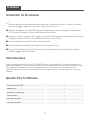
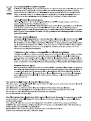
LED Strip Lights
Adapter
Control Box
Camera
User Manual
Service Card
1
1
1
1
1
1
Safety Instructions
01
Be cautious of static electricity during installation and usage. Keep the product away
from sharp objects or strong corrosive chemicals.
When bending the strip lights during installation, avoid folding the LED components as it
may affect the product’s lifespan.
Remove nails, metal, or other conductive objects from the installation surface before
attaching the strip lights, as it may cause short-circuiting.
Do not install the strip lights near any heat sources.
Do not allow children to install the strip lights alone.
Avoid installing the strip lights near potentially dangerous sources (e.g., candles,
liquid-filled objects).
Thank you for choosing the Govee TV Backlight. These TV strip lights provide an immersive
viewing experience. The camera, positioned in the center of your TV or PC screen, can
intelligently capture the colors displayed and automatically apply them to your lights. This
significantly enriches your gaming worlds or movie nights.
Introduction
What You Get
English

02
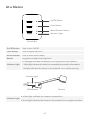
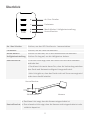
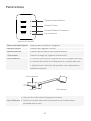
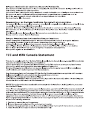
Indicator Light a. A blue light indicates the camera is powered on.
b. A dim light indicates the camera is not powered on or might be broken.
Camera
Indicator Light
3M Adhesive
At a Glance
On/Off Button
Color Button
Music/Dimmer
Button
Indicator Light
Press to turn On/Off.
Press to adjust the color.
Press to enter Music mode.
Long press to adjust the brightness.
a. A red light indicates the device is not connected to the network.
b. A blue light indicates the device has successfully connected to the network.
c. No light indicates the device is not powered on or malfunctioning.
Control Box
On/Off Button
Color Button
Music/Dimmer Button
Indicator Light

03
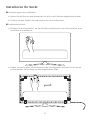
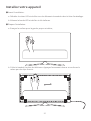
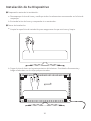
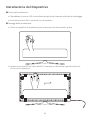
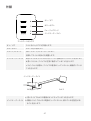
Preparation Before Installing:
a. Unbox the strip lights and check all items listed in the packing list.
b. Power on the strip lights and check whether they light up.
❶
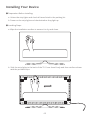
Installing Steps:
a. Wipe the installation surface to ensure it is dry and clean.
❷
Installing Your Device
b. Stick the strip lights to the back of the TV. Press them firmly and then reinforce them
with the provided clips.

04
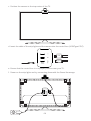
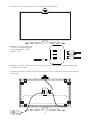
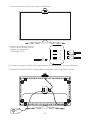
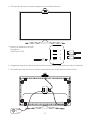
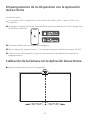
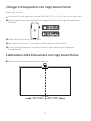
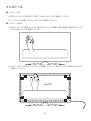
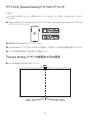
c. Position the camera to the top-center of the TV.
e.
f.
Ensure that the control box is in a proper position near your TV.
Power on the strip lights and try connecting them with the Govee Home app.
d. Insert the cable of the strip lights and the camera into the control box. (USB/Type-C/DC)
USB
Type-C
DC

05
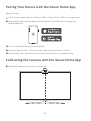
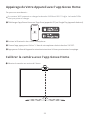
Pairing Your Device with the Govee Home App
A Wi-Fi router supporting the 2.4GHz and 802.11 b/g/n bands. 5GHz is not supported.
What you need:
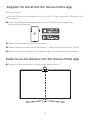
Mount the camera to the center of the screen.
❶
Calibrating the Camera with the Govee Home App
Download the Govee Home app from the App Store (iOS devices) or Google Play
(Android devices).
Turn on the Bluetooth in your smartphone.
Open the app, tap the “+” icon in the top right corner and search “H6199”.
Tap the device icon and follow the onscreen instructions to complete pairing.
❶
❷
❸
❹
Govee Home

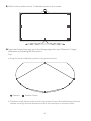
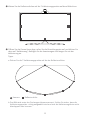
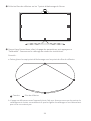
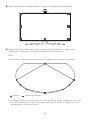
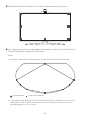
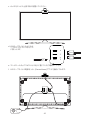
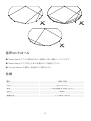
Stick the form stickers to the 7 calibration points on the screen.
❷
06
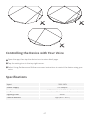
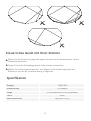
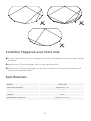
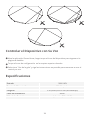
Drag the seven calibration points to the position points.a.
Tips
Camera
Open the Govee Home app, go to the Settings page, then tap “Calibration”. Begin
calibration by following the instructions.
❸
Position Points
The picture will distort under the fish-eye camera. Ensure the calibration points are
chosen correctly and the calibration lines do not overlap or cross each other.
b.

Input
Power Supply
Length
Lighting Color
Control Method
100V-240V
12V Adapter
2.3ft (left/right) +3.94ft (top/bottom)
RGBIC
App (BLE + Wi-Fi)
Specifications
07
❶
❷
❸
Open the app, then tap the device icon to enter detail page.
Tap the setting icon in the top right corner.
Select Using Guidance and follow on-screen instructions to control the device using your
voice.
Controlling the Device with Your Voice

08
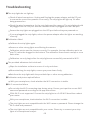
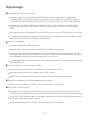
❹Calibration and picture upload failure
With your smartphone, check whether the Wi-Fi connection is stable.
❷Calibration failed.
Calibrate the strip lights again.
Ensure no other strong lights are affecting the camera.
Calibration points must be chosen correctly. For example, the top calibration point on
your TV cannot be dragged to the bottom. The calibration lines cannot overlap or cross
each other.
Calibration can only begin after the strip lights are successfully connected to Wi-Fi.
❺Wi-Fi connection failure
Do not skip the Wi-Fi connecting step during setup. Ensure you input the correct Wi-Fi
name and password according to the app instructions.
5GHz Wi-Fi is not supported. Connect the strip lights to a 2.4G Wi-Fi band then reboot
your router.
With your smartphone, check whether the Wi-Fi connection is stable.
The strip lights are not compatible with the Wi-Fi name or password. Please change the
Wi-Fi name and password.
The strip lights are not compatible with your router. Please try to connect your strip
lights to a smartphone hotspot.
❸The provided adhesives don’t stick well.
Wipe the installation surface to ensure it is dry and clean.
When attaching the strip lights, ensure you press down firmly.
Reinforce the strip lights with the provided clips or other strong adhesives.
❶The strip lights do not light up.
Check all wired connections. Unplug and Re-plug the power adapter and the DC port
to ensure the control box powers on correctly. The strip lights will light up 10s after
being powered on.
Check the wired connections for the strip lights and the camera. The strip lights should
be plugged into the LED port and the camera should be plugged into the CAM port.
Ensure the strip lights are plugged into the LED port before they are powered on.
If you unplugged the strip lights, reboot the power adapter after the lights are working
correctly.
Troubleshooting

09
Customer Service
Warranty: 12-Month Limited Warranty
Support: Lifetime Technical Support
Email: [email protected]
Official Website: www.govee.com
@Govee.smarthome@Goveeofficial
@govee.official
@govee_official
@Govee

Bitte lesen und befolgen Sie die Sicherheitsanweisungen:
●
●
●
●
●
●
LED Streifen
Adapter
Kontrollbox
Kamera
Benutzerhandbuch
Service Card
1
1
1
1
1
1
Sicherheitshinweise
10
Seien Sie vorsichtig mit statischer Elektrizität während der Installation und Nutzung. Halten
Sie das Produkt von scharfen Gegenständen oder stark ätzenden Chemikalien fern.
Vermeiden Sie beim Biegen des Lichtbands während der Installation das Falten der
LED-Komponenten, da dies die Lebensdauer des Produkts beeinträchtigen kann.
Entfernen Sie Nägel, Metall oder andere leitfähige Gegenstände von der Oberfläche, wo
der Streifen installiert wird, vor dem Anbringen des Lichtbands, da dies zu Kurzschlüssen
führen kann.
Stellen Sie die Lichterkette nicht in der Nähe von Wärmequellen auf.
Erlauben Sie Kindern nicht, das Lichtband allein zu montieren.
Vermeiden Sie die Installation des LED Streifens in der Nähe potenziell gefährlicher
Quellen (z. B. Kerzen, mit Flüssigkeit gefüllte Sachen).
Wir danken Ihnen für die Wahl für Govee RGBIC LED Streifen. Dieser TV LED Streifen bietet
Ihnen ein immersives Fernsehererlebnis. Die Kamera in der Mitte Ihres Fernseh- oder
PC-Bildschirms kann die angezeigten Farben intelligent erfassen und automatisch auf Ihre
Lichter anwenden. Dies bereichert Ihre Spielewelten oder Filmabende erheblich.
Einführung
Was Sie bekommen
Deutsch

11
Kontrollleuchte
a. Das blaue Licht zeigt, dass die Kamera eingeschaltet ist.
b. Das schwache Licht zeigt, dass die Kamera nicht eingeschaltet ist oder
vielleicht kaputt ist.
Kamera
Kontrollleuchte
3M-Klebestoff
Überblick
An / Aus Schalter
Farbetaste
Musik-Modus /
Helligkeitseinstellung
Kontrollleuchte
Drücken, um den LED Streifen ein- / auszuschalten.
Drücken, um die Farbe zu wescheln.
Drücken Sie kurz auf, um in den Musikmodus zu wechseln.
Drücken Sie lang auf, um die Helligkeit zu ändern.
a. Das rote Licht zeigt, dass das Gerät nicht mit dem Netzwerk
verbindet hat.
b. Das blaue Licht weist darauf hin, dass die Verbindung zwischen
dem Gerät und Netzwerk erfolgreich hergestellt wird.
c. Kein Licht gibt an, dass das Gerät nicht mit Strom versorgt wird
order einen Ausfall erleidet.
Kontrollbox
An / Aus Schalter
Farbetaste
Musik-Modus / Helligkeitseinstellung
Kontrollleuchte

12
Vorbereitung vor der Installation:
a. Packen Sie die Box aus und überprüfen Sie alle in der Packliste aufgeführten Artikel.
b. Schalten Sie den Streifen ein und checken Sie, ob er aufleuchtet.
❶
Installationsschritte:
a.
❷
Installieren Ihr Gerät
b. Kleben Sie den Streifen auf die Rückseite des Fernsehgeräts. Drücken Sie ihn fest an
und verstärken Sie ihn dann mit den mitgelieferten Clips.
Reinigen Sie die Oberfläche, wo der Streifen installiert wird, um sicherzustellen, dass
sie trocken und sauber ist.

13
c. Stellen Sie die Kamera oben in der Mitte des Fernsehers.
e.
f.
Stellen Sie sicher, dass sich die Kontrollbox in einer richtigen Position nahe dem
Fernseher befindet.
Schalten Sie das Lichtband ein und versuchen Sie, es mit der Govee Home App zu
verbinden
d. Stecken Sie das Kabel des
Streifens und der Kamera
in die Steuerbox. (USB /
Type-C / DC) USB
Type-C
DC

14
Koppeln Ihr Gerät mit der Govee Home App
Einen Wi-Fi-Router, der die Bänder 2,4 GHz und 802.11 b/g/n unterstützt. 5GHz wird nicht
unterstützt.
Was Sie brauchen:
Bringen Sie die Kamera oben in der Mitte des Bildschirms an.
❶
Kalibrieren die Kamera mit der Govee Home App
Laden Sie die Govee Home App aus App Store (iOS-Geräte) oder Google Play
(Android-Geräte) herunter.
Öffnen Sie das Bluetooth Ihres Smartphones.
Öffnen Sie die App. Klicken Sie auf das Symbol “+” oben rechts und suchen Sie “H6199”.
Wählen Sie H6199 und folgen Sie die Anweisungen, um das Koppeln fertigzustellen.
❶
❷
❸
❹
Govee Home

15
Kleben Sie die Reflexionsfolien auf die 7 Kalibrierungspunkte auf dem Bildschirm.
❷
Ziehen Sie die 7 Kalibrierungspunkte auf die der Reflexionsfolien.
Das Bild wird unter der Fischaugen-Kamera verzerrt. Stellen Sie sicher, dass die
Kalibrierungspunkte richtig ausgewählt sind und sich die Kalibrierungslinien nicht
überlappen oder kreuzen.
a.
b.
Tipps:
Kamera
Öffnen Sie die Govee Home App, rufen Sie die Einstellungsseite auf und klicken Sie
dann auf “Kalibrierung”. Befolgen Sie die Anweisungen und fangen Sie mit der
Kalibrierung an.
❸
Reflexionsfolie

Eingang
Kraftmethode
Länge
Farbe
Kontrollmethode
100V-240V
12V Adapter
2.3ft (Seiten) and 3.94ft (Top/Boden)
RGBIC
App (BLE + Wi-Fi)
Spezifikation
16
❶
❷
❸
Öffnen Sie die Govee Home-App und tippen Sie dann auf das Gerätesymbol, um die
Detailseite aufzurufen.
Tippen Sie auf das Einstellungssymbol in der oberen rechten Ecke.
Wählen Sie "Anleitungen verwenden" und folgen Sie den Anweisungen auf dem
Bildschirm, um mit der Sprachsteuerung zu beginnen.
Steuern Das Gerät mit Ihrer Stimme

❹Fehler beim Kalibrieren und Hochladen von Bildern
Überprüfen Sie mit Ihrem Smartphone, ob die Wi-Fi-Verbindung stabil ist.
❷Die Kalibrierung scheitert.
Kalibrieren Sie den Streifen erneut.
Stellen Sie sicher, dass keine anderen starken Lichter die Kamera beeinflussen.
Die Kalibrierungspunkte müssen richtig gewählt werden. Beispielsweise kann der
obere Punkt Ihres Fernsehgeräts nicht nach unten gezogen werden. Die
Kalibrierungslinien können sich nicht überlappen oder kreuzen.
Die Kalibrierung kann erst beginnen, nachdem das Lichtband erfolgreich mit Wi-Fi
verbunden wurde.
❺Wi-Fi-Verbindungsabbruch.
Überspringen Sie den Wi-Fi-Verbindungsschritt während der Einstellung nicht. Stellen
Sie sicher, den richtigen Wi-Fi-Namen und das richtige Password gemäß den
Anweisungen einzugeben.
5-GHz-Band wird nicht unterstützt. Verbinden Sie den Streifen mit 2,4-GHz-Band und
starten Sie den Router neu.
❸Die mitgelieferten Klebstoffe haften nicht gut.
Reinigen Sie die Oberfläche, wo den Streifen angebracht wird, um sicherzustellen, dass
sie trocken und sauber ist.
Achten Sie beim Montieren des Streifens darauf, dass Sie fest nach unten drücken.
Verstärken Sie die Lichterkette mit den mitgelieferten Befestigungsklemmen oder
anderen starken Klebstoffen.
17
❶Der Streifen leuchtet nicht auf.
Überprüfen Sie alle Kabelverbindungen. Stecken Sie den Adapter und DC-Anschluss
aus und wieder an, um sicherzustellen, dass die Kontrollbox richtig eingeschaltet wird.
Das Lichtband wird in 10 Sekunden nach dem Einschalten aufleuchten.
Checken Sie die Kabelverbindungen der Lichterkette und Kamera. Das Lichtband sollte
an den LED-Anschluss und die Kamera an den CAM-Anschluss angeschlossen werden.
Stellen Sie sicher, dass der Streifen vor dem Einschalten an den LED-Anschluss
angeschlossen ist.
Wenn Sie den Streifen ausgesteckt haben, starten Sie den Adapter neu, nachdem die
Lichter ordnungsgemäß funktionieren.
Fehlersuche

18
Überprüfen Sie mit Ihrem Smartphone, ob die Wi-Fi-Verbindung stabil ist.
Der Streifen ist nicht mit dem Wi-Fi-Name oder Password kompatibel. Bitte ändern Sie
den Wi-Fi-Namen und das Password.
Das Streifenlicht ist nicht mit dem Router kompatibel. Bitte versuchen Sie, ihr
Lichtband mit Hotspot zu verbinden.
Die Kundenbetreuung
Garantie: 12-Monate Beschränkte Garantie
Support: Lifetime Technische Unterstützung
Email: [email protected]
Offizielle Website: www.govee.com
@Govee.smarthome@Goveeofficial
@govee.official
@govee_official
@Govee
La pagina sta caricando ...
La pagina sta caricando ...
La pagina sta caricando ...
La pagina sta caricando ...
La pagina sta caricando ...
La pagina sta caricando ...
La pagina sta caricando ...
La pagina sta caricando ...
La pagina sta caricando ...
La pagina sta caricando ...
La pagina sta caricando ...
La pagina sta caricando ...
La pagina sta caricando ...
La pagina sta caricando ...
La pagina sta caricando ...
La pagina sta caricando ...
La pagina sta caricando ...
La pagina sta caricando ...
La pagina sta caricando ...
La pagina sta caricando ...
La pagina sta caricando ...
La pagina sta caricando ...
La pagina sta caricando ...
La pagina sta caricando ...
La pagina sta caricando ...
La pagina sta caricando ...
La pagina sta caricando ...
La pagina sta caricando ...
La pagina sta caricando ...
La pagina sta caricando ...
La pagina sta caricando ...
La pagina sta caricando ...
La pagina sta caricando ...
La pagina sta caricando ...
La pagina sta caricando ...
La pagina sta caricando ...
La pagina sta caricando ...
La pagina sta caricando ...
La pagina sta caricando ...
La pagina sta caricando ...
La pagina sta caricando ...
-
 1
1
-
 2
2
-
 3
3
-
 4
4
-
 5
5
-
 6
6
-
 7
7
-
 8
8
-
 9
9
-
 10
10
-
 11
11
-
 12
12
-
 13
13
-
 14
14
-
 15
15
-
 16
16
-
 17
17
-
 18
18
-
 19
19
-
 20
20
-
 21
21
-
 22
22
-
 23
23
-
 24
24
-
 25
25
-
 26
26
-
 27
27
-
 28
28
-
 29
29
-
 30
30
-
 31
31
-
 32
32
-
 33
33
-
 34
34
-
 35
35
-
 36
36
-
 37
37
-
 38
38
-
 39
39
-
 40
40
-
 41
41
-
 42
42
-
 43
43
-
 44
44
-
 45
45
-
 46
46
-
 47
47
-
 48
48
-
 49
49
-
 50
50
-
 51
51
-
 52
52
-
 53
53
-
 54
54
-
 55
55
-
 56
56
-
 57
57
-
 58
58
-
 59
59
-
 60
60
-
 61
61


in altre lingue
- English: Govee H6199 User manual
- français: Govee H6199 Manuel utilisateur
- español: Govee H6199 Manual de usuario
- Deutsch: Govee H6199 Benutzerhandbuch
- 日本語: Govee H6199 ユーザーマニュアル
Documenti correlati
-
 Govee H6601 AI Gaming Sync Box Kit Manuale utente
-
Govee H61C3 Guida utente
-
 Govee H6179 Manuale utente
-
 Govee H61790A1 Manuale utente
-
 Govee TV LED Backlights, Govee 9.8ft LED Strip Lights Manuale utente
-
Govee H6178 Manuale utente
-
Govee H6278 Manuale utente
-
Govee H5102 Manuale utente
-
Govee H6059 Manuale utente


