
Manuale d’uso
User manual
Forno Air Fryer
Air Fryer Oven
Mod.: FG97
BY TREVIDEA
IT EN PT FR
Technical model: KDF-701D
GenioPù

1
ITA: INDICE
Simbologia……...……………………………………………...……………………………………………………. p. 2
Avvertenze di sicurezza…...……………………………………...…………………………………………. p. 3
Informazioni d’uso………...……………………………………...…………………………………………….. p. 5
FG97…..…………...………………………..…………………...………………………………………...…………… p. 7
Cottura……………………...……………………………………...……………………………………………………p. 7
Pannello di controllo…...………………………………...………………………………………...…………… p. 7
Funzionamento……….…...……………………………………...……………………………………………….. p. 7
Funzione partenza ritardata…..………………………………………………..……………………………. p. 8
Accessori………………..…...……………………………………...……………………………………………….. p. 8
Suggerimenti…..………………..…...………………………………………………..……………………………. p. 9
Impostazioni…..……………………...………………………………………………..……………………………. p. 9
Pulizia………...……………………………………...……………………………………...……………..………….. p. 10
Caratteristiche tecniche………...……………………………………...………………………………………. p. 10
Trattamento dei rifiuti delle apparecchiature elettriche
ed elettroniche………...……………………………………...……………………………………...……………... p. 34
ENG: INDEX
Symbols…….…...……………………………………………...……………………………………………………. p. 2
Safety Instructions……………..……………………………………...…………………………………………. p. 11
General information………..……………………………………...…………………………………………….. p. 13
FG97…..………...………………………………….………...………………………………………...………………. p. 14
Cooking…………….…...……………………………………...……………………………………………………… p. 14
Control panel…….…………………………………………...………………………………………...…………… p. 14
Functioning………………...……………………………………...…………………………………..…………….. p. 15
Function delayed start……………………………………...…………………………………..…………….. p. 15
Accessories………………...……………………………………...…………………………………..…………….. p. 15
Tips….……….…………………………...………………………………………………..……………………….……. p. 16
Settings….……………………………...………………………………………………..……………………….……. p. 16
Cleaning……...……………………………………...……………………………………...……………..……….….. p. 17
Technical features…………….....……………………………………...………………………………………. p. 17
Waste of electric and electronic equipment (WEEE
Directive)………...……………………………………...……………………………………...………………….... p. 34
PORTUGUES:…...…………………………………..…...………………………………………………p. 18
FRANCAIS …………….…………………………...……………………………………...……………...... p. 25

2
CLASSI DI PROTEZIONE / PROTECTION CLASSES
ATTENZIONE
RISCHIO DI SCOSSE ELETTRICHE
NON ESPORRE A PIOGGIA E UMIDITA’
WARNING
ELECTRIC SHOCK RISK
DO NOT EXPOSE TO RAIN OR MOISTURE
ATTENZIONE: NON APRITE L’APPARECCHIO. ALL’INTERNO NON VI SONO COMANDI
MANIPOLABILI DALL’UTENTE NE’ PARTI DI RICAMBIO. PER TUTTE LE OPERAZIONI DI
SERVIZIO RIVOLGERSI AD UN CENTRO DI ASSISTENZA AUTORIZZATO.
Se l’apparecchio ha impresso i simboli sottostanti, significa che le caratteristiche tecniche sono
corrispondenti al simbolo.
Questo simbolo segnala la presenza all’interno del prodotto di componenti operanti ad alta tensione;
non apritelo in nessun caso.
This symbol warns the user that un-insulated dangerous voltage inside the system may cause
an electrical shock. Do not open the case.
Questo simbolo indica che l’apparecchio appartiene alla CIasse I: ciò significa che l’apparecchio ha
una spina che comprende il polo di messa a terra e va usata esclusivamente su prese provviste di
messa a terra.
Class I Appliance symbol. This means the appliance must have the chassis connected to
electrical earth/ground by an earth conductor.
Attenzione: questo simbolo indica all’utente istruzioni importanti da leggere e da rispettare durante
l’utilizzo del prodotto.
Caution: this symbol reminds the user to read carefully the important operations and
maintenance instructions in this owner’s guide.
Attenzione: Superficie che scotta, pericolo di ustioni.
Caution: hot surface, danger of burns.

3
AVVERTENZE DI SICUREZZA
Di seguito sono riportate importanti indicazioni
riguardanti l’installazione, l’uso e la manutenzione;
conservare con cura questo libretto per ogni ulteriore
consultazione; utilizzare il prodotto solo nel modo
indicato dal presente libretto di istruzioni; ogni altro uso è
da considerare improprio e pericoloso; perciò il
costruttore non può essere considerato responsabile nel
caso in cui vi siano danni derivanti da usi impropri,
erronei ed irragionevoli.
Prima dell’uso verificare l'integrità dell'apparecchio: in
caso di dubbio non utilizzarlo e rivolgersi all’assistenza.
Non lasciare gli elementi dell'imballaggio (sacchetti in
plastica, polistirolo espanso, chiodi, graffette, ecc.) alla
portata dei bambini in quanto sono potenziali fonti di
pericolo; inoltre, ricordiamo che questi, devono essere
oggetto di raccolta differenziata.
Accertarsi che i dati di targa siano compatibili con quelli
della rete elettrica; l'installazione deve essere effettuata in
base alle istruzioni del costruttore considerando la
potenza massima indicata in targa; un’errata installazione
può causare danni a persone, animali o cose, per i quali il
costruttore non può essere considerato responsabile.
Se fosse necessario l’uso di adattatori, prese multiple e
prolunghe utilizzare quelli conformi alle vigenti norme di
sicurezza; non superare i limiti di assorbimento indicati su
adattatore e/o prolunghe, nonché quello di massima
potenza marcato sull'adattatore multiplo.
Non lasciare l'apparecchio inutilmente inserito; meglio
staccare la spina dalla rete di alimentazione quando
l'apparecchio non viene utilizzato.
Scollegare sempre l’apparecchio dall’alimentazione se
lasciato incustodito.
Le operazioni di pulizia devono essere effettuate dopo
aver staccato la spina.

4
Qualora l’apparecchio sia fuori uso e si sia deciso di non
ripararlo, si raccomanda di renderlo inutilizzabile
tagliando il cavo di alimentazione.
- Non avvicinare il cavo di alimentazione a oggetti
taglienti o a superfici calde e non tirarlo per staccare la
spina. Non lasciarlo penzolare dal piano di lavoro dove
un bambino potrebbe afferrarlo. Non utilizzare il
prodotto in caso di danni al cavo di alimentazione, alla
spina o in caso di cortocircuiti; fare riparare il prodotto
da un centro di assistenza autorizzato.
- Non esporre il prodotto a condizioni atmosferiche
dannose come pioggia, umidità, gelo, ecc. Conservarlo
in luoghi asciutti. Non maneggiare o toccare il prodotto
con mani bagnate o a piedi nudi.
- Questo apparecchio può essere utilizzato da bambini
dagli 8 anni in su e da persone con ridotte capacità
fisiche, sensoriali o mentali o con mancanza di
esperienza o conoscenza se a loro è stata assicurata
un’adeguata sorveglianza oppure se hanno ricevuto
istruzioni circa l’uso in sicurezza dell’apparecchio e
compreso i rischi associati; le operazioni di pulizia e di
manutenzione non devono essere effettuate da bambini a
meno che non abbiano più di 8 anni e siano sorvegliati.
- I bambini non devono giocare con l’apparecchio.
- Tenere il prodotto ed il cavo di alimentazione fuori dalla
portata dei bambini sotto 8 anni.
Se il cavo di alimentazione è danneggiato, o in caso di
guasto e/o di cattivo funzionamento non manomettere
l'apparecchio. L'eventuale riparazione deve essere
effettuata dal costruttore o dal suo servizio assistenza
tecnica o comunque da una persona con qualifica
similare, in modo da prevenire ogni rischio. Il mancato
rispetto di quanto sopra può compromettere la sicurezza
dell'apparecchio e far decadere i termini di garanzia.
ATTENZIONE: il prodotto ha una funzione riscaldante.

5
Le superfici possono sviluppare alte temperature. Dato
che la percezione della temperatura è diversa per ogni
persona, utilizzare l’apparecchio con cautela. Toccare
solo le superfici progettate per essere toccate.
- Questo apparecchio è progettato per uso domestico o
applicazioni simili come: cucine per il personale in
negozi, uffici o altri luoghi di lavoro, per i clienti in
hotel, motel, bed & breakfast o residence.
- L’apparecchio non è progettato per essere usato
attraverso timer esterni o telecomandi. Prima di ogni
utilizzo svolgere il cavo di alimentazione.
- Non sottoporre il prodotto ad urti, potrebbero
danneggiarlo. Utilizzare solo ricambi ed accessori
originali e compatibili.
- Non utilizzare sotto o accanto a materiali infiammabili
come le tende, fonti di calore, zone fredde e vapore.
INFORMAZIONI D’USO
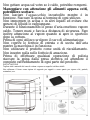
Non posizionare le pareti contro un muro. Lasciare
almeno 10cm di spazio libero sul retro, sui lati e sopra
l’apparecchio.
L’apparecchio molto caldo durante l’utilizzo; non
toccare mai il vetro o le parti interne, ma solo
maniglia e pannello di controllo. Utilizzare sempre
presine e maniglia in dotazione per estrarre gli accessori.
Non appoggiare nulla sullo sportello quando questo è
aperto, poiché la porta potrebbe danneggiarsi o il forno
potrebbe cadere e rompersi.
Servono circa 30 minuti perchè l’apparecchio si raffreddi
completamente dopo l’uso.
Non appoggiare nulla sopra l’apparecchio. Non muovere
l’apparecchio se contiene del cibo o se è ancora caldo.
Inserire gli alimenti solo su teglie e accessori in dotazione
per evitare che tocchino la resistenza.
Non riempire d’olio la leccarda: rischio di incendio.

6
Non gettare acqua sul vetro se è caldo, potrebbe rompersi.
Maneggiare con attenzione gli alimenti appena cotti,
potrebbero scottare.
Non lasciare l’apparecchio incustodito mentre è in
funzione. Staccare la spina al termine di ogni utilizzo.
Non immergere in acqua o in altri liquidi ed evitare che
spruzzi di liquidi lo raggiungano.
Durante il funzionamento le prese d’aria emettono vapore
caldo. Tenere mani e faccia a distanza di sicurezza. Fare
inoltre attenzione al vapore quando si apre lo sportello
dopo la cottura.
Prima di ogni utilizzo svolgere il cavo di alimentazione.
Non coprire le feritoie di entrata e di uscita dell’aria
mentre la macchina è in funzione.
Non utilizzare il prodotto come unità di riscaldamento.
Non inserire nulla nelle feritoie di areazione.
Prima di effettuare qualsiasi operazione di pulizia
staccare la spina dalla presa elettrica ed attendere il
completo raffreddamento di ogni parte del prodotto.
INSTALLAZIONE
Togliere tutti i materiali dal vano di cottura e riporre su superfici solide e stabili.
Non utilizzare il forno come ripiano di supporto per oggetti o come spazio per riporre cibi, pentole,
contenitori, ecc.

7
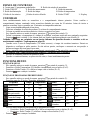
NOMENCLATURA FG97
1 Ingresso aria 2 Pannello di controllo 3 Corpo
4 Porta 5 Vassoio raccogli grassi 6 Vassoi forati (2 pezzi)
7 Griglia uscita aria (sul retro) 8 Maniglia 9 Accessorio girarrosto
10 Accessorio cestello 11 Accessorio spiedini 12 Manico per accessori
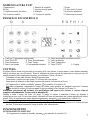
PANNELLO DI CONTROLLO
A. Tasti per 12 programmi preimpostati B. Tasto azionamento rotazione accessori
C. Tasto ON/OFF D. Tasto Riscaldamento E. Tasto incremento
F. Tasto decremento G. Tasto Tempo H. Tasto Temperatura
I. Tasto Luce interna J. Tasto partenza ritardata K. Tasto START L. Display
COTTURA
Al primo utilizzo lavare con cura tutti gli accessori ed il vano interno. Lasciar areare il vano interno estraendo
tutti gli accessori per circa 30 minuti. Prima di effettuare la prima cottura far funzionare a vuoto per circa 10
minuti portandolo alla temperatura massima, per eliminare l’odore “di nuovo”.
- Connettere ad una presa idonea e dotata di messa a terra.
- Posizionare il vassoio raccogli grassi (5) alla base del vano interno.
- Posizionare gli alimenti su uno degli accessori ed inserire l’accessorio nel forno.
- Se l’apparecchio è andato in standby, premere sul pannello di controllo (2).
- Impostare programma, temperatura e tempo di cottura come spiegato nei paragrafi successivi. Premere
per avviare la cottura. In ogni momento si può accendere la luce interna con il tasto (I).
Attenzione: Non toccare gli accessori o le parti interne dell’apparecchio durante la cottura e fino al
completo raffreddamento. Toccare solo la maniglia (8).
Quando si sente il suono del timer (10 beep), il tempo di cottura è terminato. Estrarre gli alimenti e
controllare se sono cotti. Se non sono pronti, rimetterli nel forno ed impostare una cottura aggiuntiva di alcuni
minuti. Nota: la macchina può essere spenta manualmente, premendo sul pannello di controllo (2).
Fare attenzione al vapore quando si rimuove il contenitore dopo la cottura.
- Mettere gli alimenti in un contenitore o in un piatto. Terminata una cottura, qualora se ne volesse iniziare
un’altra, il forno non necessita di tempi di attesa, ed è subito pronta.
FUNZIONAMENTO
FUNZIONAMENTO MANUALE
- Se l’apparecchio è andato in standby, premere sul pannello di controllo (2).

8
- Premere il tasto Temperatura (H) ed impostare la temperatura desiderata con i tasti (E ed F).
- Premere il tasto Tempo (G) ed impostare il tempo di cottura desiderata con i tasti (E ed F).
- Premere per avviare la cottura.
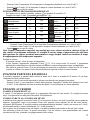
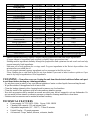
FUNZIONAMENTO PROGRAMMI PREIMPOSTATI
- Se l’apparecchio è andato in standby, premere sul pannello di controllo (2).
- Premere uno degli 12 tasti “Programma preimpostato” (A).
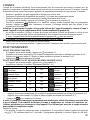
Programma
Tempo
Temperatura
Programma
Tempo
Temperatura
Riscaldamento
3
180
Dolci
25
160
Patatine
15
200
Crostacei
8
180
Pane precotto
12
200
Pesce
10
180
Cosce di pollo
20
200
Pollo spiedo
30
200
Carne
12
180
Verdure
10
160
Pizza
20
180
Essiccatore
360
60
- Qualora si vogliano cambiare le impostazioni del programma scelto:
o Premere il tasto Temperatura (H) ed impostare la temperatura desiderata con i tasti (E ed F).
o Premere il tasto Tempo (G) ed impostare il tempo di cottura desiderata con i tasti (E ed F).
- Premere per avviare la cottura.
Nota. Tempo e temperatura impostati sono studiati per avere cotture corrette in relazione al tipo di
cibo relativo al programma selezionato. Si consiglia di variare tempo e temperatura solo sulla base
dell’esperienza (es. cotture precedenti non terminate o troppo lunghe). Inoltre non includono il tempo
di raggiungimento della temperatura impostata.
Durante la cottura:
- Si possono variare i valori di tempo e temperatura.
- Si può fermare l’apparecchio premendo il tasto (C). Se si riavvia entro 10 secondi, il programma
riprenderà la cottura da dove era stato fermata, altrimenti occorrerà reimpostare tempo e temperatura.
- Non aprire la porta del forno (4) se non necessario per mescolare o controllare lo stato dei cibi. Se si apre
la porta, la cottura va in pausa ed alla chiusura della porta riprende da dove era stata fermata.
FUNZIONE PARTENZA RITARDATA
È possibile impostare la partenza della cottura in modo che il forno si accenda da 30 minuti a 8 ore dopo
l’impostazione della cottura stessa.
- Inserire i cibi da cuocere ed impostare la cottura come descritto nei paragrafi precedenti
- Premere il tasto (J) per impostare il ritardo della partenza. Impostare il ritardo della partenza con i tasti
(E ed F). Verrà impostato un timer al termine del quale il forno effettuerà la cottura impostata.
UTILIZZO ACCESSORI
VASSOIO ANTIADERENTE (5)
Il vassoio (5) ha funzione raccogli-grassi, e va appoggiato alla base del vano interno. Si consiglia di versare
un po’ di acqua nella leccarda per evitare odori ed incrostazioni.
VASSOIO FORATO (6) e VASSOIO AIR FRYER
In dotazione sono presenti un vassoio forato (6) ed un vassoio air fryer, sui quali è possibile cuocere qualsiasi
alimento. Appoggiarli come in un normale forno sulle apposite corsie presenti sui lati del vano interno,
utilizzando delle presine. È possibile mettere contemporaneamente entrambi i vassoi per cuocere su 2 livelli,
ed utilizzando anche il vassoio antiaderente (5) i livelli diventano 3.
Fare in modo che gli alimenti stiano ad almeno 3 cm dalla resistenza posizionata in alto nel vano cottura.
Non utilizzare la carta da forno, in quanto ostruirebbe i fori del vassoio e non permetterebbe una corretta
circolazione dell’aria, portando a un peggioramento della cottura.

9
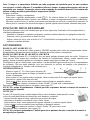
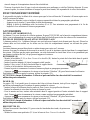
GIRARROSTO (9)
- Montare gli spiedi (C) alla barra (D) e fissarli stringendo l’apposito perno (B).
- Inserire le punte degli spiedi nel pollo (o arrosto o altro) e bloccarlo saldamente.
- Inserire il capo (A) nell'apposito supporto rotante sinistro.
- Inserire il capo (E) nell'apposito supporto destro.
- Controllare che il girarrosto sia correttamente fissato.
- Chiudere la porta del forno ed impostare la cottura come spiegato
nei paragrafi precedenti.
- Premere per avviare la cottura ed il tasto “Rotate” (B) per far girare il girarrosto.
Per estrarre il girarrosto a cottura ultimata, utilizzare il manico (12). ATTENZIONE: pericolo di scottature.
Fare attenzione a non scottarsi mentre si estrae l’accessorio, ed utilizzare delle presine.
CESTELLO (10)
Il cestello (10) è perfetto per cuocere le patatine e vari alimenti, purchè non rischino di essere
rovinati dalla rotazione del cestello durante la cottura.
- Inserire la barra del girarrosto nel cestello e fissarla con i perni del girarrosto.
- Inserire gli alimenti da cuocere nel cestello e chiudere lo sportello.
- Per montarlo nel forno, inserire un capo nel supporto sinistro e l’altro capo nel supporto destro.
- Chiudere la porta del forno ed impostare la cottura come spiegato nei paragrafi precedenti.
- Premere per avviare la cottura ed il tasto “Rotate” (B) per far girare il cestello.
Per estrarre l’accessorio a cottura ultimata, utilizzare il manico (12).
ATTENZIONE: pericolo di scottature. Fare attenzione a non scottarsi mentre si estrae l’accessorio, ed
utilizzare delle presine.
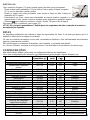
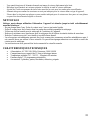
SPIEDINI (11)
Usa l’accessorio spiedini (11) per cuocere spiedini di carne, pesce o verdura.
- Montare le due ruote forate (11 b) alla barra e fissarle stringendo i perni (B).
Preparare gli spiedini (11 a) con gli alimenti da cuocere.
- Montare gli spiedini alle ruote forate come mostrato nella figura a lato. È possibile montare fino a 10
spiedini.
- Per montarlo nel forno, inserire un capo nel supporto sinistro e l’altro capo nel supporto destro.
- Chiudere la porta del forno ed impostare la cottura come spiegato nei paragrafi precedenti.
- Premere per avviare la cottura ed il tasto “Rotate” (B) per far girare gli spiedini.
Per estrarre l’accessorio a cottura ultimata, utilizzare il manico (12).
ATTENZIONE: pericolo di scottature. Fare attenzione a non scottarsi mentre si estrae l’accessorio, ed
utilizzare delle presine.
SUGGERIMENTI
I programmi preimpostati non includono il tempo di riscaldamento del forno. Si può pre-riscaldare per 3-4
minuti o aggiungerli ai tempi di cottura. In caso di cottura su teglie o su cestello, si consiglia di distribuire
prima uniformemente dell’olio sugli alimenti per avere maggiore croccantezza.
Non sovraccaricare gli accessori di alimenti, altrimenti la cottura ne risentirà.
Nel posizionare gli alimenti, fare in modo che siano distanti almeno 3 cm dalla resistenza posta in alto.
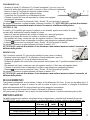
IMPOSTAZIONI
La tabella seguente può aiutare a selezionare tempo e temperatura, a seconda degli alimenti da cuocere.
ATTENZIONE: questi valori sono indicativi, in quanto dipendono da gusto, origine e tipo di alimenti, ecc.
Quanità
Min-max (g)
Tempo
(min.)
Temp
(/℃)
Accessorio
Patate
Patate congelate sottili
600-700
15-20
200
Cestello
Patate congelate spesse
600-700
18-23
200
Cestello
Patate gratinate
700-900
15-20
200
Vassoi

10
Carne e Pesce
Bistecca
200-800
15-20
180
Vassoi
Costolette di maiale
400-800
12-16
180
Vassoi
Hamburger
200-800
10-15
185
Vassoi
Petto di pollo
400-800
15-20
180
Vassoi
Cosce di pollo
400-800
25-30
190
Vassoi
Pollo al girarrosto
700-1000
40-45
180
Girarrosto
Spiedini di carne
400-800
15-20
185
Spiedini
Salsicce
400-800
12-16
200
Spiedini
Spiedini di pesce
400-800
13-15
170
Spiedini
Pesce al forno o gratinato
400-800
13-16
180
Vassoi
Snacks
Crocchette di pollo congelate
500-800
8-14
200
Vassoi
Bastoncini di pesce congelati
500-800
6-10
200
Vassoi
Bocconcini di formaggio con
panatura congelati
500-700
8-10
180
Vassoi
Verdure ripiene
500-700
15-18
160
Vassoi
Cuocere al forno
Con teglia aggiuntiva (o piatto per forno)
Torta
800
20-25
180
Usare una teglia
Quiche
800
20-22
200
Usare una teglia
Muffins
800
16-20
180
Usare una teglia
Snack dolci
800
18-20
170
Usare una teglia
Nota: aggiungere 3 minuti se quando si accende la friggitrice ad aria, essa è fredda.
- Ingredienti più piccoli richiedono un tempo di cottura leggermente minore.
- Una quantità maggiore di ingredienti richiede un tempo di cottura leggermente superiore.
- Mescolare gli alimenti a metà della cottura ottimizza il risultato, e fa si che la cottura sia più uniforme.
- Aggiungi un pò di olio alle patate fresche appena prima di cuocerle, per ottenere più croccantezza.
- Alimenti molto grassi come le salsicce non sono adatti per la cottura in friggitrice ad aria.
- Inserire nel cestello una teglia o un piatto adatto al forno se si vuol cuocere una torta o se si vuole
friggere alimenti fragili o ripieni.
PULIZIA
Pulire dopo ogni utilizzo. Staccare la spina dalla presa elettrica e lasciar raffreddare ogni parte prima
di eseguire qualsiasi operazione di pulizia.
- Non immergere in acqua. Evitare che schizzi d’acqua o di altri liquidi raggiungano l’apparecchio.
- Non far penetrare gocce di liquido o di sapone nelle aperture di areazione durante la pulizia.
- Utilizzare un panno morbido inumidito per la pulizia del corpo esterno.
- Pulire la resistenza con una spazzola per pulizia, per rimuovere eventuali residui di cibo.
- Pulire l’interno con acqua calda e spugna non abrasiva.
- Gli accessori antiaderenti possono essere lavati come normali padelle antiaderenti, ma si consiglia di non
utilizzare la lavastoviglie. Non utilizzare spugne abrasive o in metallo, o utensili da cucina.
- Gli accessori in acciaio possono essere lavati come normali stoviglie.
CARATTERISTICHE TECNICHE
• Alimentazione: AC 220-240V~50Hz. Potenza: 1600-1800W
• Vano con capacità 12 litri e luce interna
• Temperatura regolabile (50° - 200°C) - Timer 60 minuti
• Display digitale - 12 programmi preimpostati
• Accessori: 3 vassoi, cestello, spiedini, girarrosto, maniglia

11
ENGLISH: SAFETY INSTRUCTIONS
The following are important notes on the installation, use
and maintenance; save this instruction manual for future
reference; use the equipment only as specified in this
guide; any other use is considered improper and
dangerous; therefore, the manufacturer cannot be held
responsible in the event of damages caused by improper,
incorrect or unreasonable use.
Before use, ensure the equipment is undamaged; if in
doubt, do not attempt to use it and contact the authorized
service center; do not leave packing materials (i.e. plastic
bags, polystyrene foam, nails, staples, etc.) within the
reach of children as they are potential sources of danger;
always remember that they must be separately collected.
Make sure that the rating information given on the
technical label are compatible with those of the electricity
grid; the installation must be performed according to the
manufacturer's instructions considering the maximum
power of the appliance as shown on the label; an incorrect
installation may cause damage to people, animals or
things, for which the manufacturer cannot be considered
responsible thereof.
If it is necessary to use adapters, multiple sockets or
electrical extensions, use only those that comply with
current safety standards; in any case do not exceed the
power consumption limits indicated on the electrical
adapter and / or extensions, as well as the maximum
power shown on multiple adaptor.
Do not leave the unit plugged; better to remove the plug
from the mains when the device is not in use. Always
disconnect from power supply if you leave it unattended.
Cleaning operations should be carried out after
unplugging the unit.
If the unit is out of order and you do not want to fix it, it
must be made inoperable by cutting power cord.

12
- Do not allow the power cord to get closer to sharp
objects or in contact with hot surfaces; do not pull it to
disconnect the plug.
- Do not use the appliance in the event of damage to the
power cord, plug, or in case of short circuits; to repair
the product only address an authorized service center.
- Do not handle or touch the appliance with wet hands or
bare feet. Do not expose the appliance to harmful
weather conditions such as rain, moisture, frost, etc..
Always store it in a dry place.
- This appliance can be used by children of 8 years and
above and persons with reduced physical, sensory or
mental capabilities or lack of experience and knowledge
if they received supervision or instruction concerning
use of the appliance in a safe way and understand
hazards involved; children shall not play with the
appliance; cleaning and user maintenance shall not be
made by children without supervision.
- Children must not play with the appliance.
- Keep the appliance and its cord out of reach of children
less than 8 years.
If the power cord is damaged, or in case of failure and / or
malfunction do not tamper with the unit. The reparation
must be done by manufacturer or by service center
authorized by the manufacturer in order to prevent any
risk. Failure to comply with the above may compromise
the unit safety and invalidate the warranty.
WARNING: This appliance includes heating function.
Surfaces, other than functional surfaces may develop high
temperatures. Since temperatures are perceived
differently by different people, this device should be used
with CAUTION. Hold the appliance exclusively to grip
surfaces intended to be touched.
- This appliance is intended to be used in household and
similar applications such as: staff kitchen areas in shops,

13
offices and other working environments; by clients in
hotels, motels and other residential type environments;
farm houses, bed and breakfast type environments.
- The appliance is not intended to be operated by means
of an external timer or separate remote-control system.
- Before every use, unroll the power cord.
- Use original spare parts and accessories only.
- Do not subject the product to strong impacts, serious
damages may result.
- Do not use near or under flammable materials (like
curtains), heat, cold spots and steam.
GENERAL INFORMATION
The surfaces of appliance shall not be placed against a
wall. Leave at least 10cm free space on the back and sides
and 10cm free space above the appliance.
The appliance becomes very hot during use; never
touch the glass or the inside of the appliance, but only
handles and control panel. Always use pot holders to
remove the accessories.
Do not place anything on the door when it is open, as
door may be damaged or oven may fall and break.
The appliance needs approximately 30 minutes to cool
down for handle or cleaning safely. Do not wash or throw
water on glass when is hot, as it may break.
Do not place anything on top of the appliance. Don’t
move the oven if is hot or if contains food.
Put food only on the trays and accessories included, in
order to avoid them from touching the heating element.
Do not fill trays with oil as this may cause a fire hazard
Handle with care cooked food to avoid risk of burning.
Never leave the appliance unattended while it is running.
Remove the plug after each use.
Do not place the oven in water or other liquids and avoid
splashing of liquids on the unit.

14
During functioning, hot steam is released through the air
outlet openings. Keep your hands and face at a safe
distance from air outlet. Also be careful of hot steam
when you open the door after cooking.
Before every use, unroll the power cord.
Do not cover the air inlet and the air outlet openings
while the appliance is operating.
Do not use the appliance as a heating unit. Do not insert
anything in the ventilation windows.
Before cleaning, always unplug the unit from the
electrical outlet and wait for the complete cooling of each
part of the appliance.
Remove all packaging materials from the cooking compartment. Put on solid and stable surfaces only.
Always leave enough space at every side of the oven when the unit is working.
Do not use the oven as shelf support for objects or as place to store food, pots, containers, etc..
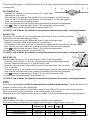
FG97
1 Air inlet 2 Control panel 3 Housing 4 Door
5 Grease collecting tray 6 Holed trays (2 pcs) 7 Air outlet (on the back) 8 Handle
9 Rotisserie 10 Basket 11 Skewers 12 Handle
CONTROL PANEL
A. Buttons for 12 preset programs B. Button for accessory rotation C. Button ON/OFF
D. Button Reheat E. Button increase F. Button decrease
G. Button time H. Button Temperature I. Button for inner light
J. Button delay start K. Button START L. Display
COOKING
Carefully wash all accessories and the inner housing first. Allow to ventilate the internal compartment
keeping all accessories away for about 30 minutes. Before starting with the first cooking, turn on the
appliance for 10 minutes at the maximum temperature.
- Connect to a suitable and earthed power socket.
- Place the grease collecting tray (5) at the bottom of cooking chamber.
- Insert food in one of the accessories and put the accessory in the oven.
- If appliance went in standby, press on the control panel (2).
- Set program, temperature and time of cooking, as explained in following paragraphs. Press to start
cooking. In any moment you can switch on the internal light with the button (I).
Caution: Do not touch accessories or inner parts of appliance during cooking and until complete
cooling. Touch only the handle (8).
- When you ear the timer sound (10 beeps), cooking time is finished. Extract food and check if is ready. If
not ready, replace in the oven and set additional cooking of some more minutes.
Note: appliance can be switched off manually, pressing on the control panel (2).
Be careful to the hot steam when you remove container after cooking.
- Place the cooked food in a container or in a dish.
- Once cooking finished, if you want to start another one, air fryer is immediately ready.

15
FUNCTIONING
MANUAL FUNCTION
- If appliance went in standby, press on the control panel (2).
- Press button Temperature (H) and Set temperature with the buttons (E and F).
- Press button Time (G) and set time with the buttons (E and F).
- Press to start cooking.
PRESET PROGRAMS FUNCTION
- If appliance went in standby, press on the control panel (2).
- Press one of the 12 preset program buttons (A).
Program
Time
Temperature
Program
Time
Temperature
Re heat
3
180
Cake
25
160
Fries
15
200
Shellfishes
8
180
Pre cooked bread
12
200
Fish
10
180
Chicken thighs
20
200
Chicken rotisserie
30
200
Meat
12
180
Vegetables
10
160
Pizza
20
180
Dehydrate
360
60
- If you want to change the settings of the program chosen:
o Press button Temperature (H) and Set temperature with the buttons (E and F).
o Press button Time (G) and set time with the buttons (E and F).
- Press to start cooking
Note. Time and temperature set on each program are studied to have correct cookings for the relative
food. It is advised to change time and temperature only based on experience (eg. Previous cookings not
finished or too long). The settings don’t include the time needed to reach the temperature set.
During cooking:
- You can change time and temperature.
- You can stop appliance pressing button (C). if you restart cooking in 10 seconds, the program will
restart from the stopping point, otherwise you will have to reset time and temperature.
- Do not open the door of oven (4) if not necessary to mix or check food cooking. If you open the door,
cooking goes in standby and when you close it, it restarts from the stopping point.
FUNCTION DELAYED START
It is possible to set delayed start of cooking in order to turn on oven from 30 minutes to 8 hours after setting
the cooking itself.
- Inserire i cibi da cuocere ed impostare la cottura come descritto nei paragrafi precedenti
- Insert the food to be cooked and set cooking as described in the previous paragraphs
- Press Button (J) to set the time delay. Set the time delay with buttons (E ed F). A timer will be set at the
end of which the oven will carry out the set cooking.
ACCESSORIES
GREASE COLLECTING TRAY (5)
The tray (5) has grease collecting function, and you should ALWAYS put it at the bottom of cooking
chamber. Put some water in the tray to avoid bad smell and fat incrustation.
HOLED TRAY (6) and AIR FRYER TRAY
One holed trays (6) and one air freyer tray are included and can be used to cook any kind of food. Place them
as in a normal oven on the aisles on the sides of the internal chamber, using pot holders.
It is possible to use both trays at once, to cook on 2 levels, and using the non-stick tray the levels are 3.
Make sure that the food is at least 3 cm far from heating element (top of chamber).

16
Do not use baking paper: it would close the holes of the trays, obstructing air circulation, and giving worse
cooking result.
ROTISSSERIE (9)
- Assemble the skewers (C) to the rotisserie (D), secure them
tightening the lock nut (B).
- Place the tips of the skewers in the chicken (or roast or whatever) and lock securely.
- Insert the end (E) in the left rotating support. Insert the head (A) in the right support.
- Make sure the rotisserie is properly secured.
- Now close the oven door and set the cooking as explained in the previous paragraphs.
- Press to start cooking and press “Rotate” (B) to make the rotisserie rotate.
To extract rotisserie when cooking finished, use the handle (12).
CAUTION: risk of burns. Pay attention to not get burnt when extract accessory, and use pot holders.
BASKET (10)
The basket (10) is perfect to cook fries and many other foods (if they don’t risk to be ruined
by the rotation of the basket during cooking).
- Insert the rotisserie bar into the basket and secure it with the rotisserie pins.
- Insert the food to be cooked in the basket and close the door.
- To assemble it in the oven, insert one end into the left support and the other end into the right support.
- Now close the oven door and set the cooking as explained in the previous paragraphs.
- Press to start cooking and press “Rotate” (B) to make the basket rotate.
To extract when cooking finished, use the handle (12).
CAUTION: risk of burns. Pay attention to not get burnt when extract accessory, and use pot holders.
SKEWERS (11)
Use the skewers accessory (11) to cook skewers of meat, fish and vegetables.
- Mount the 2 holed wheels (11 b) to the rotisserie bar and secure them tightening the
lock nut. Prepare the skewers (11 a) with the food to cook.
- Mount the skewers to the 2 holed wheels as shown in the side figure. You can mount
up to 10 skewers.
- To mount in the oven, put a head in the left rotating support, and the other head in the right support.
- Now close the oven door and set the cooking as explained in the previous paragraphs.
- Press to start cooking and press “Rotate” (B) to make the skewers rotate.
To extract when cooking finished, use the handle (12).
CAUTION: risk of burns. Pay attention to not get burnt when extract accessory, and use pot holders.
TIPS
The preset programs don’t include the time needed to reach the temperature set. You can pre-heat for 3-4
minutes or add this time to the cooking time.
If you cook on trays or basket, it is advised to spread evenly a little oil on food, to have more crispyness.
Don’t overload of food the accessories, as the cooking quality will be worse.
When placing the food, make sure that the food is at least 3 cm far from heating element (top of chamber).
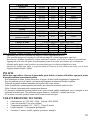
SETTINGS
This table below will help you to select the basic settings for the ingredients.
Note: these settings are indications, as depend on personal taste, origin and type of food, ecc.
Min-max
Amount (g)
Time
(min.)
Temp
(/℃)
Accessory
Potato & fries
Thin frozen fries
600-700
15-20
200
Basket
Thick frozen fries
600-700
18-23
200
Basket

17
Potato gratin
700-900
15-20
200
Trays
Meat and fish
Steak
200-800
15-20
180
Trays
Pork chops
400-800
12-16
180
Trays
Hamburger
200-800
10-15
185
Trays
Chicken breast
400-800
15-20
180
Trays
Chicken thighs
400-800
25-30
190
Trays
Chicken rotisserie
700-1000
40-45
180
Rotisserie
Meat Skewers
400-800
15-20
185
Skewers
Sausages
400-800
12-16
200
Skewers
Fish Skewers
400-800
13-15
170
Skewers
Fish
400-800
13-16
180
Trays
Snacks
Frozen chicken nuggets
500-800
8-14
200
Trays
Frozen fish fingers
500-800
6-10
200
Trays
Frozen bread crumbed
cheese snacks
500-700
8-10
180
Trays
Stuffed vegetables
500-700
15-18
160
Trays
Baking
Cake
800
20-25
180
Use additional baking tin
Quiche
800
20-22
200
Use additional baking tin
Muffins
800
16-20
180
Use additional baking tin
Sweet snacks
800
18-20
170
Use additional baking tin
Note: Add 3 minutes to the preparation time when you start frying while the Hot-air fryer is still cold.
- Smaller ingredients usually require a slightly shorter preparation time than larger ingredients.
- A larger amount of ingredients only requires a slightly longer preparation time.
- Shaking smaller ingredients halfway through the preparation time optimizes the end result and can help
prevent unevenly fried ingredients.
- Add some oil to fresh potatoes for a crispy result. Fry your ingredients in the Hot-air fryer within a few
minutes after you added the oil.
- Do not prepare extremely greasy ingredients such as sausages in the Hot-air fryer .
- Place a baking tin or oven dish in the Hot-air fryer basket if you want to bake a cake or quiche or if you
want to fry fragile ingredients or filled ingredients
CLEANING - Clean after every use. Unplug the unit from the electrical outlet and allow each part
to cool down before starting any cleaning procedure.
- Do not place oven in water. In any case prevent splashes of water or other liquids from reaching the unit.
- Wipe the outside of the appliance with a moist cloth.
- Clean the heating element with a cleaning brush to remove any food residues.
- Clean the inside of the appliance with hot water and non-abrasive sponge.
- Non stick accessories can be washed as normal non-stick pans, but we suggest to not use dishwasher. Do
not use metal kitchen utensils or abrasive sponges or abrasive cleaning materials to clean them.
- Stainless steel accessories can be washed as normal crockery.
TECHNICAL FEATURES
• Power supply: AC 220-240V~50Hz. Power: 1600-1800W
• Chamber with capacity 12L and internal light
• Adjustable temperature (50° - 200°C) - Timer 60 minutes
• Digital Display - 12 preset programs
• Accessories: 3 trays, basket, skewers, rotisserie, handle.

18
PORTUGUÊS: ADVERTÊNCIAS
As indicações seguintes são muito importantes no que se
refere à instalação, uso e manutenção deste aparelho;
conserve com cuidado este manual para eventuais futuras
consultas; utilize o aparelho apenas do modo indicado
neste manual de instruções; outro tipo de utilização
deverá considerar-se inadequado e perigoso; por isso, o
fabricante não poderá ser considerado responsável na
eventualidade de ocorrerem danos resultantes de uso
indevido, errado ou irresponsável.
Antes de utilizar, certifique-se da integridade do aparelho;
em caso de dúvida não o utilize e dirija-se à assistência
técnica autorizada; não deixe partes da embalagem (sacos
de plástico, esferovite, pregos, agrafos, etc.) ao alcance
das crianças, uma vez que constituem potenciais fontes de
perigo; além disso, recordamos que essas partes devem
ser objecto de recolha diferenciada de resíduos.
Certifique-se de que os dados constantes da placa são
compatíveis com os da rede eléctrica; a instalação deve
ser efectuada de acordo com as instruções do fabricante,
considerando a potência máxima do aparelho indicada na
placa; uma errada instalação poderá causar danos a
pessoas, animais ou objectos, pelos quais o fabricante não
poderá ser considerado responsável.
Caso seja necessário o uso de adaptadores, tomadas
múltiplas e extensões, utilizar só as que estiverem
conformes às normas de segurança em vigor; em qualquer
caso, nunca ultrapassar os limites de absorção indicados
no adaptador e/ou nas extensões, nem os de máxima
potência indicados nos adaptadores múltiplos.
Não deixar o aparelho inutilmente ligado à corrente; é
preferível retirar a ficha da tomada eléctrica quando o
aparelho não estiver a ser utilizado.
Sempre desconecte o aparelho da fonte de alimentação se
for deixado sem supervisão

19
As operações de limpeza devem ser efectuadas depois de
se ter desligado a ficha da tomada eléctrica.
Sempre que o aparelho estiver fora de uso e seja decidido
não o reparar, recomenda-se a sua inutilização, cortando-
lhe o cabo de alimentação;
- Não aproximar o cabo de alimentação de objectos
cortantes ou de superfícies quentes, e não o puxar para
arrancar a ficha da tomada eléctrica. Não deixe que ele
fique pendurado na bancada onde a criança pode segurá-
lo. Não utilizar o aparelho no caso de o cabo de
alimentação ou a ficha se encontrarem danificados, ou
em caso de curto-circuitos; Nessa eventualidade, leve o
aparelho a um centro de assistência autorizado.
- Não expor o aparelho a condições atmosféricas adversas,
como chuva, humidade, gelo, etc. Conserve-o em lugares
secos.
- Não manusear ou tocar o aparelho com as mãos
molhadas ou os pés descalços.
- Este aparelho pode ser utilizado por crianças com mais
de 8 anos e por pessoas com reduzida capacidade física,
sensorial ou mental, ou ainda com falta de experiência
na sua utilização, desde que lhes seja assegurada uma
adequada supervisão ou se tiverem sido instruídas no uso
do aparelho em segurança; as operações de limpeza e de
manutenção não devem ser efectuadas por crianças, a
menos que tenham mais de 8 anos e sejam
supervisionadas.
- As crianças não devem brincar com o aparelho.
- Mantenha o aparelho e o cabo de alimentação fora do
alcance de crianças com menos de 8 anos de idade.
Se o cabo de alimentação estiver danificado, ou em caso
de falha e / ou avaria, não mexa no aparelho. Qualquer
reparação deve ser realizada pelo fabricante ou pelo seu
serviço de assistência técnica ou, em qualquer caso, por
uma pessoa com qualificação semelhante, a fim de
La pagina si sta caricando...
La pagina si sta caricando...
La pagina si sta caricando...
La pagina si sta caricando...
La pagina si sta caricando...
La pagina si sta caricando...
La pagina si sta caricando...
La pagina si sta caricando...
La pagina si sta caricando...
La pagina si sta caricando...
La pagina si sta caricando...
La pagina si sta caricando...
La pagina si sta caricando...
La pagina si sta caricando...
La pagina si sta caricando...
La pagina si sta caricando...
-
 1
1
-
 2
2
-
 3
3
-
 4
4
-
 5
5
-
 6
6
-
 7
7
-
 8
8
-
 9
9
-
 10
10
-
 11
11
-
 12
12
-
 13
13
-
 14
14
-
 15
15
-
 16
16
-
 17
17
-
 18
18
-
 19
19
-
 20
20
-
 21
21
-
 22
22
-
 23
23
-
 24
24
-
 25
25
-
 26
26
-
 27
27
-
 28
28
-
 29
29
-
 30
30
-
 31
31
-
 32
32
-
 33
33
-
 34
34
-
 35
35
-
 36
36


in altre lingue
- English: Girmi FG97 User manual
- français: Girmi FG97 Manuel utilisateur
- português: Girmi FG97 Manual do usuário
Altri documenti
-
Beko FRL 5388 B Manuale utente
-
G3FERRARi TY-A220CLG Manuale utente
-
Masterpro ROCKET 1100 Manuale utente
-
Samsung BT62CDBST Manuale utente
-
Whirlpool AKZM 773/IX Guida utente
-
-
Grundig GEBM11400X Manuale utente
-
-
-