Lavazza Fantasia Manuale utente
- Categoria
- Macchine da caffè
- Tipo
- Manuale utente
La pagina si sta caricando...

RU Инструкция ..........................61-78
Перед первым применением
устройства прочтите раздел о
мерах предосторожности на
стр. 62.
NO Bruksanvisning .................... 43-60
Les rådene vedrørende sikkerhet
på side 47 før du bruker apparatet
for første gang.
FI Käyttöohjeet .........................43-60
Lue sivun 46 turvallisuusohjeet
huolellisesti ennen kuin käytät
laitetta ensimmäistä kertaa.
DA Brugervejledning ...............43-60
Før apparatet bruges for første
gang, bør sikkerhedsrådene på
side 45 læses.
SV Bruksanvisning .................... 43-60
Läs säkerhetsanvisningen på sidan
44 innan du använder apparaten
första gången.
PL Instrukcja obsługi .............. 25-42
Przed pierwszym użyciem urzą-
dzenia przeczytaj uważnie zalece-
nia bezpieczeństwa na stronie 29.
PT Manual de instruções .... 25–42
Antes de utilizar o aparelho pela
primeira vez, leia os avisos de
segurança na página 28.
ES Instrucciones de uso ...... 25–42
Antes de utilizar el electrodomés-
tico por primera vez, lea la indica-
ción de seguridad de la página 27.
NL Gebruiksaanwijzing ......... 25–42
Lees het veiligheidsadvies op
pagina 26 voordat u het apparaat
voor het eerst gebruikt.
DE Anleitung ..................................7–24
Vor der ersten Inbetriebnahme
des Geräts lesen Sie bitte die
Sicherheitshinweise auf Seite 11.
FR Mode d'emploi .....................7–24
Avant d’utiliser cet appareil pour
la première fois, veuillez lire les
consignes de sécurité en page10.
CONTENTS
EN Instruction book ..................7–24
Before using the appliance for the
first time, please read the safety
advice on page 9.
IT Gentile cliente ............................... 3
EN Dear Customer ..............................3
FR Cher/Chère client(e) .................. 3
DE Sehr geehrte Kundin .................3
NL Geachte klant.................................4
ES Estimado cliente .......................... 4
PT Estimado Cliente ..........................4
PL Drogi Kliencie ................................ 4
SV Kära kund ......................................... 5
DA Kære kunde .....................................5
FI Hyvä asiakas ....................................5
NO Kjære kunde ....................................5
RU Уважаемый покупатель ......... 6
PRACTICAL INFORMATION
6 ......................................
AR
6 ....................................
FA
IT
IT Libretto di istruzioni ...........7–24
Prima di utilizzare l’apparecchio
per la prima volta, leggere atten-
tamente le norme di sicurezza
riportate a pagina 8.
51-66 .....
FA
).54
51-66 ....................
AR
53

3
IT
EN
fR
DE
NL
ES
pT
pL
SV
DA
fI
NO
Ru
AR
fA
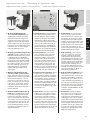
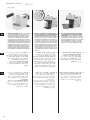
Sehr geehrte Kundin,
Schön, dass Sie unseren Espresso-Automat
„Fantasia“ gekauft haben – wir wünschen Ih-
nen viel Freude damit!
Einige praktische Ratschläge zu Funktion und
Verwendung unserer neuen Kapsel-Kaee-
maschine mit Milchschäumer würden wir Ihnen
noch gerne mit auf den Weg geben.
Verwenden Sie zur Milchzubereitung bitte die in
der Bedienungsanleitung empfohlene optimale
Menge. Schäumen Sie zu Ihrer eigenen Sicher-
heit immer mindestens die Milchmenge für
einen kleinen Cappuccino
auf, auch wenn Sie
weniger aufgeschäumte Milch benötigen. Die
maximale Menge an Milch, die Sie auf einmal
aufschäumen können, ist durch das Milchkaee-
Symbol
gekennzeichnet.
Wenn Sie eine zu kleine Menge an Milch ver-
wenden, fängt die Milch an zu kochen, und
wenn Sie eine zu große Menge an Milch ver-
wenden, kann das Milchgefäß überlaufen. Der
Motor des Milchschäumers kann durch über-
laufende Milch beschädigt werden.
DE
FR
Cher/Chère client(e),
Nous sommes ravis que vous ayez fait
l’acquisition de notre machine à espresso Fan-
tasia. Nous espérons que vous l’apprécierez.
Nous souhaitons vous donner quelques informa-
tions pratiques concernant le fonctionnement et
l’utilisation de votre nouvelle machine à café à
capsule avec mousseur à lait.
Pour les préparations laitières, veuillez suivre
les quantités optimales recommandées dans ce
manuel. Pour votre sécurité, utilisez au moins la
quantité de lait correspondant au petit cappuc-
cino
, même si vous n’avez pas besoin d’autant
de mousse de lait. La quantité maximale de lait
que vous pouvez faire mousser est indiquée par
l’icône Latte
.
En plus petites quantités, le lait viendrait à bouil-
lir. Et si vous dépassez le niveau maximum de
lait spécié, la mousse de lait pourrait déborder
du réservoir de lait. Les débordements de lait
risqueraient d’endommager le moteur du mous-
seur.
EN
Dear Customer,
We are happy that you bought our Fantasia
espresso machine and we hope you will enjoy it!
We would like to give you some practical infor-
mation regarding the function and use of your
new capsule coee machine with milk frother.
For milk preparation please follow the optimal
amount recommended in the manual. For your
safety, even if you need less foamed milk please
use at least the amount of milk corresponding to
the small cappuccino
. The maximum amount
of milk that you can foam is indicated by the
Latte icon
.
Smaller quantities will bring the milk to boil,
if milk quantity is above the maximum level
milk foam can overow out of the milk vessel.
Overowing milk can damage the motor of the
frother unit.
IT
Gentile cliente,
Siamo lieti che abbia acquistato la nostra mac-
china per il caè espresso Fantasia e speriamo
possa sfruttarne tutte le funzionalità!
Desideriamo orirLe alcune informazioni pra-
tiche sulle funzioni e sull’uso della Sua nuova
macchina per caè in capsule con montalatte.
Per la preparazione del latte, si prega di fare ri-
ferimento alle quantità riportate nel manuale.
Per questioni di sicurezza, anche se si desidera
montare una quantità inferiore di latte, si prega
di utilizzare almeno la quantità di latte cor-
rispondente al cappuccino corto
. L’icona
Latte
indica la quantità massima di latte che
può essere montata.
Quantità di latte inferiori a quelle indicate por-
tano il latte ad ebollizione; al contrario, quantità
di latte superiori al livello massimo possono far
traboccare la crema dal bicchiere per il latte. La
fuoriuscita del latte in eccesso può danneggiare
il motore del frullino.
La pagina si sta caricando...
La pagina si sta caricando...
La pagina si sta caricando...

7
IT
EN
fR
DE
NL
ES
pT
pL
SV
DA
fI
NO
Ru
AR
fA
A
B
C
D
E
G
H
J
I
F
K
L
K
M
P
Q
Q
N
U
V
W
X
T
L
S
O
R
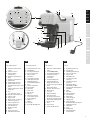
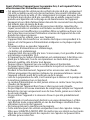
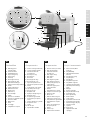
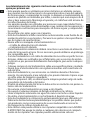
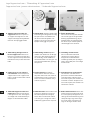
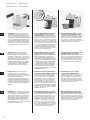
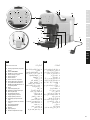
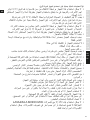
Teile
A. Bedienfeld (Touchscreen)
B. Ein-/Aus-Taste
C. Entkalkungsalarm-Anzeige
D. Espresso-Lungo-Taste
E. Espresso-Taste
F. Milchkaee-Taste
G. Taste für einen großen
Cappuccino
H. Taste für einen kleinen
Cappuccino
I. Einstellungen für das
Aufschäumen von Milch
J. Anzeige für das Aufschäumen von
kalter Milch
K. Hebel
L. Kapselfach
M. Wassertankdeckel
N. Wasserbehälter
O. Kaeeauslass
P. Tropfschalengitter
Q. Auangschale
R. Abwasserbehälter
S. Behälter für verbrauchte Kapseln
T. Netzkabel mit Stecker
U. Milchgefäß
V. Quirl
W. Dampeitung
X. Aufschäumerspirale,
herausnehmbar
DE
Éléments
FR
A. Panneau de commande (Écran
tactile)
B. Touche MARCHE/ARRET
C. Voyant d’alarme Détartrage
D. Touche Espresso Lungo
E. Touche Espresso
F. Touche Latte
G. Touche Grand Cappuccino
H. Touche Petit Cappuccino
I. Réglage du moussoir à lait
J. Voyant de moussage de lait froid
K. Levier
L. Emplacement capsule
M. Couvercle du réservoir d’eau
N. Réservoir d’eau
O. Sortie café
P. Plaque d’égouttage
Q. Bac récolte-gouttes
R. Récipient pour d’eau usagées
S. Récipient pour capsules usagées
T. Cordon et che d’alimentation
U. Réservoir de lait
V. Fouet
W. Tuyau à vapeur
X. Spirale amovible du fouet
Components
A. Control Panel (Touch screen)
B. ON/OFF button
C. Descaling alarm indicator
D. Espresso Lungo button
E. Espresso button
F. Latte button
G. Large Cappuccino button
H. Small Cappuccino button
I. Milk frothing settings
J. Cold milk frothing indicator
K. Lever
L. Capsule compartment
M. Water tank lid
N. Water tank
O. Coee spout
P. Drip tray grid
Q. Drip tray
R. Waste water container
S. Used capsules container
T. Power cord & plug
U. Milk vessel
V. Whisker
W. Steam pipe
X. Removable whisking spiral
EN
A. Pannello di controllo (Touch
screen)
B. Pulsante accensione
C. Indicatore allarme
decalcicazione
D. Pulsante erogazione Espresso
Lungo
E. Pulsante erogazione Espresso
F. Pulsante Latte
G. Pulsante Cappuccino Lungo
H. Pulsante Cappuccino Corto
I. Impostazioni preparazione crema
di latte
J. Indicatore preparazione crema di
latte fredda
K. Leva
L. Vano inserimento capsula
M. Coperchio serbatoio dell’acqua
N. Serbatoio acqua
O. Erogatore caè
P. Griglia cassetto raccogli gocce
Q. Cassetto raccogli gocce
R. Cassetto acqua di scarico
S. Cassetto capsule usate
T. Cavo alimentazione
U. Bicchiere per il latte
V. Frullino
W. Erogatore del vapore
X. Spirale frullino rimovibile
Componenti
IT

8
IT
Prima di utilizzare la macchina per la prima volta, leggere attentamen-
te le seguenti istruzioni.
• Questoelettrodomesticopuòessereusatodaibambiniapartiredagli8
anni, unicamente nel caso in cui siano monitorati o vengano fornite loro
istruzioni adeguate relativamente a un uso sicuro del dispositivo e unica-
mente nel caso in cui gli stessi capiscano i pericoli coinvolti. La pulizia e gli
interventi di manutenzione non devono essere eseguiti dai bambini di età
inferiore agli 8 anni e in assenza di supervisione. Tenere l’apparecchiatura
e il rispettivo cavo fuori dalla portata dei bambini di età inferiore agli 8
anni.
• Leapparecchiaturepossonoessereusatedapersoneconlimitatecapacità
siche, sensoriali o mentali o con scarsa esperienza o conoscenza sull’uso
dell’apparecchiatura, solamente se sorvegliati o se sono stati istruiti relati-
vamente all’uso dell’apparecchiatura e se hanno compreso i rischi coinvol-
ti.
• Ibambininondevonogiocareconl’apparecchiatura.
• Collegarel’apparecchiosoloaunafontedialimentazionecontensionee
frequenza conformi alle speciche riportate sulla targhetta delle caratteri-
stiche.
• Nonutilizzarenéaerrarel’apparecchiose:
- il cavo di alimentazione è danneggiato,
- il rivestimento esterno è danneggiato.
• L’apparecchiodeveesserecollegatosoloaunapresaconmessaaterra.Se
necessario, è possibile utilizzare una prolunga adatta per 10/A.
• Incasodidanneggiamentodell’apparecchioodelcavodialimentazio-
ne, ottenerne la sostituzione rivolgendosi al produttore, a un suo agente
dell’assistenza o a una persona egualmente qualicata, in modo da evitare
rischi.
• Posizionaresemprel’apparecchiosuunasuperciepianaeregolare.
• Nonlasciaremail’apparecchioincustoditoquandoècollegatoallarete
elettrica.
• L’apparecchioegliaccessoripossonosurriscaldarsiduranteilfunziona-
mento. Usare solo la leva designata. Lasciar rareddare l’apparecchio pri-
ma di pulirlo o riporlo.
• Durantelapreparazionedelcaè,ènormalechelapompaeilmotore
della macchina emettano rumore.
• Evitarecheilcavodialimentazioneentriincontattoconleparticalde
dell’apparecchio.
• Nonimmergerel’apparecchioinacquaoinaltriliquidi.
• Nonsuperareilvolumemassimodiriempimentoindicatosull’apparec-
chio.
• Riempireilserbatoiodell’acquasoloconacquafredda,maiconlatteoaltri
liquidi.
• Nonutilizzarel’apparecchioseilserbatoiodell’acquanonèstatoriempito.
• Questoapparecchioèprogettatoesclusivamenteperusodomestico.Il
produttore declina qualsiasi responsabilità per eventuali danni causati
dall’uso improprio o errato.
• Nontrasportarelamacchinaperlaleva.
• UtilizzarequestamacchinaesclusivamenteconcapsulecompatibiliLA-
VAZZA A MODO MIO. Non mettere le dita o qualsiasi altro oggetto nello
scompartimento delle capsule. Le capsule possono essere utilizzate solo
una volta.
La pagina si sta caricando...
La pagina si sta caricando...
La pagina si sta caricando...

12
!
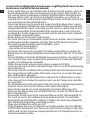
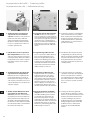
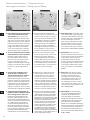
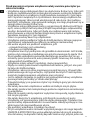
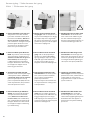
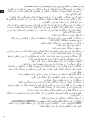
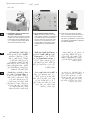
2. Wenn Sie die Maschine zum ersten
Mal einschalten:
Stellen Sie eine Schüssel (mindes-
tens 1,2l Fassungsvermögen) unter
die Kaeedüse und brühen Sie dann
4 Tassen Espresso Lungo auf.
Füllen Sie den Milchbecher ebenfalls
mit frischem Wasser und drücken
Sie die Taste „Latte“, um die Funktion
„Latte“ ein Mal ohne Milch durchlau-
fen zu lassen.
DE
Erste Schritte
3. Die Maschine darf nicht mit einem
leeren Tank verwendet werden!
Wird sie zu lange ohne Wasser
betrieben, kann die automatische
Ansaugung blockieren. Im Falle
einer Störung lesen Sie bitte den
Abschnitt „Fehlersuche“ auf Seite 23.
1. Stellen Sie die Maschine auf eine
ebene Fläche. Reinigen Sie den
Behälter vor dem ersten Gebrauch.
Füllen Sie den Behälter mit kaltem
Wasser (trinkbar und nicht spru-
delnd). (Die Maschine darf nicht mit
einem leeren Behälter eingeschaltet
werden!) Stecken Sie das Netzkabel
in die Steckdose und drücken Sie
die Einschalttaste. Die Maschine
ist betriebsbereit, wenn die Tasten
aufhören zu blinken und konstant
leuchten.
2. Lors de la première mise en ser-
vice de la machine :
Placez un récipient (d’une capacité
minimale de 1,2l) sous le bec à
café et préparez 4tasses de café
Espresso Lungo.
Activez également la fonction Latte
une fois en appuyant sur la touche
Latte lorsque le verre à lait est rem-
pli d’eau.
FR
Première utilisation /
3. La machine ne doit pas être
utilisée avec le réservoir vide!
Si vous l’utilisez sans eau pendant
trop longtemps, l’amorçage auto-
matique pourrait se bloquer. En cas
de problème, veuillez vous reporter
au chapitre «En cas d’anomalie de
fonctionnement» à la page23.
1. Posez la machine sur une surface
plane. Rincez le réservoir avant de
l’utiliser. Remplissez le réservoir avec
de l’eau potable et non gazeuse. (La
machine ne doit pas être utilisée avec
un réservoir vide!) Branchez le cordon
d’alimentation au secteur et pressez
sur la touche MARCHE. La machine
est prête à être utilisée lorsque les
touches cessent de clignoter et
restent allumées en continu.
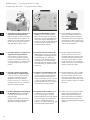
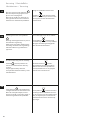
2. When starting the machine for the
rst time:
Place a bowl (1.2 l minimum capac-
ity) under the coee spout, and brew
4 cups of Espresso Lungo coee.
Run also the Latte function one time
by pressing the Latte button with
water in the milk glass.
EN
3. The machine must not be used
with an empty tank! If you use it
without water for too long a time
the auto priming could be blocked.
If there is an issue, please check
Troubleshooting section on page
22.
Getting started
1. Place the machine on a at sur-
face. Rinse the tank before using it.
Fill the tank with cold, potable and
non-sparkling water. (The machine
must not be used with an empty
tank!) Plug the power cord into the
mains and press the ON button.
The machine is ready for use when
the buttons stop ashing and are
continuously illuminated.
2. Primo utilizzo della macchina:
Posizionare un recipiente (capacità
minima 1,2 l) sotto il beccuccio di
erogazione del caè e preparare
4 tazzine di caè Espresso Lungo.
Successivamente, attivare la fun-
zione Latte versando dell’acqua nel
bicchiere del latte e premendo una
volta il pulsante Latte.
IT
Operazioni preliminari /
3. La macchina non deve essere
usata con il serbatoio vuoto! Se
lasciate la macchina senz´acqua per
troppo tempo, l’autoinnesco potreb-
be bloccarsi. Per eventuali problemi
fare riferimento alla tabella “Ricerca
ed eliminazione guasti” a pag. 22.
1. Posizionare la macchina su una
supercie piana. Risciacquare
il serbatoio prima di utilizzarlo.
Riempire il serbatoio con acqua
fresca potabile e non gasata. (La
macchina non deve essere usata con
il serbatoio vuoto!) Inserire la spina
nella presa di corrente e premere il
pulsante ON. La macchina è pronta
all’uso quando le spie smettono di
lampeggiare e rimangono accese.

13
IT
EN
fR
DE
NL
ES
pT
pL
SV
DA
fI
NO
Ru
AR
fA
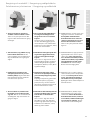
9 min Auto-o
1
2
3
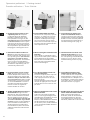
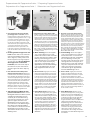
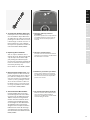
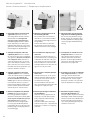
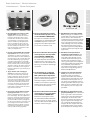
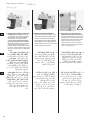
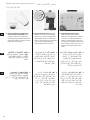
2. Diese Maschine kann nur mit Kap-
seln verwendet werden, die mit
LAVAZZA A MODO MIO kompatibel
sind. Mit Einzelportionskapseln brü-
hen Sie eine Tasse Kaee. Verwenden
Sie die Kapsel NICHT MEHR als einmal.
Werden zwei oder mehr Kapseln ein-
gesetzt, kann dies zu einer Fehlfunkti-
on der Maschine führen.
Zusatzfunktionen
1. Positionierung der Auangschale für un-
terschiedlich große Tassen. Die Positio-
nierung der Auangschale lässt sich leicht
ändern, um eine größere Tasse darauf
stellen zu können. Halten Sie die Schale mit
Ihrem Daumen und Ihrem Zeigenger fest
und drücken Sie auf den Plastikhebel, der
sich unten an der Auangschale bendet,
um die Auangschale neu zu positionieren
oder zu entfernen. Positionieren Sie die
Auangschale so, dass Sie die Tasse, die Sie
verwenden möchten, gut darauf abstellen
können. Wenn die Auangschale die richti-
ge Position erreicht hat, rastet sie ein, und
Sie hören ein Klickgeräusch. Das metallene
Tropfschalengitter kann ebenfalls am So-
ckel der Auangschale angebracht werden.
3. Die Maschine ist mit einer
Energiesparfunktion ausgerüstet,
die die Maschine automatisch nach 9
Min. ausschaltet, wenn sie in dieser Zeit
nicht benutzt wird.
Um die Abschaltautomatik auf 30Mi-
nuten festzulegen, halten Sie die Tasten
für einen Cappuccino und einen großen
Cappuccino gleichzeitig für mehr als
3Sekunden gedrückt. Wenn die Taste
für einen kleinen Cappuccino anfängt,
mit hoher Frequenz zu blinken, drücken
Sie die Taste für einen großen Cappucci-
no.
Fonctions supplémentaires /
2. Cette machine peut être utilisée
uniquement avec des capsules
compatibles avec LAVAZZA A
MODO MIO. Les capsules monodoses
permettent de préparer une tasse de
café. Ne pas réutiliser les capsules.
L’insertion de 2 ou plusieurs capsules
peut entraîner un dysfonctionnement
de la machine.
1. Positionnement du bac d’égouttement
pour diérentes tailles de tasse. Vous
pouvez facilement retirer la plaque à tas-
ses et placer une plus grande tasse. Pour
la repositionner ou la retirer, saisissez le
bac avec le pouce et l’index, puis appuyez
sur le levier en plastique situé au bas du
bac d’égouttement. Remettez-la dans la
position adaptée à la taille de la tasse que
vous souhaitez utiliser. Un déclic se fait
entendre lorsque le bac est en position
correcte. La grille métallique du bac
d’égouttement peut aussi être placée sur
la base du bac.
3. La machine est équipée d’une fonc-
tion économie d’énergie qui éteint
automatiquement la machine après 9
minutes d’inactivité.
Vous pouvez régler la fonction
d’arrêt automatique sur 30minutes en
appuyant simultanément sur les bou-
tons Cappuccino et Grand Cappuccino
pendant plus de 3secondes. Peu après,
lorsque le bouton Petit Cappuccino
commence à clignoter rapidement, ap-
puyez sur le bouton Grand Cappuccino.
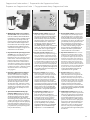
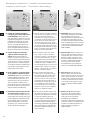
2. This machine can only be used with
LAVAZZA A MODO MIO compatible
capsules. Single dose capsules brew
a single coee/product. DO NOT use
the capsules more than once. Insert-
ing 2 or more capsules can cause the
machine to malfunction.
Other functions
1. Drip tray positioning for dierent
cup sizes. You can easily position the
drip tray and t a bigger cup on it. To
reposition or remove it, hold the tray
with your thumb and index nger and
press the plastic lever located at the
bottom of the drip tray. Place it back
in the position that ts the cup you
would like to use. You can hear a click-
ing sound when the tray is in the right
position. The metal drip tray grid can
be placed on the drip tray base.
3. The machine is equipped with an
energy saving function that automati-
cally switches it o after 9 min of inac-
tivity. You can set the automatic switch
o to 30 minutes by pressing the Small
Cappuccino and Large Cappuccino
buttons at the same time for more than
3 seconds, afterwards when the Small
Cappuccino button starts blinking at
high frequency press the Large Cappuc-
cino button.
2. Utilizzare questa macchina esclu-
sivamente con capsule compatibili
LAVAZZA A MODO MIO. Le capsule
monodose sono predisposte per
erogare una singola dose di caè/pro-
dotto. NON utilizzare le capsule più di
una volta. Inserire 2 o più capsule nella
macchina potrebbe causare malfun-
zionamenti.
Caratteristiche aggiuntive /
1. Posizionamento del cassetto raccogli
gocce per tazze di dimensioni diverse.
Il cassetto raccogli gocce è facilmente
riposizionabile al ne di poter utilizzare
anche tazze più grandi. Per riposizionare
o rimuovere il cassetto raccogli gocce,
tenerlo tra il pollice e l’indice e premere
la leva in plastica situata sul fondo del
cassetto raccogli gocce. Riposizionarlo
in base alla grandezza della tazza che si
desidera utilizzare. Quando il cassetto
raccogli gocce è nella posizione corretta
si sente uno scatto. La griglia metallica
del cassetto raccogli gocce può essere
collocata sulla base del cassetto.
3. La macchina è dotata di funzione
risparmio energetico che automati-
camente spegne l’apparecchio dopo 9
minuti di inutilizzo.
È possibile impostare lo spegnimento
automatico dopo 30 minuti premendo
contemporaneamente i pulsanti Cap-
puccino Corto e Lungo per più di 3 se-
condi; successivamente, quando il tasto
Cappuccino Corto inizia a lampeggiare
velocemente, premere il tasto Cappucci-
no Lungo.

14
1
2
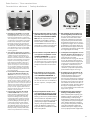
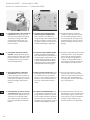
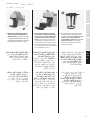
1. Stellen Sie den Hebel nach oben
und setzen Sie eine Kapsel in
das Fach. Schließen Sie den Hebel
und drücken Sie die Taste Espresso
(klein) oder die Taste Espresso Lun-
go (groß). Sobald der Kaee fertig
ist, stellen Sie den Hebel nach oben
und die Kapsel fällt in den Behälter
für verbrauchte Kapseln.
Kaffeezubereitung
DE
2. Einprogrammieren der Kaee-
menge. Stellen Sie eine Tasse auf
die Kaee-Auangschale. Halten
Sie die Espresso-Taste oder die
Espresso-Lungo-Taste so lange
gedrückt, bis sie etwa dreimal pro
Sekunde blinkt. Halten Sie die Taste
gedrückt und lassen Sie die Taste
wieder los, sobald die gewünschte
Kaeemenge erreicht ist.
3. Solange Sie die Taste gedrückt
halten, blinkt sie weiterhin schnell.
Wenn Sie die Taste wieder loslassen,
blinkt sie dreimal hintereinander
auf, um anzuzeigen, dass diese
Kaeemenge nun als bevorzugte
Menge abgespeichert wurde. Die
Kaeemaschine schaltet dann
wieder in den Standby-Modus
zurück.
1. Soulevez le levier et insérez une
capsule dans le compartiment.
Refermez le levier et appuyez soit
sur la touche Espresso, soit sur la
touche Espresso Lungo. Lorsque le
café est prêt, soulevez le levier et la
capsule tombe dans le récipient de
capsules usagées.
La préparation du café /
FR
2. Programming coee amount.
Programmation de la quantité de
café. Placez une tasse sur le bac
d’égouttement de café. Appuyez
sur la touche Espresso ou Espresso
Lungo jusqu’à ce qu’elle se mette à
clignoter 3fois par seconde. Con-
tinuez à appuyer sur la touche et ne
la relâchez que lorsque vous avez
atteint la quantité de café souhaitée.
3. La touche continuera à clignoter
rapidement tant que vous appuyez
dessus. Lorsque vous la relâchez,
elle clignote trois fois pour indiquer
que votre préférence a été enregis-
trée. La machine revient en mode
de veille.
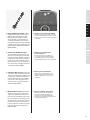
1. Lift the lever, insert a capsule in
the compartment. Close the lever
and press either Espresso or Espres-
so Lungo button. When the coee is
ready, lift the lever and the capsule
falls down into the used capsules
container.
Preparing coffee
EN
2. Programming coee amount.
Place a cup on the coee drip tray.
Press and hold the Espresso or
Espresso Lungo button until the
button starts ashing 3 times per
second; to enter edit mode. Press
and hold the button to start brew-
ing and release when the desired
coee amount is reached.
3. The button will continue to pulse
at high frequency while pressing.
When releasing the button, the but-
ton pulses three times to indicate
that your favourite cup is memo-
rized. The machine then returns to
standby mode.
IT
1. Sollevare la leva e inserire una
capsula nel vano inserimento
capsula. Chiudere la leva, premere
il pulsante della dose caè desi-
derata ed attendere l’erogazione.
Quando il caè è pronto, sollevare
la leva. La capsula usata cadrà nel
cassetto capsule usate.
La preparazione del caffè /
2. Programmazione della quantità
di caè. Posizionare una tazzina
sulla vaschetta di raccolta. Premere
e tenere premuto il pulsante Espres-
so o Espresso Lungo no a quando
il pulsante inizia a lampeggiare 3
volte al secondo. Tenere premuto il
pulsante e rilasciarlo al raggiungi-
mento della quantità di caè desi-
derata.
3. Il pulsante continua a lampeggiare
velocemente mentre lo si preme.
Rilasciando il pulsante questo lam-
peggia tre volte per indicare che
è stata memorizzata la quantità di
caè preferita. La macchina torna
quindi in stand-by.

15
IT
EN
fR
DE
NL
ES
pT
pL
SV
DA
fI
NO
Ru
AR
fA
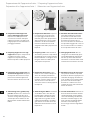
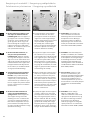
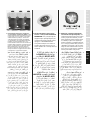
1. Aufschäumen von Milch für Cap-
puccino und Latte: Befüllen Sie das
Milchgefäß mit frischer Milch (Stand-
ard-Kühlschranktemperatur von
4-8Grad), bis Sie die Markierung-
slinie für einen Cappuccino, einen
großen Cappuccino oder einen
Milchkaee erreichen (unter- bzw.
überschreiten Sie die Markierungen
für Cappuccino bzw. Milchkaee
nicht). Setzen Sie den Deckel auf das
Milchgefäß, und schieben Sie ihn
dann zurück auf die rechte Seite der
Auangschale.
2. Heißer Milchschaum: Drücken Sie die
Taste für einen Cappuccino, einen großen
Cappuccino oder einen Milchkaee. Das
Aufschäumen der Milch ist abgeschlossen,
wenn die Taste aufhört zu blinken. Wenn
der Aufschäumvorgang abgeschlossen ist,
wird er von der Kaeemaschine automa-
tisch beendet. Sie können den Vorgang
auch manuell abbrechen, indem Sie
dieselbe Taste erneut drücken. Die benö-
tigte Zeit für das Aufschäumen von warmer
Milch beträgt etwa 75Sekunden für einen
Cappuccino, 90Sekunden für einen großen
Cappuccino und 110Sekunden für einen
Milchkaee.
3. Kalter Milchschaum: Drücken Sie die
Taste für einen Cappuccino, einen großen
Cappuccino oder einen Milchkaee und
halten Sie sie länger als 3Sekunden lang
gedrückt. Die Anzeige für das Aufschäu-
men von kalter Milch (Schneeocke)
beginnt zu blinken und nur der Quirl wird
aktiviert (kein Dampf kommt aus der
Dampeitung). Wenn der Aufschäumvor-
gang abgeschlossen ist, wird er von der
Kaeemaschine automatisch beendet.
Sie können den Vorgang auch manuell
abbrechen, indem Sie dieselbe Taste
erneut drücken. Die benötigte Zeit für das
Aufschäumen von kalter Milch beträgt etwa
45Sekunden.
Zubereiten von Cappuccino/Latte
1. Pour faire mousser le lait pour le
Cappuccino et le Latte: Remplissez le
réservoir de lait de lait frais (à tempéra-
ture normale du réfrigérateurde 4-8°),
exactement jusqu’à la ligne correspon-
dant à un Cappuccino, à un grand Cap-
puccino ou à un Latte (le niveau doit
impérativement être compris entre
la ligne Cappuccino et la ligne Latte).
Mettez le couvercle sur le réservoir de
lait, puis insérez ce dernier sur la droite
de la base du bac d’égouttement.
2. Mousse chaude: Appuyez sur la touche
Cappuccino, Grand Cappuccino ou Latte.
La machine commencera à faire mousser
le lait dès que la touche cessera de cligno-
ter. Le processus de moussage s’arrêtera
automatiquement une fois terminé. Vous
pouvez également l’interrompre manuelle-
ment en appuyant à nouveau sur la même
touche. La durée nécessaire à un moussage
chaud est de 75secondes environ pour un
Cappuccino, de xsecondes pour un Grand
Cappuccino et de 110secondes pour un
Latte.
3. Mousse froide: Appuyez sur la touche
Cappuccino, Grand Cappucino ou Latte
pendant au moins 3secondes. Le voyant
de moussage à froid (ocon) se met à
clignoter et seul le fouet est activé (aucune
vapeur provenant du tuyau à vapeur). Le
processus de moussage s’arrêtera automa-
tiquement une fois terminé. Vous pouvez
également l’interrompre manuellement en
appuyant à nouveau sur la même touche. La
durée nécessaire à un moussage à froid est
de 45secondes environ.
Préparation d’un Cappuccino/Latte /
1. Frothing milk for Cappuccino and
Latte: Fill the milk vessel with fresh
milk (standard fridge temperature
of 4-8 degrees) exactly to the level
for the Cappuccino, Large Cappuc-
cino or Latte line (do not ll below
the Cappuccino or above the
Latte line). Place the lid on top of
the milk vessel, then slide it back
onto the right side of the drip tray
base.
2. Warm frothing: Press the Cappuc-
cino, Large Cappuccino or Latte
button. The machine will start froth-
ing the milk when the button stops
ashing. The frothing process will
stop automatically once completed.
You can also stop it manually by
pressing the same button again.
Approximate time for warm frothing
is 75 sec for Cappuccino, 90 sec for
large Cappuccino and 110 sec for
Latte.
3. Cold frothing: Press the Cappuc-
cino, Large Cappucino or Latte but-
ton for more than 3 seconds. The
cold frothing indicator (snowake)
will start ashing and only the
whisker will be activated (no steam
coming from the steam pipe). The
frothing process will stop automati-
cally once completed. You can also
stop it manually by pressing the
same button again. Approximate
time for cold frothing is 45 sec.
Preparing Cappuccino/LattePreparazione del Cappuccino/Latte /
1. Preparazione della crema di latte
per il Cappuccino e il Latte: Versare
nell’apposito bicchiere del latte fresco
(a temperatura frigorifero tra i 4 °C e gli
8 °C) no al livello indicato per il Cap-
puccino Corto, il Cappuccino Lungo o
il Latte (non riempire il bicchiere al di
sotto del livello per il Cappuccino Corto
o al di sopra del livello per il Latte).
Chiudere il bicchiere per il latte con
l’apposito coperchio, quindi farlo scor-
rere sul lato destro del cassetto raccogli
gocce.
2. Preparazione di crema di latte calda:
Premere il pulsante Cappuccino Corto, Cap-
puccino Lungo o Latte. La macchina inizia a
montare il latte quando il pulsante smette
di lampeggiare. Il processo di preparazione
della crema si arresta automaticamente
quando il latte è pronto. Si può interrompe-
re manualmente il processo di preparazione
della crema di latte premendo nuovamente
il pulsante. Approssimativamente, il tempo
necessario per la preparazione della crema di
latte è di 75 secondi per il Cappuccino Corto,
di 90 secondi per il Cappuccino Lungo e di 110
secondi per il Latte.
3. Preparazione di crema di latte fredda:
Premere il pulsante Cappuccino Corto, Cap-
puccino Lungo o Latte per più di 3 secondi.
L’indicatore relativo alla preparazione della
crema di latte fredda (occo di neve) inizia
a lampeggiare. Si attiva solo il frullino senza
erogazione di vapore proveniente dal bec-
cuccio per il vapore. Il processo di prepara-
zione della crema si arresta automaticamente
quando il latte è pronto. Si può interrompere
manualmente il processo di preparazione
della crema di latte premendo nuovamente
il pulsante. Approssimativamente, il tempo
necessario per la preparazione della crema di
latte fredda è di 45 secondi.

16
4. Zubereitung eines (großen) Cap-
puccino. Bereiten Sie in einer Tasse
für einen Cappuccino oder einer
Tasse für einen großen Cappuccino
einen Espresso zu. Gießen Sie den
Milchschaum auf den zubereiteten
Kaee.
5. Zubereitung der Milch: Schäumen
Sie die Milch wie in den drei vor-
hergehenden Schritten beschrie-
ben auf. Wenn das Aufschäumen
abgeschlossen ist, gießen Sie die
aufgeschäumte Milch in ein Milch-
glas. Stellen Sie das Glas unter die
Kaeedüse und bereiten Sie einen
Espresso zu.
6. Schaumstufe ändern: Drücken Sie
die Taste für das Einstellen der Mil-
chaufschäumung, um die gewün-
schte Schaummenge einzustellen.
Der Pfeil nach oben zeigt an, dass
mehr Schaum ausgewählt wurde.
Der Pfeil nach unten zeigt an,
dass weniger Schaum ausgewählt
wurde.
DE
Zubereiten von Cappuccino/Latte
FR
4. Préparation d’un Cappuccino ou
d’un Grand Cappuccino. Préparez
un Espresso dans une tasse à Cap-
puccino ou à Grand Cappuccino.
Versez la mousse de lait sur le café.
5. Préparation d’un Latte: Faites
mousser le lait comme indiqué au
cours des 3étapes précédentes.
Une fois la procédure de moussage
terminée, versez la mousse de lait
dans une tasse à Latte. Placez le
verre sous la buse à café et préparez
un Espresso.
6. Modier le niveau de moussage:
vous pouvez modier la quantité
de mousse désirée en appuyant sur
le bouton de réglage du moussoir
à lait. La èche vers le haut indique
que vous avez sélectionné plus
de mousse. La èche vers le bas
indique que vous avez sélectionné
moins de mousse.
Préparation d’un Cappuccino/Latte /
EN
4. Preparing Cappuccino or Large
Cappuccino. Prepare an Espresso in
a Cappuccino cup or a large
Cappuccino cup. Pour the milk
foam on top of the coee prepared.
5. Preparing Latte: Froth the milk as
described in previous 3 steps. When
the frothing process stops, pour the
frothed milk into a Latte glass. Place
the glass under the coee spout
and prepare an Espresso.
6. Changing froth level: You can
change the level of foam by press-
ing the Milk frothing settings but-
ton. The up arrow indicates that
extra foam is selected. Down arrow
indicates that less foam is selected.
Preparing Cappuccino/Latte
IT
4. Preparazione del Cappuccino
Corto o del Cappuccino Lungo.
Preparare un caè Espresso su
cui versare la crema di latte per il
Cappuccino Corto o il Cappuccino
Lungo preparati come indicato nei
passaggi precedenti.
5. Preparazione del Latte: Preparare
la crema di latte come descritto
nei 3 passaggi precedenti. Al ter-
mine del processo di preparazione
della crema di latte, versare il latte
montato in un bicchiere. Mettere
il bicchiere sotto il beccuccio di
erogazione del caè e preparare un
Espresso.
6. Modica del livello della crema:
è possibile modicare a proprio
piacimento il livello della crema
premendo il pulsante di selezione
del livello di crema di latte. La
freccia in alto indica la selezione di
una quantità maggiore di crema. La
freccia in basso indica la selezione
di una quantità minore di crema.
Preparazione del Cappuccino/Latte /

17
IT
EN
fR
DE
NL
ES
pT
pL
SV
DA
fI
NO
Ru
AR
fA
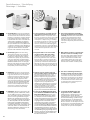
1. Schalten Sie die Maschine aus,
ziehen Sie das Kabel aus der
Steckdose und lassen Sie die
Maschine abkühlen. Wischen Sie
das Gehäuse mit einem feuchten
Tuch ab. Reinigen Sie den Wasser-
behälter einmal täglich.
3. Das Milchgefäß, der Deckel und die
Dampfdüse können im Geschirr-
spüler gereinigt werden. Sollte der
Motor mit Milch in Berührung
kommen, schalten Sie die Kaf-
feemaschine aus, ziehen Sie den
Stecker aus der Steckdose und
lassen Sie die Kaeemaschine
auskühlen. Wischen Sie alle äuße-
ren Oberächen mit einem feuch-
ten Tuch ab.
Reinigung und Pflege
2. Der Kapselbehälter mit den ver-
wendeten Kapseln verfügt über
ein transparentes Fenster an der
Vorderseite, durch das Sie sehen
können, wie viele Kapseln ver-
braucht wurden.
Alle 2 bis 3 Tage oder nach 10 Brüh-
vorgängen müssen die verbrauchten
Kapseln und Abwasserbehälter
entfernt, geleert, ausgewaschen,
getrocknet und wieder eingesetzt
werden.
Nettoyage et entretien /
1. Eteignez la machine, débranchez
le cordon et laissez refroidir
la machine. Essuyez toutes les
surfaces externes avec un chion
humide. Rincez le réservoir d’eau
une fois par jour.
3. Le réservoir de lait, le couvercle,
le fouet et la buse à vapeur sont
tous lavables au lave-vaisselle.
Dans le cas où du lait entrerait en
contact avec le moteur, arrêtez la
machine, débranchez le cordon
d’alimentation et laissez la ma-
chine refroidir. Nettoyez toutes les
surfaces extérieures avec un chion
humide.
2. Le bac à capsules usagées est doté
d’une fenêtre transparente sur le
devant vous permettant de voir la
quantité de capsules usagées qu’il
contient.
Tous les 2 ou 3jours, ou après 10cafés
moulus, les bacs pour les capsules
et l’eau usagées doivent être retirés,
vidés, lavés, séchés et remis en place.
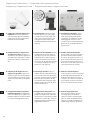
1. Turn the machine o, unplug the
cord and let the machine cool
down. Wipe all outer surfaces with
a damp cloth. Rinse the water tank
once a day.
Cleaning and care
3. The milk vessel, lid, whisker and
steam spout can be washed in a
dishwasher. If milk gets in contact
with the motor, turn the machine
o, unplug the cord and let the
machine cool down. Wipe all outer
surfaces with a damp cloth.
2. The used capsules container
has a transparent window in the
front which helps you to see the
amount of used capsules. Every
2 or 3 days or after 10 brewed cof-
fees, the used capsules and waste
water containers shall be removed,
emptied, rinsed, dried and put back
in their place.
1. Spegnere la macchina, staccare
la spina e lasciar rareddare la
macchina. Pulire tutte le super-
ci esterne con un panno umido.
Sciacquare il serbatoio dell’acqua
quotidianamente.
Pulizia e manutenzione /
3. Il bicchiere per la preparazione della
crema di latte, il coperchio, il frullino
e il beccuccio erogatore di vapore
possono essere lavati in lavasto-
viglie. Qualora il latte venga in
contatto con il motore, spegnere
la macchina, scollegare il cavo e
lasciare che la macchina si rared-
di. Pulire le superci esterne della
macchina con un panno umido.
2. Il contenitore delle capsule usate
è dotato di una nestrella traspa-
rente posta frontalmente per ve-
dere la quantità di capsule usate.
Ogni 2 o 3 giorni oppure dopo 10
caè, i contenitori delle capsule
usate e dell’acqua di scarico devo-
no essere rimossi, svuotati, lavati,
asciugati e riposizionati.

18
1
DE
Reinigung und Pflege
1
2
4. Sie können die Einstellungen der
Kaeemaschine an die Wasserhärte
Ihres Leitungswassers anpassen.
Drücken Sie gleichzeitig die Taste
für einen großen Cappuccino und
die Taste für einen Milchkaee, und
halten Sie dann beide Tasten für mehr
als 3Sekunden lang gedrückt, um
in den Bearbeitungsmodus für die
Wasserhärte zu wechseln. Die Taste
für einen großen Cappuccino blinkt
nun schnell, um anzuzeigen, dass die
Einstellung „Mittlere Wasserhärte“
ausgewählt ist (Standardeinstellung).
5. Drücken Sie die Taste für einen klein-
en Cappuccino, um die Einstellung
„Niedrige Wasserhärte“ auszuwählen
oder drücken Sie die Taste für einen
Milchkaee, um die Einstellung „Hohe
Wasserhärte“ auszuwählen. Daraufhin
fängt die ausgewählte Taste an zu
blinken. Wenn Sie alle Einstellungen
vorgenommen haben, drücken Sie
die Ein-/Aus-Taste, um wieder in den
Standby-Modus zu wechseln. Die
ausgewählte Taste leuchtet dreimal
hintereinander auf, um anzuzeigen,
dass die neue Einstellung gespeichert
wurde. Dann schaltet die Maschine in
den Standby-Modus zurück.
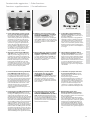
6. Wasserlter. Im Handel können
Sie einen optionalen Wasserlter
erwerben, der die Wasserhärte
von Leitungswasser mit hohem
Härtegrad auf ein optimales Niveau
reduziert und so die Lebensdauer
der Kaeemaschine verlängert.
Entfernen Sie die Plastikverpackung
des Filters und setzen Sie den Filter so
in den vorgesehenen Steckplatz an
der Unterseite des Wassertanks ein,
dassereinrastet.Filter-Referenzcode:
EPAB 3, EPAB 6
6. Filtre à eau. Vous pouvez acheter
un ltre à eau facultatif permettant
de réduire la dureté de l’eau de
votre robinet à un niveau optimal
et de prolonger la durée de vie de
votre machine. Sortez le ltre de
son emballage et insérez ce dernier
correctement dans sa fente en bas du
réservoir d’eau. Code de référence du
ltre:EPAB3,EPAB6
6. Water lter. You can buy an
optional water lter that decreases
the hardness of your hard tap water
to the optimal level and helps
to prolong the lifetime of your
machine. Remove the lter from the
packaging and place it rmly into
its slot at the bottom of the water
tank.Filterreferencecode:EPAB3,
EPAB 6
6. Filtro dell’acqua. È possibile acqui-
stare un ltro dell’acqua opzionale
che porta la durezza dell’acqua del
proprio rubinetto al livello ottimale
e aiuta a prolungare la durata
della macchina. Rimuovere il ltro
dall’imballaggio in plastica e posi-
zionarlo nella sua sede, sul fondo
del serbatoio dell’acqua. Codice di
riferimentodelltro:EPAB3,EPAB6
FR
Nettoyage et entretien /
4. Vous pouvez congurer la ma-
chine de façon à l’ajuster à la
dureté de l’eau de votre robinet.
Appuyez simultanément sur les
touches Grand Cappuccino et Latte
pendant au moins 3secondes pour
passer en mode de modication de
la dureté de l’eau. La touche Grand
Cappuccino clignote rapidement
indiquer la sélection d’une eau moy-
ennement dure (réglage par défaut).
5. Appuyez sur la touche Petit Cap-
puccino pour sélectionner une
eau plus douce ou sur la touche
Latte pour une eau très dure. La
touche sélectionnée se met alors à
clignoter. Une fois terminé, appuyez
sur la touche Marche/Arrêt pour re-
venir en mode de veille. La touche
sélectionnée clignote trois fois pour
conrmer l’enregistrement, puis la
machine revient en mode de veille.
EN
Cleaning and care
4. You can set the machine to t the
water hardness of your tap water.
Hold the Large Cappuccino and
the Latte button simultaneously
for more than 3 seconds to enter
hardness edit mode. The Large
Cappuccino button blinks at a high
frequency to indicate that “medium
hardness” is selected (default set-
ting).
5. Press the Small Cappuccino but-
ton to change to “low”, or the Latte
button to change to “high”. The
selected button will start to blink
instead. When done, press the on/
o button to return to standby. The
selected button pulses three times
to conrm that it is saved, then the
machine returns to standby.
IT
Pulizia e manutenzione /
5. Premere il pulsante Cappuccino
Corto per passare a “low” (bassa) o il
pulsante Latte per passare a “high”
(alta). Il pulsante selezionato inizia
a lampeggiare. Al termine, premere
il pulsante di accensione/spegni-
mento per tornare alla modalità di
stand-by. Il pulsante selezionato
lampeggia tre volte per confermare
che la modica è stata salvata; la
macchina ritorna quindi in stand-by.
4. È possibile impostare la macchina
in base alla durezza dell’acqua
del rubinetto. Per accedere alla
modalità di modica della durezza
dell’acqua, tenere premuti i pulsanti
Cappuccino Lungo e Latte contem-
poraneamente per più di 3 secondi.
Il pulsante Cappuccino Lungo lam-
peggia velocemente per indicare
che è stata selezionata la “durezza
media” (impostazione predenita).

19
IT
EN
fR
DE
NL
ES
pT
pL
SV
DA
fI
NO
Ru
AR
fA
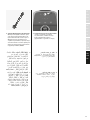
7. Austauschen des Wasserlters.
Der Wasserlter sollte nach einen
Verwendungszeitraum von 2Mona-
ten oder nach der Zubereitung von
100Tassen Espresso ausgetauscht
werden. Der Filter reduziert die An-
sammlung von Kalkablagerungen
und verlängert so die Lebensdauer
der Kaeemaschine. Die Verwen-
dung des Filters ist optional und die
Kaeemaschine kann für den tägli-
chen Gebrauch auch ohne Filter ver-
wendetwerden.Filter-Referenzcode:
EPAB 3, EPAB 6
7. Remplacement du ltre à eau. Vous
pouvez remplacer le ltre au bout de
2mois d’utilisation ou après avoir pré-
paré 100tasses d’Espressos. Le ltre
vous aide à réduire l’accumulation de
calcaire et, ainsi, à prolonger la durée
de vie de votre machine. Le ltre est
facultatif et n’est pas nécessaire pour
un usage au quotidien. Code de réfé-
rencedultre:EPAB3,EPAB6
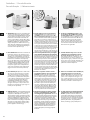
7. Replacing the water lter.
You can replace the lter after 2
months of use or after brewing 100
cups of Espresso. The lter helps
you prolong the lifetime of your
machine by reducing the buildup of
limescale. The lter is optional (not
mandatory for daily use).
Filterreferencecode:
EPAB 3, EPAB 6
1. Zur Standardeinstellung wechseln
Wenn Sie die Ein-/Aus-Taste für mehr
als 5Sekunden gedrückt halten,
setzen Sie die Maschine auf die Stand-
ardeinstellungen zurück.
1. Rétablir les paramètres par défaut
Vous pouvez rétablir les paramètres
par défaut de l’appareil en appuyant
sur la touche marche/arrêt pendant
plus de 5secondes.
1. Change to default setting
You can reset the machine to default
settings by pressing the on/o button
for more than 5 seconds.
1.
Ripristino delle impostazioni
predenite
È possibile ripristinare le impostazioni
predenite della macchina tenendo
premuto il tasto on/o per più di 5
secondi.
7. Sostituzione del ltro dell’acqua.
Il ltro può essere sostituito dopo 2
mesi di utilizzo o dopo 100 tazzine
di caè Espresso. Il ltro consente di
prolungare la durata della macchina
riducendo gli accumuli di calcare. Il
ltro è opzionale e non è obbliga-
torio per l’uso quotidiano. Codice di
riferimentoltro:
EPAB 3, EPAB 6

20
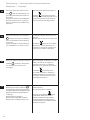
Entkalken
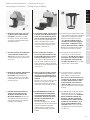
2. Leeren Sie das Milchgefäß und setzen
Sie es wieder in die Kaeemaschine ein.
Nach dem Aufheizen: Stellen Sie eine
Schüssel unter die Kaeedüse. Halten
Sie die Espresso-Taste und die Espresso-
Lungo-Taste gleichzeitig mehr als 3Sekun-
den lang gedrückt, um den Entkalkungs-
vorgang zu starten. Die Kaee-Tasten
auf der linken und rechten Seite blinken
während des Entkalkungsvorgangs in
einem wellenförmigen Muster. Die Kaee-
Tasten oben und unten blinken während
des Entkalkungsvorgangs in einem wel-
lenförmigen Muster. Die benötigte Zeit für
den Entkalkungsvorgang beträgt etwa 20
Minuten. Sie können den Entkalkungsvor-
gang manuell abbrechen, indem Sie die
Ein-/Aus-Taste drücken.
1. Entkalken. Wenn die Anzeige für den
Entkalkungsalarm aueuchtet, sollten
Sie die Kaeemaschine entkalken. Für
eine dauerhaft problemlose Funktions-
weise und eine gleichbleibend gute
Qualität der Kaeezubereitung wird
eine regelmäßige Entkalkung empfoh-
len. Wir empfehlen die Electrolux Ent-
kalkungslösung EPD4/C/D/E/N/R zu
verwenden (benutzen Sie auf keinen
Fall Essig). Wassertank entnehmen und
entleeren. Füllen Sie den Entkalker in
den Wasserbehälter (befolgen Sie die
Anweisungen des Herstellers).
Détartrage /
2. Videz le réservoir de lait et insérez-le
dans la machine. Après la préchauage:
Placez un récipient sous le bec à café.
Appuyez simultanément sur les touches
Espresso et Espresso Lungo pendant au
moins 3secondes pour lancer le détartra-
ge. Pour indiquer que le détartrage est en
cours, les touches de café gauche et droite
clignotent de façon séquentielle.Pour
indiquer que le détartrage est en cours, les
touches café du haut et du bas clignotent
de façon séquentielle. Le processus de
détartrage prend 20 minutes environ. Le
détartrage peut être interrompu par sim-
ple pression sur le bouton d’alimentation.
1. Détartrage. Lorsque le voyant d’alerte
Détartrage s’allume, procédez au détar-
trage de la machine. Il est conseillé de
toujours procéder au détartrage pour
préserver la qualité de votre machine
et du café que vous préparez. Nous
vous conseillons d’utiliser la solution de
détartrage Electrolux EPD4/C/D/E/N/R
(n’utilisez jamais de vinaigre). Vider le
réservoir à eau. Remplissez le réservoir
d’eau avec la solution de détartrage
(suivez les instructions du produit).
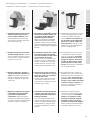
Decalcifying
2. Empty the milk vessel and assemble
it to the machine. After preheating
is done: Place a bowl under the coee
spout. Press both the Espresso and Es-
presso Lungo buttons at the same time
for more than 3 seconds to start the des-
caling. To indicate that descaling is in pro-
gress the top and bottom coee buttons
will pulse in a wave. The descaling process
takes about 20 minutes. The descaling can
be aborted by pressing the power button.
1. Decalcifying. When the descaling
alert indicator lights up you should
decalcify the machine. Decalcifying
is always recommended in order to
maintain the quality of your machine
and your coee. We recommend the
use of Electrolux decalcifying solution
EPD4/C/D/E/N/R (never use vinegar).
Remove and empty the water tank. Fill
the water tank with decalcifying solu-
tion (follow product instructions).
Decalcificazione /
2. Svuotare il bicchiere per il latte e ssarlo
alla macchina. Al termine del preriscal-
damento: Sistemare un recipiente sotto al
beccuccio erogatore. Per avviare la procedura
di decalcicazione, premere entrambi i pul-
santi Espresso e Espresso Lungo contempo-
raneamente per più di 3 secondi. Per indicare
che la decalcicazione è in corso, i pulsanti
superiore e inferiore del caè lampeggiano
ondeggiando. Il processo di decalcicazione
dura circa 20 minuti. È possibile interrompere
la decalcicazione premendo il tasto di ac-
censione.
1. Decalcicazione. L’accensione dell’indi-
catore di allarme decalcicazione indica
che la macchina necessita di una decalci-
cazione. Si consiglia si eseguire sempre
la decalcicazione al ne di mantenere
la qualità della macchina e del caè. Rac-
comandiamo di utilizzare la soluzione
decalcicante EPD4/C/D/E/N/R Electro-
lux (non utilizzare mai aceto). Rimuovere
e svuotare il serbatoio acqua. Riempire il
serbatoio con la soluzione decalcicante
(seguendo attentamente le istruzioni
riportate sulla confezione del prodotto).
DE
FR
EN
IT
3. Sobald der Entkalkungsmodus
abgeschlossen ist, schaltet die
Kaeemaschine automatisch in den
Standby-Modus zurück. Wird die
Kaeemaschine erneut eingeschaltet,
wird das Entkalkungs-Symbol ausge-
blendet. Reinigen Sie den Wasserbe-
hälter und füllen Sie ihn mit frischem
Wasser. Drücken Sie die Espresso-Taste
und lassen Sie den halben Behälter mit
frischem Wasser durch die Maschine
laufen, um das System auszuspülen.
3. Une fois le détartrage terminé, la
machine revient en mode de veille.
Le symbole de détartrage disparaîtra
à la remise en marche de la machine.
Nettoyez le réservoir d’eau et remplis-
sez-le avec de l’eau froide; faites cou-
ler la moitié du réservoir d’eau froide
en appuyant sur la touche Espresso
pour nettoyer le système.
3. When the descaling is complete, the
machine returns to standby mode.
The descaling symbol will be hidden
after restarting the machine. Clean
out the water tank and rell it with
cold, potable water. By pressing the
Espresso button, run through half a
tank of water to ush out the system.
3. Una volta terminata la decalcica-
zione, la macchina torna in modalità
stand-by. Il simbolo di decalcicazione
scompare al riavvio della macchina.
Pulire il serbatoio dell’acqua e riem-
pirlo no a metà con acqua corrente;
sciacquare l’impianto premendo il tasto
Espresso.

21
IT
EN
fR
DE
NL
ES
pT
pL
SV
DA
fI
NO
Ru
AR
fA
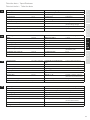
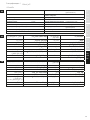
DE
Technische Daten
Spannung/Frequenz: 220–240 V, 50/60 Hz Automatische Abschaltung nach: 9 min, 30 min (Optional)
Leistung: 1200 W Energieverbrauch im Standby-
Modus:
< 0,5 W
Thermoblock-Leistung: 1150 W Kaeespenderfunktion: Automatisches Anhalten
Außenlänge: 0,8 m Kapseltyp: A Modo Mio
Pumpendruck: 15 bar Tropfschalengitter: Edelstahl
Fassungsvermögen Kapselfach: Max. 10 Kapseln Hebelwinkel: 0–102 Grad
Abwasserbehälter: 320 ml Abmessungen (L x B x H): 364 mm * 184 mm * 297 mm
(bei nach unten gedrücktem Gri)
Gesamtfassungsvermögen Wasserbehälter: 1200 ml Produktnettogewicht: 4,1 kg
Selbstansaugend: Ja
Caractéristiques /
FR
Tension/Fréquence: 220–240 V, 50/60 Hz Arrêt automatique au bout de: 9 min, 30 min (En option)
Alimentation: 1200W Alimentation en mode veille: <0,5W
Alimentation du Thermoblock: 1150W Fonction de distribution du café: Arrêt automatique
Longueur extérieure: 0,8m Type de capsule: A Modo Mio
Pression de la pompe: 15bar Plaque d’égouttage: Acier inoxydable
Capacité du compartiment à capsules: Max. 10capsules Angle du levier: 0–102degrés
Réservoir d’eau usagée: 320ml Dimensions (L x l x H): 364 mm * 184 mm * 297 mm
(avec poignée fermée)
Capacité du réservoir d’eau, totale: 1200ml Poids net du produit: 4,1kg
Auto-aspiration: Oui
EN
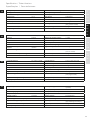
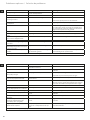
Specifications
Voltage/Frequency: 220–240 V, 50/60 Hz Auto o after: 9 min, 30 min (optional)
Power: 1200 W Standby power: < 0.5 W
Thermoblock power: 1150 W Coee dispenser function: Auto stop
Cord length, outside the product: 0.8 m Capsule type: A Modo Mio
Pump pressure: 15 bar Drip tray grid: Stainless Steel
Capsule compartment capacity: Max 10 capsules Lever angle: 0–102 degrees
Waste water container: 320 ml Dimensions (L * W * H): 364 mm * 184 mm * 297 mm
(with handle closed)
Water tank capacity, total: 1200 ml Product net weight: 4.1 kg
Self priming: Yes
Caratteristiche tecniche /
Tensione/frequenza: 220–240 V, 50/60 Hz Spegnimento automatico dopo: 9 min, 30 min (opzionale)
Alimentazione: 1200 W Consumo di energia in modalità
Standby:
< 0,5 W
Potenza Thermoblock: 1150 W Funzione dosatore caè: Auto Stop
Lunghezza esterna cavo di
alimentazione:
0,8 m Tipo capsula: A Modo Mio
Pressione pompa: 15 bar Griglia cassetto raccogli gocce: Acciaio inossidabile
Capacità cassetto capsule usate: Max. 10 capsule Angolo leva: 0–102 gradi
Capacità contenitore acqua di scarico: 320 ml Dimensioni (L* W * H): 364 mm * 184 mm * 297 mm
(con leva chiusa)
Capacità complessiva serbatoio acqua: 1200 ml Peso netto prodotto: 4,1 kg
Autoinnesco: Sì
IT

22
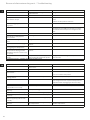
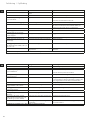
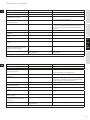
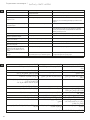
EN
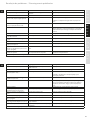
Troubleshooting
Problems Causes Solutions
The machine does not turn on. The machine is not connected to the
power source.
Connect the machine to the power source.
Contact Electrolux customer service.
The pump is very noisy.
No water ow.
No water in the tank. Fill the tank with fresh drinking water.
Check correct water tank position.
The loading lever doesn’t reach the
brewing position.
Capsule inserted incorrectly. Empty the used capsule compartment.
Repeat the sequence, open and close the lever. If that
is not enough remove the capsule manually from the
compartment after unplugging the machine safely.
The coee is cold. Preheat the cup with hot water.
The coee is brewed too fast, the
brewed coee is not creamy.
Capsule already used. Open the lever and insert a new capsule.
Coee is not brewed or brewed in
drips only.
Coee spout is clogged. Brew water without the use of a capsule.
The buttons do not stop ashing. Thermoblock is not working properly. Contact Electrolux customer service.
The machine requires a lot of time
to heat up.
The machine has limescale build up. Descale the machine.
Coee is not brewed and coee light
ashes very quickly (0.25s on and
0.25s o).
Thermal sensor is not working properly. Contact Electrolux customer service.
Capsule is stuck in the capsule com-
partment.
Used capsule stayed to long in the cap-
sule compartment.
Unplug the machine and remove the capsule manually
from the compartment.
If you cannot solve the trouble, contact Electrolux customer service.
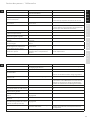
Ricerca ed eliminazione dei guasti /
IT
Anomalie Possibili cause Soluzioni
La macchina non si accende. La macchina non è collegata
all’alimentazione.
Collegare la macchina all’alimentazione.
Contattare il servizio assistenza Electrolux.
La pompa è molto rumorosa.
Non c’è usso d’acqua.
Non c’è acqua nel serbatoio. Riempire il serbatoio con acqua fresca potabile e non
gasata.
Vericare corretta posizione serbatoio.
La leva non raggiunge la posizione di
erogazione.
Capsula inserita in modo scorretto. Svuotare il cassetto capsule usate.
Ripetere la sequenza, aprire e chiudere la leva. Se le
operazioni non sono sucienti rimuovere la capsula
manualmente dal vano dopo aver scollegato la mac-
china.
Il caé è freddo. Preriscaldare la tazza con acqua calda.
Il caé è stato fatto troppo
velocemente, il caé preparato
non è cremoso.
Capsula già usata. Aprire la leva ed inserire una nuova capsula.
Il caè non viene erogato o solo in
gocce.
L’erogatore caè è ostruito. Erogare solo acqua senza usare una capsula.
le spie non smettono di lampeggiare Thermoblock non funziona corret-
tamente.
Contattare il servizio assistenza Electrolux.
La macchina impiega molto tempo
per raggiungere la temperatura.
Probabile formazione calcare. Eseguire procedura decalcicazione.
Il caè non viene preparato e la spia
corrispondente lampeggia molto
rapidamente (0,25 sec. accesa e 0,25
sec. spenta).
Il sensore termico non funziona corret-
tamente.
Contattare il servizio assistenza Electrolux.
La capsula è incastrata nel vano
capsule.
La capsula usata è rimasta troppo a
lungo nel vano di inserimento capsula.
Scollegare la macchina e togliere la capsula manual-
mente dal vano.
Se il problema persiste , contattare l’assistenza clienti Electrolux.
La pagina si sta caricando...

24
DE
Recyceln Sie Materialien mit dem Sym-
bol
. Entsorgen Sie die Verpackung
in den entsprechenden Recycling-
behältern.
Recyceln Sie zum Umwelt- und
Gesundheitsschutz elektrische und
elektronische Geräte.
Entsorgen Sie Geräte mit diesem
Symbol
nicht mit dem Hausmüll.
Bringen Sie das Gerät zu Ihrer örtlichen
Sammelstelle oder wenden Sie sich an
Ihr Gemeindeamt.
Entsorgung
FR
Recyclez les matériaux portant le
symbole
. Déposez les emballages
dans les conteneurs prévus à cet eet.
Contribuez à la protection de
l’environnement et à votre sécurité,
recyclez vos produits électriques et
électroniques.
Ne jetez pas les appareils portant
le symbole
avec les ordures
ménagères. Emmenez un tel produit
dans votre centre local de recyclage ou
contactez vos services municipaux.
Mise au rebut /
EN
Do not dispose appliances marked
with
the symbol with the household
waste. Return the product to your local
recycling facility or contact your mu-
nicipal oce.
Recycle the materials with the symbol
. Put the packaging in applicable
containers to recycle it.
Help protect the environment and
human health and to recycle waste of
electrical and electronic appliances.
Disposal
IT
Riciclare i materiali con il simbolo .
Buttare l’imballaggio negli appositi
contenitori per il riciclaggio.
Aiutare a proteggere l’ambiente e la
salute umana e a riciclare riuti deri-
vanti da apparecchiature elettriche ed
elettroniche.
Non smaltire le apparecchiature che
riportano il simbolo
insieme ai
normali riuti domestici. Portare il pro-
dotto al punto di riciclaggio più vicino
o contattare il comune di residenza.
Smaltimento /
La pagina si sta caricando...
La pagina si sta caricando...
La pagina si sta caricando...
La pagina si sta caricando...
La pagina si sta caricando...
La pagina si sta caricando...
La pagina si sta caricando...
La pagina si sta caricando...
La pagina si sta caricando...
La pagina si sta caricando...
La pagina si sta caricando...
La pagina si sta caricando...
La pagina si sta caricando...
La pagina si sta caricando...
La pagina si sta caricando...
La pagina si sta caricando...
La pagina si sta caricando...
La pagina si sta caricando...
La pagina si sta caricando...
La pagina si sta caricando...
La pagina si sta caricando...
La pagina si sta caricando...
La pagina si sta caricando...
La pagina si sta caricando...
La pagina si sta caricando...
La pagina si sta caricando...
La pagina si sta caricando...
La pagina si sta caricando...
La pagina si sta caricando...
La pagina si sta caricando...
La pagina si sta caricando...
La pagina si sta caricando...
La pagina si sta caricando...
La pagina si sta caricando...
La pagina si sta caricando...
La pagina si sta caricando...
La pagina si sta caricando...
La pagina si sta caricando...
La pagina si sta caricando...
La pagina si sta caricando...
La pagina si sta caricando...
La pagina si sta caricando...
La pagina si sta caricando...
La pagina si sta caricando...
La pagina si sta caricando...
La pagina si sta caricando...
La pagina si sta caricando...
La pagina si sta caricando...
La pagina si sta caricando...
La pagina si sta caricando...
La pagina si sta caricando...
La pagina si sta caricando...
La pagina si sta caricando...
La pagina si sta caricando...
La pagina si sta caricando...
La pagina si sta caricando...
-
 1
1
-
 2
2
-
 3
3
-
 4
4
-
 5
5
-
 6
6
-
 7
7
-
 8
8
-
 9
9
-
 10
10
-
 11
11
-
 12
12
-
 13
13
-
 14
14
-
 15
15
-
 16
16
-
 17
17
-
 18
18
-
 19
19
-
 20
20
-
 21
21
-
 22
22
-
 23
23
-
 24
24
-
 25
25
-
 26
26
-
 27
27
-
 28
28
-
 29
29
-
 30
30
-
 31
31
-
 32
32
-
 33
33
-
 34
34
-
 35
35
-
 36
36
-
 37
37
-
 38
38
-
 39
39
-
 40
40
-
 41
41
-
 42
42
-
 43
43
-
 44
44
-
 45
45
-
 46
46
-
 47
47
-
 48
48
-
 49
49
-
 50
50
-
 51
51
-
 52
52
-
 53
53
-
 54
54
-
 55
55
-
 56
56
-
 57
57
-
 58
58
-
 59
59
-
 60
60
-
 61
61
-
 62
62
-
 63
63
-
 64
64
-
 65
65
-
 66
66
-
 67
67
-
 68
68
-
 69
69
-
 70
70
-
 71
71
-
 72
72
-
 73
73
-
 74
74
-
 75
75
-
 76
76
-
 77
77
-
 78
78
-
 79
79
-
 80
80


Lavazza Fantasia Manuale utente
- Categoria
- Macchine da caffè
- Tipo
- Manuale utente
in altre lingue
- English: Lavazza Fantasia User manual
- français: Lavazza Fantasia Manuel utilisateur
- español: Lavazza Fantasia Manual de usuario
- Deutsch: Lavazza Fantasia Benutzerhandbuch
- русский: Lavazza Fantasia Руководство пользователя
- Nederlands: Lavazza Fantasia Handleiding
- português: Lavazza Fantasia Manual do usuário
- dansk: Lavazza Fantasia Brugermanual
- polski: Lavazza Fantasia Instrukcja obsługi
- svenska: Lavazza Fantasia Användarmanual
- suomi: Lavazza Fantasia Ohjekirja
Documenti correlati
Altri documenti
-
Electrolux ELM7000 Manuale utente
-
-
Electrolux ELM6000S Manuale utente
-
-
-
AEG LM7000T-U Manuale utente
-
-
Electrolux ELM5400MR Manuale utente
-
Smeg MFF01CREU Manuale utente
-
Smeg MFF01BLEU Manuale utente