AKASO 10 Manuale utente
- Categoria
- Registratori di unità
- Tipo
- Manuale utente
Questo manuale è adatto anche per

USER
MANUAL
Trace 1 Dash Camera


English
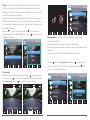
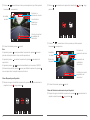
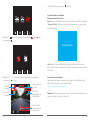
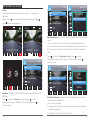
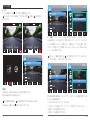
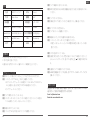
ICONS INTRODUCTION
8
11
7
9
10
12
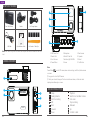
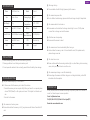
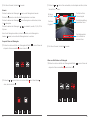
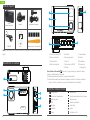
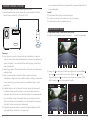
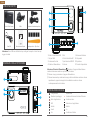
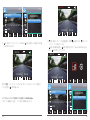
1. USB Power Port
2. Bracket Slot
3. Front Camera
4. Power Button
5. Microphone
6. MicroSD Card Slot
7. Indicator light & IR LEDs
8. Screen
9. Rear Camera
10. Speaker
11. Reset
12. Set Buttons
: Setup
: Parking Monitor
: Start to recording
: MIC
: Back
: Forward
: Down
: Playback
: Switch Front and Rear Camera
: Lock video
: Stop recording
: Backward
: Up
: Confirm or Exist
01 0201 02
Trace 1 Dash Camera
Car Charger Adapter
Car Crowbar + Cable ClipsQuick Reference Guide
USB Cable
Bracket
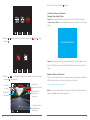
WHAT’S IN THE BOX?
QUICK
REFERENCE
GUIDE
Trace1 Car Dash Camera
CAMERA OVERVIEW
TRACE 1
1
3
2
4
6
5
Note: USB Cable is only used to connect the computer and the dash camera to read the
card.
Note:
Power Button : Turn On/Off camera; when dual recording, switch front/inside camera
on screen.
Long press to turn On/Off camera.
Short press to switch images of front or inside showed alone, or front and inside
displayed simultaneously on screen.

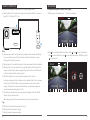
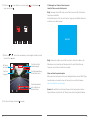
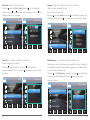
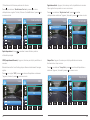
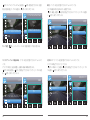
HOW TO POWER ON RECORDING
1
2
TRACE 1
Insert the car charger with cable into your car’s cigarette lighter socket.
Insert the USB end of the cable of car charger into the dash cam USB port. (Charger is
Input DC12-24V, Output DC 5V 2A.)
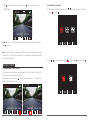
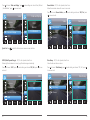
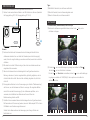
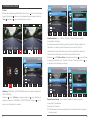
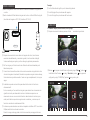
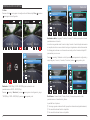
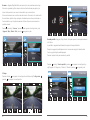
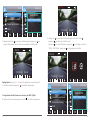
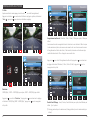
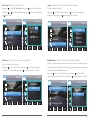
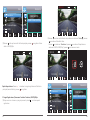
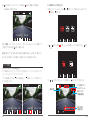
1. Single Recording (Front Camera) 1080P @60fps
After turning on the camera, press button to stop recording.
WDR
00:00:23
1080P60
10/01/2018 07:24:52
Press to enter setting interface and choose “Video ”, press to the Video interface.
Press to choose “Resolution”, press to enter setting and choose ”1080P(60fps)”, press
to save and exist.
WDR
00:01:23
1080P60
10/01/2018 07:25:52
03 04
Note:
After powering on dash cam through the car charger, the dash cam will automatically
turn on and start recording (if the card has been inserted). If wanting to do some
settings, please firstly stop recording.
Please charge for 30 minutes before using this dash cam powered by the built-in battery.
When the dash cam is connected to the car’s cigarette lighter socket through the car
charger, the built-in battery will be charging at the same time, the red indicator light is
on. When it charged fully, the red light goes off.
The built-in battery is only used to power the "parking monitor" function.
In normal use, please plug the car charger into the cigarette lighter of the car to power
the dash cam. The built-in battery is not recommended as a normal use of power
supply to the dash cam, in order to avoid the battery no power when parking, and
cause the parking monitoring function to fail.
The camera can be powered by connecting the phone adapter 5VDC with the USB
Cable to plug into a power outlet.
When charging, please shut down the camera by long press the power button.
Tips
Blue Flashing light means the camera is recording.
Red light means the camera is charging.
Blue light means the camera is working.

Video
Loop recording
WDR
WDR
Dual cam Display
1
Front
Resolution
SIZE
Resolution
WDR
1
Front
SIZE
1080P(60FPS)
1080P+1080P(30FPS)
Press two times to back the main interface, press to record. The saved video is
1080P@60fps.
Quick Set: Press to switch the single recording (front camera) on main interface,
press to record.
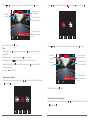
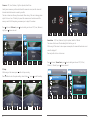
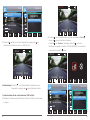
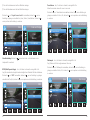
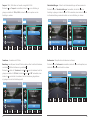
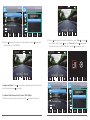
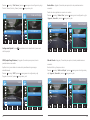
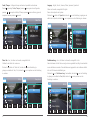
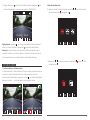
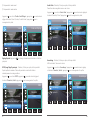
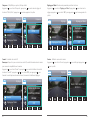
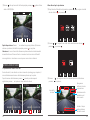
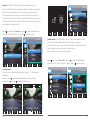
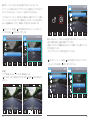
2. Dual Recording (Front and Rear Camera) 1080P @30fps
After turning on the camera, press button to stop recording.
WDR
00:01:23
1080P60
10/01/2018 07:25:52
WDR
00:00:23
1080P60
10/01/2018 07:24:52
Press to enter setting interface and choose “Video ”, press to the Video interface.
Press to choose “Resolution”, press to enter setting and choose ”1080P+1080P
(30fps)”, press to save and exit.
WDR
00:01:23
1080P60
10/01/2018 07:25:52
Video
Loop recording
WDR
WDR
Dual cam Display
1
Front
Resolution
SIZE
Resolution
WDR
1
Front
SIZE
1080P(60FPS)
1080P+1080P(30FPS)
05 06

Press two times to back the main interface, press to record. The saved video is
1080P@60fps.
Quick Set: Press to switch the dual recording(front and rear camera) on main interface,
press to record.
Note: The infrared light of rear camera will automatically detect the light brightness of inside
the car and turn on if the light is not insufficient. The recorded video is black and white after
turning on the infrared light.
WDR
00:01:23
1080P60
10/01/2018 07:25:52
07 08
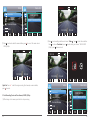
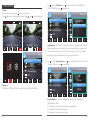
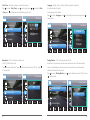
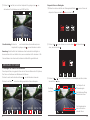
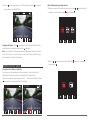
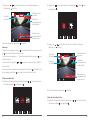
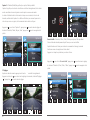
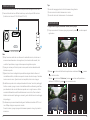
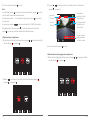
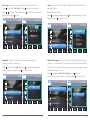
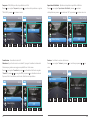
PLAYBACK VIDEOS
1. Playback Videos on Dash Camera
The unlocked video, locked video and parking monitor’s video for options; the video of
front camera and inside camera for options.
After turning on the camera, press button to stop recording, press to playback the
videos which is stored on the card.
00:00:23
1080P60
04/28/2019 03:25:52 PM
01:17:34
1080P60
04/28/2019 03:27:52 PM
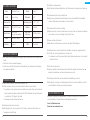
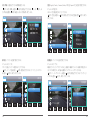
Unlocked videos to playback
After entering the playback interface, press / to choose the folder of unlocked
videos , then press ;
Press / to choose the folder of front or inside camera video, then press ;

09 10
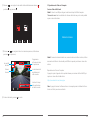
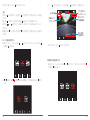
Press / to choose the video you want to play, last short press to play;
1080P60
04/28/2019 15:20
1/1
00:00:06
The time schedule
of video playing.
The video's
quantity
The current video's
recording date and
time
The current video's
recording resolution
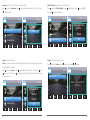
The video is over, press to exit.
Note:
When playing, press one time to end playing, press twice times to exit the current
playing folder.
When playing, press to pause playing, press to go on playing.
When playing, press / to backward/forward, 2X/4X/8X for options
When pausing playing, press ne time to end playing, press twice times to exit the
current playing folder.
Long press to delete videos
Locked videos to playback
After entering the playback interface, press / to choose the folder of locked videos
, then press ;
Press / to choose the folder of front or rear camera video, then press ;
Press / to choose the video you want to play, last short press to play;
1080P60
04/28/2019 15:20
1/1
00:00:06
The time schedule
of video playing.
The video's
quantity
The video is
locked
The current video's
recording date and
time
The current video's
recording resolution
The video is over, press to exit.
Videos of park monitor to playback
After entering the playback interface, press / to choose the folder of locked videos
, then press ;

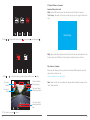
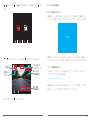
2. Playback Videos on Computer
Download Videos from Card
Way1. Use the USB cable to connect the dash cam into the USB port of computer.
"Mass Storage" will display on the screen of dash cam, then you can copy the videos from
card.
11 12
Press / to choose the folder of front or rear camera video, then press ;
Press / to choose the video you want to play, last short press to play;
1080P60
04/28/2019 15:20
1/1
00:00:06
The time schedule
of video playing.
The video's
quantity
The video is
locked
The current video's
recording date and
time
The current video's
recording resolution
The video is over, press to exit.
Way2. Take out the card from the dash cam, insert the card into the card reader, last insert
the card reader into the USB port of the computer to obtain the videos in the card.
Play Videos on Computer
Please copy the following link on any browser to download AKASO player, then play the
videos which get from the card.
https://www.akasotech.com/akasoplayer
Note: Please close the anti-virus software on computer before installing the player or click
“allow” when prompted.
Mass Storage

Video
Loop recording
WDR
WDR
Dual cam Display
1
Front
Resolution
SIZE
Press to choose “Resolution”, press to enter setting and choose ”1080P(60fps) /
1080P + 1080P(30fps)”, press to save and exist.
Resolution
1080P(60fps) / 1080P+1080P(30fps) for optional, default is 1080P+1080P(30fps).
Video
Loop recording
WDR
WDR
Dual cam Display
1
Front
Resolution
SIZE
Resolution
WDR
1
Front
SIZE
1080P(60FPS)
1080P+1080P(30FPS)
Loop Recording - Off / 1 minute / 3 minutes / 5 minutes for optional, default is 3 minutes.
The files will be saved every 3 minutes if you choose 3 minutes. When the memory card is
full, the new files will cover the old one if the loop recording is on; If it is off, the camera
won’t work any more, please format the SD card or change a new one.
Press to choose “Loop recording”, press to enter setting and choose ”Off / 1 Minute
/ 3 Minutes / 5 Minutes”, press to save and exist.
Video
WDR
WDR
Dual cam Display
1
Front
Resolution
SIZE
Loop recording
Dual cam Display - Front / Rear / Front&Rear for optional, default is Front&Rear.
The Display has 3 options:
The big image is front camera, the small is rear camera(default).
Only display the front camera on the screen.
Only display the rear camera on the screen.
Loop recording
WDR
1
Front
SIZE
Off
1 Minute
3 Minute
4 Minute
13 14
SYSTEM SETTING
1. Video
After turning on the camera, press button to stop recording.
Press button to enter the system setting, choose ”Video ”, press to enter the setting.
WDR
00:01:23
1080P60
10/01/2018 07:25:52
WDR
00:00:23
1080P60
10/01/2018 07:24:52

Press to choose “Dual cam Display”, press to enter setting and choose ”Front / Behind
/ Front&Behind”, press to save and exist.
Video
WDRWDR
Dual cam Display
1
Front
Resolution
SIZE
Loop recording
Dual cam Display
WDR
1
Front
SIZE
Front
Behind
Front/Behind
Quick Set: Press to switch the front and rear camera on main interface.
WDR (Wide Dynamic Range) - Off / On for optional, default is on.
Balance light and darkness in driving to get the best image automatically.
Press to choose “WDR”, press to enter setting and choose ”Off / On”, press to save
and exist.
Video
Dual cam Display
1
Front
Resolution
SIZE
Loop recording
WDR
WDR
WDR
WDR
1
Front
SIZE
Off
On
Record Audio - Off / On for optional, default is on.
Allows the recorded videos with sound or no sound.
Press to choose “Record Audio”, press to enter setting and choose ”Off / On”, press
to save and exist.
Video
G Sensor
Record Audio
Date Stamp
JUL
7
G
Record Audio
JUL
7
G
Off
On
Date Stamp - Off / On for optional, default is on.
Show the date and time on videos.
Press to choose “Date Stamp”, press to enter setting and choose ”Off / On”, press
to save and exist.
Video
G Sensor
Record Audio
Date Stamp
JUL
7
G
Date Stamp
JUL
7
G
Off
On
15 16

G-sensor - Off / Low / Medium / High for optional, default is low.
Gravity Sensor means any collision will activate the camera to record, and the videos will
be locked which will never be covered by new files.
The video is stored as a file every three minutes. When driving, if the road is bumpy, please
adjust it to low or turn off it directly to prevent the camera doesn’t work because of the
memory card is full. When parking, recommend you to adjust it to medium.
Press to choose “G-Sensor”, press to enter setting and choose ”Off / Low / Medium /
High”, press to save and exist.
Video
G Sensor
Record Audio
Date Stamp
JUL
7
G
G Sensor
JUL
7
G
Off
Low
Medium
High
2. Setup
After turning on the camera, press button to stop recording.
Press button to enter the system setting, choose ”Setup ”, press to enter the setting.
WDR
00:01:23
1080P60
10/01/2018 07:25:52
WDR
00:00:23
1080P60
10/01/2018 07:24:52
Setup
Date/Time
Beep Sound
Language
Screen Save
Screen Save - Off / Low / Medium / High for optional, default is 1 Minute.
The screen will be turned off automatically after the time you set.
After turning off the screen to reduce power consumption, the camera still work and record
under the display off.
Press any button to turn on the screen.
Press to choose “Screen Save”, press to enter setting and choose ”Off / 30 Sec /
1 Minute / 2 Minutes”, press to save and exist.
Setup
Date/Time
Beep Sound
Language
Screen Save
Screen Save
Off
30 Sec
1 Minute
2 Minutes
17 18

19 20
Date / Time - Set the time shown on screen of this camera.
Press to choose “Date / Time”, press to enter setting, press or to adjust the Date
/ Time, press to confirm and next, after finishing, press to exit.
Setup
Beep Sound
Language
Screen Save
Date/Time
Date/Time
10 / 01 / 2018
09 : 18 : 56
MM/DD/YY
Beep Sound - Off / On for optional, default is on.
Turn On / Off the button sound.
Press to choose “Beep Sound”, press to enter setting and choose ”Off / On”, press
to save and exist.
Language - English / French / German / Italian / Japanese / Spanish etc.
For optional, default is English.
Set the language of the system.
Press to choose “Language”, press to enter setting and choose language, press to
save and exist.
Setup
Date/Time
Language
Screen Save
Beep Sound
Beep Sound
Off
On
Setup
Date/Time
Screen Save
Beep Sound
Language
Language
English
Français
Parking Monitor - Off / On for optional, default is off.
When there is no power input and the camera has been turned off, the camera will be
turned on automatically and start recording, the video will be saved and the camera
automatic shutdown after 30 seconds.
Press to choose “Parking Monitor”, press to enter setting and choose ”Off / On”, press
to save and exist.
Setup
Frequency
Default Setting
HZ
Format
Parking Monitor
Parking Monitor
HZ
Off
On

Frequency - 50Hz / 60Hz for optional, default is 60Hz.
Press to choose “Frequency”, press to enter setting and choose ”50Hz / 60Hz”, press
to save and exist.
Setup
Default Setting
Format
Parking Monitor
Frequency
HZ
Frequency
50Hz
60Hz
HZ
Format - Format the SD card.
Note: Every time you insert a SD card, please format the card in the camera to ensure more
compatible with the camera.
Press to choose “Format”, press to format interface and choose “SD Card”, press and
to choose “OK”, then press to format the card. After finishing the format, it will back to
the setup interface.
Setup
Parking Monitor
Frequency
Default Setting
HZ
Format
Format
HZ
All data will be
deleted
Cancel
OK
Default Setting - Restore factory default settings.
Press to choose “Default Setting”, press to enter setting, press to choose “OK”,
then press to restore and exist.
Setup
Parking Monitor
Frequency
HZ
Format
Default Setting
Default Setting
HZ
Return menu setting
to default
Cancel
OK
Version - Check the camera’s version.
Press to choose “Version”, press to check, then press or to exist.
Setup
VER Version
Version
TRACE1-FTHYLY600707-V01
2018-10-18
21 22

SPECIFICATIONS
PRECAUTIONS
1. Please safekeeping, prevent the lens from scratching and dirty.
2. Please pay attention to anti-fouling and moisture-proof.
3. Do not expose the machine to the sun directly, prevent the built-in battery from damage.
TROUBLESHOOTING
Q: Why the camera always say “no card inserted”?
A: 1. Please ensure that the memory card is class 10 and above.
2. Format the memory card on computer firstly. When you format it on computer, please
choose "FAT32(Default)" on File system, and choose "32 kilobytes" on Allocation unit
size.
3. Format it in the camera.
Q: The camera don’t work any more.
A: Please check whether the memory is full, if yes, please save the files and format the SD
card.
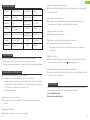
Name
AKASO Dash Cam
78mm x 33mm
53.5g
2 inch HD LCD Screen
16GB-128GB(not included)
Dual SONY Sensor
Built-in
Size
Net Weight
Screen
Micro SD Card
Sensor
MIC
Model
Viewing Angle
Working
Temperature
Battery
CPU
WDR
Max
Video Resolution
Trace 1
340°
-4°F - 158°F
240mAh
1080P@60fps
Novatek chip
Support
Q: The image is blurry.
A: The windshield will reflect the light, please adjust the camera.
Q: The camera lose power often.
A: Due to different vehicle designs, please rotate the car charger to adjust it keep stable.
Q: The camera unable to be turned on.
A: Please make sure that whether the charge indicator light is on or off, if off, please
re-insert the car charger and reset the camera.
Q: All buttons are not responding.
A: Please reset the camera to restart.
Q: The camera doesn’t record automatically after turning on.
A: Check whether the memory card is full or reformat the card, if this problem exists,
please change a new card.
Q: The video has no voice.
A: Please confirm whether the recording indicator light is on, blue flashing. And in recording
mode, short press will close to record the voice.
Q: The camera keeps turning on and off automatically.
A: Please charge the camera via USB car charger, do not charge the battery via the USB
data cable with other adapters
CONTACT US
For any inquiries, issues or comments concerning our products, please do not hesitate to
contact us. We will respond as soon as possible.
E-mail: [email protected]
Tel: (888) 466-9222 (US) Mon-Fri 9am-5pm(EST)
Brand web: www.akasotech.com.
23 24
English

25
26
Deutsch
8
11
7
9
10
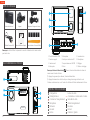
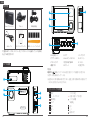
1. USB Anschluss
2. Steckplatz für Halterung
3. Vordere Kamera
4. Ein- / Ausschalter
5. Mikrofon
6. MikroSD Kartenschlitz
7. Anzeige Licht & Infrarot LEDs
8. Bildschirm
9. Hintere Kamera
10. Lautsprecher
11. Reset
12. Bedientasten
12
SYMBOL ERLÄUTERUNG
: Einstellungen
: Park Bildschirm
: Aufnahme starten
: Mikrofon
: Zurück
: Vorwärts
: Runter
: Wiedergabe
: Wechsel Vorder-/Hinterkamera
: Video sperren
: Aufnahme stoppen
: Rückwärts
: Hoch
: Bestätigen oder verlassen
Trace 1 Autokamera Auto-Ladegerät
Auto-Brechstange + KabelclipsKurze Bedienungsanleitung
USB Kabel
Halterung
INHALT
QUICK
REFERENCE
GUIDE
Trace1 Car Dash Camera
KAMERA ÜBERBLICK
TRACE 1
1
3
2
4
6
5
Hinweis: Das USB-Kabel wird nur verwendet, um den Computer und die Dashcam zum
Kartenlesen zu verbinden.
Hinweis:
Ein- / Ausschalter : Schalten Sie die Kamera ein und aus und schalten Sie die Kameras
auf dem Bildschirm ein.
Lang drücken, um das Gerät ein- und auszuschalten.
Kurz drücken, um Bilder von vorne oder von innen zu wechseln, die einzeln oder
gleichzeitig auf dem Bildschirm angezeigt werden.

27 28
INBETRIEBNAHME
AUFNAHME
1
2
TRACE 1
Drücken Sie das Ladekabel in den Zigarettenanzünder Ihres Autos.
Stecken Sie das andere Ende des Kabels in den USB Anschluss der Kamera. (Ladekabel
hat Eingangsleistung DC12-24V, Ausgangsleistung DC 5V 2A.)
1. Einzelaufnahme (Vordere Kamera) 1080P bei 60fps.
Nachdem Sie die Kamera eingeschaltet haben, drücken Sie die Taste, um die
Aufnahme zu stoppen.
WDR
00:00:23
1080P60
10/01/2018 07:24:52
Drücken Sie , um zu den Einstellungen zu gelangen und wählen Sie “Video ”,
drücken Sie , um zum Video Menü zu kommen.
Drücken Sie , um “Resolution” auszuwählen, drücken Sie , um zu den Einstellungen
zu gelangen und wählen Sie ”1080P(60fps)”. Um zu speichern und das Menü zu
verlassen, drücken.
WDR
00:01:23
1080P60
10/01/2018 07:25:52
Hinweis:
Nach dem Einschalten der Autokamera über das Autoladegerät schaltet sich die
Autokamera automatisch ein und startet die Aufnahme (wenn die Karte eingelegt
wurde). Wenn Sie einige Einstellungen vornehmen möchten, beenden Sie zunächst die
Aufnahme.
Bitte laden Sie das Gerät 30 Minuten lang auf, bevor Sie diese Autokamera mit dem
eingebauten Akku verwenden.
Wenn die Autokamera über das Autoladegerät mit dem Zigarettenanzünder des
Fahrzeugs verbunden ist, wird der eingebaute Akku gleichzeitig aufgeladen, und die
rote Kontrollleuchte leuchtet. Wenn der Akku vollständig aufgeladen ist, erlischt das
rote Licht.
Der eingebaute Akku dient nur zur Stromversorgung der Funktion "Parküberwachung".
des Autos an, um die Autokamera mit Strom zu versorgen. Die eingebaute Batterie
wird nicht als normale Stromversorgung für die Autokamera empfohlen, um zu
vermeiden, dass die Batterie beim Parken keinen Strom erhält und die
Parküberwachungsfunktion ausfällt.
Schließen Sie bei normalem Gebrauch das Autoladegerät an den Zigarettenanzünder
Die Kamera kann mit Strom versorgt werden, indem der Telefonadapter 5VDC mit dem
USB-Kabel an eine Steckdose angeschlossen wird.
Schalten Sie die Kamera während des Ladevorgangs durch langes Drücken des
Netzschalters aus.
Tipps:
Blau Blinklicht bedeutet, dass die Kamera aufzeichnet.
Rotes Licht bedeutet, dass die Kamera aufgeladen wird.
Blaues Licht bedeutet, dass die Kamera arbeitet.

29 30
Video
Loop recording
WDR
WDR
Dual cam Display
1
Front
Resolution
SIZE
Resolution
WDR
1
Front
SIZE
1080P(60FPS)
1080P+1080P(30FPS)
Drücken Sie zwei Mal, um zurück zur Hauptansicht zu gelangen, dann um
aufzunehmen. Die Aufnahmen sind nun in 1080P bei 60fps.
Schnelleinstellung: Drücken Sie , um zur Einzelaufnahme (Vordere Kamera) in der
Hauptansicht zu gelangen, dann um eine Aufnahme zu starten.
2. Zweifachaufnahme (Vorder- und Hinterkamera) 1080P bei 30fps
Nachdem Sie die Kamera eingeschaltet haben, drücken Sie die Taste, um die Aufnahme
zu stoppen.
WDR
00:01:23
1080P60
10/01/2018 07:25:52
WDR
00:00:23
1080P60
10/01/2018 07:24:52
Drücken Sie , um zu den Einstellungen zu gelangen und wählen Sie “Video ”,
drücken Sie , um zum Video Menü zu kommen.
Drücken Sie , um “Resolution” auszuwählen, drücken Sie , um zu den
Einstellungen zu gelangen und wählen Sie ”1080P+1080P(30fps)”. Um zu speichern
und das Menü zu verlassen, drücken.
WDR
00:01:23
1080P60
10/01/2018 07:25:52
Video
Loop recording
WDR
WDR
Dual cam Display
1
Front
Resolution
SIZE
Resolution
WDR
1
Front
SIZE
1080P(60FPS)
1080P+1080P(30FPS)

31 32
Drücken Sie zwei Mal, um zurück zur Hauptansicht zu gelangen, dann , um
aufzunehmen. Die Aufnahmen sind nun 1080P bei 30fps.
WDR
00:01:23
1080P60
10/01/2018 07:25:52
Schnelleinstellung: Drücken Sie um zur Einzelaufnahme (Vordere Kamera) in der
Hauptansicht zu gelangen, dann um eine Aufnahme zu starten.
Bemerkung: Das Infrarotlicht der Hinterkamera erfasst automatisch die Helligkeit im
Innenraum Ihres Autos und schaltet sich ein, wenn unzureichend Licht vorhanden ist. Die
Videoaufnahmen sind schwarz-weiß, nachdem das Infrarotlicht angeschaltet wird.
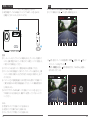
WIEDERGABE VON VIDEOS
1. Wiedergabe von Videos auf der Autokamera
Das entsperrte Video, das gesperrte Video und das Video des Parkmonitors für Optionen;
Das Video von Frontkamera und Rückkamera für Optionen.
Drücken Sie nach dem Einschalten der Kamera , um die Aufnahme zu beenden.
Drücken Sie die Taste um die auf der Karte gespeicherten Videos abzuspielen.
00:00:23
1080P60
04/28/2019 03:25:52 PM
01:17:34
1080P60
04/28/2019 03:27:52 PM
Entsperrte Videos zur Wiedergabe
Drücken Sie nach dem Aufrufen der Wiedergabeschnittstelle / um den Ordner der
entsperrten Videos auszuwählen , dann drücken Sie .
Drücken Sie / um den Ordner von vorne zu wählen oder hintere Kamera
video, dann drücken Sie .
Drücken Sie / Um das Video auszuwählen, das Sie abspielen möchten, drücken
Sie zuletzt kurz spielen.
1080P60
04/28/2019 15:20
1/1
00:00:06
Der Zeitplan für die
Videowiedergabe
Die Menge
des Videos
Das Aufnahmedatum
und die Uhrzeit des
aktuellen Videos
Die Aufnahmeauflösung
des aktuellen Videos

33 34
Das Video ist beendet, drücken Sie beenden.
Hinweis:
Drücken Sie während der Wiedergabe einmal, um die Wiedergabe zu beenden.
Drücken Sie zweimal, um den aktuellen Wiedergabeordner zu verlassen.
Drücken Sie während der Wiedergabe Um die Wiedergabe zu unterbrechen, drücken
Sie weiterspielen
Drücken Sie während der Wiedergabe / zu rückwärts / vorwärts, 2X / 4X / 8X für
Optionen.
Wenn Sie die Wiedergabe anhalten, drücken Sie einmal, um die Wiedergabe zu
beenden zweimal, um den aktuellen Wiedergabeordner zu verlassen.
Gesperrte Videos zur Wiedergabe
Drücken Sie nach dem Aufrufen der Wiedergabeschnittstelle / um den Ordner der
entsperrten Videos auszuwählen , dann drücken Sie ;
Drücken Sie / um den Ordner von vorne zu wählen oder hintere Kamera
video, dann drücken Sie ;
Drücken Sie / Um das Video auszuwählen, das Sie abspielen möchten, drücken
Sie zuletzt kurz spielen;
1080P60
04/28/2019 15:20
1/1
00:00:06
Der Zeitplan für die
Videowiedergabe
Die Menge
des Videos
Das Video
ist gesperrt
Das Aufnahmedatum
und die Uhrzeit des
aktuellen Videos
Die Aufnahmeauflösung
des aktuellen Videos
Das Video ist beendet, drücken Sie beenden.
Videos von Park Monitor zur Wiedergabe
Drücken Sie nach dem Aufrufen der Wiedergabeschnittstelle / um den Ordner der
entsperrten Videos auszuwählen , dann drücken Sie ;

35 36
Drücken Sie / um den Ordner von vorne zu wählen oder hintere Kamera
video, dann drücken ;
Drücken Sie / Um das Video auszuwählen, das Sie abspielen möchten, drücken
Sie zuletzt kurz spielen;
1080P60
04/28/2019 15:20
1/1
00:00:06
Der Zeitplan für die
Videowiedergabe
Die Menge
des Videos
Das Video
ist gesperrt
Das Aufnahmedatum
und die Uhrzeit des
aktuellen Videos
Die Aufnahmeauflösung
des aktuellen Videos
Das Video ist beendet, drücken Sie beenden.
2. Wiedergabe von Videos auf dem Computer
Laden Sie Videos von der Karte herunter
Weg1. Verwenden Sie das USB- Kabel, um die Dash-Cam an den USB- Anschluss des
Computers anzuschließen.
Auf dem Bildschirm der Dash-Cam wird "Speicher" angezeigt. Anschließend können Sie
die Videos von der Karte kopieren.
Speicher
Weg2. Nehmen Sie die Karte aus der Dash-Cam heraus, setzen Sie die Karte in den
Kartenleser ein und stecken Sie den Kartenleser zuletzt in den USB-Anschluss des
Computers, um die Videos auf der Karte zu erhalten.
Videos auf dem Computer abspielen
Bitte kopieren Sie den folgenden Link in einen beliebigen Browser, um den AKASO-Player
herunterzuladen, und spielen Sie dann die Videos ab, die von der Karte stammen.
https://www.akasotech.com/akasoplayer
Hinweis: Bitte schließen Sie die Antivirensoftware auf dem Computer, bevor Sie den
Player installieren, oder klicken Sie auf "Zulassen", wenn Sie dazu aufgefordert werden.
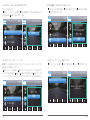
La pagina si sta caricando...
La pagina si sta caricando...
La pagina si sta caricando...
La pagina si sta caricando...
La pagina si sta caricando...
La pagina si sta caricando...
La pagina si sta caricando...
La pagina si sta caricando...
La pagina si sta caricando...
La pagina si sta caricando...
La pagina si sta caricando...
La pagina si sta caricando...
La pagina si sta caricando...
La pagina si sta caricando...
La pagina si sta caricando...
La pagina si sta caricando...
La pagina si sta caricando...
La pagina si sta caricando...
La pagina si sta caricando...
La pagina si sta caricando...
La pagina si sta caricando...
La pagina si sta caricando...
La pagina si sta caricando...
La pagina si sta caricando...
La pagina si sta caricando...
La pagina si sta caricando...
La pagina si sta caricando...
La pagina si sta caricando...
La pagina si sta caricando...
La pagina si sta caricando...
La pagina si sta caricando...
La pagina si sta caricando...
La pagina si sta caricando...
La pagina si sta caricando...
La pagina si sta caricando...
La pagina si sta caricando...
La pagina si sta caricando...
La pagina si sta caricando...
La pagina si sta caricando...
La pagina si sta caricando...
La pagina si sta caricando...
La pagina si sta caricando...
La pagina si sta caricando...
La pagina si sta caricando...
La pagina si sta caricando...
La pagina si sta caricando...
La pagina si sta caricando...
La pagina si sta caricando...
La pagina si sta caricando...
La pagina si sta caricando...
La pagina si sta caricando...
La pagina si sta caricando...
La pagina si sta caricando...
La pagina si sta caricando...
-
 1
1
-
 2
2
-
 3
3
-
 4
4
-
 5
5
-
 6
6
-
 7
7
-
 8
8
-
 9
9
-
 10
10
-
 11
11
-
 12
12
-
 13
13
-
 14
14
-
 15
15
-
 16
16
-
 17
17
-
 18
18
-
 19
19
-
 20
20
-
 21
21
-
 22
22
-
 23
23
-
 24
24
-
 25
25
-
 26
26
-
 27
27
-
 28
28
-
 29
29
-
 30
30
-
 31
31
-
 32
32
-
 33
33
-
 34
34
-
 35
35
-
 36
36
-
 37
37
-
 38
38
-
 39
39
-
 40
40
-
 41
41
-
 42
42
-
 43
43
-
 44
44
-
 45
45
-
 46
46
-
 47
47
-
 48
48
-
 49
49
-
 50
50
-
 51
51
-
 52
52
-
 53
53
-
 54
54
-
 55
55
-
 56
56
-
 57
57
-
 58
58
-
 59
59
-
 60
60
-
 61
61
-
 62
62
-
 63
63
-
 64
64
-
 65
65
-
 66
66
-
 67
67
-
 68
68
-
 69
69
-
 70
70
-
 71
71
-
 72
72
-
 73
73
-
 74
74


AKASO 10 Manuale utente
- Categoria
- Registratori di unità
- Tipo
- Manuale utente
- Questo manuale è adatto anche per
in altre lingue
- français: AKASO 10 Manuel utilisateur
- Deutsch: AKASO 10 Benutzerhandbuch
- 日本語: AKASO 10 ユーザーマニュアル
Documenti correlati
Altri documenti
-
TOGUARD CE52 Manuale utente
-
Midland Street Guardian + Manuale utente
-
Midland Street Guardian Manuale del proprietario
-
REXING M1 1296P Mirror Front and Rear Dash Cam Guida utente
-
REXING Rexing V1 Manuale utente
-
Philips ADR81BLX1 Manuale utente
-
-
Midland H3+ Full HD Action Kamera Manuale utente
-
Pioneer VREC-DZ700DC Manuale utente
-
 Wiseup WP-F9000 Manuale utente
