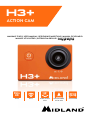
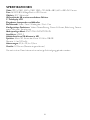
Midland H3+ Full HD Action Kamera Manuale utente
- Categoria
- Fotocamere per sport d'azione
- Tipo
- Manuale utente
Questo manuale è adatto anche per

WIDE ANGLE
LENS
1080P WI-FI WATERPROOF
UP TO 30M
STABILIZER
FULL
HD
120°
H3+
ACTION CAM
MANUALE D’USO | USER MANUAL | BEDIENUNGSANLEITUNG | MANUAL DE USUARIO
MANUEL UTILISATEUR | INSTRUKCJA OBSŁUGI |
ΟΔΗΓΊΕΣ ΧΡΗΣΗΣ


4
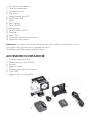
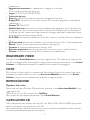
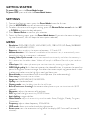
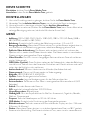
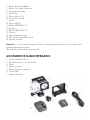
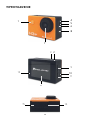
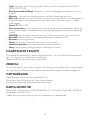
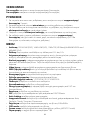
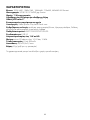
DESCRIZIONE DEI TASTI
7
1
4
5
6
8
10
23
9
11
12
13
1415

5
1
2
3
5
7
6
4
1. Tasto accensione/modalità
2. Tasto scatto/selezione
3. Indicatore di stato
4. Microfono
5. Alloggiamento micro SD
6. Porta micro USB
7. Lente
8. Porta HDMI
9. Tasto UP/WiFi
10. Altoparlante
11. Tasto DOWN / MUTE
12. Schermo
13. Led ricarica
14. Gancio per coperchio vano batteria
15. Coperchio vano batteria
Attenzione: se utilizzate la custodia waterproof nell’ acqua, dopo l’uso lavatela con cura e
asciugatela. Non utilizzate nessun prodotto per pulirla.
Rimuovere la pellicola protettiva dallo schermo.
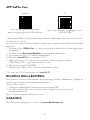
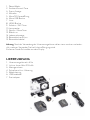
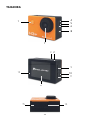
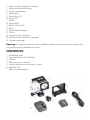
ACCESSORI IN DOTAZIONE
1. Custodia waterproof 30m
2. Pacco batteria Li-Ion 900mAh
3. Cornice
4. Aggancio rapido
5. Supporto base piatta con biadesivo
6. Cavo USB
7. Aggancio con vite fotografica

6
PER INIZIARE
Accensione: premere il tasto Accensione/Modalità.
Spegnimento: tenere premuto il tasto Accensione/Modalità.
IMPOSTAZIONI
1. Per accedere alle impostazioni premere tre volte il tasto Accensione/Modalità.
2. Per scorrere tra le varie opzioni premete UP/DOWN.
3. Per selezionare un’impostazione e modificarla, premete il tasto Scatto/Selezione e
successivamente UP o DOWN.
4. Per confermare la vostra scelta premete il tasto Scatto/Selezione.
5. Per uscire dal menu impostazioni premete brevemente il tasto Accensione/Modalità
(se uscite senza conferma, H3+ manterrà l’ultima opzione selezionata).
DESCRIZIONE DEI MENU
› Risoluzione: 1920x1080 (FHD), 1440x1080 (HD), 1280x720 (HD Ready) 848X480
WVGA e 640x480
› Esposizione (Exposure): permette di regolare l’esposizione tra -2.0 e +2.0.
› Rilevamento del movimento: se questa funzione è attiva e H3+ è accesa, comincia a
registrare automaticamente non appena viene rilevato un movimento.
› Registrazione ciclica (Looping video): la videocamera registra ciclicamente e quando la
memoria è piena, sovrascrive i video meno recenti. I video saranno separati in vari file a
seconda della durata impostata.
› Intervalli video: H3+ scatta un’istantanea con intervalli di tempo predefiniti creando un
unico video.
› WDR (Alta qualità): WDR migliora la definizione dei video e l’esposizione dell’immagine
quando vi sono contrasti di luce.
› Registra Audio: attiva o disattiva il microfono (registrazione dell’audio).
› Etichetta data: consente di impostare data e ora in sovrimpressione al video.
› Dimensione dell’immagine: 16/12/10/8/5/3/2/1.3 MP/VGA.
› Modalità di scatto: imposta il timer per l’autoscatto.
› Qualità di registrazione: imposta il livello desiderato.
› Scatto continuo (Time Lapse): Foto ad intervalli di tempo ogni 3/10 secondi.
› Nitidezza: regola il contrasto della foto.
› ISO: regola la sensibilità alla luce 100/200/auto.
› Anti-shaking: stabilizzatore d’immagine.
› Bilanciamento del bianco: regola la sensibilità al colore bianco (Auto / luce diurna /
nuvoloso / tungsteno / luce fluorescente).
› Frequenza: regola la frequenza del video 50Hz/60Hz.
› Modalità OSD: consente di visualizzare le informazioni sul display.
› Salvaschermo: imposta lo spegnimento automatico del display (Disattivo: display sempre
acceso/1 minuto/2 minuti/3 minuti).
› Ruotare: quando questa funzione è attiva, il file registrato sarà ruotato di 180° e la
visualizzazione sul display sarà sempre capovolta indipendentemente dal verso della

7
videocamera.
› Spegnimento automatico: la videocamera si spegne se inutilizzata
(Disattivo/3minuti/5minuti/10minuti).
› Lingua: EN/IT/F/NL/D/ES/PT/RU/PL.
› Tono avviso bip tasti
› Data-ora: consente di impostare data e ora e scegliere il formato.
› Display OFF: consente di disattivare il display. Per riabilitarlo spegnere e riaccendere la
videocamera.
› Formato TV: PAL/NTSC.
› Modalità dash cam: consente di utilizzare la videocamera come dash cam. Ciò è possibile
collegando H3+ ad un caricatore da auto 12V con presa USB opzionale. Quando questa
funzione è attivata, l’accensione (registrazione) e lo spegnimento della videocamera sono
automatici all’avvio ed arresto del veicolo.
› Wi-Fi SSID: consente di modificare il nome Wi-Fi con cui viene identificata la videocame-
ra.
› Wi-Fi password: permette di modificare la password di accesso al Wi-Fi della videocamera.
› Elimina: questa funzione permette di cancellare i file registrati.
› Formatta: formatta completamente la memory card.
› Ripristina impostazioni: consente di resettare l’unità e ripristinare i valori di fabbrica.
› Versione: visualizza la versione del FW attualmente sulla videocamera.
REGISTRARE VIDEO
Premere il tasto Scatto/Selezione per iniziare la registrazione. H3+ emetterà un beep e il led
inizierà a lampeggiare. Per interrompere la registrazione, premete nuovamente il tasto Scatto/
Selezione. La videocamera emetterà un beep ed il led smetterà di lampeggiare.
FOTO
Per scattare una foto singola, una sequenza di foto o foto ad intervalli di tempo (time lapse)
accedere alla modalità foto tramite il tasto Accensione/Modalità; premete il tasto Scatto/
Selezione: ad ogni scatto la videocamera emetterà un segnale sonoro.
RIPRODUZIONE
Riprodurre foto e video
Per entrare nel menu Playback (Riproduzione), premete il tasto Accensione/Modalità fino a
raggiungere i file.
Per scorrere tra i vari file utilizzate i tasti Up/Down.
Per riprodurre il file selezionato premete il tasto Scatto/Selezione.
CARD MICRO SD
H3+ è compatibile con memory card classe 10, da 16Gb, 32Gb, 64Gb e 128Gb (per queste
due ultime capacità consigliamo classe 10 U3).
Per ottenere buone riprese durante le vostre attività, specialmente quelle con forti vibrazioni,
le memory card devono essere di buona qualità.

8
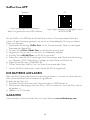
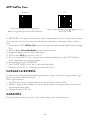
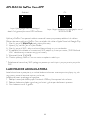
APP GoPlus Cam
Android
https://play.google.com/store/apps/
details?id=generalplus.com.GPCamDemo
iOs
https://apps.apple.com/it/app/goplus-cam/
id1055541083
L’Applicazione GoPlus Cam permette di controllare la videocamera a distanza utilizzando uno
smartphone o un tablet.
Le caratteristiche permettono di vedere in tempo reale, riprodurre e condividere le foto/filmati
selezionati.
1. Scaricate la App “GoPlus Cam” sul vostro smartphone o tablet presso lo store Apple App o
Google Play.
2. Premete il tasto Accensione/Modalità per accendere la videocamera.
3. Assicuratevi che H3+ sia in modalità Videocamera.
4. Premete il tasto Wi-Fi per accendere il Wi-Fi. *
5. Nelle impostazioni Wi-Fi del vostro smartphone o tablet, collegatevi alla rete
“SSID:Midland H3+” seguita da una serie di numeri.
6. Digitate la password “12345678”.
7. Aprite la App “GoPlus Cam” sul vostro smartphone o tablet.
* Per spegnere il Wi-Fi tenete premuto il tasto Wi-Fi.
RICARICA DELLA BATTERIA
Se la batteria si scarica completamente mentre state registrando, la videocamera si spegne ma
la vostra registrazione viene automaticamente salvata.
Per caricare la batteria:
1. Collegate la videocamera al computer o a una sorgente USB.
2. Durante la carica il led di stato rimane acceso e si spegnerà quando la batteria è
completamente carica.
Per una ricarica completa occorrono 3-5 ore.
GARANZIA
Per informazioni sulla garanzia visitate il sito www.midlandeurope.com

9
SPECIFICHE TECNICHE
Video: 1920x1080 (FHD), 1440x1080 (HD), 1280x720 (low HD), 848x480 , 640x480
formato AVI.
Foto: 16/12/10/8/5/3/MP formato jpg
Lente: 120° grandangolo
Waterproof fino a 30m con la custodia subacquea
Display LCD a colori 2”
Microfono e altoparlanti integrati
Modalità operative: Video/Foto/Riproduzione/Dash cam
Funzioni configurabili: risoluzione video/foto, data e ora, esposizione, sequenza foto, time
lapse, lingua ecc.
Lingue menu: EN/IT/F/NL/D/ES/PT/RU/PL
Connessioni : USB 2.0
Autonomia fino a 110’ in HD
Memoria: micro SD classe 10 U3 fino a 128Gb
Batteria: Li-Ion 900mAh
Dimensioni: 59,3x29,3x41,1mm
Peso: 52gr (batteria inclusa)
Le specifiche sono soggette a modifiche senza preavviso.

10
THE BASICS
7
1
4
5
6
8
10
23
9
11
12
13
1415

11
1
2
3
5
7
6
4
1. Power/Mode button
2. Shutter/Select button
3. Status indicator
4. Microphone
5. Micro SD slot
6. Micro USB port
7. Lens
8. HDMI port
9. UP/Wi-Fi button
10. Speaker
11. DOWN/MUTE button
12. Screen
13. Charging status led
14. Battery door latch
15. Battery door
Attention: if you use the case in water, wash it well and dry if after use. Do not use any type of
cleaning product.
Remove the protective film from the screen.
ACCESSORIES SUPPLIED IN THE PACKAGE
1. Waterproof case 30m
2. Li-Ion battery pack 900mAh
3. Frame
4. Quick release mount
5. Flat mount with bi-adhesive
6. USB cable
7. Standard photo mount

12
GETTING STARTED
To power ON: press the Power/Mode button.
To power OFF: press and hold the Power/Mode button.
SETTINGS
1. To enter the Settings menu, press the Power/Mode button for 3 times.
2. Use the UP/DOWN controls to browse the settings.
3. To select a function and change its setting, press the Shutter/Select control and then UP
or DOWN to choose the desired option.
4. Press Shutter/Select to confirm your selection.
5. To exit the Setting menu, press the Power/Mode button (if you exit the menu without giv-
ing a confirmation, H3+ will keep the latest option selected).
MENU
› Resolution: 1920x1080 (FHD), 1440x1080 (HD), 1280x720 (HD Ready) 848X480
WVGA and 640x480 (VGA).
› Exposure: allows to adjust the exposure between -2.0 and +2.0.
› Motion detection: if this feature is enabled and the camera is on, it automatically starts
recording as soon as a movement is detected.
› Looping video-Cyclic record: the camera records continuously and when the memory is
full, it overwrites the older videos. Videos will be split in dierent files with a pre-set dura-
tion.
› Video lapse: H3+ takes a photo at pre-set time intervals, creating a single video.
› WDR (High quality ): this feature improves the video definition. It improves the overall ex-
posure throughout the entire image. It enables the camera to pick up greater detail in dark
shadows and makes sure the highlights won’t get blown-out.
› Record Audio: activates/deactivates the microphone (the audio recording).
› Date stamp: Date and time on videos.
› Image size: 16/12/10/8/5/3/2/1.3 MP/VGA.
› Quality: set the desired level.
› Capture mode: sets the delay time for the self timer.
› Burst (Continuous shooting): the camera takes photos at pre-set time intervals (3/10
seconds).
› Sharpness: adjusts the contrast of the photo.
› ISO: regulates the light sensitivity 100/200/auto.
› Anti-shaking: image stabilizer.
› White Balance: adjusts the sensitivity to white color: Auto, Daylight, Cloudy, Tungsten,
Fluorescent
› Frequency: adjusts video frequency 50Hz/60Hz.
› OSD mode: allows to visualize the display information.
› Screen saver: sets the automatic turning o of the display (o/ 1 minute/2 minutes /3
minutes).

13
› Rotate: if enabled, the recordered file will be rotated of 180° and will always be shown like
this.
› Auto power o: the camera turns o if not used (o/3 min/5 min/10 min.).
› Language: selects the desired language (EN/IT/F/NL/D/ES/PT/RU/PL).
› Beep Sound: on/o.
› Date/time: allows to set data/time and the desired format.
› Screen OFF: to turn o the display. To turn it on again, switch o and on the camera.
› TV format: PAL/NTSC.
› Car mode: this feature allows to use H3+ as a dash cam. This is possible by connecting the
camera to an optional 12V charger with USB port. If this mode is activated, the camera
automatically switches on (records) and o at the turning on and o of the vehicle.
› Wi-Fi SSID: allows to change the Wi-Fi ID used to identify the cam.
› Wi-Fi password: allows to change the Wi-Fi access password of the cam.
› Delete: to delete the recorded files.
› Format: to format the memory card.
› Default setting: allows you to reset the camera to factory settings.
› Version: identifies the version of the FW currently on the cam.
CAPTURE VIDEO
Press the Shutter/Select button to start recording. The camera will emit a beep and the LED
indicator will start blinking. To stop recording, press the Shutter/Select button again.
The camera will emit a beep and the LED will stop blinking.
PHOTO
To take a photo (burst photo) or Time Lapse, enter the Photo mode by pressing the Power/
Mode button, then press the Shutter/Select button.
The camera will emit a sound every time a phote is shot .
PLAY BACK
Play videos and Photos
To enter the Playback menu, press Power/Mode.
To scroll throught the dierent files, use the Up/Down buttons.
To play the selected files, press the Shutter/Select button.
MICRO SD CARD
H3+ is compatible with 16Gb, 32Gb, 64Gb and 128Gb memory cards class 10. For 64Gb
and 128Gb we recommend to use class 10 U3.
For maximum reliability in high-vibration activity, we strongly suggest the use of brand name
memory cards.

14
GoPlus Cam APP
Android
https://play.google.com/store/apps/
details?id=generalplus.com.GPCamDemo
iOs
https://apps.apple.com/it/app/goplus-cam/
id1055541083
The GoPlus Cam APP allows you to control the camera remotely using a smartphone or tab-
let. Features include live preview, photo playback and sharing videos/photos and more.
1. Download the “GoPlus Cam” APP on your smartphone or tablet at Apple Store or Google
Play.
2. Press the Power/Mode button to turn the camera on.
3. Make sure H3+ is in Video mode.
4. Press the Wi-Fi key to enable Wi-Fi. *
5. In your smartphone or tablet’s Wi-Fi settings, connect to the network “SSID:Midland
H3+” followed by a series of numbers.
6. Edit the password “12345678”.
7. Open the “GoPlus Cam” APP on your smartphone or tablet.
* To disable the Wi-Fi, keep pressed the Wi-Fi key.
CHARGING THE BATTERY
If the battery is completely discharged while you are recording, the camera turns o, but your
recording is automatically saved.
To charge the battery:
1. Plug the camera to a computer or a USB power supply.
2. While charging, the status led stays on and goes o when the battery is fully charged
3. Charging time: 3-5 hours.
WARRANTY
For warranty informations, visit our web site www.midlandeurope.com

15
SPECIFICATIONS
Video: 1920x1080 , 1440x1080 , 1280x720 , 848x480 , 640x480 AVI format
Foto: 16/12/10/8/5/3/MP jpg format
Lens: 120° wide angle
Waterproof up to 30 m with waterproof case
Display LCD color 2”
Built-in speaker and microphone
Operational modes: Video/photo /Play back/Dash cam
Configurable Functions: video foto resolution, Date & time , Exposure, photo sequence,
time lapse, language etc.
Multilanguage menu: EN/IT/F/NL/D/ES/PT/RU/PL
Connections: USB 2.0
Battery life up to 110’ in HD
Memory: micro SD cards class 10 U3 up to 128Gb
Battery: Li-Ion 900mAh
Dimensions: 59,3x29,3x41,1mm
Weight: 52gr (battery included)
Specifications are subject to change without notice.

16
TASTEN UND FUNKTIONEN
7
1
4
5
6
8
10
23
9
11
12
13
1415

17
1
2
3
5
7
6
4
1. Power/Modus
2. Auslöser/Auswahl Taste
3. Status Anzeige
4. Mikrofon
5. Micro SD Kartenönung
6. Micro USB Buchse
7. Linse
8. HDMI Buchse
9. Aufwärts / WiFi Taste
10. Lautsprecher
11. Abwärts / Mute Taste
12. Bildschirm
13. Ladestandsanzeige
14. Batteriefachverschluss
15. Batteriefachdeckel
Achtung: Nach der Verwendung des Unterwassergehäuses sollten sie es waschen und orden-
tlich trocknen. Verwenden Sie hierfür keine Reinigungmittel.
Entfernen Sie die Schutzfolie von dem Display.
LIEFERUMFANG
1. Unterwassergehäuse bis 30m
2. Lithium-Ionen Akku 900mAh
3. Montagerahmen
4. Schnellverschluss-Halterung
5. Klebehalterung
6. USB Ladekabel
7. Stativadapter

18
ERSTE SCHRITTE
Einschalten: drücken Sie die Power/Modus Taste
Ausschalten: halten Sie die Power/Modus Taste gedrückt
EINSTELLUNGEN
1. Um in das Einstellungsmenü zu gelangen, drücken Sie 3x die Power/Modus Taste
2. Verwenden Sie die Aufwärts/Abwärts Tasten, um sich durch das Menü zu bewegen.
3. Um eine Auswahl zu bestätigen, drücken Sie den Auslöser-/Auswahltaste.
4. Um das Menü zu verlassen, drücken Sie die Power/Modus Taste (wenn Sie ein Menü ohne
vorherige Bestätigung verlassen, behält die H3+ die alte Auswahl bei).
MENÜ
› Auflösung: 1920 x 1080 (FHD), 1440 x 1080 (HD), 1280 x 720 (HD Ready), 848 x
480 (WVGA) und 640 x 480 (VGA)
› Belichtung: Ermöglicht die Einstellung der Belichtung zwischen -2,0 und +2,0
› Bewegungserkennung: Wenn diese Funktion aktiviert ist und die Kamera eingeschaltet ist,
wird automatisch die Aufzeichnung gestartet, sobald eine Bewegung erkannt wird
› Zyklische Video-Aufzeichnung: Die Kamera zeichnet kontinuierlich auf und wenn der
Speicher voll ist, werden ältere Videos überschrieben. Die Videos werden in verschiedene
Dateien mit einer voreingestellten Dauer aufgeteilt
› Video-Zeitraer: Die H3 + nimmt in festgelegten Zeitintervallen ein Foto auf und daraus
wird ein Video erstellt
› WDR (Hohe Qualität): Diese Funktion verbessert die Videoqualität, indem die Belichtung
im erhöht wird. Dadurch kann die Kamera bei Dunkelheit mehr Details erfassen und stellt
sicher, dass die Highlights nicht verblassen
› Audio aufnehmen: Aktiviert / deaktiviert das Mikrofon (die Audioaufnahme)
› Datumsstempel: Datum und Uhrzeit werden im Video angezeigt
› Bildgröße: 16/12/10/8/5/3/2 /1,3 MP/VGA
› Qualität: Stellen Sie die gewünschte Stufe ein
› Aufnahmemodus: Legt die Verzögerungszeit für den Selbstauslöser fest
› Serienaufnahme: Die Kamera nimmt Fotos in voreingestellten Zeitintervallen auf (3/10
Sekunden)
› Schärfe: Passt den Kontrast des Fotos an
› ISO: regelt die Lichtempfindlichkeit 100/200/Auto
› Verwacklungsschutz: Bildstabilisator
› Weißabgleich: Passt die Empfindlichkeit für Weiß an: Automatisch, Tageslicht, Bewölkt,
Wolfram, Fluoreszierend
› Frequenz: Stellt die Videofrequenz auf 50 Hz / 60 Hz ein
› OSD-Modus: Ermöglicht die Visualisierung der Anzeigeinformationen
› Bildschirmschoner: Stellt das automatische Ausschalten des Displays ein (aus / 1 Minute /
2 Minuten / 3 Minuten)
› Drehen: Wenn diese Option aktiviert ist, wird die aufgezeichnete Datei um 180 ° gedreht
› Automatische Abschaltung: Die Kamera schaltet sich aus, wenn sie nicht verwendet wird

19
(aus / 3 min / 5 min / 10 min)
› Sprache: Wählen Sie die gewünschte Sprache aus (EN/IT/FR/NL/DE/ES/PT/RU/PL)
› Piepton: Ein / Aus.
› Datum / Uhrzeit: Ermöglicht die Einstellung von Datum / Uhrzeit und des gewünschten
Formats
› Bildschirm AUS: Zum Ausschalten des Displays (erhöht die Batterielaufzeit). Schalten Sie
die Kamera aus und wieder ein, um den Bildschirm wieder einzuschalten
› Fernsehformat: PAL / NTSC
› Automodus: Mit dieser Funktion können Sie die H3 + als Dash-Cam verwenden. Dies ist
durch das Anschließen der Kamera an ein optionales 12-V-Ladegerät mit USB-Anschluss
möglich. Wenn dieser Modus aktiviert ist, schaltet die Kamera sich beim Ein- und Auss-
chalten des Fahrzeugs automatisch ein (Videoaufnahme) und aus
› WiFi-SSID: Ermöglicht das Ändern der WiFi-ID, mit der die Kamera identifiziert wird
› WLAN-Passwort: Ermöglicht das Ändern des WLAN-Passworts der Kamera.
› Löschen: Zum Löschen der aufgezeichneten Dateien
› Formatieren: Zum Formatieren der Speicherkarte
› Standardeinstellung: Ermöglicht das Zurücksetzen der Kamera auf die Werkseinstellungen
› Version: Gibt die Version der sich aktuell auf der Kamera befindlichen Firmware an
VIDEO AUFNEHMEN
Drücken Sie den Auslöser/Auswahltaste, um die Aufnahme zu starten. Die Kamera gibt einen
Piepton aus und die LED Anzeige beginnt zu blinken. Drücken Sie den Auslöser/Auswahltaste
erneut, um die Aufnahme zu beenden. Die Kamera gibt einen Piepton aus und die LED hört
auf zu blinken.
FOTO
Um ein Foto, Serienbild oder eine Zeitraeraufnahme zu machen, rufen Sie den Fotomodus
auf, indem Sie die Ein-/Aus-Taste drücken und dann den Auslöser/Auswahltaste drücken. Die
Kamera gibt jedes Mal einen Bestätigungston aus, wenn ein Foto aufgenommen wird.
ABSPIELEN
Spielen Sie Videos und Fotos ab:
Drücken Sie Power/Mode, um das Wiedergabemenü aufzurufen.
Verwenden Sie die Auf-/Ab-Tasten, um durch die verschiedenen Dateien zu scrollen.
Drücken Sie den Auslöser/Auswahltaste, um die ausgewählten Dateien abzuspielen.
MICRO SD KARTE
H3 + ist kompatibel mit 16 GB, 32 GB, 64 GB und 128 GB Speicherkarten der Klasse 10. Für
64 GB und 128 GB empfehlen wir die Verwendung von einer Speicherkarte der Klasse 10 U3.
Für maximale Zuverlässigkeit bei hoher Vibrationsaktivität empfehlen wir nachdrücklich die
Verwendung von Markennamen Speicherkarten.

20
GoPlus Cam APP
Android
https://play.google.com/store/apps/
details?id=generalplus.com.GPCamDemo
iOs
https://apps.apple.com/it/app/goplus-cam/
id1055541083
Mit der GoPlus Cam APP können Sie die Kamera über ein Smartphone oder Tablet fern-
steuern. Zu den Funktionen gehören Live-Vorschau, Fotowiedergabe, Sharing von Videos/
Fotos und viele mehr.
1. Downloaden Sie die App „GoPlus Cam“ auf Ihr Smartphone oder Tablet aus dem Apple
Store oder bei Google Play
2. Drücken Sie die Power / Mode-Taste, um die Kamera einzuschalten.
3. Vergewissern Sie sich, dass sich die H3 + im Videomodus befindet.
4. Drücken Sie die WLAN-Taste, um WLAN zu aktivieren*
5. Stellen Sie in den WLAN-Einstellungen Ihres Smartphones oder Tablets eine Verbindung
zum Netzwerk „SSID: Midland H3 +”(gefolgt von einer Reihe von Zahlen) her.
6. Geben Sie das Passwort „12345678“ ein.
7. Önen Sie die App „GoPlus Cam“ auf Ihrem Smartphone oder Tablet.
* Um das WLAN zu deaktivieren, halten Sie die WLAN-Taste gedrückt.
DIE BATTERIE AUFLADEN
Wenn der Akku während der Aufnahme vollständig entladen ist, schaltet sich die Kamera aus,
aber Ihre letzte Aufnahme wird automatisch gespeichert.
So laden Sie den Akku auf:
1. Schließen Sie die Kamera an einen Computer oder ein USB-Netzteil an.
2. Während des Ladevorgangs bleibt die Status-LED an und erlischt, wenn der Akku vollstän-
dig geladen ist
3. Ladezeit: ca. 3-5 Stunden.
GARANTIE
Informationen zur Garantie finden Sie auf unserer Webseite www.midlandeurope.com
La pagina si sta caricando...
La pagina si sta caricando...
La pagina si sta caricando...
La pagina si sta caricando...
La pagina si sta caricando...
La pagina si sta caricando...
La pagina si sta caricando...
La pagina si sta caricando...
La pagina si sta caricando...
La pagina si sta caricando...
La pagina si sta caricando...
La pagina si sta caricando...
La pagina si sta caricando...
La pagina si sta caricando...
La pagina si sta caricando...
La pagina si sta caricando...
La pagina si sta caricando...
La pagina si sta caricando...
La pagina si sta caricando...
La pagina si sta caricando...
-
 1
1
-
 2
2
-
 3
3
-
 4
4
-
 5
5
-
 6
6
-
 7
7
-
 8
8
-
 9
9
-
 10
10
-
 11
11
-
 12
12
-
 13
13
-
 14
14
-
 15
15
-
 16
16
-
 17
17
-
 18
18
-
 19
19
-
 20
20
-
 21
21
-
 22
22
-
 23
23
-
 24
24
-
 25
25
-
 26
26
-
 27
27
-
 28
28
-
 29
29
-
 30
30
-
 31
31
-
 32
32
-
 33
33
-
 34
34
-
 35
35
-
 36
36
-
 37
37
-
 38
38
-
 39
39
-
 40
40


Midland H3+ Full HD Action Kamera Manuale utente
- Categoria
- Fotocamere per sport d'azione
- Tipo
- Manuale utente
- Questo manuale è adatto anche per
in altre lingue
Documenti correlati
-
Midland XTC400 specificazione
-
-
-
Midland H9 Manuale del proprietario
-
-
-
Midland H5 Pro Istruzioni per l'uso
-
-
Midland Street Guardian Manuale del proprietario
-
Altri documenti
-
AKASO V50 Elite Manuale utente
-
Xblitz S7 Duo Manuale del proprietario
-
-
-
-
Medion LIFE S47018 MD 87205 Manuale utente
-
iON Shutter Pal Guida Rapida
-
 Dmax 3320008 Manuale del proprietario
-
Rollei Actioncam 4s Plus Manuale del proprietario
-
