Lindy 2 Port DisplayPort 1.2, USB 2.0 & Audio Cable KVM Switch Manuale utente
- Categoria
- Hub di interfaccia
- Tipo
- Manuale utente
Questo manuale è adatto anche per

© LINDY Group – THIRD EDITION (October 2018)
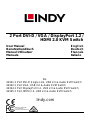
2 Port DVI-D / VGA / DisplayPort 1.2 /
HDMI 2.0 KVM Switch
User Manual English
Benutzerhandbuch Deutsch
Manuel Utilisateur Français
Manuale Italiano
No.
42341 2 Port DVI-D Single Link, USB 2.0 & Audio KVM Switch
42342 2 Port VGA, USB 2.0 & Audio KVM Switch
42344 2 Port DisplayPort 1.2, USB 2.0 & Audio KVM Switch
42345 2 Port HDMI 2.0, USB 2.0 & Audio KVM Switch
lindy.com
Tested to comply with
FCC Standards
For Home and Office Use!


User Manual English
Introduction
Thank you for purchasing from the Lindy Cable KVM Switch range. This product has been designed to
provide trouble free, reliable operation. It benefits from both a LINDY 2 year warranty and free lifetime
technical support. To ensure correct use, please read this manual carefully and retain it for future
reference.
Package Contents
▪ KVM Switch with cables
▪ This Manual
Specification
▪ USB 2.0 compliant, supports USB 2.0 hubs and device sharing
▪ Port switching via button, software and keyboard hotkey switching
▪ 2 System Cables connected to the switch
42341: Interfaces: DVI, USB 2.0, Audio out & Microphone
DVI-D Single Link: up to 1920x1200, HDCP compliant – not for connection to HDMI ports of graphic
cards or PC/notebook, HDMI and Deep Colour are not supported!
42342: Interfaces: VGA, USB 2.0, Audio out & Microphone
42344: Interfaces: DisplayPort 1.2, USB 2.0, Audio out & Microphone
Supports resolutions up to 3840x2160 60Hz 4:4:4 8bit
42345: Interfaces: HDMI 2.0, USB 2.0, Audio out & Microphone
Supports resolutions up to 3840x2160 60Hz 4:4:4 8bit
Installation
1. Install the driver software. This is located at Lindy.com
2. To install on Mac OS, copy the file (*.pkg format) to the local hard disk and install it from there.
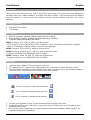
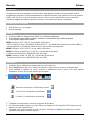
3. This will install the software on your computer and create some new icons in the Windows taskbar or
in the Mac Dock. They will look like one of the icons shown below.
4.
No live connection or KVM switch detected
Port 1computer is displayed and selected
Port 2 computer is displayed and selected
5. Connect your keyboard, mouse, monitor and audio devices to the KVM switch.
6. If required, you may use a USB hub to connect more than 2 USB devices, to do this please use a
self-powered USB hub.
7. Connect the system cables directly to your computers. Extension or adapter cables may NOT be
supported at high video resolutions.

User Manual English
Operation
There are three methods to toggle between the computers. After switching please allow the computer a
few seconds to load all USB drivers before you can use the system.
1. Switch Button
The Switch Button is a wired remote control. Press the button to toggle between the two computers.
2. KVM Switching Software (Windows & Mac OS)
For KVM Switching Software please refer to installation section.
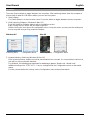
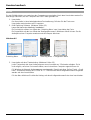
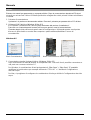
Right clicking the icon opens the port switching menu.
Double clicking the icon opens the configuration menu. Using this menu you may bind the audio ports
to one computer and you may enable the beeper.
Windows OS Mac OS
Switching Menu Configuration Menu Switching Menu Configuration Menu
3. Keyboard Hotkey Switching (Windows & Mac OS)
Each keystroke hotkey sequence must be pressed within two seconds. It is not possible to switch to a
port with no active computer attached.
For Windows, the following key sequence for switching is preset: “Scroll Lock + Scroll Lock”.
Additional hotkeys like "CTRL ALT + *" can be configured via the Configuration menu as described
above.
For Mac, please define the hotkeys via the Configuration menu as described above.

Benutzerhandbuch Deutsch
Einführung
Wir freuen uns, dass Ihre Wahl auf ein LINDY-Produkt gefallen ist und danken Ihnen für Ihr Vertrauen.
Sie können sich jederzeit auf unsere Produkte und einen guten Service verlassen. Dieser Lindy KVM
Swtich unterliegt einer 2-Jahres LINDY Herstellergarantie und lebenslangem kostenlosen, technischen
Support. Bitte lesen Sie diese Anleitung sorgfältig und bewahren Sie sie auf.
Lieferumfang
▪ KVM Switch mit Kabeln
▪ Dieses Handbuch
Spezifikationen
▪ Kompatibel mit USB 2.0, unterstützt USB 2.0 Hubs und die gemeinsame Nutzung mehrerer Geräte
▪ Umschalten zwischen den Ports mittels Taste, Software und Tastaturhotkey
▪ Mit 2 am Switch fest angeschlossenen KVM-Kabeln
42341: Schnittstellen: DVI, USB 2.0, Audio-Ausgang & Mikrofon
DVI-D Single Link: bis 1920x1200, HDCP-kompatibel – nicht zum Anschluss an HDMI Ports von
Grafikkarten oder PC/Notebook, HDMI und Deep Colour werden nicht unterstützt!
42342: Schnittstellen: VGA, USB 2.0, Audio-Ausgang & Mikrofon
42344: Schnittstellen: DisplayPort 1.2, USB 2.0, Audio-Ausgang & Mikrofon
Unterstützt Auflösungen bis 3840x2160 60Hz 4:4:4 8Bit
42345: Schnittstellen: HDMI 2.0, USB 2.0, Audio-Ausgang & Mikrofon
Unterstützt 3840x2160 60Hz 4:4:4 8Bit
Installation
1. Installieren Sie die Treiber, die Sie zum Download auf Lindy.com finden
2. Zur Installation auf einem Mac-Computer, kopieren Sie die Datei *.pkg format auf die lokale
Festplatte und führen die Installation durch
3. Nach der Softwareinstallation werden neue Icons in der Windows-Taskleiste bzw. auf dem Mac
angezeigt (Beispiele siehen unter 4.).
4.
Keine Live-Verbindung oder kein KVM Switch erkannt
Port 1 Computer wird angezeigt und ist ausgewählt
Port 2 Computer wird angezeigt und ist ausgewählt
5. Verbinden Sie Tastatur, Maus, Monitor und Audiogeräte mit dem KVM Switch.
6. Falls erforderlich können Sie einen USB Hub verwenden, wenn Sie mehr als 2 USB-Geräte
anschließen möchten. Verwenden Sie einen USB Hub mit eigenem Netzteil.
7. Verbinden Sie die KVM-Kabel direkt mit Ihren Computer. Verlängerungs- oder Adapterkabel
unterstützen möglicherweise keine hohen Auflösungen.

Benutzerhandbuch Deutsch
Betrieb
Es gibt 3 Möglichkeiten, um zwischen den Computern umzuschalten. Nach dem Umschalten warten Sie
bitte einige Sekunden, bis der Computer alle USB-Treiber geladen hat.
1. Umschalter
Der Umschalter ist eine kabelgebundene Fernbedienung. Drücken Sie die Taste zum
Umschalten zwischen den zwei Computern.
2. KVM Switching Software (Windows & Mac OS)
Lesen Sie hierzu den Abschnitt “Installation”.
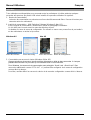
Ein Rechtsklick auf das Icon öffnet das „Switching Menu“ zum Umschalten der Ports.
Ein Doppelklick auf das Icon öffnet das Konfigurationsmenü. Mit diesem Menü können Sie die
Audioports einem Computer zuweisen und den Beeper aktivieren.
Windows OS Mac OS
Switching Menu Configuration Menu Switching Menu Configuration Menu
3. Umschalten mit dem Tastaturhotkey (Windows & Mac OS)
Jeder Tastendruck bei einer Hotkeysequenz muss innerhalb von 2 Sekunden erfolgen. Es ist
nicht möglich, auf einen Port umzuschalten, wenn kein aktiver Computer angeschlossen ist.
Für Windows ist folgende Hotkeysequenz voreingestellt: “Scroll Lock (bzw. Rollen-Taste) + Scroll
Lock”. Zusätzliche Hotkeys wie "STRG ALT + *" können über das Konfigurationsmenü eingestellt
werden wie oben beschrieben.
Für den Mac definieren Sie bitte die Hotkeys mit dem Konfigurationsmenü wie oben beschrieben.

Manuel Utilisateur Français
Introduction
Nous sommes heureux que votre choix se soit porté sur un produit LINDY et vous remercions de votre
confiance. Vous pouvez compter à tout moment sur la qualité de nos produits et de notre service. Cette
gamme de Switch KVM est soumise à une durée de garantie LINDY de 2 ans et d’une assistance
technique gratuite à vie. Merci de lire attentivement ces instructions et de les conserver pour future
référence.
Contenu de l’emballage
▪ Switch KVM avec câbles
▪ Ce manuel
Spécifications
▪ Conforme USB 2.0, prend en charge le partage des périphériques et des hubs USB 2.0
▪ Commutation des ports via bouton, logiciel et raccourcis clavier
▪ Deux câbles systèmes attachés au switch
42341: Interfaces: DVI, USB 2.0, Audio out & Microphone
DVI-D Single Link: jusqu’à 1920x1200, conforme HDCP– ne pas connecter à des cartes graphiques
HDMI de PC/ordinateurs portables, les signaux HDMI et Deep Colour ne sont pas pris en charge !
42342: Interfaces: VGA, USB 2.0, Audio out & Microphone
42344: Interfaces: DisplayPort 1.2, USB 2.0, Audio out & Microphone
Prend en charge les résolutions jusqu’à 3840x2160 60Hz 4:4:4 8bit
42345: Interfaces: HDMI 2.0, USB 2.0, Audio out & Microphone
Prend en charge les résolutions jusqu’à 3840x2160 60Hz 4 :4 :4 8bit
Installation
1. Installez les pilotes, disponibles sur Lindy.com
2. Pour une installation sous Mac OS, copiez le fichier (format *.pkg) sur le disque local et installez-le.
3. Cela va installer le logiciel sur votre ordinateur et créer de nouveaux icones dans la barre des tâches
Windows ou le Dock sous Mac. Ils se présentent comme ci-dessous.
4.
Pas de connexion active ou de switch KVM détecté
Le port ordinateur 1 est affiché et sélectionné
Le port ordinateur 2 est affiché et sélectionné
5. Connectez vos clavier, souris, moniteur et périphériques audio sur le switch KVM.
6. Si nécessaire, vous pouvez utiliser un hub USB pour connecter plus de deux périphériques USB,
pour ce faire veuillez utiliser un hub USB autoalimenté.
7. Connectez les câbles système directement à vos ordinateurs. Des rallonges ou des adaptateurs ne
sont pas pris en charge avec les hautes résolutions.

Manuel Utilisateur Français
Utilisation
Trois méthodes sont disponibles pour commuter entre les ordinateurs. Veuillez patienter quelques
secondes afin que tous les pilotes USB soient installés à la première utilisation du système.
1. Bouton de commutation
Le bouton de commutation se présente sous forme de télécommande filaire. Pressez le bouton pour
commuter entre les ordinateurs.
2. Logiciel de commutation - KVM Switching Software (Windows & Mac OS)
Pour le logiciel de commutation, veuillez-vous référer au paragraphe installation.
Un clic droit avec la souris ouvre le menu de sélection du port.
Un double clic ouvre le menu de configuration. En utilisant ce menu vous pouvez fixer le port audio à
un des ordinateurs ou active le bip sonore.
Windows OS Mac OS
Menu de commut. Menu de config. Menu de commut. Menu de configuration
3. Commutation par raccourcis clavier (Windows & Mac OS)
Chaque séquence de raccourci clavier doit être faite dans un délai de deux secondes. Il n’est pas
possible de commuter un port sans qu’un ordinateur actif ne soit connecté.
Pour Windows, les raccourcis de commutation sont préréglés: “Scroll Lock + Scroll Lock”. Des
raccourcis additionnels comme "CTRL ALT + *" peuvent être configurés via le menu de configuration
comme décrit ci-dessus.
Pour Mac, veuillez définir les raccourcis clavier via le menu de configuration comme décrit ci-dessus.

Manuale Italiano
Introduzione
Vi ringraziamo per aver acquistato un KVM Switch della famiglia Compact. Questo prodotto è stato
progettato per garantirvi la massima affidabilità e semplicità di utilizzo ed è coperto da 2 anni di garanzia
LINDY oltre che da un servizio di supporto tecnico a vita. Per assicurarvi di farne un uso corretto vi
invitiamo a leggere attentamente questo manuale e a conservarlo per future consultazioni.
Contenuto della confezione
▪ KVM Switch con cavi integrati
▪ Questo manuale
Specifiche
▪ Conforme USB 2.0, supporto Hub USB 2.0 e condivisione dispositivi
▪ Commutazione porta tramite pulsante, software e combinazione tasti hotkey da tastiera
▪ 2 cavi system integrati nello switch
42341: Interfacce: DVI, USB 2.0, Uscita Audio & Microfono
DVI-D Single Link: fino a 1920x1200, conforme HDCP – non adatto alla connessione a porte HDMI di
schede grafiche o PC/notebook, HDMI e Deep Colour NON sono supportati!
42342: Interfacce: VGA, USB 2.0, Uscita Audio & Microfono
42344: Interfacce: DisplayPort 1.2, USB 2.0, Uscita Audio & Microfono
Supporta risoluzioni fino a 3840x2160 60Hz 4:4:4 8bit
42345: Interfacce: HDMI 2.0, USB 2.0, Uscita Audio & Microfono
Supporta risoluzioni fino a 3840x2160 60Hz 4:4:4 8bit
Installazione
1. Installate i driver software che potete trovare sul sito Lindy.com
2. Per l’installazione su Mac OS, copiate il file (formato *.pkg) sul disco locale ed installatelo da lì.
3. Verrà installato il software sul vostro computer e appariranno alcune nuove icone nella taskbar
Windows o nel Mac Dock come indicato qui di seguito
4.
Nessuna connessione o KVM switch rilevato
La Porta 1 è visualizzata e selezionata
La Porta 2 è visualizzata e selezionata
5. Collegate la vostra tastiera, mouse e schermo al KVM switch.
6. Se necessario potete utilizzare un hub USB per connettere più di 2 dispositivi USB avendo cura di
utilizzare un hub autoalimentato.
7. Collegate i cavi system integrati ai vostri computer. Prolunghe e adattatori potrebbero non essere
supportati utilizzando risoluzioni elevate.

Manuale Italiano
Utilizzo
Esistono tre metodi per passare da un computer all’altro. Dopo la commutazione lasciate al PC alcuni
secondi per caricare tutti i driver USB delle periferiche collegate allo switch prima di iniziare ad utilizzare
il sistema.
1. Pulsante di commutazione
Il pulsante è in pratica un telecomando cablato. Premete il pulsante per passare dal un PC all’altro.
2. Software KVM Switching (Windows & Mac OS)
Per installare il software KVM Switching fate riferimento alla sezione “installazione”.
Fate click con il tasto destro del mouse sull’icona per aprire il menù di commutazione.
Facendo doppio click sull’icona si apre il menù di configurazione. Utilizzando questo menù potete
bloccare le porte Audio su uno dei due computer e potete abilitare/disabilitare il suono di
commutazione.
Windows OS Mac OS
Menù Commutazione Menù Configurazione Menù Commutazione Menù Configurazione
3. Commutazione tramite Keyboard Hotkey (Windows & Mac OS)
Ogni combinazione di tasti da tastiera va completata entro 2 secondi. Non è possibile commutare su
una porta non connessa ad alcun PC.
Per Windows, la combinazione di tasti preimpostata è: “Bloc Scorr” + “Bloc Scorr”. E’ possibile
modificare la combinazione per esempio utilizzando "CTRL ALT + *" dal Menù Configurazione
descritto sopra.
Per Mac, vi preghiamo di configurare la combinazione di hotkeys dal Menù Configurazione descritto
sopra.

CE/FCC Statement
CE Certification
This equipment complies with the requirements relating to Electromagnetic Compatibility Standards.
It has been manufactured under the scope of RoHS compliance.
CE Konformitätserklärung
Dieses Produkt entspricht den einschlägigen EMV Richtlinien der EU für IT-Equipment und darf nur
zusammen mit abgeschirmten Kabeln verwendet werden.
Diese Geräte wurden unter Berücksichtigung der RoHS Vorgaben hergestellt.
Die formelle Konformitätserklärung können wir Ihnen auf Anforderung zur Verfügung stellen
FCC Certification
This equipment has been tested and found to comply with the limits for a Class B digital device, pursuant
to part 15 of the FCC Rules. These limits are designed to provide reasonable protection against harmful
interference in a residential installation.
You are cautioned that changes or modification not expressly approved by the party responsible for
compliance could void your authority to operate the equipment.
This device complies with part 15 of the FCC Rules.
Operation is subject to the following two conditions:
1. This device may not cause harmful interference, and
2. This device must accept any interference received, including interference that may cause undesired
operation.
LINDY Herstellergarantie – Hinweis für Kunden in Deutschland
LINDY gewährt für dieses Produkt über die gesetzliche Regelung in Deutschland hinaus eine zweijährige Hersteller-
garantie ab Kaufdatum. Die detaillierten Bedingungen dieser Garantie finden Sie auf der LINDY Website aufgelistet
bei den AGBs.
Hersteller / Manufacturer (EU):.
LINDY-Elektronik GmbH LINDY Electronics Ltd
Markircher Str. 20 Sadler Forster Way
68229 Mannheim Stockton-on-Tees, TS17 9JY
Germany England
Email: info@lindy.com , T: +49 (0)621 470050 postmaster@lindy.co.uk , T: +44 (0)1642 754000

Recycling Information
WEEE (Waste of Electrical and Electronic Equipment),
Recycling of Electronic Products
Europe, United Kingdom
In 2006 the European Union introduced regulations (WEEE) for the collection and recycling of all waste electrical
and electronic equipment. It is no longer allowable to simply throw away electrical and electronic equipment. Instead,
these products must enter the recycling process.
Each individual EU member state has implemented the WEEE regulations into national law in slightly different ways.
Please follow your national law when you want to dispose of any electrical or electronic products. More details can
be obtained from your national WEEE recycling agency.
Germany / Deutschland Rücknahme Elektroschrott und Batterie-Entsorgung
Die Europäische Union hat mit der WEEE Direktive Regelungen für die Verschrottung und das Recycling von Elektro-
und Elektronikprodukten geschaffen. Diese wurden im Elektro- und Elektronikgerätegesetz – ElektroG in deutsches
Recht umgesetzt. Das Entsorgen von Elektro- und Elektronikgeräten über die Hausmülltonne ist verboten! Diese
Geräte müssen den Sammel- und Rückgabesystemen zugeführt werden! Dort werden sie kostenlos entgegen
genommen. Die Kosten für den weiteren Recyclingprozess übernehmen die Gerätehersteller.
LINDY bietet deutschen Endverbrauchern ein kostenloses Rücknahmesystem an, beachten Sie bitte, dass Batterien
und Akkus den Produkten vor der Rückgabe an das Rücknahmesystem entnommen werden müssen und über die
Sammel- und Rückgabesysteme für Batterien separat entsorgt werden müssen. Ausführliche Informationen zu
diesen Themen finden Sie stets aktuell auf der LINDY Webseite im Fußbereich.
France
En 2006, l'union Européenne a introduit la nouvelle réglementation (DEEE) pour le recyclage de tout équipement
électrique et électronique.
Chaque Etat membre de l’ Union Européenne a mis en application la nouvelle réglementation DEEE de manières
légèrement différentes. Veuillez suivre le décret d’application correspondant à l’élimination des déchets électriques
ou électroniques de votre pays.
Italy
Nel 2006 l’unione europea ha introdotto regolamentazioni (WEEE) per la raccolta e il riciclo di apparecchi elettrici ed
elettronici. Non è più consentito semplicemente gettare queste apparecchiature, devono essere riciclate. Ogni stato
membro dell’ EU ha tramutato le direttive WEEE in leggi statali in varie misure. Fare riferimento alle leggi del proprio
Stato quando si dispone di un apparecchio elettrico o elettronico.
Per ulteriori dettagli fare riferimento alla direttiva WEEE sul riciclaggio del proprio Stato.
No. 42341-2_4-5
3rd Edition, October 2018
lindy.com
Tested to comply with
FCC Standards
For Home and Office Use!
-
 1
1
-
 2
2
-
 3
3
-
 4
4
-
 5
5
-
 6
6
-
 7
7
-
 8
8
-
 9
9
-
 10
10
-
 11
11
-
 12
12


Lindy 2 Port DisplayPort 1.2, USB 2.0 & Audio Cable KVM Switch Manuale utente
- Categoria
- Hub di interfaccia
- Tipo
- Manuale utente
- Questo manuale è adatto anche per
in altre lingue
Documenti correlati
-
Lindy USB Type C to HDMI 4K60 Converter Manuale utente
-
-
-
-
-
-
-
-
-