Gigaset E550H Manuale del proprietario
- Categoria
- Telefoni
- Tipo
- Manuale del proprietario


2
Gigaset E550H / UK-IE / A31008-M2554-L101-1-7619 / introduction.fm / 3/5/15
A-Klasse_Layout_Neu, Version 4, 28.05.2014
Gigaset E550H – Your reliable companion
This phone has the benefits of an ergonomic design, easy-to-use keys and a clear dis-
play with large font.
It is also impressively robust and has first-class sound quality in handsfree mode as
well as a long operating time.
In Eco Mode your Gigaset is radiation-free while in idle status .
If you use your Gigaset E550H in conjunction with an E550A base, you can use the
emergency function. See the user guide for your E550A base for further information.
Further information on your phone can be found at www.gigaset.com/e550h
.
Have fun using your new telephone!
Direct dialling keys
Dial frequently used numbers quickly and easily using special keys (¢ page 27).
Jumbo font and lighting
Improve the legibility of dialling digits by using a larger font and set the lighting of the
display to your preference (
¢ page 36).
Volume
Turn up the earpiece and handsfree volume quickly and easily using the boost key on
the right-hand side of the telephone ( page 37).
Directory for 150 entries
Save phone numbers and names to the directory (
¢ page 25).
Call list
Check who has called while you were out (
¢ page 30).
Redial
Use the last dialled numbers (
¢ page 29).
Environmentally friendly
Make low-radiation calls in Eco Mode (
¢ page 33).

3
Gigaset E550H / UK-IE / A31008-M2554-L101-1-7619 / overview.fm / 3/5/15
A-Klasse_Layout_Neu, Version 4, 28.05.2014
Overview
Overview
i
To change the display language, proceed as described on page 36.
5
6
13
14
16
10
4
12
8
11
7
3
1
2
1 Direct dialling key A (¢ page 27)
2 Direct dialling keys B to D
(¢ page 27)
3 Display (page4)
4 Display keys (page4)
5 Talk key
Flashes: Accepting a call
6 Control key (page21)
7 Key 1
Call the network mailbox ( page 32)
8 Star key
Ringers on/off (press and hold)
9 Torch and signal light (LED)
10 Side key for torch
11 Side key for boost function
Extra volume key, setting the volume
( page 25)
12 Handsfree key (page24)
Switch between earpiece and hands-
free mode;
Lights up: handsfree activated
13 End call key, On/Off key
End call; cancel function; go back one
menu level (press briefly); back to idle
status (press and hold); activate/deac-
tivate handset (press and hold in idle
status)
14 Hash key
Keypad lock on/off (press and hold,
( page 20)); upper/lower case and
digits ( page 22)
15 0 key/recall key
Consultation call (flash): press and hold
16 Microphone
9
15
Gigaset service contact numbers:
For personal advice on our range of products and for repairs or guarantee/warranty claims
call:
Service Centre UK: 020 369 53111 (local call cost charge)
Please have your proof of purchase ready when calling.

4
Gigaset E550H / UK-IE / A31008-M2554-L101-1-7619 / Symbols_Keys.fm / 3/5/15
A-Klasse_Layout_Neu, Version 4, 28.05.2014
Using the user guide effectively
Using the user guide effectively
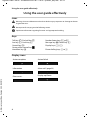
Icons
Keys
Display icons
a
Warnings, the non-adherence to which can lead to injury to persons or damage to devices
or generate costs.
h
Prerequisite for carrying out the following action.
i
Important information regarding function and appropriate handling.
Talk key c/ End call key a Number/letter keys Q to O
Star key P/ Hash key # Message key f/ Recall key S
Control key
p/
Centre of the control key
Display keys n o
Handsfree key î Direct dialling keys é to ì
Information
Please wait...
Action failed
Action complete
Ð
‰
Ò
À
Alarm call ( page 33)
ØgÚ
Display up/Down
U

5
Gigaset E550H / UK-IE / A31008-M2554-L101-1-7619 / Symbols_Keys.fm / 3/5/15
A-Klasse_Layout_Neu, Version 4, 28.05.2014
Using the user guide effectively
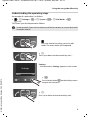
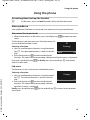
Understanding the operating steps
An example of a procedure is as follows:
¤¤ q Settings ¤ §OK§ ¤ q System ¤ §OK§ ¤ q Eco Mode+ ¤ §OK§
(³ =on)
This means you should proceed as follows:
i
Scroll upwards if you wish to select one of the last entries in a menu level with
numerous entries.
:
Press the control-key when you are in idle
mode. The main-menu will be opened.
¤ q:
Press up or down on the control key until ...
Settings
Back OK
¤ §OK§:
Press the key below §OK§ on the display screen
to open the submenu.
¤ q:
Press up or down on the control key until ...
Settings:
... the menu entry Settings appears on the screen.

6
Gigaset E550H / UK-IE / A31008-M2554-L101-1-7619 / Symbols_Keys.fm / 3/5/15
A-Klasse_Layout_Neu, Version 4, 28.05.2014
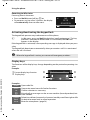
Using the user guide effectively
Eco
Mode+
´
Back OK
System
Back OK
Eco
Mode+
³
Back OK
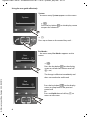
Eco Mode+:
... the menu entry Eco Mode+ appears on the
screen.
System:
... the menu entry System appears on the screen.
¤ q:
Press up or down on the control key until ...
¤ §OK§:
Press the key below §OK§ on the display screen
to open the submenu.
¤ §OK :
Press the key below §OK§ on the display
screen to switch the function on or off
(³ =on).
The change is effective immediately and
does not need to be confirmed.
Press the key below §Back§ on the display
screen to jump back to the previous
menu level
Or
Press and hold the end call key a to
return to idle status.

7
Gigaset E550H / UK-IE / A31008-M2554-L101-1-7619 / E550HIVZ.fm / 3/5/15
A-Klasse_Layout_Neu, Version 4, 28.05.2014
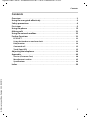
Contents
Contents
Overview . . . . . . . . . . . . . . . . . . . . . . . . . . . . . . . . . . . . . . . . . . . . . . . . . . . . . . . . . . . .3
Using the user guide effectively . . . . . . . . . . . . . . . . . . . . . . . . . . . . . . . . . . . . . . .4
Safety precautions . . . . . . . . . . . . . . . . . . . . . . . . . . . . . . . . . . . . . . . . . . . . . . . . . . .8
First steps . . . . . . . . . . . . . . . . . . . . . . . . . . . . . . . . . . . . . . . . . . . . . . . . . . . . . . . . . . .9
Using the phone . . . . . . . . . . . . . . . . . . . . . . . . . . . . . . . . . . . . . . . . . . . . . . . . . . . 19
Making calls . . . . . . . . . . . . . . . . . . . . . . . . . . . . . . . . . . . . . . . . . . . . . . . . . . . . . . . 23
Using the network mailbox . . . . . . . . . . . . . . . . . . . . . . . . . . . . . . . . . . . . . . . . . 32
Further Functions . . . . . . . . . . . . . . . . . . . . . . . . . . . . . . . . . . . . . . . . . . . . . . . . . . 33
ECO DECT . . . . . . . . . . . . . . . . . . . . . . . . . . . . . . . . . . . . . . . . . . . . . . . . . . . . . . . . . . . . . . . 33
Using the handset as an alarm clock . . . . . . . . . . . . . . . . . . . . . . . . . . . . . . . . . . . . . . 33
Baby monitor . . . . . . . . . . . . . . . . . . . . . . . . . . . . . . . . . . . . . . . . . . . . . . . . . . . . . . . . . . . 34
One touch call . . . . . . . . . . . . . . . . . . . . . . . . . . . . . . . . . . . . . . . . . . . . . . . . . . . . . . . . . . . 35
Torch (Spot-LED) . . . . . . . . . . . . . . . . . . . . . . . . . . . . . . . . . . . . . . . . . . . . . . . . . . . . . . . . 35
Adjusting the telephone . . . . . . . . . . . . . . . . . . . . . . . . . . . . . . . . . . . . . . . . . . . . 36
Appendix . . . . . . . . . . . . . . . . . . . . . . . . . . . . . . . . . . . . . . . . . . . . . . . . . . . . . . . . . . 40
Service (Customer Care) . . . . . . . . . . . . . . . . . . . . . . . . . . . . . . . . . . . . . . . . . . . . . . . . . 40
Manufacturer's advice . . . . . . . . . . . . . . . . . . . . . . . . . . . . . . . . . . . . . . . . . . . . . . . . . . . 45
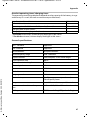
Specifications . . . . . . . . . . . . . . . . . . . . . . . . . . . . . . . . . . . . . . . . . . . . . . . . . . . . . . . . . . . 46
Index . . . . . . . . . . . . . . . . . . . . . . . . . . . . . . . . . . . . . . . . . . . . . . . . . . . . . . . . . . . . . . 50

8
Gigaset E550H / UK-IE / A31008-M2554-L101-1-7619 / security.fm / 3/5/15
A-Klasse_Layout_Neu, Version 4, 28.05.2014
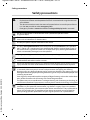
Safety precautions
Safety precautions
a
• Read the safety precautions and the user guide before use.
• Explain their content and the potential hazards associated with using the device to
your children.
• The device cannot be used in the event of a power failure. In case of a power failure
it is also not possible to make emergency calls.
• Emergency numbers cannot be dialled if the keypad/display lock is activated!
Do not use the devices in environments with a potential explosion hazard
(e.g. paint shops).
The devices are not splashproof. For this reason do not install them in a damp environ-
ment such as bathrooms or shower rooms.
Use only the power adapter indicated on the device.
Use only rechargeable batteries that correspond to the specification (see "Specifica-
tions"). Never use a conventional (non-rechargeable) battery or other battery types as
this could result in significant health risks and personal injury. Rechargeable batteries,
which are noticeably damaged, must be replaced.
If you give your Gigaset to a third party, make sure you also give them the user guide.
Remove faulty devices from use or have them repaired by our Service team, as these
could interfere with other wireless services.
Do not use the device if the display is cracked or broken. Broken glass or plastic can cause
injury to hands and face. Send the device to our Service department to be repaired.
Do not hold the rear of the handset to your ear when it is ringing or when speaker mode
is activated. Otherwise you risk serious and permanent damage to your hearing.
During a call, a very high call volume can be set on your handset. This setting can cause
damage to the hearing of people with good hearing and is only intended for people with
a hearing impairment .
Your Gigaset is compatible with the majority of digital hearing aids on the market. How-
ever, perfect function with all hearing aids cannot be guaranteed.
The phone may cause interference in analogue hearing aids (humming or whistling) or
cause them to overload. If you require assistance, please contact the hearing aid supplier.
Using your telephone may affect nearby medical equipment. Be aware of the technical
conditions in your particular environment, e.g. doctor's surgery. If you use a medical
device (e.g. a pacemaker), please contact the device manufacturer. They will be able to
advise you regarding the susceptibility of the device to external sources of high fre-
quency energy (for the specifications of your Gigaset product see "Specifications").

9
Gigaset E550H / UK-IE / A31008-M2554-L101-1-7619 / first_steps.fm / 3/5/15
A-Klasse_Layout_Neu, Version 4, 28.05.2014
First steps
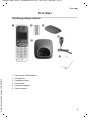
First steps
Checking package contents
1. One Gigaset E550H handset
2. Two batteries
3. One battery cover
4. One charger
5. One power adapter
6. One user guide
1
4
23
6
5

10
Gigaset E550H / UK-IE / A31008-M2554-L101-1-7619 / first_steps.fm / 3/5/15
A-Klasse_Layout_Neu, Version 4, 28.05.2014
First steps
Setting up the charger
The charger is designed for use in dry rooms in a temperature range of +5°C to +45°C.
¤ Set up the charger on a level, non-slip surface or mount the charger on the wall
¢ page 49.
The phone's feet do not usually leave any marks on surfaces. However, due to the mul-
titude of different varnishes and polishes used on today's furnishings, the occurrence
of marks on the surfaces cannot be completely ruled out.
Connecting the charger
i
Pay attention to the range of the base. This is up to 300 m in unobstructed out-
door areas and up to 50 m inside buildings. The range is reduced when Eco
Mode is activated ( page 33).
a
• Never expose the telephone to the influence of heat sources, direct sunlight
or other electrical devices.
• Protect your Gigaset from moisture, dust, corrosive liquids and fumes.
¤ Plug the power adapter into the plug
socket 2.
¤ Connect the flat plug on the power
adapter 1.
Remove the plug from the charging cradle
To disconnect the plug from the charger, press the
release button 3 and disconnect the plug 4.
3
4
1
2

11
Gigaset E550H / UK-IE / A31008-M2554-L101-1-7619 / first_steps.fm / 3/5/15
A-Klasse_Layout_Neu, Version 4, 28.05.2014
First steps
Setting up the handset for use
The display is protected by a plastic film. Please remove the protective film!
Inserting the battery and closing the battery cover
a
Use only rechargeable batteries (¢ page 46) recommended by Gigaset Com-
munications GmbH, as this could otherwise result in significant health risks and
personal injury. For example, the outer casing of the batteries could be
destroyed or the batteries could explode. The phone could also malfunction or
be damaged as a result of using batteries that are not of the recommended
type.
¥ Insert the batteries
(for correct +/-
direction,
see diagram).
¥ Fit the cover from the
top .
¥ Then press the cover
until it clicks into place
.
1
2
To open the battery cover:
¥ Grip the notch on the
cover and slide it
downwards .
3
4
1
2
4
3

12
Gigaset E550H / UK-IE / A31008-M2554-L101-1-7619 / first_steps.fm / 3/5/15
A-Klasse_Layout_Neu, Version 4, 28.05.2014
First steps
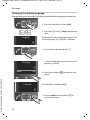
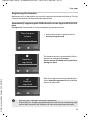
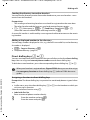
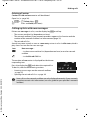
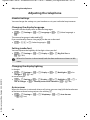
Changing the display language
Change the display language if you do not understand the language currently set.
¤ Press the control key in the middle
¤ Press keys 5 and 4 slowly one after the
other.
The display for setting languages appears. The
current language (e.g., English) is selected.
¤ Press down on the control key
s
...
... until the language you wish to use is dis-
played e.g., French.
¤ Press the key below §OK§ to select this lan-
guage.
The selection is marked with ³.
¤ Press and hold the end call key a to
return to idle status.
54
English
³
Francais
´
Back
OK
Francais
³

13
Gigaset E550H / UK-IE / A31008-M2554-L101-1-7619 / first_steps.fm / 3/5/15
A-Klasse_Layout_Neu, Version 4, 28.05.2014
First steps
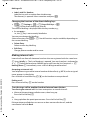
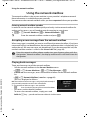
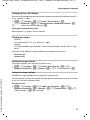
Registering the handset
Before you can use the phone, you must first register the handset to the base. The reg-
istration procedure will depend on the type of base.
Automatically registering the E550H handset to the Gigaset E550/E550A
base
Prerequisite: The handset must not already be registered to a base.
i
• Each key press interrupts automatic registration.
• If the handset is already registered to at least one base or if automatic regis-
tration does not work, the handset will have to be registered manually.
¤ Place the handset in the base with its
display facing forward.
The handset registers automatically. Regis-
tration can take up to 5 minutes.
Do not remove the handset from the base
during this time.
After it has registered, the handset display
shows Handset registered briefly and then
returns to idle status.
Place handset
in base
Menu
Ò
Handset is
registering
‰
Handset
registered

14
Gigaset E550H / UK-IE / A31008-M2554-L101-1-7619 / first_steps.fm / 3/5/15
A-Klasse_Layout_Neu, Version 4, 28.05.2014
First steps
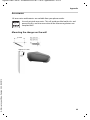
Manually registering the E550H handset
You must manually register the handset on both the handset (1) and the base (2).
A Gigaset E550H handset can be registered on up to four bases.
After it has registered, the handset returns to idle status. If it does not appear, repeat
the procedure.
1) On the handset
¤ §Menu§ ¤ Settings ¤ Registration ¤ Register Handset
If the handset is already registered to four bases:
s Select base, e.g., 3 and press §OK§.
~ If required, enter the system PIN for the base and press §OK§.
The display shows Handset is registering.
2) On the base
¤ Within 60 seconds, press and hold the registration/paging key on the base
(approx. 3 seconds).
i
For instructions on deregistering the handsets, please consult the base user
guide.

15
Gigaset E550H / UK-IE / A31008-M2554-L101-1-7619 / first_steps.fm / 3/5/15
A-Klasse_Layout_Neu, Version 4, 28.05.2014
First steps
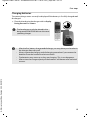
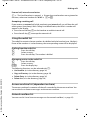
Charging batteries
The correct charge status can only be displayed if the battery is first fully charged and
discharged.
i
• After the first battery charge and discharge, you may place your handset in
the charger after every call.
• Always repeat the charging and discharging procedure if you remove the
batteries from the handset and reinsert them.
• The batteries may warm up as they are charging. This is not dangerous.
• After a time the charge capacity of the batteries will decrease for technical
reasons.
¤ Place the handset in the charger with its display
facing forward for 9 hours.
i
The handset must only be placed in the
designated E550/E550A base or the corre-
sponding charger.
9 h

16
Gigaset E550H / UK-IE / A31008-M2554-L101-1-7619 / first_steps.fm / 3/5/15
A-Klasse_Layout_Neu, Version 4, 28.05.2014
First steps
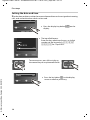
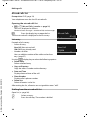
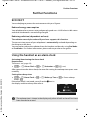
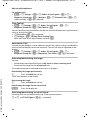
Setting the date and time
S
Set the date and time so that the correct date and time can be assigned to incoming
calls, and so that the alarm clock can be used.
¤ Press the display key below §Time§ on the
display.
Ë
Time
Date:
01.04.2015
Back OK
¤ The input field opens.
Enter the day, month and year as an 8-digit
number via the keypad e.g., Q1Q4
2Q15 for 1 April 2015.
To correct errors: press left or right on
the control key to swap between fields.
¤ Press the key below §OK§ on the display
screen to confirm your entry.
Back OK

17
Gigaset E550H / UK-IE / A31008-M2554-L101-1-7619 / first_steps.fm / 3/5/15
A-Klasse_Layout_Neu, Version 4, 28.05.2014
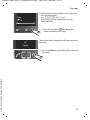
First steps
¤ Enter the hours and minutes as four-digit num-
bers via the keypad
e.g., QM15 for 7.15 a.m.
If necessary, use the control key to swap
between fields.
¤ Press and hold the end call key a to return to
idle status.
The display shows Saved. You will hear a confirma-
tion tone.
¤ Press the key below §OK§ on the display
screen to confirm your entry.
Time:
07:15
Back OK
‰
Saved

18
Gigaset E550H / UK-IE / A31008-M2554-L101-1-7619 / first_steps.fm / 3/5/15
A-Klasse_Layout_Neu, Version 4, 28.05.2014
First steps
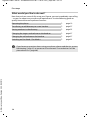
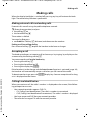
What would you like to do next?
Now that you have successfully set up your Gigaset, you can immediately start calling
– or you can adapt it to your personal requirements. Use the following guide to
quickly locate the most important functions.
Operating the phone page 19
Transferring an old directory to a new handset page 27
Storing numbers in the directory page 25
Changing the ringers and volume on the handset page 37
Changing the call volume on the handset page 37
Switching on Eco Mode / Eco Mode+ page 33
i
If you have any questions about using your phone, please read the tips on trou-
bleshooting ( page 41) or contact our Service team. Our technicians will be
pleased to assist ( page 40)!
g
g
g
g
g
g

19
Gigaset E550H / UK-IE / A31008-M2554-L101-1-7619 / starting.fm / 3/5/15
A-Klasse_Layout_Neu, Version 4, 28.05.2014
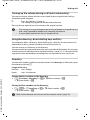
Using the phone
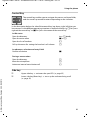
Using the phone
Activating/deactivating the handset
a In idle status, press and hold the end call key (confirmation tone).
Menu guidance
Your telephone's functions are accessed via a menu consisting of several levels.
Main menu (first menu level)
¤ When the handset is in idle status, press the display key §Menu§ to open the main
menu.
The functions in the main menu are shown by means of
an icon and the function's name.
Selecting a function:
¤ You can scroll between functions using the control
key q. The selectable function is shown in the dis-
play.
¤ Press the display key §OK§ to select the displayed
function. This opens the corresponding submenu and the first entry is displayed.
If you press the display key §Back§ or briefly press the end call key a, the display
returns to idle status.
Sub menu
The functions in the sub menu are indicated by name.
Selecting a function:
¤ You can scroll between functions using the control
key q. The relevant function is shown in the dis-
play.
¤ Press the display key §OK§ to select the displayed
function. This opens the corresponding submenu
and the first entry is displayed.
Briefly press the display key §Back§ or the end call key a to return to the previous
menu level.
É
Settings
Back OK
Display
Back OK

20
Gigaset E550H / UK-IE / A31008-M2554-L101-1-7619 / starting.fm / 3/5/15
A-Klasse_Layout_Neu, Version 4, 28.05.2014
Using the phone
Reverting to idle status
From any point in the menu:
¤ Press and hold the end call key a or
¤ Do not press any key: after 2 minutes, the display
will automatically revert to idle status.
Activating/deactivating the keypad lock
The keypad lock prevents any inadvertent use of the phone.
# In idle status, press and hold the hash key (confirmation tone). The key-
pad lock is activated or deactivated. If it is activated, the
Ø icon
appears in the display.
If the keypad lock is activated, a corresponding message is displayed when you press
a key.
The keypad lock deactivates automatically when you receive a call. It is reactivated
when the call is finished.
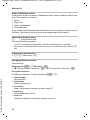
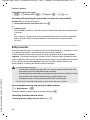
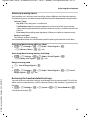
Display keys
The functions of the display keys change depending on the particular operating situ-
ation.
Example:
Examples:
Open redial list.
Open main menu/menu for further functions.
Confirm selection or save entry.
Missed calls or messages on the answer machine (base dependent)/net-
work mailbox.
Delete key: delete character by character/word by word from right to left.
Go back one menu level or cancel operation.
Mute the microphone ( page 24).
Ð ± U
07:15
01.04.2015
Ë
Menu
i
When the keypad lock is active, you cannot call emergency numbers.
Redial Menu
1
2
1
2
1
Current display key function
2
Display keys
Redial
Menu
OK
Û
Delete
Back
Mute
La pagina si sta caricando...
La pagina si sta caricando...
La pagina si sta caricando...
La pagina si sta caricando...
La pagina si sta caricando...
La pagina si sta caricando...
La pagina si sta caricando...
La pagina si sta caricando...
La pagina si sta caricando...
La pagina si sta caricando...
La pagina si sta caricando...
La pagina si sta caricando...
La pagina si sta caricando...
La pagina si sta caricando...
La pagina si sta caricando...
La pagina si sta caricando...
La pagina si sta caricando...
La pagina si sta caricando...
La pagina si sta caricando...
La pagina si sta caricando...
La pagina si sta caricando...
La pagina si sta caricando...
La pagina si sta caricando...
La pagina si sta caricando...
La pagina si sta caricando...
La pagina si sta caricando...
La pagina si sta caricando...
La pagina si sta caricando...
La pagina si sta caricando...
La pagina si sta caricando...
La pagina si sta caricando...
La pagina si sta caricando...
La pagina si sta caricando...
La pagina si sta caricando...
La pagina si sta caricando...
-
 1
1
-
 2
2
-
 3
3
-
 4
4
-
 5
5
-
 6
6
-
 7
7
-
 8
8
-
 9
9
-
 10
10
-
 11
11
-
 12
12
-
 13
13
-
 14
14
-
 15
15
-
 16
16
-
 17
17
-
 18
18
-
 19
19
-
 20
20
-
 21
21
-
 22
22
-
 23
23
-
 24
24
-
 25
25
-
 26
26
-
 27
27
-
 28
28
-
 29
29
-
 30
30
-
 31
31
-
 32
32
-
 33
33
-
 34
34
-
 35
35
-
 36
36
-
 37
37
-
 38
38
-
 39
39
-
 40
40
-
 41
41
-
 42
42
-
 43
43
-
 44
44
-
 45
45
-
 46
46
-
 47
47
-
 48
48
-
 49
49
-
 50
50
-
 51
51
-
 52
52
-
 53
53
-
 54
54
-
 55
55


Gigaset E550H Manuale del proprietario
- Categoria
- Telefoni
- Tipo
- Manuale del proprietario
in altre lingue
- English: Gigaset E550H Owner's manual