
1PIDG64N
1PIDG64B
1PIDG84N
GREEN
IT
EN
DE
ES
FR
Manuale d’installazione ed uso
Use and installation manual
Bedienungs-und Montageanleitung
Manual de instalación y uso
Manuel d’installation et d’utilisation
2
rev. 00 -09.201
7
B
arazza srl
31025 Sarano di S.Lucia di Piave (TV) ITALIA
Via Risorgimento, 14
info@barazzasrl.it
www.barazzasrl.it

2
780 mm
4 mm
510 mm
50 mm
485 mm
745 mm
490 mm
750 mm
1
~ 2 mm
2
min. 50 mm
50
mm
20 mm
3
mm
03
mm
04
4

3
Induction
A
B
6
H05V2V2-F 4G / 2,5 mm
2
5
4
2
3
1
7 15
open
L1
L2
N
L1
L2
N
GRN
L (L1+L2)
N
GRN
2 1
L2 L1
2 Ph + N
34
N
5
2 1
L
1 Ph + N
34
N
5
L1=brown L2=black N=blue or grey GRN= green/yellow
5
7
∅ 160
1,1kW
P:1,4kW
∅ 160
1,1kW
P:1,4kW
∅ 200
2,30 kW
P: 3,00 kW
∅ 200
2,30 kW
P: 3,00 kW
1
2
3
4
8

4
Italiano
Leggere attentamente il contenuto del
presente libretto in quanto fornisce
importanti indicazioni riguardanti la sicurezza
di installazione, d’uso e di manutenzione.
Conservare il libretto per ogni ulteriore
consultazione.
Tutte le operazioni relative all’installazione
(connessioni elettriche) devono essere
effettuate da personale specializzato in
conformità delle norme vigenti.
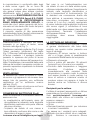
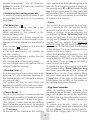
AVVERTENZE PER LA SICUREZZA
• Il piano di cottura deve essere utilizzato
sempre nei limiti del normale uso
domestico per preparare e tenere in caldo
le pietanze. Qualsiasi altro impiego non è
ammesso.
• Le persone che per le loro capacità
fisiche, sensoriali o psichiche o per la loro
inesperienza o non conoscenza non siano
in grado di utilizzare in sicurezza il piano
di cottura, non devono farne uso senza
la sorveglianza e la guida di una persona
responsabile.
• I bambini sotto gli 8 anni di età devono
essere tenuti lontani dal piano di cottura
a meno che non siano sotto controllo
costante di un adulto.
• I bambini al di sopra degli 8 anni possono
eventualmente utilizzare l’apparecchio
da soli, se sono in grado di usarlo
correttamente. È importante che sappiano
riconoscere i pericoli che possono derivare
da un uso non corretto.
• Non permettere ai bambini di giocare con
l’apparecchio.
• I bambini non devono effettuare operazioni
di pulizia o manutenzione del piano di
cottura a meno che non siano sotto la
supervisione di un adulto.
• Lavori di installazione e manutenzione,
nonché riparazioni, devono essere
eseguiti da personale specializzato. Lavori
o riparazioni non correttamente eseguiti
possono creare seri pericoli per l’utente.
• PERICOLO DI SCOSSA ELETTRICA!
Non mettere in funzione o spegnere
subito il piano di cottura se la lastra in
vetroceramica è danneggiata o crepata.
Staccare l’apparecchio dalla rete elettrica.
• ATTENZIONE: Se il cavo di alimentazione
dell’apparecchio è danneggiato deve
essere sostituito dal produttore, dal servizio
assistenza autorizzato o da personale
qualificato al fine di evitare rischi.
• ATTENZIONE: L’apparecchio e le sue parti
accessibili diventano caldi durante l’uso.
Si deve prestare attenzione per evitare di
toccare gli elementi riscaldanti.
• ATTENZIONE: La cottura con olio o grasso
può essere pericolosa e può provocare
incendi. Non utilizzare MAI acqua per
cercare di spegnere il fuoco. Soffocare le
fiamme ad es. con un coperchio, un panno
da cucina umido o simili.
• ATTENZIONE: Il piano di cottura è molto
caldo quando è in funzione e rimane caldo
anche per un certo tempo dopo averlo
spento. Il rischio di ustione non sussiste
più solo quando si spengono le spie del
calore residuo.
• ATTENZIONE: Il normale processo di
cottura deve essere sorvegliato. Un
processo di cottura di breve durata deve
essere sorvegliato continuamente. Pentole
dalle quali evaporano completamente i
liquidi possono provocare danni al piano in
vetroceramica. Grasso o olio surriscaldati
possono iniziare a bruciare e provocare un
incendio.
• PERICOLO DI INCENDIO! Non conservare
oggetti sulle superfici di cottura! Oggetti
metallici quali coltelli, forchette, cucchiai
e coperchi non devono essere posti sulla
superficie del piano di cottura in quanto
possono surriscaldarsi.
• Spegnere sempre le zone di cottura dopo
l’uso!
• L’apparecchio non è destinato ad essere
utilizzato per mezzo di un timer esterno
o un sistema di comando a distanza
separato.
INSTALLAZIONE
Le presenti istruzioni sono rivolte ad un
installatore specializzato e fungono da
guida per l’installazione, la regolazione e
IT

5
la manutenzione in conformità delle leggi
e delle norme vigenti. Se un forno da
incasso o qualsiasi altra apparecchiatura
che genera calore deve essere montato
direttamente sotto il piano di cottura in
vetroceramica, È NECESSARIO CHE TALE
APPARECCHIATURA (forno) E IL PIANO
DI COTTURA IN VETROCERAMICA
SIANO ADEGUATAMENTE ISOLATI, in
modo tale che il calore generato dal forno,
misurato sul lato destro del fondo del piano
di cottura, non superi i 60°C.
Il mancato rispetto di tale precauzione
potrebbe determinare l’errato funzionamento
del sistema TOUCH CONTROL.
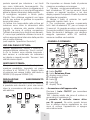
POSIZIONAMENTO
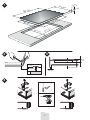
L’elettrodomestico è realizzato per essere
incassato in un piano di lavoro, come
illustrato nella figura (Fig.1).
Predisporre materiale sigillante (Fig.2) lungo
l’intero perimetro (dimensioni del taglio
(Fig.1). Bloccare l’elettrodomestico sul piano
di lavoro mediante i 4 sostegni, tenendo
presente lo spessore del piano di lavoro
(Fig.4). Se la parte inferiore dell’apparecchio,
dopo l’installazione, è accessibile dalla parte
inferiore del mobile è necessario montare un
pannello separatore rispettando le distanze
indicate (Fig.3).
VENTILAZIONE
La distanza tra il piano di cottura e i mobili
da cucina o gli apparecchi da incasso deve
essere tale da garantire una sufficiente
ventilazione ed un sufficiente scarico
dell’aria. (Fig.3).
Non utilizzare il piano di cottura se nel forno
è in corso il processo di pirolisi.
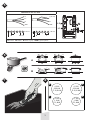
CONNESSIONI ELETTRICHE (Fig.5)
Prima di effettuare le connessioni elettriche
assicurarsi che:
- le caratteristiche dell’impianto siano tali
da soddisfare le indicazioni sulla targhetta
identificativa applicata sulla parte inferiore
del piano di lavoro;
- l’impianto sia dotato di una messa a
terra efficiente conforme alle norme e alle
disposizioni di legge in vigore.
La messa a terra è obbligatoria per legge.
Nel caso in cui l’elettrodomestico non
sia dotato di cavo e/o della relativa spina,
utilizzare materiale adatto per l’assorbimento
indicato nella targhetta identificativa e
per la temperatura di funzionamento. Se
si desidera una connessione diretta alla
linea elettrica, è necessario interporre un
interruttore omnipolare, con un’apertura
minima di 3 mm fra i contatti, appropriato
al carico indicato nella targhetta e conforme
alle norme vigenti (il conduttore di terra
giallo/verde non deve essere interrotto dal
commutatore). Terminata l’installazione
dell’apparecchiatura, l’interruttore
omnipolare deve essere facilmente
raggiungibile.
LA COTTURA AD INDUZIONE
Nel sistema di cottura ad induzione il calore
si genera direttamente alla base della
pentola, per questo motivo presenta una
serie di vantaggi:
• Risparmio di tempo mentre si bollono
cibi o si frigge, grazie al riscaldamento
proveniente direttamente dal recipiente.
• Risparmio di energia.
• Cura e pulizia più semplici. Gli alimenti
fuoriusciti non si bruciano con rapidità.
• Controllo della temperatura e maggiore
sicurezza. L’induttore reagisce
immediatamente alle variazioni della
temperatura, in questo modo la potenza
può essere dosata in modo preciso. La
zona di cottura a induzione smette di
produrre calore non appena si toglie la
pentola anche se l’induttore è ancora
acceso.
Recipienti per la cottura
L’utilizzo di recipienti appropriati è un fattore
essenziale per la cottura ad induzione.
Solo pentole/recipienti ferromagnetici
sono adatti alla cottura ad induzione e
possono essere in:
• Acciaio smaltato
• Ghisa
• Recipienti/pentole speciali per induzione
in acciaio inossidabile.
Per sapere se i recipienti sono adeguati,
verificare che siano attratti da un magnete.
(Fig.6). Esistono in commercio alcune

6
pentole speciali per induzione i cui fondi
non sono totalmente ferromagnetici. Per
ottenere una buona cottura vi suggeriamo di
utilizzare pentole la cui zona ferromagnetica
abbia le stesse dimensioni della pentola.
Si consigliano recipienti a fondo piatto
(Fig.6A). Non utilizzare recipienti con base
ruvida, per evitare di graffiare la superficie
termica del piano.
Un fattore non trascurabile nella cottura ad
induzione sono infine le dimensioni della
pentola in relazione alla piastra utilizzata
(Fig.6B). Le zone di cottura consentono
l’utilizzo di recipienti con fondi di vari diametri.
E’ comunque preferibile utilizzare la zona di
cottura appropriata al diametro della pentola
che si vuole utilizzare.
(vedi capitolo “specifiche Tecniche”)
USO DEL PIANO COTTURA
Questo apparecchio utilizza il sistema di
programmazione elettronica “touch control”
in cui le funzioni sono attivate toccando i
tasti sensori e confermate da indicazioni
sui display e segnali acustici. Toccare i tasti
dall’alto senza coprirli.
GESTIONE POTENZA
Alla prima accensione il livello di potenza
massima predefinito, impostato sul piano
di cottura è di 7400W (7,4). Questo livello
di potenza può essere ridotto dall’utente a
2800W (2,8) oppure 3500W (3,5).
REGOLAZIONE ASSORBIMENTO
MASSIMO
Nota: La modifica dell’assorbimento massimo
è possibile solo durante i primi due minuti,
dopo la connessione del piano cottura alla
rete elettrica.
Per impostare un diverso livello di potenza
massima, procedere come segue:
1- Premere contemporaneamente tutti i
tasti di selezione “B”, per tre secondi. Verrà
emesso un segnale acustico, e nei due
display superiori comparirà il livello di potenza
attualmente impostato.
2- Variare il livello di potenza tra quelli
disponibili, tramite i tasti – e +.
3- Per confermare, premere nuovamente
tutti i tasti di selezione “B”, per un tempo di
3 secondi. Un segnale acustico confermerà
l’avvenuta modifica. Il piano cottura si spegne.
Nota: Se durante il settaggio, non vengono
eseguite operazioni entro 60 secondi,
nessuna modifica verrà salvata.
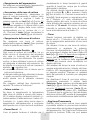
• PANNELLO COMANDI
A
C
3
C
1
B
1
E
D
C*
B
3
B
2
B
4
F
C
4
C
2
A. tasto On/Off
B. tasto Selezione Zona
C. display zona cottura
C*. indicatore LED
D. tasto [-]
E. tasto [+]
F. display Timer
• Accensione dell’apparecchio
Premere il tasto ON/OFF per accendere
l’apparecchio.
Tutti i display relativi alle zone di cottura si
accendono in posizione «0».
Il pannello di controllo rimane attivo
per 20 secondi. Se entro questo tempo
non si effettua alcuna regolazione su una
zona di cottura l’apparecchio si spegne
automaticamente.
7 4
B
1
B
3
B
2
B
4

7
• Spegnimento dell’apparecchio
Per spegnere completamente l’apparecchio
tenere premuto il tasto ON/OFF.
• Accensione delle zone di cottura
Accendere l’apparecchio, selezionare la
zona di cottura premendo il relativo tasto
Selezione Zona e regolare il livello di
potenza agendo sui tasti [+] e [-] entro 10
secondi. La potenza di ogni singola zona
può essere regolata in 9 diversi livelli è sarà
visualizzata nel display della zona cottura
corrispondente con un numero da «1» a
«9». Premere il tasto [+] per aumentare la
potenza, premere il tasto [-] per diminuirla.
• Spegnimento delle zone di cottura
Per spegnere una zona di cottura,
selezionarla e agire sul tasto [-] per riportare
il livello di potenza sul valore «0».
• Riconoscimento Pentole «
0 4
»
Ogni zona di cottura ad induzione, ha un
limite minimo di rilevamento del recipiente
che varia in funzione del materiale del
recipiente che si sta utilizzando. Per questo
motivo, si deve utilizzare la zona di cottura
più adeguata al diametro del recipiente. Se
sul display di una zona di cottura compare il
simbolo «
0 4
», significa che:
• il recipiente utilizzato non è idoneo per la
cottura ad induzione.
• il diametro della pentola utilizzata è inferiore
a quello consentito dall’apparecchio.
• sulla piastra non è presente nessuna
pentola.
Per maggiori dettagli fare riferimento al
capitolo
‘‘la cottura a induzione’’.
• Calore residuo «H»
Se dopo lo spegnimento la temperatura
della zona di cottura è ancora alta (sopra i
50°) il relativo display mostrerà il simbolo «H»
(calore residuo) in alternanza con il valore «0».
Il simbolo «H» rimane attivo anche dopo lo
spegnimento dell’apparecchio e scompare
solo quando non vi è più rischio di scottature.
• Power Boost «P»
L’uso di questa funzione è indicato per il
riscaldamento in tempi brevissimi di grandi
quantità di liquidi (es. acqua per la cottura
della pasta) o pietanze.
Per attivare questa funzione selezionare la
zona di cottura B
1
o B
4
e premere il tasto
[+] fino al livello «9». Premere nuovamente il
tasto [+]. Verrà emesso un segnale acustico
ed il simbolo «P» sarà visualizzato nel
display relativo alla zona. La zona di cottura
viene attivata alla massima potenza per un
intervallo di 10 minuti. Al termine di questo
intervallo la potenza della zona di cottura
torna automaticamente al livello «9».
• Timer
Questa funzione permette di stabilire un
tempo da «01» (1 minuto) a «99» (99 minuti)
per lo spegnimento automatico di una zona
di cottura.
Per attivare il timer su una zona di cottura,
selezionarla e regolarne la potenza.
Premere simultaneamente i tasti [+] e [-]
per accendere il display del timer e agire sui
tasti [+] e [-] entro 10 secondi per regolare il
tempo dell’autospegnimento. Attendere 10
secondi per la conferma della regolazione.
Il conto alla rovescia viene visualizzato sul
display del timer.
Allo scadere del tempo la zona di cottura si
spegne automaticamente, il display del timer
indica lo «00» lampeggiante e viene emesso
un segnale acustico. Premere un qualsiasi
tasto del pannello di controllo per spegnere
i segnali.
Per disattivare il timer di una zona cottura,
selezionarla premendo il relativo tasto
Selezione Zona, premere simultaneamente
i tasti [+] e [-] per attivare il display del timer
ed entro 10 secondi premere il tasto [-] per
riportare il tempo sul valore «00». Attendere
10 secondi per la conferma. Il led del display
della zona cottura (
C*) smette di lampeggiare
confermando la disattivazione della funzione.
• Egg timer/Promemoria
Quando tutte le zone cottura sono spente
è possibile stabilire un promemoria acustico
che rimane attivo anche dopo lo spegnimento
dell’apparecchio. Se l’Egg timer/Promemoria
è attivo la funzione Timer non può essere

8
attivata.
Per impostare il promemoria accendere il
piano cottura e premere simultaneamente i
tasti [+] e [-] per attivare il display del Timer.
Agire sui tasti [+] e [-] entro 10 secondi per
regolare il tempo. Attendere 10 secondi per
la conferma delle regolazioni. Il conto alla
rovescia viene visualizzato sul display del
timer. Allo scadere del tempo il display del
timer indica lo «00» lampeggiante e viene
emesso un segnale acustico. Premere un
qualsiasi tasto del pannello di controllo per
spegnere i segnali.
Per disattivare il promemoria attivo premere
simultaneamente i tasti [+] e [-] e poi agire
sul tasto [-] entro 10 secondi per riportare il
tempo sul valore «00». Attendere 10 secondi
per la conferma.
• Sicurezza bambini «L»
Questa funzione ha lo scopo di evitare
che i bambini accendano l’apparecchio
accidentalmente o intenzionalmente e può
essere attivata solo se tutte le zone di cottura
sono spente.
Per attivare la Sicurezza bambini premere
simultaneamente il tasto Selezione Zona
B
3
e il tasto [-] poi nuovamente il tasto
Selezione Zona B
3
. Il simbolo «L» appare su
tutti i display delle zone di cottura e il relativo
led si accende.
La funzione rimane attiva allo spegnimento e
alla successiva riaccensione dell’apparecchio.
Per disattivare il blocco di Sicurezza bambini
in modo temporaneo e tornare ad agire sulle
regolazioni, premere simultaneamente il
tasto Selezione Zona B
3
e il tasto [-]. La
funzione rimane attiva ad ogni riaccensione
dell’apparecchio.
Per disattivare il blocco di Sicurezza
bambini in modo permanente, premere
simultaneamente il tasto Selezione Zona
B
3
e il tasto [-] poi nuovamente il tasto [-].
L’apparecchio si spegne. Alla riaccensione la
funzione non è più attiva.
• Spegnimento di sicurezza
L’apparecchio è provvisto di un sistema di
sicurezza che spegne automaticamente le
zone di cottura trascorso il tempo limite di
accensione ad una data potenza. In tal caso
l’indicazione del calore residuo «
H» viene
visualizzata nel display della zona.
POTENZA
TEMPO LIMITE
ACCENSIONE (ore)
1 8
2 6
3 - 4 5
5 4
6 - 7 - 8 - 9 1,5
PULIZIA E MANUTENZIONE
Rimuovere eventuali residui di cibo e gocce di
unto dalla superficie di cottura utilizzando lo
speciale raschietto fornito su richiesta (Fig.7).
Pulire l’area riscaldata nel miglior modo
possibile utilizzando prodotti idonei ed
un panno-carta, quindi sciacquare con
acqua e asciugare con un panno pulito.
Mediante lo speciale raschietto rimuovere
immediatamente dall’area riscaldata di
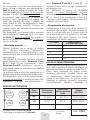
SPECIFICHE TECNICHE
∅ 160
1,1kW
P:1,4kW
∅ 160
1,1kW
P:1,4kW
∅ 200
2,30 kW
P: 3,00 kW
∅ 200
2,30 kW
P: 3,00 kW
1
2
3
4
Zona
cottura
Dimensioni
zona (mm)
Dimensioni
minime pentola
(mm)
Output
(W) 230V
2/3
Ø 160 Ø 110 1100 (1400*)
1/4
Ø 200 Ø 120 2300 (3000*)
tipologia piano cottura: a incasso
tecnologia di riscaldamento: induzione
*
con Power
Booster
max. 7400

9
cottura frammenti di fogli di alluminio e
materiale plastico scioltisi inavvertitamente
o residui di zucchero o di cibi ad elevato
contenuto di zucchero. In questo modo si
evita ogni possibile danno alla superficie del
piano. In nessun caso si devono utilizzare
spugnette abrasive o detergenti chimici
irritanti quali spray per forno o smacchiatori.
ATTENZIONE: Non utilizzare pulitori a
vapore.
DISMISSIONE DEGLI
ELETTRODOMESTICI
La direttiva Europea 2002/96/CE
sui rifiuti di apparecchiature
elettriche ed elettroniche (RAEE),
prevede che gli elettrodomestici
non debbano essere smaltiti nel
normale flusso dei rifiuti solidi urbani. Gli
apparecchi dismessi devono essere raccolti
separatamente per ottimizzare il tasso di
recupero e riciclaggio dei materiali che li
compongono ed impedire potenziali danni
per la salute e l’ambiente. Il simbolo del
cestino barrato è riportato su tutti i prodotti
per ricordare gli obblighi di raccolta separata.
Per ulteriori informazioni, sulla corretta
dismissione degli elettrodomestici, i detentori
potranno rivolgersi al servizio pubblico
preposto o ai rivenditori.
SI DECLINA OGNI RESPONSABILITÀ
PER EVENTUALI DANNI PROVOCATI
DALLA INOSSERVANZA DELLE SUDDETTE
AVVERTENZE.
LA GARANZIA NON E’ VALIDA NEL CASO DI
DANNI DERIVANTI DALLA INOSSERVANZA
DELLE SUDDETTE AVVERTENZE.

10
RISOLUZIONE DEI PROBLEMI
Problema Possibile causa Soluzione
Non è possibile attivare
il piano di cottura o
metterlo in funzione.
Il piano di cottura non è
collegato a una fonte di
alimentazione elettrica o non
è collegato correttamente.
Accertarsi che il piano di cottura sia
collegato correttamente alla rete elettrica.
Fare riferimento al capitolo
“collegamento
elettrico”.
È scattato il fusibile. Verificare se l’anomalia di funzionamento
sia dovuta al fusibile. Nel caso in cui il
fusibile continui a scattare, rivolgersi ad un
elettricista qualificato.
Sono passati più di 20
secondi dall’accensione del
piano.
Accendere di nuovo il piano di cottura e
impostare il livello di potenza in meno di 20
secondi.
Sono stati toccati 2 o più
tasti contemporaneamente.
Toccare un tasto alla volta.
Il pannello dei comandi è
bagnato o presenta macchie
di unto.
Pulire il pannello dei comandi.
Il piano cottura si
disattiva.
Uno o più tasti del pannello
di controllo sono stati
coperti.
Rimuovere gli oggetti dai tasti del pannello
di controllo.
La spia del calore residuo
non si accende.
La zona non è calda perché
è rimasta in funzione solo
per brevissimo tempo.
Se la zona ha funzionato abbastanza a
lungo da essere calda, contattare il Centro
di Assistenza Autorizzato.
I tasti del pannello
di controllo si
surriscaldano.
Le pentole sono troppo
grandi oppure sono state
collocate troppo vicino ai
comandi.
Se possibile, collocare le pentole grandi
sulle zone posteriori.
Compare
nel display. La funzione “Sicurezza
bambini” è attiva.
Fare rifermento al capitolo
“uso del piano
cottura”
Compare
0 4
nel display. Non vi sono pentole sulla
zona.
Appoggiare una pentola sulla zona.
Le pentole non sono adatte. Utilizzare pentole idonee.
Fare riferimento al capitolo
“la cottura a
induzione”.
Il diametro del fondo della
pentola è troppo piccolo
rispetto alla zona.
Usare pentole delle dimensioni corrette.
Fare riferimento al capitolo
“la cottura a
induzione”.
Le pentole non coprono il
riquadro/ la croce/il cerchio.
Fare in modo che la croce/il riquadro/il
cerchio siano completamente coperti.
7
compare nel
display.
Le piastre a induzione sono
surriscaldate.
Lasciare raffreddare l’apparecchio.
e 4
e un numero
compaiono nel display.
C’è un errore
nell’apparecchio.
Scollegare per un certo periodo di tempo
l’apparecchio dall’alimentazione elettrica.
Scollegare il fusibile dall’impianto elettrico
domestico. Ricollegarlo. Se il codice di
errore compare di nuovo, rivolgersi al
Centro di Assistenza Autorizzato.
Qualora non sia possibile trovare una soluzione al problema, contattare il rivenditore o il Centro di
Assistenza Autorizzato. Fornire i dati riportati sulla targhetta dei dati.

11
English
Carefully read the contents of this leaflet since
it provides important instructions regarding
safety of installation, use and maintenance.
Keep the leaflet for possible future
consultation. All the operations relating to
installation (electrical connections) must
be carried out by specialised personnel in
accordance with current regulations.
SAFETY WARNINGS
• Use the cooktop only in household-type
situations for the preparation and warming
of food. All other types of use are not
permitted.
• Individuals who are incapable of using the
appliance safely because of their physical,
sensory or mental capabilities or their lack
of experience or knowledge must not
use this appliance without supervision or
instruction by a responsible person.
• Children under 8 years of age must be
kept away from the cooktop unless they
are under constant supervision.
• Children 8 years and older must only be
allowed to use the cooktop if they have
been given supervision or instruction
concerning use of the appliance in a safe
way and understand the hazards involved.
• Children shall not play with the appliance.
• Cleaning and user maintenance shall not
be made by children without supervision.
• Installation, repair and maintenance work
should only be performed by an authorized
service technician. Work by unqualified
persons could be dangerous for the user.
• RISK OF ELECTRIC SHOCK! If the
cooktop is defective or chipped, cracked or
broken in any way, immediately switch it off
and do not continue to use it. Disconnect it
from the electrical power supply.
• WARNING: If the supply cord of the
appliance is damaged, it must be replaced
by the manufacturer, its service agent or
similarly qualified persons in order to avoid
a hazard.
• WARNING: The appliance and its
accessible parts become hot during use.
Care should be taken to avoid touching
heating elements.
• WARNING: Unattended cooking on a hob
with fat or oil can be dangerous and may
result in fire. NEVER try to extinguish a fire
with water, but switch off the appliance
and then cover flame e.g. with a lid or a
fire blanket.
• WARNING: The cooktop is hot during use
and remains so for some time after being
switched off. The risk of burns remains
until the residual heat indicators have gone
out.
• CAUTION: The cooking process has to be
supervised. A short term cooking process
has to be supervised continuously.
• DANGER OF FIRE: Do not store items
on the cooking surfaces! Metallic objects
such as knives, forks, spoons and lids
should not be placed on the hob surface
since they can become hot.
• Always switch the cooking zones off after
use!
• The appliance is not intended to be
operated by means of an external timer or
separate remote-control system.
INSTALLATION INSTRUCTIONS
These instructions are for a specialized
installer and are a guide for the installation
process, regulations and maintenance
in accordance with the law and current
standards.
If the built-in oven or any other appliances
that produce heat, need to be installed
directly underneath the cooking hobs in
ceramic glass, IT IS NECESSARY THAT
THE APPLIANCE (oven) AND THE
COOKING HOBS IN CERAMIC GLASS
ARE ADEQUATELY ISOLATED, in such
a way that the heat generated from the
oven, measured on the right hand side of
the bottom of the cooking hobs, does not
exceed 60°C.
Failure to follow this precaution, could cause
a malfunction in the TOUCH CONTROL
system.
POSITIONING
The domestic appliance was built in order
EN

12
to be encased on a work surface, the way it
is illustrated in the graph (Fig.1). Predispose
sealing material (Fig.2) along the whole
perimeter (for dimensions of the cut see
Fig.1). Lock the domestic appliance into
place with 4 supporters, keeping in mind
the width of the surface (Fig.4). If the lower
part of the appliance after installation, is
accessable via the lower part of the furniture,
it is necessary to mount a separating panel
keeping in mind the distances indicated
(Fig.3).
VENTILATION
The distance between the cooktop and built-
in kitchen’s furnitures or cooking apparatuses
must guarantee sufficient ventilation of the
air (Fig.3). Not to use the cooktop if in the
oven is in course the pyrolysis process.
ELECTRICAL CONNECTIONS (Fig.5)
Before making the electrical connections,
check that:
- the system ratings meet the ratings
indicated on the identification plate fixed on
the lower part of the worktop;
- the system is fitted with efficient ground
wires in accordance with the laws and
current standards.
Grounding is mandatory by law.
If the domestic appliance is not supplied
with a cable and/or suitable plug, use
material suitable for the absorption value
indicated on the identification plate and the
operating temperature. If wishing to make a
direct connection to the mains, an omnipolar
switch must be installed with a minimum 3
mm opening between the contacts and
appropriate for the load indicated on the plate
and in accordance with current standards
(the yellow/green ground conductor must
not be disconnected by a switch). When the
appliance has been installed, the omnipolar
switch must be easily reachable.
INDUCTION COOKING
The fundamental characteristic of the
induction system is the direct transference
of heat from the generator to the cooking
recipient.
Advantages:
- The transference of power takes place
only when the recipient is placed on the
cooking zone.
- The heat is generated only at the base of
the recipient and transferred directly to the
food to be cooked.
- Reduced heating time and low consumption
of power during the beginning of cooking,
allowing a global saving of power.
- The fibreglass top remains cold, the heat
felt on the cooking top is that reflected
from the base of the recipient.
Cooking recipients
The use of appropriate recipients is an
essential factor for induction cooking. Check
that your pots are suitable for the induction
system. Only ferromagnetic cookware made
of the following materials is suitable for
induction cooktops:
• Enameled steel
• Cast iron
• Induction-capable cookware of stainless
steel.
To determine whether the cookware is
suitable, check whether the base of the pot
or pan attracts a magnet (Fig.6).
There are other induction-capable pots
and pans whose bases are not completely
ferromagnetic. To get good cooking results,
we recommend that the dimension of the
ferromagnetic area of the cookware match
the size of the burner.
We advise recipients having a flat base
(Fig.6A). This way you can use the power
optimally.
Do not use recipients with a rough base to
avoid scratching the thermal surface of the
top.
A very important factor in induction cooking
is the dimension of the pot compared to the
plate used (Fig.6B). The cooking zones allow
the use of recipients with bases of various
diameters.
It is, however, preferable to use the
appropriate cooking zone for the dimension
of the pot.

13
(see
“Technical specifications”
chapter)
USING THE COOKTOP
The appliance is operated using the control
panel sensor keys.
Functions are controlled by touching the
sensor keys and confirmed by displays and
acoustic signals. Touch the sensor keys
from above, without covering other sensor
keys.
POWER MANAGEMENT
Default maximum power level for the first
time, set on the hob, is 7400W (7.4). This
power level can be reduced to 2800W (2.8)
or 3500W (3.5).
SETTING COOKTOP POWER LIMIT
ADJUSTING POWER CONSUMPTION
Note: it is possible to change the maximum
power consumption only after two minutes,
after connecting the hob to the power
network .
To set a different level of power, follow the
steps:
1-press simultaneously all buttons "B" for 3
seconds. An acoustic signal will be issued
and the current power level will be displayed
on the two upper displays.
2-Change the power level from those
available, using – and + buttons.
3-to confirm, press again simultaneously all
the buttons "B" for 3 seconds. A beep will
confirm the change. The hob switches off.
Note: If during the setting, no operation
is performed for within 60 seconds, no
changes will be saved.
• TOUCH CONTROL
A
C
3
C
1
B
1
E
D
C*
B
3
B
2
B
4
F
C
4
C
2
A. On/Off key
B. Zone Selection key
C. Cooking zone Display
C*. LED indicator
D. Minus [-] key
E. Plus [+] key
F. Timer display
• Switching the appliance on
Press the On/Off key to switch the
appliance on.
All the displays relative to the cooking zones
switch on in the standby position
«0»
.
The control unit remains active for 20
seconds. If no cooking zone is selected
within this time, the appliance switches off
automatically.
• Switching the appliance off
To turn off the appliance entirely hold down
the On/Off key.
• Switching the cooking zones on
To switch on a cooking zone press the
corresponding Cooking Zone key then
adjust the heat setting using the [+] key and
[-] Key within 10 seconds. The heat level of
each single cooking zone can be set in 9
different positions and will be shown in the
corresponding cooking zone display with a
7 4
B
1
B
3
B
2
B
4

14
number ranging from
«1»
to
«9»
. Press the
[+] key to increase the heat level, press the
[-] key to decrease it.
• Switching the cooking zones off
To switch a cooking zone off select it and
bring its heat level back to
«0»
by pressing
the [-] key.
• Pot detection
«
0 4
»
Each induction cooking zone has a pot
detection minimum limit, which
varies according to the material of the
cookware being used.
For this reason, you should choose the
cooking zone which is most suitable for the
diameter of the cookware you are going to
use.
If the symbol
«
0 4
»
appears on the cooking
zone display, it means that:
• The cookware used is not suitable for
induction cooking.
• The cookware diameter is smaller than the
one allowed by the hob.
• No cookware is on the cooking zone.
For more details about this feature refer to
chapter
‘‘Induction cooking”
.
• Residual heat
«H»
If the temperature of the cooking zone is still
high (over 50°) after it has been switched off,
the relative display will indicate the symbol
«H»
(residual heat).
The symbol will stay on even when the
appliance is switched off and will only switch
off when the burn risk in no longer present.
• Power Boost
«P»
The use of this function is recommended for
heating large quantities of liquids (e.g. water
to cook pasta) or food in a very short time.
This program further reduces the cooking
time of a certain cooking zone, by bringing
the temperature to the maximum heat level
for 10 minutes.
At the end of this timeframe, the cooking
zone heat level will automatically go back to
level
«9»
. To activate this program, switch on
the cooking zone
B
1
or B
4
and press the [+]
key until you reach level
«9»
then press the
[+] key again. The
«P»
symbol will be shown
on the cooking zone display to confirm the
activation of the function.
• Timer
This function allows you to set the time from
«01»
(1 minute) to
«99»
(99 minutes) for the
automatic switch off of a cooking zone.
Select a cooking zone by pressing the
corresponding Zone Selection key and
adjust the heat level. Press simultaneously
the [+] and [-] keys to activate the Timer
display. Set the desired time within 10
seconds using the [+] and [-] keys. Wait
10 seconds for the automatic confirmation
of the settings. The time countdown will be
shown on the timer display.
When time elapses the cooking zone will
automatically switch off, the display will
show a flashing
«00»
and an acoustic signal
will be heard. Press any key on the control
panel to stop the signals.
To disable the timer of a cooking zone press
the corresponding Zone Selection key
then press simoultaneously the [+] and [-]
keys to turn on the Timer display. Bring
the timer value back to
«00»
by using the
[-] key. Wait 10 seconds for the automatic
confirmation.The led (C*) on the display of
the cooking zone stops flashing.
• Egg timer/reminder
When no cooking zone is active it is
possible to set an acoustic reminder which
stays active after switching the appliance
off. When the Egg timer/Reminder function
is active, the Timer function cannot be
selected.
To enable this function switch on the
appliance then press simoultaneously the
[+] and [-] keys. The timer display lights up.
Set the time, ranging from
«01»
(1 minute)

15
to
«99»
(99 minutes), by pressing the [+]
and [-] keys. Wait 10 seconds for the
automatic confirmation of the settings. The
time countdown will be shown on the timer
display.
When time elapses the display will show a
flashing
«00»
and an acoustic signal will be
heard. Press any key on the control panel
to stop the signals.
To disable the Egg timer/Reminder function
press simoultaneously the [+] and [-] keys
and bring the timer value back to
«00»
by
using the [-] key. Wait 10 seconds for the
automatic confirmation.
• Child safety lock
«L»
This function serves the purpose of
preventing children from switching on the
appliance even accidentally or intentionally.
The Child safety lock can only be activated
with all the cooking zones off.
To activate this function press
simoultaneously the Zone Selection
B
3
Key and the [-] key, then again the Zone
Selection
B
3
Key. The symbol
«L»
will
appear on all displays to confirm your
confirmation of the settings. The time
countdown will be shown on the timer
display.
When time elapses the display will show a
flashing
«00»
and an acoustic signal will be
heard. Press any key on the control panel
to stop the signals.
To disable the Egg timer/Reminder function
press simoultaneously the [+] and [-] keys
and bring the timer value back to
«00»
by
using the [-] key. Wait 10 seconds for the
automatic confirmation.
• Child safety lock
«L»
This function serves the purpose of
preventing children from switching on the
appliance even accidentally or intentionally.
The Child safety lock can only be activated
with all the cooking zones off.
To activate this function press
simoultaneously the Zone Selection
B
3
Key and the [-] key, then again the Zone
Selection
B
3
Key. The symbol
«L»
will
appear on all displays to confirm your
selection and the relative led will light up.
When the Child safety lock is enabled
you can switch the appliance off. The
Child safety lock is still enabled when the
appliance is switched on again.
To unlock the appliance permanently, press
simoultaneously the Zone Selection
B
3
Key
and the [-] key. The Child safety lock won’t
be enabled when the appliance is switched
on again.
To unlock the appliance temporarily press
simoultaneously the Zone Selection
B
3
Key and the [-] key, then again the [-] key.
In this case the Child safety lock will still be
active each time the appliance is switched
on again.
• Safety switch
The appliance has a safety switch that
automatically switches off the cooking
zones when they have been operating for
a certain amount of time at a given power
level.
POWER LEVEL OPERATING TIME
LIMIT (hours)
1 8
2 6
3 - 4 5
5 4
6 - 7 - 8 - 9 1,5
CLEANING AND MAINTENANCE
Remove any residues of food and drops of
grease from the cooking surface by using
the special scraper supplied on request
(Fig.7).
Clean the heated area as thoroughly as
possible using suitable products, and a

16
TECHNICAL SPECIFICATIONS
∅ 160
1,1kW
P:1,4kW
∅ 160
1,1kW
P:1,4kW
∅ 200
2,30 kW
P: 3,00 kW
∅ 200
2,30 kW
P: 3,00 kW
1
2
3
4
Cooking
zone
Dimensions
(mm)
Minimum pot
dimension
(mm)
Output
(W) 230V
2/3
Ø 160 Ø 110 1100 (1400*)
1/4
Ø 200 Ø 120 2300 (3000*)
type of hob: built-in
heating technology: induction
*using Power
Booster
max. 7400
cloth/paper, then rinse with water and dry
with a clean cloth.
Using the special scraper immediately
remove any fragments of aluminium and
plastic material that have unintentionally
melted on the heated cooking area, or
residues of sugar or food with a high sugar
content.
In this way, any damage to the cooktop
surface can be prevented. Under no
circumstances should abrasive sponges,
or corrosive chemical detergents, such as
oven sprays or stain removers, be used.
WARNING: STEAM CLEANERS MUST
NOT BE USED.
DISPOSAL OF OLD ELECTRICAL
APPLIANCES
The European Directive 2002/96/
EC on Waste Electrical and
Electronic Equipment (WEEE),
requires that old household electrical
appliances must not be disposed of
in the normal unsorted municipal waste
stream. Old appliances must be collected
separately in order to optimise the recovery
and recycling of the materials they contain
and reduce the impact on human health and
the environment.
The crossed-out dustbin symbol on the
product reminds you of your obligation
regarding separated waste collection.
Consumers should contact their local
public service or their local dealer for more
information on the correct disposal of
exhausted household appliances.
THE MANUFACTURER DECLINES ALL
RESPONSIBILITY FOR EVENTUAL
DAMAGES CAUSED BY BREAKING THE
ABOVE WARNINGS.
THE WARRANTY IS NOT VALID IN
THE CASE OF DAMAGE CAUSED BY
FAILURE TO COMPLY WITH THE ABOVE-
MENTIONED WARNINGS.

17
TROUBLESHOOTING
Problem Possible cause Remedy
You cannot activate
or operate the
appliance.
The appliance is not
connected to an electrical
supply or it is connected
incorrectly.
Check if the appliance is correctly connected
to the electrical supply. Refer to
“Electrical
connection”
chapter.
The fuse is released. Make sure that the fuse is the cause of the
malfunction.
If the fuse releases again and again, contact a
qualified electrician.
It’s been more than 20
seconds from the switching
on of the appliance.
Activate the appliance again and set the heat
setting in less than 20 seconds.
You touched 2 or more
sensor keys at the same
time.
Touch only one sensor key.
There is water or fat stains
on the control panel.
Clean the control panel.
The hob deactivates. You put something on the
sensor key ON-OFF.
Remove the object from the sensor key.
Residual heat
indicator does not
come on.
The zone is not hot
because it operated only
for a short time.
If the zone operated sufficiently long to be hot
contact an Authorised Service Centre.
The sensor keys
become hot.
The cookware is too large
or you put it too near to
the controls.
Put large cookware on the rear zones if possible.
The heat setting
changes
between two levels.
Power management
function operates.
Refer to
“Using the cooktop”
chapter.
comes on. The Child Lock function
operates.
Refer to
“Using the cooktop”
chapter.
0 4
comes on. There is no cookware on
the zone.
Put cookware on the zone.
The cookware is incorrect. Use the correct cookware. Refer to
“Induction
Cooking”
chapter.
The dimension of the
bottom of the cookware is
too small for the zone.
Use cookware with correct dimensions. Refer to
“Induction Cooking”
chapter.
The cookware does not
cover the cooking zone.
Cover the cooking zone fully.
7
comes on.
The induction coils are
overheated.
Allow the appliance to cool down.
e 4
and a number
come on.
There is an error in the
appliance.
Disconnect the appliance from the electrical
supply for some time. Disconnect the fuse from
the electrical system of the house. Connect it
again. If comes on again, contact an Authorised
Service Centre.
If you cannot find a solution to the problem yourself, contact your dealer or an Authorised Service
Centre. Give the data from the rating plate.

18

19

2
rev. 00 -09.201
7
B
arazza srl
31025 Sarano di S.Lucia di Piave (TV) ITALIA
Via Risorgimento, 14
info@barazzasrl.it
www.barazzasrl.it
3PCLIOBIE740TBZ 14/09/17
-
 1
1
-
 2
2
-
 3
3
-
 4
4
-
 5
5
-
 6
6
-
 7
7
-
 8
8
-
 9
9
-
 10
10
-
 11
11
-
 12
12
-
 13
13
-
 14
14
-
 15
15
-
 16
16
-
 17
17
-
 18
18
-
 19
19
-
 20
20


Barazza 1PIDG84N Istruzioni per l'uso
- Categoria
- Piani cottura
- Tipo
- Istruzioni per l'uso
in altre lingue
Documenti correlati
Altri documenti
-
Candy CI642CWTT Manuale utente
-
Foster 7322/300 Use And Installation Manual
-
Zigmund & Shtain CIS 029.30 WX Manuale utente
-
Candy CIS642SCTT/1 Manuale utente
-
ROSIERES RDVI342 Manuale del proprietario
-
-
-
-
-