Yukon Stringer Digital NV device Manuale utente
- Categoria
- Illuminazione di comodità
- Tipo
- Manuale utente
Questo manuale è adatto anche per


Особенности работы матриц КМОП
Матрицы КМОП, используемые в цифровых приборах Yukon, отличаются высоким качеством, но даже
в них допускаются белые и черные точечные дефекты и пятна различной амплитуды. Эти дефекты
могут быть хорошо заметны при наблюдении не только в ночных условиях, но и днем. Наличие белых и
черных точек, пятен и ряда других небольших дефектов ПЗС матрицы (до 4%) допускается в
соответствии с нормативными документами производителя матрицы.
Видимость на экране монитора белого дефекта одного и того же уровня дефектности зависит от типа
матрицы, типа камеры, от повышения температуры после включения прибора.
Caution - use of controls or adjustments or
performance of procedures other than those
specified herein may result in hazardous
radiation exposure.
Attention - l'emploi de commandes, réglages ou
performances de procédure autres que ceux
spécifiés dans ce manuel peut entraîner une
exposition à des rayonnements dangereux.
Vorsicht – wenn andere als die hier angegebenen
Bedienungs- oder Justiereinrichtungen benutzt
oder andere Verfahrensweisen ausgeführt
w e r d e n , k a n n dies z u g e f ä h r l i c h e r
Strahlungsexposition führen.
Atención! La utilización de controles, ajustes o
parámetros de procedimiento distintos de los aquí
indicados puede provocar una exposición a
radiaciones peligrosas.
Attenzione – in caso di utilizzo di dispositivi di
comando o di regolazione di natura diversa da quelli
riportati in questa sede oppure qualora si seguano
procedure diverse vi è il pericolo di provocare
un’esposizione alle radiazioni particolarmente
pericolosa.
Внимание – использование других не упомянутых
здесь элементов управления и настройки или
других методов эксплуатации может подвергнуть
Вас опасному для здоровья излучению.
v.0214

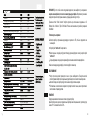
В таблице приведен список возможных проблем, которые могут возникнуть при эксплуатации прибора.
При наличии дефектов, не перечисленных в таблице, или при невозможности самостоятельно
устранить дефект прибор следует вернуть для ремонта.
ВЫЯВЛЕНИЕ НЕИСПРАВНОСТЕЙ
несколько светящихся или
На дисплее прибора видны
черных точек (пикселей).
Наличие таких точек связано с технологией
изготовления матрицы и браком не является.
Отсутствует карта пямяти.
Карта памяти заполнена.
Вставьте карту памяти.
Вставьте новую карту памяти.
Прибор включен, при
нажатии на кнопку “REC”,
запись не начинается
(правый индиктор загорается
синим цветом и затем гаснет).
59
ПРОБЛЕМА ПРОВЕРКА ИСПРАВЛЕНИЕ
Проверьте правильность установки элементов
питания в контейнере батарей. Убедитесь в
работоспособности батарей.
Проверьте, настроены ли окуляр и объектив в
соответствии с инструкцией по эксплуатации.
Убедитесь, что линзы не запотели и не
загрязнены.
Замените элементы питания или
установите их правильно.
Настройте прибор в соответствии с
инструкцией. Произведите чистку
линз салфеткой, смоченной в спирте.
Прибор не включается.
Низкое качество
изображения.
Данный эффект связан с особенностью
работы лазерных осветителей.
Недостатком не является.
После включения
встроенного лазерного
осветителя на дисплее может
наблюдаться малозаметная
текстура, не влияющая на
дальность обнаружения и
эффективность наблюдения.
Недостатком не является.

Примечание: Файл “Video Converter” следует запускать при использовании программы на ОС
Windows Vista и Windows 7. Для ОС Windows XP можно воспользоваться служебной программой
MovieMaker.
Установка даты и времени
Включите прибор и встроенный видеорекордер и подключите к ПК, чтобы он определился как
съемный диск.
Откройте файл “settime.txt” на карте памяти.
Внесите данные о текущей дате (формат ггг/мм/дд) и времени (формат чч:мм:сс), закройте файл
“settime.txt”.
Теперь информация о текущей дате и времени будет записываться в свойствах видеофайлов .
Выключите видеорекордер и прибор, отключите прибор от компьютера.
58
Чистку оптических деталей производите только в случае необходимости. Пользуйтесь мягкой
хлопчатобумажной салфеткой и специальными средствами для линз с многослойным покрытием.
Извлеките батареи, если прибор не будет использоваться продолжительное время.
Пластмассовые и металлические поверхности протирайте мягкой тканью, немного пропитанной
синтетическим чистящим средством.
ОБСЛУЖИВАНИЕ
Перед хранением извлеките элементы питания и просушите прибор.
Храните прибор в чехле, вдали от нагревательных приборов и вентиляционных шахт, при температуре
не ниже +10 °С и влажности не более 70%.
ХРАНЕНИЕ
768x576 / 656x492 768x576 / 656x492
CMOS CMOS
3.5/4.2
42
≥34
5.5/4.5
0,5
5/5.8
50
≥34
4/3.5
1
Generation
Visual magnification (CCIR/EIA), x
Objective lens, mm
Resolution, lines/mm
Angular field of view (horizontal)(CCIR/EIA), degree
125
125
640x480 / 30 frames/sec
PAL/NTSC
SD (32 Gb, SDHC support)
50 min
ВНИМАНИЕ! Для того чтобы записать следующий видеоролик, снова выберите путь сохранения и
введите название файла, отличное от названия предыдущего файла. В противном случае новый
видеоролик сохранится под старым названием, и предыдущая запись будет стерта.
Sensor type

57
The Stringer line of digital night vision monoculars includes two models - Stringer 3,5x42 and Stringer 5x50.
The devices are equipped with a built-in video recorder which enables high quality recording with a resolution
of 640x480 pixel. Files can be recorded either on the SD memory card or directly on the hard disc of you PC.
The monoculars can be mounted on a tripod for a comfortable long-time usage.
The Stringer can be connected to the PC with an USB cable to transfer and process recorded information. The
Stringer monoculars employ a high sensitive CMOS array with a wide range of working illuminance. Each
monocular is outfitted with a built-in IR Illuminator which significantly improves device's efficiency in lowlight
conditions and in the dark. The Stringer operates on two AA batteries up to around ten hours.
The Stringer is perfectly suited to a wide range of applications including:
Режим записи видеосигнала на жесткий диск ПК
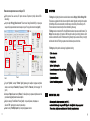
Прибор должен быть выключен, SD карта извлечена. Подключите прибор кабелем USB к
компьютеру.
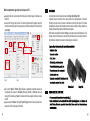
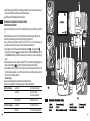
Запустите файл “Stringer_Video Converter”. Появится окно “Image Download Utility”, которое нужно
закрыть либо дождаться автоматического закрытия через 15 секунд. Затем появится окно (рис.5).
В пункте “Options”, закладке “Formats” (рис.3) рекомендуется выбрать следующие настройки
записи на жесткий диск: Resolution (Разрешение) “640x480" и Frame rate (Частота кадров) “30”
(рис.3).
В закладке “Capture” нажмите кнопку “Browse”, чтобы выбрать путь сохранения файлов на жесткий
диск компьютера (рис.4) и ввести название файла.
Выберите закладку “Enable/Disable Preview” (рис.6) - теперь изображение, попадающее в
объектив ПНВ, транслируется на монитор компьютера.
Нажмите кнопку “Start/Stop Capture” для запуска/прекращения записи.
Рис.6
Рис.3
Рис.4
Рис.5

56
Программное обеспечение
На поставляемой с прибором карте памяти имеется программное обеспечение, представленное
следующими файлами:
“Stringer_driver” – драйвер для подключения прибора к компьютеру. Установите его перед тем как
подключить прибор к компьютеру.
“Stringer_converter” – программа для работы в режиме записи видеосигнала на жесткий диск ПК.
“Settime.txt” - файл для установки даты и времени.
Прибор совместим с операционными системами Windows XP, Windows Vista и Windows 7.
Примечание: перед использованием прибора программное обеспечение рекомендуется сохранить
на персональном компьютере. В случае утери файлов Вы можете обратиться в техническую
поддержку: [email protected]
Подключение к компьютеру
Примечание: скорость передачи данных с карты памяти на ПК - до 10Мб/сек.
Запустите установочный файл “Stringer_driver.exe”, чтобы установить драйвер на Ваш ПК.
Подключите прибор кабелем USB к компьютеру, он определится как съемный диск (убедитесь, что
карта памяти установлена в приборе). Прибор можно не включать.
С помощью программы Total Commander или других файловых менеджеров с картой SD
видеорекордера можно работать как со съемным диском.
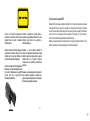
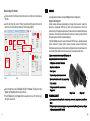
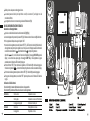
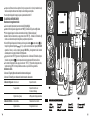
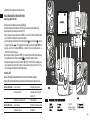
Remove the lens cap from the objective lens (1).
Activate the device by turning the button “ON” (2) - the left LED indicator (8) will light up green.
Locate an object within 20 to 30 meters.
Rotate the eyepiece (3) until you clearly see the frame of the display and a fine black grid on it.
To turn on the IR Illuminator (4) push the “IR” button (5). The green indicator changes its color to yellow.
To change IR brightness level (from 1 to 3), continuously press the “IR”. To switch off the IR Illuminator,
keep the “IR” button pressed for two seconds – the left LED indicator (8) will change its color for green.
Rotate the objective lens (1) until you see a sharp image of the object.
When changing the viewing distance, try to see a sharp and high quality image by rotating the
objective lens (1).
Do not rotate the eyepiece (3) - the device has already been individually adjusted.
Having finished operation, turn the unit off with the “ON” (2) button –left LED indicator goes out.
Please observe polarity shown on the inner side of the battery compartment cover. If the batteries are low,
the left LED indicator (8) will blink green (or yellow - if the IR Illuminator is turned on).

55
Индикаторы
Левый индикатор (8) предназначен для индикации работы прибора.
Правый индикатор (9) предназначен для индикации работы видеорекордера.
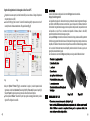
Откройте заглушку и установите карту памяти SD (6), как показано на рисунке 2.
Включите прибор нажатием кнопки “ON” (2). Левый индикатор (8) загорится зеленым цветом.
Настройте прибор в соответствии с указаниями раздела “ЭКСПЛУАТАЦИЯ”.
Для включения видеорекодера нажмите кнопку “REC” (7) – правый светодиод (9) загорится синим цветом.
Видеорекордер будет готов к записи примерно через пять секунд. На дисплее появится информация о
заряде батарей , карте памяти , доступное время записи .
Если в приборе отсутствует карта памяти (сообщение NO CARD на дисплее) или она переполнена
(сообщение CARD FULL на дисплее), видеорекордер отключится автоматически - правый индикатор (9)
погаснет.
Для начала видеозаписи нажмите кнопку “REC” - правый индикатор (9) начнет мигать. На дисплее
появится индикация записи и счетчик продолжительности записи.
Для прекращения видеозаписи нажмите кнопку “REC” (7). Правый индикатор (9) перестанет мигать. Для
отключения видеорекордера нажмите и удерживайте кнопку “REC” в течение двух секунд. Правый
индикатор (9) погаснет.
ИСПОЛЬЗОВАНИЕ ВСТРОЕННОГО ВИДЕОРЕКОРДЕРА
Включение и видеозапись
Левый индикатор Горит зеленым Прибор включен
Правый индикатор
Горит желтым
Мигает зеленым (желтым)
Горит синий
Мигает синим
Прибор включен с ИК-осветителем
Батареи разряжены
Включен рекордер
Идет запись
Фокусировка ИК-осветителя (4) конструкцией не предусмотрена.
При фокусировке на экран дисплея (видна черная «сетка») в плоскости изображения допускаются
семь светлых или темных точек по всему полю зрения.
7. “REC” Button.
8. Left LED indicator.
9. Right LED indicator.

Operation of LED indicators
The left LED indicator (8) shows operational status of the unit.
The right LED indicator (9) shows operational status of the video recorder.
Open the plug and insert the SD memory card (6) as shown in Pic.2.
Activate the device by pressing the button “ON” (2). The left LED indicator (8) will light green.
Adjust the device following the instructions in the section “OPERATION”.
Turn on the video recorder by pressing the button “REC” (7) – the right LED indicator (9) will light up blue. The
video recorder will be ready in five seconds.
The display will show information on the battery charge , memory card and available recording
time . If there is no memory card in the device (NO CARD message on the display) or it is full (CARD
FULL message), the video recorder will automatically shut off and the right LED indicator (9) will go out.
To start video recording, press the “REC” button (7) - the right LED indicator (9) will start blinking.
Indication/recording and recording time counter will appear on the display.
Push the “REC” button (7) to stop video recording. The right LED indicator (9) will cease to blink.
To switch off the video recorder, keep the “REC” button pressed for two seconds – the right LED indicator will
go out.
Left LED Lights green The unit is on
Right LED
Lights yellow
Blinking green (yellow)
Lights blue
Blinking blue
The unit is on with IR
Low battery
The video recorder is on
Video recording is in progress

53
ЭКСПЛУАТАЦИЯ
Снимите крышку с объектива (1).
Включите прибор, нажатием кнопки “ON” (2) - левый индикатор (8) загорится зеленым цветом.
Наведите прибор на объект, удаленный на расстоянии 20 - 30 м.
Вращением окуляра (3) добейтесь четкого видения рамки дисплея и черной мелкой “сетки” полосок
на нем.
Для включения ИК-осветителя (4) нажмите кнопку “IR” (5). Цвет левого индикатора (8) сменится с
зеленого на желтый. Для изменения уровня яркости осветителя (от 1 до 3) последовательно
нажимайте кнопку “IR”. Для выключения ИК-осветителя удерживайте кнопку “IR” в течение двух
секунд - цвет левого индикатора сменится на зеленый.
Вращением объектива (1) добейтесь появления четкого изображения объекта.
При изменении дистанции наблюдения добивайтесь четкого и качественного изображения с
помощью вращения объектива (1).
ОСОБЕННОСТИ ЭКСПЛУАТАЦИИ
Вы можете эксплуатировать прибор в условиях нормальной освещенности; такой режим работы
обеспечивается диапазоном рабочей освещенности.
Если прибор эксплуатировался на холоде и был внесен в теплое помещение, не вынимайте его из
чехла в течение не менее 2-3 часов для предотвращения появления на электронно-оптических
элементах конденсата.
Не погружайте прибор в жидкости; не оставляйте его под дождем и солнечными лучами.
Не допускайте сильных ударных, тепловых и иных воздействий, повреждающих прибор.
Вращать окуляр (3) не требуется - прибор Вами уже индивидуально настроен.
По завершении работы выключите прибор кнопкой “ON” (2) - левый индикатор (8) погаснет.
Будьте внимательны, соблюдайте полярность, указанную на крышке контейнера батарей.
В случае разряда батарей левый индикатор (8) начинает мигать зеленым цветом (при
включенном ИК-осветителе - желтым).
Задвиньте крышку контейнера батарей.
“Settime.txt” - file for date and time setup.
Connection to PC
Note: Transmission speed from the memory card to the PC will not exceed 10Mb/sec.
Launch the setup file “Stringer_driver.exe” to install the driver on your computer.
Connect the video recorder with the supplied USB cable to your PC – it will be detected as a removable disc
(make sure the memory card is inserted). The NV device can be turned off .
With the help of Total Commander or similar file manager you can handle the SD card as a removable disc.

Pic.6
Pic.3
Pic.4
Pic.5
Серия цифровых монокуляров ночного видения Stringer включает в себя две модели -
Stringer 3,5x42 и Stringer 5x50.
Приборы оснащены встроенным видеорекордером, с помощью которого вы можете осуществлять
видеозапись с разрешением 640x480 на карту памяти либо непосредственно на жесктий диск
компьютера. Для удобства ведения видеозаписи на протяжении длительного времени приборы можно
установить на штатив. Приборы имеют возможность подключения к компьютеру посредством USB
кабеля для передачи и обработки записанной информации.
В приборах Stringer используется высокочувствительная КМОП матрица с широким диапазоном
рабочей освещенности. Каждый прибор оснащен встроенным лазерным ИК-осветителем,
позволяющим значительно увеличить эффективность наблюдения при низких условиях освещенности
в ночное время. Прибор может работать автономно до десяти часов на двух батареях типа AA.
Video recording to a PC hard disc
The device should be off, the SD memory card should be removed. Connect the device to the computer via a
USB cable.
Launch the file “Stringer_Video Converter”. Window “Image Download Utility” appears which needs to be
shut or wait for 15 seconds until it shuts automatically. Then window appears (pic. 5).
It is recommended that you choose “Resolution” (640x480) and “Frame rate” (30) settings in the option
“Options”, tab “Formats” (pic.3) for recording on a hard disc.
Press the “Browse” button on the “Capture” tab to choose saving directory on your PC hard drive (pic.4)
and to type the name of the file.

640x480 / 30 кадров/сек
PAL/NTSC*
SD (32 Гб, поддержка SDHC)
50 мин
Mini USB
195x80x59
-10 °C ~ +50 °C -10 °C ~ +50 °C
768x576 / 656x492 768x576 / 656x492
КМОП КМОП
Тип матрицы
3,5/4,2
42
≥34
5,5/4,5
0,5
5/5,8
50
≥34
4/3,5
1
125
125
Видимое увеличение (CCIR/EIA), крат
Угол поля зрения, гориз. (CCIR/EIA), град
Choose the tab “Enable/Disable Preview” (pic. 6) and turn on the NV device – now the image seen
through the NV device is transmitted to the PC monitor.
Note: the file “Video Converter” should be used for OS Windows Vista and Windows 7. If you run OS Windows
XP you can use a default programme like MovieMaker or similar.
Push the “Start/Stop Capture” button to start/stop video recording.
ATTENTION! In order to record another video file, choose saving directory again and type the name of
the file, which is different from the name of the previous file. Failure to do so will cause the new video file
to save under the old name and the previous recording will be deleted.
Copy the “settime.txt” file from the folder with software programs located on the supplied memory card, to the
root folder of the memory card.
Open the copied file “settime.txt”, type information about the current date (format yyyy/mm/dd and time
(format hh:mm:ss) and close the file “settime.txt”.
Now the information on the current date and time will be recorded in the properties of video files. File
“settime.txt” will be deleted from the root folder of the memory card.
Turn off the video recorder and the NV device, disconnect the device.
Разрешение, штрихов/мм

Segno appena visibile, che non
ostacola la distanza di localizzazione e
l’efficienza de l'osservazione si può
notare sul display dopo aver attivato
l'illuminatore laser IR.
Questo è un effete normale per illuminatore
eye-safe.
Particolarità dei sensori CMOS
I sensori CMOS, utilizzati nei visori notturni digitali Yukon, sono caratterizzati da un'elevata qualità. Tuttavia è
possibile la presenza di qualche punto bianco e nero e di piccoli aloni di ampiezza variabile. Queste
particolarità potrebbero presentarsi sia durante l'osservazione diurna che quella notturna. La presenza di
punti bianchi e/o neri, di aloni e altre imperfezioni minori sul CMOS (fino a 4%) sono da considerare accettabili,
in accordo con quanto stabilito. La visibilità sullo schermo di un difetto bianco di uguale livello di difetto dipende
dal tipo di CMOS, dal tipo di apparecchio, aumento di temperatura dopo l'accensione dell'unità.
Il dispositivo è acceso, premendo il
tasto "REC", la registrazione non
parte (l'indicatore a destra si
accende in blu e subito si spegne).
DIFETTO CAUSA POSSIBILE RIPARAZIONE
Ci sono alcuni piccoli punti
chiari o scuri (pixels) sul display
del visore.
La presenza di puntini di questo
tipo risulta dalla tecnologia
di fabbricazione matrice.
Manca la scheda SD.
La scheda di memoria è piena.
Inserire la scheda SD.
Si prega di inserire una nuova scheda.
Non è un difetto.
Non è un difetto.

No SD memory card inside.
Memory card is full.
Insert a memory card.
Insert a new memory card.
The device is on, when pressing
the “REC” button, recording will
not start (the right indicator will
light blue and instantly goes off).
No action required.
This is not a defect.
Peculiarities of CMOS array
CMOS arrays employed in Yukon digital night vision devices, feature high quality. However certain white and
black defective dots and variable amplitude spots are allowed. These defects can be easily detected when
conducting observation both in the day and in the nighttime. Presence of white and black dots, spots and other
minor defects of a CMOS array (up to 4%) are acceptable in accordance with regulations of array producer.
Visibility on the screen of a white defect of equal defect level depends on the type of CMOS array, camera type,
temperature increase after the unit is switched on.
After the built-in laser IR
Illuminator is activated, you may
see a slightly grainy, non-uniform
pattern which does not impact
detection range and efficiency of
observation.
This is normal for eye safe laser illuminators.

Grossissement (CCIR/EIA), x
Diamètre de la lentille, mm
La rèsolution, lignes/mm, non moins que
Champs de vision (horizontal) (CCIR/EIA), degrés
Distance de mise au point minimale, m
Résolution vidéo, pixel (CCIR/EIA)
Type de la matrice
768x576 / 656x492 768x576 / 656x492
CMOS
125
125
CMOS
3,5/4,2
42
≥34
5,5/4,5
0,5
5/5,8
50
≥34
4/3,5
1
Génération
Digital Digital
640x480 / 30 cadres/sec
PAL/NTSC
SD (32 Go, support de SDHC)
50 min
Scegliere il segnalibro “Enable/DisablePreview” (fig.6) e accendere il nottevisore – adesso la immagine che
viene catturata con l'obiettivo del NVD e trasmessa sul monitor del computer.
Nota: Il file “Stringer_VideoConverter”deve essere avviato se si usano i programmi su sistemi operativi
WindowsVista и Windows 7. Per il sistema operativo WindowsXP si puo usare il programma di servizio
MovieMaker.
Cliccando il bottone “Start/Stop Capture” si accende/si ferma la registrazione del video.
Impostazione di data/ora
Accendere il apparecchio e il videorecorder nel modo per farlo definirsi come un disco rimovibile.
Copiare il file "settime.txt" dalla cartella con i programmi software che sono sulla scheda di memoria in
dotazione, nella cartella principale della scheda di memoria.
Aprire il file, "settime.txt" copiato, digita la data (formato aaaa / mm / gg) e l'ora (formato hh: mm: ss) e
chiudere il file "settime.txt".
Ora le informazioni sulla data e l'ora corrente vengono registrate nelle proprietà del file video. I file
"settime.txt" verranno eliminati dalla cartella principale della scheda di memoria.
Spegnere il videorecorder e staccarlo dal computer.
ATTENZIONE! Per registrare un altro video, salvate la directory e digitare il nome del file, diverso dal nome
del file precedente. In caso contrario, il nuovo file video verra' salvato sotto il vecchio nome e la
registrazione precedente verrà cancellata.

La série de monoculaires numériques de vision nocturne Stringer présente deux modèles -
Stringer 3,5x42 et Stringer 5x50.
Les dispositifs sont équipés d'un vidéorécorder incorporé, permettant de réaliser l'enregistrement d'images à
une définition de 640x480 pixels tant sur la carte mémoire, que sur le disque dur de l'ordinateur directement.
Afin de faciliter l'enregistrement des images pendant une période de temps durable, il est possible de monter
les dispositifs sur un pied. Pour le raccordement des dispositifs à l'ordinateur, utilisez le câble USB,
permettant de transférer et de traiter les images enregistrés.
Les dispositifs Stringer sont munis d'une matrice de communication à charge de haute sensibilité, permettant
d'obtenir une large gamme d'intensité lumineuse. Un illuminateur infrarouge incorporé est prévu dans tous les
dispositifs, afin d'améliorer l'observation et la rendre plus efficace aux conditions de faible éclairage pendant la
nuit. Le mode de fonctionnement autonome du dispositif, pendant une durée de dix heures à peu près, est
garanti grâce à deux batteries de type AA.
Les monoculaires de vision nocturne Stringer sont parfaits pour une large variété d'utilisations incluant:
Fig.6
Fig.3
Fig.4
Fig.5
Il regime della registrazione del videosegnale sul disco fisso del PC
Nel punto “Options”/“Formats” (Fig.3) e raccomandato di scegliere i prossimi impostazioni della
registrazione sul disco fisso: Resolution (Risoluzione)(640x480) e Frame rate (Frequenza di quadri)(30).
Nel punto “Capture” scegliere il percorso per conservare i file sul disco fisso del computer.
Premere il pulsante "Browse" nella scheda "Capture" per scegliere il salvataggio della directory sul disco
rigido del PC e di digitare il nome del file.
Il dispositivo deve essere spento, la scheda di memoria SD puo' essere rimossa. Collegare il dispositivo al
computer tramite un cavo USB.
Lanciare il file "Stringer_Video Converter". La finestra "Download image utility" compare occorono circa 15
secondi prima che si chiuda automaticamente. Poi appare la finestra (fig. 5).

Software
Sulla scheda memoria che viene fornita insieme al apparecchio si trova il software, rappresentato con i
seguenti file:
“Stringer_driver” – driver del videorecorder per il suo collegamento al computer. Installarlo prima di
collegare il videorecorder al computer.
“Stringer_Converter” – programma per il lavoro nel regime della registrazione del videosegnale sul disco
fisso del PC.
“Settime.txt” – il file che permette di settare data e ora.
Il apparecchio è compatibile con i sistemi operativi Windows XP, Windows Vista e Windows 7.
Nota: prima dell'uso del videorecorder e raccomandato di conservare il software sul computer personale. Nel
caso se i file si perdono potete rivolgervi al servizio di supporto tecnico: [email protected]
Collegamento al computer
Nota: la velocità del trasferimento dei dati dalla scheda memoria del recorder al PC non supera 10 Мb/sec.
Collegar il apparecchio con il cavo USB al computer, il videorecorder sara definito come un disco rimovibile
(verificare che la scheda di memoria è installata). Tu non puoi accendere il dispositivo.
Con l'aiuto del programma Total Commander o altri manager di file si può lavorare con la scheda SD del
recorder come con un disco rimovibile.
Lanciare il file di installazione "Stringer_driver.exe" per installare il driver sul computer.
UTILISATION DE L'APPAREIL
Enlevez le couvercle de la lentille objective (1).
Mettez en fonction l'appareil en appuyant le bouton “ON” (2) - l’indicateur LED gauche vert (8) stable
s'allumera.
Visez l'appareil sur l'objet se trouvant éloigné de 20-30 métres.
En tournant l'oculaire (3), vous pourrez obtenir l'image net du cadre de l'afficheur et de la petite «grille» noire
en fines bandes sur le dernier.
Pour allumer la torche IR (4) appuyez sur le bouton “IR” (5). La couleur de l'indicateur gauche deviendra
jaune. Pour modifier le niveau de luminosité de l'IR (de 1 à 3), appuyez continuellement sur "IR". Pour
éteindre l'illuminateur IR, maintenez la touche "IR" enfoncée pendant deux secondes - l'indicateur LED à
gauche changera sa couleur pour le vert.
Lors du changement de la distance d'observation, faites tourner la lentille objective (1) jusqu'à ce que
l'image de l'objet soit nette.
Ne pas effectuer de rotation de l'oculaire (3) l'appareil est déjà ajusté individuellement.
PARTICULARITÉS D'UTILISATION
L'appareil peut être utilisé en lumière de jour comme en conditions de nuit.
Après avoir utiliser l'appareil dans des températures froides, veuillez, attendre 2-3 heures avant d'utiliser
l'appareil dans des températures chaudes. Cela permet d'éviter la condensation sur les lentilles.
Ne pas laisser l'appareil en lumière directe. Ne submergez pas dans l'eau.
Pour éteindre l'appareil, appuyez sur le bouton “ON” (2) – l'indicateur LED gauche vert (8) s'éteint.
Attention! Ne pas utiliser des piles de différents types ou des piles avec des niveaux de charge différents.
Le clignotement vert de l’indicateur LED gauche (8) indique la décharge des batteries (couleur jaune, si
l'illuminateur infrarouge est allumé).
Remettez en place et fermez le couvercle.
Ne pas donner de choc ou d'impact à l'appareil digital NV. Ne pas faire tomber.
Le sable, la poussière, et le sel peuvent endommager l'appareil.

Indicazione di diodi luminosi
Il diodo sinistro (8) e destinato all'indicazione del lavoro del apparecchio.
Il diodo destro (9) e destinato all'indicazione del lavoro del videoregistratore.
Aprire la cover dello slot della et inserire scheda memoria SD (6) (Fig.2).
Accendere l'apparecchio premendo il pulsante “ON” (2). sinistro di colore verde (8) si illuminerà. l'indicatore
Per la regolazione del dispositivo seguire il capitolo “USO”.
Accendere il videoregistratore premendo il pulsante “REC” (7) – il LED destro di colore blu (9) si illuminerà. Il
videoregistratore sarà pronto per la registrazione ca. fra cinque secondi. ll display visualizza le informazioni
sul livello di carica della batteria , sulla scheda di memoria , sul tempo di registrazione
disponibile . Se non c'è la scheda di memoria nel dispositivo (il messaggio NO CARD appare sul
display) o se la scheda fosse piena (appre il messaggio CARD FULL), il videoregistratore si spegne
automaticamente e l'indicatore LED di destra (9) si spegne.
Premere il bottone “REC” (7) per cominciare la registrazione. Il LED destro blu (9) comincia a lampeggiare.
Indicazione / registrazione e il contatore del tempo di registrazione verranno visualizzati sul display.
USO DEL VIDEOREGISTRATORE INTEGRATO
Accensione e videoregistrazione
LED sinistro Illumina verde Il dispositivo e' acceso
LED destro
Illumina giallo
Lampeggia verde (giallo)
Illumina blu
Lampeggia blu
Il dispositivo e' acceso con IR illuminatore
Indicazione di scarico pila
Videoregistratore e' acceso
Registrazione in corsa
L'eventuale presenza di alcuni piccoli punti chiari o scuri (fino al numero di 7) sul display non è da
considerarsi un difetto.
Sabbia, polvere e sale possono danneggiare il visore.
La progettazione del visore non consente la regolazione dell'illuminatore IR (4).
Per interruzione della registrazione premere la bottone “REC” (7). Il diodo blu (9) cessa di lampeggiare.
Per spegnere il videoregistratore, tenere il tasto "REC" premuto per due secondi - l'indicatore LED destro si
spegne.

Indication des LEDs
L’indicateur LED gauche (8) est un indicateur de fonctionnement de l'appareil.
L’indicateur LED droite (9) est un indicateur de fonctionnement du vidéorecorder.
Ouvrez le capot de l'emplacement pour carte mémoire SD (6) (voir Fig.2)
Mettez en fonction l'appareil en appuyant le bouton “ON” (2). L’indicateur LED gauche vert (8) s'allume.
Pour le réglage de l'appareil se référer aux instructions du chapitre “Utilisation de l'appareil”.
Mettez en marche le vidéorecorder, en appuyant sur le bouton “REC” (7) – l’indicateur LED droite bleu (9)
s'allume. Le vidéorecorder sera prêt à enregistrer a peu près dans cinq secondes.
L'écran d'affichage indiquera des informations sur la charge de la batterie , la carte mémoire , le
temps d'enregistrement disponible . S'il n'y a pas de carte mémoire dans l'appareil (NO CARD
apparaitra à l'écran) ou si elle est pleine (message CARD FULL), l'enregistrement vidéo s'éteindra
automatiquement et le voyant à l’indicateur LED (9) disparaitra.
Appuyez sur le bouton “REC” (7) pour lancer l'enregistrement vidéo. L’indicateur LED droite bleu clignote.
Indication / enregistrement et le compteur de durée d'enregistrement s'afficheront sur l'écran.
Pour arrêter l'enregistrement vidéo, appuyez sur le bouton “REC” (7). Pour éteindre l'enregistreur vidéo,
maintenez le bouton "REC" enfoncé pendant deux secondes - le voyant à LED rouge s'éteindra.
UTILISATION DU VIDÉORECORDER
Branchement et enregistrement vidéo
L’indicateur LED gauche Allumé feu vert Dispositif enclenché
L’indicateur LED droite
Feu jaune allumé
Clignotement vert (jaune)
Allumé feu bleu
Dispositif enclenché avec
illuminateur infrarouge
Affichage de la décharge des batteries
Vidéorecorder mis en marche
Clignotement bleu
Enregistrement en cours
Lorsque vous effectuez une mise au point sur l'écran (vous pouvez voir le noir net) un maximum de sept
lumières ou de points sombres sur tout le champ de vision de l'image est acceptable.
La conception de l'appareil n'est pas prévu pour un ajustement de la torche IR.

USO
Rimuovere il tappo dell'obiettivo (1).
Accendere l'apparecchio premendo il pulsante “ON” (2) - l'indicatore di sinistra verde (8) si illuminerà.
Individuare un oggetto tra i 20 e i 30 metri.
Far ruotare l'oculare (3) per raggiungere l'immagine del telaietto nitida del display e la griglia fine delle stricie
nere.
Per accendere l'illuminatore IR (4) premere il pulsante “IR” (5). Il colore dell'indicatore sinistro (8) diventa
giallo. Per modificare il livello di luminosità IR (da 1 a 3), premere il tasto "IR". Per spegnere l'illuminatore IR,
tenere il tasto "IR" premuto per due secondi - l'indicatore di sinistra LED cambierà colore per il verde.
Regolare l'obiettivo (1) per ottenere un'immagine definita.
Durante il cambiamento della distanza del`osservazione, cercate di ottenere la qualita` d`immagine
migliore, girando l`obiettivo (1).
CASI PARTICOLARI
L'apparecchio può essere usato sia di notte che di giorno.
Dopo aver usato il visore a basse temperature, attendere 2-3 ore prima di usarlo con temperature calde. Ciò
per evitare la formazione di condensa sulle lenti.
Non dimenticare l'apparecchio al sole. Non immergere in acqua.
Evitare di far prendere colpi al visore. Non farlo cadere.
Non è necessario girare l`oculare (3) esso è stato già regolato.
Per spegnere l'apparecchio premere il pulsante “ON” (2) - l'indicatore di sinistra (8) di colore verde si spegne.
Attenzione! Non utilizzare batterie di diverso tipo o con livelli di carica differenti.
Nel caso dello scarico di pile l'indicatore di sinistra (8) lampeggia verde (se acceso IR illuminatore – giallo).
Riposizionare il coperchietto e chiudere.
LOGICIEL
La carte mémoire, livrée avec l'appareil, est munie d'un logiciel comprenant les fichiers suivants:
“Stringer_driver” – driver du videorecorder pour son branchement au PC. Il est à installer avant le
branchement de l'appareil au PC.
“Stringer_Converter” – programme pour le fonctionnement en mode d'enregistrement du signal vidéo sur
le disque dur du PC.
“Settime.txt” – un fichier permettant d'installer la date et l'heure.
L'appareil est compatible avec les systèmes d'exploitation Windows XP, Windows Vista et Windows 7.
Remarque: avant l'utilisation de l'appareil, il est conseillé de sauvegarder le logiciel sur le PC. En cas de perte
de fichiers, veuillez consulter l'aide: [email protected]
Branchement au PC
Remarque: la vitesse de transfert de données de la carte mémoire du vidéorecorder vers le PC ne dépasse
pas 10Mb/sec.
Lancez le fichier d'installation "Stringer_driver.exe" pour installer le pilote sur votre ordinateur.
Connectez l'appareil à l'aide du câble USB au PC, le videorecorder sera reconnu entant que disque
amovible (assurez-vous que la carte mémoire est insérée). Vous pouvez ne pas allumer l'appareil.
Le programme TotalCommander ou les autres gestionnaires de fichiers permettent de travailler avec la
carte SD comme avec un disque amovible.

Fig.6
Fig.3
Fig.4
Fig.5
Mode d'enregistrement du signal vidéo sur le disque dur de PC
L'appareil doit être éteint, la carte mémoire SD doit être enlevée. Branchez l'appareil à l'ordinateur via un
câble USB.
Lancez le fichier "Stringer_Video Converter". Une fenêtre “Image Download Utility” apparaît, mais qui doit
être arrêtée ou attendez pendant 15 secondes jusqu'à ce qu'il s'arrête automatiquement. Ensuite la fenêtre
apparaît (fig. 5).
Dans le menu “Options”/ “Formats” (fig.3) choisissez les ajustements recommandés suivants pour
l'enregistrement sur le disque dur: Resolution (Résolution) (640x480) et Frame rate (vitesse de
trames)(30). En activant la case “Capture”, choisissez le chemin de sauvegarde des fichiers sur le disque
dur du PC.
Appuyez sur le bouton "Browse" dans l'onglet "Capture" (fig.4) pour choisir de sauver le répertoire sur le
disque dur de votre PC et pour taper le nom du fichier.
Serie di monostati nottevisori comprende due modelle - Stringer 3,5x42 e Stringer 5x50.
I dispositivi incorporano fonoincesore video il quale permette di fare videoregistrazione con risoluzione
640x480 pixel sia sullo scheda di memoria che direttamente sul hard disk del computer. Per facilitare
videoregistrazione a lungo montare il dispositivo sullo stativo. Usare il cavo USB per collegare i dispositivi con
computer per la trasmissione e trattamento dell'informazione registrata.
CMOS-matrice alla sensibilita' nei dispositivi Stringer ha una larga banda operativa d'illuminazione. Ogni
dispositivo incorpora IR illuminatore per aumentare l'efficacia d'osservazione nelle condizioni notturne di
luminosita' bassa. Il dispositivo funziona anche nel modo autonomo con due pile AA.
La pagina si sta caricando...
La pagina si sta caricando...
La pagina si sta caricando...
La pagina si sta caricando...
La pagina si sta caricando...
La pagina si sta caricando...
La pagina si sta caricando...
La pagina si sta caricando...
La pagina si sta caricando...
La pagina si sta caricando...
La pagina si sta caricando...
La pagina si sta caricando...
-
 1
1
-
 2
2
-
 3
3
-
 4
4
-
 5
5
-
 6
6
-
 7
7
-
 8
8
-
 9
9
-
 10
10
-
 11
11
-
 12
12
-
 13
13
-
 14
14
-
 15
15
-
 16
16
-
 17
17
-
 18
18
-
 19
19
-
 20
20
-
 21
21
-
 22
22
-
 23
23
-
 24
24
-
 25
25
-
 26
26
-
 27
27
-
 28
28
-
 29
29
-
 30
30
-
 31
31
-
 32
32


Yukon Stringer Digital NV device Manuale utente
- Categoria
- Illuminazione di comodità
- Tipo
- Manuale utente
- Questo manuale è adatto anche per
in altre lingue
- English: Yukon Stringer Digital NV device User manual
- français: Yukon Stringer Digital NV device Manuel utilisateur
- español: Yukon Stringer Digital NV device Manual de usuario
- Deutsch: Yukon Stringer Digital NV device Benutzerhandbuch
- русский: Yukon Stringer Digital NV device Руководство пользователя
Documenti correlati
Altri documenti
-
Pulsar DIGIFORCE 860RT Manuale utente
-
-
-
-
-
-
Minox NVD 650 Manuale utente
-
Pulsar digitforce 850S Manuale utente