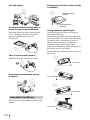
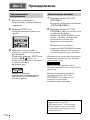
Sony VPL-HW65 Manuale utente
- Categoria
- Proiettori
- Tipo
- Manuale utente
Questo manuale è adatto anche per

M:\081\XPML A7.0\ML\New Folder\4580176042_VPL-
HW65_ML\01GB-VPLHW65SY\010COV.fm
masterpage:Ba ck
Cover
Video
Projector
VPL-HW65
VPL-HW45
VPL-HW65/HW45
4-580-176-04 (2)
4-580-176-04 (2)
Quick Reference Manual ____________ GB
Guide de référence rapide __________ FR
Manual de referencia rápida _________ ES
Kurzreferenz_______________________ DE
Guida rapida all’uso ________________ IT
Краткое справочное руководство __ RU
______________________ CT
F:\#Work#\0127\4580176021\4580176021VPLHW65SYQ\01GB-
VPLHW65SY\100BCO.fm
masterpage:Ba ck
Cover
VPL-HW65/HW45
4-580-176-02 (1)
©
2015 Sony Corporation Printed in China

GB
2
This Quick Reference Manual explains the installation and basic operations for projecting
pictures. It also describes important notes and cautions to which you have to pay attention when
handling and using this unit.
Refer to “Warning Indicators,” “Replacing the Lamp,” and “Cleaning the Air Filter” as
necessary.
For details on the operations, refer to the Operating Instructions contained in the supplied CD-
ROM.
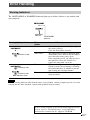
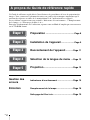
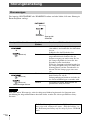
About the Quick Reference Manual
Preparing ..................................................Page 12
Installing the Unit..................................Page 13
Connecting the Unit.............................Page 15
Selecting the Menu Language........Page 16
Projecting..................................................Page 17
Error Handling
Warning Indicators.........................................Page 19
Maintenance
Replacing the Lamp .......................................Page 20
Cleaning the Air Filter ....................................Page 23
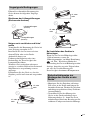
Step 1
Step 2
Step 3
Step 4
Step 5

3
GB
Before operating the unit, please read this
manual thoroughly and retain it for future
reference.
WARNING
To reduce the risk of fire or electric
shock, do not expose this apparatus
to rain or moisture.
To avoid electrical shock, do not open
the cabinet. Refer servicing to
qualified personnel only.
WARNING
THIS APPARATUS MUST BE
EARTHED.
WARNING
When installing the unit, incorporate a
readily accessible disconnect device in the
fixed wiring, or connect the power plug to an
easily accessible socket-outlet near the unit.
If a fault should occur during operation of
the unit, operate the disconnect device to
switch the power supply off, or disconnect
the power plug.
CAUTION
About the LAN connector (VPL-HW65
only)
For safety, do not connect the connector for
peripheral device wiring that might have
excessive voltage to this port.
WARNING
1. Use the approved Power Cord (3-core
mains lead) / Appliance Connector / Plug
with earthing-contacts that conforms to
the safety regulations of each country if
applicable.
2. Use the Power Cord (3-core mains lead) /
Appliance Connector / Plug conforming
to the proper ratings (Voltage, Ampere).
If you have questions on the use of the above
Power Cord / Appliance Connector / Plug,
please consult a qualified service personnel.
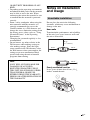
About 3D Glasses
The 3D Glasses communicate with the
projector via Bluetooth technology to
display 3D signals.
(a) frequency band(s) in which the radio
equipment operates:
2.4 - 2.4835 GHz
(b) maximum radio-frequency power
transmitted in the frequency band(s) in
which the radio equipment operates:
4.30 dBm (E.I.R.P.)
As with any bright
light source, do not
stare into the beam,
RG2 IEC 62471-5:
2015.
For the customers in the U.S.A.
This equipment has been tested and found to
comply with the limits for a Class B digital
device, pursuant to part 15 of the FCC Rules.
These limits are designed to provide
reasonable protection against harmful
interference in a residential installation. This
equipment generates, uses and can radiate
radio frequency energy and, if not installed
and used in accordance with the instructions,
may cause harmful interference to radio
communications. However, there is no
guarantee that interference will not occur in
a particular installation. If this equipment
does cause harmful interference to radio or
television reception, which can be
determined by turning the equipment off and
on, the user is encouraged to try to correct
the interference by one or more of the
following measures:
- Reorient or relocate the receiving antenna.
- Increase the separation between the
equipment and receiver.
- Connect the equipment into an outlet on a
circuit different from that to which the
receiver is connected.
- Consult the dealer or an experienced
radio/TV technician for help.
You are cautioned that any changes or
modifications not expressly approved in this
manual could void your authority to operate
this equipment.
GB

GB
4
All interface cables used to connect
peripherals must be shielded in order to
comply with the limits for a digital device
pursuant to Subpart B of part 15 of FCC
Rules.
This device complies with part 15 of the
FCC Rules. Operation is subject to the
following two conditions: (1) This device
may not cause harmful interference, and (2)
this device must accept any interference
received, including interference that may
cause undesired operation.
If you have any questions about this product,
you may call;
Sony Customer Information Service Center
1-800-222-7669 or http://www.sony.com/
This transmitter must not be co-located or
operating in conjunction with any other
antenna or transmitter.
For the customers in Canada
This device complies with Industry Canada
licence-exempt RSS standard(s). Operation
is subject to the following two conditions:
(1) this device may not cause interference,
and (2) this device must accept any
interference, including interference that may
cause undesired operation of the device.
For the customers in the U.S.A. and
Canada
Radiated Exposure Statement:
The product complies with the US/Canadian
portable RF exposure limit set forth for an
uncontrolled environment and is safe for
intended operation as described in this
manual. The further RF exposure reduction
can be achieved if the product can be kept as
far as possible from the user body or if the
device is set to lower output power if such
function is available.
For the customers in Canada
CAN ICES-3 (B)/NMB-3(B)
For kundene i Norge
Dette utstyret kan kobles til et IT-
strømfordelingssystem.
For the customers in Europe
Notice for customers: the following information is only applicable to equipment sold in
Countries applying EU directives.
Declaration of Conformity
Trade Name: SONY
Model: VPL-HW65
VPL-HW45
Responsible party: Sony Electronics Inc.
Address: 16535 Via Esprillo,
San Diego, CA 92127
U.S.A.
Telephone Number:858-942-2230
This device complies with part 15 of the
FCC Rules. Operation is subject to the
following two conditions: (1) This device
may not cause harmful interference, and
(2) this device must accept any interference
received, including interference that may
cause undesired operation.
Bulgarian
С настоящето Сони Корпорация декларира, че VPL-HW65/VPL-HW45
отговаря на основните изисквания и другите съответстващи клаузи на
Директива 1999/5/ЕС.
Подробности може да намерите на Интернет страницата :
http://www.compliance.sony.de/.
Croatian
Ovime Sony Corporation izjavljuje da je VPL-HW65/VPL-HW45 u
skladu s osnovnim zahtjevima i ostalim relevantnim odredbama direktive
1999/5/EZ. Dodatne informacije potražite na sljedećoj internet adresi:
http://www.compliance.sony.de/

5
GB
Czech
Sony Corporation tímto prohlašuje, že tento VPL-HW65/VPL-HW45 je
ve shodě se základními požadavky a dalšími příslušnými ustanoveními
směrnice 1999/5/ES.
Podrobnosti lze získat na následující URL: http://
www.compliance.sony.de/
Danish
Undertegnede Sony Corporation erklærer herved, at følgende udstyr VPL-HW65/
VPL-HW45 overholder de væsentlige krav og øvrige relevante krav i direktiv
1999/5/EF.
For yderligere information gå ind på følgende hjemmeside: http://
www.compliance.sony.de/
Dutch
Hierbij verklaart Sony Corporation dat het toestel VPL-HW65/VPL-HW45 in
overeenstemming is met de essentiële eisen en de andere relevante bepalingen
van richtlijn 1999/5/EG.
Nadere informatie kunt u vinden op: http://www.compliance.sony.de/
English
Hereby, Sony Corporation, declares that VPL-HW65/VPL-HW45 is in
compliance with the essential requirements and other relevant provisions of the
Directive 1999/5/EC.
For details, please access the following URL :http://www.compliance.sony.de/
Estonian
Sony Corporation kinnitab käesolevaga seadme VPL-HW65/VPL-HW45
vastavust 1999/5/EÜ direktiivi põhinõuetele ja nimetatud direktiivist
tulenevatele teistele asjakohastele sätetele.
Üksikasjalikum info: http://www.compliance.sony.de/.
Finnish
Sony Corporation vakuuttaa täten että VPL-HW65/VPL-HW45 tyyppinen laite
on direktiivin 1999/5/EY oleellisten vaatimusten ja sitä koskevien direktiivin
muiden ehtojen mukainen.
Halutessasi lisätietoja, käy osoitteessa: http://www.compliance.sony.de/
Greek
Hungarian
Alulírott, Sony Corporation nyilatkozom, hogy a(z)
VPL-HW65/VPL-HW45
megfelel a vonatkozó alapvető követelményeknek és az 1999/5/EC irányelv
egyéb előírásainak.
További információkat a következő weboldalon találhat: http://
www.compliance.sony.de/
Latvian
Lithuanian
Norwegian
Sony Corporation erklærer herved at VPL-HW65/VPL-HW45 er i samsvar med
de grunnleggende krav og øvrige relevante krav i direktiv 1999/5/EF.
For flere detaljer, vennligst se: http://www.compliance.sony.de/
VPL-HW65/VPL-HW45
VPL-HW65/VPL-HW45
VPL-HW65/VPL-HW45

GB
6
Caution on replacement/disposal of
the battery for the 3D glasses
Danger of explosion if battery is incorrectly
replaced.
Replace only with the same or equivalent
type recommended by the manufacturer.
When you dispose of the battery, you must
obey the law in the relative area or country.
For the Customers in Brazil only
Apenas para clientes no Brasil
DESCARTE DE PILHAS E BATERIAS
Pilhas e Baterias não recarregáveis
Atenção:
Verifique as instruções de uso do aparelho
certificando-se de que as polaridades (+) e
(-) estão no sentido indicado. As pilhas
poderão vazar ou explodir se as polaridades
forem invertidas, expostas ao fogo,
desmontadas ou recarregadas.
Evite misturar com pilhas de outro tipo ou
com pilhas usadas, transportá-las ou
armazená-las soltas, pois aumenta o risco de
vazamento.
Retire as pilhas caso o aparelho não esteja
sendo utilizado, para evitar possíveis danos
na eventualidade de ocorrer vazamento.
As pilhas devem ser armazenadas em local
seco e ventilado.
Polish
Niniejszym Sony Corporation oświadcza, że VPL-HW65/VPL-HW45 jest
zgodne z zasadniczymi wymaganiami oraz innymi stosownymi
postanowieniami Dyrektywy 1999/5/WE.
Szczegółowe informacje znaleźć można pod następującym adresem URL:
http://www.compliance.sony.de/
Portuguese
Sony Corporation declara que este VPL-HW65/VPL-HW45 está conforme com
os requisitos essenciais e outras disposições da Directiva 1999/5/CE.
Para mais informacoes, por favor consulte a seguinte URL: http://
www.compliance.sony.de/
Romanian
Prin prezenta, Sony Corporation declară că VPL-HW65/VPL-HW45
respectă cerinţele esenţiale și este în conformitate cu prevederile
Directivei 1999/5/EC.
Pentru detalii, vă rugăm accesaţi următoarea adresă: http://
www.compliance.sony.de/
Slovak
Sony Corporation týmto vyhlasuje, že VPL-HW65/VPL-HW45 spĺňa
základné požiadavky a všetky príslušné ustanovenia Smernice 1999/5/ES.
Podrobnosti získate na nasledovnej webovej adrese: http://
www.compliance.sony.de/
Slovenian
Sony Corporation izjavlja, da je ta VPL-HW65/VPL-HW45 v skladu z
bistvenimi zahtevami in ostalimi relevantnimi določili direktive 1999/5/ES.
Za podrobnosti vas naprošamo, če pogledate na URL: http://
www.compliance.sony.de/
Swedish
Härmed intygar Sony Corporation att VPL-HW65/VPL-HW45 står I
överensstämmelse med de väsentliga egenskapskrav och övriga relevanta
bestämmelser som framgår av direktiv 1999/5/EG.
För ytterligare information gå in på följande hemsida: http://
www.compliance.sony.de/
Tu r ki sh
VPL-HW65/VPL-HW45

7
GB
No caso de vazamento da pilha, evite o
contato com a mesma. Lave qualquer parte
do corpo afetado com água abundante.
Ocorrendo irritação, procure auxílio médico.
Não remova o invólucro da pilha.
Mantenha fora do alcance das crianças. Em
caso de ingestão procure auxílio médico
imediatamente.
For Customers in UAE (United Arab
Emirates)
TRA
REGISTERED No: ER0115212/13
DEALER No: DA0065531/11
For the customers in the U.S.A.
SONY LIMITED WARRANTY
- Please
visit http://www.sony.com/psa/warranty
for important information and complete
terms and conditions of Sony’s limited
warranty applicable to this product.
For the customers in Canada
SONY LIMITED WARRANTY
- Please
visit http://www.sonybiz.ca/pro/lang/en/
ca/article/resources-warranty-product-
registration for important information
and complete terms and conditions of
Sony’s limited warranty applicable to this
product.
For the customers in Europe
Sony Professional Solutions Europe -
Standard Warranty and Exceptions on
Standard Warranty.
Please visit http://www.pro.sony.eu/
warranty for important information and
complete terms and conditions.
For the customers in Korea
SONY LIMITED WARRANTY
- Please
visit http://bpeng.sony.co.kr/handler/
BPAS-Start for important information
and complete terms and conditions of
Sony’s limited warranty applicable to this
product.

GB
8
Precautions
On safety
• Check that the operating voltage of your
unit is identical with the voltage of your
local power supply.
• Should any liquid or solid object fall into
the cabinet, unplug the unit and have it
checked by qualified personnel before
operating it further.
• Unplug the unit from the wall outlet if it is
not to be used for several days.
• To disconnect the cord, pull it out by the
plug. Never pull the cord itself.
• The wall outlet should be near the unit and
easily accessible.
• The unit is not disconnected to the AC
power source (mains) as long as it is
connected to the wall outlet, even if the
unit itself has been turned off.
• Do not look into the lens while the lamp is
on.
• Do not place your hand or objects near the
ventilation holes. The air coming out is
hot.
On preventing internal heat build-
up
After you turn off the power with the ?/1
(ON/STANDBY) button, do not disconnect
the unit from the wall outlet while the
cooling fan is still running.
Caution
This unit is equipped with ventilation holes
(intake) and ventilation holes (exhaust). Do
not block or place anything near these holes,
or internal heat build-up may occur, causing
picture degradation or damage to the unit.
On repacking
Save the original shipping carton and
packing material; they will come in handy if
you ever have to ship your unit. For
maximum protection, repack your unit as it
was originally packed at the factory.
On watching 3D video images
Safety precautions
• You should only use the 3D glasses for
watching 3D video images.
• If you observe flickering or flashing, turn
off the lighting in the room.
• Not for use by children without proper
adult supervision.
• Be careful not to pinch your fingers in
hinges of the 3D glasses when bending the
temple frames.
• Do not drop or modify these 3D glasses.
• If these glasses are broken, keep broken
pieces away from your mouth or eyes.
On LCD Projector
The LCD projector is manufactured using
high-precision technology. You may,
however, see tiny black points and/or bright
points (red, blue, or green) that continuously
appear on the LCD projector. This is a
normal result of the manufacturing process
and does not indicate a malfunction.
Also, when you use multiple LCD projectors
to project onto a screen, even if they are of
the same model, the color reproduction
among projectors may vary, since color
balance may be set differently from one
projector to the next.
On condensation
If the room temperature where the projector
is installed changes rapidly, or if the
projector is moved suddenly from a cold to a
warm place, condensation in the projector
may occur. As the condensation may cause
malfunction, be careful in adjusting
temperature settings of the air conditioner. If
condensation occurs, leave the projector
turned on for about two hours before use.
Notes on security (VPL-HW65 only)
• SONY WILL NOT BE LIABLE FOR
DAMAGES OF ANY KIND
RESULTING FROM A FAILURE TO
IMPLEMENT PROPER SECURITY
MEASURES ON TRANSMISSION
DEVICES, UNAVOIDABLE DATA
LEAKS RESULTING FROM
TRANSMISSION SPECIFICATIONS,

9
GB
OR SECURITY PROBLEMS OF ANY
KIND.
• Depending on the operating environment,
unauthorized third parties on the network
may be able to access the unit. When
connecting the unit to the network, be sure
to confirm that the network is protected
securely.
• From a safety standpoint, when using the
unit connected with the network, it is
strongly recommended to access the
Control window via a Web browser and
change the access limitation settings from
the factory preset values (refer to “Using
Network Features” in the Operating
Instructions).
Changing the password regularly is also
recommended.
• Do not browse any other website in the
Web browser while making settings or
after making settings. Since the login
status remains in the Web browser, close
the Web browser when you complete the
settings to prevent unauthorized third
parties from using the unit or harmful
programs from running.
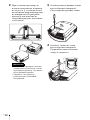
Notes on Installation
and Usage
Do not place the unit in the following
situations, which may cause malfunction or
damage to the unit.
Near walls
To maintain the performance and reliability
of the unit, leave space between walls and
the unit as illustrated.
Poorly ventilated location
Leave space of more than 30 cm (11
7
/
8
inches) around the unit.
Note
SONY WILL NOT BE LIABLE FOR
DAMAGES OF ANY KIND
RESULTING FROM THE USE OF
THIS UNIT FOR PURPOSES OTHER
THAN GENERAL HOME USE,
EITHER DURING THE WARRANTY
PERIOD OR AFTER EXPIRATION OF
THE WARRANTY.
Unsuitable installation
30 cm
(11
7
/
8
inches)
30 cm
(11
7
/
8
inches)
30 cm
(11
7
/
8
inches)
30 cm
(11
7
/
8
inches)

GB
10
Hot and humid
Locations subject to direct cool or
warm air from an air-conditioner
Installing the unit in such a location may
cause a malfunction of the unit due to
moisture condensation or rise in
temperature.
Near a heat or smoke sensor
Malfunction of the sensor may occur.
Very dusty and extremely smoky
locations
Do not do any of the following while using
the unit.
Blocking the ventilation holes (intake
or exhaust)
Tilting front/rear and left/right
Avoid using the unit tilted at an angle of
more than 15 degrees.
Do not install the unit anywhere other than
on a level surface or on the ceiling. Installing
the unit in such a location may result in
uneven color uniformity or reduce the
reliability of the effects of the lamp.
If the unit is tilted up or down, the image on
the screen may be trapezoidal.
Position the unit so that the lens is parallel to
the screen.
Unsuitable Conditions
Ventilation holes
(exhaust)
Ventilation holes
(intake)
15° or more
15° or more
15° or more
15° or more

11
GB
When installing the unit at high
altitudes
When using the unit at an altitude of
1,500 m (approx. 4,900 ft) or higher, set
“High Altitude Mode” on the Setup
menu to “On”. Failing to set this mode when
using the unit at high altitudes could have
adverse effects, such as reducing the
reliability of certain components.
• Never mount the projector on the ceiling
or move it by yourself. Be sure to consult
with qualified Sony personnel (charged).
• When installing the unit on a ceiling, be
sure to use a safety wire, etc., to prevent
the unit from falling. Entrust the
installation to an experienced contractor or
installer.
For dealers
• When the projector is mounted on the
ceiling, a Sony bracket or recommended
equivalent must be used for installation.
• Be sure to secure the cabinet cover firmly
when installing to the ceiling firmly.
Safety precautions for
installing the unit on a ceiling
15° or more

GB
12
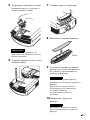
Check the carton to make sure it contains the
following items:
• Remote control RM-PJ28 (1)
• Size AA (R6) manganese batteries (2)
• AC power cord (1)
•Lens cap (1)
When you have purchased the projector,
the lens cap is put onto the lens. Remove
this lens cap when you use the projector.
• Quick Reference Manual (this manual) (1)
• Operating Instructions (CD-ROM) (1)
CAUTION
Danger of explosion if battery is incorrectly
replaced.
Replace only with the same or equivalent
type recommended by the manufacturer.
When you dispose of the battery, you must
obey the law in the relative area or country.
Caution
Two size AA (R6) batteries are supplied for
Remote Control.
To avoid risk of explosion, use size AA (R6)
manganese or alkaline batteries.
Caution about handling the remote
control
• Handle the remote control with care. Do
not drop or step on it, or spill liquid of any
kind onto it.
• Do not place the remote control in a
location near a heat source, a place subject
to direct sunlight, or a damp room.
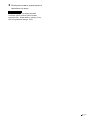
The manual can be read on a computer with
Adobe Reader installed.
You can download Adobe Reader free from
the Adobe website.
1 Open the index.html file in the CD-
ROM.
2 Select and click on the manual that
you want to read.
If you have lost or damaged the CD-ROM, you
can purchase a new one from your Sony dealer
or Sony service counter.
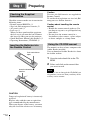
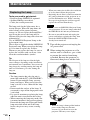
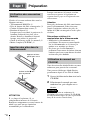
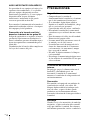
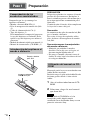
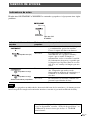
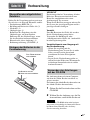
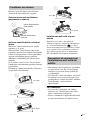
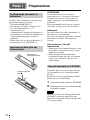
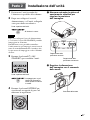
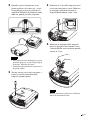
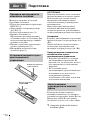
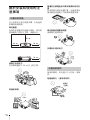
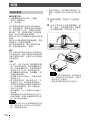
Preparing
Step 1
Checking the Supplied
Accessories
Inserting the Batteries into
the Remote Control
Push and slide to
open.
Insert the batteries E
side first.
Using the CD-ROM manual
Note

13
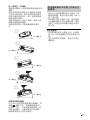
GB
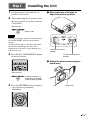
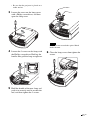
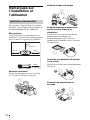
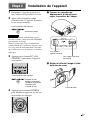
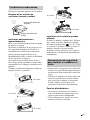
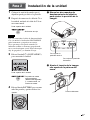
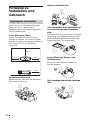
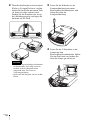
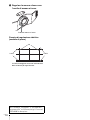
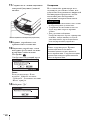
1 Position the unit so that the lens is
parallel to the screen.
2 After connecting the AC power cord to
the unit, plug the AC power cord into
a wall outlet.
After connecting the AC power cord to the unit,
the ON/STANDBY indicator may blink in
orange.
You may not be able to control the unit while
the indicator is blinking, but this is not a
malfunction. Wait until it stops blinking and
remains lit in red.
3 Press the ?/1 (ON/STANDBY) button
to turn on the unit.
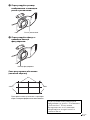
4 Press the PATTERN button to display
a test signal for performing
adjustments.
a Move both lens shift dials to
adjust the picture position.
b Adjust the picture size using the
zoom lever.
Installing the Unit
Step 2
Note
Lights in red.
Top of the unit
Flashes in green for a
while (tens of seconds)
and then lights in green.
Top of the unit
To adjust the vertical
position
To adjust the horizontal
position
Zoom lever

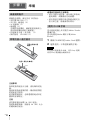
GB
14
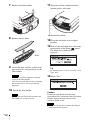
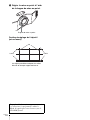
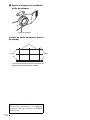
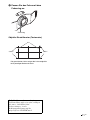
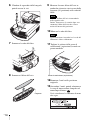
c Adjust the focus using the focus
ring.
Lens adjustment window (test pattern)
Focus ring
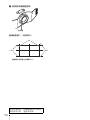
2.35:1
4:3
1.85:1
The dashed lines show the screen sizes of each
aspect ratio.
For more information, refer to
“Connections and Preparations” in the
Operating Instructions contained in the
supplied CD-ROM.

15
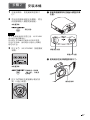
GB
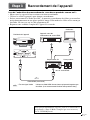
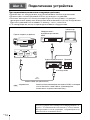
When making connections, be sure to do the following:
• Turn off all equipment before making any connections.
• Use the proper cables for each connection.
• Insert the cable plugs properly; poor connection at the plugs may cause a malfunction or poor
picture quality. When pulling out a cable, be sure to pull it out from the plug, not the cable
itself.
• Refer to the operating instructions of the connected equipment.
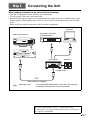
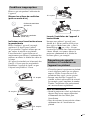
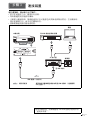
Connecting the Unit
Step 3
Right side of the unit
AV amplifier
Speakers
Equipment with HDMI
output connectors
Computer
to HDMI output
HDMI cable (not supplied)
: Video signal flow Use a high speed HDMI cable on which the cable type logo
is specified. (Sony products are recommended.)
For more information, refer to “Connections and
Preparations” in the Operating Instructions contained in
the supplied CD-ROM.

GB
16
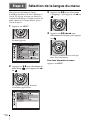
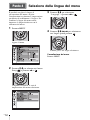
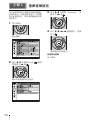
You can select the language for displaying
the menu and other on-screen displays. The
factory default setting is English. To change
the current menu language, set the desired
language with the menu screen.
1 Press MENU.
The menu appears.
2 Press M/m to select the Setup
menu, and press , or .
The setting items of the selected menu
appear.
3 Press M/m to select “Language,” and
press , or .
4 Press M/m/</, to select a
language, and press .
The menu changes to the selected
language.
To clear the menu
Press MENU.
Selecting the Menu Language
Step 4

17
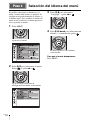
GB
1 Turn on both the unit and the
equipment connected to the unit.
2 Press INPUT to display the input
palette on the screen.
3 Select the equipment from which you
want to display images.
Press INPUT repeatedly or press M/m/
(enter) to select the equipment from
which to project.
1 Press the ?/1 (ON/STANDBY)
button.
A message “POWER OFF?” appears on
the screen.
2 Press the ?/1 (ON/STANDBY) button
again before the message disappears.
The ON/STANDBY indicator flashes in
green and the fan continues to run to
reduce the internal heat.
The fan stops and the ON/STANDBY
indicator changes from flashing green to
remaining red.
The power is turned off completely, and you
can disconnect the AC power cord.
Never disconnect the AC power cord while the
indicator is flashing.
You can turn off the unit by holding the ?/1
(ON/STANDBY) button for about 1 second,
instead of performing the above steps.
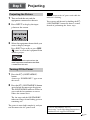
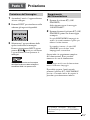
Projecting
Step 5
Projecting the Picture
Turning Off the Power
Example: To view the picture from the
video equipment connected to the HDMI
1 connector of this unit.
Note
For more information, refer to
“Projecting” in the Operating Instructions
contained in the supplied CD-ROM.

GB
18
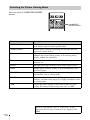
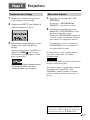
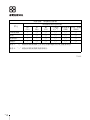
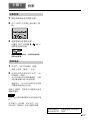
Press one of the CALIBRATED PRESET
buttons.
Selecting the Picture Viewing Mode
CALIBRATED
PRESET buttons
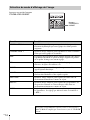
Setting items Description
CINEMA FILM 1 Picture quality suited to reproducing the highly dynamic and
clear images typical of master positive film.
CINEMA FILM 2 Picture quality suited to reproducing the rich tone and color
typical of a movie theater.
REF A picture quality setup suitable for when you want to reproduce
faithfully the original image quality, or for enjoying image
quality, without any adjustment.
TV Picture quality suited for watching TV programs, sports,
concerts, etc.
PHOTO Ideal for projecting still images taken with a digital camera.
GAME Picture quality suited to gaming, with well-modulated colors
and fast response.
BRT CINE Picture quality suited for watching movies in a bright
environment, such as a living room.
BRT TV Picture quality suited for watching TV programs, sports,
concerts, and other video images in a bright environment, such
as a living room.
USER Adjusts the picture quality to suit your taste then saves the
setting. The factory default setting is the same as “REF.”
For more information, refer to “Projecting” in the
Operating Instructions contained in the supplied CD-
ROM.

19
GB
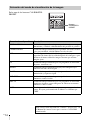
The ON/STANDBY or WARNING indicator lights up or flashes if there is any trouble with
your projector.
When a warning indicator other than the above starts flashing, and the symptom persists even after
carrying out the above methods, consult with qualified Sony personnel.
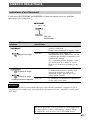
Error Handling
Warning Indicators
Flashing/Lighting indicators The number of
flashes
Cause and Remedy
Twice Close the lamp cover securely, then tighten
the screws securely.
Close the filter holder securely.
Three times The temperature of lamp is unusually high.
Turn off the power and wait for the lamp to
cool, then turn on the power again.
If the symptom persists, the lamp may be at
the end of its service life. In this case,
replace the lamp with a new one.
Twice The internal temperature is unusually high.
Check to ensure that if nothing is blocking
the ventilation holes or whether or not the
unit is being used at high altitudes.
Three times The fan is broken. Consult with qualified
Sony personnel.
Note
ON/STANDBY
indicator
WARNING
indicator
(Flashes in red)
(Flashes in red)
(Flashes in red)
Both indicators flash
If there is any problem or an error message appears on the
screen, refer to “Troubleshooting” in the Operating
Instructions contained in the supplied CD-ROM.

GB
20
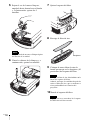
Tools you need to get started:
• Projector Lamp LMP-H210 (optional)
• Standard Phillips screwdriver
• Cloth (for scratch protection)
The lamp used for the light source has a
certain lifespan. When the lamp dims, the
color balance of the picture becomes
strange, or “Please replace the Lamp/Filter.”
appears on the screen, the lamp may be
exhausted. Replace the lamp with a new one
without delay.
Use an LMP-H210 Projector Lamp as the
replacement lamp.
The air filter is supplied with the LMP-H210
Projector Lamp. When you replace the lamp,
it is also time to replace the air filter.
Whenever you replace the lamp, be sure to
replace the air filter with a new one. Also
clean the ventilation holes (intake).
Tip
The lifespan of the lamp used for the light
source changes depending on the installation
environment or use conditions. You can use the
lamp longer by avoiding turning the lamp off
until several minutes pass after turning the
lamp on.
Caution
• The lamp remains hot after the unit is
turned off with the ?/1 (ON/STANDBY)
button. If you touch the lamp, you may
burn your fingers. When you replace the
lamp, wait for at least 1 hour for the lamp
to cool.
• Do not touch the surface of the lamp. If
you touch it, wipe off the fingerprints with
a soft cloth.
• Pay special attention to replacing the lamp
when the unit is installed on the ceiling.
• When removing the lamp unit, make sure
it remains horizontal, then pull straight up.
Do not tilt the lamp unit. If you pull out the
lamp unit while tilted and if the lamp
breaks, the pieces may scatter, causing
injury.
• When you remove the air filter, be careful not
to let any dust fall into the projector.
• Replacing the air filter is crucial to maintain
the good performance of the projector or to
prevent malfunction to it. When a warning
message for replacing the air filter appears,
replace the air filter immediately.
• Be sure to use an LMP-H210 Projector Lamp
for replacement. If you use lamps other than
the LMP-H210, the unit may malfunction.
• Be sure to turn off the unit and unplug the
power cord before replacing the lamp, then
check the ON/STANDBY indicator has
already been turned off.
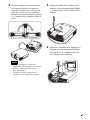
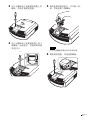
1 Turn off the projector and unplug the
AC power cord.
2 When setting the projector on a flat
surface such as a desk etc., put a cloth
to prevent the surface from being
scratched. Reverse the projector as
illustrated, then place it on the cloth.
• When the lamp is damaged the broken
pieces of the lamp may become
scattered, if you do not reverse the
projector. This may cause injury.
Maintenance
Replacing the Lamp
Notes
Notes
La pagina si sta caricando...
La pagina si sta caricando...
La pagina si sta caricando...
La pagina si sta caricando...
La pagina si sta caricando...
La pagina si sta caricando...
La pagina si sta caricando...
La pagina si sta caricando...
La pagina si sta caricando...
La pagina si sta caricando...
La pagina si sta caricando...
La pagina si sta caricando...
La pagina si sta caricando...
La pagina si sta caricando...
La pagina si sta caricando...
La pagina si sta caricando...
La pagina si sta caricando...
La pagina si sta caricando...
La pagina si sta caricando...
La pagina si sta caricando...
La pagina si sta caricando...
La pagina si sta caricando...
La pagina si sta caricando...
La pagina si sta caricando...
La pagina si sta caricando...
La pagina si sta caricando...
La pagina si sta caricando...
La pagina si sta caricando...
La pagina si sta caricando...
La pagina si sta caricando...
La pagina si sta caricando...
La pagina si sta caricando...
La pagina si sta caricando...
La pagina si sta caricando...
La pagina si sta caricando...
La pagina si sta caricando...
La pagina si sta caricando...
La pagina si sta caricando...
La pagina si sta caricando...
La pagina si sta caricando...
La pagina si sta caricando...
La pagina si sta caricando...
La pagina si sta caricando...
La pagina si sta caricando...
La pagina si sta caricando...
La pagina si sta caricando...
La pagina si sta caricando...
La pagina si sta caricando...
La pagina si sta caricando...
La pagina si sta caricando...
La pagina si sta caricando...
La pagina si sta caricando...
La pagina si sta caricando...
La pagina si sta caricando...
La pagina si sta caricando...
La pagina si sta caricando...
La pagina si sta caricando...
La pagina si sta caricando...
La pagina si sta caricando...
La pagina si sta caricando...
La pagina si sta caricando...
La pagina si sta caricando...
La pagina si sta caricando...
La pagina si sta caricando...
La pagina si sta caricando...
La pagina si sta caricando...
La pagina si sta caricando...
La pagina si sta caricando...
La pagina si sta caricando...
La pagina si sta caricando...
La pagina si sta caricando...
La pagina si sta caricando...
La pagina si sta caricando...
La pagina si sta caricando...
La pagina si sta caricando...
La pagina si sta caricando...
La pagina si sta caricando...
La pagina si sta caricando...
La pagina si sta caricando...
La pagina si sta caricando...
La pagina si sta caricando...
La pagina si sta caricando...
La pagina si sta caricando...
La pagina si sta caricando...
La pagina si sta caricando...
La pagina si sta caricando...
La pagina si sta caricando...
La pagina si sta caricando...
La pagina si sta caricando...
La pagina si sta caricando...
La pagina si sta caricando...
La pagina si sta caricando...
La pagina si sta caricando...
La pagina si sta caricando...
La pagina si sta caricando...
La pagina si sta caricando...
La pagina si sta caricando...
La pagina si sta caricando...
La pagina si sta caricando...
La pagina si sta caricando...
La pagina si sta caricando...
La pagina si sta caricando...
La pagina si sta caricando...
La pagina si sta caricando...
La pagina si sta caricando...
La pagina si sta caricando...
La pagina si sta caricando...
La pagina si sta caricando...
La pagina si sta caricando...
La pagina si sta caricando...
La pagina si sta caricando...
La pagina si sta caricando...
La pagina si sta caricando...
La pagina si sta caricando...
La pagina si sta caricando...
La pagina si sta caricando...
La pagina si sta caricando...
La pagina si sta caricando...
La pagina si sta caricando...
-
 1
1
-
 2
2
-
 3
3
-
 4
4
-
 5
5
-
 6
6
-
 7
7
-
 8
8
-
 9
9
-
 10
10
-
 11
11
-
 12
12
-
 13
13
-
 14
14
-
 15
15
-
 16
16
-
 17
17
-
 18
18
-
 19
19
-
 20
20
-
 21
21
-
 22
22
-
 23
23
-
 24
24
-
 25
25
-
 26
26
-
 27
27
-
 28
28
-
 29
29
-
 30
30
-
 31
31
-
 32
32
-
 33
33
-
 34
34
-
 35
35
-
 36
36
-
 37
37
-
 38
38
-
 39
39
-
 40
40
-
 41
41
-
 42
42
-
 43
43
-
 44
44
-
 45
45
-
 46
46
-
 47
47
-
 48
48
-
 49
49
-
 50
50
-
 51
51
-
 52
52
-
 53
53
-
 54
54
-
 55
55
-
 56
56
-
 57
57
-
 58
58
-
 59
59
-
 60
60
-
 61
61
-
 62
62
-
 63
63
-
 64
64
-
 65
65
-
 66
66
-
 67
67
-
 68
68
-
 69
69
-
 70
70
-
 71
71
-
 72
72
-
 73
73
-
 74
74
-
 75
75
-
 76
76
-
 77
77
-
 78
78
-
 79
79
-
 80
80
-
 81
81
-
 82
82
-
 83
83
-
 84
84
-
 85
85
-
 86
86
-
 87
87
-
 88
88
-
 89
89
-
 90
90
-
 91
91
-
 92
92
-
 93
93
-
 94
94
-
 95
95
-
 96
96
-
 97
97
-
 98
98
-
 99
99
-
 100
100
-
 101
101
-
 102
102
-
 103
103
-
 104
104
-
 105
105
-
 106
106
-
 107
107
-
 108
108
-
 109
109
-
 110
110
-
 111
111
-
 112
112
-
 113
113
-
 114
114
-
 115
115
-
 116
116
-
 117
117
-
 118
118
-
 119
119
-
 120
120
-
 121
121
-
 122
122
-
 123
123
-
 124
124
-
 125
125
-
 126
126
-
 127
127
-
 128
128
-
 129
129
-
 130
130
-
 131
131
-
 132
132
-
 133
133
-
 134
134
-
 135
135
-
 136
136
-
 137
137
-
 138
138
-
 139
139


Sony VPL-HW65 Manuale utente
- Categoria
- Proiettori
- Tipo
- Manuale utente
- Questo manuale è adatto anche per
in altre lingue
- English: Sony VPL-HW65 User manual
- français: Sony VPL-HW65 Manuel utilisateur
- español: Sony VPL-HW65 Manual de usuario
- Deutsch: Sony VPL-HW65 Benutzerhandbuch
Documenti correlati
-
Sony VPL-VW890ES Manuale del proprietario
-
Sony VPL-XW7000 Guida utente
-
Sony VPL-HW40ES Manuale utente
-
Sony VPL-SW620 specificazione
-
Sony VPL-HW55ES Manuale utente
-
-
Sony VPL-EX7 Manuale del proprietario
-
Sony VPL-EX120 Guida Rapida
-
Sony VPL-SW235 Manuale del proprietario
-
Sony VPL-EX235 specificazione