Denver MRD-51 Manuale utente
- Categoria
- Lettore CD
- Tipo
- Manuale utente
Questo manuale è adatto anche per


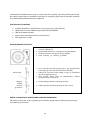
CLEANING THE CABINET
If the wooden cabinet becomes dusty please wipe it with a soft, non-abrasive dust cloth. Also
don’t use water or spray cleaners as this can damage the cabinet and the plastic/metal parts
of the unit.
TECHNICAL SPECIFICATION
Turntable speed: 33/45/78 RPM (Disc size 17.5/25/30cm)

CD can play CD/CD-R/CD-RW/MP3
USB can play MP3
Cassette: C60 & C90 (C120 cassette is not recommended)
Output power: 2x4W
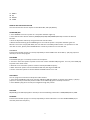
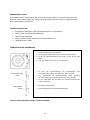
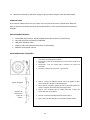
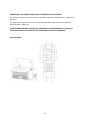
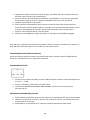
PREPARATION FOR USE
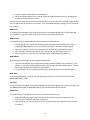
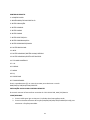
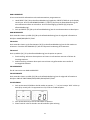
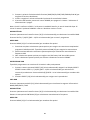
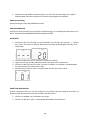
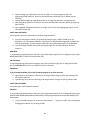
IMPORTANT: RAISING AN LOWERING THE TURNTABLE LID
To open the lid. Raise it as far as it can go until the lid support bracket locks in the position.
To close the lid. Pull forward the lid support bracket to release and then gently lower the lid.
TO AVOID DAMAGING THE CABINET OR THE LID, NEVER FORCE THE LID CLOSED. ALWAYS RAISE THE LID
TO RELEASE THE LID SUPPORT BRACKET.

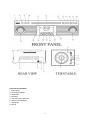
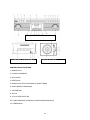
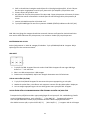
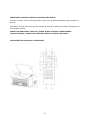
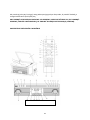
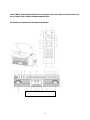
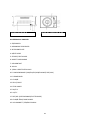
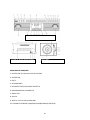
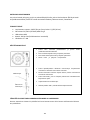
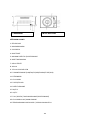
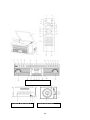
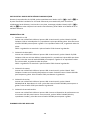
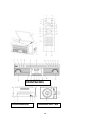
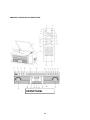
LOCATIIONS OF CONTROLS AND INDICATORS
2

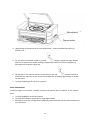
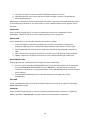
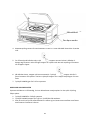
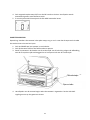
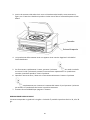
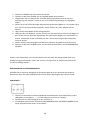
LOCATION OF CONTROLS
1. DUST COVER
2. COVER MECHANISM
3. TURNTABLE
4. SPEAKERS
5. TAPE STOP/EJECT BUTTON
6. CASSETTE MECHANISM
7. USB SOCKET
8. AUX-IN

9. 3.5mm HEADPHONE JACK
10. FUNCTION BUTTON (DAB/FM/CD/USB/PHONO/TAPE/AUX)
11. REMOTE SENSOR
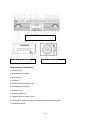
12. CD DOOR
13. PLAR/PAUSE
14. STOP BUTTON
15. DN/F-R
16. UP/F-F
17. REC/DEL (RECORD BUTTON/DELETE BUTTON)
18. CD DOOR OPEN/CLOSE BUTTON
19. VOLUME KNOB/ POWER STANBY
20. POWER LED
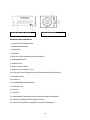
21. DAB MENU BUTTON
22. DAB INFO BUTTON
23. DAB SCAN BUTTON
24. DAB PRESET BUTTON
25. DAB ENTER
26. LCM DISPLAY
27. TUNING BOTTON/PLAY.MODE
28. FM/DAB ANTENNA
29. AC CORD
30. ON/OFF SWITCH
31. ADAPTOR
32. TURNTABLE PAUSE SWITCH
33. PICK-UP HOLDER
34. Auto-stop ON/OFF
35. 33/45/78 RPM SPEED SELECTOR
36. TONE ARM
37. TURNTABLE
38. LINE OUT
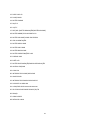
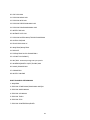
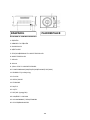
REMOTE CONTROL
1. POWER ON/OFF
2. CD DOOR OPEN/CLOSE BUTTON
3. RECORD BUTTON
4. DELETE BUTTON5. MODE BUTTON
6. STOP BUTTON
7. REPEAT BUTTON/VOL+
8. PROGRAM BUTTON/VOL-
9. PLAY/PAUSE BUTTON
10. DAB SCAN BUTTON
11. INFO
12. SKIP-BUTTON/FAST FORWARD BUTTON
13. SKIP+ BUTTON/REWIND BUTTON
14. NUMERIC KEYBOARD
15. +10
16. ENTER

17. MENU
18. EQ
19. PRESET
20. TIMER
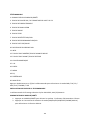
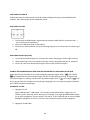
REMOTE BATTERY INSTALLATION
The infrared remote control requires 2 PCS UM-4 R03, AAA (3V) Battery
POWER ON/OFF
1. Press POWER to turn the system on. The power indicator lights up.
2. Press the function selector buttons (DAB/FM/CD/USB/TAPE/PHONO/AUX IN) to select the desired
function.
3. Start to adjust the volume by using the volume control button.
4. When finished listening press POWER again to turn off the system. The power indicator goes off.
Remark: The unit is comply with ERP2, the unit will turn to Standby mode if there is no operation on the
unit after 15 mins, please press POWER button 2 times if you want to re-start the unit.
DAB MODE
Press function button (10) (5 on remote) repeatedly to select DAB mode. Press SKIP+/- (16/15) (12/13 on
remote) to search the program
DAB MENU
Press MENU (21) (17 on remote) to access to the options.
1. Full Scan: select this option to perform a full scan of the available DAB programs. You can press SCAN (23)
to perform the same action.
2. Manual Tune: select this option to select manually the DAB frequency
3. DRC: select this option to choose between DRC low, DRC high and DRC off.
4. Prune: select this option to choose between PRUNE stations on or off.
DAB PRESET
You can program a maximum of 20 preset radio stations.
1. Press and hold PRESET (24) (19 on remote). PRESET STORE will appear on display. Press SKIP+/- (16/15)
(12/13 on remote) to select the preset number. Press ENTER (9) (16 on remote) to confirm.
2. Press PRESET (24) (19 on remote) to navigate through the presets.
DAB INFO
Repeatedly press INFO (22) (18 on remote) to see the following information: NAME/KBPS/DATE /TIME.
FM MODE
Press function button (10) (5 on remote) repeatedly to select FM mode. Turn the TUNING KNOB (27) to
manually select the frequency

FM MENU
Press MENU (21) (17 on remote) to access to the options.
1. Scan Setting: select this option to choose between scanning all stations or only the strong stations.
2. Audio Setting: select this option to choose between forcing mono audio or allowing stereo Sound.
FM PRESET
See DAB PRESET instructions.
FM INFO
Repeatedly press INFO (22) (18 on remote) to see the following informations: KIND OF PRO-
GRAM/FREQUENCE/AUDIO/DATE/TIME.
CD OPERATION
1. Press the CD/USB button to enter CD mode, the “---“ and ‘DISC’ icon will be shown on the screen. The unit
can play CD, CD-R and CD-RW.
2. Press the OP/CL button top open the CD drawer.
3. Place your disc in the CD drawer with the label side facing up.
4. Press the OP/CL button again to close the CD drawer. Playback will automatically start from the first track.
5. MP3 icon will be shown if MP3 file is detected in the disc.
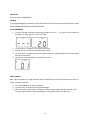
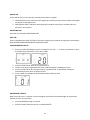
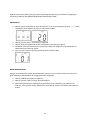
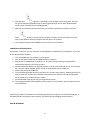
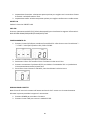
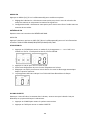
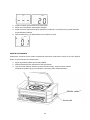
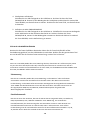
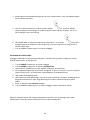
PLAYING CASSETTE
Note: Before inserting the tape in the player be sure that there is no excess slack in the cassette that could
jam the mechanism.
1. Press POWER to turn the system on.
2. Press TAPE button to enter TAPE mode.

3. Insert your cassette into the slot located on the right side of the cabinet, as shown in the illustration, with
the side you wish to play facing up and the open end on the right side.
4. Cassette playback begins as soon as the tape is inserted. Adjust the VOLUME control to the desired level.
5. To advance the tape rapidly, depress the button approximately half way. The tape will move forward
rapidly as long as the button is depressed. Normal playback will resume when the button is released
6. When the tape ends, the player stops automatically. Depress the button completely to remove the
tape from the player. You may depress button to stop playing the tape at any time.
7. Press POWER again to turn the system off.
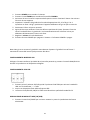
PLAYING VINYLS RECORDS
The system includes a full-size, 3 speed, belt-drive turntable. You can play 33, 45 and 78rpm records.
1. Press POWER to turn the system on.
2. Press the PHONO button to enter the PHONO mode.
3. Make sure you have removed the stylus cover from the stylus and have released the tone arm lock
that
4. secured the tone arm to the tone arm rest.
5. Set the turntable speed selector to appropriate speed 33, 45 or 78rpm. If you are playing 45 rpm
singles, place the 45rpm adapter on the centre spindle.
6. Place your record on the the centre spindle.
7. Raise the cue lever to lift the tone arm of its rest. Move the tone arm to the edge of the record. The
turntable starts automatically. Use the cue lever to gently lower the tone arm onto the record.
8. Adjust the volume control to the desired level.
9. Press POWER again to turn the system off. The POWER indicator goes OFF.

Note: Do not turn or stop the turntable manually. Moving or jarring the turntable without securing the
tone arm clamp could result in damage to the tone arm.
AUX IN OPERATION
Connect the audio system into the AUX IN jack on the rear panel, Press the PHONO/AUX IN button. Start
playing from the connected device.
USB OPERATION
1. Press the CD/USB button first and the FUNCTION button to enter USB mode. The ‘---‘ and USB icon will
be shown.
2. Insert a USB flash device into the USB socket.
3. PLAY/PAUSE, DN/UP and stop functions are the same as CD functions.
Note: You may press the FUNCTION on the panel or long press PLAY/PAUSE button on the remote control
for 2 seconds to change the playing mode between CD and USB.
PLAYING IN MP3 MODE (CD/USB)
1. Press PLAY/PAUSE button to start or pause playback selected track.
2. While playing the song, the song number and folder number of the selected track will be shown in
the display.
3. You can stop the playback at any time by pressing the STOP button.
TRACK SKIP AND HIGH SPEED TRACK SEARCH IN CD/USB MODE
During CD/USB playback press UP/F.F ( ) or DN/F.R ( ) button on the unit front panel or on the
remote control repeatedly to change track. To rapidly search forward or backwards within a track press
and hold UP/F.F (press UP/F.F ( ) or DN/F.R ( ) button. To skip 10 tracks back or forth then
press TRACK-10 or TRACK+10 on the remote control.
USB RECORDING
1. CD recording
Insert USB flash drive into the USB socket. Then press CD/USB button. Place CD into the CD drawer and
play the track which will be recorded. Press RECORD button twice to start recording. If all CD is played,
Then all tracks will be recorded. NOTE: Recording will fail if pressing STOP button during recording

2. MP3 DISC recording
Insert USB flash drive into the USB socket. Then press CD/USB button. Place CD with MP3 files into the CD
drawer and play the MP3 track which will be recorded. Press RECORD button twice to start recording. If all
MP3 files is played, Then all tracks will be recorded. NOTE: Recording will fail if pressing STOP button
during recording
3. Cassette recording
Insert USB flash drive into the USB socket. Then press TAPE button. Place the cassette into the socket. Play
cassette. Press RECORD button twice to start recording. Press STOP button to stop recording.
4. Vinyl recording
Insert USB flash drive into the USB socket. Then press PHONO/AUX IN button. Play the vinyl and press
RECORD button twice to start recording. Press STOP button to stop recording.
5. AUX IN recording
Insert USB flash drive into the USB socket. Connect the external audio device into the AUX jack on the rear
panel. Then press PHONO/AUX IN button and play audio and press RECORD button twice to start
recording.
ALLE RECHTE VORBEHALTEN, URHEBERRECHTE DENVER ELECTRONICS A/S
DELETE TRACKS FROM USB DISC
Press CD/USB button on the front panel or long press PLAY/PAUSE on remote control to select USB
mode. Select the track and press delete for 2 seconds and the track is deleted.
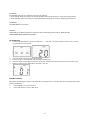
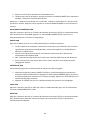
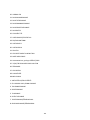
CLOCK
In standby mode, long press STOP button to display 24H flashing, then short press DN/F-R, UP/F-F key to
select 12/24H, then short press ST0P button to set MINUTE/HOUR/DAY/MONTH/YEAR.
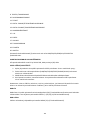
TIMER
Long press TIMER button under Standby mode to choose Alarm or Clock function, then short press the
remote control up and down buttons to enter the alarm debugging, press TIMER reset after complete the
alarm debugging, and then press the remote control up and down buttons to select DAB, FM , CD,TAPE,
USB, boot mode.
SLEEP
Setting the clock to CD,DAB, FM, TAPE, AUX, USB or PHONO mode first, in CD,DAB, FM, TAPE, AUX, USB,
PH0N0 mode, long press TIMER to display Sleep, Timer, 0FF and then press the up and down buttons on
the remote control to select the sleep time: 15, 30, 45, 60 , 90 min then automatic shutdown.

Electric and electronic equipment is marked with the crossed out trash can symbol, seen below. This symb
ol signifies that electric and electronic equipment should not be disposed of with other household waste,
but should be disposed of separately.
All cities have established collection points, where electric and electronic equipment can either be
submitted free of charge at recycling stations and other collection sites, or be collected from the
households. Additional information is available at the technical department of your city.Hereby, Inter Sales
A/S declares that the radio equipment type MRD-51 is in compliance with Directive 2014/53/EU. The full
text of the EU declaration of conformity is available at the following internet address:
Please enter: www.denver-electronics.com and then click the search ICON on top line of website.
Write model number: MRD-51
Now enter product page, and red directive is found under downloads/other downloads
Operating Frequency Range: FM:87.5-108MHz DAB:168-240MHz
Max Output Power: 2*2.5W
DENVER ELECTRONICS A/S
Omega 5A, Soeften
DK-8382 Hinnerup
Denmark
Facebook.com/denverelectronics
Electric and electronic equipment contains materials, components and substances that can be hazardous to
your health and the environment, if the waste material (discarded electric and electronic equipment) is not
handled correctly.


BRUKSANVISNING
MRD-51
WWW.DENVER-ELECTRONICS.COM
Läs denna användarmanual noggrant, innan du börjar använda produkten.

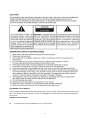
FÖ RSIKTIGHET
FÖ R ATT UNDVIKA BRAND ELLER STÖ TAR, ANVÄND INTE DENNA APPARAT MED EN
FÖ RLÄNGNINGSSLADD ELLER ANNAT UTTAG OM INTE BLADEN HELT KAN FÖ RAS IN FÖ R ATT
UNDVIKA EXPONERING. FÖ R ATT FÖ REBYGGA RISK FÖ R BRAND ELLER ELSTÖ TAR SKALL MAN INTE
UTSÄTTA DENNA ENHET FÖ R REGN ELLER FUKT.
Blixten med pilhuvudet i en
liksidig triangel är avsedd att
varna användaren för
närvaron av oisolerad ”farlig
spänning” innanför
produktens hölje som kan
vara tillräckligt stark för att
utgöra en risk för elektriska
stötar.
VARNING: FÖ R ATT MINSKA
RISKEN FÖ R ELEKTRISK
KORTSLUTNING SKA DU INTE TA
BORT LUCKAN (ELLER
BAKSIDAN). DET FINNS INGA
DELAR SOM KAN UNDERHÅLLAS
AV ANVÄNDAREN INVÄNDIGT.
Ö VERLÅT SERVICE ÅT BEHÖ RIG
SERVICEPERSONAL.
Utropstecknet i en liksidig
triangel är avsedd att varna
användaren för att det finns
viktiga instruktioner för drift
och underhåll (service) i den
dokumentation som medföljer
apparaten.
VIKTIGA SÄKERHETSANVISNINGAR
1. Läs, följ och förvara anvisningarna i denna manual.
2. Rengör endast med torr trasa.
3. Blockera inte några ventilationsöppningar. Installera i enlighet med tillverkarens anvisningar.
4. Installera inte nära värmekällor såsom radiatorer, värmeelement, kaminer eller annan
utrustning (inkl. förstärkare) som avger värme.
5. Skydda sladden från att gå på eller klämmas speciellt vid kontakten, eluttag och utgången från
apparaten.
6. Koppla ur denna apparat under åskväder eller när den inte används under långa perioder.
7. Ö verlämna all service till en kvalificerad tekniker. Service krävs när apparaten har skadats på
något sätt, om till exempel nätsladden eller kontakten är skadad, vätska har spillts eller
föremål har fallit in i apparaten, om apparaten har utsatts för regn eller fukt, inte fungerar
normalt, eller har tappats.
8. Enheten ska inte utsättas för droppande eller stänkande vatten och inga föremål med vätska
som vasar ska placeras på apparaten.
9. Ö verbelasta inte vägguttaget.
10. Använd kontroller och omkopplare så som beskrivs i manualen.
11. Förvara dina CD-skivor, kassetter i ett svalt utrymme för att undvika skador från värmekällor.
12. När du flyttar på enheten, måste du först koppla ur nätkabeln.
FÖ RSIKTIGHET
RISK FÖ R ELEKTRISK STÖ T
Ö PPNA INTE

RENGÖ RING AV SKÅPET
Om träskåpet samlar på sig damm, ska du torka det med en mjuk, icke-slipande dammtrasa. Du
ska heller inte använda vatten eller sprayrengöringsmedel, eftersom detta kan skada skåpet och
plast-/metalldelarna på enheten.
TEKNISK SPECIFIKATION
Skivspelarens hastighet: 33/45/78 RPM (Skivstorlek 17,5/25/30cm)
CD kan spela upp CD/CD-R/CD-RW/MP3
USB kan spela upp MP3
Kassett: C60 och C90 (C120 kassett rekommenderas inte)
Utgående ström: 2x4W
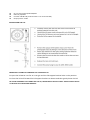
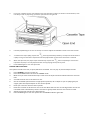
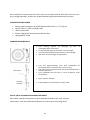
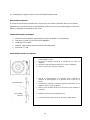
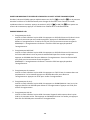
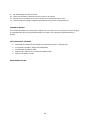
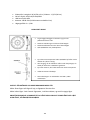
FÖ RBEREDELSE FÖ R ANVÄNDNING
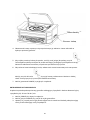
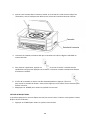
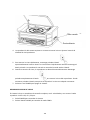
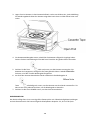
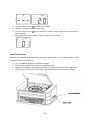
Ta försiktigt bort enheten från kartongen och plocka bort allt
förpackningsmaterial från enheten.
Linda upp nätsladden och sträck ut den till sin fulla längd.
Linda upp FM-antennkabeln och sträck ut den till sin fulla
längd.
Lyft upp locket till för att visa skivtallriken.
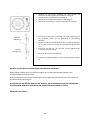
Ta bort det ogenomskinliga vita plastomslaget från
grammofonnålen genom att skjuta den i pilens riktning.
Var uppmärksam på grammofonnålen under spelning,
eftersom skada på grammofonnålen täcks inte av garantin.
Ta bort ståltråden som användes för att säkra pickuparmen
under transporten.
Lås upp för pickuparmen .
Anslut nätkontakten till AC 220V, 50HZ uttag.
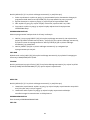
VIKTIGT: HÖ JA OCH SÄNKA LOCKET PÅ SKIVTALLRIKEN
Pickuparmens
låsarm
Grammofonnålens
skydd

När du vill öppna locket: Ta upp det så långt det går till dess att locket får stöd av vinkeljärnets lås i
läge.
När du vill stänga locket: Dra locket framåt för att vinkelstödet ska släppa och sedan sänk locket
försiktigt.
FÖ R ATT UNDVIKA ATT SKADA SKÅPET ELLER LOCKET, ANVÄND ALDRIG VÅLD FÖ R ATT STÄNGA
LOCKET. LYFT ALLTID UPP LOCKET FÖ R ATT LOCKETS VINKELSTÖ D SKA SLÄPPA.
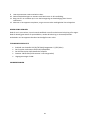
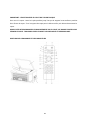
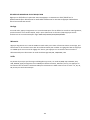
PLATSER FÖ R KONTROLLER OCH INDIKATORER
2

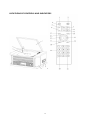
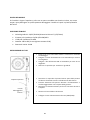
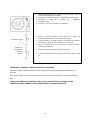
KONTROLLERNAS PLACERING
1. DAMMLUCKA
2. LUCKANS MEKANISM
3. SKIVTALLRIK
4. HÖ GTALARE
5. KNAPPPEN STOPP/UTMATNING AV KASSETTBAND
6. KASEETBANDETS MEKANISM
7. USB-KONTAKT
8. AUX-IN
9. 3,5 mm HÖ RLURSUTTAG
10. FUNKTIONSKNAPP (DAB/FM/CD/USB/PHONO/BAND/AUX)
11. FJÄRRSENSOR
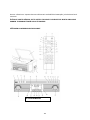
FRONTPANEL
SKIVTALLRIK
VISNING BAKIFRÅN

12. CD-LUCKA
13. SPELA/PAUSA
14. STOPP-KNAPP
15. DN/F-R
16. UP/F-F
17. INSPELN/RAD (KNAPPEN INSPELNING/KNAPPEN RADERA)
18. Ö PPNA/STÄNG-KNAPPEN FÖ R CD-LUCKA
19. VOLYMRATT/ STRÖ M I STANDBY-LÄGE
20. LYSDIODSTRÖ M
21. KNAPPEN DAB-MENY
22. KNAPPEN DAB-INFO
23. KNAPPEN DAB-SCAN
24. KNAPPEN DAB-PRESET
25. DAB ENTER
26. LCM-SKÄRM
27. INSTÄLLNINGSKNAPP/SPELLÄGE
28. FM/DAB-ANTENN
29. AC-KABEL
30. PÅ/AV-KNAPP
31. ADAPTER
32. PAUSKNAPP FÖ R SKIVTALLRIK
33. NÅLMIKROFONENS HÅLLARE
34. Autostopp PÅ/AV
35. VARVTALSVÄLJARE 33/45/78 RPM
36. TONARM
37. SKIVTALLRIK
38. LINJE UT
La pagina sta caricando ...
La pagina sta caricando ...
La pagina sta caricando ...
La pagina sta caricando ...
La pagina sta caricando ...
La pagina sta caricando ...
La pagina sta caricando ...
La pagina sta caricando ...
La pagina sta caricando ...
La pagina sta caricando ...
La pagina sta caricando ...
La pagina sta caricando ...
La pagina sta caricando ...
La pagina sta caricando ...
La pagina sta caricando ...
La pagina sta caricando ...
La pagina sta caricando ...
La pagina sta caricando ...
La pagina sta caricando ...
La pagina sta caricando ...
La pagina sta caricando ...
La pagina sta caricando ...
La pagina sta caricando ...
La pagina sta caricando ...
La pagina sta caricando ...
La pagina sta caricando ...
La pagina sta caricando ...
La pagina sta caricando ...
La pagina sta caricando ...
La pagina sta caricando ...
La pagina sta caricando ...
La pagina sta caricando ...
La pagina sta caricando ...
La pagina sta caricando ...
La pagina sta caricando ...
La pagina sta caricando ...
La pagina sta caricando ...
La pagina sta caricando ...
La pagina sta caricando ...
La pagina sta caricando ...
La pagina sta caricando ...
La pagina sta caricando ...
La pagina sta caricando ...
La pagina sta caricando ...
La pagina sta caricando ...
La pagina sta caricando ...
La pagina sta caricando ...
La pagina sta caricando ...
La pagina sta caricando ...
La pagina sta caricando ...
La pagina sta caricando ...
La pagina sta caricando ...
La pagina sta caricando ...
La pagina sta caricando ...
La pagina sta caricando ...
La pagina sta caricando ...
La pagina sta caricando ...
La pagina sta caricando ...
La pagina sta caricando ...
La pagina sta caricando ...
La pagina sta caricando ...
La pagina sta caricando ...
La pagina sta caricando ...
La pagina sta caricando ...
La pagina sta caricando ...
La pagina sta caricando ...
La pagina sta caricando ...
La pagina sta caricando ...
La pagina sta caricando ...
La pagina sta caricando ...
La pagina sta caricando ...
La pagina sta caricando ...
La pagina sta caricando ...
La pagina sta caricando ...
La pagina sta caricando ...
La pagina sta caricando ...
La pagina sta caricando ...
La pagina sta caricando ...
La pagina sta caricando ...
La pagina sta caricando ...
La pagina sta caricando ...
La pagina sta caricando ...
La pagina sta caricando ...
La pagina sta caricando ...
La pagina sta caricando ...
La pagina sta caricando ...
La pagina sta caricando ...
La pagina sta caricando ...
La pagina sta caricando ...
La pagina sta caricando ...
La pagina sta caricando ...
La pagina sta caricando ...
La pagina sta caricando ...
La pagina sta caricando ...
La pagina sta caricando ...
La pagina sta caricando ...
La pagina sta caricando ...
La pagina sta caricando ...
La pagina sta caricando ...
La pagina sta caricando ...
La pagina sta caricando ...
La pagina sta caricando ...
La pagina sta caricando ...
La pagina sta caricando ...
La pagina sta caricando ...
La pagina sta caricando ...
La pagina sta caricando ...
La pagina sta caricando ...
La pagina sta caricando ...
La pagina sta caricando ...
La pagina sta caricando ...
La pagina sta caricando ...
La pagina sta caricando ...
La pagina sta caricando ...
La pagina sta caricando ...
La pagina sta caricando ...
La pagina sta caricando ...
La pagina sta caricando ...
La pagina sta caricando ...
La pagina sta caricando ...
La pagina sta caricando ...
La pagina sta caricando ...
La pagina sta caricando ...
La pagina sta caricando ...
La pagina sta caricando ...
La pagina sta caricando ...
La pagina sta caricando ...
La pagina sta caricando ...
La pagina sta caricando ...
La pagina sta caricando ...
La pagina sta caricando ...
La pagina sta caricando ...
La pagina sta caricando ...
La pagina sta caricando ...
La pagina sta caricando ...
La pagina sta caricando ...
La pagina sta caricando ...
La pagina sta caricando ...
La pagina sta caricando ...
La pagina sta caricando ...
La pagina sta caricando ...
La pagina sta caricando ...
La pagina sta caricando ...
La pagina sta caricando ...
-
 1
1
-
 2
2
-
 3
3
-
 4
4
-
 5
5
-
 6
6
-
 7
7
-
 8
8
-
 9
9
-
 10
10
-
 11
11
-
 12
12
-
 13
13
-
 14
14
-
 15
15
-
 16
16
-
 17
17
-
 18
18
-
 19
19
-
 20
20
-
 21
21
-
 22
22
-
 23
23
-
 24
24
-
 25
25
-
 26
26
-
 27
27
-
 28
28
-
 29
29
-
 30
30
-
 31
31
-
 32
32
-
 33
33
-
 34
34
-
 35
35
-
 36
36
-
 37
37
-
 38
38
-
 39
39
-
 40
40
-
 41
41
-
 42
42
-
 43
43
-
 44
44
-
 45
45
-
 46
46
-
 47
47
-
 48
48
-
 49
49
-
 50
50
-
 51
51
-
 52
52
-
 53
53
-
 54
54
-
 55
55
-
 56
56
-
 57
57
-
 58
58
-
 59
59
-
 60
60
-
 61
61
-
 62
62
-
 63
63
-
 64
64
-
 65
65
-
 66
66
-
 67
67
-
 68
68
-
 69
69
-
 70
70
-
 71
71
-
 72
72
-
 73
73
-
 74
74
-
 75
75
-
 76
76
-
 77
77
-
 78
78
-
 79
79
-
 80
80
-
 81
81
-
 82
82
-
 83
83
-
 84
84
-
 85
85
-
 86
86
-
 87
87
-
 88
88
-
 89
89
-
 90
90
-
 91
91
-
 92
92
-
 93
93
-
 94
94
-
 95
95
-
 96
96
-
 97
97
-
 98
98
-
 99
99
-
 100
100
-
 101
101
-
 102
102
-
 103
103
-
 104
104
-
 105
105
-
 106
106
-
 107
107
-
 108
108
-
 109
109
-
 110
110
-
 111
111
-
 112
112
-
 113
113
-
 114
114
-
 115
115
-
 116
116
-
 117
117
-
 118
118
-
 119
119
-
 120
120
-
 121
121
-
 122
122
-
 123
123
-
 124
124
-
 125
125
-
 126
126
-
 127
127
-
 128
128
-
 129
129
-
 130
130
-
 131
131
-
 132
132
-
 133
133
-
 134
134
-
 135
135
-
 136
136
-
 137
137
-
 138
138
-
 139
139
-
 140
140
-
 141
141
-
 142
142
-
 143
143
-
 144
144
-
 145
145
-
 146
146
-
 147
147
-
 148
148
-
 149
149
-
 150
150
-
 151
151
-
 152
152
-
 153
153
-
 154
154
-
 155
155
-
 156
156
-
 157
157
-
 158
158
-
 159
159
-
 160
160
-
 161
161
-
 162
162
-
 163
163
-
 164
164


Denver MRD-51 Manuale utente
- Categoria
- Lettore CD
- Tipo
- Manuale utente
- Questo manuale è adatto anche per
in altre lingue
- English: Denver MRD-51 User manual
- français: Denver MRD-51 Manuel utilisateur
- español: Denver MRD-51 Manual de usuario
- Deutsch: Denver MRD-51 Benutzerhandbuch
- Nederlands: Denver MRD-51 Handleiding
- português: Denver MRD-51 Manual do usuário
- dansk: Denver MRD-51 Brugermanual
- polski: Denver MRD-51 Instrukcja obsługi
- svenska: Denver MRD-51 Användarmanual
- suomi: Denver MRD-51 Ohjekirja
Documenti correlati
-
Denver MRD-51 Manuale utente
-
-
Denver MCR-50MK3 Manuale utente
-
Denver MRD-166 Manuale utente
-
Denver TCU-206BLACK Manuale utente
-
Denver MC-5220BLACK Manuale utente
-
Denver MRD-165 Manuale utente
-
-
 Denver Electronics DAB-11 Manuale utente
-
Denver TCP-40 Manuale utente

Altri documenti
-
Auna Elton - Impianto stereo Manuale del proprietario
-
Roadstar HIF-1996D+BT Manuale utente
-
Soundmaster NR545DAB Manuale utente
-
Roadstar HIF-1993D+BT Manuale utente
-
Soundmaster NR560 Manuale utente
-
Roadstar HIF-1898D+BT Manuale utente
-
Soundmaster PL979 Manuale utente
-
TechniSat DIGITRADIO 1980 Manuale utente
-
ONKYO CS-265DAB Manuale utente
-
TEAC cr-h101dab Manuale del proprietario