Tyco ADEMD4B000TV Manuale utente
- Categoria
- Videoregistratori digitali (DVR)
- Tipo
- Manuale utente
Questo manuale è adatto anche per

ADEMD4B Series Net DVR
User Manual
Model: ADEMD4B000TV
ADEMD4B000TVS
V.1.0

Digital Video Recorder User Manual
Index
Chapter1 Product Introduction..................................................................................... 7
1.1 Summary.......................................................................................................................7
1.2 Features.........................................................................................................................7
Chapter2 Installation ................................................................................................. 10
2.1 Check DVR and It’s Accessories ................................................................................10
2.2 HDD Installation.........................................................................................................10
2.3 DVR Rear Panel..........................................................................................................12
2.4 External Alarm In/Out Connection .............................................................................13
Chapter3 Operational Instructions............................................................................. 14
3.1 DVR Front Panel.........................................................................................................14
3.2 Remote Controller.......................................................................................................16
3.3 OSD Menu Description...............................................................................................18
3.3.1 Main Menu Items ..........................................................................................18
3.3.2 Menu Operation ............................................................................................19
3.4 Character Input............................................................................................................21
Chapter4 Basic Operation Guide............................................................................... 22
4.1 Power on .....................................................................................................................22
4.2 Live Preview ...............................................................................................................22
4.3 Login...........................................................................................................................24
4.4 PTZ Control ................................................................................................................24
4.5 Manual Record............................................................................................................26
4.6 Playback......................................................................................................................27
4.7 Backup Recorded Files ...............................................................................................30
4.8 Turn off DVR..............................................................................................................31
4.9 Video spot output ........................................................................................................32
Chapter5 Advanced Operation Guide ....................................................................... 33
5.1 User Management .......................................................................................................34
5.1.1 Add User ........................................................................................................35
5.1.2 Delete User....................................................................................................36
5.1.3 Password Modification.................................................................................37
5.1.4 User Rights....................................................................................................38
5.2 Device ID....................................................................................................................40
5.3 Video Format and VGA Resolution ............................................................................40
5.4 Date and Time Setup...................................................................................................41
5.4.1 Date and Time Setting .................................................................................41
5.4.2 Date and Time Display Mode......................................................................42
5.4.3 Daylight Saving Time Setup........................................................................43
5.5 Camera Setting............................................................................................................43
5.5.1 Camera Title ..................................................................................................43
5.5.2 Video Parameters Setup .............................................................................45
5.6 Mask Area Setup .........................................................................................................45
5.7 View Tampering Alarm...............................................................................................47
5.7.1 Enable Tamper Alarm...................................................................................47
2

Digital Video Recorder User Manual
5.7.2 Select tampering area..................................................................................48
5.7.3 Alarm handling ..............................................................................................48
5.7.4 Temple Alarm schedule................................................................................49
5.8 Video Loss Alarm........................................................................................................50
5.9 Motion Detection Alarm .............................................................................................52
5.10 Live View Setup.........................................................................................................55
5.11 Recording Setup.........................................................................................................56
5.12 Alarm I/O Setup ..............................................................................................................60
5.13 Network Setup.................................................................................................................63
5.13.1 Network Basic Settings................................................................................64
5.13.2 Network Advanced Settings ........................................................................65
5.13.3 DHCP Function .............................................................................................65
5.13.4 PPPoE Function ...........................................................................................66
5.13.5 IP Server Solution for DHCP.......................................................................66
5.14 PTZ Setup ..................................................................................................................67
5.14.1 Typical PTZ Connection ..............................................................................67
5.14.2 PTZ Settings..................................................................................................68
5.14.3 PTZ Control ...................................................................................................70
5.14.4 Preset Setup..................................................................................................70
5.14.5 Sequence Setup ...........................................................................................71
5.14.6 Pattern Setup ...............................................................................................73
5.15 Exceptions Setup........................................................................................................74
Chapter6 Utilities ....................................................................................................... 75
6.1 Restore Parameters......................................................................................................75
6.2 Hard Disk Management ..............................................................................................77
6.3 Clear Alarm Out..........................................................................................................77
6.4 Reboot.........................................................................................................................77
6.5 Power Off....................................................................................................................77
6.6 View Log.....................................................................................................................78
6.7 System Information.....................................................................................................78
Chapter7 Firmware Upgrade ..................................................................................... 79
7.1 Upgrade from USB Flash............................................................................................79
7.2 Upgrade from FTP Server...........................................................................................79
7.2.1 FTP Server Setup.........................................................................................79
7.2.2 Use DVR FTP Upgrade Function...............................................................81
7.3 Use Client Software to Upgrade..................................................................................83
1 RS485 Connection ..........................................................................................................85
2 UTP Network Connection...............................................................................................85
3

Digital Video Recorder User Manual
Safety Precaution
Caution:
To reduce the risk of electric shock, do not remove cover, unless you are ready to install
hard disks, please refer to the section "Hard Disk Installation".
Only qualified service technician can perform the service.
Important Safeguards:
1. Read the instruction carefully before using the unit.
2. Keep this instruction in a safe place for future reference.
3. Do not use this apparatus near water.
4. Clean only with a dry cloth.
5. Do not block any ventilation openings. Install in accordance with the manufacturer's
instructions.
6. Do not install near any heat sources such as radiators, stoves, or other apparatus
(including amplifiers) that produce heat.
7. Do not defeat the safety purpose of the polarized or grounding plug. A polarized plug
has two blades with one wider than the other. A grounding-type plug has two blades
and a third grounding prong. The wider blade and the third prong are provided for
your safety. If the provided plug does not fit into the outlet, consult an electrician for
replacement of the obsolete outlet.
8. Protect the power cord from being walked on or pinched particularly at plugs,
convenience receptacles, and the point where they exit from the apparatus.
9. Only use attachments/accessories specified by the manufacturer.
10. Use only with the cart, stand, tripod, bracket, or table specified by the manufacturer,
or sold with the apparatus. When a cart is used, use caution when moving the
cart/apparatus combination to avoid injury from tip-over.
11. Unplug this unit during lightning storms or when unused for a long period of time.
12. Refer all servicing to qualified service personnel. Servicing is required when the
apparatus has been damaged in any way, such as power-supply cord or plug is
4

Digital Video Recorder User Manual
damaged, liquid has been spilled or objects have fallen into the apparatus, the
apparatus has been exposed to rain or moisture, does not operate normally, or has
been dropped.
13. Moving - Disconnect the power before moving the unit. The unit should be moved with
care. Excessive force or shock may result in damage to the unit and the hard disk
drives.
14. Power Sources - This unit should be operated only from the type of power source
indicated on the marking label. If you are not sure of the type of power supply you
plan to use, consult your appliance dealer or local power company.
15. Overloading - Do not overload outlets and extension cords as this can result in a risk
of fire or electric shock.
16. Object and Liquid Entry - Never push objects of any kind into this unit through
openings, as they may touch dangerous voltage points or short out parts that could
result in a fire or electric shock. Never spill liquid of any kind on the unit.
17. Replacement Parts - When replacement parts are required, be sure the service
technician has used replacement parts specified by the manufacturer or have the
same characteristics as the original parts. Unauthorized substitutions may result in
fire, electric shock, or other hazards.
18. Coax Grounding - If an outside cable system is connected to the unit, be sure the
cable system is grounded. U.S.A. models only--Section 810 of the National Electrical
Code, ANSI/NFPA No.70-1981, get information from professional electrician to proper
grounding of the mount and supporting structure, grounding of the coax to a
discharge unit, size of grounding conductors, location of discharge unit, connection to
grounding electrodes, and requirements for the grounding electrode.
19. To reduce the risk of fire or electric shock, this apparatus should not be exposed to
rain or moisture and objects filled with liquids, such as vases, should not be placed on
this apparatus.
20. Danger of explosion if battery is incorrectly replaced. Replace only with the same or
equivalent type. Dispose of the replaced battery in an environmentally friendly way.
5

Digital Video Recorder User Manual
Cleaning
You can clean the unit with a moist fluff-free cloth or leather cloth.
Warning
This device is intended for use in public areas only. Surreptitious recording of oral
communications may be prohibited by law.
Unpacking
Check the package for visible damage. If any item appears to have been damaged in
shipment, notify the shipping company. Unpack carefully. This is electronic equipment and
should be handled with care to prevent damage to the unit. Do not attempt to use the unit
if any component is damaged. If any item is missing, notify the dealer.
Please save the carton and all packing materials for future use. If the unit must be
returned, use the original packing materials.
Packaging contents
The package should contain the following items:
1. Digital Video Recorder 1 pcs
2. Accessories box 1 pcs
6

Digital Video Recorder User Manual
Product Introduction
Chapter1 Product Introduction
1.1 Summary
ADEMD series network digital video recorders utilize the latest IT technologies, e.g. H.264
video compression, large capacity HDD recording, TCP/IP etc. With embedded MCU and
DSP chip, it delivers digital video recording with extremely reliability in an economical
package. Firmware can be easily upgrade from local or remote site.
It can either work stand alone or be built into a large scaled video surveillance system. It is
an ideal solution for numerous applications, e.g. bank, telecommunication, transportation,
government infrastructures, resident areas, warehouses, hydraulic facilities etc.
1.2 Features
Compression
z Supports up to 4 channels video inputs (PAL/NTSC). Each channel is
independent, H.264 hardware compression and real time (PAL: 25 FPS, NTSC:
30FPS) display
z Supports both variable bit rate and variable frame rate
z Supports 1 channel audio input. Each channel use the same audio, OggVorbis
compression at 16Kbps bit rate
z Compressed video and audio are synchronized. You can select either mixed
stream or video stream only
z Supports CIF and QCIF resolution
z Supports multi-areas motion detection
z Supports WATER-MARK
7

Digital Video Recorder User Manual
Local processing
Record
z Supports multiple record modes, including real time, manual record, motion
detection, alarm inputs, Motion & Alarm in, motion or alarm in
z Supports 1 SATA HDD, up to 2TB/HDD.
z Supports FAT32 file system
z Supports HDD S.M.A.R.T technology
z Supports cycle or none cycle record
z Supports backup the recorded files and clips
z Supports variable storage medias: Flash, USB HDD, USB CD/DVD writer
Preview and playback
z Supports BNC analog monitor and VGA output(available on
ADEMD4B000TVS)
z Supports multiple preview modes (1/4)
z Supports area mask function
1
z Supports camera tamper alarm
z Supports 1-ch playback
z Supports multi-speed playback
z Supports playback by files or by time
z Local record status display
PTZ
z Supports majority of industrial PTZ protocols
z Supports preset, sequence and cruise control
2
Alarms
z Supports exceptional alarm, motion detection alarm, external alarm inputs, etc
Others
z Support IR remote control
z Supports multi-levels user management
1
For fixed camera only.
2
Not available on all SpeedDome cameras, refer to manufacturer’s user manual for details.
8

Digital Video Recorder User Manual
Network
z Supports TCP/IP
z Supports PPPoE for broad band dialup
z Supports DHCP
z Supports remote parameters setup via client software
z Support real-time preview via TCP, UDP, RTP, broadcast
z Alarm information can be sent to remote host
z Network control PTZ
z Network record the real time stream
z Network download and playback of recorded files in DVR
z Supports firmware remote upgrade
z Supports bi-directional voice talk or one-way voice broadcast
z Supports preview and configuration via Windows IE
z Supports event log
9

Digital Video Recorder User Manual
Installation
Chapter2 Installation
2.1 Check DVR and It’s Accessories
Upon receiving the device, check that all the items are included in your product package.
There is a list in the package. If any of the items is missing, please contact your dealer
immediately.
2.2 HDD Installation
Installation of the hard disks must be done by qualified personnel only. Unauthorized
installation of hard disks may result in permanent damage of the disk and the recorder.
Caution:
When working with electrostatic sensitive devices such as a hard disk or the DVR unit,
make sure you use a static-free workstation. Any electrostatic energy coming in contact
with the hard disk or DVR main board may damage it permanently.
1. Before installation of the HDD, switch the recorder off and unplug the power cable.
2. Place the recorder on a flat table, and make sure you take proper ESD precautions.
Wear an ESD bracelet at all times. A cross head screwdriver should be used to screw
and unscrew the various parts.
3. Open the metal top cover by removing the screws on the side and back of the cover.
4. Place the hard disks you wish to install on and fasten hard disk with 4 screws.
Connect each hard disk to the main board PCB using the provided cables. Make sure
that the cables does not blocking any airflow through the DVR.
5. Connect the power connector from the internal power supply to each hard disk. Make
sure that the cables does not blocking any airflow through the DVR.
6. Check all connections, and mount the metal cover of the DVR.
7. Switch on the DVR.
8. Press [MENU] key to enter into DVR main menu. Go to the "Utilities" menu and
10

Digital Video Recorder User Manual
choose "Hard disk" to format the hard disks, Check if all installed disks are detected
by the DVR, and if the capacity is OK. Choose "Format" and select "All" to format all
hard disks. When all disks are formatted, a confirmation message will be shown on
the screen. Check if all installed disks have the status "OK".
9. The installation of HDD is complete. The DVR unit is ready to use.
11

Digital Video Recorder User Manual
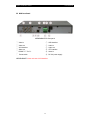
2.3 DVR Rear Panel
ADEMD4B000TVS Rear panel
① Video in USB interface⑦
② Video out Audio in⑧
③ VGA interface Audio out⑨
④ Alarm out UTP interface⑩
⑤ RS485 T+ T- R+ R-
⑪ Alarm in
Power switch⑥
⑫ DC12V power supply
ADEMD4B000TV does not have a VGA interface.
12

Digital Video Recorder User Manual
2.4 External Alarm In/Out Connection
Alarm inputs
Alarm input port (dry contact):
G (GND): Connect the GND of sensor.
1~4: Alarm input,
support normally open/normally close.
Alarm output:
1G: 1 relay output.
Alarm output connection
Connect with DC device
Connect with AC device
13

Digital Video Recorder User Manual
Operational Instructions
Chapter3 Operational Instructions
3.1 DVR Front Panel
Index Type Name Description
1 IR Sensor IR receiver for remote controller.
2 State
Lamps
Power
STATUS
Tx/Rx
Green = DVR is working;
Red = DVR is powered off;
Green = Numeric keys is enabled;
Twinkle = Data transmitting;
Numeric
Keys
Input number, lower case, upper case character and
symbols.
3
Function
Keys
MENU
ESC
EDIT
PLAY
REC
PTZ
PREV
A
Switch of preview mode and menu mode;
Cancel and back to parent menu.
1. Enter edit mode
2. Edit check box
3. Select clips while playback
Local playback;
Manual record;
Enter into PTZ control mode;
1. Multi screen preview switch;
2. Switch menu mode into preview;
1. Switch between text input method (number,
lower case, upper case and symbol);
14

Digital Video Recorder User Manual
SHIFT
2. In preview mode, display or hide the channel
status bar.
Switch between numeric keys and function keys
4 Control
Keys
Direction
Keys
ENTER
Composed of 【Ç】,【È】,【Å】 and 【Æ】.
1. Menu mode, use【Å】/【Æ】 select,【Ç】/【È】
to edit;
2. PTZ direction control;
3. Playback speed control.
1. Confirm in menu mode.
2. Edit check box
3. Pause while playback
15

Digital Video Recorder User Manual
3.2 Remote Controller
Index Name Description
1 POWER Turn On/Off device
2 DEV Enable/Disable remote controller
3 Numeric Keys
Select video channel, entry
password
4 EDIT Same as [EDIT] key on front panel
5 A Switching character input method
6 REC Same as [REC] key on front panel
7 PLAY
Same as [PLAY] key on front
panel
8 INFO Reserved
9 VOIP Reserved
10 MENU
Same as [MENU] key on front
panel.
11 PREV Switch preview mode.
12
Direction Keys
ENTER
Same as direction keys on front
panel
13 PTZ Same [PTZ] key on front panel
16

Digital Video Recorder User Manual
14 ESC Same as [ESC] key of front panel
15 Reserved Reserved for future function
16 F1 Reserved for future function
17 Lens control
IRIS, FOCUS ZOOM for lens
control
18 F2 Reserved for future function
Loading the batteries into the remote controller
1. Remove the battery cover.
2. Insert the battery. Please make sure that the polarities (+ and -) are correctly
positioned.
3. Replace the battery cover.
Start to use remote controller
Press [DEV] key, input the DVR device ID (default is “88”, can be changed in “Display”
menu) and then press [ENTER] key.
Stop using remote controller
Press [DEV] key again, the remote controller is disconnected from the DVR. Please note
there is no audible warning given by this unit. You may switch the DVR ID to “255”, thus
the remote controller will be always connected, you don’t have to establish the connect
between the RC and DVR after rebooting the unit.
Switch the DVR off
When IR controller status is on, press [POWER] key for several seconds, the DVR will be
powered off.
If the remote controller is not work properly
z Check batteries polarities.
z Check the batteries capacity.
z Check whether IR sensor is covered.
z Check whether the remote controller has been linked to the DVR.
Please change another remote controller to try again. If the problem still exists,
please contact your dealer for repair or replacement.
17

Digital Video Recorder User Manual
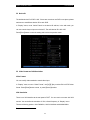
3.3 OSD Menu Description
3.3.1 Main Menu Items
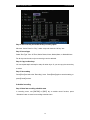
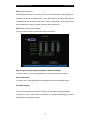
Menu Name Function Menu Name Function
Display
Language
Device ID
Enable/Disable password
Screen saver
Output video format
Brightness
Menu transparency
VGA resolution
Date and Time
Preview
Camera
Camera name and position
Color
OSD Display mode, position
and OSD format setup
Motion detection
Advanced settings
Recording
Overwrite/Stop recording
Stream type
Resolution
Frame rate
Bit rate
Record schedule
PreRecord time
PostRecord time
Network
DVR IP address
DNS IP
Multicast IP address
Remote host IP and port
NAS IP and name
PPPoE setup
Alarms
Alarm input type (Normal
open/ Normal close)
Alarm response and PTZ
linkage
Alarm output and schedule
Exception setup
PTZ
PTZ parameters
Preset
Sequence
Cruise
User
Add or delete user
Password
User rights
User MAC address
User rights on channels
Utilities
Restore factory parameters
Upgrade firmware
HDD management
Stop alarm output
Reboot
Power off
View log
System information
18

Digital Video Recorder User Manual
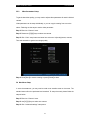
3.3.2 Menu Operation
How to enter into menu mode
z Press [MENU] key to enter into DVR main menu
z Press [PLAY] key to enter into playback menu
z Press [REC] key to enter into manual record menu
z Press [PTZ] key to enter into PTZ control mode
Notes: You may be required to input user name and password. The default user name is
“admin” and password is “12345”.
1
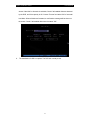
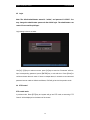
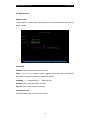
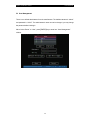
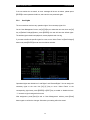
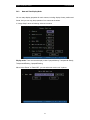
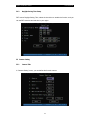
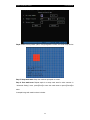
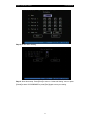
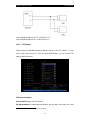
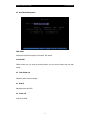
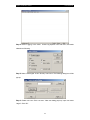
Main Menu Description
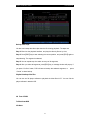
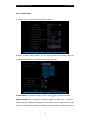
The main menu interface is shown in below:
There is one small rectangle frame named “Active Frame”. It can be moved from one item
to another by using direction keys ([↑] [↓] [Æ] [Å]). When the “Active Frame” is located on
one item and highlight it, you can press [ENTER] key to enter into the sub menu. For
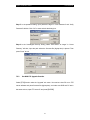
example, move the “Active Frame” to “Camera”, press [ENTER] to enter into the
secondary menu as below:
1
If the “Enable Password” feature has been checked.
19

Digital Video Recorder User Manual
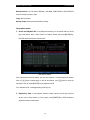
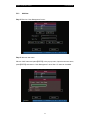
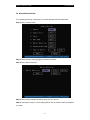
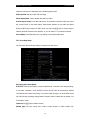
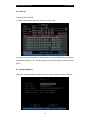
Each menu contains different kinds of items:
a) Check Box: Provide 2 options, “9” means enabled and “×” means disabled. You
can use [ENTER] or [EDIT] key to check/uncheck the box.
b) List Box: Provide more than 2 options. However, only one of them can be
selected. You can press [ENTER] or [EDIT] to enter into edit mode, then use [↑]
and [↓] to select one option.
c) Edit Box: The edit box is used to input characters. Press [EDIT]key to enter into
edit mode, you can input characters as following:
Press [A] key on the remote controller to select input method: number,
upper case, lower case or symbols;
Use [Æ] and [Å] keys to move cursor;
Use [EDIT] key to delete the previous character;
Press [ENTER] or [ESC] to exit edit.
d) Button: Execute a special function or enter into next sub-menu. For example,
press “Policy” button to enter into sub-menu. Press [Done] to save parameters
and return to parent menu. Press [Cancel] button to cancel and return to parent
menu.
How to exit menu
Press [ESC] key to exit menu and return to preview mode.
20
La pagina si sta caricando...
La pagina si sta caricando...
La pagina si sta caricando...
La pagina si sta caricando...
La pagina si sta caricando...
La pagina si sta caricando...
La pagina si sta caricando...
La pagina si sta caricando...
La pagina si sta caricando...
La pagina si sta caricando...
La pagina si sta caricando...
La pagina si sta caricando...
La pagina si sta caricando...
La pagina si sta caricando...
La pagina si sta caricando...
La pagina si sta caricando...
La pagina si sta caricando...
La pagina si sta caricando...
La pagina si sta caricando...
La pagina si sta caricando...
La pagina si sta caricando...
La pagina si sta caricando...
La pagina si sta caricando...
La pagina si sta caricando...
La pagina si sta caricando...
La pagina si sta caricando...
La pagina si sta caricando...
La pagina si sta caricando...
La pagina si sta caricando...
La pagina si sta caricando...
La pagina si sta caricando...
La pagina si sta caricando...
La pagina si sta caricando...
La pagina si sta caricando...
La pagina si sta caricando...
La pagina si sta caricando...
La pagina si sta caricando...
La pagina si sta caricando...
La pagina si sta caricando...
La pagina si sta caricando...
La pagina si sta caricando...
La pagina si sta caricando...
La pagina si sta caricando...
La pagina si sta caricando...
La pagina si sta caricando...
La pagina si sta caricando...
La pagina si sta caricando...
La pagina si sta caricando...
La pagina si sta caricando...
La pagina si sta caricando...
La pagina si sta caricando...
La pagina si sta caricando...
La pagina si sta caricando...
La pagina si sta caricando...
La pagina si sta caricando...
La pagina si sta caricando...
La pagina si sta caricando...
La pagina si sta caricando...
La pagina si sta caricando...
La pagina si sta caricando...
La pagina si sta caricando...
La pagina si sta caricando...
La pagina si sta caricando...
La pagina si sta caricando...
La pagina si sta caricando...
La pagina si sta caricando...
La pagina si sta caricando...
La pagina si sta caricando...
La pagina si sta caricando...
La pagina si sta caricando...
La pagina si sta caricando...
-
 1
1
-
 2
2
-
 3
3
-
 4
4
-
 5
5
-
 6
6
-
 7
7
-
 8
8
-
 9
9
-
 10
10
-
 11
11
-
 12
12
-
 13
13
-
 14
14
-
 15
15
-
 16
16
-
 17
17
-
 18
18
-
 19
19
-
 20
20
-
 21
21
-
 22
22
-
 23
23
-
 24
24
-
 25
25
-
 26
26
-
 27
27
-
 28
28
-
 29
29
-
 30
30
-
 31
31
-
 32
32
-
 33
33
-
 34
34
-
 35
35
-
 36
36
-
 37
37
-
 38
38
-
 39
39
-
 40
40
-
 41
41
-
 42
42
-
 43
43
-
 44
44
-
 45
45
-
 46
46
-
 47
47
-
 48
48
-
 49
49
-
 50
50
-
 51
51
-
 52
52
-
 53
53
-
 54
54
-
 55
55
-
 56
56
-
 57
57
-
 58
58
-
 59
59
-
 60
60
-
 61
61
-
 62
62
-
 63
63
-
 64
64
-
 65
65
-
 66
66
-
 67
67
-
 68
68
-
 69
69
-
 70
70
-
 71
71
-
 72
72
-
 73
73
-
 74
74
-
 75
75
-
 76
76
-
 77
77
-
 78
78
-
 79
79
-
 80
80
-
 81
81
-
 82
82
-
 83
83
-
 84
84
-
 85
85
-
 86
86
-
 87
87
-
 88
88
-
 89
89
-
 90
90
-
 91
91


Tyco ADEMD4B000TV Manuale utente
- Categoria
- Videoregistratori digitali (DVR)
- Tipo
- Manuale utente
- Questo manuale è adatto anche per
in altre lingue
- English: Tyco ADEMD4B000TV User manual
Documenti correlati
Altri documenti
-
Elvox 46340.F08 Manuale utente
-
Elvox 46840.D08 Manuale utente
-
Elvox 46540.F04 Istruzioni per l'uso
-
 MPEG LA 16CH Manuale utente
-
Atlantis NetDVR V400 Manuale utente
-
 IVS System AVC793D Guida d'installazione
-
Vimar 46916.001 Manuale utente
-
König SEC-DVRMON20 Manuale utente
-
Trendnet RB-TV-DVR104K Guida utente
-
Comelit AHDVR160 Series Quick Manual

