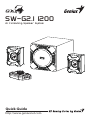
Genius SW-G2.I I200 2.1 Channel 45 Watts RMS Gaming Woofer Speaker System Guida utente
- Categoria
- Altoparlanti
- Tipo
- Guida utente

Quick Guide
http://www.geniusnet.com
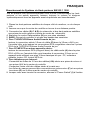
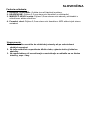
SW-G2.I I200
2.I CH Gaming Speaker System
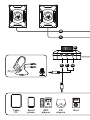
AUX MIC

CD
players
MP3
players
+
DIGITAL MP3 PLAYER
iPod
iPod
MENU
Smart
phone
Table
PC
E F G
D
B
C
AUX MIC
SPEAKER OUTPUT
AUX IN
~100-240
50/60Hz
AC IN OFF
ON
HI
TV/DVD/VCD
Home Audio
Desktops
Notebook
Gaming
Console
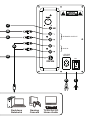
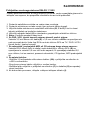
D
B
J
C
A

CD
players
MP3
players
+
DIGITAL MP3 PLAYER
iPod
iPod
MENU
Smart
phone
Table
PC
E F G
D
B
C
AUX MIC
SPEAKER OUTPUT
AUX IN
~100-240
50/60Hz
AC IN OFF
ON
HI
TV/DVD/VCD
Home Audio
Desktops
Notebook
Gaming
Console
D
B
J
C
A

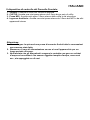
ENGLISH
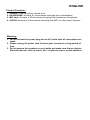
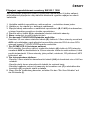
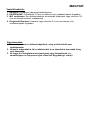
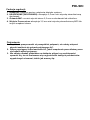
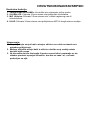
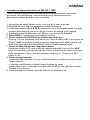
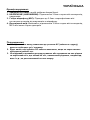
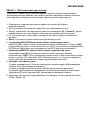
1. Place the satellite speakers next to the monitor, one on either side.
2. Place the controller within reaching distance.
3. Plug the subwoofer and satellite speaker cables (B, C & D) into the subwoofer,
left and right speaker output jacks.
4. Plug the AC power cord (H) into a standard household electrical outlet.
5. Bass: Controls speaker’s bass level
6. For TV/DVD/VCD/Home Audio/Game console:
Insert the 3.5mm stereo plug cable (E) into the 3.5mm socket “AUX” on the
controller and then connect the red/white RCA plug to the two RCA sockets of
TV/DVD/VCD/Home Audio/Game consoles.
7. For PC/MP3/CD or other stereo devices:
Insert the RCA plugs (white and red) of the audio cable (A) into the RCA socket
(A) on the subwoofer and insert the 3.5mm plug to the audio devices that use a
standard 3.5mm socket, such as desktops, notebooks, CD players, MP3 player
etc.
8. For Internet phone:
-Plug the 3.5mm plugs of the stereo cables (J/A) to the Mic and AUX jacks on the
subwoofer.
-Plug the other side of the stereo cables into the sound card.
-The plugs of the headset can be plugged into the Mic (F) and earphone (G)
jacks on the front of the controller.
9. When you finish the connection, turn on the “Power Switch” (I) on the back.
Connecting the SW-G2.1 1200 Speakers
To prevent malfunction and/or damage to speakers or other devices, always turn
down the volume, and turn off the power on all devices before making any
connections.

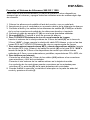
ENGLISH
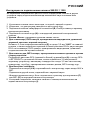
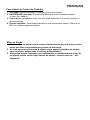
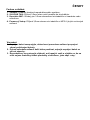
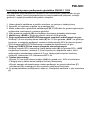
Control Function:
1. Volume: Controls system volume level
2. HEADPHONE: Accepts a 3.5mm stereo mini-plug from a headphone
3. MIC Jack: Accepts a 3.5mm stereo mini-plug from headset or microphone
4. AUX-IN: Accepts a 3.5mm stereo mini-plug from MP3 or other stereo devices
Warning:
1. Do not connect the power plug into an AC outlet until all connections are
made.
2. Please unplug AC power cord if device goes unused for a long period of
time.
3. Do not expose the speakers to any liquids and make sure that no objects
filled with liquids, such as vases, etc., are placed near or on the speakers.

РУССКИЙ
1. Установите колонки около монитора, по одной с каждой стороны.
2. Убедитесь, что контроллер находится в доступной зоне.
3. Подключите кабели сабвуфера и сателлитов (B, C и D) к левому и правому
выходным разъемам.
4. Подключите сетевой шнур (H) к стандартной домашней электрической
розетке.
5. Кнопка «Bass»: управление уровнем низких частот.
6. Для телевизора, DVD-плеера, проигрывателя видеодисков, домашней
звуковой системы, игровой консоли:
Вставьте 3,5-мм стереоразъем кабеля (E) в гнездо 3,5 мм “AUX” на главной
колонке, а затем подключите красный и белый разъемы RCA к двум гнездам
RCA на телевизоре, DVD-плеере, проигрывателе видеодисков, домашней
стереосистеме или игровой консоли.
7. Для компьютера, MP3-плеера, проигрывателя компакт-дисков и прочих
стереоустройств:
Подключите разъемы RCA (красный и белый) аудиокабеля (A) к гнезду RCA
«LEFT/RIGHT» на главной колонке, затем подключите 3,5-мм разъем к
звуковому устройству, имеющему стандартное гнездо 3,5 мм: настольному
компьютеру, ноутбуку, проигрывателю компакт-дисков, MP3-плееру и др.
8. Для Интернет-телефона:
-Подключите штекера (J/A) стереокабелей к контроллеру через входы AUX и
MIC.
-Подключите другой конец стереокабеля к звуковой карте.
-Штекера наушников могут быть подключены к разъему для наушников (F)
или MIC (G) на передней панели контроллера.
9. Установив соединение, включите питание с помощью выключателя на
задней панели контроллера (I).
Инструкции по подключению колонок SW-G2.1 1200
Во избежание неправильной работы и/или повреждения колонки и других
устройств перед подключением всегда выключайте звук и питание всех
устройств.

РУССКИЙ
Управление
1. Кнопка «Volume»: управление уровнем звука системы.
2. HEADPHONE: предназначено для 3,5-мм министереоразъема наушников.
3. Гнездо микрофона (MIC): Предназначено для мини-штекера (3,5мм)
наушников или микрофона.
4. Дополнительный вход: для 3,5-мм министереоразъема MP3-
проигрывателей и других стереоустройств.
Внимание!
1. Подключайте шнур питания к выходу питания переменного только
после установки всех соединений.
2. Если устройство не будет использоваться в течение долгого
времени, выдерните шнур питания из розетки.
3. Защищайте колонки от капель и брызг воды. Не ставьте на них
наполненные водой предметы (например, вазы).

DEUTSCH
1. Stellen Sie die Satellitenlautsprecher neben den Monitor, einer auf jeder Seite,
auf.
2. Stellen Sie sicher, dass der Controller innerhalb der Reichweite steht.
3. Schließen Sie die Kabel des Subwoofer und der Satellitenlautsprecher (B, C und
D) an die entsprechenden Ausgangssteckdosen für Subwoofer, linker und
rechter Lautsprecher.
4. Stecken Sie das Netzkabel (H) in eine normale Steckdose.
5. Bass: Zur Regelung des Basspegels der Lautsprecher.
6. Für TV/DVD/VCD/Home Audio/Spielekonsole:
Stecken Sie den 3,5 mm Stereostecker des Kabels (E) in die 3,5 mm Buchse
“AUX” am Host-controllers und verbinden Sie dann die roten & weißen Cinch-
Stecker mit den zwei Cinch-Buchsen von TV/DVD/VCD/Home Audio/
Spielekonsole.
7. Für PC/MP3/CD oder andere Stereogeräte:
Stecken Sie die Cinch-Stecker (rot und weiß) des Audiokabels (A) in die Cinch-
Buchse “AUX” am Host-controllers und stecken Sie den 3,5 mm- Stecker in die
Standard-3,5 mm-Buchse der Audiogeräte, wie Desktop-PC, Notebook, CD-
Player, MP3-Player usw.
8. Für Internetphone:
-Stecken Sie den 3,5 mm Stecker des Stereokabels in die MIC- und AUX-
Anschlüsse des Controllers.
-Stecken Sie das andere Ende des Stereokabels (J/A) in die Soundkarte.
-Die Stecker des Kopfhörers können Sie an den Mikrofonanschluss (F) und den
Kopfhöhreranschluss (G) vorne am Gehäuse des Controllers anschließen.
9. Wenn Sie die Verbindung hergestellt haben, schalten Sie den „Netzschalter“ (I)
auf der Rückseite ein.
Anleitung zum Anschließen der SW-G2.1 1200-Lautsprecher
Um Fehlfunktionen und/oder Schäden am Lautsprecher oder anderen Geräten zu
vermeiden, immer die Lautstärke herunterregeln und alle Geräte ausschalten,
bevor Sie irgendwelche Anschlüsse vornehmen.

DEUTSCH
Reglerfunktion:
1. Lautstärke: Zur Lautstärkeregelung des Systems.
2. HEADPHONE: Für einen 3,5-mm-Stereo-Ministecker von Kopfhörern.
3. Mikrofon-Anschluss: Geeignet für 3,5 mm Stereo-Ministecker von Kopfhörern
oder Mikrofonen.
4. Auxiliary - Eingang: Für einen 3,5-mm-Stereo-Ministecker von MP3-Playern
und anderen Stereogeräten.
Warnung:
1. Stecken Sie den Stecker erst dann in die Steckdose, wenn alle
Verbindungen hergestellt sind.
2. Bitte entfernen Sie das Stromkabel, wenn Sie das Gerät über einen
längeren Zeitraum nicht verwenden.
3. Die Lautsprecher sollten keinesfalls dort aufgestellt werden, wo
Flüssigkeit herunter tropfen oder die Lautsprecher bespritzen könnte.
Stellen Sie keine mit Flüssigkeit gefüllten Behälter, wie Vasen usw. darauf
ab.

FRANÇAIS
1. Placez les haut-parleurs satellites de chaque côté du moniteur, un de chaque
côté.
2. Assurez-vous que la centre de contrôle se trouve à une distance proche.
3. Connectez les câbles (B, C & D) du subwoofer et des haut-parleurs satellites
aux prises de sortie gauche et droite du centre de subwoofer.
4. Branchez le cordon d’alimentation (H) sur une prise standard.
5. BASS: Permet de contrôler le niveau des basses des enceintes.
6. Pour TV/DVD/VCD/Home Audio/Console de jeu:
Insérez le connecteur stéréo 3,5mm du câble (E) dans la 3,5mm «AUX» sur
l’enceinte hôte, puis insérez les connecteurs RCA rouge/blanc dans les 2 prises
RCA de la TV/DVD/VCD/Home Audio/Console de jeu.
7. Pour PC/MP3/CD ou autres appareils stéréo:
Insérez les connecteurs RCA (rouge et blanc) du câble audio (A) dans la prise
RCA «AUX» sur l’enceinte hôte, puis branchez le connecteur 3,5mm sur un
appareil audio utilisant une prise 3,5mm classique tel que : PC, ordinateur
portable, lecteur CD, lecteur MP3 etc.
8. Pour téléphoner par Internet:
-Connectez les fiches de 3.5 mm des câbles (J/A) stéréo aux prises du micro et
aux prises AUX de la centre de contrôle.
-Connectez l'autre côté des câbles steréo à la carte son.
-Les fiches du casque peuvent être connectées aux prises micro (F) et aux prises
écouteurs (G) sur la face avant du centre de contrôle.
9. Lorsque vous avez terminé la connexion, allumez le "Power Switch" (I) à l'arrière.
Branchement du Système de Haut-parleurs SW-G2.1 1200
Afin de prévenir tout dysfonctionnement et/ou d’éviter d’endommager les haut-
parleurs et les autres appareils, baissez toujours le volume et éteignez
systématiquement tous les appareils avant de procéder aux branchements.

FRANÇAIS
Face Avant du Centre de Contrôle
1. VOLUME: Permet d’ajuster le volume sonore du système.
2. HEADPHONE (casque): Permet de brancher le mini connecteur stéréo
3,5mm d’un casque
3. Prise micro: compatible avec une mini fiche stéréo de 3.5 mm du casque ou
du microphone.
4. Entrée auxiliaire: Permet de brancher le mini connecteur stéréo 3.5mm d’un
MP3 ou d’autres appareils stéréo
Mise en Garde
1. Ne branchez en aucun cas le cordon d’alimentation sur une prise secteur
avant que tous les branchements aient été effectués.
2. Si vous pensez ne pas avoir à utiliser votre appareil pendant un certain
laps de temps, débranchez le cordon d’alimentation.
3. N’exposez jamais l’appareil à des infiltrations ou éclaboussures d’eau et
ne placez jamais aucun objet rempli de liquide - tel que vase etc. - sur
l’appareil.

ITALIANO
1. Metti gli speaker satelliti accanto al monitor, una da ogni parte.
2. Assicurati che il dispositivo di controllo sia a portata.
3. Connetti il subwoofer e i cavi degli speaker satelliti (B, C & D) nelle prese output
sinistra e destra degli speaker sul subwoofer del dispositivo.
4. Inserisci il cavo elettrico AC (H) nella presa elettrica standard della casa.
5. Bass: Controlla il livello dei bassi.
6. Per TV/DVD/VCD/Home Audio/Game console:
Inserire l’attacco stereo 3.5mm del cavo (E) dentro la presa 3.5mm “AUX” dell
controllore e poi collegare l’attacco RCA rosso/bianco dentro le due prese RCA
delle TV/DVD/VCD/Home Audio/Game console
7. Per PC/MP3/CD o alter apparecchiature stereo:
Inserire gli attacchi RCA (rosso e bianco) del cavo audio (A) dentro la presa RCA
“AUX” dell’ controllore ed inserire la presa 3.5mm nelle apparecchiature audio
che utilizzano una presa standard 3.5mm, come per esempio un desktop,
portatile, lettore CD, lettore MP3, ecc.
8. Per telefono Internet:
-Inserisci le spine 3.5mm dei cavi stereo nelle (J/A) prese mic e AUX sul
dispositivo di controllo.
-Inserisci l’altra parte dei cavi stereo nella scheda audio.
-Le spine delle cuffie possono essere inserite nelle prese mic (F) e earphone (G)
sulla parte anteriore del dispositivo di controllo.
9. Appena ultimate la connessione, accendere l’interruttore “Power” che si trova sul
retro (I).
Connettere il Sistema Speaker SW-G2.1 1200
Onde evitare il malfunzionamento e/o il danno all’altoparlante o ad altri apparecchi,
abbassare sempre il volume, e spegnere tutti gli apparecchi prima di effettuare
qualsiasi connessione.

ITALIANO
Il dispositivo di controllo del Pannello Frontale:
1. Volume: Controlla il livello del volume di sistema.
2. CUFFIE: Accetta una mini-presa stereo da 3.5mm da un paio di cuffie
3. Presa MIC: Accetta mini-spine 3.5mm stereo dalle cuffie e dal microfono
4. Ingresso Ausiliario: Accetta una mini-presa stereo da 3.5mm dal MP3 o da altri
apparecchi stereo
Attenzione:
1. Non collegare la spina ad una presa di corrente finché tutte le connessioni
non saranno state fatte.
2. Rimuovere il cavo di alimentazione se non si usa l'apparecchio per un
lungo periodo di tempo.
3. Non lasciate che gli altoparlanti vengano in contatto con gocce o schizzi
d'acqua ed accertatevi che nessun oggetto riempito d'acqua, come vasi
ecc., sia appoggiato su di essi.

ESPAÑOL
1. Colocar los altavoces de satélite al lado del monitor, uno en cada lado.
2. Asegúrese de que el controlador se encuentre dentro de la distancia de alcance.
3. Conectar el bafle y los cables de los altavoces de satélite (B, C & D) en el bafle
del y en los conectores de salida de los altavoces derecho e izquierdo.
4. Conecte el cable de energía AC (H) en una toma doméstica estándar.
5. Graves«BASS»: Controla el nivel de graves del altavoz.
6. Para TV/DVD/VCD/sistema de cine en casa/consola de juegos:
Inserte el extremo de la clavija estéreo de 3.5mm del cable (E) en la toma de
3.5mm “AUX” y luego conecte la clavija del cable RCA blanco y rojo en las dos
tomas RCA del TV/DVD/VCD/sistema de cine en casa/consola de juegos
7. Para ordenadores/reproductores MP3 y demás dispositivos estéreo: Inserte
las clavijas RCA (rojo y blanco) del cable de sonido (A) en la toma RCA “AUX”e
inserte la clavija de 3.5mm a los dispositivos de sonido que utilicen tomas
estándar de 3.5mm, como ordenadores, portátiles, reproductores CD o MP3, etc.
8. Para teléfono por Internet:
-Conecte los enchufes de 3.5mm de los cables (J/A) estéreo a los conectores
para micrófono y AUX del controlador.
-Conecte el otro extremo de los cables estéreo en la tarjeta de sonido.
-Los enchufes de los auriculares pueden conectarse en las entradas para
micrófono (F) y auricular (G) de la parte delantera del controlador.
9. Cuando finalice la conexión, encienda el interruptor en la parte de atrás del
control y presione el botón (I).
Conectar el Sistema de Altavoces SW-G2.1 1200
Para evitar un mal funcionamiento y/o daños al parlante u otros dispositivos,
siempre baje el volumen y apague todas las unidades antes de realizar algún tipo
de conexión.

ESPAÑOL
Función de control:
1. Volumen: Controla el nivel del volumen.
2. HEADPHONE: Acepta conectores de auriculares estéreo de 3.5mm
3. Conector MIC: Acepta un pequeño enchufe estéreo de 3.5mm del auricular
o micrófono.
4. Entrada Auxiliar: Acepta conectores estéreo de 3.5mm provenientes de
reproductores de MP3 u otros dispositivos estéreo
Advertencia:
1. No conecte la clavija de toma de corriente en una salida de CA hasta no
que se hayan realizado todas las conexiones.
2. Por favor, retire el cable de toma de corriente de CA si no va a utilizar este
aparato en un largo periodo de tiempo.
3. No exponga los altavoces a ningún goteo ni salpicadura y asegúrese de
no colocar sobre ellos ningún objeto que contenga líquido, como jarrones,
etc.

PORTUGUÊS/BRASIL
1. Coloque os alto-falantes satélites próximo ao monitor, um de cada lado.
2. Assegure-se de que o controlador esteja dentro de uma distância de alcance.
3. Conecte os cabos do subwoofer e alto-falantes satélites (B, C & D) no
subwoofer do tomadas de saída de alto-falantes esq e dir.
4. Conecte o cabo de energia AC (H) numa tomada elétrica doméstica padrão.
5. Bass (grave): controla o nível de graves dos alto-falantes.
6. Para TV/DVD/VCD/Home Audio/Consolas de jogos:
Introduza o conector estéreo 3.5mm do cabo (E) na entrada 3.5mm “AUX” da
coluna central e, de seguida, introduza o conector RCA vermelho/branco nas
duas entradas RCA da TV/DVD/VCD/Home Audio/Consola de jogos.
7. Para PC/MP3/CD ou outros dispositivos estéreo:
Introduza os conectores RCA (vermelho e branco) do cabo de áudio (A) na
entrada RCA “AUX” da coluna central e introduza o conector de 3.5mm nos
dispositivos de áudio que utilizam uma tomada padrão de 3.5mm, tal como um
computador, portátil, leitor de CD, leitor MP3, etc.
8. Para telefone da Internet:
-Conecte os plugues de 3.5mm dos cabos (J/A) estéreo nas tomadas mic e
AUX no controlador.
-Plugue o outro lado dos cabos estéreos na placa de som.
-Os plugues do headset podem ser conectados nas tomadas mic (F) e fone de
ouvido (G) na frente do
9. Quando você concluir a conexão, acione a “Chave de Energia (Power
Switch)” atrás do controlador (I).
Conectando os Sistema de Alto-Falantes SW- G2.1 1200
To prevent malfunction and/or damage to speakers or other devices, always turn
down the volume, and turn off the power on all devices before making any
connections.

PORTUGUÊS/BRASIL
Função do comando
1. Volume: controla o nível de volume do sistema.
2. HEADPHONE: Aceita um mini-plugue 3.5mm estéreo de um headphone
3. Tomada MIC: Aceita um mini plugue estéreo de 3.5mm de headset ou
microfone.
4. Entrada Auxiliar: Aceita um mini-plugue 3.5mm estéreo de MP3 ou outros
dispositivos estéreo
Advertência:
1. Não conecte o plugue de energia na saída AC até que todas as conexões
sejam feitas.
2. Favor remover o fio do plugue AC se não usar este aparelho por um longo
tempo.
3. Não exponha os alto-falantes a goteiras ou respingos e certifique-se de
que nenhum objeto com líquido, como um vaso, por exemplo, esteja
colocado sobre eles.

ČESKY
1. Umístěte satelitní reproduktory vedle monitoru – na každou stranu jeden.
2. Ujistěte se, že ovladač je v dostupné vzdálenosti.
3. Zapojte kabely subwooferu a satelitních reproduktorů (B, C & D) do subwooferu,
výstupní konektory pravého a levého reproduktoru.
4. Zasuňte síťový kabel (H) do standardní domácí elektrické zásuvky.
5. Bass: nastavení úrovně hlubokých tónů.
6. Pro konzolu TV/DVD/VCD/Domácího audia/Her:
Konektor 3,5 mm stereo zástrčku kabelu (E) vložte do 3.5mm zásuvky označené
AUX na hostitelském a pak připojte červeno/bílou zásuvku RCA do dvou RCA
zásuvek konzoly TV/DVD/VCD/Domácího audia/Her.
7. Pro PC/MP3/CD či jiná stereo zařízení:
RCA zástrčky (červenou a bílou) zvukového kabelu (A) vložte do RCA zásuvky
označené AUX na hostitelském a 3,5mm zásuvku vložte do audio zařízení, které
používá standardní 3,5mm zásuvky, jako počítač, notebook, CD přehrávač, MP3
přehrávač, atd.
8. Pro internetovému telefonu:
-Zasuňte 3.5mm zástrčku stereofonních kabelů (J/A) do konektorů mic a AUX na
ovladači.
-Zasuňte druhý konec stereofonních kabelů do zvukové karty.
-Zástrčky headsetu mohou být zasunuty do konektoru mic (F) a sluchátkového
konektoru (G) na přední straně ovladače
9. Wenn Sie die Verbindung beenden, schalten Sie den "Ein-/Aus-Schalter" auf
der Rückseite (I).
Připojení reproduktorové soustavy SW-G2.1 1200
Aby se předešlo nesprávné funkci či poškození reproduktoru či jiného zařízení,
před jakýmkoli připojením vždy stáhněte hlasitost a vypněte napájení na všech
zařízeních.

ČESKY
Funkce ovládání:
1. Volume: ovládání hlasitosti reproduktorového systému.
2. SLUCHÁ TKA: Přijímá 3,5mm stero mini konektor ke sluchátkům
3. Konektor MIC: Vhodný pro 3.5mm stereofonní minizástrčku z headsetu nebo
mikrofonu.
4. Pomocný Vstup: Přijímá 3,5mm stereo mini zástrčku z MP3 či jiných zvukových
zařízení
Varování:
1. Napájecí kabel nezapojujte, dokud není provedeno celkové propojení
všemi potřebnými kabely.
2. Pokud nebudete zařízení delší dobu používat, odpojte napájecí kabel ze
síťové zásuvky.
3. Reproduktory nevystavujte vlhkosti, ani kapající vodě a ujistěte se, že na
nich nejsou umístěny žádné předměty s tekutinou, jako např. vázy.

MAGYAR
1. A mellékhangszórókat helyezze a monitor mellé – egyiket az egyik oldalra, a
másikat a másik oldalra.
2. Ügyeljen arra, hogy a vezérlőegység az elérhető távolságon belül legyen.
3. A mélynyomó és mellékhangszóró kábeleit (B, C és D) csatlakoztassa a
mélynyomó illetve bal és jobb hangszóró kimeneti csatlakozójába.
4. A hálózati kábelt (H) csatlakoztassa egy szabványos háztartási villamos
csatlakozóaljzatra.
5. Mély hangok «BASS»: A hangfalak mély hangzását szabályozza.
6. TV/DVD/VCD/Otthoni audiorendszer/Játékkonzol eszközökhöz:
Helyezze a kábel (E) 3,5 mm-es sztereó csatlakozóját a 3,5 mm-es „AUX”
bemenetébe, majd csatlakoztassa a piros/fehér RCA csatlakozót a
TV/DVD/VCD/Otthoni audiorendszer/Játékkonzol két RCA bemenetébe.
7. PC/MP3/CD vagy egyéb sztereó eszközök:
Helyezze a audiokábel RCA (A) csatlakozóit (piros és fehér) a „AUX” RCA
bemenetébe, majd a 3,5 mm-es csatlakozót az ilyen szabványt használó
audioeszközök (asztali számítógép, notebook, CD lejátszó, MP3 lejátszó, stb.)
bemenetébe.
8. Internetes telefon esetén:
-Helyezze be a 3,5 mm-es jack a sztereó kábel (J/A) a mikrofon és RCA
csatlakozó (F), az AUX kimenet a vezérlő
-A sztereó kábelek másik végét csatlakoztassa a hangkártyára.
-A kombinált fejhallgató csatlakozói a vezérlőegység előlapján található mikrofon
(F) és fülhallgató (G) csatlakozóra csatlakoztathatók.
9. Miután végzett a csatlakoztatással, a rendszer indításához nyomja meg a
vezérlő hátsó részén található főkapcsolót (I).
Az SW-G2.1 1200 hangszórórendszer csatlakoztatása
A hangfal vagy egyéb eszközök meghibásodásának és/vagy sérülésének
megelőzése érdekében mindig csökkentse a hangerőt, és kapcsoljon ki minden
eszközt a csatlakoztatás előtt.
La pagina sta caricando ...
La pagina sta caricando ...
La pagina sta caricando ...
La pagina sta caricando ...
La pagina sta caricando ...
La pagina sta caricando ...
La pagina sta caricando ...
La pagina sta caricando ...
La pagina sta caricando ...
La pagina sta caricando ...
La pagina sta caricando ...
La pagina sta caricando ...
La pagina sta caricando ...
La pagina sta caricando ...
La pagina sta caricando ...
La pagina sta caricando ...
La pagina sta caricando ...
La pagina sta caricando ...
-
 1
1
-
 2
2
-
 3
3
-
 4
4
-
 5
5
-
 6
6
-
 7
7
-
 8
8
-
 9
9
-
 10
10
-
 11
11
-
 12
12
-
 13
13
-
 14
14
-
 15
15
-
 16
16
-
 17
17
-
 18
18
-
 19
19
-
 20
20
-
 21
21
-
 22
22
-
 23
23
-
 24
24
-
 25
25
-
 26
26
-
 27
27
-
 28
28
-
 29
29
-
 30
30
-
 31
31
-
 32
32
-
 33
33
-
 34
34
-
 35
35
-
 36
36
-
 37
37
-
 38
38


Genius SW-G2.I I200 2.1 Channel 45 Watts RMS Gaming Woofer Speaker System Guida utente
- Categoria
- Altoparlanti
- Tipo
- Guida utente
in altre lingue
- français: Genius SW-G2.I I200 2.1 Channel 45 Watts RMS Gaming Woofer Speaker System Mode d'emploi
- slovenčina: Genius SW-G2.I I200 2.1 Channel 45 Watts RMS Gaming Woofer Speaker System Užívateľská príručka
- română: Genius SW-G2.I I200 2.1 Channel 45 Watts RMS Gaming Woofer Speaker System Manualul utilizatorului


