

2
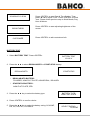
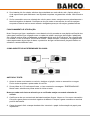
EN - BBT80 BATTERY/CHARGING/STARTING SYSTEM ANALYZER WITH PRINTER
ES - BBT80 PROBADOR DE BATERÍA Y ANALIZADOR DEL SISTEMA ELÉCTRICO CON IMPRESORA
FR - BBT80 TESTEUR DE BATTERIE ET DE CIRCUIT DE CHARGE / IMPRIMER
DE - BBT80 BATTERIE - / LADESYSTEM TESTER MIT DRUCKER TESTABLAUF
IT - BT80 BATTERIA/CARICA/AVVIO DEL SISTEMA DI ANALIZZAZIONE/STAMPANTE
PT - BBT80 ANALISADOR DE BATERIAS / SISTEMAS DE CARGA E DE PARTIDA COM IMPRESSORA

3
EN - WARNING / ES - ADVERTENCIA / FR – AVERTISSEMENT / DE - WARNUNG
FI - TÄRKEÄÄ / SV – VARNING / DA - ADVARSEL / IT - AVVISO / SV - AVISO
NL - BELANGRIJK / RU - ВАЖНО / PL – WAZNE
TR - ÖNEMLİ / EL - ΠΡΟΕΙΔΟΠΟΙΗΣΗ

4
WARNING - EN
1. For testing 6 and 12 volt batteres, and for testing 12 and 24 volt charging systems. (ONLY 12
volts for START & STOP batteries)
2. Suggested operation range 0℃ (32℉) to 50℃ (122℉) in ambient temperature.
WARNING: This product can expose you to chemicals including arsenic, which is known to the
State of California to cause cancer.
1. Working in the vicinity of a lead acid battery is dangerous. Batteries generate explosive gases
during normal battery operation. For this reason, it is of utmost importance, if you have any
doubt, that each time before using your tester, you read these instructions very carefully.
2. To reduce risk of battery explosion, follow these instructions and those published by the battery
manufacturer and manufacturer of any equipment you intend to use in the vicinity of the battery.
Observe cautionary markings on these items.
3. Do not expose the tester to rain or snow.
PERSONAL SAFETY PRECAUTIONS:
1. Someone should be within range of your voice or close enough to come to your aid when you
work near a lead acid battery.
2. Have plenty of fresh water and soap nearby in case battery acid contacts skin, clothing or
eyes.
3. Wear safety glasses and protective clothing.
4. If battery acid contacts skin or clothing, wash immediately with soap and water. If acid enters
eye, immediately flood eye with running cold water for at least ten minutes and get medical
attention immediately.
5. NEVER smoke or allow a spark or flame in vicinity of battery or engine.
6. Be extra cautious to reduce risk of dropping a metal tool onto the battery. It could spark or
short-circuit the battery or other electrical parts and could cause an explosion.
7. Remove personal metal items such as rings, bracelets, necklaces and watches when working
with a lead acid battery. It can produce a short circuit current high enough to weld a ring or the
like to metal causing a severe burn.
PREPARING TO TEST:
1. Be sure area around battery is well ventilated while battery is being tested.
2. Clean battery terminals. Be careful to keep corrosion from coming in contact with eyes.
3. Inspect the battery for cracked or broken case or cover. If battery is damaged, do not use
tester.

5
4. If the battery is not sealed maintenance free, add distilled water in each cell until battery acid
reaches level specified by the manufacturer. This helps purge excessive gas from cells. Do not
overfill.
5. If necessary to remove battery from vehicle to test, always remove ground terminal from
battery first. Make sure all accessories in the vehicle are off to ensure you do not cause any
arcing.
OPERATION & USE:
Note: Each time you connect the tester to a battery, the tester will run a quick cable verification to
ensure a proper connection through the output cables to sensors in the clamp jaws. If the
connection checks out OK, the tester will proceed to the Home Screen. If the connection is poor,
the display will show “CHECK CABLE”. In this case, check cable connections for visible signs of
damage, as you may need to re-connect the clamps to the battery or replace the cable end.
HOW TO REPLACE CABLE END:
1. Detach the clamp lead when the replacement is necessary.
2. Make sure the new clamp lead is well connected.
NOTE that do not detach the cables unless necessary to make sure
the pins are not rusted or corroded by the acid liquid.
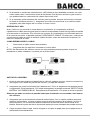
BEFORE TESTING:
1. Before you test a battery in a vehicle, turn off the ignition, all accessories and loads. Close all
the vehicle doors and the trunk lid.
2. Make sure you have put 6 pcs 1.5V batteries into the battery chamber. Oxyride batteries are
not recommended because of the initial 1.7 Volt output. If the 1.5V battery runs out of power,
screen will show “POWER LOW”. Replace those 6 pcs 1.5V batteries before starting the test.
Note that nothing will be seen on the display until the tester is connected to a vehicle
battery.
3. Make sure the battery terminals are clean. Wire brush them if necessary. Clamp the black load
lead to the vehicle negative battery terminal. Clamp the red load lead to the vehicle positive
battery terminal. Please clamp on the lead part of the terminal only. Clamping on the iron part
of the terminal will lead to wrong test results.

6
4. Paper load:
Open the clear cover. Insert paper to the paper feeding for auto running the paper into printer
PAPER REPLACEMENT:
A. Open the clear cover.
B. Insert replaced paper roll into the paper feeding for auto running the paper into the printer.
C. Pull the paper slowly and straightly from the paper roll in the chamber.
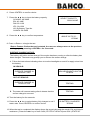
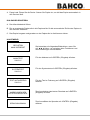
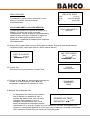
MAIN MENU:
SYSTEM ANALYZER
You will view the following screens by pressing ◄ / ►
to switch between all functions and settings.
BATTERY TEST
XX.XX V
Press «ENTER» to do battery test.
SYSTEM TEST
XX.XX V
Press «ENTER» to do system test.
IN-VEHICLE TEST
XX.XX V
Press «ENTER» to do In-vehicle test.
PRINT LAST RESULT
Press «ENTER» to print last result.
LANGUAGE SELECT
Press «ENTER» to change language.
TEST COUNTER
Press «ENTER» to see how many times you tested in
battery / system / in-vehicle test.

7
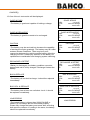
2018/02/05 13:25:00
Press «ENTER» to start Date & Time Setting. Then
press ◄ / ► to adjust “Year”. Press «ENTER» to finish
Year. Please follow previous step to finish Month, Day,
Hour & Minute.
BRIGHTNESS
Press «ENTER» to start adjusting brightness of the
screen.
CUSTOMIZE
Press «ENTER» to edit customized info.
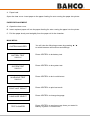
BATTERY TEST:
1. Select BATTERY TEST. Press «ENTER».
BATTERY TEST
XX.XX V
2. Press the ◄ ► to select REGULAR/STD or START/STOP battery.
REGULAR/STD
START/STOP
* REGULAR/STD BATTERY:
FLOODED, AGM FLAT PLATE, AGM SPIRAL, VRLA/GEL
* START/STOP BATTERY:
AGM FLAT PLATE, EFB
3. Press the ◄ ► key to select the battery type: BATTERY TYPE:
AGM FLAT PLATE
4. Press «ENTER» to confirm choice.
5. Press the ◄ ► key to select the battery rating: CCA/SAE,
EN, JIS, DIN, IEC, & CA/MCA.
SELECT RATING:
CCA/SAE

8
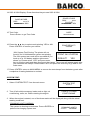
6. Press «ENTER» to confirm choice.
7. Press the ◄ ► key to input the battery capacity.
CCA/SAE: 40~2000
EN: 40~1885
DIN: 25~1120
IEC: 30~1320
JIS: By Battery Type No.
CA/MCA: 50~2400
SELECT CAPACITY:
560CCA/SAE
8. Press the ◄ ► key to confirm temperature.
ABOVE 32°F/0°C?
YES/NO
9. Press <<Enter>> to begin the test.
*Return Feature: Before the test is started, the user can always return to the previous
setting page by pressing <<ENTER>> for 2 seconds.
SURFACE CHARGE NOTICE:
The battery will hold a surface charge if the engine has been running or after the battery has
been charged. The tester may prompt you to remove the surface charge.
A. Follow the instructions indicating when to turn the headlights on and off or apply a load into
the battery.
IN VEHICLE:
SURFACE CHARGE IN
VEHICLE? YES
TURN HEADLIGHTS ON FOR
15 SECS
OUT OF VEHICLE:
SURFACE CHARGE IN
VEHICLE? NO
TESTING
B. The tester will resume testing after it detects that the
surface charge is removed.
TESTING
10. Test the battery for few seconds.
11. Press the ◄ ► key to select battery fully charged or not if
tester asks. Press «ENTER» to confirm choice.
IS BATTERY CHARGED?
YES/NO
12. When the test is completed, the display shows the actual volts and the actual CCA and internal
resistance. {Press the ◄ ► key to read: SOH (STATE OF HEALTH) and SOC (STATE OF

9
CHARGE)}.
13. One of the six test results will be displayed:
GOOD & PASS
*The battery is good and capable of holding a charge.
GOOD & PASS
VOL: xx.xx V
CCA: xxxx CCA/SAE
IR: xx.xx mΩ
GOOD & RECHARGE
*The battery is good but needs to be recharged.
GOOD & RECHARGE
VOL: xx.xx V
CCA: xxxx CCA/SAE
IR: xx.xx mΩ
CAUTION
*The battery may be serviced but decrease the capability
of starting the engine gradually. The battery may fail under
extreme climate conditions. There may be a poor
connection between the vehicle and the battery affect the
charging function. Please pay attention to the battery for
replacement consideration and charging system checking.
CAUTION
VOL: xx.xx V
CCA: xxxx CCA/SAE
IR: xx.xx mΩ
RECHARGE & RETEST
*Battery is discharged, the battery condition cannot be
determined until it is fully charged. Recharge & retest the
battery.
RECHARGE & RETEST
VOL: xx.xx V
CCA: xxxx CCA/SAE
IR: xx.xx mΩ
BAD & REPLACE
*The battery will not hold a charge. It should be replaced
immediately.
BAD & REPLACE
VOL: xx.xx V
CCA: xxxx CCA/SAE
IR: xx.xx mΩ
BAD CELL & REPLACE
*The battery has at least one cell short circuit. It should
be replaced immediately.
BAD CELL & REPLACE
VOL: xx.xx V
CCA: xxxx CCA/SAE
IR: xx.xx mΩ
LOAD ERROR
*The tested battery is bigger than 2000CCA/SAE or
200AH. Or the clamps are not connected properly.
Please fully charge the battery and retest after excluding
both previous reasons. If reading is the same, the battery
should be replaced immediately.
LOAD ERROR

10
PRINT 24V SYSTEM
RESULT? YES
14. SOC & SOH Display: Press directional keys to see SOC & SOH:
GOOD & PASS
SOC: xx.xx V
■■■■■■■■■□ 90%
GOOD & PASS
SOH: xxxx
CCA/SAE
■■■■■■■■■□ 90%
15. Test Code:
Press <Enter> to get Test Code.
CODE
xxxxxxxxxxxx
16. Press the ◄ ► key to select result printing: YES or NO.
Press «ENTER» to confirm your choice.
PRINT RESULT?
YES/NO
*24V System Test Printing: The printer will not
function for 24 Volt batteries system test printing.
The 24V system test result will be recorded till you
hook up to a 12V battery and the right screen
shows up. Please select “YES” and press enter
key to print the result and then disconnect the clamps. The screen will appear again after
you reconnect the clamps. Please select “NO” and press the enter key to go back to the
main menu.
17. Press «ENTER» return to MAIN MENU or remove the test clamps from the battery posts after
completion of testing batteries to end test.
SYSTEM TEST:
1. Select “SYSTEM TEST” from the main menu.
SYSTEM TEST
xx.xx V
2. Turn off all vehicle accessory loads such as light, air
conditioning, radio, etc. Before starting the engine.
TURN OFF LOADS
START ENGINE
3. When the engine is started, one of the three results will be displayed along with the actual
reading measured.
CRANKING VOLTS NORMAL
The system is showing normal draw. Press «ENTER» to
perform the charging system test.
CRANKING VOLTS
xx.xx V NORMAL

11
CRANKING VOLTS LOW
The cranking voltage is below normal limits, troubleshoot
the starter with manufacturers recommended procedure.
CRANKING VOLTS
xx.xx V LOW
CRANKING NOLTS NOT DETECTED
The cranking voltage is not detected.
CRANKING VOLTS
NOT DETECTED
4. Press «ENTER» to begin charging system test.
PRESS ENTER FOR
CHARGING TEST
MAKE SURE ALL
LOADS ARE OFF
5. Press the «ENTER» key, one of the three results will be displayed along with the actual
reading measured.
HIGH CHARGING VOLTS WHEN TEST AT IDLE
The voltage output from the alternator to the battery
exceeds the normal limits of a functioning regulator. Check
to ensure there is no loose connection and the ground
connection is normal.
ALT. IDLE VOLTS
xx.xx V HIGH
If there is no connection issue, replace the regulator. Since most alternators have the
regulator built-in, this will require you to replace the alternator. The normal high limit of a
typical automotive regulator is 14.7 volts +/- 0.05. Check manufacturer specifications for the
correct limit, as it will vary by vehicle type and manufacturer.
CHARGING SYSTEM NORMAL WHEN TEST AT IDLE
The system is showing normal output from the alternator.
No problem is detected.
ALT. IDLE VOLTS
xx.xx V NORMAL
LOW CHARGING VOLTS WHEN TEST AT IDLE
The alternator is not providing sufficient current to the
battery. Check the belts to ensure the alternator is
rotating with engine running.
ALT. IDLE VOLTS
xx.xx V LOW
If the belts are slipping or broken, replace the belts and retest. Check the connections from
the alternator to the battery. If the connection is loose or heavily corroded, clean or replace the
cable and retest. If the belts and connections are in good condition, replace the alternator.

12
6. Press «ENTER» for the charging system with accessory
loads. Turn on the blower to high (heat), high beam
headlights, and rear defogger. Do not use cyclical loads
such as air conditioning or windshield wipers.
TURN ON LOADS
PRESS ENTER
7. When testing older model diesel engines, the users need
to run up the engine to 2500 rpm for 15 secs.
RUN ENGINE UP TO
2500RPM 15 SEC
8. Press «ENTER» to read the ripple from the charging system to the battery. One of the three
testing results will be displayed along with the actual testing measured.
RIPPLE DETECTED NORMAL
Diodes function well in the alternator / starter.
RIPPLE DETECTED
xx.xx V NORMAL
NO RIPPLE DETECT
Ripple is not detected.
NO RIPPLE DETECT
PRESS ENTER
EXCESS RIPPLE DETECTED
One or more diodes in the alternator are not functioning
or there is stator damage. Check to ensure the alternator
mounting is sturdy and that the belts are in good shape
and functioning properly. If the mounting and belts are
good, replace the alternator.
RIPPLE DETECTED
xx.xx V HIGH
9. Press the «ENTER» key to continue the charging system with accessory loads. One of the
three results will be displayed along with the actual testing measured.
CHARGING SYSTEM HIGH WHEN TEST WITH
ACCESSORY LOADS
The voltage output from the alternator to the battery
exceeds the normal limits of a functioning regulator.
ALT. LOAD VOLTS
xx.xx V HIGH
Check to ensure there are no loose connections and that the ground connection is normal. If
there are no connection issues, replace the regulator. Since most alternators have the
regulator built-in, this will require you to replace the alternator.

13
CHARGING SYSTEM LOW WHEN TEST
WITH ACCESSORY LOADS
The alternator is not providing sufficient current for
the system’s electrical loads and the charging
current for the battery. Check the belts to ensure the
alternator is rotating with the engine running. If the
belts are slipping or broken, replace the belts and
retest.
ALT. LOAD VOLTS
xx.xx V LOW
Check the connections from the alternator to the battery. If the connection is loose or heavily
corroded, clean or replace the cable and retest. If the belts and connections are in good
working condition, replace the alternator.
CHARGING SYSTEM NORMAL WHEN TEST WITH
ACCESSORY LOADS
The system is showing normal output from the alternator.
No problem detected.
ALT. LOAD VOLTS
xx.xx V NORMAL
10. Press «ENTER» when charging system test is completed.
Turn all accessory loads and engine off. Press «ENTER»
to read the system test results.
TEST OVER. TURN OFF
LOADS & ENGINE
ALT. LOAD VOLTS
xx.xx V NORMAL
RIPPLE VOLTAGE
xx.xx V NORMAL
11. Press “ENTER” to press result or not. CRANKING VOLTAGE
xx.xx V NORMAL
ALT. IDLE VOLTS
xx.xx V NORMAL
PRINT RESULT?
YES/NO
IN-VEHICLE TEST
This is a combination test of both battery test & system test. Please refer to above testing
procedures or follow the instructions on the display of the tester.

14
GLOSSARY
What is a GEL battery?
A gel battery is a lead-acid electric storage battery that:
■ is sealed using special pressure valves and should never be opened.
■ is completely maintenance-free.
■ uses thixotropic gelled electrolyte.
■ uses a recombination reaction to prevent the escape of hydrogen and oxygen gases normally
lost in a flooded lead-acid battery (particularly in deep cycle applications).
■ is non-spillable, and therefore can be operated in virtually any position. However, upside-down
installation is not recommend-ed.
■ Connections must be retorqued and the batteries should be cleaned periodically.
What is an AGM battery?
An AGM battery is a lead-acid electric storage battery that:
■ is sealed using special pressure valves and should never be opened.
■ is completely maintenance-free.*
■ has all of its electrolyte absorbed in separators consisting of a sponge-like mass of matted glass
fibers.
■ uses a recombination reaction to prevent the escape of hydrogen and oxygen gases normally
lost in a flooded lead-acid battery (particularly in deep cycle applications).
■ is non-spillable, and therefore can be operated in virtually any position. However, upside-down
installation is not recommended.
■ Connections must be retorqued and the batteries should be cleaned periodically.
What is a VRLA battery?
Valve Regulated Lead Acid Battery – This type of battery is sealed Maintenance Free with a
“Bunce” Valve or Valves in the top of them that opens when a preset pressure is realized inside
the battery and let’s the excess gas pressure out. Then the valve resets itself.
What is a SLI battery?
These initials stand for Starting, Lighting and Ignition, which are the three basic functions which a
battery has to perform on all normal vehicles. Batteries given this description will have been
specifically designed for service on cars and trucks within a voltage controlled electrical system.
Those SLI batteries which are intended for heavy haulage vehicles fitted with large diesel motors
may often be called COMMERCIAL batteries. They have to be much more powerful and more
robust than batteries intended for cars.

15
What is STATE OF HEALTH?
It means how much battery capacity is left (%) comparing with the marked original battery
capacity.
What is STATE OF CHARGE?
It means how many percent of the battery is actually charged.
What is CCA (COLD CRANKING AMPS)?
The current in amperes which a new fully charged battery can deliver for 30 seconds continuously
without the terminal voltage falling below 1.2volts per cell, after it has been cooled to 0OF and
held at that temperature. This rating reflects the ability of the battery to deliver engine starting
currents under winter conditions.
What is AMPERE-HOUR?
The unit of measurement of electrical capacity. A current of one ampere for one hour implies the
delivery or receipt of one ampere-hour of electricity. Current multiplied by time in hours equals
ampere-hours.
TERMS AND CONDITIONS OF WARRANTY
Any battery tester defective in material or workmanship will be repaired or replaced according to
published defective return test repair procedures. The existence of a defect shall be determined
by the seller in accordance with published procedures. The published test procedures are
available upon request.
This warranty does not cover any unit that has been damaged due to accident, abuse, alternation,
use for a purpose other than that for which it was intended, or failure to follow operating
instructions. This warranty is expressly limited to original retail buyers. This warranty is not
assignable or transferable. Proof of purchase is required for all alleged claims. Warranty cannot
be authorized without proof of purchase. Warranty claims must be sent pre-paid with dated proof
of purchase. Damage incurred during shipment is the responsibility of the shipper (customer
returning unit) If the returned unit qualifies for warranty, the shipper will only incur shipping cost.
The seller reserves the right to substitute or offer alternative warranty options at its discretion.
The sole and exclusive remedy for any unit found to be defective is repair or replacement, at the
option of the seller. In no event shall the seller be liable for any direct, indirect, special, incidental,
or consequential damages (including lost profit) whether based on warranty, contract, tort, or any
other legal theory.
RETURN GOODS:
Pack with sufficient over-pack to prevent damage during shipment. Damage incurred during return
shipment is not covered under this warranty. Repair costs for such damages will be charged
back to shipper.

16
PRECAUCIÓN - ES
1. Para probar baterías de 6 & 12 voltios y para probar el sistema de carga de 12 & 24 voltios.
(SOLAMENTE 12 voltios para baterías START & STOP)
2. Se recomienda que el rango de temperatura durante la prueba, esté entre 0°C (32°F) y 50°C
(122°F).
PRECAUCIÓN: Este producto puede exponerle a químicos, incluyendo arsénico, el cual es
conocido en el Estado de California por causar cáncer.
1. Trabajar cerca de una batería de plomo-ácido es peligroso. Las baterías generan hidrógeno,
gas explosivo durante su funcionamiento. Lea estas instrucciones con cuidado antes de
utilizar el comprobador.
2. Para reducir el riesgo de explosión de la batería, siga estas instrucciones y las publicadas por
el fabricante de la batería.
3. No exponga el comprobador a la lluvia o nieve.
PRECAUCIONES DE SEGURIDAD PERSONAL:
1. Alguien deba estar dentro del alcance de su voz o lo bastante cerca para poder ayudarle
cuando usted esté trabajando cerca de una batería de plomo ácido
2. Tenga agua fresca y jabón cerca de usted, en caso de que el ácido de la batería haga contacto
con la piel, la ropa o los ojos
3. Lleve gafas de seguridad y ropa adecuada.
4. Si el ácido de la batería hace contacto con la piel o ropa, lave inmediatamente con jabón y
agua. Si el ácido entra en los ojos, inmediatamente lávelos con abundante agua corriente por
lo menos durante 10 minutos y busque atención medica inmediatamente.
5. NO fume y evite chispas o llamas en las inmediaciones de la batería o del motor.
6. Bajo ningún concepto coloque ninguna herramienta metálica en la parte superior de la batería.
Podría provocar una chispa que pudiera ocasionar una explosión
7. Quítese los objetos metálicoas personales como los anillos, brazaletes, collares y relojes
cuando esté trabajando con una batería de plomo ácido. Se puede producir un fuerte
cortocircuito, como para fundir un anillo, y provocar quemaduras graves.
PREPARACIÓN DE LA PRUEBA:
1. Asegúrese que el área alrededor de la batería esté bien ventilada mientras que la batería esté
siendo examinada.
2. Limpie las terminales de la batería. Tenga cuidado de que los polvos de la corrosión en las
terminales, no hagan contacto con sus ojos.
3. Examine la batería en busca de roturas en la caja o tapa. Si la batería está dañada, no utilice
el comprobador.

17
4. Si la batería no es libre de mantenimiento, (MF) añada el agua destilada necesaria, en cada
celda, hasta cubrir 2 centímetros arriba de las placas. Esto ayuda a eliminar el gas excesivo
que pudiera haber en cada celda. No rebase nunca este nivel.
5. Si es necesario quitar la batería del vehículo para la prueba, siempre desconecte el terminal
de tierra de la batería primero (-). Asegúrese que todos los accesorios en el vehículo están
apagados para estar seguro de no causar un corto circuito.
OPERACIÓN Y USO:
Nota: Cada vez que conecta el comprobador a una batería, el comprobador verificará
rápidamente el cable para asegurar que la conexión es apropiada a través de los cables de salida
a los sensores en las pinzas. Si la conexión es correcta, el comprobador ira a la Pantalla de Inicio.
Si la conexión es pobre, la pantalla mostrara "VERIFIQUE EL CABLE". En este caso, verifique las
conexiones del cable en caso de señales visibles de daño, antes de reconectar las pinzas a la
batería o remplazar el cable.
COMO REEMPLAZAR EL CABLE:
1. Desconecte el cable cuando sea necesario
2. Asegúrese de que está bien conectado el nuevo cable
NOTA. No desconecte los cables a menos que sea necesario para asegurarse de que los
pasadores no están oxidados o corroídos por el ácido líquido.
ANTES DE LA PRUEBA:
1. Antes de que usted examine la batería de un vehículo, apague el motor, todos los accesorios y
las cargas. Cierre todas las puertas del vehículo y la tapa del maletero.
2. Asegúrese que usted ha colocado las 6 baterías de 1.5V en el alojamiento de las baterías del
comprobador. Si las baterías de 1.5V están descargadas, la pantalla mostrará “DEFECTUOSA
BATERIA” OR “ENERGIA BAJA”. Reemplace las 6 baterías de 1.5V antes de iniciar la prueba.
Observe que nada se verá en la pantalla hasta que el testeador es conectado a una batería
del vehículo.
3. Asegúrese que los terminales de la batería estén limpios. Con un cepillo metálico las puede
limpiar si es necesario. Conecte la pinza negra al terminal negativo de la batería y el rojo al
terminal positivo. Se recomienda amarrar solamente la parte de plomo del terminal de la
batería. Amarrar la parte de hierro del terminal puede provocar resultados de prueba erróneos.
4. Carga de papel: Abra la tapa. Inserte el papel en el cajón de papel para que el papel entre al
alimentador automáticamente.

18
REEMPLAZO DEL PAPEL:
A. Abrir la tapa.
B. Introduzca el rollo de papel dentro del alimentador de papel para la estrada automática del
papel dentro de la impresora.
C. Tire del papel despacio
MENÚ PRINCIPAL:
ANALIZADOR DEL
SISTEMA
Usted podrá ver las siguientes imágenes en la pantalla
presionando ◄/► para cambiar entre todas las
funciones y configuraciones.
PRUEBA DE LA
BATERÍA
XX.XX V
Presione «ENTER» para hacer la prueba de la batería.
PRUEBA DEL
SISTEMA
XX.XX V
Presiona «ENTER» para hacer la prueba del sistema.
PRUEBA
EN-VEHÍCULO
XX.XX V
Presione «ENTER» para hacer la prueba de
En-vehículo.
IMPRIMIR EL ULTIMO
RESULTADO
Presione «ENTER» para imprimir el resultado anterior.
SELECCIONAR EL
IDIOMA
Presiona «ENTER» para cambiar el idioma.
CONTADOR DE
PRUEBA
Presione «ENTER» para ver cuántas veces a probado
en la batería/sistema/en-vehículo.

19
2018/02/05 13:25:00
Presione «ENTER» para iniciar la Configuración de
Fecha & Hora. Luego presione ◄/► para ajustar el
"Año". Presione «ENTER» para finalizar el Año. Por
favor siga los pasos anteriores para finalizar el Mes,
Día, Hora & Minuto.
BRILLO
Presione «ENTER» para iniciar el ajuste del brillo de la
pantalla.
PERSONALIZAR
Presione «ENTER» para editar la información
personalizada.
PRUEBA DE LA BATERÍA:
1. Seleccionar PRUEBA DE LA BATERÍA. Presione
«ENTER».
PRUEBA DE LA
BATERÍA
XX.XX V
2. Presione la tecla ◄ ► para seleccionar batería REGULAR/STD o INICIO/DETENCIÓN.
REGULAR/STD
INICIO/DETENCIÓN
* BATERÍA REGULAR/STD:
INUNDADA, PLACA PLANA AGM, ESPIRAL AGM, VRLA/GEL
* BATERÍA INICIO/DETENCIÓN:
PLACA PLANA AGM, EFB
3. Presione la tecla ◄ ► para seleccionar el tipo de batería:
TIPO DE BATERÍA:
PLACA PLANA AGM
4. Presione «ENTER» para confirmar la escogencia.
5. Presione la tecla ◄ ► para seleccionar la clasificación de
la batería: CCA/SAE, EN, JIS, DIN, IEC, & CA/MCA.
SELECCIÓN DE LA
CLASIFICACIÓN:
CCA/SAE

20
6. Presione «ENTER» para confirmar la escogencia.
7. Presione la tecla ◄ ► para introducir la capacidad de la
batería.
CCA/SAE: 40~2000
EN: 40~1885
DIN: 25~1120
IEC: 30~1320
JIS: Para tipo de batería No.
CA/MCA: 50~2400
SELECCIONE LA
CAPACIDAD:
560CCA/SAE
8. Presione la tecla ◄ ► para confirmar la temperatura.
SOBRE 32°F/0°C?
SI/NO
9. Presione <<Enter>> para iniciar la prueba.
*Función de Retorno: Antes que se inicie la prueba, el usuario puede siempre retornar
a la página de configuración anterior presionando <<ENTER>> por 2 segundos.
NOTIFICACIÓN DE LA CARGA DE LA SUPERFICIE:
La batería mantendrá una carga de la superficie si el motor a estado funcionando o después
que la batería ha sido cargada. El probador puede pedirle que retire la carga de la superficie.
A. Siga las instrucciones que indican cuando encender y apagar las luces o aplicar una carga
a la batería.
EN VEHÍCULO:
CARGA DE LA
SUPERFICIE EN
VEHÍCULO? SI
ENCIENDA LAS
LUCES POR 15
SEGUNDOS
FUERA DEL VEHÍCULO:
CARGA DE LA
SUPERFICIE EN EL
VEHÍCULO? NO
PRUEBA
B. El probador seguirá la prueba después de que detecte
que la carga de la superficie es retirada.
PRUEBA
La pagina si sta caricando...
La pagina si sta caricando...
La pagina si sta caricando...
La pagina si sta caricando...
La pagina si sta caricando...
La pagina si sta caricando...
La pagina si sta caricando...
La pagina si sta caricando...
La pagina si sta caricando...
La pagina si sta caricando...
La pagina si sta caricando...
La pagina si sta caricando...
La pagina si sta caricando...
La pagina si sta caricando...
La pagina si sta caricando...
La pagina si sta caricando...
La pagina si sta caricando...
La pagina si sta caricando...
La pagina si sta caricando...
La pagina si sta caricando...
La pagina si sta caricando...
La pagina si sta caricando...
La pagina si sta caricando...
La pagina si sta caricando...
La pagina si sta caricando...
La pagina si sta caricando...
La pagina si sta caricando...
La pagina si sta caricando...
La pagina si sta caricando...
La pagina si sta caricando...
La pagina si sta caricando...
La pagina si sta caricando...
La pagina si sta caricando...
La pagina si sta caricando...
La pagina si sta caricando...
La pagina si sta caricando...
La pagina si sta caricando...
La pagina si sta caricando...
La pagina si sta caricando...
La pagina si sta caricando...
La pagina si sta caricando...
La pagina si sta caricando...
La pagina si sta caricando...
La pagina si sta caricando...
La pagina si sta caricando...
La pagina si sta caricando...
La pagina si sta caricando...
La pagina si sta caricando...
La pagina si sta caricando...
La pagina si sta caricando...
La pagina si sta caricando...
La pagina si sta caricando...
La pagina si sta caricando...
La pagina si sta caricando...
La pagina si sta caricando...
La pagina si sta caricando...
La pagina si sta caricando...
La pagina si sta caricando...
La pagina si sta caricando...
La pagina si sta caricando...
La pagina si sta caricando...
La pagina si sta caricando...
La pagina si sta caricando...
-
 1
1
-
 2
2
-
 3
3
-
 4
4
-
 5
5
-
 6
6
-
 7
7
-
 8
8
-
 9
9
-
 10
10
-
 11
11
-
 12
12
-
 13
13
-
 14
14
-
 15
15
-
 16
16
-
 17
17
-
 18
18
-
 19
19
-
 20
20
-
 21
21
-
 22
22
-
 23
23
-
 24
24
-
 25
25
-
 26
26
-
 27
27
-
 28
28
-
 29
29
-
 30
30
-
 31
31
-
 32
32
-
 33
33
-
 34
34
-
 35
35
-
 36
36
-
 37
37
-
 38
38
-
 39
39
-
 40
40
-
 41
41
-
 42
42
-
 43
43
-
 44
44
-
 45
45
-
 46
46
-
 47
47
-
 48
48
-
 49
49
-
 50
50
-
 51
51
-
 52
52
-
 53
53
-
 54
54
-
 55
55
-
 56
56
-
 57
57
-
 58
58
-
 59
59
-
 60
60
-
 61
61
-
 62
62
-
 63
63
-
 64
64
-
 65
65
-
 66
66
-
 67
67
-
 68
68
-
 69
69
-
 70
70
-
 71
71
-
 72
72
-
 73
73
-
 74
74
-
 75
75
-
 76
76
-
 77
77
-
 78
78
-
 79
79
-
 80
80
-
 81
81
-
 82
82
-
 83
83


in altre lingue
- English: Bahco BBT80 User manual
- français: Bahco BBT80 Manuel utilisateur
- español: Bahco BBT80 Manual de usuario
- Deutsch: Bahco BBT80 Benutzerhandbuch
- português: Bahco BBT80 Manual do usuário
Documenti correlati
Altri documenti
-
Facom BAT.TEST Manuale utente
-
-
GYS BATTERY TESTER DBT350 Scheda dati
-
GYS BATTERY TESTER DBT400 Scheda dati
-
-
BLACK DECKER BDSBC30A Manuale del proprietario
-
-
-
GYS BATTERY TESTER NBT100 Manuale del proprietario
-
GYS BATTERY TESTER BT2010 DHC - START/STOP Scheda dati