
BAT.TEST
TESTEUR DE BATTERIE
BATTERY TESTER
BATTERIE - /LADESYSTEMTESTER
ACCU/SYSTEEM TESTER
PROBADOR DE BATERÍA
TESTER BATTERIE
Notice originale
Original instructions
Originalbedienungsanleitung
Oorspronkelijke gebruiksaanwijzing
Manual original
Istruzioni originali
Manual original
ANALISADOR DE BATERIAS
La pagina si sta caricando...
La pagina si sta caricando...
La pagina si sta caricando...
La pagina si sta caricando...
La pagina si sta caricando...

English
- 5 -
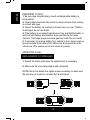
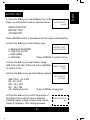
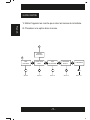
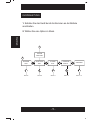
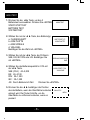
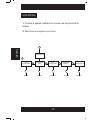
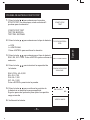
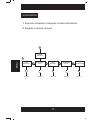
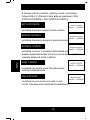
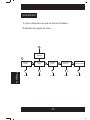
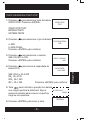
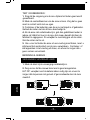
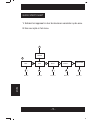
QUICK START CHART
1. Switch on the device by connecting the clamps on the battery.
2. Choose an option in the menu.
START-STOP
TEST
See P.8 See P.6 See P.11 See P.15 See P. 15
B
ATTERY
TEST
SYSTEM
ANALYSER
SYSTEM
TEST
LANGUAGE
SELECT
1
2
CUSTOMIZE
La pagina si sta caricando...

English
- 7 -
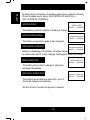
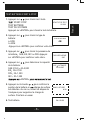
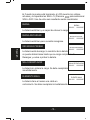
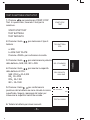
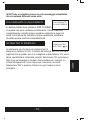
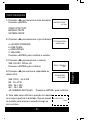
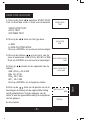
7. When test is completed, the display shows the results as following
{Press theŻ Ź key to select: SOH (STATE OF HEALTH) or
SOC (STATE OF CHARGE)}.
GOOD & PASS
The battery is good & capable of holding a charge.
GOOD & RECHARGE
The battery is good but needs to be recharged.
RECHARGE & RETEST
Battery is discharged. The battery condition cannot
be determined until it is fully charged. Recharge & retest the battery.
BAD & REPLACE
The battery will not hold a charge. It should be
replaced immediately.
BAD CELL & REPLACE
The battery has at least one cell short circuit. It
should be replaced immediately.
8. End of test. Proceed the printout if needed.
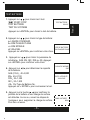
GOOD & PASS
XX.XXV XXXXSAE
BAD & REPLACE
XX.XXV XXXXSAE
RECHARGE & RETEST
XX.XXV XXXXSAE
GOOD & RECHARGE
XX.XXV XXXXSAE
BAD CELL & REPLACE
XX.XXV XXXXSAE
La pagina si sta caricando...

English
- 9 -
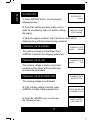
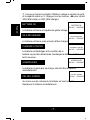
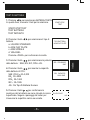
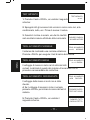
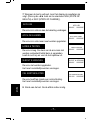
6. When test is completed, the display shows the results as following
{Press theŻ Ź key to select: SOH (STATE OF HEALTH) or
SOC (STATE OF CHARGE)}.
GOOD & PASS
The battery is good & capable of holding a charge.
GOOD & RECHARGE
The battery is good but needs to be recharged.
RECHARGE & RETEST
Battery is discharged. The battery condition cannot
be determined until it is fully charged. Recharge & retest the battery.
BAD & REPLACE
The battery will not hold a charge. It should be
replaced immediately.
BAD CELL & REPLACE
The battery has at least one cell short circuit. It
should be replaced immediately.
12. End of test. Proceed the printout if needed.
GOOD & PASS
XX.XXV XXXXSAE
BAD & REPLACE
XX.XXV XXXXSAE
RECHARGE & RETEST
XX.XXV XXXXSAE
GOOD & RECHARGE
XX.XXV XXXXSAE
BAD CELL & REPLACE
XX.XXV XXXXSAE
La pagina si sta caricando...
La pagina si sta caricando...
La pagina si sta caricando...
La pagina si sta caricando...
La pagina si sta caricando...
La pagina si sta caricando...
La pagina si sta caricando...
La pagina si sta caricando...
La pagina si sta caricando...
La pagina si sta caricando...
La pagina si sta caricando...

French
- 5 -
GUIDE RAPIDE
1. Mettez l'appareil en marche pour relier les bornes de la batterie.
2. Choisissez une option dans le menu.
START-STOP
TEST
See P.8 See P.6 See P.11 See P.15 See P. 15
TEST
BATTERIE
SYSTEM
ANALYSER
TEST
DU SUSTEME
LANGUAGE
SELECT
1
2
CUSTOMISE
La pagina si sta caricando...

French
- 7 -
7. Lorsque le test est complété, l'afficheur indique le nombre de volts
et la capacité réelle ou %. (Appuyez sur les touches ŻŹ pour choisir
SOH (Etat santé) ou SOC (Etat charge)).
BATTERIE OK
La batterie est bonne et capable de garder charge.
OK A RECHARGER
La batterie est bonne mais a besoin d'être chargée.
CHARGER & TESTER
La batterie est déchargée et la condition de la
batterie ne peut être déterminée. Rechargez la batterie et effectuez le
test à nouveau.
A REMPLACER
La batterie ne garde pas sa charge, elle doit être remplacée
immédiatement.
CEL DEF. A REMPL
Au moins une des cellules de la batterie est court-circuitée.
Remplacez la batterie immédiatement.
BATTERIE OK
XX.XXV XXXXSAE
A REMPLACER
XX.XXV XXXXSAE
CHARGER & TESTER
XX.XXV XXXXSAE
OK A RECHARGER
XX.XXV XXXXSAE
CEL DEF. A REMPL
XX.XXV XXXXSAE
La pagina si sta caricando...

French
- 9 -
6. Lorsque le test est complété, l'afficheur indique le nombre de volts
et la capacité réelle ou %. (Appuyez sur les touches ŻŹ pour choisir
SOH (Etat santé) ou SOC (Etat charge)).
BATTERIE OK
La batterie est bonne et capable de garder charge.
OK A RECHARGER
La batterie est bonne mais a besoin d'être chargée.
CHARGER & TESTER
La batterie est déchargée et la condition de la
batterie ne peut être déterminée. Rechargez la batterie et effectuez le
test à nouveau.
A REMPLACER
La batterie ne garde pas sa charge, elle doit être remplacée
immédiatement.
CEL DEF. A REMPL
Au moins une des cellules de la batterie est court-circuitée.
Remplacez la batterie immédiatement.
BATTERIE OK
XX.XXV XXXXSAE
A REMPLACER
XX.XXV XXXXSAE
CHARGER & TESTER
XX.XXV XXXXSAE
OK A RECHARGER
XX.XXV XXXXSAE
CEL DEF. A REMPL
XX.XXV XXXXSAE
La pagina si sta caricando...
La pagina si sta caricando...
La pagina si sta caricando...
La pagina si sta caricando...
La pagina si sta caricando...
La pagina si sta caricando...
La pagina si sta caricando...
La pagina si sta caricando...
La pagina si sta caricando...
La pagina si sta caricando...
La pagina si sta caricando...

German
- 5 -
KURZANLEITUNG
1. Schalten Sie das Gerät durch die Klemmen an der Batterie
anschließen.
2. Wählen Sie eine Option im Menü.
START-STOP
TEST
See P.8 See P.6 See P.11 See P
.15 See P. 15
BATTERIE
TEST
SYSTEM
ANALYSER
SYSTEM
TEST
LANGUAGE
SELECT
1
2
ANPASSEN

German
- 6 -
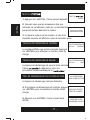
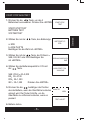
START-STOP AKKUTEST
1. Drücken Sie die Taste, um den 3
Batterietest auszuwählen. Drücken Sie «ENTER».
START-STOP TEST
BATTERIE TEST
SYSTEM TEST
2. Wählen Sie mir der
Taste, den Batterietyp.
a. EFB
b. AGM PLATTE
Bestätigen Sie die Wahl mit «ENTER».
3. Wählen Sie mit der
Taste, die Prüfnorm
SAE, EN, IEC oder DIN. Bestätigen Sie
mit «ENTER».
4. Wählen Sie die Batteriekapazität in CCA mit
der
Taste.
SAE (CCA)
40~2,000
EN
40~2,100
DIN
25~1,300
IEC
30~1,500 Drücken Sie «ENTER».
5. Drücken Sie die
bestätigen die Position
des die Batterie, wenn die Oberfläche kostenlos
erkannt wird. Der Tester Schritte, um die
Oberfläche zu entfernen kostenlos, wenn es
passiert.
6. Batterie testen.
BATTERIE TYP
EFB
START-STOP
TEST
NORM AUSWAEHLEN
SAE
KAPAZITAET CCA
XXXX SAE
IM AUTO?
NEIN
TEST LAEUFT

German
- 7 -
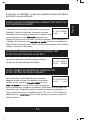
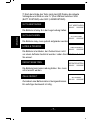
7. Nach dem Ende des Tests zeigt das LED Display die aktuelle
Voltangabe und SAE an oder %. (Zum Wählen zwischen SOH
(BATT. ZUSTAND) oder SOC (LADEZUSTAND).
GUT & BESTANDEN
Die Batterie ist okay & in der Lage Ladung halten.
GUT & AUFLADEN
Die Batterie okay, muss jedoch aufgeladen werden.
LADEN & PRUEFEN
Die Batterie ist entladen, der Zustand kann nicht
vor einem Aufladen bestimmt werden. Laden Sie die Batterie & testen
Sie erneut.
DEFEKT/ERSETZEN
Die Batterie kann keine Ladung halten. Sie muss
sofort ersetzt werden.
ZELLE DEFEKT
Zumindest eine Batteriezelle ist kurzgeschlossen.
Ein sofortiger Austausch ist nötig.
GUT & BESTANDEN
XX.XXV XXXXSAE
DEFEKT/ERSETZEN
XX.XXV XXXXSAE
LADEN & PRUEFEN
XX.XXV XXXXSAE
GUT & AUFLADEN
XX.XXV XXXXSAE
ZELLE DEFEKT
XX.XXV XXXXSAE
La pagina si sta caricando...

German
- 9 -
6. Nach dem Ende des Tests zeigt das LED Display die aktuelle
Voltangabe und SAE an oder %. (Zum Wählen zwischen SOH
(BATT. ZUSTAND) oder SOC (LADEZUSTAND).
GUT & BESTANDEN
Die Batterie ist okay & in der Lage Ladung halten.
GUT & AUFLADEN
Die Batterie okay, muss jedoch aufgeladen werden.
LADEN & PRUEFEN
Die Batterie ist entladen, der Zustand kann nicht
vor einem Aufladen bestimmt werden. Laden Sie die Batterie & testen
Sie erneut.
DEFEKT/ERSETZEN
Die Batterie kann keine Ladung halten. Sie muss
sofort ersetzt werden.
ZELLE DEFEKT
Zumindest eine Batteriezelle ist kurzgeschlossen.
Ein sofortiger Austausch ist nötig.
GUT & BESTANDEN
XX.XXV XXXXSAE
DEFEKT/ERSETZEN
XX.XXV XXXXSAE
LADEN & PRUEFEN
XX.XXV XXXXSAE
GUT & AUFLADEN
XX.XXV XXXXSAE
ZELLE DEFEKT
XX.XXV XXXXSAE
La pagina si sta caricando...

German
- 11 -
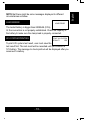
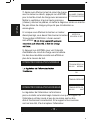
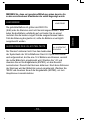
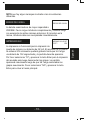
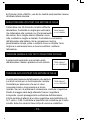
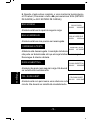
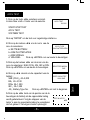
SYSTEMTEST
1. Wenn Sie auf «ENTER» drücken, erscheint
folgender Bildschirm:
2. Schalten Sie alle Verbraucher des Fahrzeugs,
wie etwa Licht, Klimaanlage, Radio usw. aus bevor
Sie das Gerät einschalten.
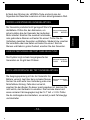
3. Nach dem Start erscheint eins der beiden Resultate mit dem aktuell
gelesenen Wert.
ANLASSS PANNUNG NORMAL
Das System zeigt ein normales Ergebnis. Drücken
Sie auf «ENTER», um den Ladetest auszuführen.
ANLASSS PANNUNG NIEDRIG
Die Startspannung liegt unter normalen Werten,
Suchen Sie nach möglichen Fehlern auf vom Herstellers empfohlene
Weise.
ANLASSS PANNUNG NICHT ENTDECKT
Die Startspannung nicht entdeckt.
4. Drücken Sie bei normaler Startspannung auf
«ENTER», um den Aufladetest zu starten.
5. Wenn Sie auf «ENTER» drücken, erscheint der
folgende Bildschirm.
.
SYSTEM TEST
XX.XXV
VERBRAUCHER AUS
MOTOR STARTEN
ANLASSS PANNUNGS
XX.XXV NORMAL
ANLASSS PANNUNG
XX.XXV NIEDRIG
ANLASSS PANNUNG
NICHTS ENTDECKT
PRESS ENTER FUER
LABUNGS TEST
ALLE VERBRAUCHER
AUSSCHALTEN
La pagina si sta caricando...
La pagina si sta caricando...
La pagina si sta caricando...
La pagina si sta caricando...
La pagina si sta caricando...
La pagina si sta caricando...
La pagina si sta caricando...
La pagina si sta caricando...
La pagina si sta caricando...

Spanish
- 5 -
GUÍA RÁPIDA
1. Conecte el aparato mediante la conexión de las pinzas de la
batería.
2. Seleccione una opción en el menú.
START-STOP
TEST
See P.8 See P.6 See P.11 See P.15 See P. 15
TEST
DE BATERIA
ANALIZADOR
TEST
DEL SISTEMA
LANGUAGE
SELECT
1
2
PERSONALIZAR
La pagina si sta caricando...

Spanish
- 7 -
7. Cuando la prueba está terminada, el LCD muestra los voltajes
actuales y la capacidad en SAE o % (Presione para seleccionar
SOH o SOC. Uno de estos seis resultados serán visualizados:
BUENA
La batería está bien y es capaz de retener la carga.
BUENA-RECARGAR
La batería está bien pero necesita recargarse.
RECARGAR-PROBAR
La batería está descarga, la condición de la batería
no puede determinarse hasta que se carga completamente.
Recargue y vuelva a probar la batería.
MALA-REEMPLAZAR
La batería no retiene la carga. Se debe reemplazar
inmediatamente.
ELEMENTO MALA
La batería tiene al menos una celda en
cortocircuito. Se debe reemplazar inmediatamente.
BUENA
XX.XXV XXXXSAE
MALA-REEMPLAZAR
XX.XXV XXXXSAE
RECARCAR-PROBAR
XX.XXV XXXXSAE
BUENA-RECARGAR
XX.XXV XXXXSAE
ELEMTO MALA
XX.XXV XXXXSAE
La pagina si sta caricando...

Spanish
- 9 -
6. Cuando la prueba está terminada, el LCD muestra los voltajes
actuales y la capacidad en SAE o % (Presione para seleccionar
SOH o SOC. Uno de estos seis resultados serán visualizados:
BUENA
La batería está bien y es capaz de retener la carga.
BUENA-RECARGAR
La batería está bien pero necesita recargarse.
RECARGAR-PROBAR
La batería está descarga, la condición de la batería
no puede determinarse hasta que se carga completamente.
Recargue y vuelva a probar la batería.
MALA-REEMPLAZAR
La batería no retiene la carga. Se debe reemplazar
inmediatamente.
ELEMENTO MALA
La batería tiene al menos una celda en
cortocircuito. Se debe reemplazar inmediatamente.
BUENA
XX.XXV XXXXSAE
MALA-REEMPLAZAR
XX.XXV XXXXSAE
RECARCAR-PROBAR
XX.XXV XXXXSAE
BUENA-RECARGAR
XX.XXV XXXXSAE
ELEMTO MALA
XX.XXV XXXXSAE
La pagina si sta caricando...
La pagina si sta caricando...
La pagina si sta caricando...
La pagina si sta caricando...
La pagina si sta caricando...
La pagina si sta caricando...

Italian
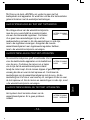
LEGGERE ATTENTAMENTE IL MANUALE PRIMA DI UTILIZZARE QUESTO PRODOTTO
LEGGERE ATTENTAMENTE IL MANUALE PRIMA DI UTILIZZARE QUESTO PRODO
T
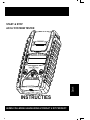
START & STOP
LIBRETTO D’ISTRUZIONI
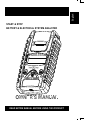
BATTERIA/CARICA/AVVIO DEL SISTEMA DI
ANALIZZAZIONE

Italian
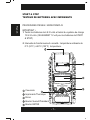
TESTER BATTERIE CON STAMPANTE
START & STOP
PROCEDURE DI TEST / ISTRUZIONI OPERATIVE
- 1 -
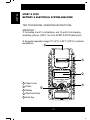
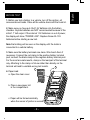
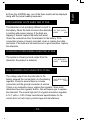
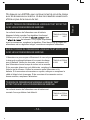
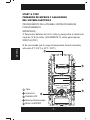
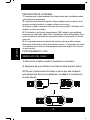
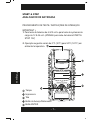
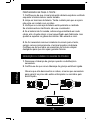
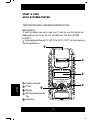
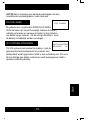
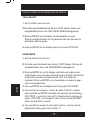
IMPORTANT
1. Per testare le batterie a 6 & 12 volt, e per testare I sistemi di carica
a 12 & 24 volt. (Prova solo 12V per batteria START-STOP)
2. Escursione delle temperature operative suggerite da 0°C (32°F) a
50°C (122°F) della temperatura ambiente.
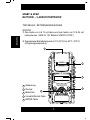
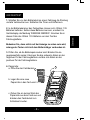
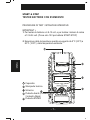
Coperchio
Stampante termica
Schermo
Pulsante Avanti (Forward)
/ Indiestro (Back)
Pulsante ENTER

Italian
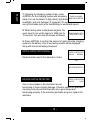
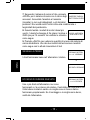
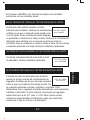
ATTENZIONE
1. Lavorare in prossimità dei poli delle batterie con l’acido è pericoloso
Le batterie generano gas esplosivi durante le normali operazioni della
batteria. Per questa ragione, è estremamente importante, se avete un
qualsiasi dubbio, che ogni volta prima di utilizzare il vostro tester, voi
leggiate queste istruzioni molto attentamente.
2. Per ridurre il rischio di esplosione della batteria, seguite queste
istruzioni e quelle pubblicate dal produttore della batteria e dal
produttore di qualsiasi apparato voi intendiate utilizzare in prossimità
della batteria. Osservate i segni di avvertimento di questi articoli.
3. Non esponete il tester alla pioggia o alla neve.
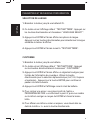
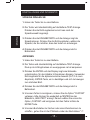
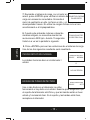
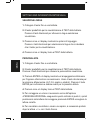
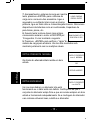
PRECAUZIONI DI SICUREZZA PERSONALI
1.
Ci dovrebbe esser sempre qualcuno in un raggio d’ azione della vostra
voce o abbastanza vicino per venire in vostro aiuto quando voi lavorate
vicino ad un polo di una batteria con acido.
2.
Avere acqua pulita in abbondanza e sapone nelle vicinanze dei casogli
acidi della batteria vengano a contatto con la pelle i vestiti od occhi.
3.
Indossate occhiali di sicurezza e vestiti protettivi.
4.
Se gli acidi della batteria vengono a contatto con la pelle o con i vestiti,
lavate immediatamente con sapone ed acqua. Se l’acido entra negli occhi,
immergete immediatamente gli occhi in acqua corrente fredda per minimo
dieci minuti e andate a prendere le dovute visite mediche.
5.
MAI fumare o emettere una scintilla o fiamma in prossimità della batteria
o del motore.
6.
Essere estremamente prudenti per ridurre il rischio di caduta di attrezzi
metallici sopra la batteria. Possono emettere una scintilla o corto-circuitare
la batteria o altre parti elettriche e possono causare un’esplosione.
7.
Rimuovete gli oggetti metallici personali come anelli, braccialetti, collane
e orologi quando lavorate con i poli di una batteria ad acido. Possono
produrre un corto circuito ad alta intensità abbastanza da raggiungere un
anello o cose metalliche causando una seria bruciatura.
- 2 -

Italian
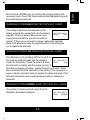
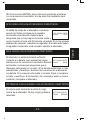
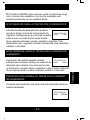
PREPARAZIONE PER TEST :
1. Assicuratevi che l’area intorno alla batteria è ben ventilate mentre
2. Pulite i terminali della batteria. Siate cauti per evitare che gli agenti
corrosive vadano in contatto con gli occhi.
3. Ispezionate la batteria per incrinature o rotture del contenitore o del
coperchio. Se la batteria è danneggiata, non utilizzate il tester.
4. Se la batteria non è del tipo sigillato senza manutenzione,
aggiungete acqua distillate in ogni cella sino a che la batteria ad
acido raggiunge il loivello specificato dal costruttore. Questo aiuta a
5. Se necessario rimuovete la batteria dal veicolo per il test, rimuovet
e
sempre prima il terminale di terra dal veicolo. Assicuratevi che tutti
gli accessori nel veicolo siano spenti per assicurarvi di non causare
nessun arco.
la batteria inizia ad essere testata.
purificare dall’eccesso di gas dale celle. Non oltrepassate il livello
consigliato.
- 3 -
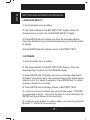
INSERIMENTO O SOSTITUZIONE DI UN CAVO CONDUTTORE
1. Scollegare il cavo del morsetto quando la sostituzione è necessaria
2. Assicurarsi che il nuovo morsetto cavo è ben collegato.
Si noti che non si staccano i cavi se non necessario per assicurarsi
che i perni non sono arrugginiti o corroso dal liquido acido.

Italian
- 4 -
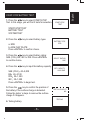
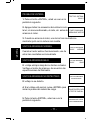
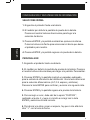
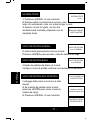
PRIMA PROVA
1. Prima di testare una batteria in un veicolo, spengete l’ignezione,
tutti gli accessori e carichi. Chiudete tutte le portiere del veicolo e lo
sportello del bagagliaio.
2. Assicuratevi di aver inserito 4 pz. di batterie da 1.5V dentro
l’alloggiamento batterie. Se le batterie da 1.5V finiscono la carica, lo
schermo mostrerà “ENERGIA BASSA”. Rimpiazzate le con 4 pz. di
batterie da 1.5V prima di niziare il test.
Nota che lo schermo mostra nulla fino al tester e’ stato
collegato alla batteria dell’automezzo.
3. Assicuratevi che I terminale delle batterie siano puliti. Spazzolateli
con la spazzola metallica se necessario. Fissate il terminale a pinza
nero al terminale negativo della batteria del veicolo. Fissate il
terminale a pinza rosso al terminale della batteria del veicolo
positivo.
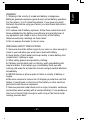
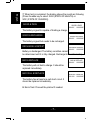
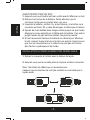
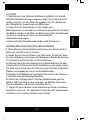
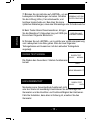
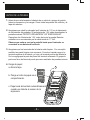
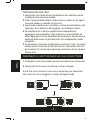
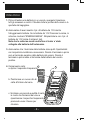
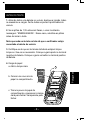
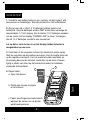
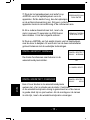
4. Caricamento carta:
a. Aprire il coperchio trasparente.
b. Posizionare un nuovo rullo di
carta all'interno del vano.
c. Srotolare una piccola quantità di carta
in modo che fuoriesca dal vano e
riposizionare il coperchio trasparente
premendo verso il basso per
chiudere.
b
a
La pagina si sta caricando...
La pagina si sta caricando...
La pagina si sta caricando...
La pagina si sta caricando...
La pagina si sta caricando...
La pagina si sta caricando...
La pagina si sta caricando...
La pagina si sta caricando...
La pagina si sta caricando...
La pagina si sta caricando...
La pagina si sta caricando...
La pagina si sta caricando...
La pagina si sta caricando...
La pagina si sta caricando...
La pagina si sta caricando...
La pagina si sta caricando...
La pagina si sta caricando...
La pagina si sta caricando...
La pagina si sta caricando...
La pagina si sta caricando...
La pagina si sta caricando...
La pagina si sta caricando...
La pagina si sta caricando...
La pagina si sta caricando...
La pagina si sta caricando...
La pagina si sta caricando...
La pagina si sta caricando...
La pagina si sta caricando...
La pagina si sta caricando...
La pagina si sta caricando...
La pagina si sta caricando...
La pagina si sta caricando...
La pagina si sta caricando...
La pagina si sta caricando...
La pagina si sta caricando...
La pagina si sta caricando...
La pagina si sta caricando...
La pagina si sta caricando...
La pagina si sta caricando...
La pagina si sta caricando...
La pagina si sta caricando...
La pagina si sta caricando...
La pagina si sta caricando...
La pagina si sta caricando...
-
 1
1
-
 2
2
-
 3
3
-
 4
4
-
 5
5
-
 6
6
-
 7
7
-
 8
8
-
 9
9
-
 10
10
-
 11
11
-
 12
12
-
 13
13
-
 14
14
-
 15
15
-
 16
16
-
 17
17
-
 18
18
-
 19
19
-
 20
20
-
 21
21
-
 22
22
-
 23
23
-
 24
24
-
 25
25
-
 26
26
-
 27
27
-
 28
28
-
 29
29
-
 30
30
-
 31
31
-
 32
32
-
 33
33
-
 34
34
-
 35
35
-
 36
36
-
 37
37
-
 38
38
-
 39
39
-
 40
40
-
 41
41
-
 42
42
-
 43
43
-
 44
44
-
 45
45
-
 46
46
-
 47
47
-
 48
48
-
 49
49
-
 50
50
-
 51
51
-
 52
52
-
 53
53
-
 54
54
-
 55
55
-
 56
56
-
 57
57
-
 58
58
-
 59
59
-
 60
60
-
 61
61
-
 62
62
-
 63
63
-
 64
64
-
 65
65
-
 66
66
-
 67
67
-
 68
68
-
 69
69
-
 70
70
-
 71
71
-
 72
72
-
 73
73
-
 74
74
-
 75
75
-
 76
76
-
 77
77
-
 78
78
-
 79
79
-
 80
80
-
 81
81
-
 82
82
-
 83
83
-
 84
84
-
 85
85
-
 86
86
-
 87
87
-
 88
88
-
 89
89
-
 90
90
-
 91
91
-
 92
92
-
 93
93
-
 94
94
-
 95
95
-
 96
96
-
 97
97
-
 98
98
-
 99
99
-
 100
100
-
 101
101
-
 102
102
-
 103
103
-
 104
104
-
 105
105
-
 106
106
-
 107
107
-
 108
108
-
 109
109
-
 110
110
-
 111
111
-
 112
112
-
 113
113
-
 114
114


in altre lingue
- English: Facom BAT.TEST User manual
- français: Facom BAT.TEST Manuel utilisateur
- español: Facom BAT.TEST Manual de usuario
- Deutsch: Facom BAT.TEST Benutzerhandbuch
- Nederlands: Facom BAT.TEST Handleiding
- português: Facom BAT.TEST Manual do usuário
Documenti correlati
Altri documenti
-
USAG 890K Manuale utente
-
Bahco BBT60 Manuale utente
-
-
 JBM 52233 Guida utente
-
GYS BATTERY TESTER DBT350 Scheda dati
-
GYS BATTERY TESTER DBT400 Scheda dati
-
BLACK DECKER BDSBC30A Manuale del proprietario
-
-
BLACK DECKER BDSBC10A Manuale del proprietario
-
DHC BT2010 Manuale del proprietario
