

2
Disclaimer.................................................................................................................................................3
Warning ....................................................................................................................................................4
About GPS................................................................................................................................................5
Conditions for Use: .................................................................................................................................6
1 Introduction...................................................................................................................................7
1.1 Package Contents: ................................................................................................................7
1.2 Maintenance:..........................................................................................................................7
1.3 Replace Battery: ....................................................................................................................8
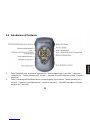
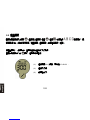
1.4 Introduction to the Hardware ...............................................................................................9
1.5 Basic Specifications............................................................................................................10
2 Instructions ................................................................................................................................. 11
2.1 Start....................................................................................................................................... 11
2.2 Compass Mode ....................................................................................................................12
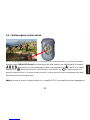
2.3 Temperature Mode...............................................................................................................13
2.4 Location Mode:....................................................................................................................14
2.5 Mark your location...............................................................................................................15
2.6 Other Functions:..................................................................................................................17
2.7 Setup Mode:.........................................................................................................................18
2.7.1 Time zone setup in Compass Mode(satellite icon is flashing) :.........................18
2.7.2 Time zone setup in Compass Mode(satellite icon is not flashing) :..................18
2.7.3 Temperature unit setup in Temperature Mode: .........................................................19
2.7.4 Distance unit setup in Location Mode:.......................................................................19
3 Troubleshooting..........................................................................................................................20

3
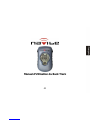
Disclaimer
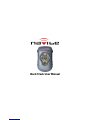
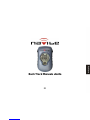
Back Track
User Manual
Version: V1.0
Compass Systems Corp.
E-mail: service@cpss.com.tw
This user manual is only intended for the personal use of the purchaser. The purchaser may not copy or
otherwise publish any part of this user manual for any purpose, in any form or through any method, be it
electronic or mechanical, photographic records included, except with the prior consent in writing of
Compass Systems.
Compass Systems reserves the right to modify without notice any of the information contained within this
user manual. Compass Systems reserves the right to change, improve or modify its product or its content
at any time without having to notify any person or organization.
© Copyright 2009, Compass Systems Corp.
All rights reserved.

4
Warning
The correct and safe use of the Back Track requires the user's familiarity with certain items of knowledge.
Please read through this user manual before operating the device.
The Back Track is only intended to be an auxiliary device and can't be held legally liable for any
accidents resulting from errors in measurement through the user's incorrect operation or use of the Back
Track.

5
About GPS
GPS (Global Positioning System) is a satellite navigation system developed by the U.S. Department of
Defense. GPS consists of 32 satellites orbiting around 11,000 miles above the surface of the Earth.
These satellites travel at speeds that allow them to orbit the planet twice a day and emit a low-powered
radio signal. These signals are received and recorded using five ground stations with extremely accurate
clocks. By using these extremely accurate clocks, the ground stations can determine with great precision
the position of every satellite in their orbit. Your GPS receiver is capable of "reading" the signals
transmitted by these satellites. By knowing the position and distance of al least 4 satellites, it's possible to
accurately calculate the receiver's current latitude, longitude and elevation.
WAAS enhances the accuracy of your GPS. WAAS stands for Wide Area Augmentation System and was
developed by the Federal Aviation Administration to augment the accuracy of GPS for aviation use. It
consists of additional ground stations that are placed at specific locations where the exact coordinates
are known. When used with a master station, the accuracy of satellite positioning signals can be
improved to almost three meters.
The Back Track must scan and detect signals from at least 3 such satellites in order to calculate your
current location and movement. The Back Track is designed for recreational use only. Please do not use
this product for industrial or professional surveying.

6
Conditions for Use:
The Back Track is not designed for indoor or underwater use. The device uses GPS satellites to
calculate distances and is designed to serve as an auxiliary navigation aid for personal between the
temperatures 0°C to +60°C.
If you find that any of the standard accessories listed in this manual are missing or damaged, please
contact your local distributor or retailer.

7
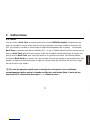
1 Introduction
1.1 Package Contents:
Before using this product, please check that the following items were included within the package. If
there are any missing items, please contact the distributor you purchased this product from immediately.
1. Back Track.
2. User Manual.
3. Neck Lanyard.
1.2 Maintenance:
1. Do not attempt to disassemble the Back Track.
2. This device contains no user-repairable parts.
3. Please store the Back Track out of direct sunlight or high temperatures.

8
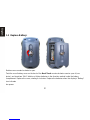
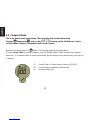
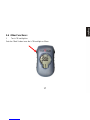
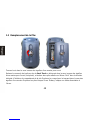
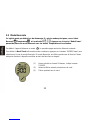
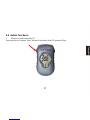
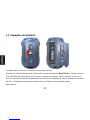
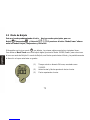
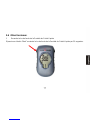
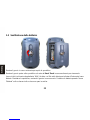
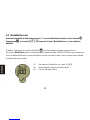
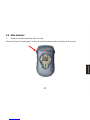
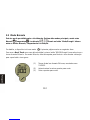
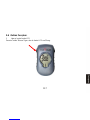
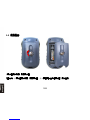
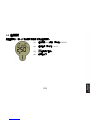
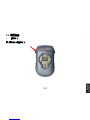
1.3 Replace Battery:
Rotate screw counterclockwise to open
Twist the round battery cover on the back of the Back Track counterclockwise srew to open it (see
photo), and insert two “AAA” alkaline or lithium batteries in the direction marked inside the battery
compartment. Replace the cover, rotating it clockwise. Replace the batteries when the display’s “Battery”
icon indicates
low power.


10
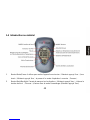
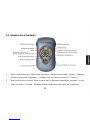
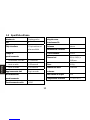
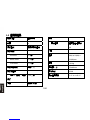
1.5 Basic Specifications
Interface Graphical Display
POI 4
Receiver Chip High sensitivity
receiver chip
Positioning Time
Hot Start < 1 sec
Warm Start < 38 sec
Cold Start < 42 sec
Data Refresh Rate Once every second
Positioning Accuracy
Single unit
positioning with no SA
interference
<10M
Antenna Internal
Power Supply
Battery Type 2xAAA
Size 88(L)x 54(W) x
29(D)mm
Mass <100g
Display Size 33x42mm
Water Resistance IPX6
Operating Temperature
Range
0 °C to + 60 °C

11
2 Instructions
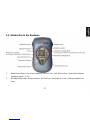
2.1 Start
To turn the Back Track on,hold the MODE/Power button. Make sure you are outdoors with a clear view
of the sky to ensure good quality GPS reception (e.g.; the unit will not work well in an indoor parking
garage). The Back Track will take a few moments to lock on to GPS satellites- the “Satellite” icon will
stop flashing when this is done and the Back Track is ready to use (satellite lock will take longer the first
time the Back Track is used, but be quicker on the next power on). To save time, turn on the Back Track
at least one or two minutes before you will be marking your first location (for example, when entering the
parking lot instead of waiting until you get out of the car and then mark where you left it).
Blinking icon means no fix or scanning. A constantly lit icon means fix acquired or being
acquired. When there is no GPS fix, time is displayed as --:--:--, distance as ---

12
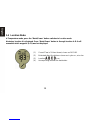
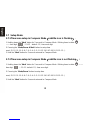
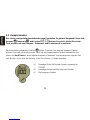
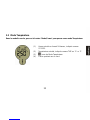
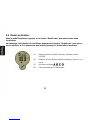
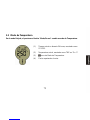
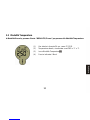
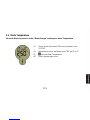
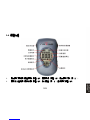
2.2 Compass Mode
This is the default mode upon startup. There are three main modes, these being
Compass , Temperature and Location . Pressing on the "Mode/Power" button
cycles between Compass, Temperature and Location modes.
By default, the device starts in mode. The first page shows the following items:
To use the Back Track as a digital compass, push the “MODE/Power” button to select the Compass
mode icon . In Compass mode, an arrow points North, and the display shows the direction you’re facing
in degrees
(1) Current Time in 24-hour format, shown as 13:58:32 .
(2) Current azimuth and arrow pointing north.
(3) Arrow pointing north.


14
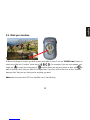
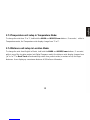
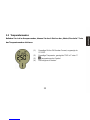
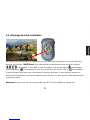
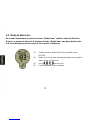
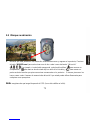
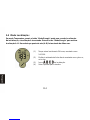
2.4 Location Mode:
In Temperature mode, press the "Mode/Power" button switches to Location mode.
At startup, location A is displayed. Press "Mode/Power" button to through location A~D. It will
remember which waypoint (A~D) was last displayed.
(1) Current Time in 24-hour format, shown as 14:53:06.
(2) Estimated direct line distance shown as in yd or m ; mi or km.
(3) Location icon.
(4) Arrow pointing towards the destination.

15
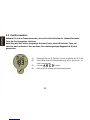
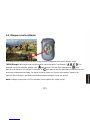
2.5 Mark your location
3
1. While standing at a location you wish to mark and return to later, Push the” MODE/Power” button to
select one of the four “Location” mode icons ( ). For example, if you are out camping, you
might use “ ” to mark your campground, “ ” to mark where you left your vehicle or bike, and “ ” to
mark a favorite scenic spot you want to find again later. If you like, think of the icons as four “location
memory slots” that you can freely use for anything you want.
Note: make sure you have GPS lock (satellite icon is not flashing)

16
2. To mark the location (store it in the Back Track’s memory under your selected, Location icon), hold the
MARK button until the distance indication changes to “0”. It does not matter which direction you face
when marking the location (as a stored GPS location is just a point or “dot”). When you move away from
that location, an arrow points the way back to the location (general direction relative to your current
position), and the display shows your distance from the location. You may now turn the Back Track’s
power off by holding down the MODE/Power button, or proceed to another location you want to mark. Be
sure to select a different Location icon before marking this new spot, as holding MARK with a previously
used Location icon selected will replace that position with your current location.
3. When you’re ready to return to one of your previously marked locations, turn the Back Track back on
(Hold the MODE/Power button). The Back Track will remember the last mode and location you used, so
if the last place you marked was your car in a parking lot, the Back Track will already be showing you the
direction and distance back to your car! If you want to return to a location other than the last one you
marked, just push the MODE/Power button to select the Location icon you used when you marked it
earlier. To find your way back to the selected location, simply move in the direction the arrow points and
watch for the distance to decrease-when you reach your destination, a full circle of arrows will be seen at
the outer edge of the display.


18
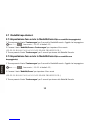
2.7 Setup Mode:
2.7.1 Time zone setup in Compass Mode(satellite icon is flashing) :
1. Holding down the "Mark" button for 3 seconds in Compass Mode . Blinking items include: ,
--:--:--time digit, (-13~12,default -13)time zone digit.
2. Pressing the "Mode/Power & Mark" button to setup time
zone(-13.-12.-11.-10.-9.-8.-7.-6.-5.-4.-3.-2.-1.0.1.2.3.4.5.6.7.8.9.10.11.12.-13..) .
3. Hold the "Mark" button for 3 seconds returned to Compass Mode.
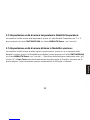
2.7.2 Time zone setup in Compass Mode(satellite icon is not flashing) :
1. Holding down the "Mark" button for 3 seconds in Compass Mode . Blinking items include: , --:--:--
time digit, (-13~12,default -13)time zone digit.
2. Pressing the "Mode/Power" button to setup time
zone(-13.-12.-11.-10.-9.-8.-7.-6.-5.-4.-3.-2.-1.0.1.2.3.4.5.6.7.8.9.10.11.12.-13..)
3. Hold the "Mark" button for 3 seconds returned to Compass Mode

19
2.7.3 Temperature unit setup in Temperature Mode:
To change the units from °F to °C,hold both the MARK and MODE/Power buttons(3 seconds) while in
Temperature mode, the Temperature units display change from °F to°C.
2.7.4 Distance unit setup in Location Mode:
To change the units from English to Metric, hold both the MARK and MODE/Power buttons(3 seconds)
while in any of the Location modes (not Digital Compass mode)- the distance units display changes from
“yd” to “m”. The Back Track will automatically switch from yards to miles (or meters to km) for longer
distances. It can display up a maximum distance of 999 miles or kilometers.

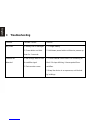
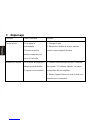
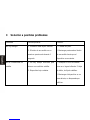
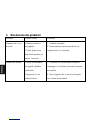
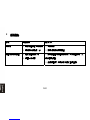
3 Troubleshooting
Problem Possible Causes Solution
No power 1. Battery low or damaged.
2. Power button not held
down for 1 seconds.
1. Change battery.
2. Hold down power button until device powers up.
Satellite not
detected
1. Not enough time to scan
for satellite signal.
2. Device under cover.
1. Check satellite icon to see if it is continuing to
blink. If it stops blinking, it has acquired fix on
satellites.
2. Keep the device in an open area, not blocked
by buildings.
La pagina si sta caricando...
La pagina si sta caricando...
La pagina si sta caricando...
La pagina si sta caricando...
La pagina si sta caricando...
La pagina si sta caricando...
La pagina si sta caricando...
La pagina si sta caricando...
La pagina si sta caricando...
La pagina si sta caricando...
La pagina si sta caricando...
La pagina si sta caricando...
La pagina si sta caricando...
La pagina si sta caricando...
La pagina si sta caricando...
La pagina si sta caricando...
La pagina si sta caricando...
La pagina si sta caricando...
La pagina si sta caricando...
La pagina si sta caricando...
La pagina si sta caricando...
La pagina si sta caricando...
La pagina si sta caricando...
La pagina si sta caricando...
La pagina si sta caricando...
La pagina si sta caricando...
La pagina si sta caricando...
La pagina si sta caricando...
La pagina si sta caricando...
La pagina si sta caricando...
La pagina si sta caricando...
La pagina si sta caricando...
La pagina si sta caricando...
La pagina si sta caricando...
La pagina si sta caricando...
La pagina si sta caricando...
La pagina si sta caricando...
La pagina si sta caricando...
La pagina si sta caricando...
La pagina si sta caricando...
La pagina si sta caricando...
La pagina si sta caricando...
La pagina si sta caricando...
La pagina si sta caricando...
La pagina si sta caricando...
La pagina si sta caricando...
La pagina si sta caricando...
La pagina si sta caricando...
La pagina si sta caricando...
La pagina si sta caricando...
La pagina si sta caricando...
La pagina si sta caricando...
La pagina si sta caricando...
La pagina si sta caricando...
La pagina si sta caricando...
La pagina si sta caricando...
La pagina si sta caricando...
La pagina si sta caricando...
La pagina si sta caricando...
La pagina si sta caricando...
La pagina si sta caricando...
La pagina si sta caricando...
La pagina si sta caricando...
La pagina si sta caricando...
La pagina si sta caricando...
La pagina si sta caricando...
La pagina si sta caricando...
La pagina si sta caricando...
La pagina si sta caricando...
La pagina si sta caricando...
La pagina si sta caricando...
La pagina si sta caricando...
La pagina si sta caricando...
La pagina si sta caricando...
La pagina si sta caricando...
La pagina si sta caricando...
La pagina si sta caricando...
La pagina si sta caricando...
La pagina si sta caricando...
La pagina si sta caricando...
La pagina si sta caricando...
La pagina si sta caricando...
La pagina si sta caricando...
La pagina si sta caricando...
La pagina si sta caricando...
La pagina si sta caricando...
La pagina si sta caricando...
La pagina si sta caricando...
La pagina si sta caricando...
La pagina si sta caricando...
La pagina si sta caricando...
La pagina si sta caricando...
La pagina si sta caricando...
La pagina si sta caricando...
La pagina si sta caricando...
La pagina si sta caricando...
La pagina si sta caricando...
La pagina si sta caricando...
La pagina si sta caricando...
La pagina si sta caricando...
La pagina si sta caricando...
La pagina si sta caricando...
La pagina si sta caricando...
La pagina si sta caricando...
La pagina si sta caricando...
La pagina si sta caricando...
La pagina si sta caricando...
La pagina si sta caricando...
La pagina si sta caricando...
La pagina si sta caricando...
La pagina si sta caricando...
La pagina si sta caricando...
La pagina si sta caricando...
La pagina si sta caricando...
La pagina si sta caricando...
La pagina si sta caricando...
La pagina si sta caricando...
La pagina si sta caricando...
La pagina si sta caricando...
La pagina si sta caricando...
-
 1
1
-
 2
2
-
 3
3
-
 4
4
-
 5
5
-
 6
6
-
 7
7
-
 8
8
-
 9
9
-
 10
10
-
 11
11
-
 12
12
-
 13
13
-
 14
14
-
 15
15
-
 16
16
-
 17
17
-
 18
18
-
 19
19
-
 20
20
-
 21
21
-
 22
22
-
 23
23
-
 24
24
-
 25
25
-
 26
26
-
 27
27
-
 28
28
-
 29
29
-
 30
30
-
 31
31
-
 32
32
-
 33
33
-
 34
34
-
 35
35
-
 36
36
-
 37
37
-
 38
38
-
 39
39
-
 40
40
-
 41
41
-
 42
42
-
 43
43
-
 44
44
-
 45
45
-
 46
46
-
 47
47
-
 48
48
-
 49
49
-
 50
50
-
 51
51
-
 52
52
-
 53
53
-
 54
54
-
 55
55
-
 56
56
-
 57
57
-
 58
58
-
 59
59
-
 60
60
-
 61
61
-
 62
62
-
 63
63
-
 64
64
-
 65
65
-
 66
66
-
 67
67
-
 68
68
-
 69
69
-
 70
70
-
 71
71
-
 72
72
-
 73
73
-
 74
74
-
 75
75
-
 76
76
-
 77
77
-
 78
78
-
 79
79
-
 80
80
-
 81
81
-
 82
82
-
 83
83
-
 84
84
-
 85
85
-
 86
86
-
 87
87
-
 88
88
-
 89
89
-
 90
90
-
 91
91
-
 92
92
-
 93
93
-
 94
94
-
 95
95
-
 96
96
-
 97
97
-
 98
98
-
 99
99
-
 100
100
-
 101
101
-
 102
102
-
 103
103
-
 104
104
-
 105
105
-
 106
106
-
 107
107
-
 108
108
-
 109
109
-
 110
110
-
 111
111
-
 112
112
-
 113
113
-
 114
114
-
 115
115
-
 116
116
-
 117
117
-
 118
118
-
 119
119
-
 120
120
-
 121
121
-
 122
122
-
 123
123
-
 124
124
-
 125
125
-
 126
126
-
 127
127
-
 128
128
-
 129
129
-
 130
130
-
 131
131
-
 132
132
-
 133
133
-
 134
134
-
 135
135
-
 136
136
-
 137
137
-
 138
138
-
 139
139
-
 140
140


in altre lingue
- français: Navibe Back Track Manuel utilisateur
- español: Navibe Back Track Manual de usuario
- Deutsch: Navibe Back Track Benutzerhandbuch
Altri documenti
-
Bushnell 360110 Manuale utente
-
-
-
-
-
Bushnell BackTrack Series BackTrack Point5 Manuale utente
-
Garmin GPS152H Manuale utente
-
Suunto X9 Manuale utente
-
Timex Cycle Trainer 2.0 GPS Guida utente
-
Widex Compass GPS 4.6 Guida utente