INSTRUCCIONES
DE PINTURA
Las parrillas de la serie Sonance Visual Performance y Cinema Series
cubren totalmente el marco expuesto del altavoz, solamente las
parrillas (no las altavoces) requieren pintura. Los altavoces tienen
protectores para protegerlos si se pinta la pared o el techo despues de
que los altavoces esten instalados.
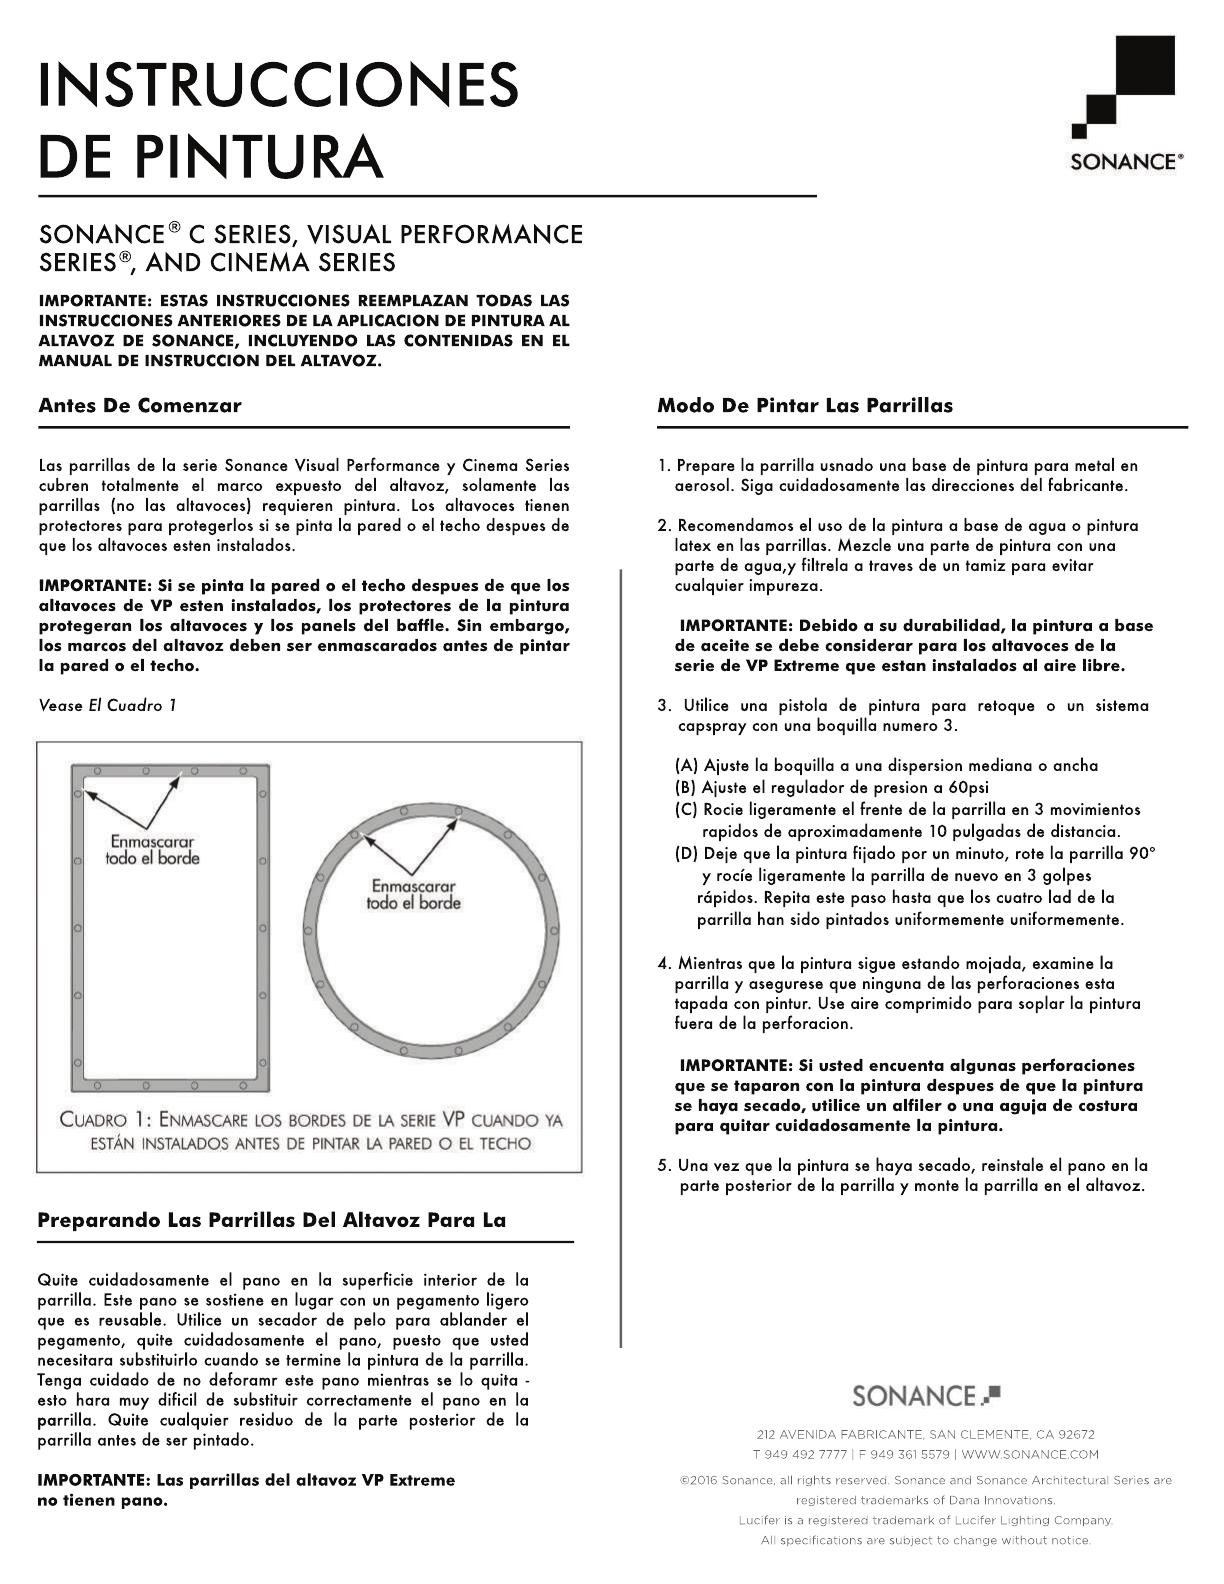
IMPORIMPORTANTE: Si se pinta la pared o el techo despues de que los
altavoces de VP esten instalados, los protectores de la pintura
protegeran los altavoces y los panels del baffle. Sin embargo,
los marcos del altavoz deben ser enmascarados antes de pintar
la pared o el techo.
Vease El Cuadro 1
IMPORTANTE: ESTAS INSTRUCCIONES REEMPLAZAN TODAS LAS
INSTRUCCIONES ANTERIORES DE LA APLICACION DE PINTURA AL
ALTAVOZ DE SONANCE, INCLUYENDO LAS CONTENIDAS EN EL
MANUAL DE INSTRUCCION DEL ALTAVOZ.
Antes De Comenzar
Quite cuidadosamente el pano en la superficie interior de la
parrilla. Este pano se sostiene en lugar con un pegamento ligero
que es reusable. Utilice un secador de pelo para ablander el
pegamento, quite cuidadosamente el pano, puesto que usted
necesitara substituirlo cuando se termine la pintura de la parrilla.
Tenga cuidado de no deforamr este pano mientras se lo quita -
esto hara muy dificil de substituir correctamente el pano en la
paparrilla. Quite cualquier residuo de la parte posterior de la
parrilla antes de ser pintado.
IMPORTANTE: Las parrillas del altavoz VP Extreme
no tienen pano.
Preparando Las Parrillas Del Altavoz Para La
1. Prepare la parrilla usnado una base de pintura para metal en
aerosol. Siga cuidadosamente las direcciones del fabricante.
2. Recomendamos el uso de la pintura a base de agua o pintura
latex en las parrillas. Mezcle una parte de pintura con una
parte de agua,y filtrela a traves de un tamiz para evitar
cualquier impureza.
IMPORTANTE: Debido a su durabilidad, la pintura a base
de aceite se debe considerar para los altavoces de la
serie de VP Extreme que estan instalados al aire libre.
3. Utilice una pistola de pintura para retoque o un sistema
capspray con una boquilla numero 3.
(A) Ajuste la boquilla a una dispersion mediana o ancha
(B) Ajuste el regulador de presion a 60psi
(C) Rocie ligeramente el frente de la parrilla en 3 movimientos
rapidos de aproximadamente 10 pulgadas de distancia.
(D) Deje que la pintura fijado por un minuto, rote la parrilla 90º
y rocíe ligeramente la parrilla de nuevo en 3 golpes
rápidos. Repita este paso hasta que los cuatro lad de la
parrilla han sido pintados uniformemente uniformemente.
4. Mient4. Mientras que la pintura sigue estando mojada, examine la
parrilla y asegurese que ninguna de las perforaciones esta
tapada con pintur. Use aire comprimido para soplar la pintura
fuera de la perforacion.
IMPORTANTE: Si usted encuenta algunas perforaciones
que se taparon con la pintura despues de que la pintura
se haya secado, utilice un alfiler o una aguja de costura
para quitar cuidadosamente la pintura.
5. Una vez que la pintura se haya secado, reinstale el pano en la
parte posterior de la parrilla y monte la parrilla en el altavoz.
©2016 Sonance, all rights reserved. Sonance and Sonance Architectural Series are
registered trademarks of Dana Innovations.
Lucifer is a registered trademark of Lucifer Lighting Company.
All specifications are subject to change without notice.
212 AVENIDA FABRICANTE, SAN CLEMENTE, CA 92672
T 949 492 7777 | F 949 361 5579 | WWW.SONANCE.COM
Modo De Pintar Las Parrillas
SONANCE C SERIES, VISUAL PERFORMANCE
SERIES
, AND CINEMA SERIES
®
®


