
User’s Guide
Viper TX 100
For Maintenance Kits, Spares,
Service and Support
Call: +44 (0) 1628 588755
E-mail: support@colourgen.com


Us er s Gu id e V iper TX 1 0 0
A P -7 5350 -Revis ion 1 . 1 3
2
C opyrig h tN otice
C O P Y RIGH T © 2 0 1 0 M u tohEu rope nv A llrights res erved .
M u tohE u rope nv res erves the rightto m od ify the information c ontained in this manu alatany
tim e withou tpriornotic e.
This d oc u mentmay notbe reprod u c ed by any m eans , in whole orin part, withou twritten
perm is s ion ofthe c opyrightowner.
This d oc u mentis fu rnis hed to s u pportthe M u toh V iperTX 1 0 0 s eries printers . In
c ons id eration ofthe fu rnis hing ofthe information c ontained in this d oc u ment, the party to
whom itis given, as s u mes its c u s tod y and c ontroland agrees to the following:
The information herein c ontained is given in c onfid enc e, and any partthereofs hallnotbe
c opied orreprod u c ed withou twritten c ons entofM u toh Eu rope nv
This d oc u mentorthe c ontents herein u nd erno c irc u ms tanc es s hallbe u s ed in the
manu fac tu re orreprod u c tion ofthe artic le s hown and the d elivery ofthis d oc u ments hallnot
c ons titu te any rightorlic ens e to d o s o.
A pril2 0 1 0
P u blis hed : M u toh E u rope nv, A rc himed es s traat1 3, B -8 40 0 O os tend e, B E L GIUM

Us er s Gu id e V iper TX 1 0 0
4 A P -7 5350 -Revis ion 1 . 1

Users G uide Viper TX 100
A P -7 5350 - Rev ision 1.1- 1/4/10 5
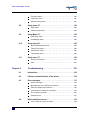
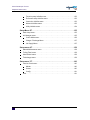
Ta bleof contents
C h a pter1 Sa fetyinstructions . . . . . . . . . . . . . . . . . . . . . . . . . . . 9
1.1 C om plia ncew ith th efollow ing reg ula tions . . . . . . . . . . . . . . 11
1.2 H a ndling inksa ndw a ste. . . . . . . . . . . . . . . . . . . . . . . . . . . . . . 12
1.3 W a rning s, ca utionsa ndnotes. . . . . . . . . . . . . . . . . . . . . . . . . 13
1.4 Sa fetyinstructions . . . . . . . . . . . . . . . . . . . . . . . . . . . . . . . . . . 14
1.5 W a rning la bels. . . . . . . . . . . . . . . . . . . . . . . . . . . . . . . . . . . . . . 16
C h a pter2 P roductov erv iew . . . . . . . . . . . . . . . . . . . . . . . . . . . 19
2.1 P a rtna m esa ndfunctions. . . . . . . . . . . . . . . . . . . . . . . . . . . . . 20
Front....................................................20
Rear ....................................................21
Heater system............................................22
Operation panel ..........................................23
Winding system ..........................................25
C h a pter3 B a sics . . . . . . . . . . . . . . . . . . . . . . . . . . . . . . . . . . . . 27
3.1 Sw itch ing th epow erO N / O F F . . . . . . . . . . . . . . . . . . . . . . . . . 29
Switching the power ON ...................................29
Switching the power OFF ..................................30
Switching ON-OFF the power of the winding system ...........31
3.2 P erfectm edia h a ndling . . . . . . . . . . . . . . . . . . . . . . . . . . . . . . . 32
Unwinder / winder 100.....................................32
Switchable print platform...................................33
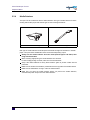
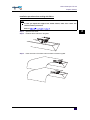
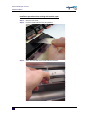
Pressure rollers disabler tool ...............................36
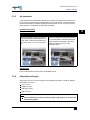
Media Retainers ..........................................38
Ink absorbents ...........................................41

Users G uide Viper TX 100
A P -7 5350 - Rev ision 1.1- 1/4/10 6
Adjustable head height ....................................41
Extra fans ...............................................42
Extra Tensioning Tool (ETT) ...............................42
Media core braces ........................................42
3.3 H a ndling a ndloa ding m edia . . . . . . . . . . . . . . . . . . . . . . . . . . . 44
Overview ................................................44
Cautions on handling media ................................45
Precaution on storing media................................45
Loading media ...........................................46
3.4 F ea turesto im prov eth eprintqua lity . . . . . . . . . . . . . . . . . . . 6 0
Nozzlecheck .............................................60
Head cleaning............................................61
Media feed compensation (step) ............................62
3.5 Refilling th eink ca ssettes . . . . . . . . . . . . . . . . . . . . . . . . . . . . 6 6
3.6 Sw itch ing betw een inkconfig ura tions . . . . . . . . . . . . . . . . . . 6 7
3.7 Sw itch ing ink types(D ispersedye Directdisperse) . . . . . 6 9
3.8 Repla cing th ew a stebottle. . . . . . . . . . . . . . . . . . . . . . . . . . . . 7 1
Replacement Procedures ..................................71
3.9 Reloca ting a ndtra nsporting th eprinter. . . . . . . . . . . . . . . . . 7 3
Relocating the printer......................................73
Transporting the printer ....................................74
C h a pter4 P eriodica lm a intena nce . . . . . . . . . . . . . . . . . . . . . . 7 7
4.1 Donebyth eenduser . . . . . . . . . . . . . . . . . . . . . . . . . . . . . . . . 7 8
Overview ................................................79
User and good shape kit ...................................80
Daily Maintenance ........................................81
Weekly maintenance ......................................87
Monthly maintenance......................................89
Six monthly maintenance ..................................91

Users G uide Viper TX 100
A P -7 5350 - Rev ision 1.1- 1/4/10 7
4.2 Donebya n a uth orizedM utoh tech nicia n . . . . . . . . . . . . . . . . 9 3
Overview ................................................93
Part numbers of the maintenance kits........................93
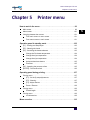
C h a pter5 P rinterm enu . . . . . . . . . . . . . . . . . . . . . . . . . . . . . . . 9 5
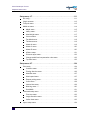
5.1 H ow to w orkin th em enu . . . . . . . . . . . . . . . . . . . . . . . . . . . . . 9 9
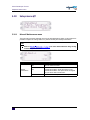
Main screen..............................................99
Menu screen ............................................100
Changing between the screens ............................101
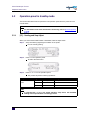
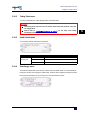
5.2 O pera tion pa nelin sta ndbym ode . . . . . . . . . . . . . . . . . . . . . 102
[F1] - Feeding and Step Adjust ............................102
[F2] - Cleaning the heads .................................103
[F3] - Controlling the heater elements.......................103
[F4] - Operating the pressure rollers ........................105
[ENTER] - Print mode check ..............................106
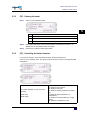
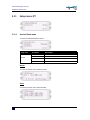
5.3 O pera ting pa nelduring printing . . . . . . . . . . . . . . . . . . . . . . . 107
Printing menu ...........................................107
Printing menu ...........................................109
Printing menu ...........................................109
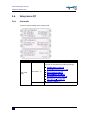
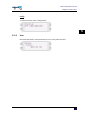
5.4 M enu ov erv iew . . . . . . . . . . . . . . . . . . . . . . . . . . . . . . . . . . . . . 110
5.5 S etup m enu 1/7 . . . . . . . . . . . . . . . . . . . . . . . . . . . . . . . . . . . . 111
Ink config ...............................................111
Origin set menu .........................................112
Test print menu..........................................113
Media set menu .........................................114
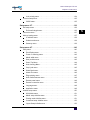
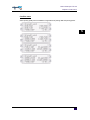
5.6 Setup m enu 2/7 . . . . . . . . . . . . . . . . . . . . . . . . . . . . . . . . . . . . 124
Print mode ..............................................124
Command setup menu ...................................132
Layout setup menu ......................................134
Function setup menu .....................................135
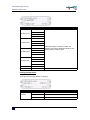
5.7 Setup m enu 3/7 . . . . . . . . . . . . . . . . . . . . . . . . . . . . . . . . . . . . 136

Users G uide Viper TX 100
8 A P -7 5350 - Rev ision 1.1- 1/4/10
Roll setup menu .........................................136
Centronics menu ........................................137
Network setting menu ....................................137
5.8 Setup m enu 4/7 . . . . . . . . . . . . . . . . . . . . . . . . . . . . . . . . . . . . 140
Utility menu .............................................140
Initialize setup menu .....................................150
5.9 Setup M enu 5/7 . . . . . . . . . . . . . . . . . . . . . . . . . . . . . . . . . . . . 155
Data dump menu ........................................155
Ink Manager menu .......................................155
5.10 Setup m enu 6 /7 . . . . . . . . . . . . . . . . . . . . . . . . . . . . . . . . . . . . 158
Manual Maintenance menu ...............................158
Tubing Flush menu ......................................159
Head Unlock menu ......................................159
Tankchange menu .......................................159
5.11 Setup m enu 7 /7 . . . . . . . . . . . . . . . . . . . . . . . . . . . . . . . . . . . . 16 0
Version Check menu .....................................160
Area ...................................................161
C h a pter6 Troublesh ooting . . . . . . . . . . . . . . . . . . . . . . . . . . . 16 3
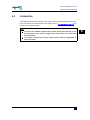
6 .1 Introduction . . . . . . . . . . . . . . . . . . . . . . . . . . . . . . . . . . . . . . . 16 5
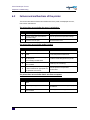
6 .2 F a iluresa ndm a lfunctionsof th eprinter. . . . . . . . . . . . . . . . 16 6
6 .3 Errorm essa g es. . . . . . . . . . . . . . . . . . . . . . . . . . . . . . . . . . . . 17 3
Status messages ........................................173
Message type error display and solutions ...................174
Data error display and solutions............................175
Command error display and solutions.......................175
Error requiring a restart ...................................176
External errors ..........................................177
6 .4 W h en m edia ja m soccur. . . . . . . . . . . . . . . . . . . . . . . . . . . . . 17 8
How to remove a piece of media ...........................178

Us er s Gu id e V iper TX 1 0 0
C hapter1 S afety ins tru c tions
A P -7 5350 -Revis ion 1 . 1 9
1
C hapter1 S afety instructions
C om plia ncew ith th efollow ing reg ula tions. . . . . . . . . . . . . . . . . . . . . . . 11
H a ndling inksa ndw a ste. . . . . . . . . . . . . . . . . . . . . . . . . . . . . . . . . . . . . . 12
W a rning s, ca utionsa ndnotes . . . . . . . . . . . . . . . . . . . . . . . . . . . . . . . . . 13
Sa fetyinstructions. . . . . . . . . . . . . . . . . . . . . . . . . . . . . . . . . . . . . . . . . . . 14
W a rning la bels . . . . . . . . . . . . . . . . . . . . . . . . . . . . . . . . . . . . . . . . . . . . . . 16

Us er s Gu id e V iper TX 1 0 0
C hapter1 S afety ins tru c tions
10 A P -7 5350 -Revis ion 1 . 1
This c hapterexplains the ins tallation ofV iperTX 1 0 0 , warning term s thatoperators need to
know, c au tion item s and warning labels on the printerm ain u nit.
׳°±®¬¿²¬
W h en insta lling a ndopera ting th isprinter, be sureto follow th edirectionsa nd
w a rning sin th isg uide.

Us er s Gu id e V iper TX 1 0 0
C hapter1 S afety ins tru c tions
A P -7 5350 -Revis ion 1 . 1 11
1
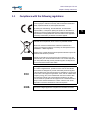
1.1 C om pliance w ith the follow ing regulations
The C E marking is a mand atory E u ropean marking forc ertain
prod u c tgrou ps to ind ic ate c onformity with the es s entialhealth and
s afety req u irements s etou tin Eu ropean D irec tives .
B y affixing the C E m arking, the m anu fac tu rer, his au thorized
repres entative, orthe pers on plac ing the prod u c ton the m arketor
pu tting itinto s ervic e ens u res thatthe item m eets allthe es s ential
requ irem ents ofallapplic able EU d irec tives and thatthe applic able
c onform ity as s es s m entproc ed u res have been applied .
You rprod u c tis d es igned and manu fac tu red with high-qu ality
materials and c omponents , whic h c an be rec yc led and reu s ed .
W hen this c ros s ed -ou twheeled bin s u bm enu is attac hed to a
prod u c t, itm eans the prod u c tis c overed by the E u ropean D irec tive
2 0 0 2 /96/E C -W EEE regu lation.
P leas e inform you rs elfabou tthe loc als eparate c ollec tion s ys tem for
elec tric aland elec tronic prod u c ts .
P leas e ac tac c ord ingto loc alru les and d o notd is pos e ofyou rold
prod u c ts with you rnormalhou s ehold was te. The c orrec td is pos alof
you rold prod u c twillhelppreventpotentialnegative c ons eq u enc es
forthe environmentand hu man health.
F C C
This eq u ipmenthas been tes ted and fou nd to c omply with the lim its
fora C las s A d igitald evic e, pu rs u antto P art1 5 ofthe FC C Ru les .
Thes e limits are d es igned to provid e reas onable protec tion agains t
harmfu linterferenc e when the eq u ipm entis operated in a c omm erc ial
environm ent. This eq u ipm entgenerates , u s es , and c an rad iate rad io
freq u enc y energy and , ifnotins talled and u s ed in ac c ord anc e with
the ins tru c tion manu al, may c au s e harmfu linterferenc e to rad io
c om mu nic ations . O peration ofthis eq u ipmentin a res id entialarea is
likely to c au s e harm fu linterferenc e in whic h c as e the u s erwillbe
requ ired to c orrec tthe interferenc e athis own expens e.
IC ES
This C las s A d igitalapparatu s c om plies with C anad ian IC E S -0 0 3.

Us er s Gu id e V iper TX 1 0 0
C hapter1 S afety ins tru c tions
12 A P -7 5350 -Revis ion 1 . 1
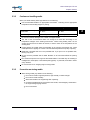
1.2 H andling inks and w aste
B efore hand linginks /c leaningand theirwas te, C A RE FUL L Y RE A D TH E M A TE RIA L
S A FETY D A TA S H E ETS (M S D S )and the labels forim portanthealth, s afety and
environmentalinformation. P os tthes e d oc u m ents in the workarea as req u ired by fed eralor
loc allaw. A lls afety d ata s heets are period ic ally u pd ated . Thes e s heets and theirtrans lations
c an be fou nd on ©©©ò³«¬±¸ò»«
O nly u s e originalm anu fac tu rer's ink and appropriate c leaning liqu id . B efore ins talling an
inkhold er, s hake itgently. D oing s o willpres erve printqu ality.
W hen inkis moved from a c old plac e to a warm plac e, keepthe inkforthree hou rs ormore
in the new printing environmentbefore printing.
D o notd is as s em ble ink hold er. O therwis e, ink m ay getin you r eyes or on you r s kin. A
d is as s em bled inkhold erc annotbe u s ed either.
W hen refilling ink, u s e originalm anu fac tu rer's ink. O u rM u tohprinters are d es igned to u s e
originalink. Ifyou u s e inkwhic h are notprod u c ed by the originalm anu fac tu rer:
printing mightbec ome blu rred and the end ofthe inkin the hold ermightnotbe
d etec ted c orrec tly
A ny problems c au s ed by u s ingan inkhold erotherthan thos e rec om mend ed above will
notbe c overed by the warranty, and repairexpens es willbe paid by the c u s tomer.
Forhand lingwas te: s ee s ec tion 1 3 on the M S D S -s heet
Inks /W as te
G enera la dv ice: wears afety glas s es and gloves es pec ially when hand ling the was te
ink.
A fterspill: rem ove c ontam inated c lothing.
A fterinh a la tion: ifd iffic u lties oc c u rafterinhaling vapou r/aeros ol, rem ove to fres h air
and s eekmed ic alattention.
A fterskin conta ct: was h thorou ghly withs oapand water.
A ftereyeconta ct: was h affec ted eyes foratleas t15 minu tes u nd erru nning water
while the eyelid s are held open.
A ftersw a llow ing : rins e mou thand d rinkplenty ofwater. N everind u c e vomiting.

Us er s Gu id e V iper TX 1 0 0
C hapter1 S afety ins tru c tions
A P -7 5350 -Revis ion 1 . 1 13
1
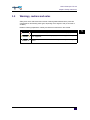
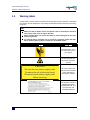
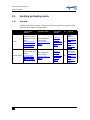
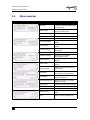
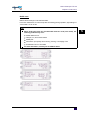
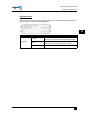
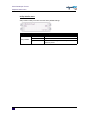
1.3 W arnings,cautions and notes
S afety term s in this manu aland the c ontents ofwarning labels attac hed to the printerare
c ategorized into the followingthree types , d epend ing on the d egree ofris k(orthe s c ale of
ac c id ent).
Read the following explanations c arefu lly and follow the ins tru c tions in this m anu al.
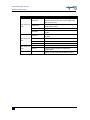
S a fetyterm s Deta ils
Im porta nt M u s tbe followed c arefu lly to avoid d eath ors eriou s bod ily inju ry.
C a ution
M u s tbe obs erved to avoid bod ily inju ry (mod erate orlight)ord am age to
you req u ipment.
N otes
C ontains im portantinform ation and u s efu ltips on the operation ofyou r
printer.

Us er s Gu id e V iper TX 1 0 0
C hapter1 S afety ins tru c tions
14 A P -7 5350 -Revis ion 1 . 1
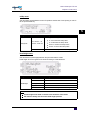
1.4 S afety instructions
M a ch inesm ustbeinsta lleda ccording to M utoh 'sInsta lla tion G uidea lso a fterm ov ing
m a ch inesto a noth erloca tion;m a intena nceneedsto bedonea ccording to th eserv ice
m a nua l.
To preventfire orelec tric als hoc k, never u s e a power s u pply s ou rc e otherthan the one
rated forthe prod u c tin the c ou ntry where you pu rc has ed the prod u c t.
Us e only the provid ed power c able. To prevent fire or elec tric al s hoc k, follow the
ins tru c tions below when hand ling the powerc able:
D o notc u tormod ify the c able.
D o notpu theavy objec ts on the c able.
D o notbend , twis t, knotorpu llthe c able.
D o notwire the c able nearequ ipm entthatgenerates heat.
D o notu s e the c able withany otherelec tric ald evic e
D o nothand le the c able with wethand s
B e aware ofallc au tion and warninglabels to avoid potentially hazard ou s s itu ations .
To preventfire orelec tric als hoc k, m ac hines m u s tbe c onnec ted to a properly grou nd ed
elec tric alpowerou tlet. D o notc onnec tthe powerc able to a powers tripora powers ou rc e
s hared by otherelec tric ald evic es .
M ake s u re thatno foreign s u bs tanc es s u c h as d u s tetc . are s tu c kto the powerplu g.
M ake s u re thatthe powerplu g is firm ly ins erted to the ed ge ofthe powers oc ket.
D o notd is able any s afety prec au tions s ys tem s .
D o notoperate the u nitu nles s allparts are mou nted .
D o notplac e the mac hine in the following areas . D oing s o may res u ltin the mac hine
tipping orfalling overand c au s ing inju ry.
Uns table s u rfac es
S loping floors
A reas s u bjec tto vibration by othereq u ipm ent
D o nots tand on or plac e heavy objec ts on you r m ac hine. D oing s o m ay res u ltin the
mac hine tippingorfalling overand c au s ing inju ry.
D o notplac e the m ac hine in hu mid and d u s ty areas orin areas expos ed to flam mables .
D oing s o may res u ltin elec tric als hoc korfire.
D o notc over the ventilation hole of you rm ac hine with c loth, s u c h as a blanketor table
c loth. D oings o c ou ld obs tru c tventilation and c au s e fire.
D o notins ertor d rop m etalor inflam mable objec ts into openings , s u c h as ventilation
ou tlets . D oings o may res u ltin elec tric als hoc kand fire.
S topu s ing you rmac hine ifa liq u id is s pilled into it. This may c au s e elec tric als hoc korfire.
S witc h the m ac hine offas s oon as pos s ible, u nplu gthe powerc ord , and c ontac tyou rloc al
M u tohd ealer.

Us er s Gu id e V iper TX 1 0 0
C hapter1 S afety ins tru c tions
A P -7 5350 -Revis ion 1 . 1 15
1
B e s u re to power O FF the mac hine and u nplu g the power c able from the ou tletbefore
c leaning the mac hine. Us e a d am p c loth to c lean the m ac hine. D o notu s e thinner,
benzene, alc oholorotherac tive agents . D oing s o m ay res u ltin d amage orpaintpeeling
from the c as ing.
D o notbend orpu llthe was te flu id tu be. D oing s o m ay c au s e was te flu id to leak ou tand
malfu nc tion ofthe prod u c t.
D o nottiltthe mac hine, plac e itagains ta wallortu rn itu ps id e d own. D oing s o may c au s e
ink to leak ins id e the mac hine. M ovementafter trans portis als o notc overed by the
warranty.
To preventbac kpains and otherinju ries , always work with atleas t4 people to u npac k or
move the mac hine. Keepthe m ac hine horizontally d u ring trans portation.
D o N O T trans portthe mac hine to anotherroom withou tc ontac ting you rloc alA u thorized
M u tohD ealer.

Us er s Gu id e V iper TX 1 0 0
C hapter1 S afety ins tru c tions
16 A P -7 5350 -Revis ion 1 . 1
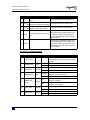
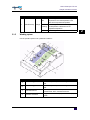
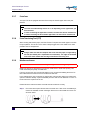
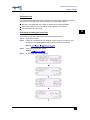
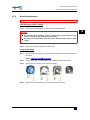
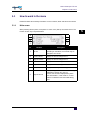
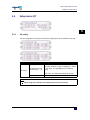
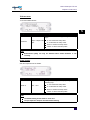
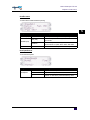
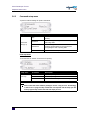
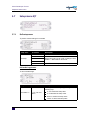
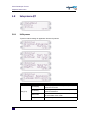
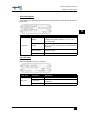
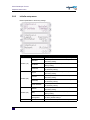
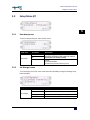
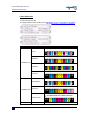
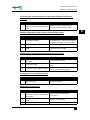
1.5 W arning labels
A s afety labelis u s ed on parts ofthe printerwhic hes pec ially need you rattention. Und ers tand
the loc ations and the d es c riptions ofthe d angeras s oc iated with eac h labelbefore operating
the printer.
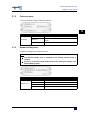
Ò±¬»
M a ke sure th a ta ll la bels ca n be recog nized. I f textorillustra tions ca nnotbe
seen clea rly, eith erclea n orrepla ceth ela bel.
W h en clea ning la bels, usea cloth w ith w a terorneutra ldeterg ent. D o notusea
solv entorg a soline.
If a w a rning la bel isda m a g ed, lostorca nnotbe recog nized, repla ce th e la bel.
W h en repla cing w a rning la bels, conta ctyourloca lM utoh dea ler.
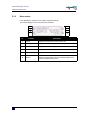
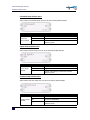
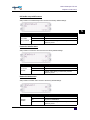
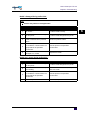
L a bel D escription
This labelwarns you to
be c arefu lnotto pinc h
you rfingers .
This labelwarns you that
this area mightbe hot.
B e c arefu lnotto bu rn
you rs elf.
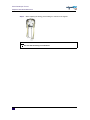
B e s u re to d is c onnec t
boththe printeras wind er
powerc able before
s ervic ing the mac hine.
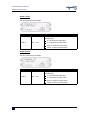
The d evic e is a C las s A
d igitalapparelwhic h
c om plies with P art1 5 of
the FC C ru les and
C anad ian IC E S -0 0 3
Ý¿«¬·±²
̸·- «²·¬ ¸¿- ¬©± °±©»® -«°°´§ ½±®¼-ò
̱ ®»¼«½» ¬¸» ®·-µ ±º »´»½¬®·½¿´ -¸±½µ
Ü·-½±²²»½¬ ¾±¬¸ °±©»® -«°°´§ ½±®¼-
Þ»º±®» -»®ª·½·²¹

Us er s Gu id e V iper TX 1 0 0
C hapter1 S afety ins tru c tions
A P -7 5350 -Revis ion 1 . 1 17
1
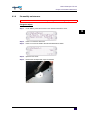
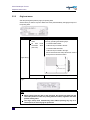
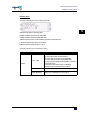
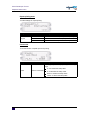
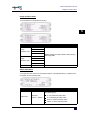
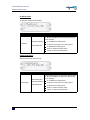
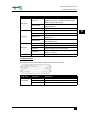
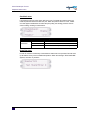
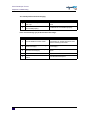
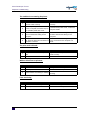
Itis very importantto
have the lates tfirm ware
ins talled on you rprinter
before performing the
firs tinkload . B u gfixes or
otherinnovative featu res
may be implem ented in a
newerfirm ware.
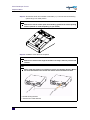
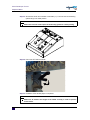
S ome parts need to be
removed firs tbefore
powering O N the print.
The s wingbars are fragile
and the c omplete
wind ing s ys tem is
c alibrated .
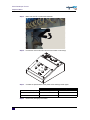
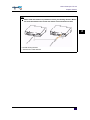
To avoid d is tortion ofthe
printer, itis prohibited to
liftthe printerwith a
forklift.
L a bel D escription

Us er s Gu id e V iper TX 1 0 0
C hapter1 S afety ins tru c tions
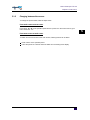
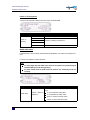
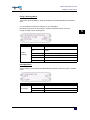
18 A P -7 5350 -Revis ion 1 . 1
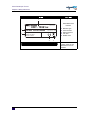
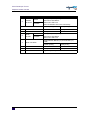
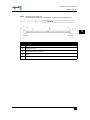
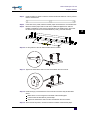
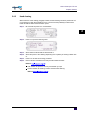
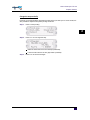
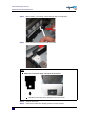
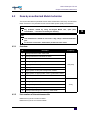
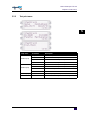
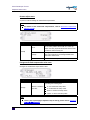
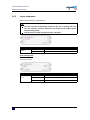
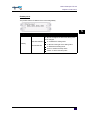
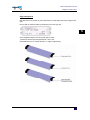
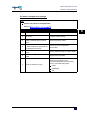
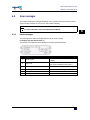
S eriallabelofthe
mac hine.
1. Machine type
2. Serial number
3. Electrical specs
4. CE mark
5. WEEE mark
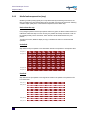
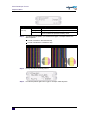
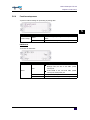
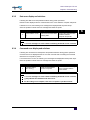
Inkord erlabel. To know
in whic h ord erthe ink
c as s ettes have to be
ins erted .
L a bel D escription
ËÒ×Ì ó ÌÈÛè﨨
ÓËÌÑØ Û«®±°» ÒòÊò
ß®½¸·³»¼»--¬®¿¿¬ ïí
Þ ó èìðð ѱ-¬»²¼»
Í»®·¿´Òp ÛȨÕ󨨨¨¨¨
Ó¿¼» ·² ÞÛÔÙ×ËÓ
Ó¿²«º¿½¬«®»¼ æ îððç
ʱ´¬¿¹» æ
Ú®»¯«»²½§ æ
Ý«®®»²¬ æ
ßÝ ïððóïîðÊ ñ îîðóîìðÊ
êð ñ ëð ئ
ïîß ñ êß
ï
î
í
ì ë
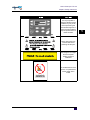
ݧ¿²
Þ´¿½µ
Þ´¿½µ
ï
î
Ðï
Ðî
Ðí
í ì
Ðì
ë
Ðë
ê
Ðê
é
Ðé
è
Ðè
ç ïð ïï
ïî
ïí ïì ïë
ïê
î¨è -§³³»¬®·½
ïÝïØ »¨¬®òì¨ì
Þ´¿½µ
Í°±¬½±´±® ì
Þ´¿½µÍ°±¬½±´±® í
д»¿-» ®»º»® ¬± ³¿²«¿´ º±® ±¬¸»® ·²µ ½±²º·¹«®¿¬·±²-ò
Í°±¬½±´±® ì
Í°±¬½±´±® ï
Ç»´´±©
Í°±¬½±´±® î Ç»´´±©Ç»´´±© Í°±¬½±´±® î Í°±¬½±´±® ï
Ó¿¹»²¬¿
ݧ¿²
Ó¿¹»²¬¿
Ó¿¹»²¬¿
ݧ¿²Þ´¿½µ
Þ´¿½µ
Ç»´´±©
Ç»´´±©
Ç»´´±©
Ó¿¹»²¬¿
Ó¿¹»²¬¿
Ó¿¹»²¬¿
ݧ¿² ݧ¿²
ݧ¿²
Í°±¬½±´±® í

Us er s Gu id e V iper TX 1 0 0
C hapter2 P rod u c toverview
A P -7 5350 -Revis ion 1 . 1 19
2
C hapter2 P roductoverview
P a rtna m esa ndfunctions. . . . . . . . . . . . . . . . . . . . . . . . . . . . . . . . . . . . . 20
Front. . . . . . . . . . . . . . . . . . . . . . . . . . . . . . . . . . . . . . . . . . . . . . . . . . . . . . . . . 20
Rear . . . . . . . . . . . . . . . . . . . . . . . . . . . . . . . . . . . . . . . . . . . . . . . . . . . . . . . . . 21
Heater system . . . . . . . . . . . . . . . . . . . . . . . . . . . . . . . . . . . . . . . . . . . . . . . . . 22
Operation panel . . . . . . . . . . . . . . . . . . . . . . . . . . . . . . . . . . . . . . . . . . . . . . . . 23
Operation keys . . . . . . . . . . . . . . . . . . . . . . . . . . . . . . . . . . . . . . . . . . . . . 23
LCD monitor and light indicators . . . . . . . . . . . . . . . . . . . . . . . . . . . . . . . 24
Winding system . . . . . . . . . . . . . . . . . . . . . . . . . . . . . . . . . . . . . . . . . . . . . . . . 25

Us er s Gu id e V iper TX 1 0 0
C hapter2 P rod u c toverview
20 A P -7 5350 -Revis ion 1 . 1
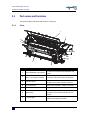
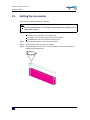
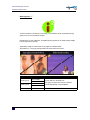
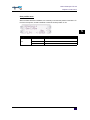
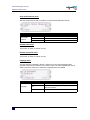
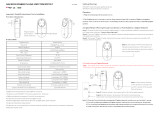
2.1 P artnam es and functions
This s ec tion explains the nam es and fu nc tions ofeac h part.
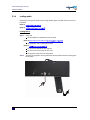
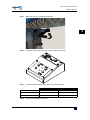
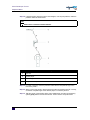
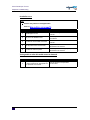
2.1.1 Front
ï
î
í
ì
ë
ê
é
è
ç
ïð
N ° Description F unction
ï Unwind er/W ind erc ontrolpanel
To c ontrolthe c om plete Unwind er/wind er1 0 0
s ys tem.
î
Frontc over
(O pen itby u s ing the hand les )
This c overkeeps the operators afe from the
d rive parts ofthe printerwhile itis operating.
í O peration panel
This panelis u s ed to s etoperationalc ond itions ,
the s tatu s ofthe printerand otherfu nc tions .
ì Inkc om partment S ixteen s lots available to ins tallinkc as s ettes .
ë ETT hand le To operate the extra tens ioning tool
ê W as te bottle
To c ollec tthe was te flu id . S hou ld be em ptied
ac c ord ing to the proc ed u re d es c ribed in this
manu al.
é Fronts wingbar
To ad ju s tthe tens ion ofthe fabric and to
optimis e the wind ing ofthe fabric .
La pagina si sta caricando...
La pagina si sta caricando...
La pagina si sta caricando...
La pagina si sta caricando...
La pagina si sta caricando...
La pagina si sta caricando...
La pagina si sta caricando...
La pagina si sta caricando...
La pagina si sta caricando...
La pagina si sta caricando...
La pagina si sta caricando...
La pagina si sta caricando...
La pagina si sta caricando...
La pagina si sta caricando...
La pagina si sta caricando...
La pagina si sta caricando...
La pagina si sta caricando...
La pagina si sta caricando...
La pagina si sta caricando...
La pagina si sta caricando...
La pagina si sta caricando...
La pagina si sta caricando...
La pagina si sta caricando...
La pagina si sta caricando...
La pagina si sta caricando...
La pagina si sta caricando...
La pagina si sta caricando...
La pagina si sta caricando...
La pagina si sta caricando...
La pagina si sta caricando...
La pagina si sta caricando...
La pagina si sta caricando...
La pagina si sta caricando...
La pagina si sta caricando...
La pagina si sta caricando...
La pagina si sta caricando...
La pagina si sta caricando...
La pagina si sta caricando...
La pagina si sta caricando...
La pagina si sta caricando...
La pagina si sta caricando...
La pagina si sta caricando...
La pagina si sta caricando...
La pagina si sta caricando...
La pagina si sta caricando...
La pagina si sta caricando...
La pagina si sta caricando...
La pagina si sta caricando...
La pagina si sta caricando...
La pagina si sta caricando...
La pagina si sta caricando...
La pagina si sta caricando...
La pagina si sta caricando...
La pagina si sta caricando...
La pagina si sta caricando...
La pagina si sta caricando...
La pagina si sta caricando...
La pagina si sta caricando...
La pagina si sta caricando...
La pagina si sta caricando...
La pagina si sta caricando...
La pagina si sta caricando...
La pagina si sta caricando...
La pagina si sta caricando...
La pagina si sta caricando...
La pagina si sta caricando...
La pagina si sta caricando...
La pagina si sta caricando...
La pagina si sta caricando...
La pagina si sta caricando...
La pagina si sta caricando...
La pagina si sta caricando...
La pagina si sta caricando...
La pagina si sta caricando...
La pagina si sta caricando...
La pagina si sta caricando...
La pagina si sta caricando...
La pagina si sta caricando...
La pagina si sta caricando...
La pagina si sta caricando...
La pagina si sta caricando...
La pagina si sta caricando...
La pagina si sta caricando...
La pagina si sta caricando...
La pagina si sta caricando...
La pagina si sta caricando...
La pagina si sta caricando...
La pagina si sta caricando...
La pagina si sta caricando...
La pagina si sta caricando...
La pagina si sta caricando...
La pagina si sta caricando...
La pagina si sta caricando...
La pagina si sta caricando...
La pagina si sta caricando...
La pagina si sta caricando...
La pagina si sta caricando...
La pagina si sta caricando...
La pagina si sta caricando...
La pagina si sta caricando...
La pagina si sta caricando...
La pagina si sta caricando...
La pagina si sta caricando...
La pagina si sta caricando...
La pagina si sta caricando...
La pagina si sta caricando...
La pagina si sta caricando...
La pagina si sta caricando...
La pagina si sta caricando...
La pagina si sta caricando...
La pagina si sta caricando...
La pagina si sta caricando...
La pagina si sta caricando...
La pagina si sta caricando...
La pagina si sta caricando...
La pagina si sta caricando...
La pagina si sta caricando...
La pagina si sta caricando...
La pagina si sta caricando...
La pagina si sta caricando...
La pagina si sta caricando...
La pagina si sta caricando...
La pagina si sta caricando...
La pagina si sta caricando...
La pagina si sta caricando...
La pagina si sta caricando...
La pagina si sta caricando...
La pagina si sta caricando...
La pagina si sta caricando...
La pagina si sta caricando...
La pagina si sta caricando...
La pagina si sta caricando...
La pagina si sta caricando...
La pagina si sta caricando...
La pagina si sta caricando...
La pagina si sta caricando...
La pagina si sta caricando...
La pagina si sta caricando...
La pagina si sta caricando...
La pagina si sta caricando...
La pagina si sta caricando...
La pagina si sta caricando...
La pagina si sta caricando...
La pagina si sta caricando...
La pagina si sta caricando...
La pagina si sta caricando...
La pagina si sta caricando...
La pagina si sta caricando...
La pagina si sta caricando...
La pagina si sta caricando...
La pagina si sta caricando...
La pagina si sta caricando...
La pagina si sta caricando...
La pagina si sta caricando...
La pagina si sta caricando...
La pagina si sta caricando...
La pagina si sta caricando...
La pagina si sta caricando...
La pagina si sta caricando...
La pagina si sta caricando...
La pagina si sta caricando...
La pagina si sta caricando...
-
 1
1
-
 2
2
-
 3
3
-
 4
4
-
 5
5
-
 6
6
-
 7
7
-
 8
8
-
 9
9
-
 10
10
-
 11
11
-
 12
12
-
 13
13
-
 14
14
-
 15
15
-
 16
16
-
 17
17
-
 18
18
-
 19
19
-
 20
20
-
 21
21
-
 22
22
-
 23
23
-
 24
24
-
 25
25
-
 26
26
-
 27
27
-
 28
28
-
 29
29
-
 30
30
-
 31
31
-
 32
32
-
 33
33
-
 34
34
-
 35
35
-
 36
36
-
 37
37
-
 38
38
-
 39
39
-
 40
40
-
 41
41
-
 42
42
-
 43
43
-
 44
44
-
 45
45
-
 46
46
-
 47
47
-
 48
48
-
 49
49
-
 50
50
-
 51
51
-
 52
52
-
 53
53
-
 54
54
-
 55
55
-
 56
56
-
 57
57
-
 58
58
-
 59
59
-
 60
60
-
 61
61
-
 62
62
-
 63
63
-
 64
64
-
 65
65
-
 66
66
-
 67
67
-
 68
68
-
 69
69
-
 70
70
-
 71
71
-
 72
72
-
 73
73
-
 74
74
-
 75
75
-
 76
76
-
 77
77
-
 78
78
-
 79
79
-
 80
80
-
 81
81
-
 82
82
-
 83
83
-
 84
84
-
 85
85
-
 86
86
-
 87
87
-
 88
88
-
 89
89
-
 90
90
-
 91
91
-
 92
92
-
 93
93
-
 94
94
-
 95
95
-
 96
96
-
 97
97
-
 98
98
-
 99
99
-
 100
100
-
 101
101
-
 102
102
-
 103
103
-
 104
104
-
 105
105
-
 106
106
-
 107
107
-
 108
108
-
 109
109
-
 110
110
-
 111
111
-
 112
112
-
 113
113
-
 114
114
-
 115
115
-
 116
116
-
 117
117
-
 118
118
-
 119
119
-
 120
120
-
 121
121
-
 122
122
-
 123
123
-
 124
124
-
 125
125
-
 126
126
-
 127
127
-
 128
128
-
 129
129
-
 130
130
-
 131
131
-
 132
132
-
 133
133
-
 134
134
-
 135
135
-
 136
136
-
 137
137
-
 138
138
-
 139
139
-
 140
140
-
 141
141
-
 142
142
-
 143
143
-
 144
144
-
 145
145
-
 146
146
-
 147
147
-
 148
148
-
 149
149
-
 150
150
-
 151
151
-
 152
152
-
 153
153
-
 154
154
-
 155
155
-
 156
156
-
 157
157
-
 158
158
-
 159
159
-
 160
160
-
 161
161
-
 162
162
-
 163
163
-
 164
164
-
 165
165
-
 166
166
-
 167
167
-
 168
168
-
 169
169
-
 170
170
-
 171
171
-
 172
172
-
 173
173
-
 174
174
-
 175
175
-
 176
176
-
 177
177
-
 178
178
-
 179
179
-
 180
180
-
 181
181
-
 182
182


in altre lingue
- English: MUTOH Viper TX 100 User manual
Documenti correlati
Altri documenti
-
 NAMRON 70110005 Manuale utente
-
 NAMRON 4512735 Manuale utente
-
EDIFIER R2000DB Manuale utente
-
HQ AT20 Manuale utente
-
Matsui MAT7DB2656E Manuale utente
-
NAMRON 4512746 Manuale utente
-
Dell C6220 Guida utente
-
-
-

