
Vacuum Sealer
Operating manual . . . . . . . . . . . . . . . 6
Vakuumierer
Bedienungsanleitung . . . . . . . . . . . . 20
Appareil de mise sous vide
Notice d’utilisation . . . . . . . . . . . . . . 35
Envasadora al vacío
Instrucciones de uso . . . . . . . . . . . . 49
Sigillatrice per sottovuoto
Istruzioni per l’uso . . . . . . . . . . . . . . 64
Vacuüminrichting
Gebruiksaanwijzing . . . . . . . . . . . . . 79
Vakuumforsegler
Betjeningsvejledning . . . . . . . . . . . . 93
Vakuumförpackare
Bruksanvisning . . . . . . . . . . . . . . . 107
Vakuum-maskin
Bruksanvisning . . . . . . . . . . . . . . . 121
Tyhjiöintilaite
Käyttöohje . . . . . . . . . . . . . . . . . . . 135
Seladora a vácuo
Manual de instruções. . . . . . . . . . . 149
Вакууматор
Инструкция по эксплуатации. . . . 164
Urządzenie do pakowania
próżniowego
Instrukcja obsługi. . . . . . . . . . . . . . 179
EN
DE
FR
ES
IT
NL
DA
SV
NO
FI
PT
RU
PL
Vakuovačka
Návod k obsluze . . . . . . . . . . . . . . 193
Vákuovací prístroj
Návod na obsluhu. . . . . . . . . . . . . 207
Vákuumcsomagoló készülék
Használati utasítás . . . . . . . . . . . . 221
CS
SK
HU
VacuSealer
VS1000


VacuSealer VS1000
3
1 2 3
7 6 5 4
1
1 2
3
2
1 2
3
10
9
4
5678
3

VacuSealer VS1000
4
21
4
5
6
7
8

VacuSealer VS1000
5
9
0
a

EN
VacuSealer VS1000
6
Please read this instruction manual carefully before first use, and store
it in a safe place. If you pass on the product to another person, hand
over this instruction manual along with it.
Table of contents
1 Explanation of symbols . . . . . . . . . . . . . . . . . . . . . . . . . . . . . . . . . . . 7
2 Safety instructions . . . . . . . . . . . . . . . . . . . . . . . . . . . . . . . . . . . . . . . 7
3 Scope of delivery . . . . . . . . . . . . . . . . . . . . . . . . . . . . . . . . . . . . . . . 10
4 Accessories . . . . . . . . . . . . . . . . . . . . . . . . . . . . . . . . . . . . . . . . . . . 10
5 Intended use . . . . . . . . . . . . . . . . . . . . . . . . . . . . . . . . . . . . . . . . . . 10
6 Technical description . . . . . . . . . . . . . . . . . . . . . . . . . . . . . . . . . . . . 11
7 Using the vacuum sealer . . . . . . . . . . . . . . . . . . . . . . . . . . . . . . . . . 12
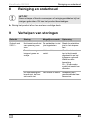
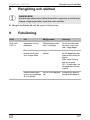
8 Cleaning and maintenance . . . . . . . . . . . . . . . . . . . . . . . . . . . . . . . 16
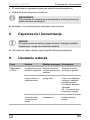
9 Troubleshooting . . . . . . . . . . . . . . . . . . . . . . . . . . . . . . . . . . . . . . . . 16
10 Warranty . . . . . . . . . . . . . . . . . . . . . . . . . . . . . . . . . . . . . . . . . . . . . 19
11 Disposal . . . . . . . . . . . . . . . . . . . . . . . . . . . . . . . . . . . . . . . . . . . . . . 19
12 Technical data . . . . . . . . . . . . . . . . . . . . . . . . . . . . . . . . . . . . . . . . . 19

EN
VacuSealer VS1000 Explanation of symbols
7
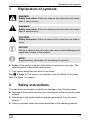
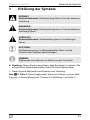
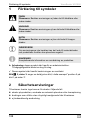
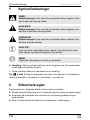
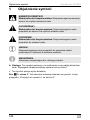
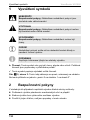
1 Explanation of symbols
D
!
!
A
I
➤ Action: This symbol indicates that action is required on your part. The
required action is described step-by-step.
✓ This symbol describes the result of an action.
Fig. 1 5, page 3: This refers to an element in an illustration. In this case,
item 5 in figure 1 on page 3.
2 Safety instructions
The manufacturer accepts no liability for damage in the following cases:
Damage to the product resulting from mechanical influences and excess
voltage
Alterations to the product without express permission from the manu-
facturer
Use for purposes other than those described in the operating manual
DANGER!
Safety instruction: Failure to observe this instruction will cause
fatal or serious injury.
WARNING!
Safety instruction: Failure to observe this instruction can cause
fatal or serious injury.
CAUTION!
Safety instruction: Failure to observe this instruction can lead to
injury.
NOTICE!
Failure to observe this instruction can cause material damage and
impair the function of the product.
NOTE
Supplementary information for operating the product.

EN
Safety instructions VacuSealer VS1000
8
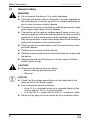
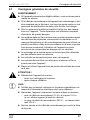
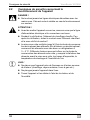
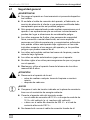
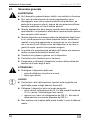
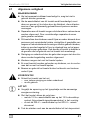
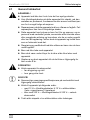
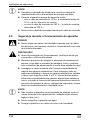
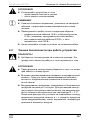
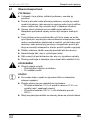
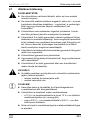
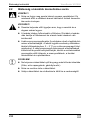
2.1 General safety
!
WARNING!
Do not operate the device if it is visibly damaged.
If this device's power cable is damaged, it must be replaced by
the manufacturer, customer service or a similarly qualified per-
son in order to prevent safety hazards.
This device may only be repaired by qualified personnel. Inade-
quate repairs may cause serious hazards.
This device can be used by children aged 8 years or over, as
well as by persons with diminished physical, sensory or mental
capacities or a lack of experience and knowledge, providing
they are supervised, or have been taught how to use the device
safely and are aware of the resulting risks.
Cleaning and user maintenance must not carried out by unsu-
pervised children.
Children must not play with the device.
Children must be supervised to ensure that they do not play with
the device.
Always keep and use the device out of the reach of children
under 8 years of age.
!
CAUTION!
Disconnect the device from the mains:
– Before cleaning and maintenance
– After use
A
NOTICE!
Check that the voltage specification on the type plate is the
same as that of the power supply.
Only connect the device as follows:
– to the 12 Vg on-board socket (e.g. cigarette lighter) in the
vehicle with the 12 Vg connection cable
– or to the 230 Vw mains with the 230 Vw connection cable
Never pull the plug out of the socket by the connection cable.

EN
VacuSealer VS1000 Safety instructions
9
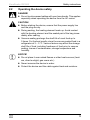
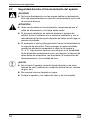
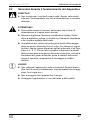
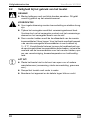
2.2 Operating the device safely
D
DANGER!
Do not touch exposed cables with your bare hands. This applies
especially when operating the device from the AC mains.
!
CAUTION!
Before starting the device, ensure that the power supply line
and the plug are dry.
During sealing, the heating element heats up. Avoid contact
with the heating element and the sealed part of the bag imme-
diately after sealing.
Vacuum-sealing prolongs the shelf-life of most food up to
5 times. For the best results, store the vacuum-sealed food in a
refrigerator at 3–5°C. Various factors may affect the storage
shelf life of food, including freshness of food prior to vacuum
sealing, traces of contaminates, storage temperature and
humidity.
A
NOTICE!
Do not place it near naked flames or other heat sources (heat-
ers, direct sunlight, gas ovens etc.)
Never immerse the device in water.
Protect the device and the cable against heat and moisture.

EN
Scope of delivery VacuSealer VS1000
10
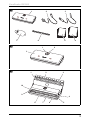
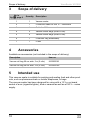
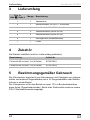
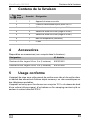
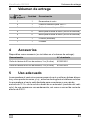
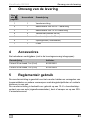
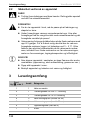
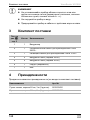
3 Scope of delivery
4 Accessories
Available as accessories (not included in the scope of delivery):
5 Intended use
This vacuum sealer is suitable for packing and sealing food and other prod-
ucts, such as pharmaceuticals or mobile telephones, in bags.
The vacuum sealer has been designed for using with a 12 Vg on-board
socket of a car (cigarette lighter), boat or caravan as well as a 230 Vw mains
supply.
No. in
fig. 1, page 3
Quantity Description
1 1 Vacuum sealer
2 1 Connection cable for 230 Vw connection
3 1 Cable for 12 Vg connection
4 5 Vacuum sealer bags (width 28 cm)
5 5 Vacuum sealer bags (width 20 cm)
6 1 Collection tray (detachable)
7 1 Cutter
Description Item no.
Vacuum roll bag 20 cm wide, 3 m (2 rolls) 9103533021
Vacuum roll bag 28 cm wide, 3 m (2 rolls) 9103533022

EN
VacuSealer VS1000 Technical description
11
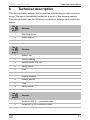
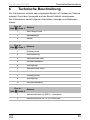
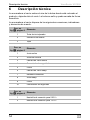
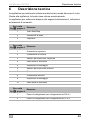
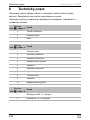
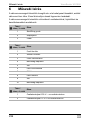
6 Technical description
The vacuum sealer extracts the air from the inserted bag so that a vacuum
forms. The bag is hermetically sealed as a result of the vacuum sealing.
The vacuum sealer has the following connections, displays and control ele-
ments:
No. in
fig. 2,
page 3
Element
1 Start/Stop button
2 Status display
3Lid
No. in
fig. 3,
page 3
Element
1 Gasket, top
2 Silicone sealing
3 Vacuum sealer tray, top
4 Safety switch
5Lock
6 Vacuum sealer tray, bottom
7 Heating element
8 Gasket, bottom
9Lock
10 Safety switch
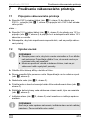
No. in
fig. 4,
page 4
Element
1 Socket for 230 Vw connection cable
2 Socket for 12 Vg connection cable

EN
Using the vacuum sealer VacuSealer VS1000
12
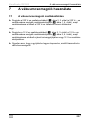
7 Using the vacuum sealer
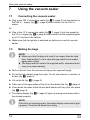
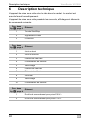
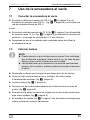
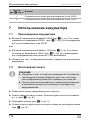
7.1 Connecting the vacuum sealer
➤ Plug in the 230 V connection cable (fig. 1 2, page 3) into the socket for
the 230 Vw supply (fig. 4 1, page 4) and connect it to the 230 Vw
mains.
Or
➤ Plug in the 12 V connection cable (fig. 1 3, page 3) into the socket for
the 12 Vg supply (fig. 4 2, page 4) and connect it to the cigarette lighter
or a 12 V socket in the vehicle.
➤ Make sure that the ignition is switched on before you use the vacuum
sealer.
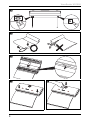
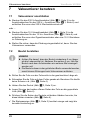
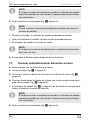
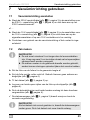
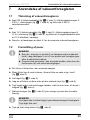
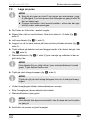
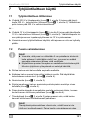
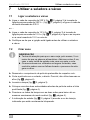
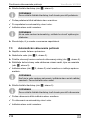
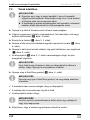
7.2 Making the bags
I
➤ Roll out the foil from the vacuum roll bag to the required length.
➤ Cut off the foil straight using the cutter. Do not use scissors, or similar, to
do this (fig. 5, page 4).
➤ Lift up the lid (fig. 2 3, page 3).
➤ Place one of the open sides of the foil on the dotted line (fig. 6, page 4).
➤ Press down the sides of the lid with both hands until they click into place
(fig. 7, page 4).
✓ The status display (fig. 2 2, page 3) lights up orange and shows that it
has locked properly.
I
NOTE
Make sure that the bag is at least 5 cm longer than the food
item. Add another 2 cm in case the bag needs to be sealed
again after cutting.
The bags must be used in the supplied width, otherwise faults
may occur when sealing.
NOTE
If the lid is not closed properly, the status display continues to light
up green. Press the lid down more firmly.

EN
VacuSealer VS1000 Using the vacuum sealer
13
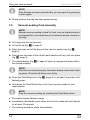
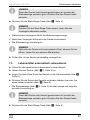
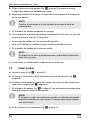
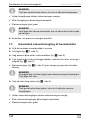
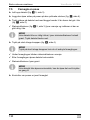
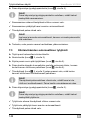
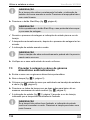
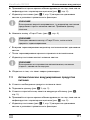
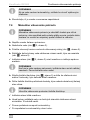
➤ Press the Start/Stop button (fig. 8, page 4).
I
✓ During sealing, the status display flashes orange.
✓ After sealing, the lid opens automatically.
✓ The status display lights up green.
I
➤ Check whether the bag has been sealed evenly.
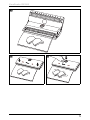
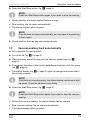
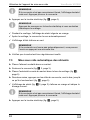
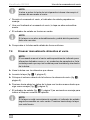
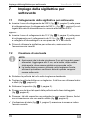
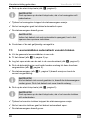
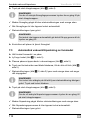
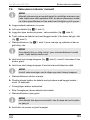
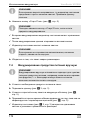
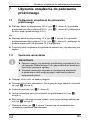
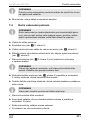
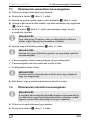
7.3 Vacuum-sealing food automatically
➤ Fill a bag with the food product.
➤ Lift up the lid (fig. 2 3, page 3).
➤ Place the open end of the bag into the vacuum sealer tray (fig. 9,
page 5).
➤ Press down the sides of the lid with both hands until they click into place
(fig. 0, page 5).
✓ The status display (fig. 2 2, page 3) lights up orange and shows that it
has locked properly.
I
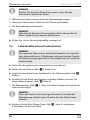
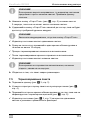
➤ Press the Start/Stop button (fig. a, page 5).
I
✓ During the vacuum-sealing, the status display flashes orange.
✓ After vacuum-sealing, the lid opens automatically.
✓ The status display lights up green.
NOTE
Press the Start/Stop button again if you want to stop the sealing.
NOTE
If the lid does not open automatically, you can open it by pressing
it down again.
NOTE
If the lid is not closed properly, the status display continues to light
up green. Press the lid down more firmly.
NOTE
Press the Start/Stop button again if you want to stop the vacuum-
sealing.

EN
Using the vacuum sealer VacuSealer VS1000
14
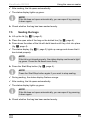
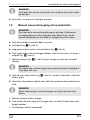
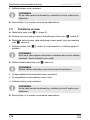
I
➤ Check whether the bag has been sealed evenly.
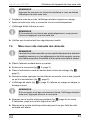
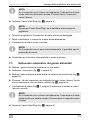
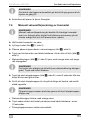
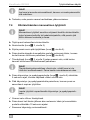
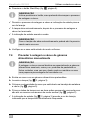
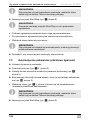
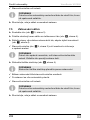
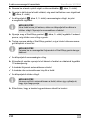
7.4 Vacuum-sealing food manually
I
➤ Fill a bag with the food product.
➤ Lift up the lid (fig. 2 3, page 3).
➤ Place the open end of the bag into the vacuum sealer tray (fig. 9,
page 5).
➤ Press down the sides of the lid with both hands until they click into place
(fig. 0, page 5).
✓ The status display (fig. 2 2, page 3) lights up orange and shows that it
has locked properly.
I
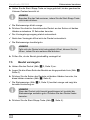
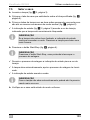
➤ Press the Start/Stop button (fig. a, page 5) for at least 2 seconds until it
flashed green.
➤ Hold down the Start/Stop button until it has vacuum-sealed to your
requirements.
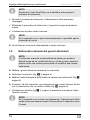
I
✓ The status display flashes orange.
➤ Immediately afterwards, press down the lid at the sides with both hands
for at least 10 seconds.
✓ The sealing procedure starts automatically.
NOTE
If the lid does not open automatically, you can open it by pressing
it down again.
NOTE
Manual vacuum-sealing is ideal for food, such as baked products
or chopped fruit, as a small amount of moisture and air remains in
the bag.
NOTE
If the lid is not closed properly, the status display continues to light
up green. Press the lid down more firmly.
NOTE
Stop the vacuum-sealing by releasing the Start/Stop button.

EN
VacuSealer VS1000 Using the vacuum sealer
15
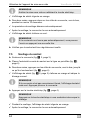
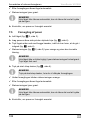
✓ After sealing, the lid opens automatically.
✓ The status display lights up green.
I
➤ Check whether the bag has been sealed evenly.
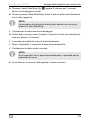
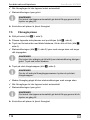
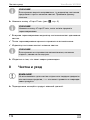
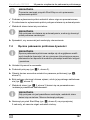
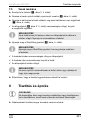
7.5 Sealing the bags
➤ Lift up the lid (fig. 2 3, page 3).
➤ Place the open side of the bag on the dotted line (fig. 6, page 4).
➤ Press down the sides of the lid with both hands until they click into place
(fig. 7, page 4).
✓ The status display (fig. 2 2, page 3) lights up orange and shows that it
has locked properly.
I
➤ Press the Start/Stop button (fig. 8, page 4).
I
✓ During sealing, the status display flashes orange.
✓ After sealing, the lid opens automatically.
✓ The status display lights up green.
I
➤ Check whether the bag has been sealed evenly.
NOTE
If the lid does not open automatically, you can open it by pressing
it down again.
NOTE
If the lid is not closed properly, the status display continues to light
up green. Press the lid down more firmly.
NOTE
Press the Start/Stop button again if you want to stop sealing.
NOTE
If the lid does not open automatically, you can open it by pressing
it down again.

EN
Cleaning and maintenance VacuSealer VS1000
16
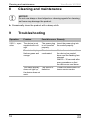
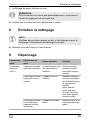
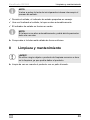
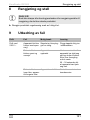
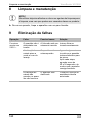
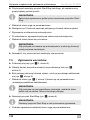
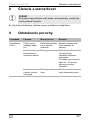
8 Cleaning and maintenance
A
➤ Occasionally clean the product with a damp cloth.
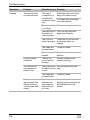
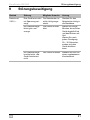
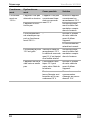
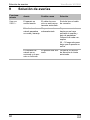
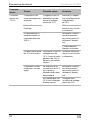
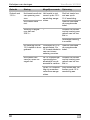
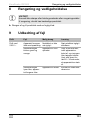
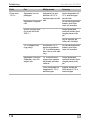
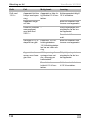
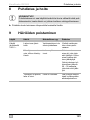
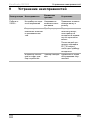
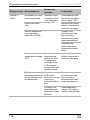
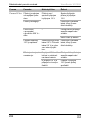
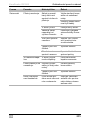
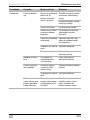
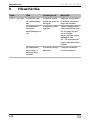
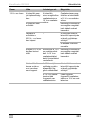
9 Troubleshooting
NOTICE!
Do not use sharp or hard objects or cleaning agents for cleaning
as these may damage the product.
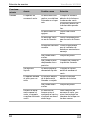
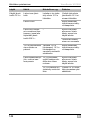
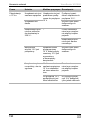
Operation Problem Possible cause Remedy
230 Vw oper-
ation
The device is not
supplied with volt-
age.
The power plug
is not inserted
properly.
Insert the power plug into
the socket properly.
The status display
flashes green and
orange.
The device has
overheated.
Wait a few minutes until
the device has cooled
down and the flashing has
stopped.
Wait 20 – 30 seconds after
every procedure so that
the device can cool down.
The status display
does not light up,
the device does not
work.
The device is
defective.
Contact an authorised cus-
tomer service centre.

EN
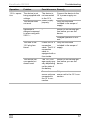
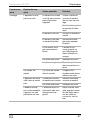
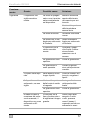
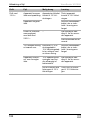
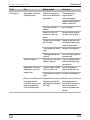
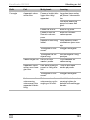
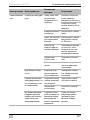
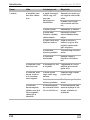
VacuSealer VS1000 Troubleshooting
17
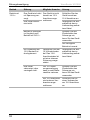
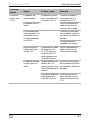
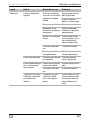
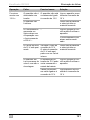
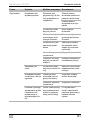
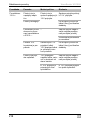
12 Vg opera-
tion
The device is not
being supplied with
voltage.
The device is
not connected
to the 12 V
power supply
properly.
Connect the device to the
12 V power supply cor-
rectly.
The device does
not work.
Only use the cable
included in the scope of
supply.
Operation is
delayed compared
to when using with
230 Vw.
– Switch on the vehicle igni-
tion before you use the
device.
Delayed operation is nor-
mal.
The fuse of the
12 V plug has
blown.
Check the 12 V
connection
cable. The 12 V
connection
cable is
equipped with a
fuse inside.
Only use the cable
included in the scope of
supply.
The device vac-
uum-packs but
doesn't seal.
The 12 V volt-
age supply may
vary depending
on the state of
the battery.
Switch on the vehicle igni-
tion before you use the
device.
Several con-
sumer units are
connected to
the 12 V con-
nection.
Only connect one con-
sumer unit to the 12 V con-
nection.
Operation Problem Possible cause Remedy

EN
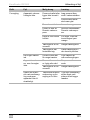
Troubleshooting VacuSealer VS1000
18
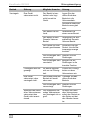
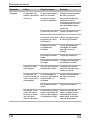
Sealing The device does
not vacuum-seal.
The bag is
crumpled or is
not placed in
the device prop-
erly.
Place the open end of the
bag in the vacuum tray.
The open end of the bag
must be smooth.
There is a hole
in the bag.
Use a new bag.
The bag is not a
Dometic vac-
uum-seal bag.
Only use vacuum-seal
bags from Dometic.
The lid is not
closed properly.
Close the lid until the sta-
tus display lights up
orange.
The seals are
contaminated.
Clean the seals.
The seals have
slipped.
Put the seals in the correct
position.
Liquid is being
extracted.
There's too
much liquid in
the bag.
Freeze liquids before
vacuum sealing.
The device vac-
uum-packs but
doesn't seal.
The open end of
the bag is moist
or wet.
Dry the open end of the
bag.
The seals are
contaminated.
Clean the seals.
While vacuum-seal-
ing manually, the
device does not
vacuum-seal suffi-
ciently.
The time
between vac-
uum-packing
and sealing is
too long.
Immediately after vacuum-
packing, press down the lid
at the sides with both
hands.
Operation Problem Possible cause Remedy

EN
VacuSealer VS1000 Warranty
19
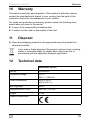
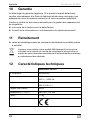
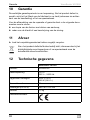
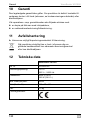
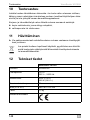
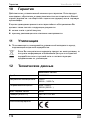
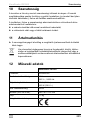
10 Warranty
The statutory warranty period applies. If the product is defective, please
contact the manufacturer's branch in your country (see the back of the
instruction manual for the addresses) or your retailer.
For repair and guarantee processing, please include the following docu-
ments when you send in the device:
A copy of the receipt with purchasing date
A reason for the claim or description of the fault
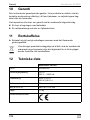
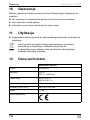
11 Disposal
➤ Place the packaging material in the appropriate recycling waste bins
wherever possible.
M
If you wish to finally dispose of the product, ask your local recycling
centre or specialist dealer for details about how to do this in
accordance with the applicable disposal regulations.
12 Technical data
VacuSealer VS1000
Item no.: 9103533018
Connection voltage: 12 Vg
230 Vw, 50/60 Hz
Power consumption: 65 W (12 Vg)
100 W (230 Vw)
Max. bag width: 29 cm
Dimensions (W x H x D): 380 x 87 x 151 mm
Weight: 1.3 kg
Inspection/certification:

DE
VacuSealer VS1000
20
Bitte lesen Sie diese Anleitung vor der Inbetriebnahme sorgfältig durch
und bewahren Sie sie auf. Geben Sie sie im Falle einer Weitergabe des
Produktes an den Nutzer weiter.
Inhaltsverzeichnis
1 Erklärung der Symbole . . . . . . . . . . . . . . . . . . . . . . . . . . . . . . . . . . 21
2 Sicherheitshinweise . . . . . . . . . . . . . . . . . . . . . . . . . . . . . . . . . . . . . 22
3 Lieferumfang . . . . . . . . . . . . . . . . . . . . . . . . . . . . . . . . . . . . . . . . . . 24
4 Zubehör . . . . . . . . . . . . . . . . . . . . . . . . . . . . . . . . . . . . . . . . . . . . . . 24
5 Bestimmungsgemäßer Gebrauch . . . . . . . . . . . . . . . . . . . . . . . . . . 24
6 Technische Beschreibung . . . . . . . . . . . . . . . . . . . . . . . . . . . . . . . . 25
7 Vakuumierer benutzen. . . . . . . . . . . . . . . . . . . . . . . . . . . . . . . . . . . 26
8 Reinigung und Pflege. . . . . . . . . . . . . . . . . . . . . . . . . . . . . . . . . . . . 30
9 Störungsbeseitigung . . . . . . . . . . . . . . . . . . . . . . . . . . . . . . . . . . . . 31
10 Gewährleistung . . . . . . . . . . . . . . . . . . . . . . . . . . . . . . . . . . . . . . . . 34
11 Entsorgung. . . . . . . . . . . . . . . . . . . . . . . . . . . . . . . . . . . . . . . . . . . . 34
12 Technische Daten . . . . . . . . . . . . . . . . . . . . . . . . . . . . . . . . . . . . . . 34
La pagina sta caricando ...
La pagina sta caricando ...
La pagina sta caricando ...
La pagina sta caricando ...
La pagina sta caricando ...
La pagina sta caricando ...
La pagina sta caricando ...
La pagina sta caricando ...
La pagina sta caricando ...
La pagina sta caricando ...
La pagina sta caricando ...
La pagina sta caricando ...
La pagina sta caricando ...
La pagina sta caricando ...
La pagina sta caricando ...
La pagina sta caricando ...
La pagina sta caricando ...
La pagina sta caricando ...
La pagina sta caricando ...
La pagina sta caricando ...
La pagina sta caricando ...
La pagina sta caricando ...
La pagina sta caricando ...
La pagina sta caricando ...
La pagina sta caricando ...
La pagina sta caricando ...
La pagina sta caricando ...
La pagina sta caricando ...
La pagina sta caricando ...
La pagina sta caricando ...
La pagina sta caricando ...
La pagina sta caricando ...
La pagina sta caricando ...
La pagina sta caricando ...
La pagina sta caricando ...
La pagina sta caricando ...
La pagina sta caricando ...
La pagina sta caricando ...
La pagina sta caricando ...
La pagina sta caricando ...
La pagina sta caricando ...
La pagina sta caricando ...
La pagina sta caricando ...
La pagina sta caricando ...
La pagina sta caricando ...
La pagina sta caricando ...
La pagina sta caricando ...
La pagina sta caricando ...
La pagina sta caricando ...
La pagina sta caricando ...
La pagina sta caricando ...
La pagina sta caricando ...
La pagina sta caricando ...
La pagina sta caricando ...
La pagina sta caricando ...
La pagina sta caricando ...
La pagina sta caricando ...
La pagina sta caricando ...
La pagina sta caricando ...
La pagina sta caricando ...
La pagina sta caricando ...
La pagina sta caricando ...
La pagina sta caricando ...
La pagina sta caricando ...
La pagina sta caricando ...
La pagina sta caricando ...
La pagina sta caricando ...
La pagina sta caricando ...
La pagina sta caricando ...
La pagina sta caricando ...
La pagina sta caricando ...
La pagina sta caricando ...
La pagina sta caricando ...
La pagina sta caricando ...
La pagina sta caricando ...
La pagina sta caricando ...
La pagina sta caricando ...
La pagina sta caricando ...
La pagina sta caricando ...
La pagina sta caricando ...
La pagina sta caricando ...
La pagina sta caricando ...
La pagina sta caricando ...
La pagina sta caricando ...
La pagina sta caricando ...
La pagina sta caricando ...
La pagina sta caricando ...
La pagina sta caricando ...
La pagina sta caricando ...
La pagina sta caricando ...
La pagina sta caricando ...
La pagina sta caricando ...
La pagina sta caricando ...
La pagina sta caricando ...
La pagina sta caricando ...
La pagina sta caricando ...
La pagina sta caricando ...
La pagina sta caricando ...
La pagina sta caricando ...
La pagina sta caricando ...
La pagina sta caricando ...
La pagina sta caricando ...
La pagina sta caricando ...
La pagina sta caricando ...
La pagina sta caricando ...
La pagina sta caricando ...
La pagina sta caricando ...
La pagina sta caricando ...
La pagina sta caricando ...
La pagina sta caricando ...
La pagina sta caricando ...
La pagina sta caricando ...
La pagina sta caricando ...
La pagina sta caricando ...
La pagina sta caricando ...
La pagina sta caricando ...
La pagina sta caricando ...
La pagina sta caricando ...
La pagina sta caricando ...
La pagina sta caricando ...
La pagina sta caricando ...
La pagina sta caricando ...
La pagina sta caricando ...
La pagina sta caricando ...
La pagina sta caricando ...
La pagina sta caricando ...
La pagina sta caricando ...
La pagina sta caricando ...
La pagina sta caricando ...
La pagina sta caricando ...
La pagina sta caricando ...
La pagina sta caricando ...
La pagina sta caricando ...
La pagina sta caricando ...
La pagina sta caricando ...
La pagina sta caricando ...
La pagina sta caricando ...
La pagina sta caricando ...
La pagina sta caricando ...
La pagina sta caricando ...
La pagina sta caricando ...
La pagina sta caricando ...
La pagina sta caricando ...
La pagina sta caricando ...
La pagina sta caricando ...
La pagina sta caricando ...
La pagina sta caricando ...
La pagina sta caricando ...
La pagina sta caricando ...
La pagina sta caricando ...
La pagina sta caricando ...
La pagina sta caricando ...
La pagina sta caricando ...
La pagina sta caricando ...
La pagina sta caricando ...
La pagina sta caricando ...
La pagina sta caricando ...
La pagina sta caricando ...
La pagina sta caricando ...
La pagina sta caricando ...
La pagina sta caricando ...
La pagina sta caricando ...
La pagina sta caricando ...
La pagina sta caricando ...
La pagina sta caricando ...
La pagina sta caricando ...
La pagina sta caricando ...
La pagina sta caricando ...
La pagina sta caricando ...
La pagina sta caricando ...
La pagina sta caricando ...
La pagina sta caricando ...
La pagina sta caricando ...
La pagina sta caricando ...
La pagina sta caricando ...
La pagina sta caricando ...
La pagina sta caricando ...
La pagina sta caricando ...
La pagina sta caricando ...
La pagina sta caricando ...
La pagina sta caricando ...
La pagina sta caricando ...
La pagina sta caricando ...
La pagina sta caricando ...
La pagina sta caricando ...
La pagina sta caricando ...
La pagina sta caricando ...
La pagina sta caricando ...
La pagina sta caricando ...
La pagina sta caricando ...
La pagina sta caricando ...
La pagina sta caricando ...
La pagina sta caricando ...
La pagina sta caricando ...
La pagina sta caricando ...
La pagina sta caricando ...
La pagina sta caricando ...
La pagina sta caricando ...
La pagina sta caricando ...
La pagina sta caricando ...
La pagina sta caricando ...
La pagina sta caricando ...
La pagina sta caricando ...
La pagina sta caricando ...
La pagina sta caricando ...
La pagina sta caricando ...
La pagina sta caricando ...
La pagina sta caricando ...
La pagina sta caricando ...
La pagina sta caricando ...
La pagina sta caricando ...
La pagina sta caricando ...
La pagina sta caricando ...
La pagina sta caricando ...
La pagina sta caricando ...
La pagina sta caricando ...
-
 1
1
-
 2
2
-
 3
3
-
 4
4
-
 5
5
-
 6
6
-
 7
7
-
 8
8
-
 9
9
-
 10
10
-
 11
11
-
 12
12
-
 13
13
-
 14
14
-
 15
15
-
 16
16
-
 17
17
-
 18
18
-
 19
19
-
 20
20
-
 21
21
-
 22
22
-
 23
23
-
 24
24
-
 25
25
-
 26
26
-
 27
27
-
 28
28
-
 29
29
-
 30
30
-
 31
31
-
 32
32
-
 33
33
-
 34
34
-
 35
35
-
 36
36
-
 37
37
-
 38
38
-
 39
39
-
 40
40
-
 41
41
-
 42
42
-
 43
43
-
 44
44
-
 45
45
-
 46
46
-
 47
47
-
 48
48
-
 49
49
-
 50
50
-
 51
51
-
 52
52
-
 53
53
-
 54
54
-
 55
55
-
 56
56
-
 57
57
-
 58
58
-
 59
59
-
 60
60
-
 61
61
-
 62
62
-
 63
63
-
 64
64
-
 65
65
-
 66
66
-
 67
67
-
 68
68
-
 69
69
-
 70
70
-
 71
71
-
 72
72
-
 73
73
-
 74
74
-
 75
75
-
 76
76
-
 77
77
-
 78
78
-
 79
79
-
 80
80
-
 81
81
-
 82
82
-
 83
83
-
 84
84
-
 85
85
-
 86
86
-
 87
87
-
 88
88
-
 89
89
-
 90
90
-
 91
91
-
 92
92
-
 93
93
-
 94
94
-
 95
95
-
 96
96
-
 97
97
-
 98
98
-
 99
99
-
 100
100
-
 101
101
-
 102
102
-
 103
103
-
 104
104
-
 105
105
-
 106
106
-
 107
107
-
 108
108
-
 109
109
-
 110
110
-
 111
111
-
 112
112
-
 113
113
-
 114
114
-
 115
115
-
 116
116
-
 117
117
-
 118
118
-
 119
119
-
 120
120
-
 121
121
-
 122
122
-
 123
123
-
 124
124
-
 125
125
-
 126
126
-
 127
127
-
 128
128
-
 129
129
-
 130
130
-
 131
131
-
 132
132
-
 133
133
-
 134
134
-
 135
135
-
 136
136
-
 137
137
-
 138
138
-
 139
139
-
 140
140
-
 141
141
-
 142
142
-
 143
143
-
 144
144
-
 145
145
-
 146
146
-
 147
147
-
 148
148
-
 149
149
-
 150
150
-
 151
151
-
 152
152
-
 153
153
-
 154
154
-
 155
155
-
 156
156
-
 157
157
-
 158
158
-
 159
159
-
 160
160
-
 161
161
-
 162
162
-
 163
163
-
 164
164
-
 165
165
-
 166
166
-
 167
167
-
 168
168
-
 169
169
-
 170
170
-
 171
171
-
 172
172
-
 173
173
-
 174
174
-
 175
175
-
 176
176
-
 177
177
-
 178
178
-
 179
179
-
 180
180
-
 181
181
-
 182
182
-
 183
183
-
 184
184
-
 185
185
-
 186
186
-
 187
187
-
 188
188
-
 189
189
-
 190
190
-
 191
191
-
 192
192
-
 193
193
-
 194
194
-
 195
195
-
 196
196
-
 197
197
-
 198
198
-
 199
199
-
 200
200
-
 201
201
-
 202
202
-
 203
203
-
 204
204
-
 205
205
-
 206
206
-
 207
207
-
 208
208
-
 209
209
-
 210
210
-
 211
211
-
 212
212
-
 213
213
-
 214
214
-
 215
215
-
 216
216
-
 217
217
-
 218
218
-
 219
219
-
 220
220
-
 221
221
-
 222
222
-
 223
223
-
 224
224
-
 225
225
-
 226
226
-
 227
227
-
 228
228
-
 229
229
-
 230
230
-
 231
231
-
 232
232
-
 233
233
-
 234
234
-
 235
235
-
 236
236


Dometic VacuSealer VS1000 Istruzioni per l'uso
- Tipo
- Istruzioni per l'uso
- Questo manuale è adatto anche per
in altre lingue
Altri documenti
-
Caso TouchVAC Istruzioni per l'uso
-
-
 MELAG MELAseal Pro Manuale utente
-
Caso VC 200 Istruzioni per l'uso
-
-
Caso FastVac 4008 Istruzioni per l'uso
-
Caso FastVac 4004 Istruzioni per l'uso
-
Caso FastVAC 3000 Istruzioni per l'uso
-
Caso Vakuumierer FastVac 4000 + GRATIS Beutel, Folienrolle und Vakuumschlauch Istruzioni per l'uso
-
Klarstein Food Locker 650 Manuale utente
