HENX 9005224 Manuale del proprietario
- Categoria
- Utensili elettrici
- Tipo
- Manuale del proprietario

Model: H36LJ16
Item-No.: 7063704
www.henxgarden.eu
40 Volt Cordless Chainsaw
40 Volt Akku Kettensäge
Scie à chaîne sans l de 40 volts
Motosega a Batteria da 40 Volt
40 Volt Accu Kettingzaag
Operating instructions
Bedienungsanleitung (Original)
Mode d'emploi
Istruzioni per l’uso
Gebruiksaanwijzing
ULTIMATE
GARDEN POWER

2
12
11
12
1314
3
9
15 16
17
10 678
4 5
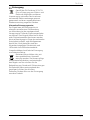
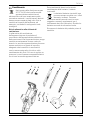
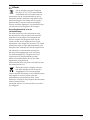
Overview
A
G
C
B
Operation
4 4
D
18
19
20

3
4 44
H
J
I
4
4 4
F G
E
K
21
25
22
22
26
23
27 28

4
L
N
M
O
Q
P
R
30
32
31
37 42
41
36
38
40
39
33
34
34
35 35
2i n.
(50.8m m)
2in.
(50.8 mm)
43
44
29

5
S
W
U
Y
T
X
V
Z
53
54
55
45 47
46
48
49
50
51
52
2
12
13
14

6
44
AA
4 4
AB
AD
AF
AC
AE
AG
56
57
58
59
60
61
62
62 63
64
66
67
68
69

7
4 4
.
AJ
AH
AL
AO
AK
AI
AM
70 71 72
75
73
76
74
77 78
0.025”
(0.6mm)
81
82
79
80

8
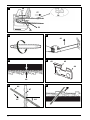
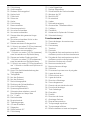
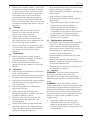
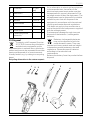
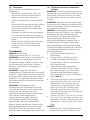
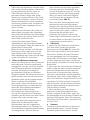
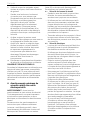
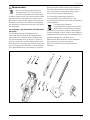
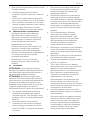
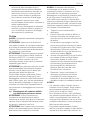
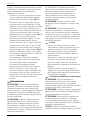
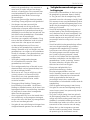
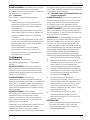
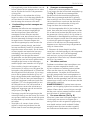
Overview
1. Chain Kickback Brake Handle
2. Front Handle
3. Battery Release Button
4. Lock-off Button
5. Trigger Switch
6. Electric Contact
7. Latch
8. Ejection Mechanism
9. Oil-Inspection Window
10. Oil Tank Cap
11. Rear Handle
12. Chain-Tensioning Knob
13. Side-Cover Knob
14. Side Cover
15. Chain-Tensioning Screw
16. Chain Sheath
17. The Control Panel
Übersicht
1. Vorderer Handschutz
2. Frontgriff
3. Akku-Freigabetaste
4. Sicherungsknopf
5. Triggerschalter
6. Elektrischer Kontakt
7. Verriegelung
8. Auswurfmechanismus
9. Öl-Sichtfenster
10. Öltankverschluss
11. Hinterer Handgriff
12. Spannknopf für Kette
13. Flügelmutter für seitliche
Kettenabdeckung
14. Seitliche Kettenabdeckung
15. Kettenspannschraube
16. Kettenschutz
17. Bedienfeld
Présentation générale
1. Poignée du frein anticontrecoup de la
chaîne
2. Poignée avant
3. Bouton de libération de la batterie
4. Bouton de verrouillage
5. Gâchette
6. Contact électrique
7. Loquet
8. Mécanisme d’éjection
9. Fenêtre d’inspection d’huile
10. Bouchon du réservoir d’huile
11. Poignée arrière
12. Bouton de tension de la chaîne
13. Bouton de couvercle latéral
14. Couvercle latéral
15. Vis de tension de la chaîne
16. Gaine de chaîne
17. Panneau de commande
Panoramica
1. Impugnatura del freno catena
(protezione da contraccolpo)
2. Impugnatura anteriore
3. Pulsante per la rimozione della batteria
4. Pulsante di sicurezza
5. Grilletto
6. Contatto elettrico
7. Fermo
8. Meccanismo di espulsione
9. Finestrella di ispezione olio
10. Tappo del serbatoio dell’olio
11. Impugnatura posteriore
12. Manopola di tensionamento della
catena
13. Manopola del coperchio laterale
14. Coperchio laterale
15. Vite di tensionamento della catena
16. Guaina della catena
17. Il pannello di controllo
Overzicht
1. Terugslagremhendel voor ketting
2. Voorste handgreep
3. Accu-ontgrendelknop
4. Vergrendelknop
5. Activeringsschakelaar
6. Elektrisch contact
7. Vergrendeling
8. Uitwerpmechanisme
9. Olie-inspectievenster
10. Dop van de olietank
11. Achterhandgreep
12. Kettingspanningsknop
13. Knop voor zijbeschermkap
14. Zijbeschermkap
15. Kettingspanningsschroef
16. Kettingbeschermhoes
17. Het bedieningspaneel

9
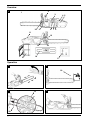
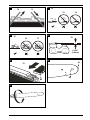
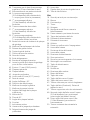
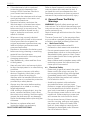
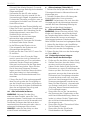
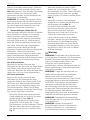
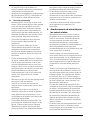
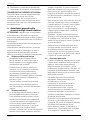
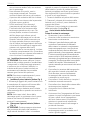
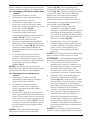
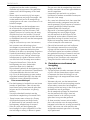
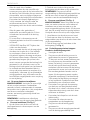
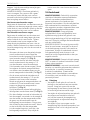
Operation
18. Kickback Danger Zone
19. Pinch
20. Kickback
21. Pull
22. Push
23. Chain kickback brake handle in
operating position
24. Chain kickback brake in brake position
25. Oil Tank Cap
26. Power Button
27. Lock-off Button
28. Trigger Switch
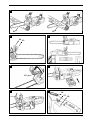
29. Grip with thumb below handle
30. Chain Line
31. Straight Arm Position
32. Chain Line
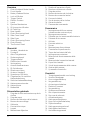
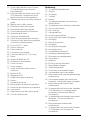
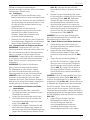
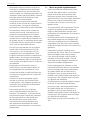
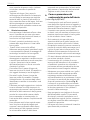
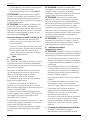
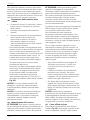
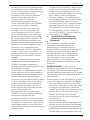
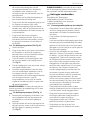
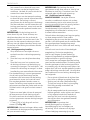
33. Felling Direction
34. Dangerous Zone
35. Safety Retreat Path
36. Notching Undercut
37. Felling Back Cut
38. Hinge
39. Notch
40. Direction of fall
41. Tree Limbing
42. Limb Cut
43. Overbucking
44. Underbucking
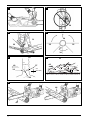
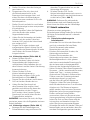
45. Log Supported Along the Entire Length
46. Cut from Top (Overbuck). Avoid Cutting
Earth
47. Log Supported One End
48. 2nd Cut Overbuck (2/3 Diameter) to
Meet 1st Cut (to Avoid Pinching)
49. 1st Cut Underbuck (1/3 Diameter) to
avoid Splintering
50. Log Supported on Both Ends
51. 1st Cut Overbuck (1/3 Diameter) to
avoid Splintering
52. 2nd Cut Underbuck (2/3 Diameter) to
meet 1st cut avoid Splintering
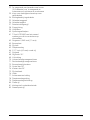
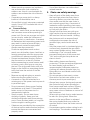
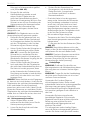
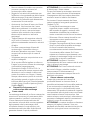
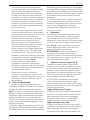
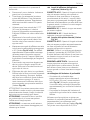
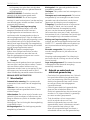
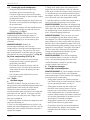
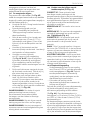
53. Guide Plate Chain Cover Button
54. Chain Drive Links
55. Guide Bar Groove
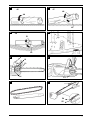
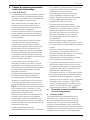
56. Guide Bar Slot
57. Rotation Directions Arrow
58. Cutter Direction
59. Alignment Flange
60. Tension Adjusting Pin
61. Lift the TIP of the Guide Bar up to check
for sag
62. Approx. 0.043” (1.1 mm)
63. Top Plate
64. Side Plate
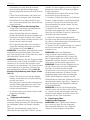
65. Depth Gauge
66. 0.177” (4.5mm) Round File
67. Cutter Tooth
68. Sharpening Angle: 30°
69. Filling Direction
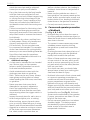
70. Left hand Cutters
71. Right Hand Cutters
72. Top Plate Sharpening Angles
73. Less than 30°
74. More than 30°
75. Side Plate Angle
76. Hook
77. Backward Slope
78. Depth Gauge Clearance
79. Depth Gauge Jointer
80. Flat File
81. Sprocket in Guide Bar Tip
82. Lubricating Hole
Gebrauch
18. Rückschlag-Gefahrenzone
19. Einklemmen
20. Rückschlag
21. Ziehen
22. Drücken
23. Griff der Kettenbremse in
Betriebsstellung
24. Rückschlagbremse in Bremsposition
25. Öltankverschluss
26. Einschaltknopf
27. Sicherungsknopf
28. Triggerschalter
29. Griff mit dem Daumen unter dem
Handgriff
30. Kettenlinie
31. Gerade Armhaltung
32. Kettenlinie

10
33. Fällrichtung
34. Gefahrenzone
35. Sicherer Rückzugspfad
36. Kerbschnitt
37. Fällschnitt
38. Scharnier
39. Kerbe
40. Fallrichtung
41. Baum entasten
42. Entastungsschnitt
43. Von oben schneiden
44. Von unten schneiden
45. Stamm über die gesamte Länge
gestützt
46. Von oben schneiden. Nicht in den
Boden schneiden
47. Stamm an einem Ende gestützt
48. 2. Schnitt von oben (2/3 Durchmesser),
um den 1. Schnitt zu treffen (um
Einklemmen zu vermeiden)
49. 1. Schnitt von unten (1/3 Durchmesser)
zum Vermeiden von Splitterbildung
50. Stamm an beiden Enden gestützt
51. 1. Schnitt von oben (1/3 Durchmesser)
zum Vermeiden von Splitterbildung
52. 2. Schnitt von unten (2/3 Durchmesser),
um 1. Schnitt zu treffen und Splittern zu
vermeiden
53. Knopf für die Kettenabdeckung der
Führungsplatte
54. Treibglieder
55. Nut der Schwert
56. Nut der Schwert
57. Drehrichtungspfeile
58. Richtung der Schneidezähne
59. Ausrichtungsansch
60. Spannungseinstellstift
61. Schwertspitze anheben, um auf
Durchhängen zu überprüfen
62. Ca. 1,1 mm
63. Dachschneide
64. Brustschneide
65. Tiefenbegrenzer
66. 4,5 mm Rundfeile
67. Sägezahn
68. Schärfwinkel: 30°
69. Füllrichtung
70. Linke Sägezähne
71. Rechte Sägezähne
72. Schärfwinkel der Dachschneide
73. Weniger als 30°
74. Mehr als 30°
75. Brustwinkel
76. Haken
77. Rückwärtsneigung
78. Abstand der Tiefenmesslehre
79. Feillehre
80. Flachfeile
81. Kettenrad in Spitze der Schwert
82. Schmierbohrung
Fonctionnement
18. Zone de danger de contrecoup
19. Pincement
20. Contrecoup
21. Traction
22. Poussée
23. Poignée de frein anticontrecoup de la
chaîne en position de fonctionnement
24. Poignée de frein anticontrecoup de la
chaîne en position de freinage
25. Bouchon du réservoir d’huile
26. Bouton marche/arrêt
27. Bouton de verrouillage
28. Gâchette
29. Prise avec le pouce sous la poignée
30. Ligne de chaîne
31. Position bras droit
32. Ligne de chaîne
33. Direction d’abattage
34. Zone dangereuse
35. Chemin de retraite de sécurité
36. Encoche d’abattage
37. Trait d’abattage
38. Charnière
39. Entaille
40. Direction de chute
41. Abattage d’arbres
42. Risque d’amputation
43. Tronçonnage supérieur
44. Tronçonnage inférieur
45. Bille soutenue sur toute sa longueur

11
46. Tronçonner par le haut (trançonnage
supérieur). Éviter d’entamer la terre
47. Bille soutenue à une seule extrémité
48. 2etronçonnage supérieur
(2/3 du diamètre) an d’atteindre la
1recoupe (pour éviter le pincement)
49. 1ertronçonnage inférieur
(1/3 du diamètre) an d’éviter
les éclats
50. Tronc soutenu des deux côtés
51. 1ertronçonnage supérieur
(1/3 du diamètre) an d’éviter
les éclats
52. 2etronçonnage supérieur
(2/3 du diamètre) an d’atteindre la
1recoupe an d’éviter les éclats
53. Bouton du carter de chaîne et de plaque
de guidage
54. Maillons d’entraînement de chaîne
55. Rainure du guide-chaîne
56. Fente du guide-chaîne
57. Flèche de sens de rotation
58. Sens de la lame
59. Bride d’alignement
60. Broche de réglage de tension
61. Levez la pointe de la barre de guidage
pour vérier si elle tombe
62. Environ 1,1mm (0,043pouce)
63. Plaque supérieure
64. Plaque latérale
65. Jauge de profondeur
66. Lime ronde 4,5mm (0,177pouce)
67. Dent de coupe
68. Angle d’affûtage: 30°
69. Direction de remplissage
70. Maillons de coupe à gauche
71. Maillons de coupe à droite
72. Angles d’affûtage de la plaque
supérieure
73. Moins de 30°
74. Plus de 30°
75. Angle de la plaque latérale
76. Crochet
77. Inclinaison arrière
78. Hauteur de la jauge de profondeur
79. Dégauchisseuse de jauge de
profondeur
80. Lime plate
81. Pignon dans la pointe du guide-barre
82. Trou de lubrication
Uso
18. Zona di pericolo per contraccolpo
19. Blocco
20. Contraccolpo
21. Tirare
22. Spingere
23. Impugnatura del freno catena in
funzionamento
24. Freno catena in posizione di arresto
25. Tappo del serbatoio dell’olio
26. Pulsante di alimentazione
27. Pulsante di sicurezza
28. Grilletto
29. Presa con pollice sotto l’impugnatura
30. Linea della catena
31. Posizione dritta del braccio
32. Linea della catena
33. Direzione di abbattimento
34. Zona pericolosa
35. Percorso per arretramento di sicurezza
36. Sottotaglio con scalttura
37. Taglio di abbattimento
38. Cerniera
39. Scalttura
40. Direzione della caduta
41. Ramo dell’albero
42. Taglio del ramo
43. Taglio dall’alto verso il basso
44. Taglio dal basso verso l’alto
45. Tronco rinforzato per tutta la lunghezza
46. Taglio dall’alto (Overbuck). Evitare di
tagliare la terra
47. Tronco supportato solo da un’estremità
48. Secondo taglio dall’alto verso il basso
(2/3 del diametro) per continuare il
primo taglio (evitando il blocco)
49. Primo taglio dal basso verso l’alto
(1/3 del diametro) per evitare la
frantumazione
50. Tronco sostenuto da entrambe le
estremità

12
51. Primo taglio dall’alto verso il basso
(1/3 del diametro) per evitare la
frantumazione
52. Secondo taglio dal basso verso l’alto
(2/3 diametro) a seguire del primo
taglio ed evitare la frantumazione
53. Pulsante del coperchio della piastra di
guida
54. Maglie motrici della catena
55. Scanalatura della barra guida
56. Scanalatura della barra guida
57. Freccia delle direzioni di rotazione
58. Direzione della fresa
59. Flangia di allineamento
60. Perno di regolazione della tensione
61. Sollevare il naso della barra guida per
controllare l’abbassamento
62. Circa 0,043” (1,1 mm)
63. Piastra superiore
64. Piastra laterale
65. Limitatore di profondità
66. Lima rotonda da 0,177” (4,5 mm)
67. Dente
68. Angolo di aflatura: 30°
69. Direzione di riempimento
70. Frese a sinistra
71. Frese a destra
72. Angoli di aflatura della piastra
superiore
73. Minore di 30°
74. Maggiore di 30°
75. Angolo della piastra laterale
76. Gancio
77. Pendenza arretrata
78. Margine del limitatore di profondità
79. Raccordo del limitatore di profondità
80. Lima piatta
81. Pignone nel naso della barra guida
82. Foro di lubricazione
Bediening
18. Terugslagveiligheidszone
19. Knijpen
20. Terugslag
21. Trekken
22. Duwen
23. Terugslagremhendel voor ketting in
bedrijfsstand
24. Terugslagrem voor ketting in remstand
25. Dop van de olietank
26. Aan-/Uitknop
27. Vergrendelknop
28. Activeringsschakelaar
29. Greep met duim onder handgreep
30. Kettinglijn
31. Rechte armpositie
32. Kettinglijn
33. Richting van omzagen
34. Gevaarlijke zone
35. Veiligheidsterugtrekpad
36. Inkeping onderzaagsnede
37. Omzagen contrazaagsnede
38. Scharnieren
39. Inkeping
40. Richting van het omvallen
41. Boomtakken afzagen
42. Takkenzaagsnede
43. Van boven naar beneden zagen
44. Van beneden naar boven zagen
45. Boomstam wordt over de gehele lengte
ondersteund
46. Van bovenaf zagen (van boven naar
beneden). In de grond zagen vermijden
47. Boomstam wordt aan één kant
ondersteund
48. 2e zaagsnede van boven naar beneden
(2/3 diameter) om 1e zaagsnede te
ontmoeten (om bekneld raken te
voorkomen)
49. 1e zaagsnede van beneden naar boven
(diameter 1/3) om splinteren te
voorkomen
50. Boomstam aan beide kanten
ondersteund
51. 1e zaagsnede van boven naar beneden
(1/3 diameter) om splinteren te
voorkomen

13
52. 2e zaagsnede van beneden naar boven
(2/3 diameter) om 1e zaagsnede te
ontmoeten om splinteren te voorkomen
53. Knop voor kettingbeschermkap voor
geleideplaat
54. Kettingaandrijvingschakels
55. Geleidestanggroef
56. Geleidestangslot
57. Rotatierichtingenpijl
58. Zaagrichting
59. Uitlijnens
60. Spanningsafstelpen
61. Til het UITEINDE van het zwaard
omhoog om dit te controleren op
doorzakken
62. Ongeveer 0,043 inch (1,1 mm)
63. Bovenplaat
64. Zijplaat
65. Diepteaanslag
66. 0,177 inch (4,5 mm) ronde vijl
67. Snijtand
68. Slijphoek: 30°
69. Vulrichting
70. Linkershandige zaagmachines
71. Rechtshandige zaagmachines
72. Bovenplaatslijphoeken
73. Groter dan 30°
74. Kleiner dan 30°
75. Zijplaathoek
76. Haak
77. Achterwaartse helling
78. Diepteaanslagspeling
79. Diepteaanslagverbinding
80. Platte vijl
81. Kettingwiel in geleideruiteinde
82. Smeeropening

14
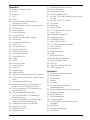
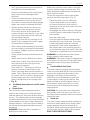
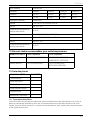
Contents
1. Safety guidelines . . . . . . 16
2. Important safety instructions . . 17
3. Important safety instructions . . 17
4. General Power Tool Safety Warnings 20
5. Chain saw safety warnings . . . 21
6. Causes and operator prevention of
kickback . . . . . . . . 22
7. Glossary of terms. . . . . . 24
8. Power Tool Use And Care . . . 24
9. Battery tool use and care . . . 24
10. Intended use . . . . . . . 25
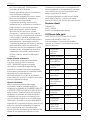
11. Specications . . . . . . . 25
12. Recommended Bar and Chain for
this Chain Saw . . . . . . 26
13. List of parts . . . . . . . 26
14. Application. . . . . . . . 27
16. Operation . . . . . . . . 28
17. Preparation for cutting . . . . 30
18. Maintenance . . . . . . . 32
19. Transporting and storing . . . 36
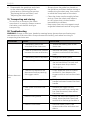
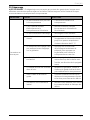
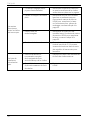
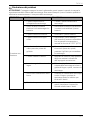
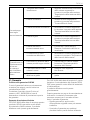
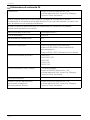
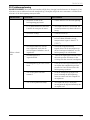
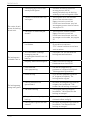
20. Troubleshooting . . . . . . 36
21. Warranty . . . . . . . . 38
22. Parts list . . . . . . . . 38
23. Disposal . . . . . . . . 39
24. EC Declaration of Conformity . . 40
Inhalt
1. Sicherheitshinweise . . . . . 41
2. Wichtige Sicherheitshinweise . . 42
3. Wichtige Sicherheitshinweise . . 43
4. Allgemeine Sicherheitshinweise zu
Elektrowerkzeugen . . . . . 46
5. Warnhinweise zu Kettensägen . . 47
6. Ursachen und Verhinderung von
Rückschlägen durch den Betreiber. 49
7. Glossar . . . . . . . . . 50
8. Gebrauch und Pege des
Elektrowerkzeugs. . . . . . 51
9. Verwendung und Pege des Akkus 51
10. Bestimmungsgemäße Verwendung 52
11. Spezikationen . . . . . . 52
12. Empfohlenes Schwert und Kette für
diese Kettensäge . . . . . . 53
13. Lieferumfang . . . . . . . 53
14. Bestimmungsgemäßer Gebrauch . 54
16. Gebrauch . . . . . . . . 55
17. Schnitt vorbereiten . . . . . 57
18. Wartung . . . . . . . . 60
19. Transport und Lagerung . . . . 64
20. Fehlerbehebung . . . . . . 65
21. Garantie . . . . . . . . 67
22. Lieferumfang . . . . . . . 68
23. Entsorgung . . . . . . . 69
24. EU-Konformitätserklärung . . . 70
Table des matières
1. Consignes de sécurité . . . . 71
2. Instructions de sécurité importantes 72
3. Instructions de sécurité importantes 73
4. Avertissements généraux de sécurité
relatifs aux outils électroportatifs . 76
5. Avertissements de sécurité pour les
scies à chaîne . . . . . . . 77
6. Causes et mesures préventives
contre les contrecoups . . . . 79
7. Glossaire de termes . . . . . 80
8. Utilisation et entretien des outils
électroportatifs . . . . . . 81
9. Utilisation et soin d’un équipement
sur batterie. . . . . . . . 81
10. Utilisation prévue . . . . . . 82
11. Spécications . . . . . . . 82
12. Barre et chaîne recommandées pour
cette tronçonneuse . . . . . 83
13. Liste des pièces . . . . . . 83
14. Application. . . . . . . . 84
16. Fonctionnement . . . . . . 85
17. Préparation à la coupe . . . . 87
18. Entretien . . . . . . . . 90
19. Transport et rangement . . . . 94
20. Dépannage. . . . . . . . 95
21. Garantie . . . . . . . . 97
22. Liste des pièces . . . . . . 98
23. Mise au rebut . . . . . . . 99
24. Déclaration de conformité CE . . 100
Contenuto
1. Linee guida di sicurezza . . . . 101
2. Importanti istruzioni di sicurezza . 102
3. Importanti istruzioni di sicurezza . 103
4. Avvertenze generali sulla sicurezza
degli utensili elettrici . . . . . 106

15
5. Avvertenze di sicurezza per le
motoseghe. . . . . . . . 107
6. Cause e prevenzione dei contraccolpi
da parte dell'utente . . . . . 108
7. Glossario . . . . . . . . 110
8. Utilizzo e manutenzione dell’utensile
elettrico . . . . . . . . 110
9. Uso e manutenzione della batteria . 111
10. Destinazione d'uso . . . . . 111
11. Caratteristiche . . . . . . 112
12. Barra e catene consigliate per la
motosega . . . . . . . . 113
13. Elenco dei componenti . . . . 113
14. Applicazione . . . . . . . 114
16. Uso . . . . . . . . . . 115
17. Prepararsi al taglio . . . . . 117
18. Manutenzione . . . . . . . 120
19. Trasporto e conservazione . . . 124
20. Risoluzione dei problemi. . . . 125
21. Garanzia . . . . . . . . 127
22. Elenco delle parti . . . . . . 128
23. Smaltimento . . . . . . . 129
24. Dichiarazione di conformità CE . . 130
Inhoud
1. Veiligheidsrichtlijnen . . . . . 131
2. Belangrijke veiligheidsinstructies . 132
3. Belangrijke veiligheidsinstructies . 133
4. Algemene
veiligheidswaarschuwingen voor
elektrisch gereedschap . . . . 136
5. Veiligheidswaarschuwingen voor
kettingzagen . . . . . . . 137
6. Oorzaken en voorkomen van
terugslag . . . . . . . . 138
7. Woordenlijst . . . . . . . 140
8. Gebruik en onderhoud van elektrisch
gereedschap . . . . . . . 140
9. Gebruik en onderhoud van
accugereedschap. . . . . . 141
10. Beoogd gebruik . . . . . . 142
11. Specicaties . . . . . . . 142
12. Aanbevolen zwaard en ketting voor
deze kettingzaag . . . . . . 143
13. Lijst van onderdelen . . . . . 143
14. Applicatie . . . . . . . . 144
16. Bediening . . . . . . . . 145
17. Het zagen voorbereiden . . . . 147
18. Onderhoud. . . . . . . . 150
19. Transport en opslag . . . . . 154
20. Probleemoplossing . . . . . 155
21. Garantie . . . . . . . . 157
22. Onderdelenlijst . . . . . . 158
23. Afvoer . . . . . . . . . 159
24. EU-Conformiteitsverklaring . . . 160

English
16
INTRODUCTION
Congratulations on your selection of the
HENX 40-Volt MAX Lithium-Ion Cordless
Chain Saw. It has been designed, engineered
and manufactured to give you the best
possible dependability and performance.
Should you experience any problem you
cannot easily remedy,please contact HENX
customer service centre +800 - 86286286.
This manual contains important information
on the safe assembly, operation and
maintenance of your chainsaw. Read it
carefully before using the chain saw.
Keep this manual nearby so you can refer to
it at any time.
IMPORTANT
READ CAREFULLY BEFORE USE
KEEP FOR FUTURE REFERENCE
WARNING: Some dust created by power
sanding, sawing, grinding, drilling and other
construction activities contains chemicals
known to the state of California to cause
cancer, birth defects or other reproductive
harm. Some examples of these chemicals
are:
• Lead from lead-based paints
• Crystalline silica from bricks and cement
and other masonry products, and
• Arsenic and chromium from chemically-
treated lumber.
Your risk from these exposures varies,
depending on how often you do this type
of work. To reduce your exposure to these
chemicals: work in a well ventilated area,
and work with approved safety equipment,
such as those dust masks that are specially
designed to lter out microscopic particles.
1. Safety guidelines
Safety symbols
The purpose of safety symbols is to attract
your attention to possible dangers.
The safety symbols and the explanations
with them deserve your careful attention
and understanding. The symbol warnings
do not, by themselves, eliminate any danger.
The instructions and warnings they give
are no substitutes for proper accident
prevention measures.
WARNING: Be sure to read and understand
all safety instructions in this Operator’s
Manual, including all safety alert symbols
such as “DANGER,” “WARNING,” and
“CAUTION” before using this tool. Failure to
following all instructions listed below may
result in electric shock, re, and/or serious
personal injury.
Damage prevention and information
messages
These inform the user of important
information and/or instructions that could
lead to equipment or other property damage
if they are not followed.
Each message is preceded by the word
“NOTICE”, as in the example below:
NOTICE: Equipment and/or property
damage may result if these instructions are
not followed.
WARNING: The operation of any
power tools can result in foreign
objects being thrown into your eyes,
which can result in severe eye
damage. Before beginning power tool
operation, always wear safety
goggles or safety glasses with side
shields and a full face shield when
needed. We recommend a Wide
Vision Safety Mask for use over
eyeglasses or standard safety
glasses with side shields. Always use
eye protection.

17
English
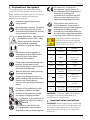
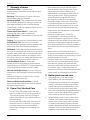
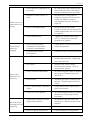
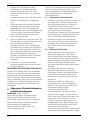
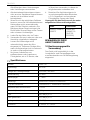
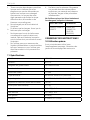
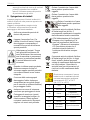
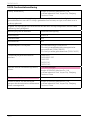
2. Explanation of the symbols
This page depicts and describes safety
symbols that may appear on this product.
Read, understand, and follow all instructions
on the machine before attempting to
assemble and operate.
Indicates a potential personal
injury hazard.
Read operator’s manual. To reduce
the risk of injury,user must read
and understand operator’s manual
before using this product.
Keep Bystanders. Away keep all
bystanders at least 50 ft. away.
Never operate the machine
while people, especially
children, or pets are nearby.
Always wear safety goggles or
safety glasses with side shields
and a full face shield when
operating this product.
Chain saw noise may damage your
hearing. Always wear sound
barriers (ear plugs or ear mufers)
to protect your hearing.
Wear an approved safety hard hat
to protect your head.
Protect your hands with gloves
when handling saw and saw chain.
Heavy-duty, nonslip gloves
improve your grip and protect your
hands.
Contact of the guide bar tip with
any object should be avoided
Contact of the guide bar tip with
any object should be avoided
Contact of the guide bar tip
with any object should be
avoided
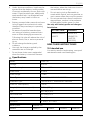
This product uses lithium-ion
(Li-ion) batteries. Local,state,or
federal laws may prohibit disposal
CE stands for “Conformité
Européenne”, which means “In
accordance with EU Regulations”.
With the CE marking, the
manufacturer conrms that this
Electric tool complies with the
applicable European directives.
This product uses lithium-ion
(Li-ion) batteries. Local,state,or
federal laws may prohibit disposal
of batteries in ordinary trash.
Consult your local waste authority
for information regarding available
recycling and/or disposal options.
Charging and Store the battery
pack only in dry rooms with an
ambient temperature of 50°F to
104°F (+10°C to +40°C)
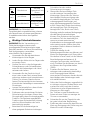
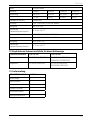
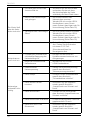
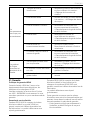
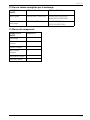
VVolt Voltage
AAmperes Current
Hz Hertz
Frequency
(cycles per
second)
WWatt Power
min Minutes Time
~Alternating
current Type of current
DC / Direct
current
Type or a
characteristic of
current
.../ min Per minute Revolutions per
minute
n0
No Load
Speed
Rotational speed,
at no load
WARNING: To ensure safety and reliability,
all repairs should be performed by a
qualied service technician!
3. Important safety instructions
WARNING! When using electric chainsaws,
basic safety precautions should always be
followed to reduce the risk of re, electric
shock,and personal injury, including the
following:

English
18
a. Do not use the battery-operated
chainsaw in rain.
b. Do not charge the battery pack in rain or
in wet locations.
c. Do not grasp the exposed cutting
blades or cutting edges when picking
up or holding the chainsaw.
d. Do not use on a ladder, rooftop, tree, or
other unstable support. Stable footing
on a solid surface enables better
control of the chainsaw in unexpected
situations.
e. Never allow children to operate the
chainsaw.
f. Never remove or tamper with safety
devices. Check their proper operation
regularly. Never do anything to interfere
with the intended function of a safety
device or to reduce the protection
provided by a safety device.
g. Never operate the chainsaw without
proper guards, plates, or other safety
protective devices in place.
h. Check damaged parts before further
use of the chainsaw. A guard or other
part that is damaged should be carefully
checked to determine that it will operate
properly and perform its intended
function. Check for alignment of moving
parts, binding of moving parts, breakage
of parts, mounting, and any other
condition that may affect its operation.
A guard or other part that is damaged
should be properly repaired or replaced
by an authorized service center unless
indicated elsewhere in this manual.
i. Check the blade and motor mounting
bolts at frequent intervals for proper
tightness. Also, visually inspect blade
for damage (e.g., bent, cracked, and
worn). Replace the blade only with
a blade from the original equipment
manufacturer (OEM).
j. Replace the blade if it is bent or cracked.
An unbalanced blade causes vibration
that could damage the motor drive unit
or cause personal injury.
k. If the equipment should start to vibrate
abnormally, stop the motor and check
immediately for the cause. Vibration is
generally a warning of trouble.
l. The trimmer shall be used to cut stems
less than 18mm thick.
m. Trim only in daylight or in good articial
light.
n. Remove or disconnect battery before
servicing, cleaning, or removing material
from the chainsaw.
o. Do not wash with a hose; avoid
getting water in motor and electrical
connections.
p. When servicing use only identical
replacement parts listed in this manual.
Use of parts which do not meet the
original equipment specications may
lead to improper performance and
compromised safety.
q. Follow instructions for lubricating and
changing accessories.
r. Keep handles dry, clean and free from
oil and grease.
s. Save these instructions. Refer to them
frequently and use them to instruct
others who may use this tool. if you
loan this tool to someone else, also loan
these instructions to them to prevent
misuse of the product and possible
injury.
Save these instructions!
3.1 Children
a. Tragic accidents can occur if the
operator is not alert to the presence of
children. Children are often attracted
to the chainsaw and trimming activity.
They do not understand the dangers.
Never assume that children will remain
where you last saw them.
b. Keep children out of the mowing
area and under the watchful care of
a responsible adult other than the
operator.
c. Be alert and turn the chainsaw off if a
child enters the area.
d. Use extreme care when approaching
blind corners, doorways, shrubs, trees,
or other objects that may obscure your
vision of a child who may run into the
chainsaw.

19
English
e. Never allow children under 15 years old
to operate a power chainsaw. Children
15 years old and over should read and
understand the operation instructions
and safety rules in this manual and
should be trained and supervised by
a parent. Only responsible individuals
who are familiar with these rules of safe
operation should be allowed to use this
machine.
3.2 Training
a. Read the instructions carefully. Be
familiar with the controls and the
correct use of the machine.
b. Never allow children or people
unfamiliar with these instructions to
use the machine. Local regulations can
restrict the age of the operator.
c. Keep in mind that the operator or user
is responsible for accidents or hazards
occurring to other people or their
property.
3.3 Preparation
a. Before use, always visually inspect
the machine for damaged, missing or
misplaced guards or shields.
b. Never operate the machine while
people, especially children, or pets are
nearby.
3.4 Operation
a. Keep supply and extension cords away
from cutting means.
b. Wear eye protection and stout shoes at
all times while operating the machine.
c. Avoid using the machine in bad weather
conditions especially when there is a
risk of lightning.
d. Use the machine only in daylight or
good articial light.
e. Never operate the machine with
damaged guards or shields or without
guards or shields in place.
f. Switch on the motor only when the
hands and feet are away from the
cutting means.
g. Always disconnect the machine from
the power supply (i.e. remove the plug
from the mains, remove the disabling
device or removable battery):
• Whenever the machine is left unattended;
• Before clearing a blockage;
• Before checking, cleaning or working on
the machine;
• After striking a foreign object;
• Whenever the machine starts vibrating
abnormally.
h. Take care against injury to feet and
hands from the cutting means.
i. Always ensure that the ventilation
openings are kept clear of debris.
j. If situations occur that are not covered
in this manual, use care and good
judgment. Contact HENX Customer
Service for assistance.
3.5 Maintenance and storage
• Disconnect the machine from the power
supply (i.e. remove the plug from the
mains, remove the disabling device or
removable battery) before carrying out
maintenance or cleaning work.
• Use only the manufacturer’s
recommended replacement parts and
accessories.
• Inspect and maintain the machine
regularly. Have the machine repaired only
by an authorized repairer.
• When not in use, store the machine out
of the reach of children.
3.6 Service
WARNING: That the vibration emission
during actual use of the power tool
can differ from the declared total value
depending on the ways in which the tool is
used.
WARNING: And of the need to identify
safety measures to protect the operator that
are based on an estimation of exposure in
the actual conditions of use (taking account
of all parts of the operating cycle such as
the times when the tool is switched off and
when it is running idle in addition to the
trigger time).
a. Have your power tool serviced by
a qualied repair person using only
identical replacement parts. This will
ensure that the safety of the power tool
is maintained.

English
20
b. If the chainsaw’s built-in overload
protection switch frequently trips,
contact HENX Customer Service or
your Closest service centre.
c. Do not wash the chainsaw with a hose;
avoid getting water in the motor and
electrical connections.
d. Remove the battery and store the
idle chainsaw in a covered area when
not in use. Allow the motor to cool
before storing it in any enclosure. The
chainsaw should be stored in a dry,
high, or locked-up enclosure, out of
reach of children.
e. When servicing, use only identical
replacement parts listed in this manual.
Use of parts that do not meet the
original equipment specications may
lead to improper performance and
compromised safety.
f. Remove or disconnect the battery pack
before servicing, cleaning, or removing
material from the chainsaw.
g. Follow instructions for lubricating and
changing accessories.
h. Keep handles dry, clean and free from
oil and grease.
i. Keep all nuts, bolts, and screws tight to
be sure the equipment is in safe working
condition.
j. Never remove or tamper with safety
devices. Regularly check their proper
operation. Never do anything to
interfere with the intended function of a
safety device or to reduce the protection
provided by a safety device.
k. Always stop the motor before making
adjustments to a wheel or a cutting-
height adjustment.
l. After striking a foreign object, stop the
motor, remove the battery pack, allow
the wire to stop rotating, and thoroughly
inspect the chainsaw for any damage.
Repair the damage before operating the
chainsaw.
m. Maintain or replace safety and
instruction labels, as necessary.
SAVE THESE INSTRUCTIONS.
Refer to them frequently and use them to
instruct others who may use this tool. If
you lend this tool to someone else, also
lend these instructions to them to prevent
misuse of the product and possibly injury.
4. General Power Tool Safety
Warnings
WARNING: Read all safety warnings and
instructions. Fail to follow the warnings and
instructions may result in electric shock, re
and/or serious injury.
Save all warnings and instructions for future
reference.
The term “power tool” in the warning refers
to your mains-operated (corded) power tool
or battery-operated (cordless) power tool.
4.1 Work Area Safety
• Keep work area clean and well lit
cluttered or dark areas invite accidents.
• Do not operate power tools in explosive
atmospheres, such as in the presence of
ammable liquids, gases or dust. Power
tools create sparks which may ignite the
dust or fumes.
• Keep children and bystanders away while
operating a power tool distractions can
cause you to lose control.
4.2 Electrical Safety
• Power tool plugs must match the outlet.
Never modify the plug in any way. Do
not use any adaptor plugs with earthed
(grounded) power tools. Unmodied
plugs and matching outlets will reduce
risk of electric shock
• Avoid body contact with earthed or
grounded surfaces, such as pipes,
radiators, ranges and refrigerators. There
is an increased risk of electric shock if
your body is earthed or grounded.
• Do not expose power tools to rain or wet
conditions. Water entering a power tool
will increase the risk of electric shock.
• Do not abuse the cord. Never use the
cord for carrying, pulling or unplugging
the power tool. Keep cord away from
heat, oil, sharp edges or moving parts.
Damaged or entangled cords increase
the risk of electric shock.
La pagina sta caricando ...
La pagina sta caricando ...
La pagina sta caricando ...
La pagina sta caricando ...
La pagina sta caricando ...
La pagina sta caricando ...
La pagina sta caricando ...
La pagina sta caricando ...
La pagina sta caricando ...
La pagina sta caricando ...
La pagina sta caricando ...
La pagina sta caricando ...
La pagina sta caricando ...
La pagina sta caricando ...
La pagina sta caricando ...
La pagina sta caricando ...
La pagina sta caricando ...
La pagina sta caricando ...
La pagina sta caricando ...
La pagina sta caricando ...
La pagina sta caricando ...
La pagina sta caricando ...
La pagina sta caricando ...
La pagina sta caricando ...
La pagina sta caricando ...
La pagina sta caricando ...
La pagina sta caricando ...
La pagina sta caricando ...
La pagina sta caricando ...
La pagina sta caricando ...
La pagina sta caricando ...
La pagina sta caricando ...
La pagina sta caricando ...
La pagina sta caricando ...
La pagina sta caricando ...
La pagina sta caricando ...
La pagina sta caricando ...
La pagina sta caricando ...
La pagina sta caricando ...
La pagina sta caricando ...
La pagina sta caricando ...
La pagina sta caricando ...
La pagina sta caricando ...
La pagina sta caricando ...
La pagina sta caricando ...
La pagina sta caricando ...
La pagina sta caricando ...
La pagina sta caricando ...
La pagina sta caricando ...
La pagina sta caricando ...
La pagina sta caricando ...
La pagina sta caricando ...
La pagina sta caricando ...
La pagina sta caricando ...
La pagina sta caricando ...
La pagina sta caricando ...
La pagina sta caricando ...
La pagina sta caricando ...
La pagina sta caricando ...
La pagina sta caricando ...
La pagina sta caricando ...
La pagina sta caricando ...
La pagina sta caricando ...
La pagina sta caricando ...
La pagina sta caricando ...
La pagina sta caricando ...
La pagina sta caricando ...
La pagina sta caricando ...
La pagina sta caricando ...
La pagina sta caricando ...
La pagina sta caricando ...
La pagina sta caricando ...
La pagina sta caricando ...
La pagina sta caricando ...
La pagina sta caricando ...
La pagina sta caricando ...
La pagina sta caricando ...
La pagina sta caricando ...
La pagina sta caricando ...
La pagina sta caricando ...
La pagina sta caricando ...
La pagina sta caricando ...
La pagina sta caricando ...
La pagina sta caricando ...
La pagina sta caricando ...
La pagina sta caricando ...
La pagina sta caricando ...
La pagina sta caricando ...
La pagina sta caricando ...
La pagina sta caricando ...
La pagina sta caricando ...
La pagina sta caricando ...
La pagina sta caricando ...
La pagina sta caricando ...
La pagina sta caricando ...
La pagina sta caricando ...
La pagina sta caricando ...
La pagina sta caricando ...
La pagina sta caricando ...
La pagina sta caricando ...
La pagina sta caricando ...
La pagina sta caricando ...
La pagina sta caricando ...
La pagina sta caricando ...
La pagina sta caricando ...
La pagina sta caricando ...
La pagina sta caricando ...
La pagina sta caricando ...
La pagina sta caricando ...
La pagina sta caricando ...
La pagina sta caricando ...
La pagina sta caricando ...
La pagina sta caricando ...
La pagina sta caricando ...
La pagina sta caricando ...
La pagina sta caricando ...
La pagina sta caricando ...
La pagina sta caricando ...
La pagina sta caricando ...
La pagina sta caricando ...
La pagina sta caricando ...
La pagina sta caricando ...
La pagina sta caricando ...
La pagina sta caricando ...
La pagina sta caricando ...
La pagina sta caricando ...
La pagina sta caricando ...
La pagina sta caricando ...
La pagina sta caricando ...
La pagina sta caricando ...
La pagina sta caricando ...
La pagina sta caricando ...
La pagina sta caricando ...
La pagina sta caricando ...
La pagina sta caricando ...
La pagina sta caricando ...
La pagina sta caricando ...
La pagina sta caricando ...
La pagina sta caricando ...
La pagina sta caricando ...
La pagina sta caricando ...
La pagina sta caricando ...
La pagina sta caricando ...
La pagina sta caricando ...
-
 1
1
-
 2
2
-
 3
3
-
 4
4
-
 5
5
-
 6
6
-
 7
7
-
 8
8
-
 9
9
-
 10
10
-
 11
11
-
 12
12
-
 13
13
-
 14
14
-
 15
15
-
 16
16
-
 17
17
-
 18
18
-
 19
19
-
 20
20
-
 21
21
-
 22
22
-
 23
23
-
 24
24
-
 25
25
-
 26
26
-
 27
27
-
 28
28
-
 29
29
-
 30
30
-
 31
31
-
 32
32
-
 33
33
-
 34
34
-
 35
35
-
 36
36
-
 37
37
-
 38
38
-
 39
39
-
 40
40
-
 41
41
-
 42
42
-
 43
43
-
 44
44
-
 45
45
-
 46
46
-
 47
47
-
 48
48
-
 49
49
-
 50
50
-
 51
51
-
 52
52
-
 53
53
-
 54
54
-
 55
55
-
 56
56
-
 57
57
-
 58
58
-
 59
59
-
 60
60
-
 61
61
-
 62
62
-
 63
63
-
 64
64
-
 65
65
-
 66
66
-
 67
67
-
 68
68
-
 69
69
-
 70
70
-
 71
71
-
 72
72
-
 73
73
-
 74
74
-
 75
75
-
 76
76
-
 77
77
-
 78
78
-
 79
79
-
 80
80
-
 81
81
-
 82
82
-
 83
83
-
 84
84
-
 85
85
-
 86
86
-
 87
87
-
 88
88
-
 89
89
-
 90
90
-
 91
91
-
 92
92
-
 93
93
-
 94
94
-
 95
95
-
 96
96
-
 97
97
-
 98
98
-
 99
99
-
 100
100
-
 101
101
-
 102
102
-
 103
103
-
 104
104
-
 105
105
-
 106
106
-
 107
107
-
 108
108
-
 109
109
-
 110
110
-
 111
111
-
 112
112
-
 113
113
-
 114
114
-
 115
115
-
 116
116
-
 117
117
-
 118
118
-
 119
119
-
 120
120
-
 121
121
-
 122
122
-
 123
123
-
 124
124
-
 125
125
-
 126
126
-
 127
127
-
 128
128
-
 129
129
-
 130
130
-
 131
131
-
 132
132
-
 133
133
-
 134
134
-
 135
135
-
 136
136
-
 137
137
-
 138
138
-
 139
139
-
 140
140
-
 141
141
-
 142
142
-
 143
143
-
 144
144
-
 145
145
-
 146
146
-
 147
147
-
 148
148
-
 149
149
-
 150
150
-
 151
151
-
 152
152
-
 153
153
-
 154
154
-
 155
155
-
 156
156
-
 157
157
-
 158
158
-
 159
159
-
 160
160
-
 161
161
-
 162
162
-
 163
163
-
 164
164


HENX 9005224 Manuale del proprietario
- Categoria
- Utensili elettrici
- Tipo
- Manuale del proprietario
in altre lingue
- English: HENX 9005224 Owner's manual
- français: HENX 9005224 Le manuel du propriétaire
- Deutsch: HENX 9005224 Bedienungsanleitung
- Nederlands: HENX 9005224 de handleiding
Altri documenti
-
Hikoki CS3630DC Manuale utente
-
EINHELL GH-EC 1835 Manuale utente
-
Hikoki CS1825DC Manuale utente
-
Worx WG300E Manuale utente
-
Westfalia 93 46 00 Manuale utente
-
Anova Mb600 Manuale del proprietario
-
-
Festool IS 330 EB Manuale utente
-
 NAKAYAMA PRO EC1550 Guida utente
-
Festool SSU 200 EB Istruzioni per l'uso
