Hoover HNC 182 AE Manuale utente
- Categoria
- Congelatori
- Tipo
- Manuale utente

PROPERTY OF
CL N° REV. DATE
SPECIFICATION
1/1
MODIFY DESCRIPTION
MODIFIED BY
BASE CODE
TREATMENT
MATERIAL
DATE SIGNATURE
DRAWN
CHECKED
FOR
WEIGHT SCALE
SIZE
NAME
(LOCAL LANGUAGE)
PART CODE
SHEET
REPLACE No ORIGIN CL No Class Specification
FR
35
RELEASE LEVEL
WITHOUT OUR WRITTEN CONSENT IS FORBIDDEN
ALL RIGHTS RESERVED, THE REPRODUCTION OF ANY PART
OF EU DIRECTIVE 2002/95/CE + AMENDMENTS
MATERIALS IN COMPLIANCE WITH REQUIREMENTS
A4
------------
08-04-2010
ELETTRONICO o MECCANICO - Prog.UNICUM - 14 LINGUE
SCHEDA TECNICA COMBINATO
CL 31527
41033652
08-04-2010
Z STUDIO
TAGLIABUE
BERTU’
MANUAL INSTRUCTION COMBI ELECTRONIC or MECHANICAL -
Project UNICUM - 14 LANGUAGES
FR COMBI - Project UNICUM 2010
GENERAL TOLERANCE
ISO 2768 - m
-
-
SC 000-000
VALIDO PER PRODUZIONE
------------
-
A
B
C
D
E

IT
COMBINATO ELETTRONICO O MECCANICO ...........................................da pag.2 a pag.4
EN
COMBINED ELECTRONIC OR MECHANICAL FREEZERS ..............from page 5 to page 7
DE
ELEKTRONISCHE ODER MECHANISCHE KÜHL-/GEFRIERKOMBINATIONEN....von Seite 8 bis Seite 10
FR
COMBINES ELECTRONIQUES OU MECANIQUES ................... De la page 11 à la page 13
ES
COMBINADOS ELECTRÓNICOS O MECÁNICOS .....................desde la página 17 a la 19
PT
CONGELADORES COMBINADOS ELECTRÓNICOS OU MECÂNICOS ....da página 20 à página 22
EL
ΨΥΓΕΙΟΚΑΤΑΨΥΚΤΕΣ ΗΛΕΚΤΡΟΝΙΚΟΥ Ή ΜΗΧΑΝΙΚΟΥ ΧΕΙΡΙΣΜΟΥ .... από σελίδα 23 ως σελίδα 25
DA
KOMBINEREDE ELEKTRONISKE ELLER MEKANISKE FRYSERE ... fra side 35 til side 37
FI
ELEKTRONISET TAI MEKAANISET YHDISTELMÄKAAPIT ................................ sivut 29-31
SV
KOMBINERADE ELEKTRONISKA ELLER MEKANISKA FRYSAR .... från sida 26 till sida 28
NO
KOMBINERTE ELEKTRONISKE ELLER MEKANISKE FRYSERE .....fra side 32 til side 34
CZ
KOMBINOVANÝ MRAZÁK S ELEKTRONICKÝM NEBO AUTOMATICKÝM OVLÁDÁNÍM .....strana 38 až strana 40
PL
ELEKTRONICZNE LUB MECHANICZNE CHŁODZIARKO-ZAMRAŻARKI ....od strony 41 do strony 43
NL
KOELVRIESCOMBINATIE ELEKTRONISCH EN MECHANISCH ....van pagina 14 tot pagina 16

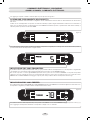
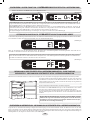
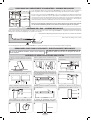
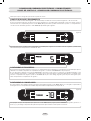
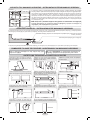
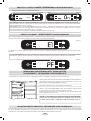
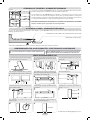
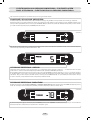
COMBINATO ELETTRONICO - CON DISPLAY
QUADRO COMANDI - COMBINATO ELETTRONICO
Per raggiungere il quadro comandi è suffi ciente aprire la porta superiore del frigorifero.
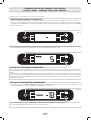
ACCENSIONE E SPEGNIMENTO DEL PRODOTTO
Il prodotto viene alimentato elettronicamente al collegamento del cavo d’alimentazione alla rete elettrica e rimane alimentato fi no alla rimozione
dello stesso.
Il trattino acceso sul display indica che il prodotto è in funzione di stand-by, è quindi collegato all’alimentazione elettrica ma non funzionante. In
questo caso per attivare il prodotto è suffi ciente premere il tasto MODE. Per disattivare il prodotto, e quindi metterlo nella funzione stand-by, è
suffi ciente premere per alcuni secondi il tasto MODE.
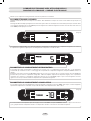
IMPOSTAZIONE DEL VANO FRIGORIFERO
E’ possibile modifi care la temperatura premendo i tasti (+) e (-). E’ possibile modifi care la temperatura da 1 a 7. La temperatura consigliata dalla
casa produttrice è 5. In fase di impostazione della temperatura del vano frigorifero la scritta FRIDGE lampeggia.
Nel caso di un prodotto con tecnologia NO FROST, premendo il tasto (+) dal 7 al 1 si troverà la modalità OFF con la quale sarà possibile
spegnere il vano frigo. Il display mostrerà solo la temperatura impostata per il vano freezer. Per riattivare il vano frigo schiacciare il tasto
MODE fi nchè la modalità FRIDGE non lampeggerà, a questo punto sarà possibile modifi care la temperatura del vano frigo.
IMPOSTAZIONE DEL VANO FREEZER
E’ possibile passare dalla modalità FRIGO alla modalità FREEZER premendo il tasto MODE. Successivamente apparirà la scritta -18°C ovvero
la temperatura consigliata. E’ possibile modifi care la temperatura da -16°C a -22°C.
Per qualsiasi variazione della temperatura dopo aver premuto il tasto MODE e con la scritta FREEZER lampeggiante premere i tasti (+) e (-)
fi no a raggiungere la temperatura desiderata. Le temperature a display sono solo indicative.
(fi gura 1)
(fi gura 2)
2 IT
2 IT
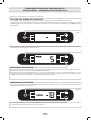
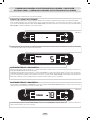
Una volta inserita la spina il prodotto visualizzerà sul display la temperatura consigliata per la cella frigo +5°C. Per la cella freezer il prodotto si
porterà automaticamente alla temperatura consigliata di -18°C.

3 IT
3 IT
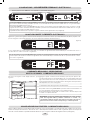
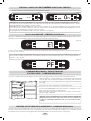
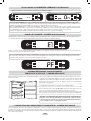
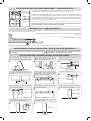
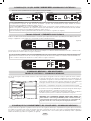
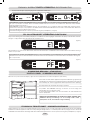
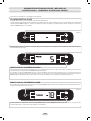
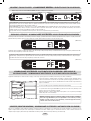
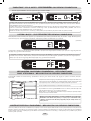
OPZIONE SUPERCONGELAZIONE / OPZIONE SUPER - COMBINATO ELETTRONICO
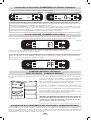
OPZIONE SUPERGUASTI ED ERRORI - COMBINATO ELETTRONICO
Ogni errore o guasto verrà segnalato automaticamente dal display che indicherà un numero preceduto dalla lettera „E” (Errore). In questo caso
provare a spegnere e riaccendere il prodotto. Se l’errore si ripresenta contattare l’assistenza tecnica.
Nel caso di prodotti con tecnologia NO FROST, dopo un black-out sul display apparirà la scritta „PF” (Power Fail). In caso di mancanza di
corrente superiore alle 10-12 ore controllare che gli alimenti siano rimasti inalterati per consumarli entro 24 ore o procedere alla loro cottura
e successivo congelamento.
(fi gura 4)
(fi gura 5)
(fi gura 3)
Disattivo Attivo
Prodotti ELETTRONICI senza tecnologia NO FROST: premere il tasto (+) per attivare la funzione SUPER. Disporre i cibi da congelare nel
vano freezer. Al termine del tempo prestabilito il prodotto uscirà automaticamente dalla funzione SUPER. Nel caso si voglia interrompere
prima la funzione SUPER premere il tasto (-).
Prodotti ELETTRONICI con tecnologia NO FROST: premere il tasto (+) per attivare la funzione SUPER. Trascorse 8 ore disporre i cibi da
congelare nel vano freezer. Al termine del tempo prestabilito il prodotto uscirà automaticamente dalla funzione SUPER. Nel caso si voglia
interrompere prima la funzione SUPER, premere il tasto (-).
La quantità massima di alimenti che è possibile congelare è indicata nella targhetta matricola (vedi fi gura 6).
Premere più volte il tasto MODE fi no a che apparirà la scritta SUPER lampeggiante.
In caso di mancanza di corrente superiore alle 10-12 ore controllare che gli alimenti siano rimasti inalterati per consumarli entro 24 ore o
procedere alla loro cottura e successivo congelamento.
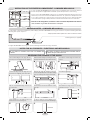
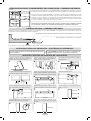
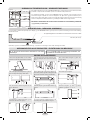
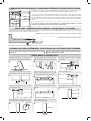
COMBINATO MECCANICO - SENZA DISPLAY
SCATOLA COMANDI - COMBINATO MECCANICO
CONGELAZIONE VANO FREEZER - COMBINATO MECCANICO
La scatola termostato per il controllo dell’apparecchio é collocata all’interno della cella
frigo in alto a destra. Per essere certi che l’apparecchio stia funzionando accertarsi
che la manopola termostato non sia sulla posizione “0”. Regolare la manopola in base
alla temperatura che si vuole nel frigorifero.
Lo sbrinamento della cella frigo avviene automaticamente.
Nei prodotti senza tecnologia NO FROST la presenza di un lieve strato di brina o di
gocce d’acqua durante il funzionamento è da considerarsi normale.
E’ importante mantenere sempre pulito il condotto di scarico ed evitare di porre i cibi
a contatto con la parete della cella.
IMPORTANTE: In presenza di temperatura ambiente molto calda, i prodotti
senza tecnologia NO FROST, potrebbero funzionare in continuo, con
conseguente formazione di brina sulla parete di fondo della cella frigo. In
questi casi è necessario ruotare la manopola frigo su numeri più bassi.
Disporre i cibi da congelare nei cassetti. All’inizio della congelazione, per non fare raffreddare eccessivamente il vano frigo, potrebbe essere necessario
arretrare la manopola del termostato, in funzione del carico e della temperatura ambiente. Alla fi ne della congelazione riportare la manopola del
termostato sul valore abituale. La quantitá massima di alimenti che si puó congelare é indicata nella targhetta matricola (vedi fi gura 6).
Nel caso di un frigorifero senza display elettronico, per raggiungere il quadro comandi (scatola termostato) aprire la porta superiore del
frigorifero.

SBRINAMENTO VANO FREEZER- COMBINATO MECCANICO
Nel caso di un frigorifero con tecnologia NO FROST il vano freezer non necessita di sbrinamento poi-
ché questo prodotto é dotato di un sistema automatico che impedisce la formazione di ghiaccio.
Per la versione senza tecnologia NO FROST é consigliabile sbrinare manualmente il prodotto quando
lo strato di ghiaccio supera 3mm. di spessore, posizionando la manopola sulld “0” Aprire la porta e
rimuovere gli alimenti avendo cura di riporli in un luogo molto fresco. Lasciare aperta la porta per tutto il
tempo necessario allo scioglimento dello strato di ghiaccio. Asciugare l’interno del congelatore con una
spugna/straccio. Reintrodurre gli alimenti e riposizionare la manopola sul valore abituale.
N.B.: All’interno della cella frigo é presente la targa matricola, contenente i dati da comunicare
all’Assistenza Tecnica qualora si verifi casse un guasto.
N.B.: Per una miglior circolazione dell’aria, lasciare dello spazio
tra gli alimenti.
N.B.: Per le PROVE NORMATIVE di consumo e conservazione
togliere tutti i cassetti ad esclusione di quello in basso.
(fi gura 6)
DRENAGGIO DELL’ACQUA - COMBINATO MECCANICO
In alcuni modelli di frigoriferi meccanici (senza display) e senza tecnologia NO FROST il congelatore è dotato di un sistema di evacuazione del-
l’acqua di sbrinamento. Tale sistema è costituito da:
Una linguetta che deve essere estratta per consentire il fl usso dell’acqua.
Bacinella di raccolta acqua non in dotazione.
Nei frigoriferi con tecnologia NO FROST il sistema di evacuazione dell’acqua di sbrinamento è automatico.
4 IT
4 IT
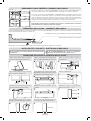
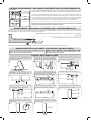
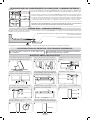
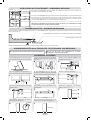
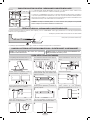
INVERSIONE DEL SENSO DI APERTURA DELLE PORTE
Sdraiare o inclinare di 45° il frigorifero, per facilitare
le operazioni nella parte inferiore dello stesso
Togliere la cerniera inferiore destra svitando le viti il
perno e le rondelle, quindi togliere la porta inferiore
Svitare la cerniera centrale e togliere la
porta superiore
Svitare il fermo dalla porta frigo e montare
quello in dotazione sull’altro lato
Togliere i tappi (A) e (B), svitare le viti ed estrarre
parzialmente il cruscotto avendo cura di non
danneggiare le parte elettrica posteriore
Svitare la cerniera destra
Dalla busta accessori in dotazione, prelevare
e fi ssare la cerniera superiore sinistra
Rimontare il cruscotto, fi ssandolo con le viti
e i tappini
Rimontare le cerniere e le porte operando
dal basso verso l’alto, 1 2 3
2 ore
Riportare l‘apparecchio in posizione verticale e
attendere 2 ore prima di rimetterlo in funzione
Per ottenere un corretto allineamento delle porte
è necessario agire sulla cerniera centrale.
NOTE PER TUTTI I PRODOTTI - ELETTRONICI E MECCANICI

COMBINED ELECTRONIC FREEZER - WITH DISPLAY
CONTROL PANEL - COMBINED ELECTRONIC FREEZER
Open the top door of the fridge in order to access the control panel.
SWITCHING THE PRODUCT ON AND OFF
The product is electronically powered by connecting the power cable to the power outlet and remains powered on until said cable is removed.
The light on the display indicates that the product is in stand-by mode, therefore it is connected to the power outlet but it is not working. In this
case, simply press the MODE button to activate the product. To deactivate the product and thus put it in standby mode, press down on the MODE
button for a few seconds.
SETTING OF THE FRIDGE COMPARTMENT
It is possible to modify the temperature by pressing the buttons (+) and (-). The temperature can be changed from 1 to 7. The temperature
recommended by the manufacturing company is 5. When setting the temperature of the fridge compartment, the FRIDGE display will start
fl ashing.
In case of products equipped with NO FROST technology, pressing the (+) button from 7 to 1 will bring up the OFF mode, which can be used
to turn off the fridge compartment. The display will only show the temperature set for the freezer compartment. In order to reactivate the
fridge compartment press the MODE button until the fridge mode stops Flashing, at this point it will be possible to change the temperature
of the fridge compartment.
SETTING OF THE FREEZER COMPARTMENT
It is possible to switch from FRIDGE to FREEZER mode by pressing the MODE button. Subsequently, the message -18 will be displayed, i.e. the
recommended temperature. It is possible to modify the temperature from -16°C to -22°C.
For any variation of the temperature after pressing the MODE button the word FREEZER will appear, press the buttons (+) and (-) until you
reach the desired temperature. The display temperatures are only indicative.
(Figure 1)
(Figure 2)
5 IT
5 EN
Once the plug has been connected, the product will show the recommended temperature for the fridge compartment on the display +5°C. For the
freezer compartment, the product will automatically switch to the recommended temperature of -18°C.

6 IT
6 EN
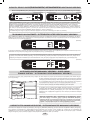
SUPER OPTIONFREEZING / SUPER OPTION - COMBINED ELECTRONIC FREEZER
SUPER OPTIONFAULTS AND ERRORS - COMBINED ELECTRONIC
Every error or fault will be automatically shown in the display which will indicate a number preceded by the letter „E” (Error). In this case, try
switching the product off and back on again. If the error persists, contact the technical assistance.
In case of products equipped with NO FROST technology, after a power-cut, the message „PF” (Power Fail) will be shown on the display. In
case of a power-cut lasting over 10-12 hours, check that the foodstuffs has remained unchanged in order to consume it within 24 hours or
proceed to cook it or freeze it.
(Figure 4)
(Figure 5)
(Figure 3)
Off On
ELECTRONIC products without NO FROST technology: Press the (+) button in order to activate the SUPER function. Place the foods to
be frozen into the freezer compartment. At the end of the preset time, the product will automatically exit the SUPER function. If you wish to
interrupt the SUPER function in advance, press the (-) button.
ELECTRONIC products with NO FROST technology: Press the (+) button in order to activate the SUPER function. After 8 hours, place the
foods to be frozen in the freezer compartment. At the end of the preset time, the product will automatically exit the SUPER function. If you
wish to interrupt the SUPER function in advance, press the (-) button.
The rating plate states the maximum quantity of foods that can be frozen (see fi gure 6).
Press the mode button repeatedly until the message SUPER is displayed.
In case of a power-cut lasting over 10-12 hours, check that the foodstuffs has remained unchanged in order to consume it within 24 hours or
proceed to cook it or freeze it.
COMBINED MECHANICAL - WITHOUT DISPLAY
CONTROL PANEL - COMBINED MECHANICAL
FREEZING OF THE FREEZER COMPARTMENT - COMBINED MECHANICAL
The thermostat box to control the appliance is located inside the fridge compartment
on the top right. To check whether the appliance is functioning, make sure that the
thermostat knob is not set on "0". Adjust the knob according to the desired temperature
in the fridge.
In this product the freezer compartment is automatically defrosted.
In products without NO FROST technology, the presence of a slight layer of frost or
drops of water when the freezer is working is normal.
Make sure the water outlet is always clean. Make sure foods do not touch the back or
sides of the fridge compartment
Important: If the room temperature is very warm, appliances without NO
FROST technology may work continuously and a layer of frost will deposit
on the back of the fridge compartment. In this case, turn the knob to lower
settings.
Place the foods to be freezer drawer, at the start of the freezing process, therefore not making the fridge compartment excessivley cold, it may be
necessary to turn the thermostat knob up or down, according to the load and room temperature. Once the freezing process is completed, return the
thermostat knob to the usual value. The rating plate states the maximum quantity of foods that can be frozen, (see fi gure 6).
In the case of a fridge without electronic display, open the top door of the fridge in order to reach the control panel (thermostat box).

DEFROSTING OF THE FREEZER COMPARTMENT - COMBINED MECHANICAL
In case of a fridge with NO FROST technology, the freezer compartment does not need to be defrosted
because this product is equipped with an automatic system which prevents ice from forming.
For the version without NO FROST technology, we recommend manually defrosting the freezer area
when the layer of frost is more than 3 mm thick. Turn the knob to "0", open the door and place the foods
in a cool place. Leave the door open as long as is necessary for the layer of frost to melt. Dry the inside
of the freezer with a sponge/cloth. Reposition the foodstuffs and reset the knob to the usual values.
N.B.: This is the rating plate. If you need to contact our Service Department in the event of
faults, remember to give them the information on the plate.
N.B.: For better air circulation, leave some room between the
foodstuffs.
N.B.: To TEST consumption and preservation standards, remove
all drawers except for the bottom one.
(Figure 6)
DRAINING WATER - COMBINED MECHANICAL
In some models of mechanical refrigerators (without display) and without NO FROST technology, the freezer has a system for draining water while
defrosting. This system comprises:
A drip tray which must be pulled out so water can fl ow into a basin.
A drainage basin (not supplied).
In fridges with NO FROST technology, the system for draining water while defrosting is automatic.
7 IT
7 EN
REVERSING THE OPENING OF THE DOORS
Place or tilt the fridge at a 45° angle, since it is
necessary to work on the bottom of the appliance
Remove the bottom hinge by removing the screws,
the plug and washers, then remove the bottom door.
Unscrew the central hinge and remove the
top door
Unscrew the hinge from the fridge door and
mount the one supplied on the other side
Remove the caps (A) and (B), loosen the
screws and partially remove the panel taking
care not to damage the rear electrical part.
Unscrew the right hinge
Flip the top left-hand hinge found in the
accessories kit
Fit the panel, and secure with the screws
and caps
Reassemble the hinges and doors working
from bottom to top, 1 2 3
2 hours
Put the appliance in an upright position and
wait two hours before turning it on
In order to obtain the correct alignment of the
doors it is necessary to work on the middle hinge.
NOTES FOR ALL PRODUCTS - ELECTRONIC AND MECHANICAL

ELEKTRONISCH GESTEUERTE KÜHL-/GEFRRIERKOMBINATION - MIT DISPLAY
BEDIENFELD - ELEKTRONISCH GESTEUERTE KÜHL-/GEFRRIERKOMBINATION
Öffnen Sie die obere Tür des Kühlschranks, um Zugang zum Bedienfeld zu bekommen.
AN- UND AUSSCHALTEN DES PRODUKTS
Das Gerät wird elektrisch gespeist, indem das Netzkabel an eine Steckdose angeschlossen wird. Die Stromversorgung bleibt solange bestehen,
bis das Kabel abgezogen wird.
Der Strich auf dem Display zeigt an, dass sich das Gerät im Standbymodus befi ndet. Das heißt, es ist an der Steckdose angeschlossen, aber nicht
in Betrieb. In diesem Fall drücken Sie einfach die MODE-Taste, um das Gerät zu anzuschalten. Um das Gerät auszuschalten und es damit in den
Standbymodus zu bringen, drücken Sie einige Sekunden lang die MODE-Taste.
EINSTELLUNG DES KÜHLFACHS
Es ist möglich, die Temperatur durch Drücken der Tasten (+) und (-) einzustellen. Die Temperatur kann von 1 bis 7 geändert werden. Die vom
Hersteller empfohlene Temperatur ist 5. Wenn die Temperatur des Kühlfachs eingestellt wird, wird auf dem Display blinkend FRIDGE angezeigt.
Wenn das Gerät mit NO FROST-Technologie ausgestattet ist, kann das Kühlfach durch Drücken der Taste (+) von 7 nach 1 ausgeschaltet
werden. Es wird nur die Temperatur angezeigt, die für das Gefrierfach eingestellt ist. Um das Kühlfach wieder anzuschalten, drücken Sie
die MODE-Taste, bis FRIDGE nicht mehr blinkt. Nun ist es möglich, die Temperatur des Kühlfachs zu ändern.
EINSTELLUNG DES GEFRIERFACHS
Es ist möglich, mit der MODE-Taste vom Kühlfach- in den Gefrierfachmodus umzuschalten. Danach wird -18 angezeigt, das ist die empfohlene
Temperatur. Es ist möglich, die Temperatur von -16°C bis -22°C einzustellen.
Wenn Sie nach dem Drücken der MODE-Taste die Temperatur ändern wollen, wird FREEZER angezeigt. Drücken Sie die Tasten (+) oder
(-), bis Sie die gewünschte Temperatur erreichen. Die angezeigten Temperaturen sind nur Anhaltspunkte.
(Abbildung 1)
(Abbildung 2)
8DE
8 DE
Wenn der Stecker angeschlossen worden ist, zeigt das Gerät die empfohlende Temperatur für das Kühlfach auf dem Display an: +5°C. Im
Gefrierfach wird das Gerät automatisch auf die empfohlene Temperatur von -18°C schalten.

9DE
9 DE
SUPER-OPTIONEINFRIEREN / SUPER-FUNKTION - ELKTRONISCH GESTEUERTE KÜHL-/GEFRIERKOMBI
SUPER-OPTIONSTÖRUNGEN UND FEHLER - KOMBINIERTES ELEKTRONISCHES GERÄT
Jeder Fehler und jede Störung wird automatisch durch eine Zahl hinter dem Buchstaben "E"angezeigt. In diesem Fall schalten Sie das Gerät
aus und wieder an. Wenn der Fehler bestehen bleibt, rufen Sie den Werkskundendienst.
Wenn die Geräte mit NO FROST-Technologie ausgestattet sind, wird nach einem Stromausfall auf dem Display "PF" (Power Fail) angezeigt.
Wenn der Stromausfall mehr als 10-12 Stunden dauert, überprüfen Sie, ob die Nahrungsmittel unverändert geblieben sind, damit Sie sie
innerhalb von 24 Stunden verzehren oder weiter kochen oder einfrieren.
(Abbildung 4)
(Abbildung 5)
(Abbildung 3)
Aus An
ELEKTRONISCHE Geräte ohne NO FROST-Technologie: Drücken Sie die Taste (+), um die SUPER-Funktion zu aktivieren. Legen Sie die
zu gefrierende Nahrung in das Gefrierfach. Am Ende der voreingestellten Zeit beendet das Gerät automatisch die SUPER-Funktion. Wenn
Sie die SUPER-Funktion vorher unterbrechen wollen, drücken Sie die Taste (-).
ELEKTRONISCHE Geräte mit NO FROST-Technologie: Drücken Sie die Taste (+), um die SUPER-Funktion zu aktivieren. Legen Sie die
einzufrierende Nahrung nach 8 Stunden ins Gefrierfach. Am Ende der voreingestellten Zeit beendet das Gerät automatisch die SUPER-
Funktion. Wenn Sie die SUPER-Funktion vorher unterbrechen wollen, drücken Sie die Taste (-).
Das Typenschild gibt die maximale Menge von Nahrung an, die eingefroren werden kann (siehe Abbildung 6).
Drücken Sie mehrfach die MODE-Taste, bis SUPER blinkend wird.
Wenn ein Stromausfall mehr als 10-12 Stunden dauert, überprüfen Sie, ob die Nahrungsmittel unverändert geblieben sind, damit Sie sie
innerhalb von 24 Stunden verzehren oder weiter kochen oder einfrieren.
MECHANISCH GESTEUERTE KÜHL-/GEFRIERKOMBINATION - OHNE DISPLAY
BEDIENFELD - MECHANISCH GESTEUERTE KÜHL-/GEFRIERKOMBINATION
EINFRIEREN IM GEFRIERFACH - MECHANISCH GESTEUERTE KÜHL-/GEFRIERKOMBINATION
Die Thermostatbox zur Steuerung des Gerätes befi ndet sich oben rechts im Inneren
des Kühlfachs. Um zu prüfen, ob das Gerät in Betrieb ist, stellen Sie sicher, dass der
Thermostatknopf nicht auf "0" gestellt ist. Stellen Sie den Knopf auf die gewünschte
Temperatur im Kühlschrank ein.
Bei diesem Gerät wird das Gefrierfach automatisch abgetaut.
Bei Geräten ohne NO FROST-Technologie ist das Vorhandensein einer leichten
Eisschicht oder von Wassertropfen normal, wenn der Kühlschrank arbeitet.
Sorgen Sie dafür, dass der Wasserablauf immer sauber ist. Vergewissern Sie sich,
dass die Nahrungsmittel nicht die Rückseite oder die Seitenwände des Kühlfachs
berühren.
Wichtig: Wenn die Raumtemperatur sehr warm ist, können Geräte ohne NO
FROST-Technologie unter Umständen ständig laufen und auf der Rückseite
des Kühlfachs wird sich eine Eisschicht ablagern. Drehen Sie den Knopf in
diesem Fall auf eine niedrigere Einstellung.
Legen Sie die zu einzufrierende Nahrung zu Beginn des Gefriervorgangs in das Gefrierschubfach. Damit das Gefrierfach nicht zu kalt wird,
kann es erforderlich sein, den Thermostatknopf entsprechend der Ladung und der Raumtemperatur nach oben oder unten zu drehen. Wenn das
Einfrieren abgeschlossen ist, drehen Sie den Thermostatknopf auf den ursprünglichen Wert zurück. Das Typenschild gibt die maximale Menge von
Nahrungsmitteln an, die eingefroren werden können (siehe Abbildung 6).
Öffnen Sie bei einem Kühlschrank ohne elektronisches Display die obere Tür, damit Sie Zugang zum Bedienfeld (Thermostatbox) erhalten.

ABTAUEN IM GEFRIERFACH - MECHANISCH GESTEUERTE KÜHL-/GEFRIERKOMBINATION
Bei einem Kühlschrank mit NO FROST-Technologie braucht das Gefrierfach nicht abgetaut zu werden,
weil dieses Gerät mit einem automatischen System ausgestattet ist, das die Bildung von Eis verhindert.
Bei Geräten ohne NO FROST-Technologie empfehlen wir, dass Sie den Gefrierfachbereich abtauen,
wenn die Eisschicht mehr als 3 mm dick ist. Drehen Sie den Knopf auf "0", öffnen Sie die Tür, und
legen Sie die Nahrung an eine kühle Stelle. Lassen Sie die Tür so lange wie es nötig ist, die Eisschicht
aufzutauen, geöffnet. Trocknen Sie das Innere des Gefrierschranks mit einem Schwamm oder Tuch.
Legen Sie die Nahrungsmittel wieder ein und drehen den Knopf wieder auf die üblichen Werte.
Wichtig: Das ist das Typenschild. Wenn Sie bei einer Störung den Kundendienst kontaktieren
müssen, geben Sie die Informationen auf diesem Schild an.
Wichtig: Um eine bessere Luftzirkulation zu schaffen, lassen Sie
etwas Platz zwischen den Nahrungsmitteln.
Wichtig: Zur Prüfung der Verbrauchs- und
Konservierungsstandards müssen alle Schubfächer außer dem
unteren herausgenommen werden.
(
Abbildung
6)
WASSERABLAUF - MECHANISCH GESTEUERTE KÜHL-/GEFRIERKOMBINATION
Bei einigen Modellen der mechanischen Kühlschränke (ohne Display) und ohne NO FROST-Technologie hat der Gefrierschrank ein System zum
Ableiten des Wassers während des Abtauens. Das System besteht aus:
Einer Ablaufrinne, die herausgezogen werden muss, so dass das Wasser in einen Behälter
fl ießen kann.
Einem Auffangbehälter (nicht im Lieferumfang enthalten).
Bei Kühlschränken mit NO FROST-Technologie ist das System zum Ablassen des Wassers beim Abtauen automatisch.
10DE
10 DE
WECHSEL DES TÜRANSCHLAGES
Stellen oder kippen Sie den Kühlschrank in einem
45°-Winkel, da es notwendig ist, an der Unterseite
des Gerätes zu arbeiten.
Entfernen Sie das untere Scharnier, indem Sie
die Schrauben, die Stopfen und Unterlegscheiben
entfernen. Entfernen Sie anschließend die untere Tür.
Schrauben Sie das mittlere Scharnier heraus
und entfernen Sie die obere Tür.
Schrauben Sie das Scharnier von der
Kühlschranktür ab und befestigen Sie das
mitgelieferte Scharnier auf der anderen Seite.
Entfernen Sie die Schutzkappen (A) und (B), lösen
Sie die Schrauben, und ziehen Sie die Stirnwand
teilweise heraus. Achten Sie darauf, dass Sie die
Elektrik im hinteren Bereich nicht beschädigen.
Schrauben Sie das rechte Scharnier ab.
Nehmen Sie aus dem Zubehör das obere
linke Scharnier und befestigen Sie es.
Bringen Sie die Griffe wieder an, indem Sie die
Schrauben und Schutzkappen befestigen.
Bauen Sie die Scharniere und die Türen wieder
an, beginnen Sie dabei von unten, 1 2 3
2 Stunden
Bringen Sie das Gerät in die aufrechte Position,
und warten Sie zwei Stunden, bevor Sie es wieder
in Betrieb nehmen.
Um die ordnungsgemäße Ausrichtung der Türen
beizubehalten, ist es erforderlich, am mittleren
Scharnier zu arbeiten.
ANMERKUNGEN FÜR ALLE GERÄTE - ELEKTRONISCH UND MECHANISCH

COMBINE ELECTRONIQUE AVEC AFFICHEUR DISPLAY
PANNEAU DE COMMANDE - COMBINE ELECTRONIQUE
Ouvrez la porte supérieure du réfrigérateur afi n d'accéder au panneau de commande.
ALLUMER/ETEINDRE L'APPAREIL
L'appareil est alimenté de façon électronique en raccordant le câble d'alimentation à la prise de courant. Il reste allumé tant que la prise est
branchée.
L'éclairage de l'affi cheur indique que l'appareil est en mode veille, qu'il est bien raccordé à la prise de courant mais qu'il n'est pas en marche. Dans
ce cas, appuyez simplement sur la touche MODE pour activer l'appareil. Pour désactiver l'appareil et le mettre en mode veille, tenez enfoncé la
touche MODE pendant quelques secondes.
PARAMETRER LE COMPARTIMENT REFRIGERATEUR
Il est possible de modifi er la température en appuyant sur les touches (+) et (-). La température peut être réglée de 1 à 7. La température
recommandée par le fabricant est de 5. Lors du réglage de la température du compartiment réfrigérateur, l'inscription FRIDGE commence à
clignoter.
Si l'appareil est doté de la technologie NO FROST, l'appui sur la touche (+) pour passer de 7 à 1 permet de passer au mode ARRET qui
peut être utilisé pour arrêter le compartiment réfrigérateur. L'affi cheur indiquera uniquement la température réglée pour le compartiment
congélateur. Pour réactiver le compartiment réfrigérateur, appuyez sur la touche MODE jusqu'à ce que le mode réfrigérateur cesse de
clignoter. Il sera alors possible de modifi er la température du compartiment réfrigérateur.
PARAMETRER LE COMPARTIMENT CONGELATEUR
Il est possible de passer du mode Réfrigérateur au mode Congélateur en appuyant sur la touche MODE. Suite à quoi, le chiffre -18 apparaît,
représentant la température recommandée. Il est possible de modifi er cette température entre -16°C et -22°C.
Pour toute variation de la température après avoir appuyé sur la touche MODE, l'inscription FREEZER s'affi chera ; appuyez sur les boutons
(+) et (-) jusqu'à atteindre la température désirée. Les températures affi chées sont fournies à titre indicatif uniquement.
(Image 1)
(Image 2)
11 IT
11 FR
Une fois branché, l'appareil indique, sur le panneau d'affi chage, la température recommandée pour le compartiment réfrigérateur, soit +5°C. Pour
le compartiment congélateur, l'appareil passe automatiquement à la température conseillée de -18°C.

12 IT
12 FR
OPTION SUPEROPTION SUPER CONGELATION - COMBINE ELECTRONIQUE
OPTION SUPERPANNES ET ERREURS - COMBINE ELECTRONIQUE
Chaque panne ou erreur est affi chée sur le bandeau d'affi chage qui indique alors un chiffre précédé de la lettre « E » (pour Erreur). Dans ce
cas, essayez d'éteindre et de rallumer l'appareil. Si l'erreur persiste, contactez l'assistance technique.
Dans le cas d'appareils dotés de la technologie NO FROST, le message « PF » (Power Fail - Panne de courant) apparaît sur l'affi cheur après
une coupure de courant. Dans le cas d'une coupure de plus de 10-12 heures, vérifi ez que les aliments n'ont pas été altérés pour pouvoir les
consommer dans les 24 heures ou alors cuisez-les avant de les cougeler.
(Image 4)
(Image 5)
(Image 3)
Arrêt Marche
Appareils ELECTRONIQUES sans technologie NO FROST : Appuyez sur la touche (+) afi n d'activer la fonction SUPER. Placez les aliments
à congeler dans le compartiment congélateur. A la fi n du temps préréglé, l'appareil quitte automatiquement la fonction SUPER. Si vous
souhaitez interrompre la fonction SUPER, vous pouvez à tout moment appuyer sur la touche (-).
Appareils ELECTRONIQUES avec technologie NO FROST : Appuyez sur la touche (+) afi n d'activer la fonction SUPER. 8 heures après,
placez les aliments devant être congelés dans le compartiment congélateur. A la fi n du temps préréglé, l'appareil quitte automatiquement la
fonction SUPER. Si vous souhaitez interrompre la fonction SUPER, vous pouvez à tout moment appuyer sur la touche (-).
La plaque de signalisation indique la quantité d'aliments maximale pouvant être congelée (Voir image 6).
Appuyez plusieurs fois sur la touche mode jusqu'à ce que SUPER soit affi ché.
Dans le cas d'une coupure de plus de 10-12 heures, vérifi ez que les aliments n'ont pas été altérés pour pouvoir les consommer dans les
24 heures ou alors cuisez-les avant de les cougeler.
COMBINE MECANIQUE - SANS AFFICHEUR
PANNEAU DE CONTROLE - COMBINE MECANIQUE
CONGELATION DU COMPARTIMENT CONGELATEUR - COMBINE MECANIQUE
Le thermostat commandant l'appareil se trouve en haut à droite l'intérieur du
réfrigérateur. Pour vérifi er que l'appareil fonctionne, assurez-vous que le bouton du
thermostat ne se trouve pas en position "0". Réglez le bouton selon la température
désirée dans le réfrigérateur.
Le compartiment réfrigérateur de ce produit est automatique dégivré.
Dans les appareils sans technologie NO FROST, la présence d'une légère couche de
givre ou de gouttes d'eau lorsque le congélateur fonctionne est normale.
Assurez-vous de toujours maintenir propre la zone d'évacuation d'eau. Assurez-vous
que les aliments ne soient pas en contact avec le fond ou les parois du réfrigérateur.
Important : Si la température de la pièce est trop élevée, il se peut que les
appareils sans technologie NO FROST fonctionnent en continu et qu'une
couche de givre se forme dans le fond du compartiment réfrigérateur. Dans
ce cas, tournez le bouton sur le réglage minimum.
Placez les aliments dans le tiroir du congélateur. Au début du processus de congélation, afi n de ne pas trop refroidir le compartiment réfrigérateur, il
peut être nécessaire de tourner le bouton du thermostat vers le haut ou le bas selon la charge et la température de la pièce. Replacez le thermostat
dans sa position habituelle une fois le processus de congélation terminé. La plaque de signalisation indique la quantité d'aliments maximale pouvant
être congelée. (Voir image 6).
Dans le cas d'un réfrigérateur sans affi cheur électronique, ouvrez la porte supérieure du réfrigérateur afi n d'accéder au panneau de contrôle
(boîtier thermostat).

DEGIVRAGE DU COMPARTIMENT CONGELATEUR - COMBINE MECANIQUE
Si un réfrigérateur dispose de la technologie NO FROST, il n'est pas nécessaire que l'on dégivre sa
partie congélateur car il est équipé d'un système automatique qui empêche la formation de givre.
Pour la version sans technologie NO FROST, nous vous recommandons de dégivrer manuellement
la partie congélateur lorsque la couche de givre dépasse 3 mm d'épaisseur. Tournez le bouton sur 0,
ouvrez la porte et placez les aliments dans un lieu frais. Laissez la porte ouverte aussi longtemps que
nécessaire pour que la couche de glace fonde. Séchez l'intérieur du congélateur avec une éponge/un
chiffon. Remettez les aliments et réinitialisez le bouton avec les valeurs habituelles.
N.B.: Ceci est la plaque de signalisation. Si vous devez contacter notre service après vente en
cas de dysfonctionnement, pensez à leur fournir les informations fi gurant sur la plaque.
N.B.: Pour une meilleure ventilation, laissez un peu d'espace
entre les aliments.
N.B.: Afi n de tester la capacité de consommation et de
conservation, retirez tous les tiroirs à l'exception de celui du
bas.
(Image 6)
DRAINAGE DE L'EAU - COMBINE MECANIQUE
Dans certains modèles de réfrigérateurs mécaniques (sans affi cheur) et sans technologie NO FROST, le congélateur possède un système de
drainage de l'eau pendant le dégivrage. Ce système est composé :
D'un plateau de dégivrage qui doit être tiré pour que l'eau s'écoule dans une bassine.
D'une cuvette de vidange (non fournie)
Pour les réfrigérateurs avec la technologie NO FROST, le système de drainage de l'eau est automatique pendant le dégivrage.
13 IT
13 FR
INVERSER LE SENS D'OUVERTURE DES PORTES
Positionnez ou basculez l'appareil à un angle de
45° car il est nécessaire d'intervenir sur le bas de
l'appareil.
Retirez la charnière du bas en retirant les vis, le
cache et les rondelles, puis enlevez la porte du bas.
Dévissez la charnière centrale et retirez la
porte du haut.
Dévissez la charnière de la porte du réfrigérateur
et installez celle fournie de l'autre côté.
Retirez les caches (A) et (B), dévissez les vis et
retirez partiellement le panneau en faisant attention
à ne pas endommager les pièces électriques qui
se trouvent derrière.
Dévissez la charnière de droite.
Fixez la charnière supérieure gauche que
vous trouverez dans le kit d'accessoires.
Installez le panneau et fi xez-le à l'aide des
vis et des caches.
Remontez les charnières et les portes en
partant du bas vers le haut, 1 2 3
2 heures
Placez l'appareil à la verticale et attendez
deux heures avant de le mettre en marche.
Le réglage de l'alignement des portes
s'effectue à partir de la charnière centrale.
REMARQUES POUR TOUS LES PRODUITS - ELECTRONIQUE ET MECANIQUE

KOELVRIESCOMBINATIE ELEKTRONISCH - MET DISPLAY
BEDIENINGSPANEEL - ELEKTRONISCHE KOELVRIESCOMBINATIE
Open de bovenste deur van de koelkast om toegang tot het bedieningspaneel te krijgen.
HET APPARAAT IN- EN UITSCHAKELEN
De elektronica van het apparaat wordt ingeschakeld zodra de stekker in het stopcontact gestoken wordt en blijft ingeschakeld totdat de stekker
uit het stopcontact wordt gehaald.
Als het licht op het display aangeeft dat het apparaat in de stand-by modus is, betekent dit dat de stekker in het stopcontact zit, maar het apparaat
niet in werking is. In dit geval drukt u op de knop MODE om het apparaat in werking te zetten. Om het apparaat uit te zetten en dus in de stand-by
modus, drukt u gedurende enkele seconden op de knop MODE.
INSTELLEN VAN HET KOELKASTCOMPARTIMENT
U kunt de temperatuur instellen door op de toetsen (+) en (-) te drukken. De temperatuur kan worden ingesteld tussen 1°C en 7°C. De door de
producent aanbevolen temperatuur is 5°C. Als u de temperatuur van het koelcompartiment instelt, zal FRIDGE op het display gaan knipperen.
In het geval dat uw apparaat is voorzien van de NO FROST technologie, zal het drukken op de (+) toets van 7 tot 1 de OFF modus doen
oproepen, wat er toe leidt dat het koelcompartiment wordt uitgeschakeld. Het display zal alleen de voor het vriescompartiment ingestelde
temperatuur weergeven. Om het vriescompartiment opnieuw te activeren, drukt op u op de knop MODE totdat FRIDGE stopt met knipperen.
Op dat moment is het mogelijk de temperatuur van het vriezercompartiment te wijzigen.
INSTELLEN VAN HET DIEPVRIESCOMPARTIMENT
Druk op de knop MODE om van de koelkast- naar de vriezermodus te schakelen. Vervolgens verschijnt het getal -18, d.w.z. de aanbevolen
temperatuur. U kunt de temperatuur binnen een bereik van -16°C tot -22°C instellen.
Voor elke variatie van de temperatuur nadat u op de knop MODE heeft gedrukt zal het woord FREEZER verschijnen, druk op de (+) en (-)
knoppen totdat u de gewenste temperatuur heeft bereikt. Het display geeft alleen indicatieve temperaturen weer.
(Afbeelding 1)
(Afbeelding 2)
14 IT
14 NL
Zodra het apparaat ingeschakeld wordt, zal de display de aanbevolen temperatuur voor het koelgedeelte weergeven (+5°C). Voor wat betreft
het vriescompartiment zal het apparaat automatisch naar de aanbevolen temperatuur van -18°C gaan.

15 IT
15 NL
SUPER OPTIEVRIEZEN / SUPER OPTIE - KOELVROESCOMBINATIE ELEKTRONISCH
SUPER OPTIEGEBREKEN EN STORINGEN - COMBI ELEKTRONISCH
Iedere fout of defect zal automatisch in de display weergegeven worden. Dit geschiedt door een getal dat voorafgegaan wordt door de letter "E"
(Error). Zet in een dergelijk geval het apparaat uit en schakel het daarna weer in. Blijft de fout bestaan, neem dan contact op met de technische
dienst.
Bij apparaten met NO FROST technologie, zal na een stroomonderbreking het bericht „PF” (stroomstoring) worden getoond op het display.
Als de stroomstoring langer dan 10-12 uur duurt, controleer dan of de levensmiddelen nog in goede staat zijn om binnen 24 uur geconsumeerd
te worden. Bereid de producten anders of vries de producten in.
(Afbeelding 4)
(Afbeelding 5)
(Afbeelding 3)
Uit Aan
ELEKTRONISCHE producten zonder NO FROST technologie: Druk op de (+) knop om de SUPER functie te activeren. Plaats de etenswaren
die u wilt gaan invriezen in het vriescompartiment. Aan het eind van de ingestelde tijd, zal het apparaat automatisch uit de SUPER functie
gaan. Indien u de SUPER functie voortijdig wilt verlaten drukt u op de (-) toets.
ELEKTRONISCHE producten met NO FROST technologie: Druk op de (+) toets om de SUPER functie te activeren. Na 8 uur plaatst u de
in te vriezen levensmiddelen in het diepvriescompartiment. Aan het eind van de ingestelde tijd, zal het apparaat automatisch uit de SUPER
functie gaan. Indien u de SUPER functie voortijdig wilt verlaten drukt u op de (-) toets.
Op het typeplaatje staat de maximum hoeveelheid etenswaren aangegeven die ingevroren kan worden, (zie afbeelding 6).
Druk op de knop MODE totdat de mededeling SUPER verschijnt.
Als de stroomstoring langer dan 10-12 uur duurt, controleer dan of de levensmiddelen nog in goede staat zijn om binnen 24 uur geconsumeerd
te worden. Bereid de producten anders of vries de producten in.
COMBI MECHANISCH - ZONDER DISPLAY
BEDIENIGSPANEEL - COMBI MECHANISCH
VRIEZEN VAN HET DIEPVRIESCOMPARTIMENT - COMBI MECHANISCH
De thermostaatregelaar van het apparaat bevindt zich rechtsboven in het
koelkastgedeelte. Om te controleren of het apparaat functioneert dient u erop te letten
dat de knop van de thermostaat niet op "0" staat. Stel de knop in op de gewenste
temperatuur in de koelkast.
Het diepvriescompartiment van dit product wordt automatisch ontdooid.
Bij producten zonder NO FROST technologie is de aanwezigheid van een dunne laag
ijs of waterdruppels normaal als de diepvriezer in gebruik is.
Controleer of de waterafvoer altijd schoon is. Zorg ervoor dat etenswaren NIET in
aanraking komen met de achterzijde of de zijkanten van het koelkastcompartiment.
Belangrijk: Als de kamertemperatuur relatief hoog is kan het zijn dat het
apparaat zonder NO FROST technologie voortdurend werkt en er ijsafzetting
op de achterkant van het koelkastcompartiment gevormd zal worden. Zet in
dit geval de knop op een lagere stand.
Plaats de levensmiddelen in de lade van de vriezer, aan het begin van het vriesproces, zonder het koelkastcompartiment extreem koud te maken. Het
kan nodig zijn de thermostaatknop omhoog of omlaag te bewegen, afhankelijk van de inhoud en de kamertemperatuur. Zodra het diepvriesproces
is voltooid dient de thermostaatknop op de normale waarde ingesteld te worden. Op het typeplaatje staat de maximum hoeveelheid etenswaren
aangegeven die ingevroren kan worden, (zie afbeelding 6).
Bij een koelkast zonder elektronisch display, dient u de bovenste deur te openen om het bedieningspaneel te bereiken (thermostaatruimte).

ONTDOOIEN VAN HET DIEPVRIESCOMPARTIMENT - COMBI MECHANISCH
Bij een koelkast met NO FROST technologie hoeft het diepvriescompartiment niet ontdooid te worden,
omdat dit apparaat voorzien is van een automatisch systeem dat ijsvorming voorkomt.
Bij apparaten zonder NO FROST technologie, raden wij u aan om het diepvriescompartiment handmatig
te ontdooien als de ijsafzetting dikker dan 3 mm is. Draai de knop naar "0", open de deur en plaats de
levensmiddelen in een koele omgeving. Laat de deur net zo lang open tot de ijslaag gesmolten is. Droog
de binnenzijde van het diepvriescompartiment af met een spons/doek. Plaats de levensmiddelen weer
terug en zet de knop weer in de gebruikelijke stand.
NB: Dit is het typeplaatje. Als u contact op moet nemen met onze onderhoudsdienst in het
geval van storingen, verstrek dan de informatie op dit plaatje.
NB: laat voor een betere luchtcirculatie wat ruimte tussen de
levensmiddelen.
NB: verwijder voor het TESTEN van de consumptie- en conserve
ringsstandaarden, alle lades behalve de onderste.
(Afbeelding 6)
WATERAFVOER - COMBI MECHANISCH
Bij sommige modellen mechanische koelkasten (zonder display) en zonder NO FROST technologie, heeft de vriezer een systeem om water af te
voeren tijdens het ontdooien. Dit systeem bestaat uit:
Een druppelplateau dat uitgetrokken moet worden zodat het water in een waterafvoerbak
kan stromen.
Een waterafvoerbak (niet meegeleverd).
Bij koelkasten met NO FROST technologie, verloopt het waterafvoersysteem bij het ontdooien automatisch.
16 IT
16 NL
HET WIJZIGEN VAN DE MANIER WAAROP DE DEUREN OPENEN
Zet de koelkast onder een hoek van 45°, zodat u
aan de onderzijde van het apparaat kunt werken
Verwijder het onderste scharnier door de
schroeven, dopjes en ringen te verwijderen, en
verwijder vervolgens de onderste deur
Schroef het middelste scharnier los en
verwijder de bovenste deur
Schroef het scharnier van de koelkastdeur los
en bevestig het meegeleverde scharnier aan de
andere zijde.
Verwijder de dopjes (A) en (B), draai de schroeven
los en verwijder deze; verwijder het paneel
gedeeltelijk, let op dat u het achterliggende
elektrische gedeelte niet beschadigt.
Schroef het rechterscharnier los
Monteer het links-boven-scharnier dat zich
in de accessoirekit bevindt
Monteer het paneel, draai de schroeven vast
en breng de dopjes aan.
Breng de scharnieren en deuren weer aan door
van onder naar boven te werken, 1 2 3
2 uur
Zet het apparaat rechtop en wacht twee uur
voordat u het apparaat inschakelt.
U kunt de deuren uitlijnen door het middelste
scharnier bij te stellen.
AANTEKEINGEN VOOR ALLE PRODUCTEN - ELECTRONISCH EN MECHANISCH

COMBINADO ELETRÓNICO CON DISPLAY
PANEL DE CONTROL - CONGELADOR ELECTRÓNICO COMBINADO
Abra la puerta superior del frigorífi co para acceder a la caja panel de mandos.
ENCENDIDO Y APAGADO DEL PRODUCTO
El producto está electrónicamente alimentado conectando el cable de alimentación a la toma de red y permanecerá encendido hasta sacar dicho
cable.
La luz en la pantalla indica que el producto está en modo en espera, y por lo tanto, que está conectado al enchufe de red pero no está funcionando.
En este caso, pulse simplemente el botón de MODO para activar el producto. Para desactivar el producto y por lo tanto, ponerlo en modo en
espera, pulse el botón de MODO durante varios segundos.
AJUSTE DEL COMPARTIMENTO DEL FRIGORÍFICO
Es posible cambiar la temperatura pulsando los botones (+) y (-). La temperatura puede cambiarse de 1 a 7. La temperatura aconsejada por
la empresa de fabricación es 5. Cuando confi gure la temperatura del compartimento del frigorífi co, la pantalla del FRIGORÍFICO empezará a
pestañear.
Para los productos equipados con tecnología ANTI HIELO, pulse el botón (+) de 7 a 1 para pasar al modo DESCONECTADO, que podrá
utilizarse para desactivar el compartimento del frigorífi co. La pantalla sólo mostrará la temperatura fi jada para el compartimento del
congelador. Con vistas a reactivar el compartimento del frigorífi co, presione el botón de MODO hasta que el modo de frigorífi co deje de
pestañear, y en este punto, podrá cambiar la temperatura del compartimento del frigorífi co.
AJUSTE DEL COMPARTIMENTO DEL CONGELADOR
Es posible pasar del modo del FRIGORÍFICO al modo del CONGELADOR pulsando el botón "MODE" (MODO). A continuación, el mensaje 17
aparecerá en pantalla, indicándole la temperatura aconsejada. Es posible modifi car la temperatura de -16°C a -22°C.
Para cualquier cambio de temperatura tras pulsar el botón de MODO, la palabra CONGELADOR aparecerá, pulse los botones (+) y (-) hasta
que alcance la temperatura deseada. Las temperaturas de la pantalla son sólo indicativas.
(Figura 1)
(Figura 2)
17IT
17 ES
Una vez que se ha conectado la toma, el producto mostrará la temperatura recomendada para el compartimento del frigorífi co en la pantalla +5°C.
Para el compartimento del frigorífi co, el producto pasará automáticamente a la temperatura recomendada de -18°C.

18IT
18 ES
OPCIÓN SÚPERCONGELADO/ OPCIÓN SÚPER - CONGELADOR ELECTRÓNICO COMBINADO
OPCIÓN SÚPERFALLOS Y ERRORES - COMBINADO ELECTRÓNICO
Cada error o fallo aparecerá indicado automáticamente en la pantalla, en donde se mostrará un número precedido de la letra "E"(Error). En este
caso, intente apagar el producto y vuelva a encenderlo de nuevo. Si el error persiste, póngase en contacto con la asistencia técnica.
Para los productos equipados con tecnología SIN HIELO, tras un corte de alimentación, el mensaje "PF” (Fallo energético) aparecerá en
pantalla. Si la interrupción de electricidad durante más de 10 o 12 horas, compruebe que los alimentos permanecen en buen estado para
poder consumirlos en un plazo de 24 horas, cocinarlos o congelarlos.
(Figura 4)
(Figura 5)
(Figura 3)
Apagado Encendido
Los productos ELECTRÓNICOS sin tecnología ANTI HIELO: Pulse el botón (+) para poder activar la función SÚPER. Coloque los alimentos
que desea congelar en el compartimento del congelador. Al fi nal del tiempo confi gurado, el producto saldrá automáticamente de la función
SÚPER. Si desea interrumpir la función SÚPER de forma anticipada, pulse el botón (-).
Los productos ELECTRÓNICOS con tecnología ANTI HIELO: Pulse el botón (+) para poder activar la función SÚPER. Al cabo de 8
horas, coloque los alimentos que desea congelar en el compartimento del congelador. Al fi nal del tiempo confi gurado, el producto saldrá
automáticamente de la función SÚPER. Si desea interrumpir la función SÚPER de forma anticipada, pulse el botón (-).
La placa indicadora muestra la cantidad máxima de comida que puede ser congelada, (véase fi gura 6).
Pulse el botón de modo repetidamente hasta que aparezca el mensaje SÚPER.
Si la interrupción de electricidad durante más de 10 o 12 horas, compruebe que los alimentos permanecen en buen estado para poder
consumirlos en un plazo de 24 horas, cocinarlos o congelarlos.
COMBINADO MECÁNICO - SIN DISPLAY
PANEL DE CONTROL - COMBINADO MECÁNICO
CONGELACIÓN DEL COMPARTIMENTO DEL CONGELADOR - COMBINADO MECÁNICO
La caja del termostato que controla la aplicación se encuentra ubicada dentro del
compartimento del frigorífi co en la zona superior derecha. Para comprobar si la
aplicación está funcionando, asegúrese de que la rueda del termostato no esté fi jada
en "0". Ajuste la rueda según la temperatura deseada en el frigorífi co.
En este producto, el compartimento del congelador se descongela automáticamente.
En los productos sin tecnología ANTI HIELO, la presencia de una ligera capa de hielo
o gotas de agua durante el funcionamiento del congelador es normal.
Asegúrese de mantener siempre limpio el desagüe. Asegúrese de que las comidas
no tocan la parte trasera del compartimento del congelador.
Importante: Si la temperatura de la habitación es muy alta, el aparato sin
tecnología ANTI HIELO seguirá funcionando pero una capa de hielo se
formará en la parte trasera del compartimento del frigorífi co. En este caso,
gire el interruptor y sitúelo en posición mínima.
Coloque los alimentos en el cajón del congelador, y al principio del proceso de congelación, no ponga demasiado frío el compartimento del
frigorífi co, ya que quizás tenga que girar el termostato hacia arriba o hacia abajo en función de la carga y de la temperatura de la habitación. Una
vez que se complete el proceso de congelación, gire la rueda del termostato hasta alcanzar su valor habitual. La placa indicadora muestra la
cantidad máxima de comida que puede ser congelada, (véase fi gura 6).
En el caso de un frigorífi co sin pantalla electrónica, abra la puerta superior del frigorífi co para alcanzar el panel de control (caja del
termostato).

DESCONGELACIÓN DEL COMPARTIMENTO DEL CONGELADOR - COMBINADO MECÁNICO
Gracias a la tecnología del frigorífi co con sistema SIN HIELO, el compartimento del congelador no necesita ser
descongelado ya que este producto está equipado con un sistema automático que evita la formación del hielo;
Para la versión sin tecnología SIN HIELO, le aconsejamos que descongele manualmente la zona del
congelador cuando la capa de hielo alcance un grosor de más de 3 mm. Gire la rueda hasta "0", abra
la puerta y coloque los alimentos en un lugar frío. Deje la puerta abierta durante el tiempo necesario
hasta que se funda la capa de hielo. Seque el interior del congelador con una esponja o paño. Vuelva
a colocar los alimentos y fi je la rueda en sus valores normales.
Nota: Esta es la placa indicadora Si necesita contactar con nuestro servicio de atención al cliente
en caso de fallos o defectos, no olvide indicarle la información contenida en dicha placa.
Nota: Para lograr una mejora circulación del aire, deje un espacio
entre los alimentos.
Nota: Para PROBAR los niveles de consumo y conservación de
los alimentos, saque todos los cajones menos el del fondo.
(Figura 6)
DRENAJE DE AGUA - COMBINADO MECÁNICO
En algunos modelos de refrigeradores mecánicos (sin pantalla) y sin tecnología SIN HIELO, el congelador tiene un sistema para el drenaje de
agua durante la descongelación. Este sistema comprende:
Una bandeja de drenaje que debe empujarse para que el agua pueda fl uir hacia un barreño.
Pila de desagüe (no suministrada con el producto).
En los frigorífi cos con tecnología SIN HIELO, el sistema para escurrir el agua mientras realiza la descongelación es automático.
19IT
19 ES
INVERTIR EL SENTIDO DE APERTURA DE LAS PUERTAS
Coloque o incline el frigorífi co respetando un
ángulo de 45°, ya que será necesario para poder
trabajar sobre la parte inferior del aparato.
Saque la bisagra inferior, desatornillando las
tuercas, sacando el enchufe y las arandelas y a
continuación, saque la puerta inferior.
Desatornille la bisagra central y saque la
puerta superior
Desajuste la bisagra de la puerta del refrigerador
e instale la bisagra de la parte opuesta.
Saque los topes (A) y (B), afl oje las tuercas y
saque y retire parcialmente el panel, teniendo
cuidado de no dañar la parte eléctrica trasera.
Desapriete la bisagra derecha.
Ajuste la bisagra del lado superior izquierdo
que se encuentra en su kit de accesorios.
Ajuste la panel de mandos y refuerce todo el
conjunto con ayuda de los tornillos y las tapas.
Una las bisagras y las puertas de arriba a
abajo. 1 2 3
2 horas
Coloque el aparato en posición vertical y espere
durante dos horas antes de encenderlo.
Para obtener la alineación adecuada de las
puertas, es necesario que trabaje en la bisagra
intermedia.
NOTAS PARA TODOS LOS PRODUCTOS - ELECTRÓNICOS Y MECÁNICOS
La pagina si sta caricando...
La pagina si sta caricando...
La pagina si sta caricando...
La pagina si sta caricando...
La pagina si sta caricando...
La pagina si sta caricando...
La pagina si sta caricando...
La pagina si sta caricando...
La pagina si sta caricando...
La pagina si sta caricando...
La pagina si sta caricando...
La pagina si sta caricando...
La pagina si sta caricando...
La pagina si sta caricando...
La pagina si sta caricando...
La pagina si sta caricando...
La pagina si sta caricando...
La pagina si sta caricando...
La pagina si sta caricando...
La pagina si sta caricando...
La pagina si sta caricando...
La pagina si sta caricando...
La pagina si sta caricando...
La pagina si sta caricando...
La pagina si sta caricando...
-
 1
1
-
 2
2
-
 3
3
-
 4
4
-
 5
5
-
 6
6
-
 7
7
-
 8
8
-
 9
9
-
 10
10
-
 11
11
-
 12
12
-
 13
13
-
 14
14
-
 15
15
-
 16
16
-
 17
17
-
 18
18
-
 19
19
-
 20
20
-
 21
21
-
 22
22
-
 23
23
-
 24
24
-
 25
25
-
 26
26
-
 27
27
-
 28
28
-
 29
29
-
 30
30
-
 31
31
-
 32
32
-
 33
33
-
 34
34
-
 35
35
-
 36
36
-
 37
37
-
 38
38
-
 39
39
-
 40
40
-
 41
41
-
 42
42
-
 43
43
-
 44
44
-
 45
45


Hoover HNC 182 AE Manuale utente
- Categoria
- Congelatori
- Tipo
- Manuale utente
Documenti correlati
-
Hoover HVNP 3884 Manuale utente
-
Hoover HCP 1860 I Manuale utente
-
Candy CSCN 6615/1E Manuale utente
-
-
Hoover-Helkama HCP 3786 Manuale utente
-
Hoover CFDE 4484 Manuale utente
-
-
Otsein-Hoover CFM 2260 E Manuale utente
-
Otsein-Hoover HCNP 4274 Manuale utente
-
ROSIERES RBLA 170 Manuale utente
Altri documenti
-
Terzismo COTG1280XL Manuale utente
-
Electrolux SB318NFCN Manuale utente
-
-
AEG ABN3201 Manuale utente
-
Candy CFBC 3160 E Manuale utente
-
Candy CKDS 5142X Manuale utente
-
-
-